2012 MERCEDES-BENZ S-CLASS SEDAN check oil
[x] Cancel search: check oilPage 13 of 536

Inserting/loading (Rear Seat
Entertainment System) ..................255
Notes on discs ............................... 234
Removing/ejecting (Rear Seat
Entertainment System) ..................256
Selecting a media type ..................228
Selecting a track ............................ 229
Sound settings (balance, bass,
fader, treble) .................................. 139
DVD audio
Operating (on-board computer) .....381
DVD video
Operating (on-board computer) .....381
E
EASY-ENTRY feature Activating (COMAND) ....................266
Function/notes ............................. 115
EASY-EXIT feature
Activating (COMAND) ....................266
Crash-responsive ........................... 115
Function/notes ............................. 115
EBD (electronic brake force
distribution) Display message ............................ 394
Function/notes ................................ 77
ECO function ...................................... 265
ECO start/stop function Deactivating/activating .................311
General information .......................310
Electrical fuses
see Fuses
Electronic brake force distribution
see EBD (electronic brake force
distribution)
Electronic Stability Program
see ESP ®
(Electronic Stability Program)
Electronic Traction System
see ETS/4ETS (Electronic
Traction System)
Emergency release
Driver's door .................................... 90
Trunk ......................................... 94, 95
Vehicle ............................................. 90
Emergency spare wheel
Storage location ............................ 474
Emergency Tensioning Devices
Function ........................................... 65
Safety guidelines ............................. 49
Emissions control
Service and warranty information ....28
Engine
Check Engine warning lamp ........... 429
Display message ............................ 406
ECO start/stop function ................310
Engine number ............................... 524
Irregular running ............................ 313
Jump-starting ................................. 483
Starting problems ..........................313
Starting the engine with the key ....309
Starting with KEYLESS-GO .............309
Switching off .................................. 327
Tow-starting (vehicle) ..................... 487
Engine electronics
Problem (malfunction) ...................313
Engine emergency stop .................... 490
Engine oil Adding ........................................... 462
Additives ........................................ 529
Checking the oil level ..................... 459
Checking the oil level using the
dipstick .......................................... 460
Checking the oil level using the
on-board computer ........................460
Display message ............................ 408
Filling capacity ............................... 529
Notes about oil grades ................... 528
Notes on oil level/consumption ....459
Temperature (on-board computer) . 381
Viscosity ........................................ 529
Entering the frequency ..................... 217
Entry Deleting ......................................... 135
Saving ............................................ 137
ESP ®
(Electronic Stability
Program) Deactivating/activating .................386
Deactivating/activating (notes) .......76
Display message ............................ 391
ETS/4ETS ........................................ 76
Function/notes ................................ 75
Important safety information ...........75
Warning lamp ................................. 426Index11
Page 23 of 536
Important safety notes ..................107
Multicontour seat .......................... 112
Seat heating problem ....................113
Seat ventilation problem ................114
Selecting (COMAND) .....................274
Storing settings (memory
function) ........................................ 118
Switching seat heating on/off .......113
Switching seat ventilation on/off ..113
Selecting stations (radio)
Using station presets .....................216
Using station search ......................216
Sending DTMF tones ......................... 207
Sensors (cleaning instructions) ....... 470
Service Center see Qualified specialist workshop
Service interval display
Displaying service messages .........465
Hiding service messages ...............465
Notes ............................................. 465
Service messages ..........................465
Service menu (on-board computer) . 387
Service products Brake fluid ..................................... 529
Coolant (engine) ............................ 530
DEF special additives .....................527
Engine oil ....................................... 528
Fuel ................................................ 525
Important safety notes ..................524
Washer fluid ................................... 531
Setting a station (radio)
Via manual frequency entry ...........217
Settings
Display ........................................... 147
Menu overview .............................. 125
On-board computer .......................387
Picture (COMAND) .........................244
Picture (Rear Seat Entertainment
System) ......................................... 253
Sound settings ............................... 139
System settings ............................. 147
Setting the language
COMAND ....................................... 153
Rear Seat Entertainment System ...262
Setting the night design ................... 147
Setting the text reader speed .......... 149
Setting the vehicle level ................... 349Setting the volume
Telephone calls .............................. 138
Video AUX ..................................... 250
Side impact air bag ............................. 52
Side marker lamp (display
message) ............................................ 405
Side windows Convenience closing feature ............97
Convenience opening feature ..........96
Important safety information ...........95
Opening/closing .............................. 96
Problem (malfunction) .....................98
Resetting ......................................... 98
Sliding sunroof
Important safety notes ....................98
Opening/closing .............................. 99
Problem (malfunction) ...................103
Resetting ....................................... 100
see Panorama roof with power
tilt/sliding panel
SmartKey
Changing the battery .......................85
Changing the programming .............84
Checking the battery .......................85
Convenience closing feature ............97
Convenience opening feature ..........96
Display message ............................ 421
Door central locking/unlocking .......82
Important safety notes ....................82
Loss ................................................. 87
Mechanical key ................................ 84
Positions (ignition lock) .................307
Problem (malfunction) .....................87
Starting the engine ........................309
SMS message
see Text message
Snow chains ...................................... 495
Socket Glove box ....................................... 444
Sockets
Points to observe before use .........443
Rear compartment .........................444
Trunk ............................................. 444
Sound menu ....................................... 139
Sounds see Sound settings Index21
Page 85 of 536

:& Locks the vehicle;F Unlocks the trunk lid=% Unlocks the vehicle
When unlocking, the turn signals flash once.
When locking, they flash three times.
When it is dark, the surround lighting also
comes on if it is activated in COMAND
( Y page 268).
If you activate the acoustic locking
confirmation function you will hear the
following, depending on the date of
production of the vehicle:
R an acoustic signal when locking
or
R one acoustic signal when unlocking and
three when locking.
The audible signal can be activated and
deactivated using the on-board computer
( Y page 388).
XTo unlock centrally: press the %
button.
If you do not open the vehicle within
approximately 40 seconds of unlocking:
R the vehicle is locked again.
R the theft deterrent locking system is armed
again.
XTo lock centrally: press the & button.KEYLESS-GO
Important notes on the use of KEYLESS-
GO
R Do not keep the KEYLESS-GO key together
with:
- electronic devices, e.g. a mobile phone
or another key
- metallic objects, e.g. coins or metal foil.
This can affect the functionality of
KEYLESS-GO.
R Bear in mind that the engine can be started
by any of the vehicle occupants if there is
a KEYLESS-GO key in the vehicle.
Locking and unlocking centrally
You can start, lock or unlock the vehicle using
KEYLESS-GO. To do this, you only need carry
the SmartKey with you. You can combine the
KEYLESS-GO functions with those of a
conventional key, e.g. using KEYLESS-GO to
unlock and pressing the & button to lock.
When locking and unlocking using KEYLESS-
GO, the distance between the SmartKey and
the corresponding door handle must not
exceed 3 ft (1 m).
KEYLESS-GO checks whether a valid key is in
the vehicle by periodically establishing a radio
connection between the vehicle and the key.
This happens:
R when the external door handles are
touched
R when starting the engine
R while the vehicle is in motion
SmartKey83Opening/closingZ
Page 323 of 536
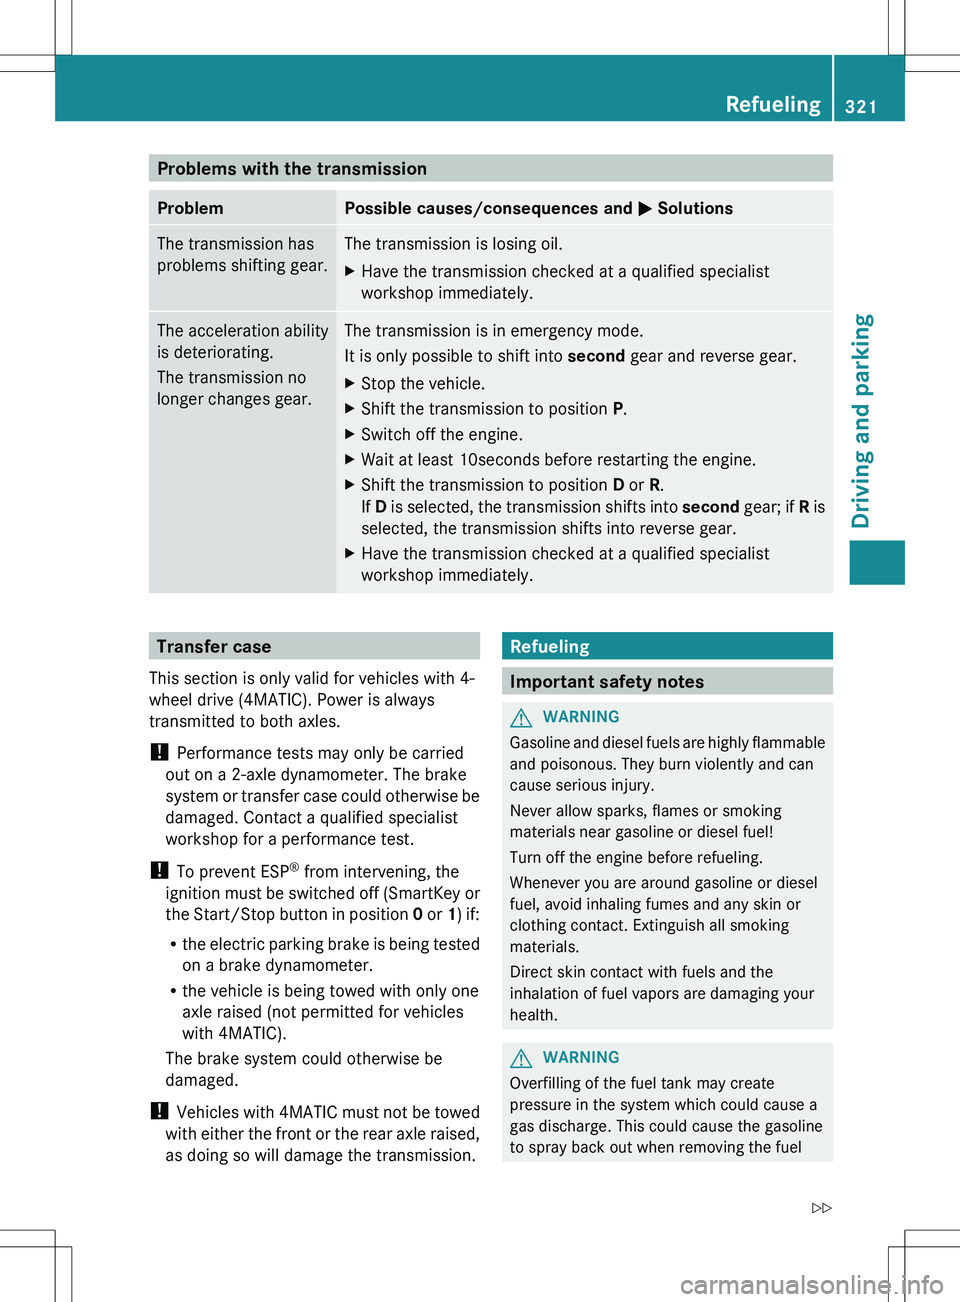
Problems with the transmissionProblemPossible causes/consequences and M SolutionsThe transmission has
problems shifting gear.The transmission is losing oil.XHave the transmission checked at a qualified specialist
workshop immediately.The acceleration ability
is deteriorating.
The transmission no
longer changes gear.The transmission is in emergency mode.
It is only possible to shift into second gear and reverse gear.XStop the vehicle.XShift the transmission to position P.XSwitch off the engine.XWait at least 10seconds before restarting the engine.XShift the transmission to position D or R.
If D is selected, the transmission shifts into second gear; if R is
selected, the transmission shifts into reverse gear.XHave the transmission checked at a qualified specialist
workshop immediately.Transfer case
This section is only valid for vehicles with 4-
wheel drive (4MATIC). Power is always
transmitted to both axles.
! Performance tests may only be carried
out on a 2-axle dynamometer. The brake
system or transfer case could otherwise be
damaged. Contact a qualified specialist
workshop for a performance test.
! To prevent ESP ®
from intervening, the
ignition must be switched off (SmartKey or
the Start/Stop button in position 0 or 1) if:
R the electric parking brake is being tested
on a brake dynamometer.
R the vehicle is being towed with only one
axle raised (not permitted for vehicles
with 4MATIC).
The brake system could otherwise be
damaged.
! Vehicles with 4MATIC must not be towed
with either the front or the rear axle raised,
as doing so will damage the transmission.Refueling
Important safety notes
GWARNING
Gasoline and diesel fuels are highly flammable
and poisonous. They burn violently and can
cause serious injury.
Never allow sparks, flames or smoking
materials near gasoline or diesel fuel!
Turn off the engine before refueling.
Whenever you are around gasoline or diesel
fuel, avoid inhaling fumes and any skin or
clothing contact. Extinguish all smoking
materials.
Direct skin contact with fuels and the
inhalation of fuel vapors are damaging your
health.
GWARNING
Overfilling of the fuel tank may create
pressure in the system which could cause a
gas discharge. This could cause the gasoline
to spray back out when removing the fuel
Refueling321Driving and parkingZ
Page 379 of 536
Menus and submenus
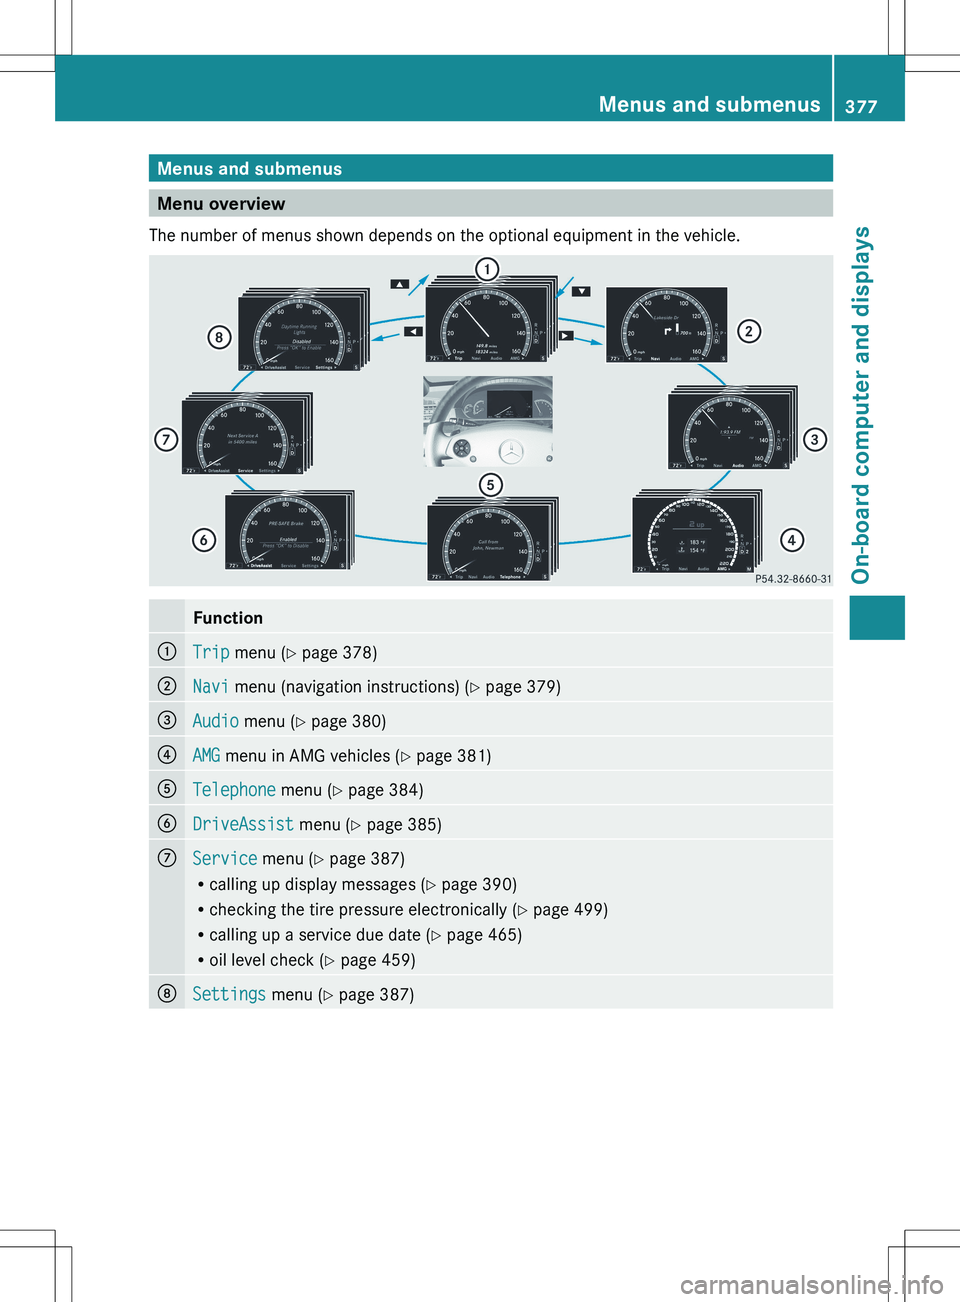
Menu overview
The number of menus shown depends on the optional equipment in the vehicle.
Function:Trip menu ( Y page 378);Navi menu (navigation instructions) ( Y page 379)=Audio menu ( Y page 380)?AMG menu in AMG vehicles ( Y page 381)ATelephone menu (Y page 384)BDriveAssist menu (Y page 385)CService menu (Y page 387)
R calling up display messages ( Y page 390)
R checking the tire pressure electronically ( Y page 499)
R calling up a service due date ( Y page 465)
R oil level check ( Y page 459)DSettings menu (Y page 387)Menus and submenus377On-board computer and displaysZ
Page 389 of 536
activating/deactivating Blind Spot
Assist
You can use the Blind Spot Assist
function to activate or deactivate Blind Spot
Assist ( Y page 363) or Active Blind Spot
Assist ( Y page 367).
XPress the = or ; button on the
steering wheel to select the DriveAssist
menu.XPress 9 or : to select Blind Spot
Assist .XPress the a button.
The current selection is displayed.XTo activate/deactivate: press the a
button again.
activating/deactivating Lane Keeping
Assist
You can use the Lane Keeping Assist
function to activate/deactivate Lane Keeping
Assist ( Y page 365) or Active Lane Keeping
Assist ( Y page 369).
XPress the = or ; button on the
steering wheel to select the DriveAssist
menu.XPress 9 or : to select Lane
Keeping Assist .XPress the a button.
The current selection is displayed.XTo activate/deactivate: press the a
button again.
When Lane Keeping Assist or Active Lane
Keeping Assist is activated, the à symbol
appears in the multifunction display when the
ignition is on.
Service menu
In the Service menu, you have the following
options:
R call up display messages ( Y page 390)
R check the tire pressure electronically
( Y page 499)
R
call up the service due date ( Y page 465)
R check the oil level ( Y page 459)
Settings menu
Introduction
The Settings menu can be used for:
R Switching the daytime running lamps on/
off
R switching Adaptive Highbeam Assist on/
off
R showing or hiding the additional
speedometer
R selecting the units for speed and distance
R switching the belt adjustment on/off
R activating/deactivating the radar sensor
system
Switching the daytime running lamps
on/off
This function is not available in Canada.
If you have activated the Daytime running
lights function and the light switch is in the
$ or c position, the daytime running
lamps are automatically switched on when
the engine is running.
Depending on the ambient light, the following
will additionally light up:
R parking lamps
R tail lamps
R license plate lamp
R side marker lamps
If you turn the light switch to a different
position, the corresponding lights are
switched on. If you switch off the daytime
running lamps at night, make sure that the
light switch is set to L or c .
The factory setting is On.
Menus and submenus387On-board computer and displaysZ
Page 410 of 536
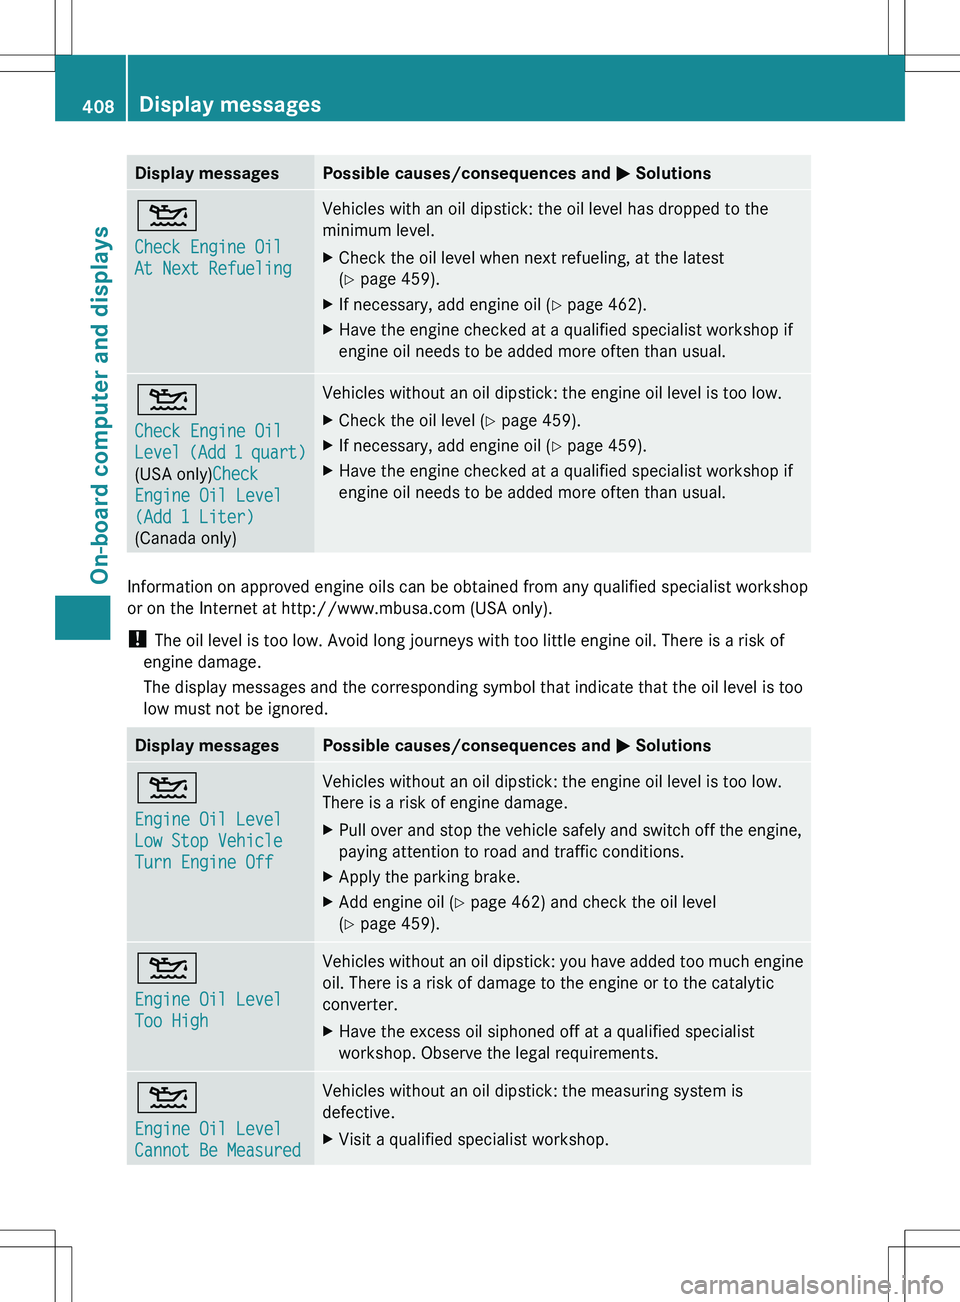
Display messagesPossible causes/consequences and M Solutions4
Check Engine Oil
At Next RefuelingVehicles with an oil dipstick: the oil level has dropped to the
minimum level.XCheck the oil level when next refueling, at the latest
( Y page 459).XIf necessary, add engine oil ( Y page 462).XHave the engine checked at a qualified specialist workshop if
engine oil needs to be added more often than usual.4
Check Engine Oil
Level (Add 1 quart)
(USA only) Check
Engine Oil Level
(Add 1 Liter)
(Canada only)Vehicles without an oil dipstick: the engine oil level is too low.XCheck the oil level ( Y page 459).XIf necessary, add engine oil ( Y page 459).XHave the engine checked at a qualified specialist workshop if
engine oil needs to be added more often than usual.
Information on approved engine oils can be obtained from any qualified specialist workshop
or on the Internet at http://www.mbusa.com (USA only).
! The oil level is too low. Avoid long journeys with too little engine oil. There is a risk of
engine damage.
The display messages and the corresponding symbol that indicate that the oil level is too
low must not be ignored.
Display messagesPossible causes/consequences and M Solutions4
Engine Oil Level
Low Stop Vehicle
Turn Engine OffVehicles without an oil dipstick: the engine oil level is too low.
There is a risk of engine damage.XPull over and stop the vehicle safely and switch off the engine,
paying attention to road and traffic conditions.XApply the parking brake.XAdd engine oil ( Y page 462) and check the oil level
( Y page 459).4
Engine Oil Level
Too HighVehicles without an oil dipstick: you have added too much engine
oil. There is a risk of damage to the engine or to the catalytic
converter.XHave the excess oil siphoned off at a qualified specialist
workshop. Observe the legal requirements.4
Engine Oil Level
Cannot Be MeasuredVehicles without an oil dipstick: the measuring system is
defective.XVisit a qualified specialist workshop.408Display messagesOn-board computer and displays
Page 414 of 536
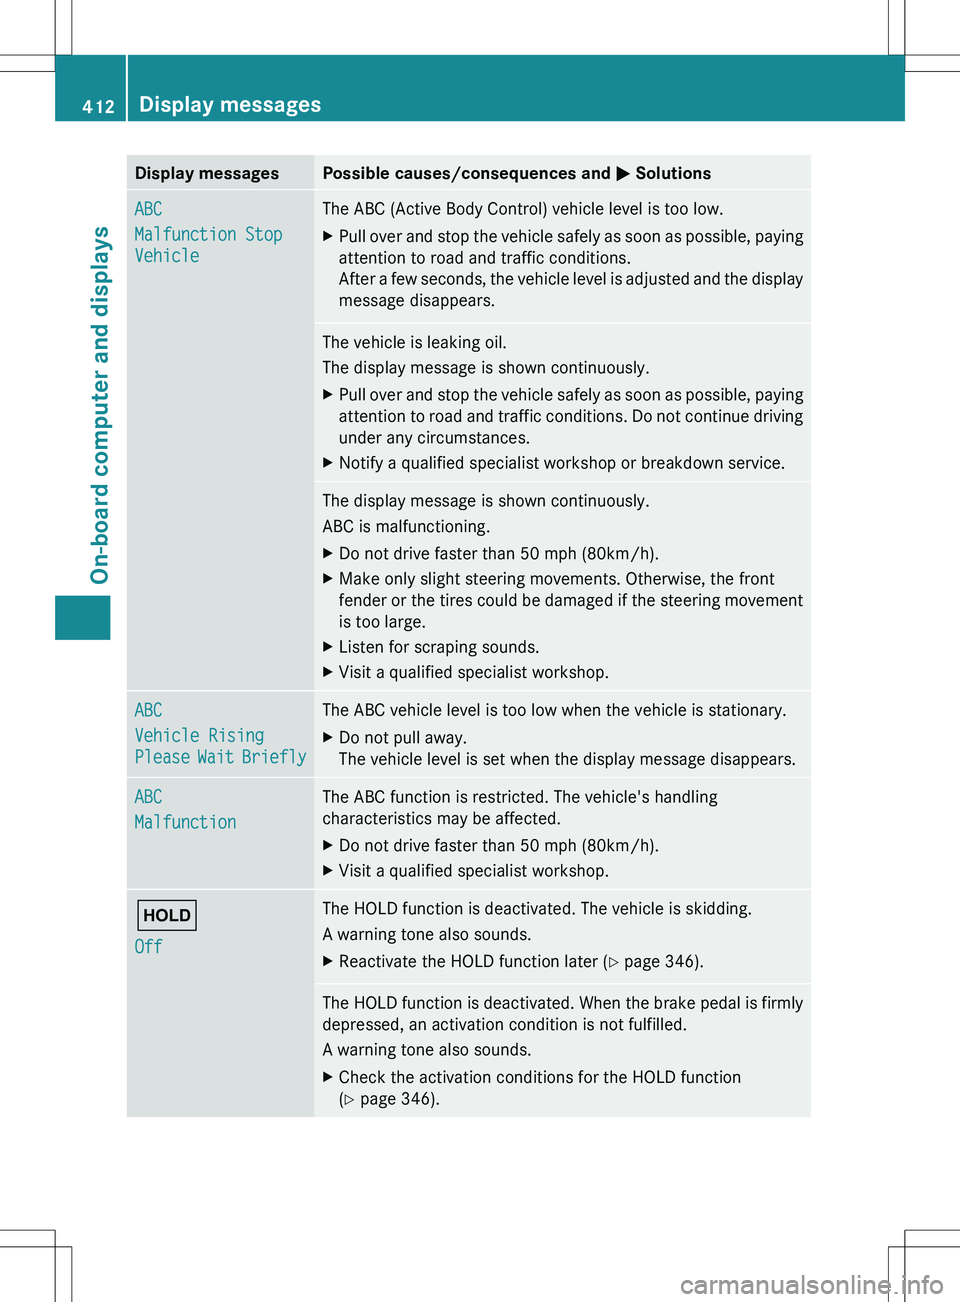
Display messagesPossible causes/consequences and M SolutionsABC
Malfunction Stop
VehicleThe ABC (Active Body Control) vehicle level is too low.XPull over and stop the vehicle safely as soon as possible, paying
attention to road and traffic conditions.
After a few seconds, the vehicle level is adjusted and the display
message disappears.The vehicle is leaking oil.
The display message is shown continuously.XPull over and stop the vehicle safely as soon as possible, paying
attention to road and traffic conditions. Do not continue driving
under any circumstances.XNotify a qualified specialist workshop or breakdown service.The display message is shown continuously.
ABC is malfunctioning.XDo not drive faster than 50 mph (80km/h).XMake only slight steering movements. Otherwise, the front
fender or the tires could be damaged if the steering movement
is too large.XListen for scraping sounds.XVisit a qualified specialist workshop.ABC
Vehicle Rising
Please Wait BrieflyThe ABC vehicle level is too low when the vehicle is stationary.XDo not pull away.
The vehicle level is set when the display message disappears.ABC
MalfunctionThe ABC function is restricted. The vehicle's handling
characteristics may be affected.XDo not drive faster than 50 mph (80km/h).XVisit a qualified specialist workshop.ë
OffThe HOLD function is deactivated. The vehicle is skidding.
A warning tone also sounds.XReactivate the HOLD function later ( Y page 346).The HOLD function is deactivated. When the brake pedal is firmly
depressed, an activation condition is not fulfilled.
A warning tone also sounds.XCheck the activation conditions for the HOLD function
( Y page 346).412Display messagesOn-board computer and displays