2012 MERCEDES-BENZ S-CLASS SEDAN check engine
[x] Cancel search: check enginePage 462 of 536
consumption may be higher than this when
the vehicle is new or if you frequently drive at
high engine speeds.
On vehicles with a 12-cylinder engine, the oil
level can be checked using the on-board
computer. On all other models, the oil
dipstick must be used to check the engine oil
level.
Depending on the engine, the oil dipstick may
be in a different location.
When checking the oil level:
R park the vehicle on a level surface.
R the engine should be switched off for
approximately five minutes if the engine is
at normal operating temperature.
R if the engine is not at normal operating
temperature, e.g. if the engine was only
started briefly: wait about 30 minutes
before carrying out the measurement.Checking the oil level using the oil
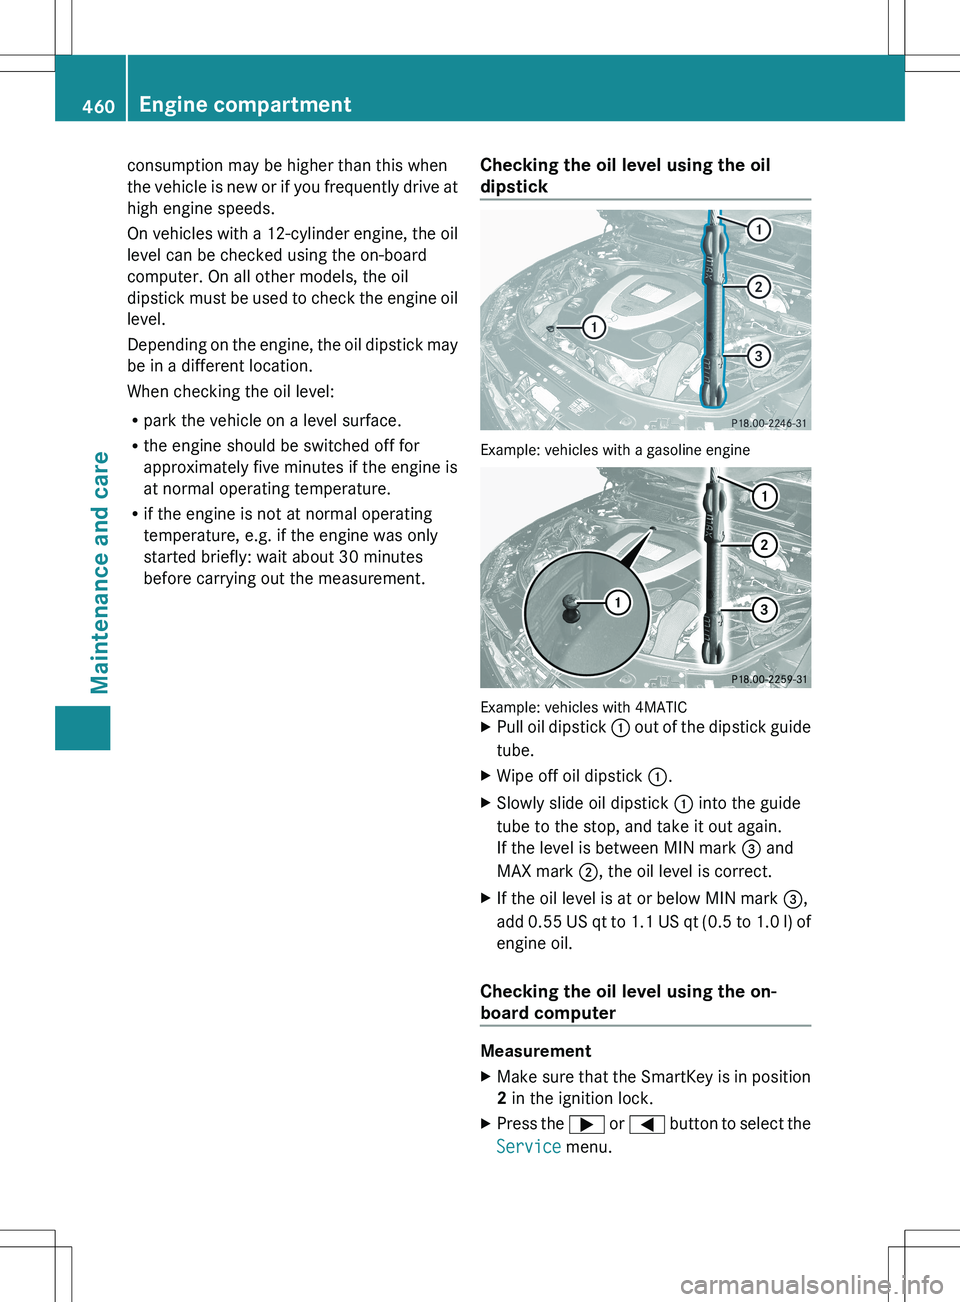
dipstick
Example: vehicles with a gasoline engine
Example: vehicles with 4MATIC
XPull oil dipstick : out of the dipstick guide
tube.XWipe off oil dipstick :.XSlowly slide oil dipstick : into the guide
tube to the stop, and take it out again.
If the level is between MIN mark = and
MAX mark ;, the oil level is correct.XIf the oil level is at or below MIN mark =,
add 0.55 US qt to 1.1 US qt ( 0.5 to 1.0 l) of
engine oil.
Checking the oil level using the on-
board computer
Measurement
XMake sure that the SmartKey is in position
2 in the ignition lock.XPress the ; or = button to select the
Service menu.460Engine compartmentMaintenance and care
Page 464 of 536

Display messages
The measurement takes a few seconds. You will see one of the following messages in the
multifunction display:ProblemPossible causes/consequences and M SolutionsEngine Oil Level OKThe oil level is correct.Add 1.0 l Engine
Oil At Next
Refueling .The oil level is too low.Xadd 1.0 l of engine oil.Add 1.5 l Engine
Oil At Next
Refueling .The oil level is too low.Xadd 1.5 l of engine oil.Add 2.0 l Engine
Oil At Next
Refueling .The oil level is too low.Xadd 2.0 l of engine oil.Engine Oil Level
Reduce Oil LevelThe engine oil level is too high.XHave excess engine oil siphoned off.For Engine Oil
Level Ignition
Must be OnThe ignition is switched off.XTurn the SmartKey to position 2 in the ignition lock.Need More Time to
Check Engine Oil
LevelThe required waiting period was not observed.XIf the engine is at normal operating temperature: repeat the
measurement after about five minutes.
If the engine is not at normal operating temperature (e.g. if the
engine was only started briefly): repeat the measurement after
about 30 minutes.Engine Oil Level
Not When Engine OnThe engine is running; oil level measurement is not possible.XSwitch off the engine.XIf the engine is at normal operating temperature: wait about five
minutes before carrying out the measurement.
If the engine is not at normal operating temperature, e.g. if the
engine was only started briefly: wait approximately
30 minutes before carrying out the measurement.Adding engine oilGWARNING
If engine oil comes into contact with hot
engine parts, it may ignite and you could burn
yourself. Do not spill any engine oil on hot
engine parts.462Engine compartmentMaintenance and care
Page 465 of 536
HEnvironmental note
When adding oil, take care not to spill any. If
oil enters the soil or waterways, it is harmful
to the environment.
! Only use engine oils and oil filters that
have been approved for vehicles with a
service system. You can obtain a list of the
engine oils and oil filters tested and
approved in accordance with the
Mercedes-Benz Specifications for Service
Products at any Mercedes-Benz Service
center.
Damage to the engine or exhaust system is
caused by the following:
R using engine oils and oil filters that have
not been specifically approved for the
service system
R replacing engine oil and oil filters after
the interval for replacement specified by
the service system has been exceeded
R using engine oil additives.
! Do not add too much oil. adding too much
engine oil can result in damage to the
engine or to the catalytic converter. Have
excess engine oil siphoned off.
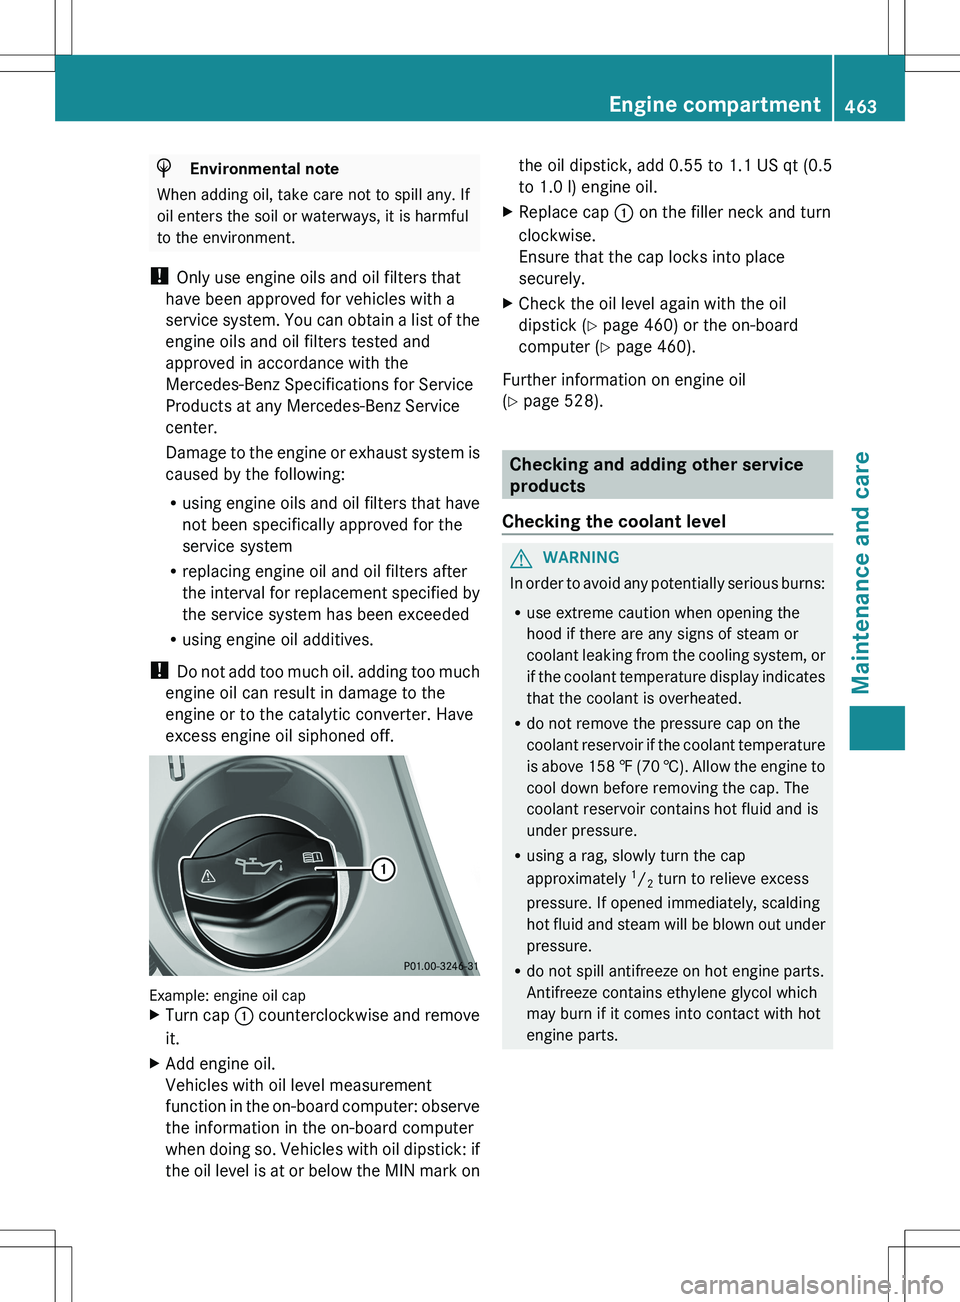
Example: engine oil cap
XTurn cap : counterclockwise and remove
it.XAdd engine oil.
Vehicles with oil level measurement
function in the on-board computer: observe
the information in the on-board computer
when doing so. Vehicles with oil dipstick: if
the oil level is at or below the MIN mark onthe oil dipstick, add 0.55 to 1.1 US qt (0.5
to 1.0 l) engine oil.XReplace cap : on the filler neck and turn
clockwise.
Ensure that the cap locks into place
securely.XCheck the oil level again with the oil
dipstick ( Y page 460) or the on-board
computer ( Y page 460).
Further information on engine oil
( Y page 528).
Checking and adding other service
products
Checking the coolant level
GWARNING
In order to avoid any potentially serious burns:
R use extreme caution when opening the
hood if there are any signs of steam or
coolant leaking from the cooling system, or
if the coolant temperature display indicates
that the coolant is overheated.
R do not remove the pressure cap on the
coolant reservoir if the coolant temperature
is above 158 ‡ (70 †). Allow the engine to
cool down before removing the cap. The
coolant reservoir contains hot fluid and is
under pressure.
R using a rag, slowly turn the cap
approximately 1
/ 2 turn to relieve excess
pressure. If opened immediately, scalding
hot fluid and steam will be blown out under
pressure.
R do not spill antifreeze on hot engine parts.
Antifreeze contains ethylene glycol which
may burn if it comes into contact with hot
engine parts.
Engine compartment463Maintenance and careZ
Page 466 of 536
XPark the vehicle on a level surface.
Only check the coolant level when the
vehicle is on a level surface and the engine
has cooled down.XTurn the SmartKey to position 2 in the
ignition lock ( Y page 307).
On vehicles with KEYLESS-GO, press the
Start/Stop button twice ( Y page 307).XCheck the coolant temperature display in
the instrument cluster.
The coolant temperature must be below
158 ‡ (70 †).XTurn the SmartKey to position
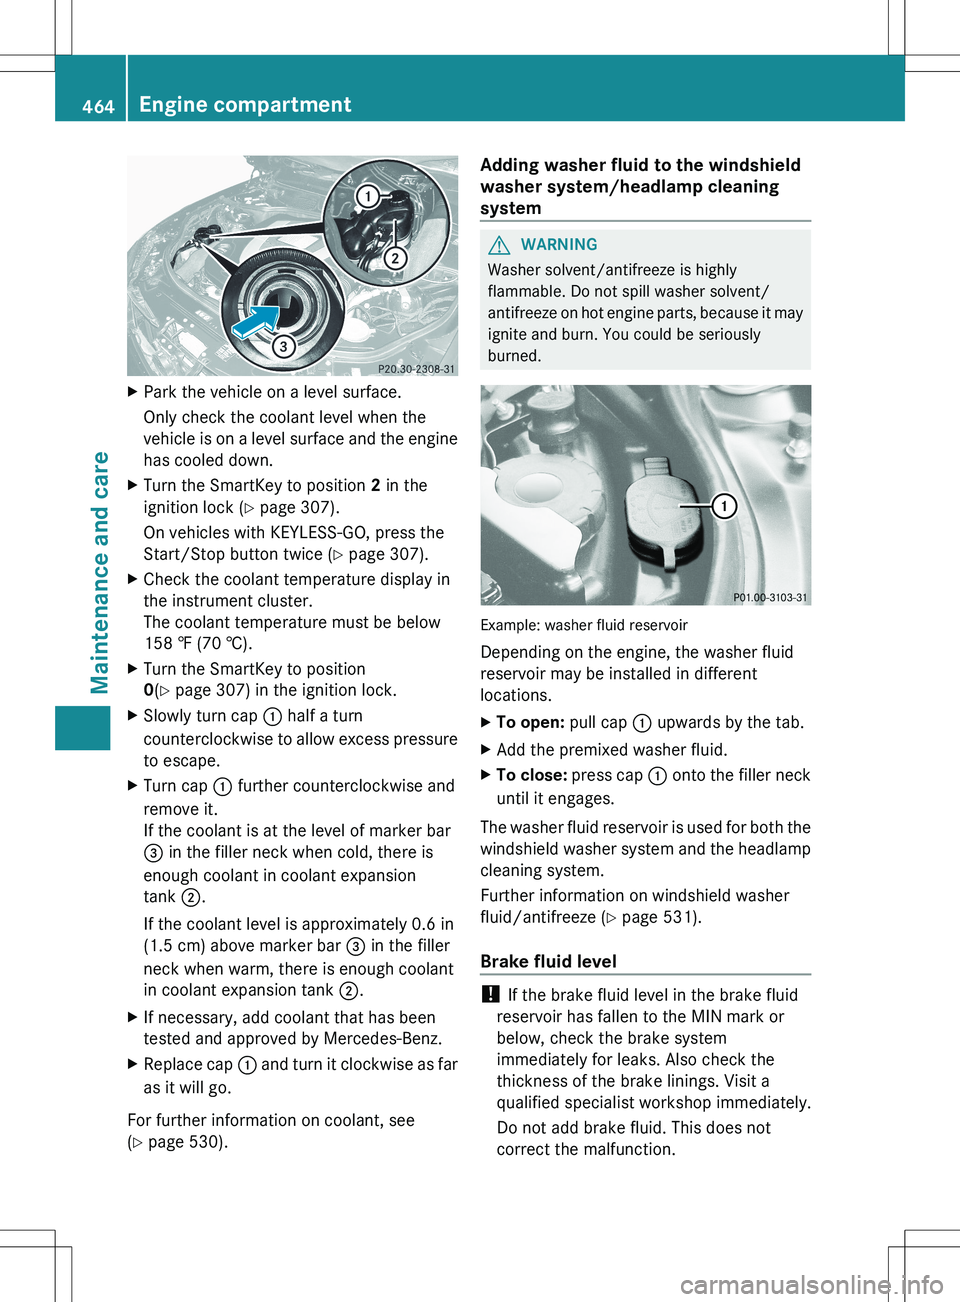
0 (Y page 307) in the ignition lock.XSlowly turn cap : half a turn
counterclockwise to allow excess pressure
to escape.XTurn cap : further counterclockwise and
remove it.
If the coolant is at the level of marker bar
= in the filler neck when cold, there is
enough coolant in coolant expansion
tank ;.
If the coolant level is approximately 0.6 in
(1.5 cm) above marker bar = in the filler
neck when warm, there is enough coolant
in coolant expansion tank ;.XIf necessary, add coolant that has been
tested and approved by Mercedes-Benz.XReplace cap : and turn it clockwise as far
as it will go.
For further information on coolant, see
( Y page 530).
Adding washer fluid to the windshield
washer system/headlamp cleaning
systemGWARNING
Washer solvent/antifreeze is highly
flammable. Do not spill washer solvent/
antifreeze on hot engine parts, because it may
ignite and burn. You could be seriously
burned.
Example: washer fluid reservoir
Depending on the engine, the washer fluid
reservoir may be installed in different
locations.
XTo open: pull cap : upwards by the tab.XAdd the premixed washer fluid.XTo close: press cap : onto the filler neck
until it engages.
The washer fluid reservoir is used for both the
windshield washer system and the headlamp
cleaning system.
Further information on windshield washer
fluid/antifreeze ( Y page 531).
Brake fluid level
! If the brake fluid level in the brake fluid
reservoir has fallen to the MIN mark or
below, check the brake system
immediately for leaks. Also check the
thickness of the brake linings. Visit a
qualified specialist workshop immediately.
Do not add brake fluid. This does not
correct the malfunction.
464Engine compartmentMaintenance and care
Page 467 of 536
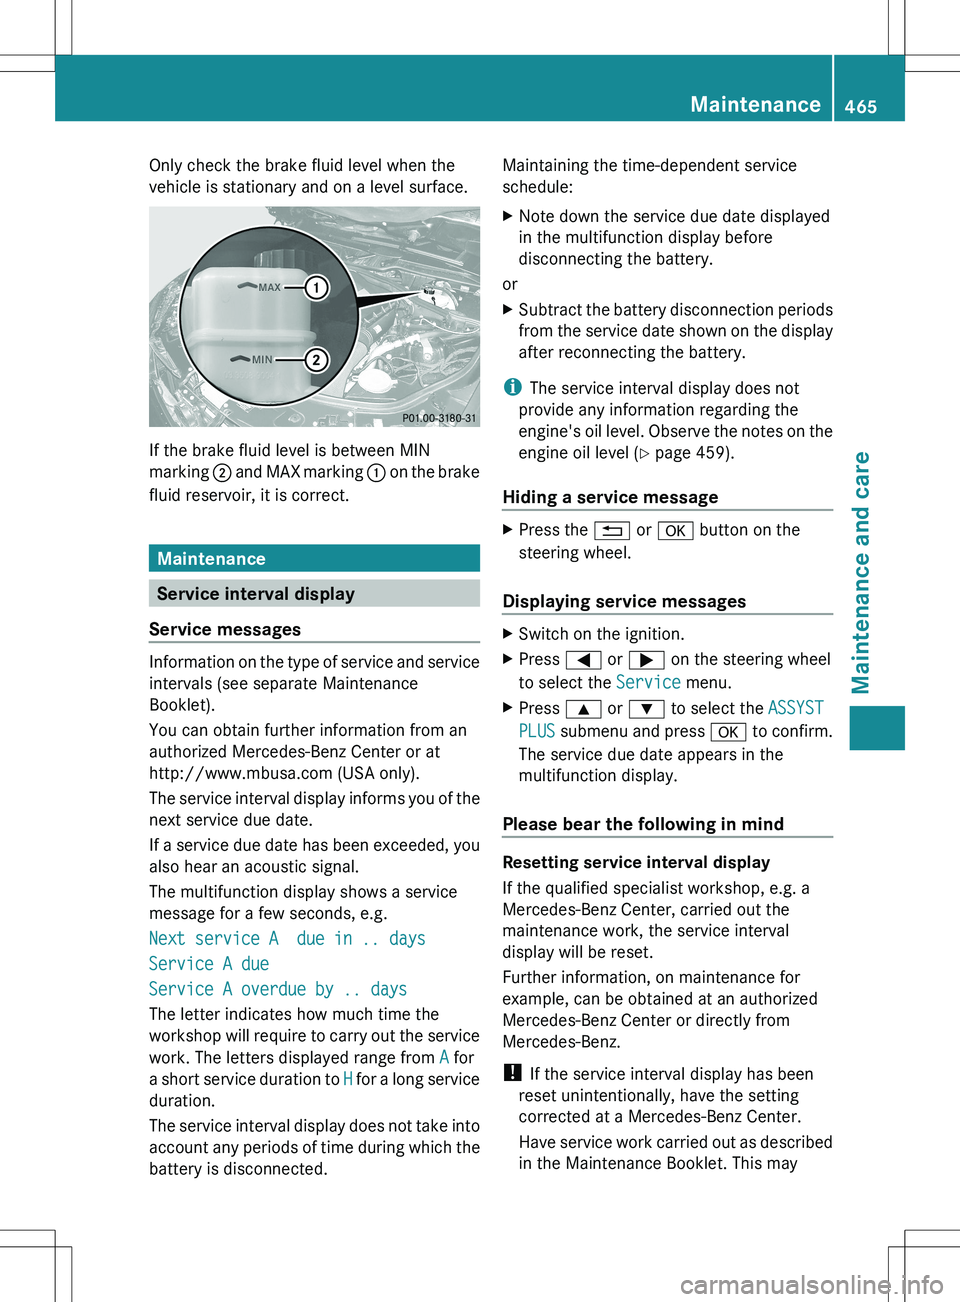
Only check the brake fluid level when the
vehicle is stationary and on a level surface.
If the brake fluid level is between MIN
marking ; and MAX marking : on the brake
fluid reservoir, it is correct.
Maintenance
Service interval display
Service messages
Information on the type of service and service
intervals (see separate Maintenance
Booklet).
You can obtain further information from an
authorized Mercedes-Benz Center or at
http://www.mbusa.com (USA only).
The service interval display informs you of the
next service due date.
If a service due date has been exceeded, you
also hear an acoustic signal.
The multifunction display shows a service
message for a few seconds, e.g.
Next service A due in .. days
Service A due
Service A overdue by .. days
The letter indicates how much time the
workshop will require to carry out the service
work. The letters displayed range from A for
a short service duration to H for a long service
duration.
The service interval display does not take into
account any periods of time during which the
battery is disconnected.
Maintaining the time-dependent service
schedule:XNote down the service due date displayed
in the multifunction display before
disconnecting the battery.
or
XSubtract the battery disconnection periods
from the service date shown on the display
after reconnecting the battery.
i The service interval display does not
provide any information regarding the
engine's oil level. Observe the notes on the
engine oil level ( Y page 459).
Hiding a service message
XPress the % or a button on the
steering wheel.
Displaying service messages
XSwitch on the ignition.XPress = or ; on the steering wheel
to select the Service menu.XPress 9 or : to select the ASSYST
PLUS submenu and press a to confirm.
The service due date appears in the
multifunction display.
Please bear the following in mind
Resetting service interval display
If the qualified specialist workshop, e.g. a
Mercedes-Benz Center, carried out the
maintenance work, the service interval
display will be reset.
Further information, on maintenance for
example, can be obtained at an authorized
Mercedes-Benz Center or directly from
Mercedes-Benz.
! If the service interval display has been
reset unintentionally, have the setting
corrected at a Mercedes-Benz Center.
Have service work carried out as described
in the Maintenance Booklet. This may
Maintenance465Maintenance and careZ
Page 484 of 536

Do not rub the battery with rags or cloths. The
battery could explode if touched due to
electrostatic charge or due to spark
formation.
! Before working on the battery, e.g.
loosening the battery terminals, switch off
the engine and remove the SmartKey from
the ignition. On vehicles with KEYLESS-GO,
make sure that the ignition is switched off.
Check that all the indicator lamps in the
instrument cluster are off. You may
otherwise destroy electronic components,
such as the alternator.
! Like other batteries, the vehicle battery
may discharge over time if you do not use
the vehicle. In this case, have the battery
disconnected at a qualified specialist
workshop. You can also charge the battery
with a charger recommended by Mercedes-
Benz. Contact a qualified specialist
workshop for further information.
The battery and the cover of the positive
terminal clamp must be installed securely
during operation.
i Remove the SmartKey if you park the
vehicle and do not require any electrical
consumers. The vehicle will then use very
little energy, thus conserving battery
power.
Mercedes-Benz recommends that you do not
carry out work on batteries yourself, e.g.
removing or charging. Have this work
performed at a qualified specialist workshop.
Charging the battery
GWARNING
Never charge a battery still installed in the
vehicle unless a battery charger unit approved
by Mercedes-Benz is being used. Gases may
escape during charging and cause explosions
that may result in paint damage, corrosion or
personal injury.
A battery charger unit specially adapted for
Mercedes-Benz vehicles and tested and
approved by Mercedes-Benz is available as an
accessory. It permits the charging of the
battery in its installed position. Contact an
authorized Mercedes-Benz Center for further
information and availability.
Charge the battery in accordance with the
separate instructions for the battery charger.GWARNING
There is a risk of acid burns during the
charging process due to the gases which
escape from the battery. Do not lean over the
battery during the charging process.
GWARNING
Battery acid is caustic. Avoid contact with the
skin, eyes or clothing.
! Only charge the installed battery with a
battery charger which has been tested and
approved by Mercedes-Benz. These battery
chargers allow the battery to be charged
while still installed in the vehicle.
! Only use battery chargers with a
maximum charging voltage of 14.8 V.
! Only charge the battery using the jump-
starting connection point.
The jump-starting connection point is in the
engine compartment ( Y page 483).
XOpen the hood ( Y page 458).XConnect the battery charger to the positive
terminal and ground point in the same
order as when connecting the donor
battery in the jump-starting procedure
( Y page 483).XRead the battery charger's operating
instructions before charging the battery.482BatteryBreakdown assistance
Page 486 of 536
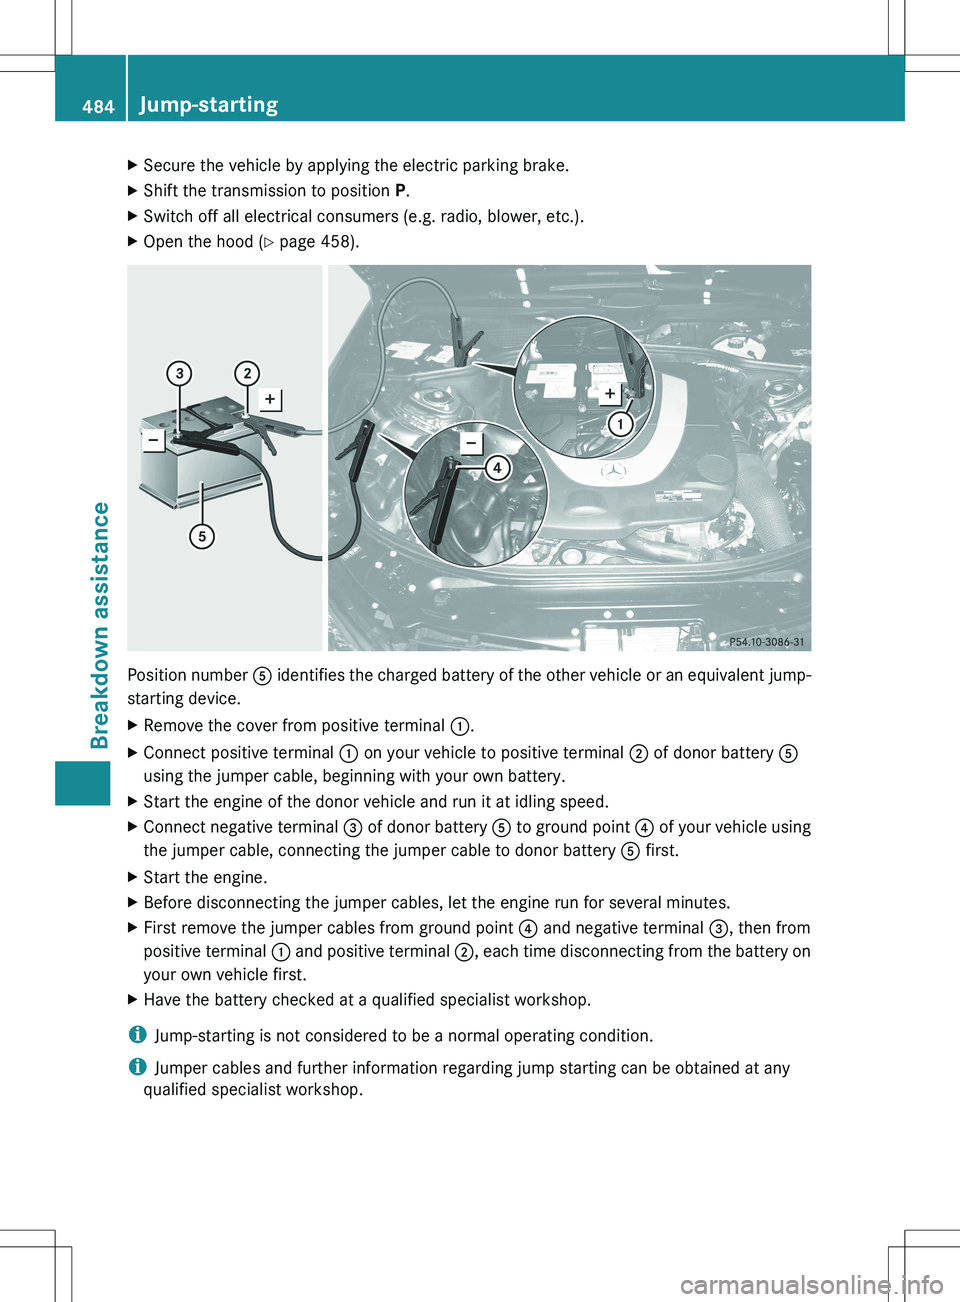
XSecure the vehicle by applying the electric parking brake.XShift the transmission to position P.XSwitch off all electrical consumers (e.g. radio, blower, etc.).XOpen the hood ( Y page 458).
Position number A identifies the charged battery of the other vehicle or an equivalent jump-
starting device.
XRemove the cover from positive terminal :.XConnect positive terminal : on your vehicle to positive terminal ; of donor battery A
using the jumper cable, beginning with your own battery.XStart the engine of the donor vehicle and run it at idling speed.XConnect negative terminal = of donor battery A to ground point ? of your vehicle using
the jumper cable, connecting the jumper cable to donor battery A first.XStart the engine.XBefore disconnecting the jumper cables, let the engine run for several minutes.XFirst remove the jumper cables from ground point ? and negative terminal =, then from
positive terminal : and positive terminal ;, each time disconnecting from the battery on
your own vehicle first.XHave the battery checked at a qualified specialist workshop.
i Jump-starting is not considered to be a normal operating condition.
i Jumper cables and further information regarding jump starting can be obtained at any
qualified specialist workshop.
484Jump-startingBreakdown assistance
Page 491 of 536

XLoosen cover ? with a suitable object =.XRemove cover ? upwards in the direction
of the arrow.
! The cover must be seated properly,
otherwise moisture or dirt could impair the
function of the fuses.
Fuse box in the engine compartment
Fuse box on the left in the direction of
travel
XOpen the hood ( Y page 458).XRemove any existing moisture from the
fuse box using a dry cloth.XAMG vehicles: remove the control unit
above the fuse box.X To open: undo screws : with an Allen
key.XRemove bracket =.XRemove cover ;.XTo close: check whether the rubber seal is
lying correctly in cover ;.XPut cover ; back in position.XReplace bracket =.XTighten screws : using an Allen key.
!
The cover must be seated properly,
otherwise moisture or dirt could impair the
function of the fuses.
XClose the hood ( Y page 459).
Fuse box on the right in the direction of
travel
XOpen the hood ( Y page 458).XRemove any existing moisture from the
fuse box using a dry cloth.XTo open: open clamps ;.XRemove cover ; upwards.XTo close: check whether the rubber seal is
lying correctly in cover ;.XPut cover ; back in position.XFold down cover : and close clamps ;.
!
The cover must be seated properly,
otherwise moisture or dirt could impair the
function of the fuses.
XClose the hood ( Y page 459).Fuses489Breakdown assistanceZ