2012 MERCEDES-BENZ S-CLASS SEDAN audio
[x] Cancel search: audioPage 264 of 536
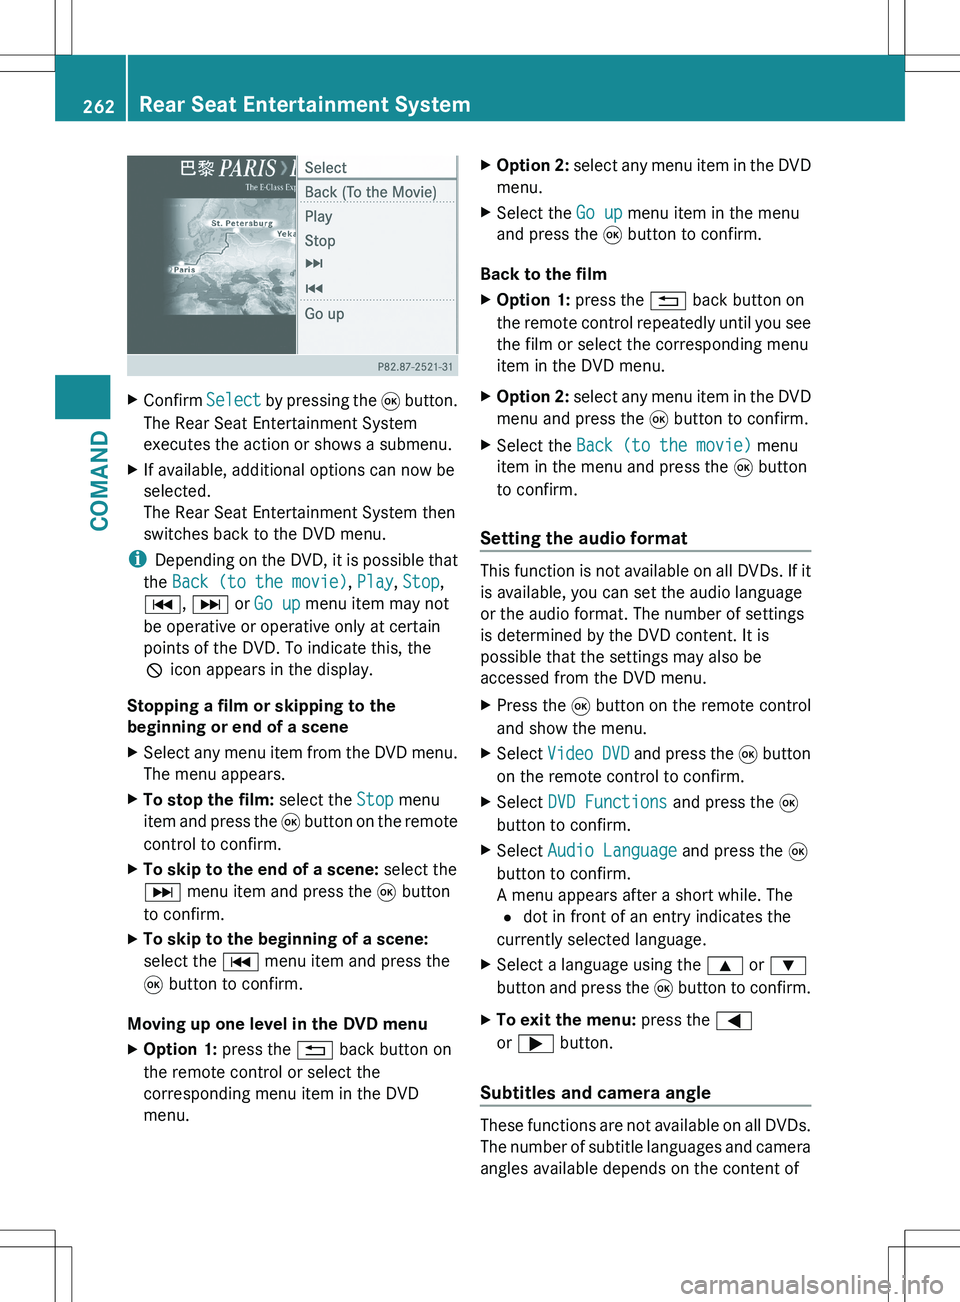
XConfirm Select by pressing the 9 button.
The Rear Seat Entertainment System
executes the action or shows a submenu.XIf available, additional options can now be
selected.
The Rear Seat Entertainment System then
switches back to the DVD menu.
i Depending on the DVD, it is possible that
the Back (to the movie) , Play , Stop ,
C , D or Go up menu item may not
be operative or operative only at certain
points of the DVD. To indicate this, the
K icon appears in the display.
Stopping a film or skipping to the
beginning or end of a scene
XSelect any menu item from the DVD menu.
The menu appears.XTo stop the film: select the Stop menu
item and press the 9 button on the remote
control to confirm.XTo skip to the end of a scene: select the
D menu item and press the 9 button
to confirm.XTo skip to the beginning of a scene:
select the C menu item and press the
9 button to confirm.
Moving up one level in the DVD menu
XOption 1: press the % back button on
the remote control or select the
corresponding menu item in the DVD
menu.XOption 2: select any menu item in the DVD
menu.XSelect the Go up menu item in the menu
and press the 9 button to confirm.
Back to the film
XOption 1: press the % back button on
the remote control repeatedly until you see
the film or select the corresponding menu
item in the DVD menu.XOption 2: select any menu item in the DVD
menu and press the 9 button to confirm.XSelect the Back (to the movie) menu
item in the menu and press the 9 button
to confirm.
Setting the audio format
This function is not available on all DVDs. If it
is available, you can set the audio language
or the audio format. The number of settings
is determined by the DVD content. It is
possible that the settings may also be
accessed from the DVD menu.
XPress the 9 button on the remote control
and show the menu.XSelect Video DVD and press the 9 button
on the remote control to confirm.XSelect DVD Functions and press the 9
button to confirm.XSelect Audio Language and press the 9
button to confirm.
A menu appears after a short while. The
# dot in front of an entry indicates the
currently selected language.XSelect a language using the 9 or :
button and press the 9 button to confirm.XTo exit the menu: press the =
or ; button.
Subtitles and camera angle
These functions are not available on all DVDs.
The number of subtitle languages and camera
angles available depends on the content of
262Rear Seat Entertainment SystemCOMAND
Page 265 of 536

the DVD. It is possible that the settings may
also be accessed from the DVD menu.XPress the 9 button on the remote control
and show the menu.XSelect Video DVD and press the 9 button
on the remote control to confirm.XSelect DVD Functions and press the 9
button to confirm.XSelect Subtitles or Camera Angle and
press the 9 button to confirm.
In both cases, a menu appears after a few
seconds. The # dot in front of an entry
indicates the current setting.XSelect the setting using the 9 or :
button and press the 9 button to confirm.XTo exit the menu: press the =
or ; button.
Interactive content
DVDs can also contain interactive content
(e.g. a video game). In a video game, you may
be able to influence events by selecting and
triggering actions. The type and number of
actions depend on the DVD.
XSelect an action using the
9;:= buttons on the
remote control and press the 9 button to
execute it.
A menu appears and the first entry,
Select , is highlighted.XPress the 9 button.
AUX mode
Introduction
You can connect one external video source to
each of the displays of the Rear Seat
Entertainment System (AUX display) and also
one external video source to the rear-seat
CD/DVD drive (AUX drive) with a sound and
video signal.
Please see the corresponding operating
instructions for information on how to
operate the external video source.
For further details about external video
sources, please consult an authorized
Mercedes-Benz Center.
Connecting AUX equipment
AUX drive
The AUX drive jacks are located on the CD/
DVD drive on the right next to the CD/DVD
eject button ( Y page 263).
Displaying AUX
The AUX display jacks are on the side of the
screen ( Y page 144).
Audio and video connection
XInsert the audio plugs for the left and right
signals into the corresponding L and R
jacks.XInsert the video plug into the V jack.
Activating AUX mode
AUX drive
XSelect AUX in the menu using the
9=; buttons on the remote
control and press the 9 button to confirm.
The AUX menu appears.XSelect Source from the AUX menu and
press the 9 button to confirm.XSelect Disk Drive Aux and press the 9
button to confirm.
You will hear and see the content of the
external video source if it is connected to
the CD/DVD drive and switched to
playback. If no video image is available
from the AUX source connected, you will
see an audio menu.Rear Seat Entertainment System263COMANDZ
Page 266 of 536
Displaying AUXXSelect the screen to which the external
video source is connected using the remote
control ( Y page 129).XSelect AUX in the menu using the
9=; buttons on the remote
control and press the 9 button to confirm.XSelect Source from the AUX menu and
press the 9 button to confirm.XSelect Display Aux and press the 9
button to confirm.
You will see and hear the content of the
video source if it is switched to playback. If
no video image is available from the AUX
source connected, you will see an audio
menu.
Selecting the active COMAND source
XSelect AUX in the menu using the
9=; buttons on the remote
control and press the 9 button to confirm.XSelect Source from the AUX menu and
press the 9 button to confirm.XSelect COMAND and press the 9 button to
confirm.
The audio or video mode selected in
COMAND is transmitted to the Rear Seat
Entertainment System.
Operation with an active COMAND
source
You can transfer an audio or video mode
selected in COMAND to the Rear Seat
Entertainment System.
i If you subsequently switch modes in
COMAND, the new source will not be
transmitted to the Rear Seat Entertainment
System.
XTo switch on the function in COMAND:
switch on the desired audio mode in
COMAND or show the menu in video DVD
mode.XSelect the menu item at the bottom left,
e.g. CD in audio CD mode, by sliding VÆand turning cVd the COMAND controller
and press W to confirm.XSelect Active Source for Rear and
press W to confirm.
In the status bar at the top, you will see the
headphones icon and the _ icon for the
source that has been switched on.XTo switch off the function in COMAND:
switch on the desired audio mode in
COMAND or show the menu in video DVD
mode.XSelect the menu item at the bottom left,
e.g. CD in audio CD mode, by sliding VÆ
and turning cVd the COMAND controller
and press W to confirm.XSelect Rear OFF _ and press W the
COMAND controller to confirm.
Adjusting the brightness, contrast or
color
XSelect Source in the rear-compartment
screen and press the 9 button on the
remote control to confirm.XSelect Display Aux or Disk Drive Aux
and press the 9 button to confirm.XSelect Brightness , Contrast or Color
and press the 9 button to confirm.
An adjustment scale appears.XSelect a setting using the 9 or :
button and press the 9 button to confirm.
Changing the picture format
XSelect Source in the AUX menu and press
the 9 button on the remote control to
confirm.XSelect Display Aux or Disk Drive Aux
and press the 9 button to confirm.XSelect Auto16:9 optimized , 4:3 or
Widescreen using the 9: buttons
and press the 9 button to confirm.
The ä icon in front of a menu item
indicates the current setting.264Rear Seat Entertainment SystemCOMAND
Page 279 of 536
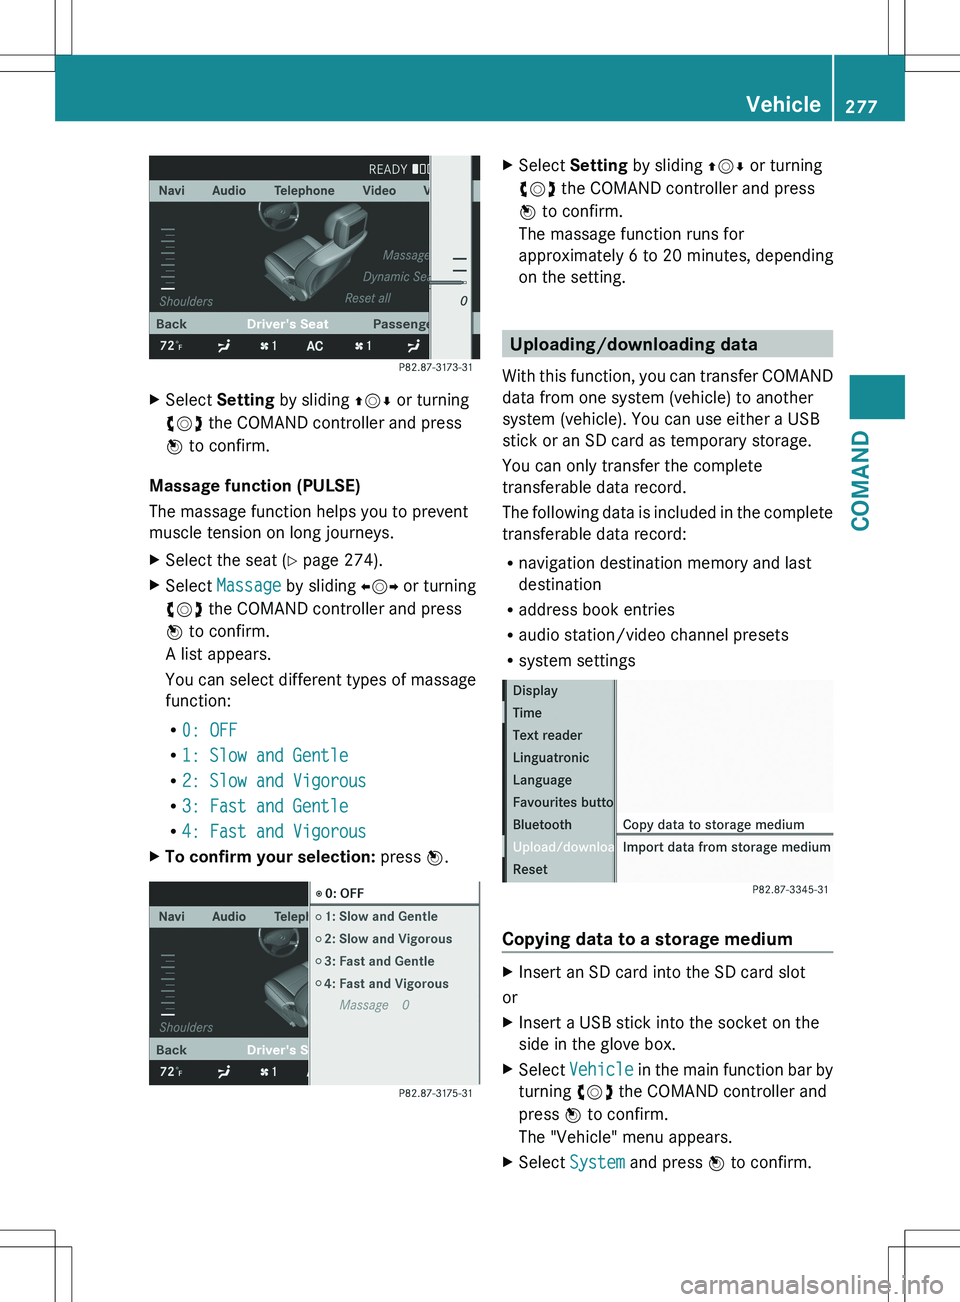
XSelect Setting by sliding ZVÆ or turning
cVd the COMAND controller and press
W to confirm.
Massage function (PULSE)
The massage function helps you to prevent
muscle tension on long journeys.
XSelect the seat ( Y page 274).XSelect Massage by sliding XVY or turning
cVd the COMAND controller and press
W to confirm.
A list appears.
You can select different types of massage
function:
R 0: OFF
R 1: Slow and Gentle
R 2: Slow and Vigorous
R 3: Fast and Gentle
R 4: Fast and VigorousXTo confirm your selection: press W.XSelect Setting by sliding ZVÆ or turning
cVd the COMAND controller and press
W to confirm.
The massage function runs for
approximately 6 to 20 minutes, depending
on the setting.
Uploading/downloading data
With this function, you can transfer COMAND
data from one system (vehicle) to another
system (vehicle). You can use either a USB
stick or an SD card as temporary storage.
You can only transfer the complete
transferable data record.
The following data is included in the complete
transferable data record:
R navigation destination memory and last
destination
R address book entries
R audio station/video channel presets
R system settings
Copying data to a storage medium
XInsert an SD card into the SD card slot
or
XInsert a USB stick into the socket on the
side in the glove box.XSelect Vehicle in the main function bar by
turning cVd the COMAND controller and
press W to confirm.
The "Vehicle" menu appears.XSelect System and press W to confirm.Vehicle277COMANDZ
Page 378 of 536

?%Press briefly:
Back
Switches off the Voice Control
System; see the separate operating
instructions
Hides display messages or calls up
the last Trip menu function used% Press and hold:
Calls up the standard display in the
Trip menuA=;
Selects a menu9: Press briefly:
Selects a function or scrolls through
lists
In the Audio menu: selects a stored
station, an audio track or a video
scene
In the Telephone menu: switches to
the phone book and selects a name
or a telephone number9: Press and hold:
In the Audio menu: selects a station
from the alphabetical list of stations,
starts station search or starts rapid
scrolling through an audio/video
disc
In the Telephone menu: starts rapid
scrolling through the phone booka
Confirms selections and display
messages
In the Telephone menu: switches to
the phone book and starts dialing
In the Audio menu: stops the station
search function at the desired stationMultifunction display
Values and settings as well as display
messages are shown in the multifunction
display.:Menu bar;Description field376Displays and operationOn-board computer and displays
Page 379 of 536
Menus and submenus
Menu overview
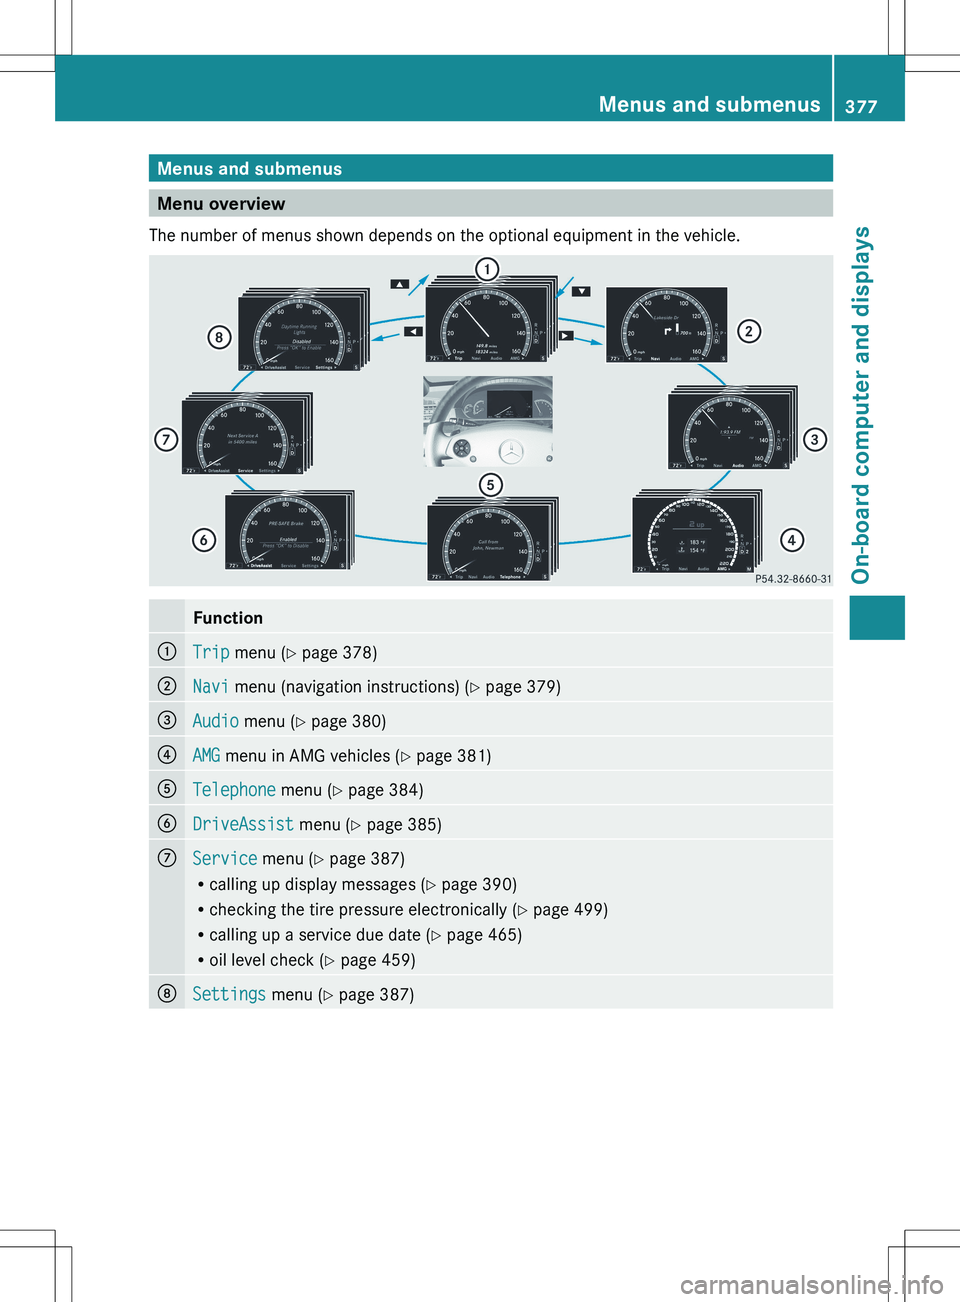
The number of menus shown depends on the optional equipment in the vehicle.
Function:Trip menu ( Y page 378);Navi menu (navigation instructions) ( Y page 379)=Audio menu ( Y page 380)?AMG menu in AMG vehicles ( Y page 381)ATelephone menu (Y page 384)BDriveAssist menu (Y page 385)CService menu (Y page 387)
R calling up display messages ( Y page 390)
R checking the tire pressure electronically ( Y page 499)
R calling up a service due date ( Y page 465)
R oil level check ( Y page 459)DSettings menu (Y page 387)Menus and submenus377On-board computer and displaysZ
Page 382 of 536
display = next to the symbol for the change
of direction ;. This decreases in size as you
approach the announced change of direction.
Change of direction announced with a
lane recommendation
Lane recommendations are only displayed if
the relevant data is available on the digital
map.:Road into which the change of direction
leads;Symbol for change of direction=Distance to change of direction and visual
distance display?Lane recommendation
On multiple-lane roads, COMAND can provide
lane recommendation ? for the next change
of direction. During the change of direction,
additional lanes may be displayed.
:Uninterrupted lane;New lane during a change of direction=Lane recommended for the change of
directionOther status indicators of the
navigation system
R O : you have reached the destination or an
intermediate destination.
R New route ...: COMAND is calculating the
new route.
R Direction of Dest. Off map or
Direction of Dest. Off mapped road :
the vehicle position is outside the area of
the digital map (off-map position).
R Direction of Dest. No Route : no route
could be calculated to the selected
destination.
Audio menu
Selecting a radio station
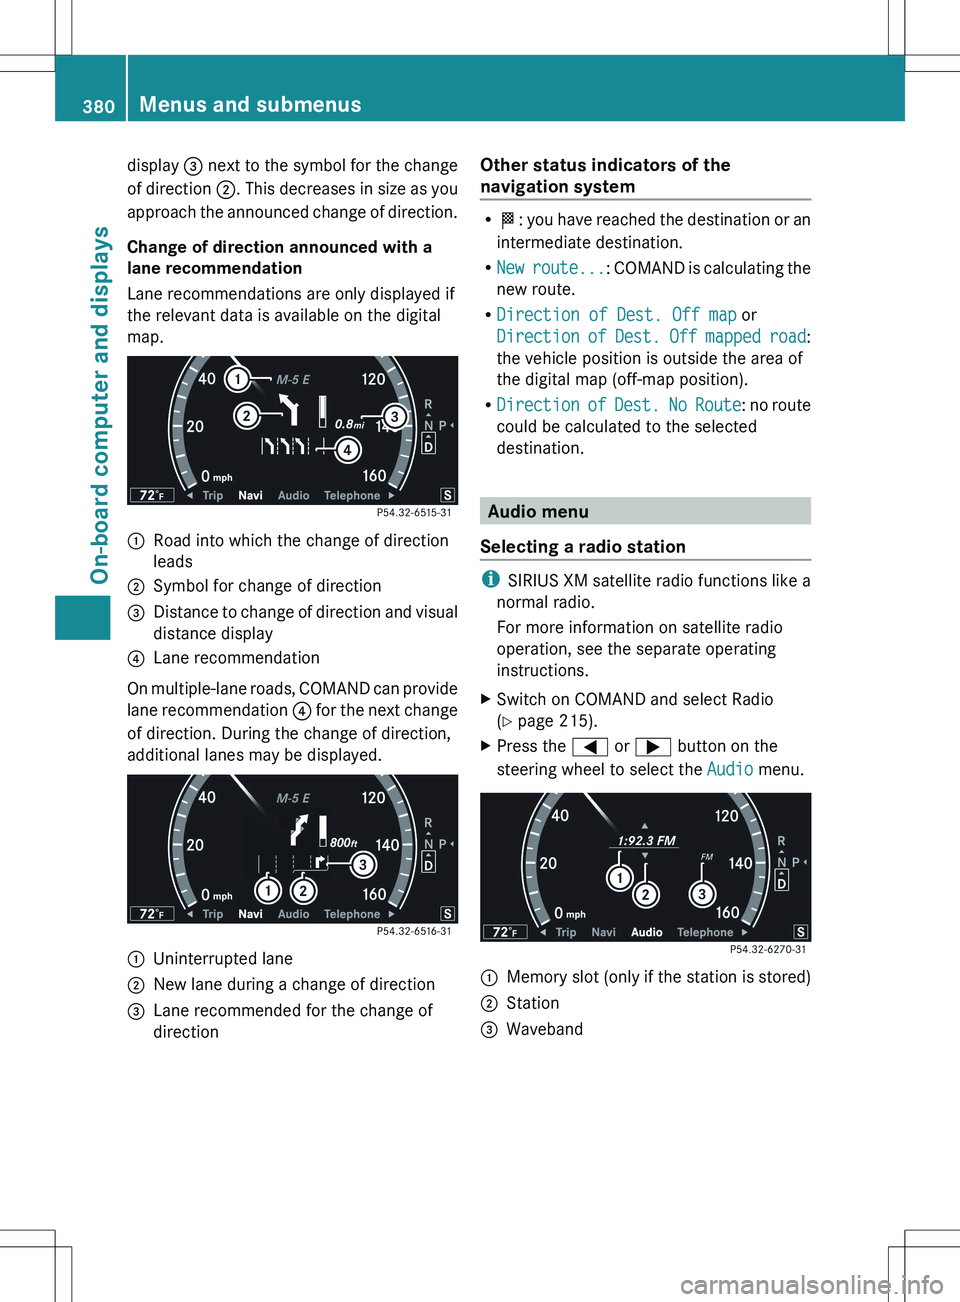
i SIRIUS XM satellite radio functions like a
normal radio.
For more information on satellite radio
operation, see the separate operating
instructions.
XSwitch on COMAND and select Radio
( Y page 215).XPress the = or ; button on the
steering wheel to select the Audio menu.:Memory slot (only if the station is stored);Station=Waveband380Menus and submenusOn-board computer and displays
Page 383 of 536

XTo select a stored station: briefly press
the 9 or : button.XTo select a station from the station
list: press and briefly hold the : or
9 button.XTo select a station using station
search 18
: press and briefly hold the 9
or : button.XPress a to stop the station search
function at the desired station.
Operating audio player or audio media
Audio data from various audio devices or
media can be played, depending on the
equipment installed in the vehicle.
XSwitch on COMAND and select audio
device or audio medium ( Y page 225).XPress the = or ; button on the
steering wheel to select the Audio menu.
CD player display (example)
:Current title;Medium (disc number only for DVD
changer)XTo select the next/previous track:
briefly press the 9 or : button.XTo select a track from the track list
(rapid scrolling): press and hold the
9 or : button until the desired track
has been reached.
If you press and hold the 9 or :
button, the rapid scrolling speed is increased.
Not all audio drives or data carriers support
this function.
If track information is stored on the audio
device or medium, the multifunction display
will show the number and name of the track.
The current track does not appear in audio
AUX mode ( Auxiliary audio mode: external
audio source connected).
Video DVD operationXSwitch on COMAND and select video DVD
( Y page 245).XPress the = or ; button on the
steering wheel to select the Audio menu.:Current scene;Medium (disc number only for DVD
changer)XTo select the next or previous scene:
briefly press the 9 or : button.XTo select a scene from the scene list
(rapid scrolling): press and hold the
9 or : button until the desired
scene has been reached.
AMG menu in AMG vehicles
AMG displays
XPress the = or ; button on the
steering wheel to select the AMG menu.18
Only if no station list is received.Menus and submenus381On-board computer and displaysZ