2012 MERCEDES-BENZ S-Class parking
[x] Cancel search: parkingPage 163 of 536

Entering an intermediate stop
Introduction
When route guidance is active, you can enter
an intermediate stop. Intermediate stops can
be predefined destinations from the following
categories that COMAND offers for selection:
R Mercedes-Benz Service Center
R Hospital
R Gas Station
R Parking Lot
R Restaurant
However, you can also enter destinations
other than the predefined ones. To do this
select the menu item Other.
You can use the intermediate stop function to
influence route guidance to the main
destination. When you have reached your
intermediate stop, COMAND automatically
recalculates the route to the main
destination.
Entering predefined destinations
XTo activate navigation mode: press the
S function button once or twice.XTo show the menu: press W the COMAND
controller.XSelect Destination in the navigation
system menu bar by turning cVd the
COMAND controller and pressing W to
confirm.XSelect Stopover and press W to confirm.
Option 1: no intermediate stop has been
entered yet.
XSelect a category; see option 2.
Option 2: an intermediate stop has
already been entered.
XSelect Change Stopover and press W to
confirm.XTo select a category: select a category by
turning cVd the COMAND controller and
pressing W to confirm.
COMAND first searches in the selected
category for destinations along the route.
If there are no destinations available there,
COMAND searches for destinations within
a radius of up to 100 km of the vehicle
position.
If COMAND finds destinations, a list
appears on the right-hand side of the
display. The currently selected point of
interest is highlighted on the left-hand side
of the map.
The intermediate stops are listed according
to increasing distance from the current
vehicle position. They are displayed in the
form of a name and their position in relation
to the route and your direction of travel.
If COMAND does not find any destinations,
you will see a message to this effect.
XConfirm OK by pressing W.XSelect a different category.XSelect the intermediate stop by turning
cVd the COMAND controller and pressing
W to confirm.XTo start route calculation: select Start
and press W to confirm.
Entering another destination as an
intermediate stop
XTo activate navigation mode: press the
S function button once or twice.XTo show the menu: press W the COMAND
controller.XSelect Destination in the navigation
system menu bar by turning cVd the
COMAND controller and pressing W to
confirm.XSelect Stopover and press W to confirm.XSelect Other and press W to confirm.Navigation161COMANDZ
Page 168 of 536

Route guidance
General notesGWARNING
COMAND calculates the route to the
destination without taking into account the
following, for example:
R Traffic lights
R Stop and right-of-way signs
R Lane merging
R Parking or stopping prohibited areas
R Other road and traffic rules and regulations
R Narrow bridges
COMAND may give incorrect navigation
commands if the data in the digital map does
not correspond with the actual road/ traffic
situation. For example, if the traffic routing
has been changed or the direction of a one-
way road has been reversed.
For this reason, you must always observe
applicable road and traffic rules and
regulations during your journey. Road and
traffic rules and regulations always have
priority over the navigation commands
generated by the system.
Route guidance begins once a route has been
calculated ( Y page 156).
COMAND guides you to your destination by
means of navigation commands in the form
of audible navigation announcements and
route guidance displays.
The route guidance displays can only be seen
if the display is switched to navigation mode.
If you do not follow the navigation
announcements or if you leave the calculated
route, COMAND automatically calculates a
new route to the destination.
If the digital map contains the corresponding
information, the following applies:
R when selecting a route, COMAND tries to
avoid roads that only have limited access,
e.g. roads closed to through traffic and non-
residents.
R roads that have time restrictions (e.g.
closed on Sundays and public holidays) are
avoided for route guidance.
Change of direction
Introduction
Changes of direction have three phases:
R preparation phase
R announcement phase
R change-of-direction phase
Preparation phase
COMAND prepares you for the upcoming
change of direction. Based on the example
display below, the change of direction is
announced with a message. You see the full-
screen map.
Example display: preparation phase
:Next road;Route=Current vehicle position (the tip of the
triangle indicates the vehicle’s direction
of travel)?Current road
The display in ? depends on the setting
selected under "Text information on the map"
( Y page 185).
Announcement phase
COMAND announces the imminent change of
direction. With reference to the following
example display, the announcement is given
166NavigationCOMAND
Page 266 of 536

XTo set the ambient lighting: select
Vehicle in the main function bar by sliding
XVY and turning cVd the COMAND
controller and press W to confirm.
The main area is active.XSelect the Ambient Lighting menu by
sliding XVY or turning cVd the COMAND
controller.
The ambient lighting menu appears. The
current setting is indicated by a # dot.XSelect Setting by sliding ZVÆ or turning
cVd the COMAND controller.
The selected setting is indicated by a #
dot.
Switching locator lighting on/off
If you switch on the locator lighting, the
following come on in the dark after you have
unlocked the vehicle using the remote
control:
R the parking lamps
R the tail lamps
R the license plate lamp
R the front fog lamps
R the entry lamps in the exterior mirror
The locator lighting switches off again when
you open the driver’s door. If you do not open
the driver’s door, the locator lighting switches
off automatically after 40 seconds.
XTo switch locator lighting on/off: select
Vehicle in the main function bar by sliding
XVY and turning cVd the COMAND
controller and press W to confirm.
The main area is active.XSelect the Locator Lighting function by
sliding XVY or turning cVd the COMAND
controller and press W to confirm.
Switching the automatic locking
feature on/off
You can use this function to activate or
deactivate the automatic central locking
feature. If the automatic locking feature is
activated, your vehicle will lock centrally from
a speed of approximately 15 km/h.
You will find further information about the
automatic locking feature in the "Automatic
locking feature" section ( Y page 86).
XTo switch the automatic locking
feature on/off: select Vehicle in the
main function bar by sliding XVY and264VehicleCOMAND
Page 278 of 536

Useful information
i This Operator's Manual describes all
models and all standard and optional
equipment of your vehicle available at the
time of publication of the Operator's
Manual. Country-specific differences are
possible. Please note that your vehicle may
not be equipped with all features
described. This also applies to safety-
related systems and functions.
i Please read the information on qualified
specialist workshops ( Y page 31).
Exterior lighting
Important safety notes
For reasons of safety, Mercedes-Benz
recommends that you drive with the lights
switched on even during the daytime. In some
countries, operation of the headlamps varies
due to legal requirements and self-imposed
obligations.
Information about driving abroad
Converting to symmetrical low beam
when driving abroad: switch the headlamps
to symmetrical low beam in countries in
which traffic drives on the opposite side of the
road to the country where the vehicle is
registered. This prevents glare to oncoming
traffic. Symmetrical lights do not illuminate
as large an area of the edge of the road.
Have the headlamps converted at a qualified
specialist workshop, e.g. an authorized
Mercedes-Benz Center, as close to the border
as possible before driving in these countries.
Converting to asymmetrical low beam
after returning: have the headlamps
converted back to asymmetrical low beam at
a qualified specialist workshop, e.g. an
authorized Mercedes-Benz Center, as soon as
possible after crossing the border again.
Light switch
Operation
Depending on the date of manufacture of your
vehicle, the c or à symbol for the
automatic headlamp mode/daytime running
lamps is located on the light switch.
1 WLeft-hand standing lamps2XRight-hand standing lamps3$Lights off/daytime running lamps4cAutomatic headlamp mode/daytime
running lamps5 TParking lamps, license plate and
instrument cluster lighting6 LLow-beam/high-beam headlamps7NFront fog lamps 118
RRear fog lamp
The turn signals, high-beam headlamps and
the high-beam flasher are operated using the
combination switch ( Y page 279).
! Switch off the parking lamps and standing
lamps when you leave the vehicle. This
prevents the battery from discharging.
The exterior lighting (except the parking/
standing lamps) switches off automatically if
you:
R remove the SmartKey from the ignition lock
R open the driver's door with the SmartKey
in position 0
If you hear a warning tone when you leave the
vehicle, the lights may still be switched on.
11 Only vehicles with Bi-Xenon headlamps without the Intelligent Light System are equipped with front fog lamps.276Exterior lightingLights and windshield wipers
Page 279 of 536

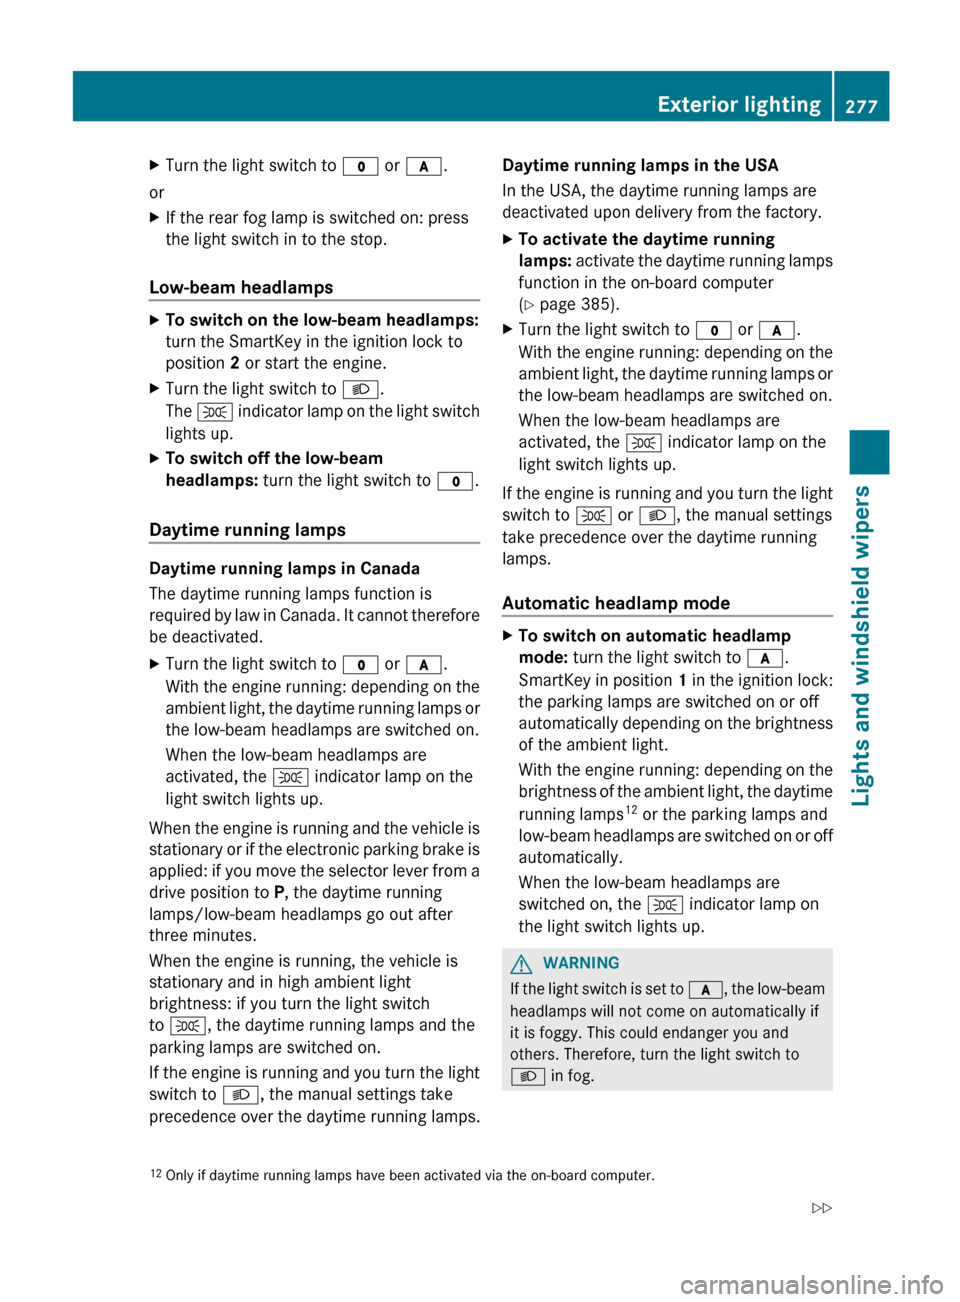
XTurn the light switch to $ or c .
or
XIf the rear fog lamp is switched on: press
the light switch in to the stop.
Low-beam headlamps
XTo switch on the low-beam headlamps:
turn the SmartKey in the ignition lock to
position 2 or start the engine.XTurn the light switch to L.
The T indicator lamp on the light switch
lights up.XTo switch off the low-beam
headlamps: turn the light switch to $.
Daytime running lamps
Daytime running lamps in Canada
The daytime running lamps function is
required by law in Canada. It cannot therefore
be deactivated.
XTurn the light switch to $ or c .
With the engine running: depending on the
ambient light, the daytime running lamps or
the low-beam headlamps are switched on.
When the low-beam headlamps are
activated, the T indicator lamp on the
light switch lights up.
When the engine is running and the vehicle is
stationary or if the electronic parking brake is
applied: if you move the selector lever from a
drive position to P, the daytime running
lamps/low-beam headlamps go out after
three minutes.
When the engine is running, the vehicle is
stationary and in high ambient light
brightness: if you turn the light switch
to T , the daytime running lamps and the
parking lamps are switched on.
If the engine is running and you turn the light
switch to L, the manual settings take
precedence over the daytime running lamps.
Daytime running lamps in the USA
In the USA, the daytime running lamps are
deactivated upon delivery from the factory.XTo activate the daytime running
lamps: activate the daytime running lamps
function in the on-board computer
( Y page 385).XTurn the light switch to $ or c .
With the engine running: depending on the
ambient light, the daytime running lamps or
the low-beam headlamps are switched on.
When the low-beam headlamps are
activated, the T indicator lamp on the
light switch lights up.
If the engine is running and you turn the light
switch to T or L , the manual settings
take precedence over the daytime running
lamps.
Automatic headlamp mode
XTo switch on automatic headlamp
mode: turn the light switch to c.
SmartKey in position 1 in the ignition lock:
the parking lamps are switched on or off
automatically depending on the brightness
of the ambient light.
With the engine running: depending on the
brightness of the ambient light, the daytime
running lamps 12
or the parking lamps and
low-beam headlamps are switched on or off
automatically.
When the low-beam headlamps are
switched on, the T indicator lamp on
the light switch lights up.GWARNING
If the light switch is set to c, the low-beam
headlamps will not come on automatically if
it is foggy. This could endanger you and
others. Therefore, turn the light switch to
L in fog.
12
Only if daytime running lamps have been activated via the on-board computer.Exterior lighting277Lights and windshield wipersZ
Page 303 of 536

Useful information ............................302
Breaking-in notes .............................. 302
Driving ............................................... 302
Automatic transmission ...................310
Refueling ............................................ 317
Parking ............................................... 323
Driving tips ........................................ 326
Driving systems ................................ 330301Driving and parking
Page 304 of 536

Useful information
i This Operator's Manual describes all
models and all standard and optional
equipment of your vehicle available at the
time of publication of the Operator's
Manual. Country-specific differences are
possible. Please note that your vehicle may
not be equipped with all features
described. This also applies to safety-
related systems and functions.
i Please read the information on qualified
specialist workshops ( Y page 31).
Breaking-in notes
The first 1000 miles (1500 km)
The more you look after the engine when it is
new, the more satisfied you will be with its
performance in the future.
R Drive at varying vehicle speeds and engine
speeds for the first 1000 miles (1500 km)
for this reason.
R Avoid overstraining the vehicle during this
period, e.g. driving at full throttle.
R Change gear in good time, at the latest
when the tachometer needle is 2
/ 3 of the
way to the red area in the tachometer
display.
R Do not manually shift to a lower gear to
brake the vehicle.
R If possible, do not depress the accelerator
pedal past the point of resistance
(kickdown).
R Only select shift ranges 3, 2 or 1 when
driving slowly, e.g. in mountainous terrain.
R If possible, drive in drive program E (in AMG
vehicles in drive program C) for the first
1000 miles (1500 km).
After 1000 miles (1500 km), you can increase
the engine speed gradually and bring the
vehicle up to full speed.
Additional breaking-in notes for AMG
vehicles:
R do not drive faster than 85 mph
(140 km/h) in the first 1000 miles
(1500 km).
R only allow the engine to reach a maximum
engine speed of 4500 rpm briefly.
R change gear in good time.
i You should also observe these notes on
running in if the engine or parts of the drive
train on your vehicle have been replaced.
i Always observe the respective speed
restrictions.
Driving
Important safety notes
GWARNING
Make sure absolutely no objects are
obstructing the pedals' range of movement.
Keep the driver's footwell clear of all
obstacles. If there are any floormats or
carpets in the footwell, make sure the pedals
still have sufficient clearance.
During sudden driving or braking maneuvers
the objects could get caught between the
pedals. You could then no longer brake or
accelerate. This could lead to accidents and
injury.
GWARNING
On slippery road surfaces, never downshift in
order to obtain braking action. This could
result in drive wheel slip and reduced vehicle
control. Your vehicle's ABS will not prevent
this type of loss of control.
GWARNING
It is dangerous to shift the automatic
transmission out of parking position P or
neutral position N if the engine speed is
higher than idle speed. If your foot is not firmly
on the brake pedal, the vehicle could
accelerate quickly forward or in reverse. You
302DrivingDriving and parking
Page 305 of 536

could lose control of the vehicle and hit
someone or something. Only shift into gear
when the engine is idling normally and when
your right foot is firmly on the brake pedal.GWARNING
HYBRID vehicles: It is imperative that you read
the HYBRID Supplemental Operating
Instructions included in your vehicle literature
portfolio. You may otherwise not receive all
necessary safety information and warning for
the operation of your vehicle.
! Warm up the engine quickly. Do not use
the engine's full performance until it has
reached operating temperature.
Only shift the automatic transmission to
the desired drive position when the vehicle
is stationary.
Where possible, avoid spinning the drive
wheels when pulling away on slippery
roads. You could otherwise damage the
drive train.
! S 63 AMG: at low engine oil temperatures
below 68 ‡ (+20 † ), the maximum engine
speed is restricted in order to protect the
engine. To protect the engine and maintain
smooth engine operation, avoid driving at
full throttle when the engine is cold.
SmartKey positions
SmartKeygTo remove the SmartKey1Power supply for some consumers, such
as the windshield wipers2Ignition (power supply for all consumers)
and drive position3To start the engine
i The SmartKey can be turned in the
ignition lock even if it is not the correct
SmartKey for the vehicle. The ignition is not
switched on. The engine cannot be started.
KEYLESS-GO
General information
Vehicles with KEYLESS-GO are equipped with
a SmartKey featuring an integrated KEYLESS-
GO function and a detachable Start/Stop
button.
The Start/Stop button must be inserted into
the ignition lock and the SmartKey must be in
the vehicle.
Pressing the Start/Stop button several times
in succession corresponds to the different
SmartKey positions in the ignition lock. This
is only the case if you are not depressing the
brake pedal.
If you depress the brake pedal and press the
Start/Stop button, the engine starts
immediately.
The Start/Stop button can be removed from
the ignition lock. Then, you can insert the
SmartKey into the ignition lock.
Driving303Driving and parkingZ