2012 MERCEDES-BENZ S-Class ECU
[x] Cancel search: ECUPage 128 of 536

ECOMAND: to select a station from
presets, select a track, enter directly,
enter a phone number, for example. Rear
Seat Entertainment System: to select a
track, enter directlyFTo exit a menu (back)XPoint the remote control at the
corresponding screen and execute the
functions by pressing the corresponding
buttons.
i The remote control's function may be
restricted depending on the angle at which
it is pointed at the respective screen.
Selecting the screen for the remote
control
XTurn thumbwheel = until the desired
display is highlighted in the window.
Switching the screen on/off (Rear Seat
Entertainment System only)
If the SmartKey is in the ignition lock in
position 0 or 1 or if the SmartKey is not in the
ignition lock, the rear screens will switch off
after 30 minutes. Before the screens switch
off, they show a message to this effect.
You can switch the screens back on.
However, this will discharge the starter
battery.
XPoint the remote control at the rear-
compartment screen which has been
selected for remote operation.XPress button : on the remote control.
The respective rear screen switches on or
off.
i You can only switch the screens on using
the remote control if the ignition is
switched on.
Switching the button lighting on/off
XPress button ; on the remote control.
Depending on the previous status, the
button lighting is switched on or off.i If you do not use the remote control for
about 15 seconds, the button lighting
switches off automatically.
MuteXPress button B on the remote control.
The sound is switched on/off.
Adjusting the volume
This function is available for SPLITVIEW and
for the Rear Seat Entertainment System in
conjunction with corded headphones.
XPress one of buttons C on the remote
control.
The volume of the currently selected audio
or video source changes.
For COMAND, you can also adjust the
volume for phone calls and navigation
messages.
Selecting a menu/menu item and
confirming your selection
XPress the =;9: buttons to
select the menu/menu item and press the
9 button to confirm.126At a glanceCOMAND
Page 129 of 536

Functions with the E and F button
You can use the remote control to execute the same functions as the COMAND control panel.
ModeFunctionAudio modeSelects a station using the station search function ( Y page 212)Selects a track by skipping to a track ( Y page 224)Fast forward/rewind ( Y page 225)Video modeSelects a scene or chapter (video DVD mode) ( Y page 243)Fast-forward/rewind (video DVD mode) ( Y page 242)
Functions of the number keypad
You can use the remote control to execute the same functions as the COMAND control panel.
ModeFunctionAudio modeSelects stations via the station presets ( Y page 212)Sets stations by entering the frequency manually ( Y page 212)Stores stations manually ( Y page 213)Selects a track ( Y page 224)Selects a data medium via the media list ( Y page 224)Telephone modeTelephone number entry ( Y page 200)Character entryEnters characters (direct entry) ( Y page 130)Operating COMAND
Selecting a main function
Initial situation
You would like to change from the telephone
menu to the vehicle settings, for example.
XSlide ZV the COMAND controller and
switch to the main function bar.XSelect Vehicle in the main function bar by
turning cVd the COMAND controller and
press W to confirm.
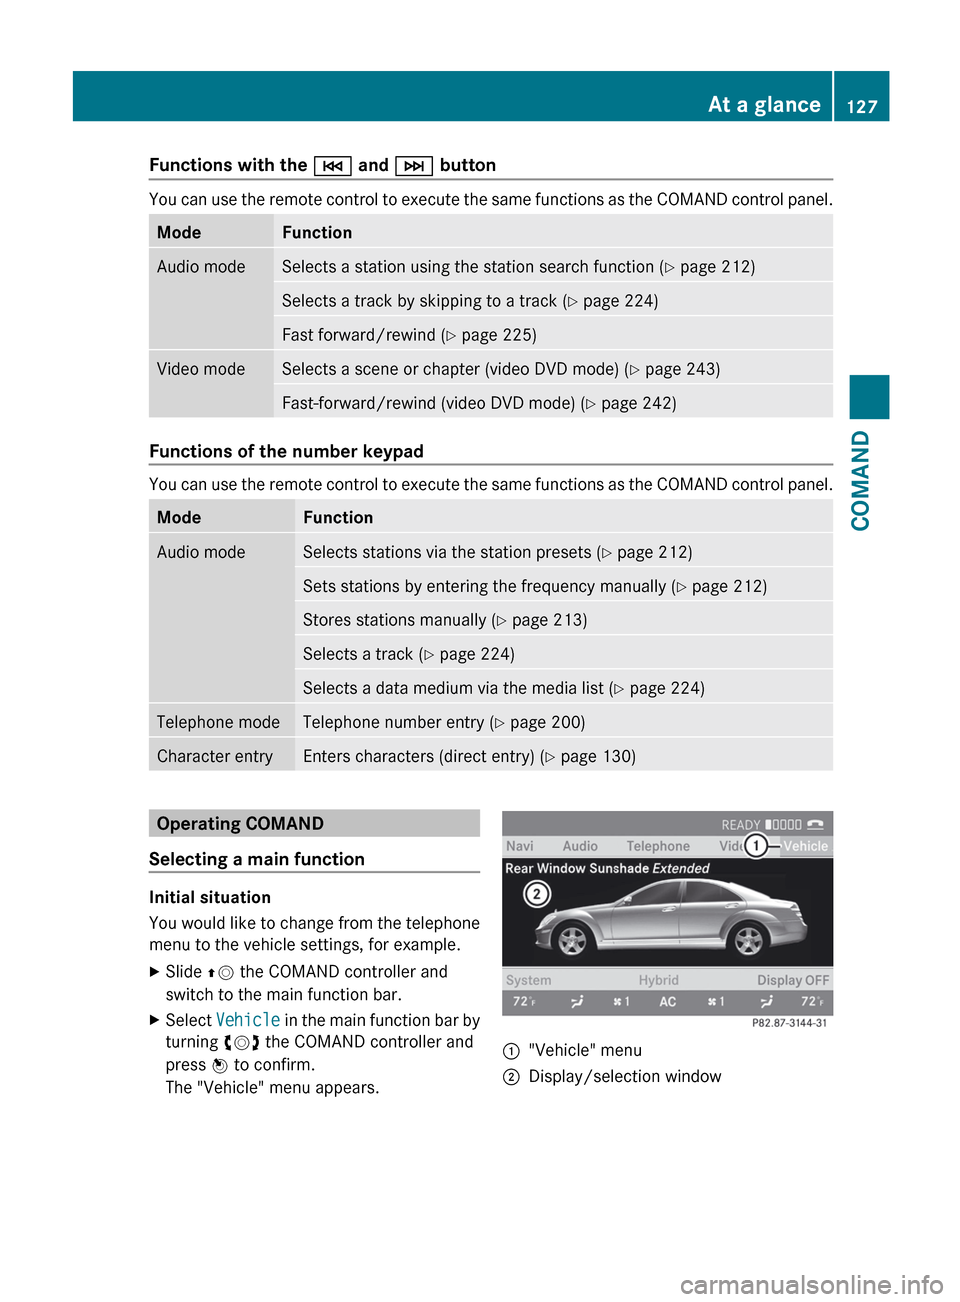
The "Vehicle" menu appears.:"Vehicle" menu;Display/selection windowAt a glance127COMANDZ
Page 151 of 536

XTo confirm an entry in COMAND: select
¬ using the COMAND controller and
press W to confirm.
or
XSelect SEND on the telephone keypad.XEnter the same passcode into the
Bluetooth ®
device (see the operating
instructions for the respective device).
The device is authorized.
External authorization
If COMAND does not detect your
Bluetooth ®
device, this may be due to
particular security settings on your
Bluetooth ®
device. In this case, you can test
if your Bluetooth ®
device can find COMAND.
The Bluetooth ®
device name of COMAND is
"MB Bluetooth".
XSelect Update .XSelect Options by sliding VY the
COMAND controller and press W to
confirm.XSelect External Authorization and
press W to confirm.XStart the Bluetooth ®
scan process on the
Bluetooth ®
device (see separate operating
instructions of the respective device).XSelect COMAND ("MB Bluetooth").
i The order in which the passkey is entered
depends on the mobile phone.
XEnter the passkey on the Bluetooth ®
device
when prompted.XConfirm the Do you want to authorize
XX? question in COMAND with Yes.XEnter the passkey in COMAND.
Displaying the details of a Bluetooth ®
device
XIn the Bluetooth ®
device list, select the
desired device by turning cVd the
COMAND controller.XSelect Options by sliding VY the
COMAND controller and press W to
confirm.XSelect Details and press W to confirm.
The detailed display for this device
appears.XTo close the detailed view: turn cVd or
slide XVY the COMAND controller.
De-authorizing (de-registering) a
Bluetooth ®
device
Mercedes-Benz USA, LLC recommends de-
authorization in both COMAND and the
Bluetooth ®
device, e.g. the mobile phone.
Subsequent authorization may otherwise fail.
XIn the Bluetooth ®
device list, select the
authorized device by turning cVd the
COMAND controller.XSelect Options by sliding VY the
COMAND controller and press W to
confirm.XSelect De-authorize and press W to
confirm.
A prompt appears asking whether you
really wish to de-authorize this device.XSelect Yes or No and press W to confirm.
If you select Yes, the authorization for the
device will be revoked.
If you select No, the process will be aborted.
i
If a Bluetooth ®
device has been de-
authorized and is out of range, when a new
search is carried out it will not appear in the
Bluetooth ®
device list.
System language settings
This function allows you to determine the
language for the menu displays and the
navigation messages. The selected language
affects the characters available for entry.
When you set the system language, the
language of the Voice Control System will
System settings149COMANDZ
Page 170 of 536

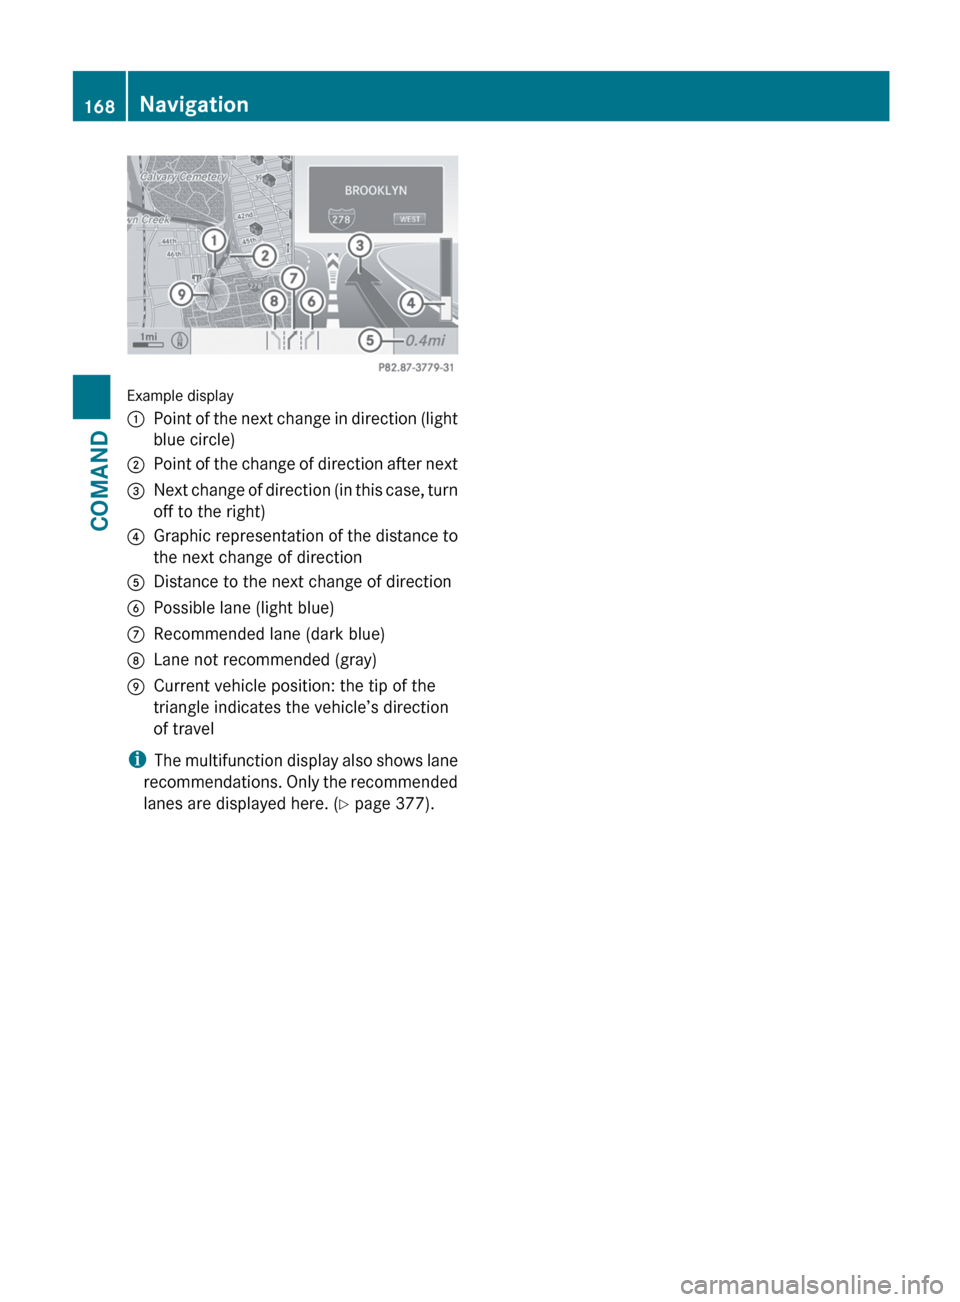
Example display
:Point of the next change in direction (light
blue circle);Point of the change of direction after next=Next change of direction (in this case, turn
off to the right)?Graphic representation of the distance to
the next change of directionADistance to the next change of directionBPossible lane (light blue)CRecommended lane (dark blue)DLane not recommended (gray)ECurrent vehicle position: the tip of the
triangle indicates the vehicle’s direction
of travel
i The multifunction display also shows lane
recommendations. Only the recommended
lanes are displayed here. ( Y page 377).
168NavigationCOMAND
Page 199 of 536

If you want to reauthorize a mobile phone
following de-authorization, you can select a
different passcode.XTo enter a passcode in COMAND: press
the number keys in sequence.
¬ is available for selection after the first
number has been entered.
or
XSelect the digits one by one by turning
cVd the COMAND controller and press
W to confirm.XTo confirm an entry in COMAND: select
¬ using the COMAND controller and
press W to confirm.
or
XSelect SEND on the telephone keypad.XNow enter the same passcode in the mobile
phone.
To make entries on the mobile phone: if
the Bluetooth ®
connection is successful, you
will be requested to enter the passcode (see
mobile phone operating instructions).
XEnter the same passcode on the mobile
phone that you entered in COMAND.
i After entering the passcode, you may also
need to enter a confirmation in your mobile
phone to connect calls. Please check your
mobile phone display.
If the Error during authorization
process message appears on the
COMAND display, you may have exceeded
the allowed time. Repeat the procedure.
The mobile phone is connected to COMAND
(authorized). You can now make phone calls
using the COMAND hands-free system.
External authorization
If COMAND does not detect your mobile
phone, this may be due to particular security
settings on your mobile phone. In this case,
you can test if your mobile phone can find
COMAND. The Bluetooth ®
device name of
COMAND is MB Bluetooth .
Observe the following: some mobile phones
require that you reconnect to COMAND after
you have entered the passcode (see the
mobile phone operating instructions). The
mobile phone cannot otherwise be
authorized.XPress the S function button on the
COMAND controller once or twice.XSelect Data/Connections in the
telephone basic menu by sliding VÆ and
turning cVd the COMAND controller and
press W to confirm.XSelect Bluetooth Telephones and press
W to confirm.XSelect Update .XSelect Options by sliding VY and press
W to confirm.XSelect External Authorization and
press W to confirm.XStart the Bluetooth ®
search on the mobile
phone (see the mobile phone operating
instructions).XSelect COMAND ( MB Bluetooth) on the
mobile phone.
i The order in which the passkey is entered
depends on the mobile phone.
XEnter the passkey on the mobile phone
when prompted.XConfirm the Do you want to authorize
XX? question in COMAND with Yes.XEnter the passkey in COMAND.
Connecting another mobile phone
If you have authorized more than one mobile
phone, you can switch between the individual
phones.
i You can only switch to another authorized
phone if you are not currently making a call.
XSelect the mobile phone in the Bluetooth ®
telephones list by turning cVd theTelephone197COMANDZ
Page 224 of 536

Option 2XPress the R function button once or
twice.XSelect an audio medium from the media list
( Y page 224).
Option 3
XSelect Audio in the main function bar by
sliding ZV and turning cVd the COMAND
controller and press W to confirm.
The last active audio source is now
activated.
If another audio source is switched on, you
can now switch to disc mode in the audio
menu.XSelect Audio by sliding ZV and turning
cVd the COMAND controller and press
W to confirm.
The audio menu appears.XSelect Disc, Memory Card , MUSIC
REGISTER , Media Interface or USB and
press W to confirm.
This switches to the desired audio source.XSelect an audio medium from the media list
( Y page 224).
Example display: audio CD mode
:Disc type;Track number=Disc number?Disc name (only if stored on the disc)ATrack name (only if stored on the disc)BTrack timeCGraphic time and track displayDSound settingsECurrent playback optionFMedia selectionGMusic searchHRecording (saving) musicICD functions
Example display: audio DVD mode
:Disc type;Track name=Disc number?Disc name (only if stored on the disc)ATrack timeBGraphic time and track displayCSound settingsDCurrent playback optionEMedia selectionFMusic searchGStop functionHPause functionIAudio DVD mode222AudioCOMAND
Page 232 of 536

If you insert thicker discs, e.g. those that
contain data on both sides (DVD on one
side and audio data on the other), they
cannot be ejected and can damage the
drive.
Do not use discs with a diameter of 8 cm,
even with an adapter. Only use round discs
with a diameter of 12 cm.
i COMAND is able to play back audio CDs
in multichannel audio format.
MUSIC REGISTER
General notes
You can store music files in MP3 or WMA
format in the MUSIC REGISTER. The memory
has a capacity of approximately 7 GB.
! Retain the original music files in a secure
location. An error in COMAND might result
in the loss of the music files stored in the
MUSIC REGISTER. Mercedes-Benz is not
liable for any loss of data.
Switching to MUSIC REGISTER
XSelect Audio in the main function bar by
sliding ZV and turning cVd the COMAND
controller and press W to confirm.
If MUSIC REGISTER was the last mode
selected, it is now switched on.
If another audio source is switched on, you
can now switch on the MUSIC REGISTER in
the audio menu.XSelect Music Register and press W to
confirm.
Example display: MUSIC REGISTER
:Type of data carrier: MUSIC REGISTER;Track number=Track name?Track timeAGraphic time and track displayBCurrent playback settings (no symbol for
"Normal track sequence")CSound settingsDMedia selectionECurrent folderFSearch functionsGData carrier position in the media listHTo call up the MUSIC REGISTER menu
Copying music data to the MUSIC
REGISTER
Introduction
You can copy music files from discs in the
DVD changer, the single DVD drive, the
memory card or the COMAND USB, as long
as they are in MP3 and/or WMA formats.
i While copying, several functions will not
be available. If this is the case, you will see
a message to this effect.
1. Selecting a data medium
XSelect Audio by sliding ZV and turning
cVd the COMAND controller and press
W to confirm.
The audio menu appears.230AudioCOMAND
Page 246 of 536

XSelect Title Selection by turning cVd
the COMAND controller and press W to
confirm.XSelect a film/title and press W to confirm.
DVD menu
Calling up the DVD menu
The DVD menu is the menu stored on the DVD
itself. It is structured in various ways
according to the individual DVD and permits
certain actions and settings.
In the case of multi-language DVDs, for
example, you can set the language in the DVD
menu.
XPress W the COMAND controller to show
the menu.XSelect DVD-V in the menu by turning cVd
the COMAND controller and press W to
confirm.XSelect DVD Functions and press W to
confirm.XSelect Menu and press W to confirm.
The DVD menu appears.
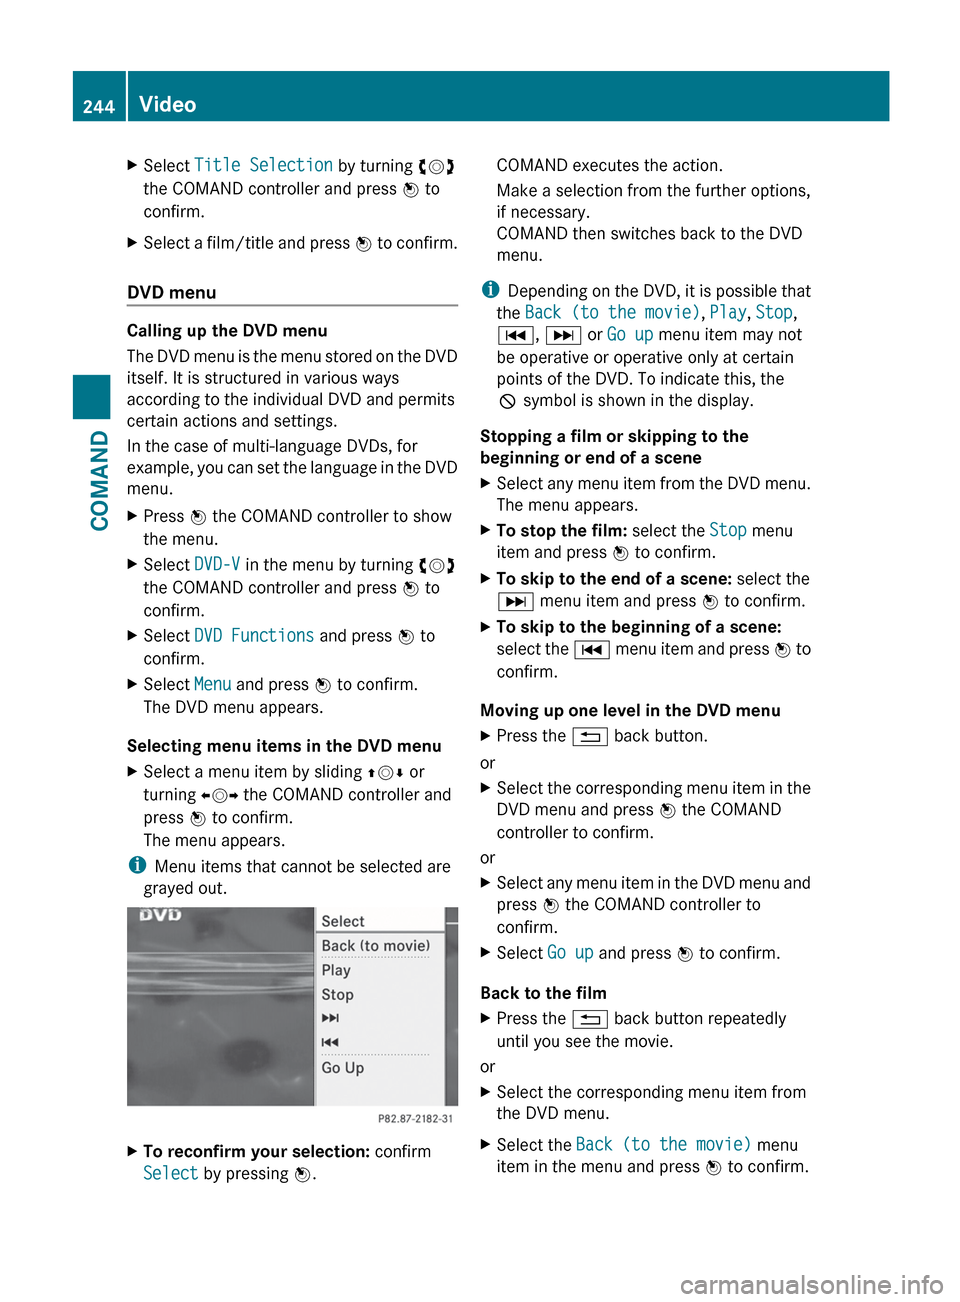
Selecting menu items in the DVD menu
XSelect a menu item by sliding ZVÆ or
turning XVY the COMAND controller and
press W to confirm.
The menu appears.
i Menu items that cannot be selected are
grayed out.
XTo reconfirm your selection: confirm
Select by pressing W.COMAND executes the action.
Make a selection from the further options,
if necessary.
COMAND then switches back to the DVD
menu.
i Depending on the DVD, it is possible that
the Back (to the movie) , Play , Stop ,
C , D or Go up menu item may not
be operative or operative only at certain
points of the DVD. To indicate this, the
K symbol is shown in the display.
Stopping a film or skipping to the
beginning or end of a scene
XSelect any menu item from the DVD menu.
The menu appears.XTo stop the film: select the Stop menu
item and press W to confirm.XTo skip to the end of a scene: select the
D menu item and press W to confirm.XTo skip to the beginning of a scene:
select the C menu item and press W to
confirm.
Moving up one level in the DVD menu
XPress the % back button.
or
XSelect the corresponding menu item in the
DVD menu and press W the COMAND
controller to confirm.
or
XSelect any menu item in the DVD menu and
press W the COMAND controller to
confirm.XSelect Go up and press W to confirm.
Back to the film
XPress the % back button repeatedly
until you see the movie.
or
XSelect the corresponding menu item from
the DVD menu.XSelect the Back (to the movie) menu
item in the menu and press W to confirm.244VideoCOMAND