2012 MERCEDES-BENZ S-Class warning
[x] Cancel search: warningPage 241 of 536

Notes on USB devices
R In order to keep the initialization time to a
minimum, store only music data on a USB
device.
R Approximately 10,000 tracks are
supported. Multiple partitions should be
used for larger numbers of tracks.
R Do not use USB extension leads or
adapters. They can impair functionality.
R A background search of the USB device is
performed and any playlists found are
shown in a separate category in addition to
the folders. Initialization of larger USB mass
storage devices containing a large number
of files may take several minutes.
i DRM (Digital Rights Management)
protected files are not supported by the
Media Interface.
Audio AUX mode
Notes on audio AUX mode
You can connect an external audio source
(AUX) to COMAND. The socket for this is
located in the glove box.
If COMAND is equipped with a Media
Interface, external audio sources are
connected using the corresponding cable set.
An AUX socket is not provided.
i You can find more information on the
Internet at http://www.mercedes-
benz.com/connect and in the "Media
Interface mode" section ( Y page 233).
Activating audio AUX mode
When you connect an external audio source,
audio AUX is not selected automatically.
XSelect Audio in the main function bar by
sliding ZV and turning cVd the COMAND
controller and press W to confirm.XSelect AUX using cVd and press W to
confirm.
The audio AUX menu appears. The medium
in the external audio source is played, if the
source is connected and playback
selected.
Please see the respective operating
instructions for how to operate the external
audio source.
You will find details on volume ( Y page 134)
and sound ( Y page 135) settings in the "At a
glance" section.
GWARNING
External audio sources may have different
volumes, which can mean that system
messages such as traffic announcements and
navigation system announcements are much
louder. If necessary, please deactivate the
system messages or adjust their volume
manually.
Increasing the volume
In some cases, the volume of the AUX device
may be quieter or louder, or the usual
maximum possible volume cannot be
reached. On some devices, it is possible to
adjust the volume separately. In this case,
start at a medium volume and increase it
gradually. This enables you to determine
whether the system is able to play tones at
high volume without distorting them.
Audio239COMANDZ
Page 242 of 536
Video
General information
Automatic picture shutoff
If the vehicle is traveling faster than
approximately 3 mph (5 km/h) and video
DVD mode is activated, the picture is
deactivated automatically.
The video picture is only shown if the selector
lever is in the P position.
When the selector lever is moved from the P
position, the In order not to distract
the driver, the picture is faded out
while the vehicle is in motion.
message appears.
As soon as the vehicle speed falls below
approximately 3 mph (5 km/h), the picture is
reactivated.
Basic settings
Picture settings
Adjusting the brightness, contrast or
color
XPress W the COMAND controller to show
the menu.XSelect Video by sliding VÆ and turning
cVd the COMAND controller and press
W to confirm.XSelect DVD-V and press W to confirm.XSelect Brightness , Contrast or Color by
turning cVd the COMAND controller and
press W to confirm.
Changing the picture format
XPress W the COMAND controller to show
the menu.XSelect Video by sliding VÆ and turning
cVd the COMAND controller and press
W to confirm.XSelect Video DVD and press W to confirm.XSelect DVD-V and press W to confirm.
The DVD-V menu appears. The ä dot in
front of a menu item indicates the current
setting.XSelect Auto, 16:9 optimized , 4:3 or
Widescreen and press W to confirm.XSelect a setting by turning cVd the
COMAND controller and press W to
confirm.
Video DVD mode
Safety notes
GWARNING
COMAND is classified as a Class 1 laser
product. You must not open the casing. If you
open the casing, or if the casing is faulty or
damaged, there is a risk of exposure to
invisible laser radiation. This may damage
your eyes, or those of others.
COMAND does not contain any parts that can
be serviced by the user. For safety reasons,
all maintenance work must be carried out by
qualified aftersales technicians.
GWARNING
Only when the vehicle is stationary should
you:
R load a disc
R eject a disc
There is a risk of being distracted from the
road and traffic conditions if this is done while
the vehicle is in motion.
Notes about discs
There may be playback problems when
playing copied discs. There are a large variety
of discs, DVD authoring software, writing
software and writers available. This variety
means that there is no guarantee that the
system will be able to play discs that you have
copied yourself.
240VideoCOMAND
Page 248 of 536

Switching to video AUX modeXSelect Video in the main function bar by
sliding ZV and turning cVd the COMAND
controller and press W to confirm.
If video AUX mode was the last mode
selected, it will now be active.
If another video source is switched on, you
can now switch to video AUX mode in the
video menu.XSelect Video and press W to confirm.XSelect AUX and press W to confirm.
The video AUX menu appears. You will hear
and see the content of the external video
source if it is connected and switched to
playback.
For details on how to operate the external
video source, see the respective device's
operating instructions.
Showing/hiding the menu
XTo show: press W the COMAND
controller.XTo hide: slide ZV the COMAND controller
and confirm Full screen by pressing W.
Volume and sound settings
You will find details on volume ( Y page 134)
and sound ( Y page 135) settings in the "At a
glance" section.
GWARNING
External video sources may have different
volumes, which can mean that system
messages such as traffic announcements and
navigation system announcements are much
louder. If necessary, please deactivate the
system messages or adjust their volume
manually.
i In some cases, the volume of the AUX
device may be quieter or louder, or the
usual maximum possible volume cannot be
reached. On some devices, it is possible to
adjust the volume separately. In this case,
start at a medium volume and increase it
gradually. This enables you to determine
whether the system is able to play the
music at high volume without distorting it.
Rear Seat Entertainment System
General information
Important safety notes
GWARNING
The RSE CD/DVD player is a Class 1 laser
product. There is a danger of invisible laser
radiation when you open or damage the cover.
Do not remove the cover. The RSE CD/DVD
player does not contain any parts which can
be serviced by the user. For safety reasons,
have any necessary service work performed
by qualified personnel.
GWARNING
The driver should not wear a Rear Seat
Entertainment headset while operating the
vehicle under any circumstances. The use of
a headset while driving the vehicle could
drastically impair the ability to react to audible
traffic conditions (e.g. emergency sirens from
police/fire/ambulance, another car's horn,
etc.).
GWARNING
When not in use, headsets or external video
sources should be stored in a safe location
(e.g. one of the vehicle's storage
compartments) so that they are not loose
within the passenger compartment during
braking, vehicle maneuvers or a traffic
accident. Objects moving within the
passenger compartment could cause serious
personal injury to vehicle occupants.
GWARNING
Due to a potential choking hazard, wired
headset usage by children should only occur
with adult supervision.
246Rear Seat Entertainment SystemCOMAND
Page 249 of 536
Changing batteries
Batteries are required for the remote control
and for the two sets of cordless headphones.
GWARNING
Keep the batteries out of the reach of
children. Consult a doctor immediately if a
child should swallow a battery.
Do not dismantle, short-circuit or burn a
battery.
HEnvironmental note
Dispose of discharged batteries in an
environmentally responsible manner.
On the remote control
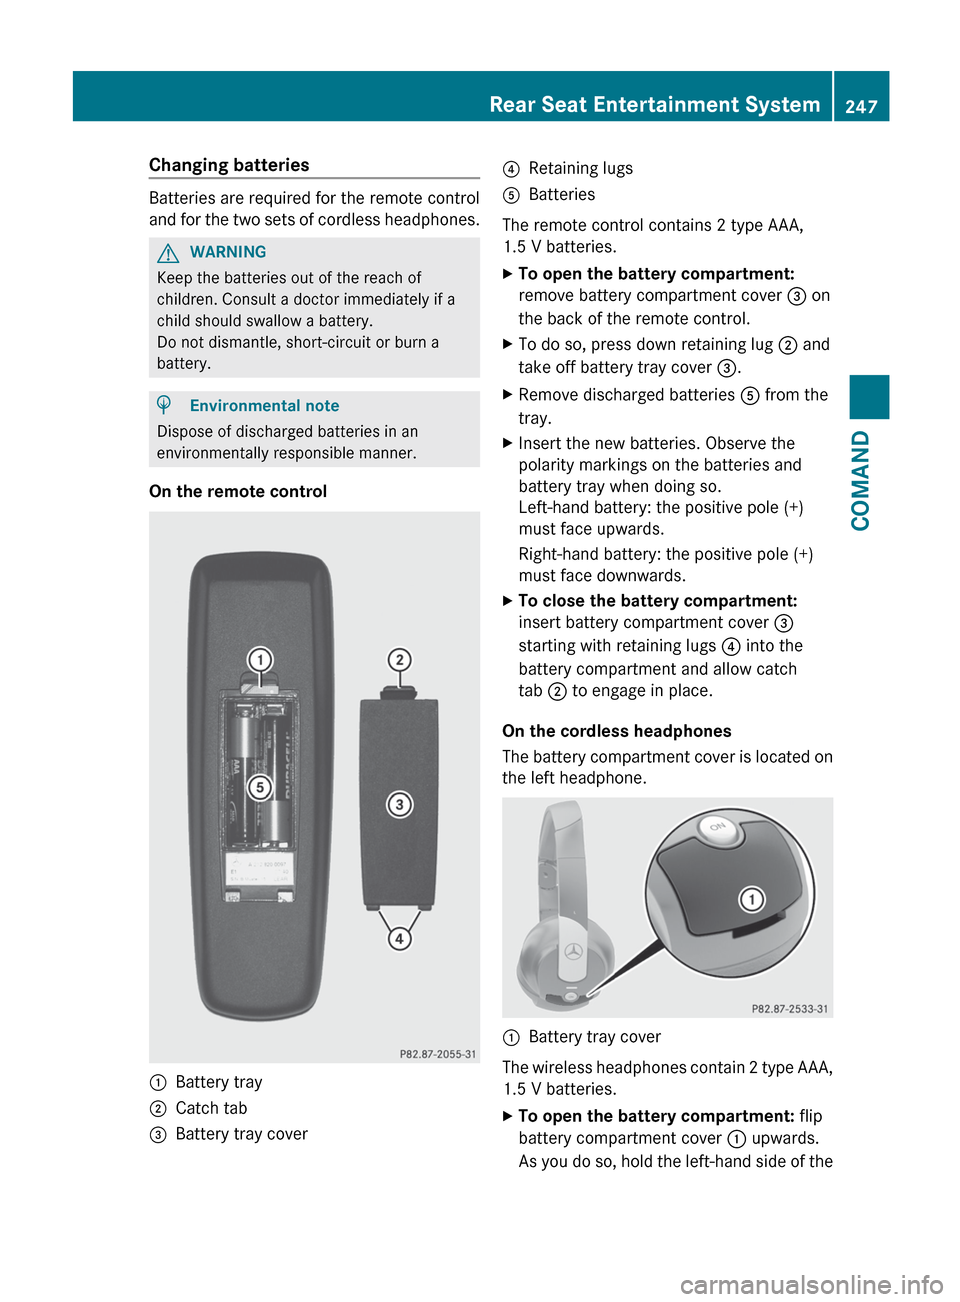
:Battery tray;Catch tab=Battery tray cover?Retaining lugsABatteries
The remote control contains 2 type AAA,
1.5 V batteries.
XTo open the battery compartment:
remove battery compartment cover = on
the back of the remote control.XTo do so, press down retaining lug ; and
take off battery tray cover =.XRemove discharged batteries A from the
tray.XInsert the new batteries. Observe the
polarity markings on the batteries and
battery tray when doing so.
Left-hand battery: the positive pole (+)
must face upwards.
Right-hand battery: the positive pole (+)
must face downwards.XTo close the battery compartment:
insert battery compartment cover =
starting with retaining lugs ? into the
battery compartment and allow catch
tab ; to engage in place.
On the cordless headphones
The battery compartment cover is located on
the left headphone.
:Battery tray cover
The wireless headphones contain 2 type AAA,
1.5 V batteries.
XTo open the battery compartment: flip
battery compartment cover : upwards.
As you do so, hold the left-hand side of theRear Seat Entertainment System247COMANDZ
Page 252 of 536

XSelect Settings using the : button
and confirm with the 9 button.XSelect Language using the 9:
buttons and press the 9 button to confirm.
The list of languages appears. The # dot
indicates the current setting.XSelect a language using the 9:
buttons and press the 9 button to confirm.
The Rear Seat Entertainment System
activates the respective language.
Switching the display design
XSelect Settings using the : button
and confirm with the 9 button.XSelect Day Mode , Night Mode or
Automatic using the 9: buttons
and press the 9 button to confirm.
The ä icon indicates the current setting.DesignExplanationDay ModeThe display is set
permanently to day
design.Night ModeThe display is set
permanently to night
design.AutomaticThe display design
changes depending on
the vehicle instrument
cluster illumination.Setting the brightnessXSelect Settings using the : button
and confirm with the 9 button.XSelect Brightness using the 9:
buttons and press the 9 button to confirm.
A scale appears.XAdjust the brightness using the 9:
buttons and press the 9 button to confirm.
The brightness bar moves up or down. The
picture becomes lighter or darker in
accordance with the scale.
Showing/hiding the picture
XTo hide the picture: select Display OFF
in the system menu using the :;
buttons on the remote control and press
the 9 button to confirm.
The picture is hidden.XTo display the picture: press the 9
button.
Audio CD/DVD and MP3 mode
Safety note
GWARNING
The RSE CD/DVD player is a Class 1 laser
product. There is a danger of invisible laser
radiation when you open or damage the cover.
Do not remove the cover. The RSE CD/DVD
player does not contain any parts which can
be serviced by the user. For safety reasons,
have any necessary service work performed
by qualified personnel.
General notes
You will find information on the following
topics in the Audio section:
R notes on CDs/DVDs ( Y page 229)
R notes on MP3 mode ( Y page 228)
R notes on copyright ( Y page 229)
250Rear Seat Entertainment SystemCOMAND
Page 264 of 536
COMAND controller and press W to
confirm.
The main area is active.XSelect the Rear Window Sunshade
function by sliding XVY or turning cVd
the COMAND controller and press W to
confirm.
Activating/deactivating the automatic
folding mirror function
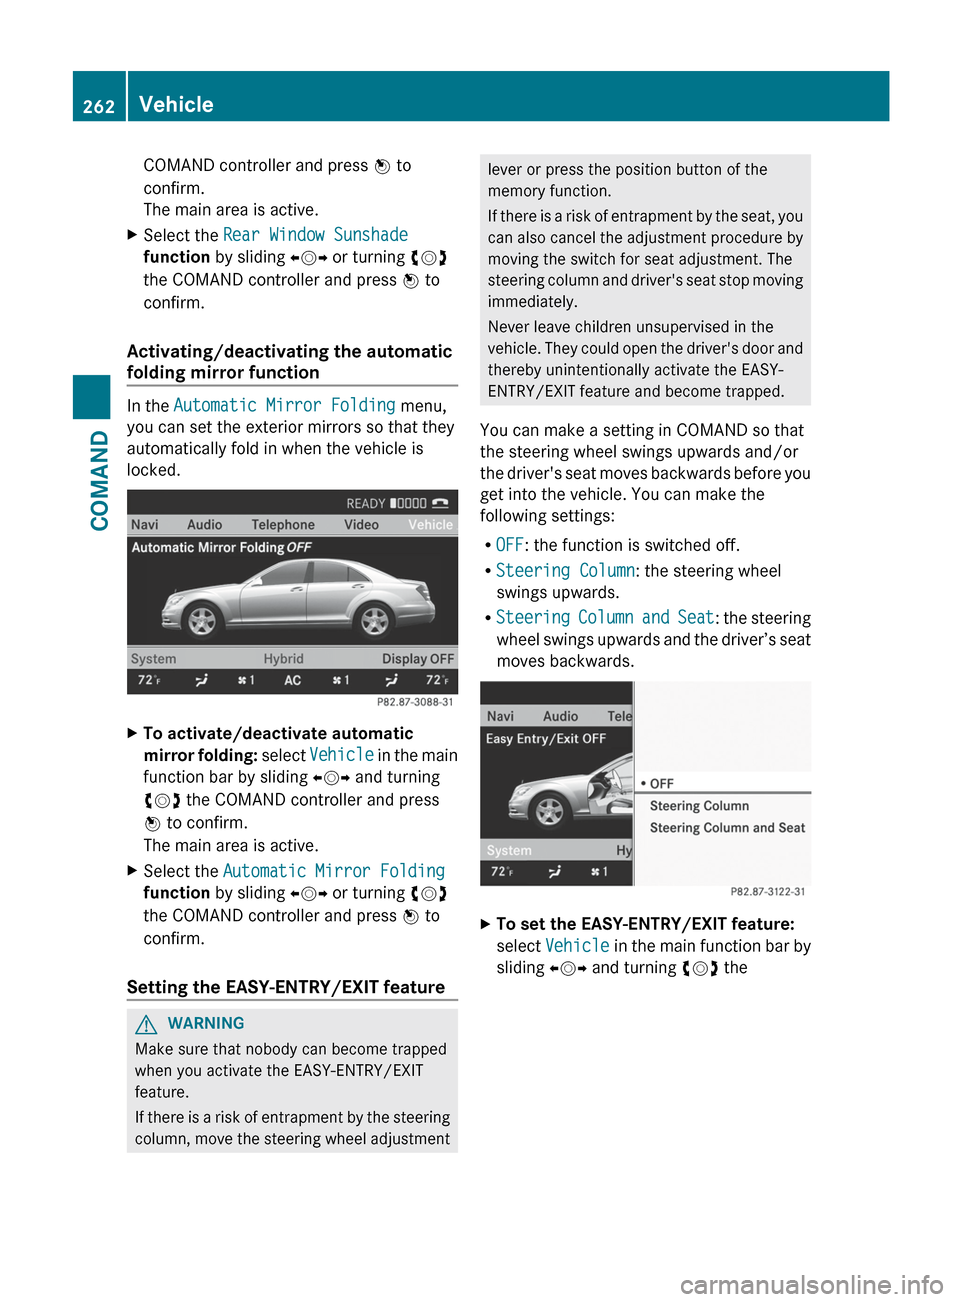
In the Automatic Mirror Folding menu,
you can set the exterior mirrors so that they
automatically fold in when the vehicle is
locked.
XTo activate/deactivate automatic
mirror folding: select Vehicle in the main
function bar by sliding XVY and turning
cVd the COMAND controller and press
W to confirm.
The main area is active.XSelect the Automatic Mirror Folding
function by sliding XVY or turning cVd
the COMAND controller and press W to
confirm.
Setting the EASY-ENTRY/EXIT feature
GWARNING
Make sure that nobody can become trapped
when you activate the EASY-ENTRY/EXIT
feature.
If there is a risk of entrapment by the steering
column, move the steering wheel adjustment
lever or press the position button of the
memory function.
If there is a risk of entrapment by the seat, you
can also cancel the adjustment procedure by
moving the switch for seat adjustment. The
steering column and driver's seat stop moving
immediately.
Never leave children unsupervised in the
vehicle. They could open the driver's door and
thereby unintentionally activate the EASY-
ENTRY/EXIT feature and become trapped.
You can make a setting in COMAND so that
the steering wheel swings upwards and/or
the driver's seat moves backwards before you
get into the vehicle. You can make the
following settings:
R OFF : the function is switched off.
R Steering Column : the steering wheel
swings upwards.
R Steering Column and Seat : the steering
wheel swings upwards and the driver’s seat
moves backwards.XTo set the EASY-ENTRY/EXIT feature:
select Vehicle in the main function bar by
sliding XVY and turning cVd the262VehicleCOMAND
Page 269 of 536

Climate control main menu
You can:
R switch cooling with dehumidification on or
off ( Æ )
R control climate control centrally ( Mono)
R adjust the Footwell Temperature
R set the Airflow for the air vents
R operate the Rear air conditioning from the
front
Switching cooling with air
dehumidification on/off
Cooling is operational when the engine is
running, and cools according to the selected
interior temperature for the vehicle. Cooling
also dehumidifies the air inside the vehicle
and, thereby, prevents the windows from
fogging up.
GWARNING
If you switch off cooling with
dehumidification, the vehicle will not be
cooled and the air not dehumidified in warm
weather conditions. The windows can mist up
faster. This could result in your no longer
being able to observe the traffic conditions
properly and you may cause an accident.
i Condensation may collect on the
underside of the vehicle when the cooler is
operating.
XSelect the climate control main menu in the
air-conditioning function bar by turningcVd the COMAND controller and press
W to confirm.
The climate control menu opens.XTo switch on: select Æ and press W.XTo switch off: select Æ and press W.
A tick appears.
Controlling climate control centrally
You can use the Mono function to set all the
air-conditioning zones in the vehicle to the
same settings. If the Mono function is
switched on and you adjust climate control
on the driver’s side, these changes will also
be made in all the air-conditioning zones.
XSelect the climate control main menu in the
air-conditioning function bar by turning
cVd the COMAND controller and press
W to confirm.
The climate control menu opens.XSelect Mono and press W.
A tick appears when the function is
selected.
The Mono function is automatically switched
off if you:
Vehicle267COMANDZ
Page 278 of 536

Useful information
i This Operator's Manual describes all
models and all standard and optional
equipment of your vehicle available at the
time of publication of the Operator's
Manual. Country-specific differences are
possible. Please note that your vehicle may
not be equipped with all features
described. This also applies to safety-
related systems and functions.
i Please read the information on qualified
specialist workshops ( Y page 31).
Exterior lighting
Important safety notes
For reasons of safety, Mercedes-Benz
recommends that you drive with the lights
switched on even during the daytime. In some
countries, operation of the headlamps varies
due to legal requirements and self-imposed
obligations.
Information about driving abroad
Converting to symmetrical low beam
when driving abroad: switch the headlamps
to symmetrical low beam in countries in
which traffic drives on the opposite side of the
road to the country where the vehicle is
registered. This prevents glare to oncoming
traffic. Symmetrical lights do not illuminate
as large an area of the edge of the road.
Have the headlamps converted at a qualified
specialist workshop, e.g. an authorized
Mercedes-Benz Center, as close to the border
as possible before driving in these countries.
Converting to asymmetrical low beam
after returning: have the headlamps
converted back to asymmetrical low beam at
a qualified specialist workshop, e.g. an
authorized Mercedes-Benz Center, as soon as
possible after crossing the border again.
Light switch
Operation
Depending on the date of manufacture of your
vehicle, the c or à symbol for the
automatic headlamp mode/daytime running
lamps is located on the light switch.
1 WLeft-hand standing lamps2XRight-hand standing lamps3$Lights off/daytime running lamps4cAutomatic headlamp mode/daytime
running lamps5 TParking lamps, license plate and
instrument cluster lighting6 LLow-beam/high-beam headlamps7NFront fog lamps 118
RRear fog lamp
The turn signals, high-beam headlamps and
the high-beam flasher are operated using the
combination switch ( Y page 279).
! Switch off the parking lamps and standing
lamps when you leave the vehicle. This
prevents the battery from discharging.
The exterior lighting (except the parking/
standing lamps) switches off automatically if
you:
R remove the SmartKey from the ignition lock
R open the driver's door with the SmartKey
in position 0
If you hear a warning tone when you leave the
vehicle, the lights may still be switched on.
11 Only vehicles with Bi-Xenon headlamps without the Intelligent Light System are equipped with front fog lamps.276Exterior lightingLights and windshield wipers