2012 MERCEDES-BENZ GLK SUV length
[x] Cancel search: lengthPage 120 of 381
the main-beam headlamps are switched on
automatically. The
Kindicator lamp in
the instrument cluster also lights up.
If you are driving at speeds below
45 km/h or other road users are recog-
nised or the roads are adequately lit:
the main-beam headlamps are switched off
automatically. The Kindicator lamp in
the instrument cluster goes out. The _
indicator lamp in the instrument cluster
stays on.
X To deactivate: move the combination
switch back to its normal position.
The _ indicator lamp in the instrument
cluster goes out. Headlamps misted up on the inside
The headlamps may mist up on the inside if
there is high atmospheric humidity.
X Switch on the lights and drive off.
The level of moisture diminishes, depend-
ing on the length of the journey and the
weather conditions (humidity and temper-
ature).
If the level of moisture does not diminish:
X Have the headlamps checked at a qualified
specialist workshop. Interior lighting
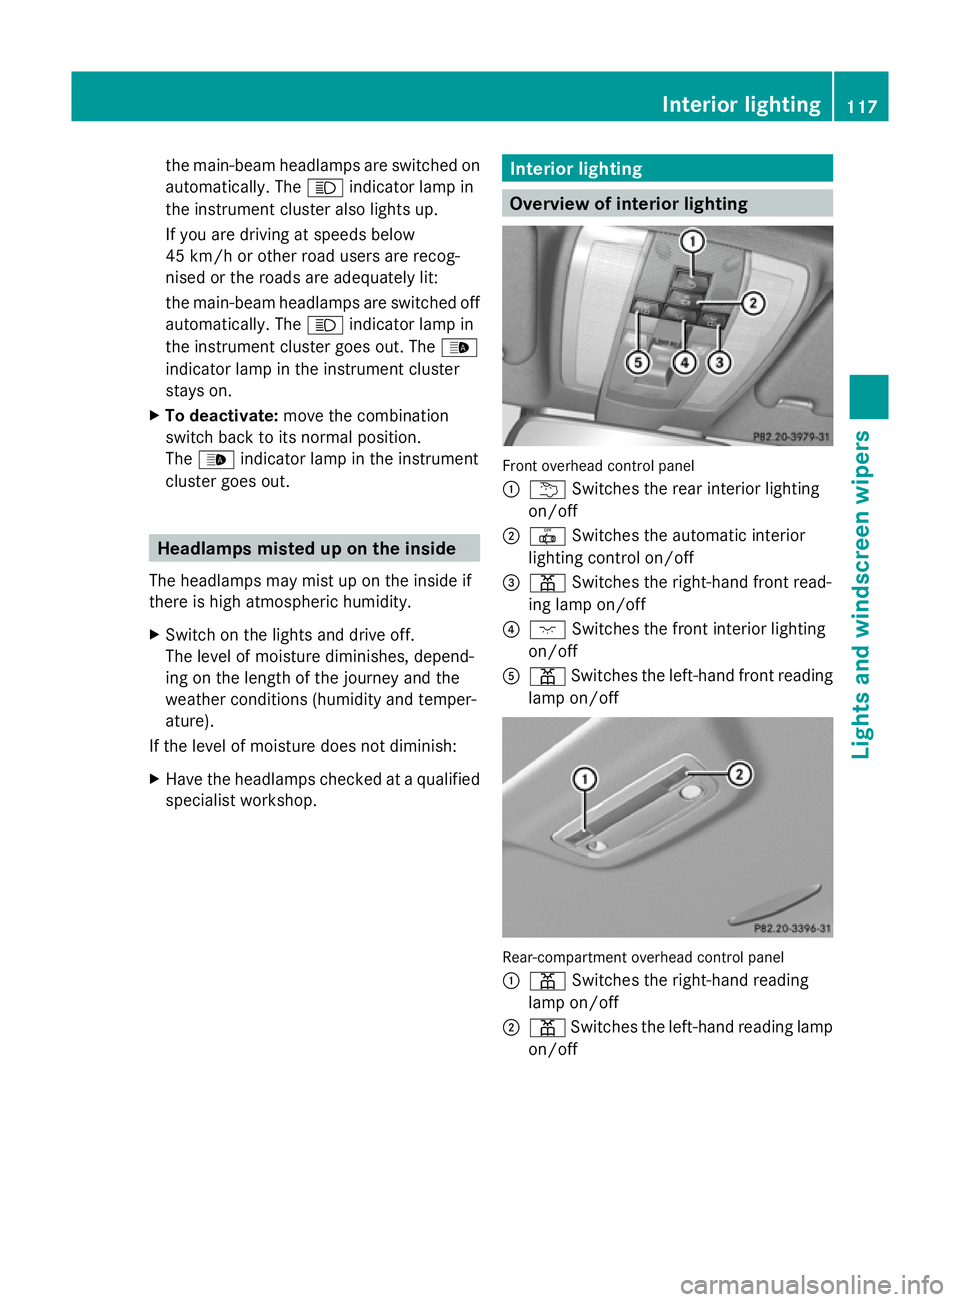
Overview of interior lighting
Front overhead control panel
:
u Switches the rear interior lighting
on/off
; | Switches the automatic interior
lighting control on/off
= p Switches the right-hand front read-
ing lamp on/off
? c Switches the front interior lighting
on/off
A p Switches the left-hand front reading
lamp on/off Rear-compartment overhead control panel
:
p Switches the right-hand reading
lamp on/off
; p Switches the left-hand reading lamp
on/off Interior lighting
117Lights andwindscreen wipers Z
Page 199 of 381
i
You will achieve the best results by wait-
ing for the steering procedure to complete
before pulling away.
If you reverse after activation, the steering
wheel is moved to the straight-ahead posi-
tion.
X Drive forwards or reverse the vehicle, being
ready to brake at all times.
X Stop as soon as PARKTRONIC sounds the
continuous warning tone, if not before.
X Drive forwards and reverse as instructed by
the PARKTRONIC warning displays.
Once you have exited the parking space com-
pletely, the steering wheel is moved to the
straight-ahead position. You hear a tone and
the message Park Assist switched off
Park Assist switched off
appears in the multifunction display. You will
then have to steer and merge into traffic on
your own. PARKTRONIC is still available.
Cancelling Active Parking Assist You can cancel Active Parking Assist at any
time.
X Stop the movement of the multifunction
steering wheel or steer yourself.
Active Parking Assist will be cancelled at
once. The Park Assist cancelled
Park Assist cancelled mes-
sage appears in the multifunction display.
or
X Press the PARKTRONIC button on the
centre console (Y page 190).
PARKTRONIC is switched off and Active
Parking Assist is immediately cancelled.
The Park Assist cancelled
Park Assist cancelled message
appears in the multifunction display.
Active Parking Assist is cancelled automati-
cally if:
R a gear is changed/the transmission is shif-
ted too early.
R parking using Active Parking Assist is no
longer possible. R
you are driving faster than 10 km/h.
R a wheel spins and ESP ®
intervenes or fails.
The ÷ warning lamp lights up in the
instrument cluster.
A warning tone sounds. The parking space
symbol disappears and the multifunction dis-
play shows the Park Assist cancelled
Park Assist cancelled
message.
When Active Parking Assist is cancelled, you
must steer again yourself.
Towing a trailer For vehicles with a trailer tow hitch, the min-
imum length for parking spaces is slightly
increased.
If you have attached a trailer to your vehicle,
you should not use Active Parking Assist.
Once the electrical connection is established
between your vehicle and the trailer, Active
Parking Assist is no longer available. PARK-
TRONIC is deactivated for the rear area.
Reversing camera
Important safety notes G
WARNING
Make sure that no persons or animals are in
the manoeuvring range. Otherwise, they
could be injured. G
WARNING
The reversing camera is only an aid and may
display obstacles in a distorted or incorrect
manner, or may not even display them at all.
The reversing camera does not relieve you of
the responsibility to pay attention. The cam-
era cannot show objects:
R very near to the rear bumper
R below the rear bumper
R in the area immediately above the boot lid
handle/tailgate handle recess
You are always responsible for safety and
must continue to pay attention to your imme-
diate surroundings when parking and 196
Driving systemsDriving and parking
Page 204 of 381
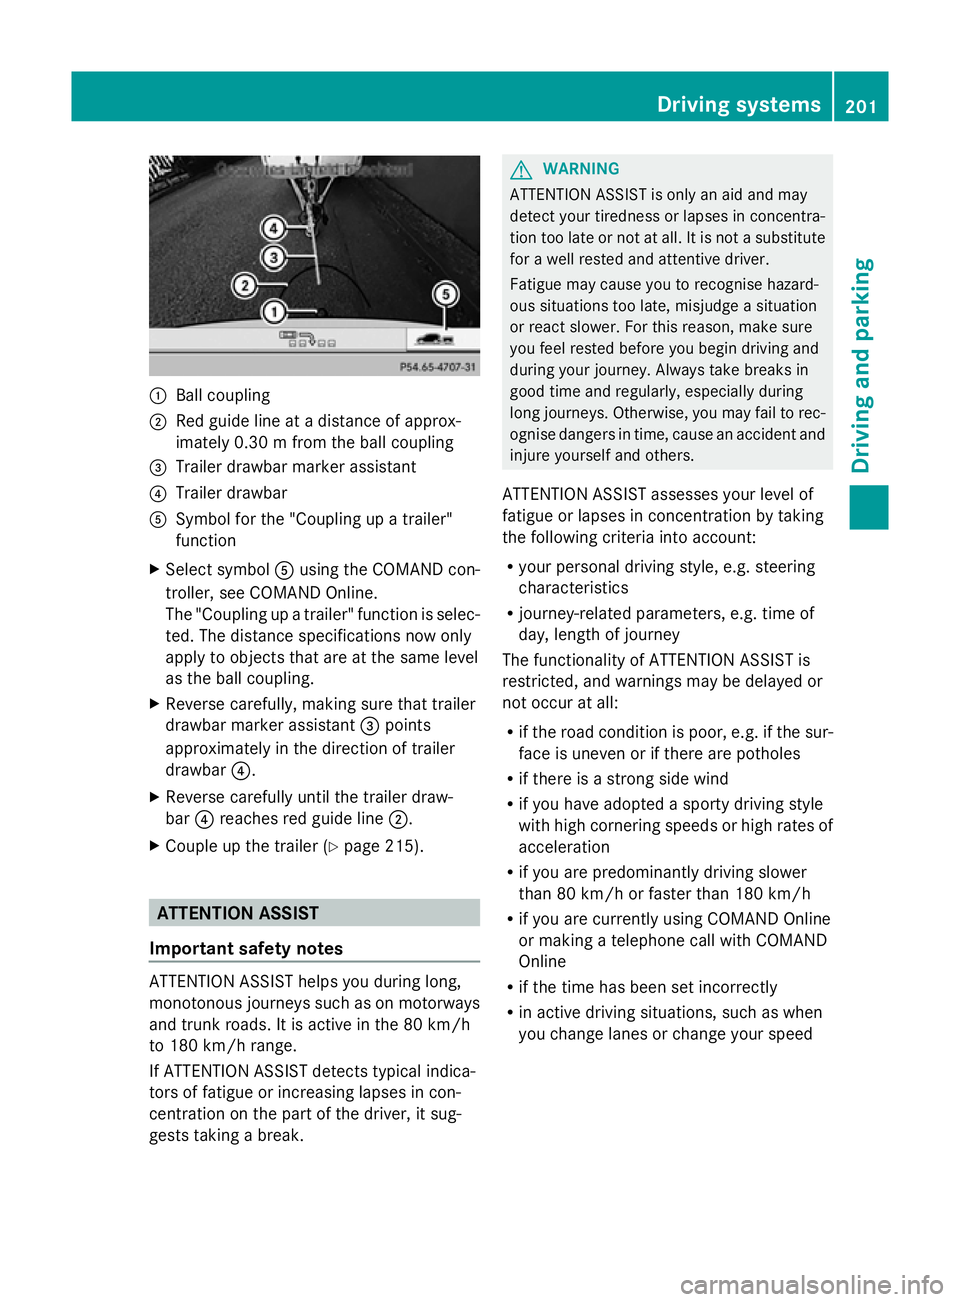
:
Ball coupling
; Red guide line at a distance of approx-
imately 0.30 m fromthe ball coupling
= Trailer drawbar marker assistant
? Trailer drawbar
A Symbol for the "Coupling up a trailer"
function
X Select symbol Ausing the COMAND con-
troller, see COMAND Online.
The "Coupling up a trailer" function is selec-
ted. The distance specifications now only
apply to objects that are at the same level
as the ball coupling.
X Reverse carefully, making sure that trailer
drawbar marker assistant =points
approximately in the direction of trailer
drawbar ?.
X Reverse carefully until the trailer draw-
bar ?reaches red guide line ;.
X Couple up the trailer (Y page 215).ATTENTION ASSIST
Important safety notes ATTENTION ASSIST helps you during long,
monotonous journeys such as on motorways
and trunk roads. It is active in the 80 km/h
to 180 km/h range.
If ATTENTION ASSIST detects typical indica-
tors of fatigue or increasing lapses in con-
centration on the part of the driver, it sug-
gests taking a break. G
WARNING
ATTENTION ASSIST is only an aid and may
detect your tiredness or lapses in concentra-
tion too late or not at all. It is not a substitute
for a well rested and attentive driver.
Fatigue may cause you to recognise hazard-
ous situations too late, misjudge a situation
or react slower. For this reason, make sure
you feel rested before you begin driving and
during your journey. Always take breaks in
good time and regularly, especially during
long journeys. Otherwise, you may fail to rec-
ognise dangers in time, cause an accident and
injure yourself and others.
ATTENTION ASSIST assesses your level of
fatigue or lapses in concentration by taking
the following criteria into account:
R your personal driving style, e.g. steering
characteristics
R journey-related parameters, e.g. time of
day, length of journey
The functionality of ATTENTION ASSIST is
restricted, and warnings may be delayed or
not occur at all:
R if the road condition is poor, e.g. if the sur-
face is uneven or if there are potholes
R if there is a strong side wind
R if you have adopted a sporty driving style
with high cornering speeds or high rates of
acceleration
R if you are predominantly driving slower
than 80 km/h or faster than 180 km/h
R if you are currently using COMAND Online
or making a telephone call with COMAND
Online
R if the time has been set incorrectly
R in active driving situations, such as when
you change lanes or change your speed Driving systems
201Driving and parking Z
Page 339 of 381
Be sure to use the original-length wheel bolts
when refitting the original wheel after it has
been repaired.
X Clean the wheel and wheel hub contact
surfaces. X
Place the emergency spare wheel on the
wheel hub and push it on.
X Tighten the wheel bolts until they are fin-
ger-tight.
X Inflate the collapsible emergency spare
wheel (Y page 336).
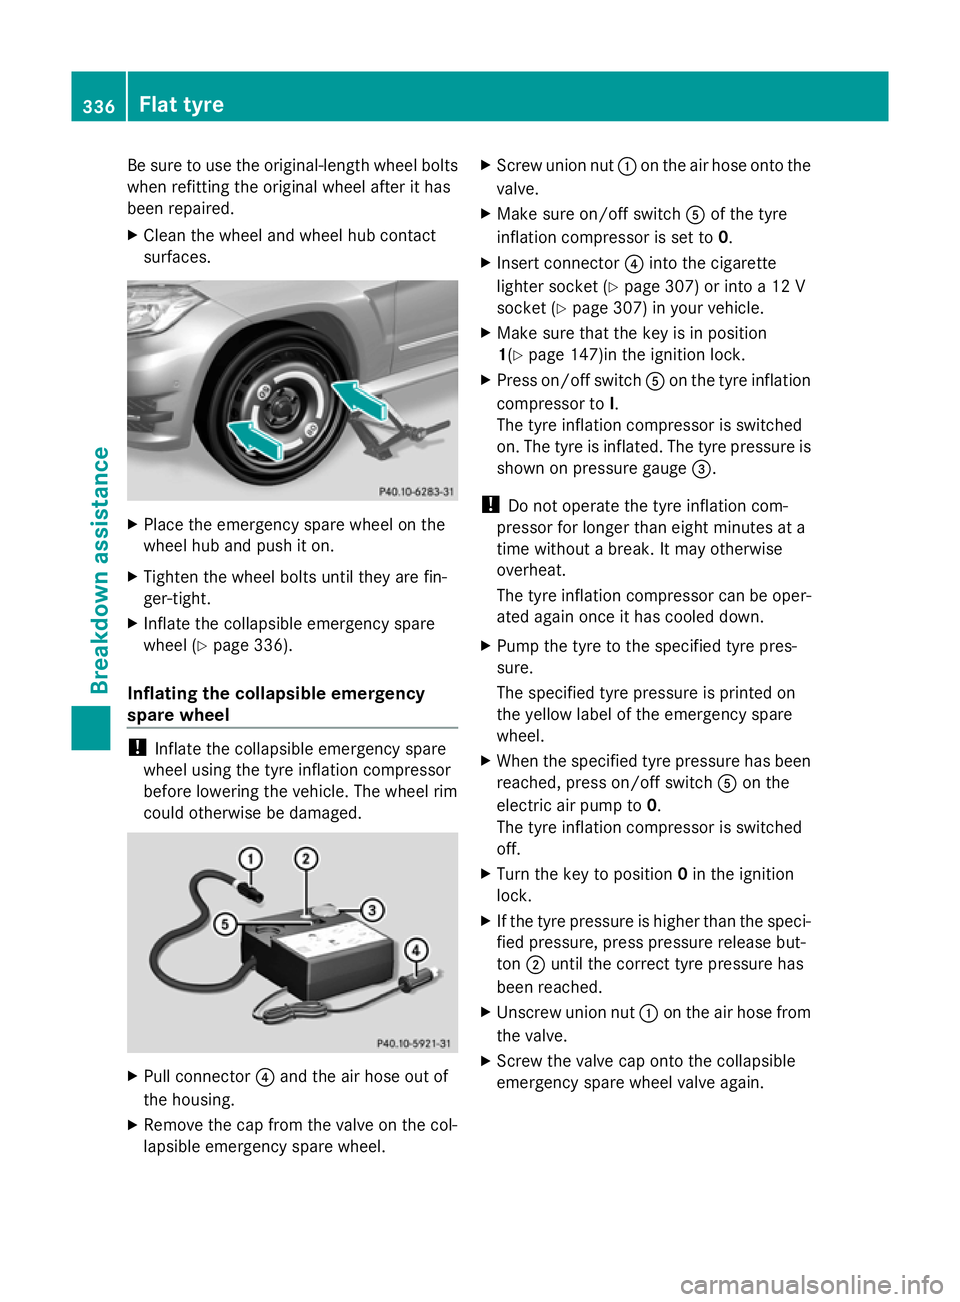
Inflating the collapsible emergency
spare wheel !
Inflate the collapsible emergency spare
wheel using the tyre inflation compressor
before lowering the vehicle. The wheel rim
could otherwise be damaged. X
Pull connector ?and the air hose out of
the housing.
X Remove the cap from the valve on the col-
lapsible emergency spare wheel. X
Screw union nut :on the air hose onto the
valve.
X Make sure on/off switch Aof the tyre
inflation compressor is set to 0.
X Insert connector ?into the cigarette
lighter socket (Y page 307) or into a 12 V
socket ( Ypage 307) in your vehicle.
X Make sure that the key is in position
1(Y page 147)in the ignition lock.
X Press on/off switch Aon the tyre inflation
compressor to I.
The tyre inflation compressor is switched
on. The tyre is inflated. The tyre pressure is
shown on pressure gauge =.
! Do not operate the tyre inflation com-
pressor for longer than eight minutes at a
time without a break. It may otherwise
overheat.
The tyre inflation compressor can be oper-
ated again once it has cooled down.
X Pump the tyre to the specified tyre pres-
sure.
The specified tyre pressure is printed on
the yellow label of the emergency spare
wheel.
X When the specified tyre pressure has been
reached, press on/off switch Aon the
electric air pump to 0.
The tyre inflation compressor is switched
off.
X Turn the key to position 0in the ignition
lock.
X If the tyre pressure is higher than the speci-
fied pressure, press pressure release but-
ton ;until the correct tyre pressure has
been reached.
X Unscrew union nut :on the air hose from
the valve.
X Screw the valve cap onto the collapsible
emergency spare wheel valve again. 336
Flat tyreBreakdown assistance
Page 342 of 381

!
You should have all work involving the
battery carried out at a qualified specialist
workshop. In the exceptional case that it is
necessary for you to disconnect the battery
yourself, make sure that:
R you switch off the engine and remove the
key. On vehicles with KEYLESS-GO,
ensure that the ignition is switched off.
Check that all the indicator lamps in the
instrument cluster are off. Otherwise,
electronic components, such as the
alternator, may be damaged.
R you first remove the negative terminal
clamp and then the positive terminal
clamp. Never swap the terminal clamps.
Otherwise, the vehicle's electronic sys-
tem may be damaged.
R in vehicles with automatic transmission,
the transmission is locked in position P
after disconnecting the battery. The vehi-
cle is secured against rolling away. You
can then no longer move the vehicle.
The battery and the cover of the positive
terminal clamp must be fitted securely dur-
ing operation.
In order for the battery to achieve the maxi-
mum possible service life, it must always be
sufficiently charged.
Have the battery charge checked more fre-
quently if you use the vehicle mainly for short
trips or if you leave it standing idle for a
lengthy period. Consult a qualified specialist
workshop if you wish to leave your vehicle
parked up for a long period of time.
Like other batteries, the vehicle battery may
discharge over time if you do not use the
vehicle. In such cases, have the battery dis-
connected at a qualified specialist workshop.
You can also charge the battery with a
charger recommended by Mercedes-Benz.
For more information, please contact a quali-
fied specialist workshop.
i When you park the vehicle, remove the
key if you do not require any electrical con-
sumers. The vehicle will then use very little
energy, thus conserving battery power. i
If the power supply has been interrupted,
e.g. if the battery was discharged, you will
have to:
R set the clock; see the separate operating
instructions.
For vehicles with Audio 20 and a 4-button
multifunction steering wheel, see "Date/
Time" (Y page 227).
R reset the panorama sliding sunroof
(Y page 93).
R reset the function for automatically fold-
ing the exterior mirrors in/out by folding
the mirrors out once (Y page 104). Charging the battery
G
WARNING
Only charge the battery in a well-ventilated
area. As the battery is being charged, gases
can escape and generate minor explosions.
This could injure you and other persons or
cause damage to the paintwork or acid cor-
rosion on the vehicle.
You can obtain information on battery charg-
ers which allow the battery to be charged
while still installed from a qualified specialist
workshop. G
WARNING
There is a risk of acid burns during the charg-
ing process due to the gases which escape
from the battery. Do not lean over the battery
during the charging process. G
WARNING
Battery acid is caustic. Avoid contact with the
skin, eyes or clothing.
! Only charge the installed battery with a
battery charger which has been tested and
approved by Mercedes-Benz. These battery
chargers allow the battery to be charged
while still installed in the vehicle.
! Only use battery chargers with a maxi-
mum charging voltage of 14.8 V. Battery (vehicle)
339Breakdown assistance Z
Page 344 of 381
Jump-starting
G
WARNING
There is a risk of acid burns when jump-starting a vehicle due to the gases which escape from
the battery. Do not lean over the battery while the engine is being jump-started. G
WARNING
Gases escaping from the battery during jump-starting may cause minor explosions. Avoid cre-
ating sparks. Keep naked flames away from the battery, and do not smoke.
Comply with safety precautions when handling batteries. You will find these under "Battery (vehi-
cle)" in the index. G
WARNING
Non-combusted fuel can collect in the exhaust system and ignite. There is a risk of fire. Avoid
repeated and lengthy starting attempts.
! Vehicles with a petrol engine: avoid repeated and lengthy starting attempts. Otherwise,
the non-combusted fuel may damage the catalytic converter.
Do not use a rapid-charging device to start the vehicle. If your vehicle's battery is discharged,
the engine can be jump-started from another vehicle or from a second battery using jump
leads. Observe the following points:
R the battery is not accessible in all vehicles. If the other vehicle's battery is not accessible,
jump-start the vehicle using a second battery or a jump-starting device.
R vehicles with a petrol engine: only jump-start the vehicle when the engine and exhaust
system are cold.
R do not start the engine if the battery is frozen. Let the battery thaw first.
R jump-starting may only be performed from batteries with a nominal voltage of 12 V.
R only use jump leads that have a sufficient cross-section and insulated terminal clamps.
R if the battery is fully discharged, leave the battery that is being used to jump-start connected
for a few minutes before attempting to start. This charges the empty battery a little.
R make sure that the two vehicles do not touch.
Make sure that:
R the jump leads are not damaged.
R bare parts of the terminal clamp do not come into contact with other metal parts while the
jump leads are connected to the battery.
R the jump leads cannot come into contact with parts such as the V-belt pulley or the fan.
These parts move when the engine is started and while it is running.
X Firmly depress the parking brake.
X Manual transmission: engage neutral.
X Automatic transmission: shift the automatic transmission to position P.
X Switch off all electrical consumers (e.g. radio, blower, etc.).
X Open the bonnet (Y page 313). Jump-starting
341Breakdown assistance Z
Page 376 of 381
R
vehicle-specific weight information can be
found on the vehicle identification plate
(Y page 364).
R only for certain countries: you can find vehi-
cle-specific vehicle data in the COC docu-
ments (CERTIFICATE OF CONFORMITY).
These documents are delivered with your
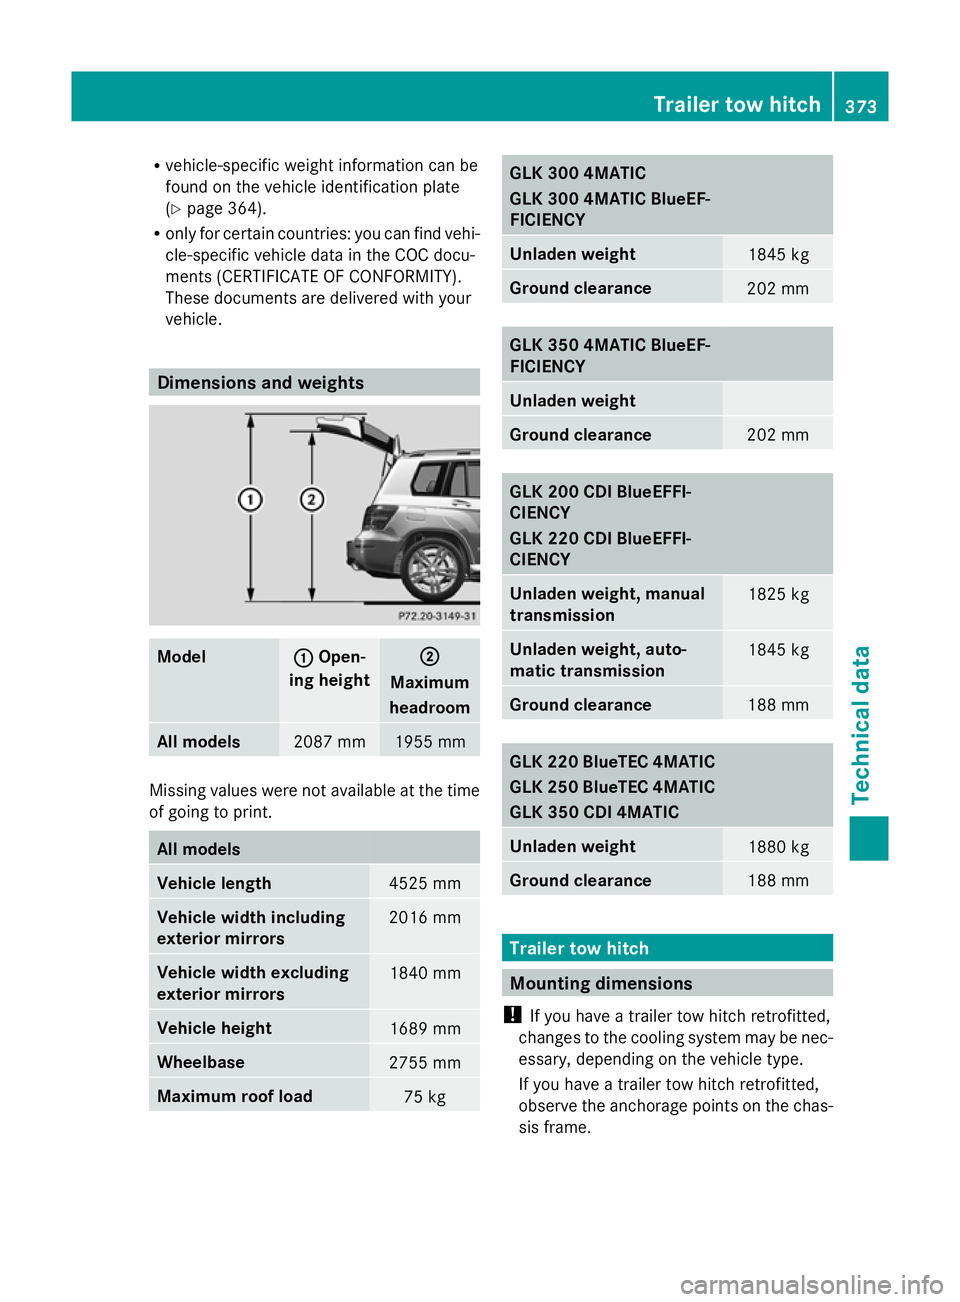
vehicle. Dimensions and weights
Model : :
Open-
ing height ;
;
Maximum
headroom All models
2087 mm 1955 mm
Missing values were not available at the time
of going to print. All models
Vehicle length
4525 mm
Vehicle width including
exterior mirrors
2016 mm
Vehicle width excluding
exterior mirrors
1840 mm
Vehicle height
1689 mm
Wheelbase
2755 mm
Maximum roof load
75 kg GLK 300 4MATIC
GLK 300 4MATIC BlueEF-
FICIENCY
Unladen weight
1845 kg
Ground clearance
202 mm
GLK 350 4MATIC BlueEF-
FICIENCY
Unladen weight
Ground clearance
202 mm
GLK 200 CDI BlueEFFI-
CIENCY
GLK 220 CDI BlueEFFI-
CIENCY
Unladen weight, manual
transmission
1825 kg
Unladen weight, auto-
matic transmission
1845 kg
Ground clearance
188 mm
GLK 220 BlueTEC 4MATIC
GLK 250 BlueTEC 4MATIC
GLK 350 CDI 4MATIC
Unladen weight
1880 kg
Ground clearance
188 mm
Trailer tow hitch
Mounting dimensions
! If you have a trailer tow hitch retrofitted,
changes to the cooling system may be nec-
essary, depending on the vehicle type.
If you have a trailer tow hitch retrofitted,
observe the anchorage points on the chas-
sis frame. Trailer tow hitch
373Technical data Z