2012 MERCEDES-BENZ GLK SUV cruise control
[x] Cancel search: cruise controlPage 186 of 381
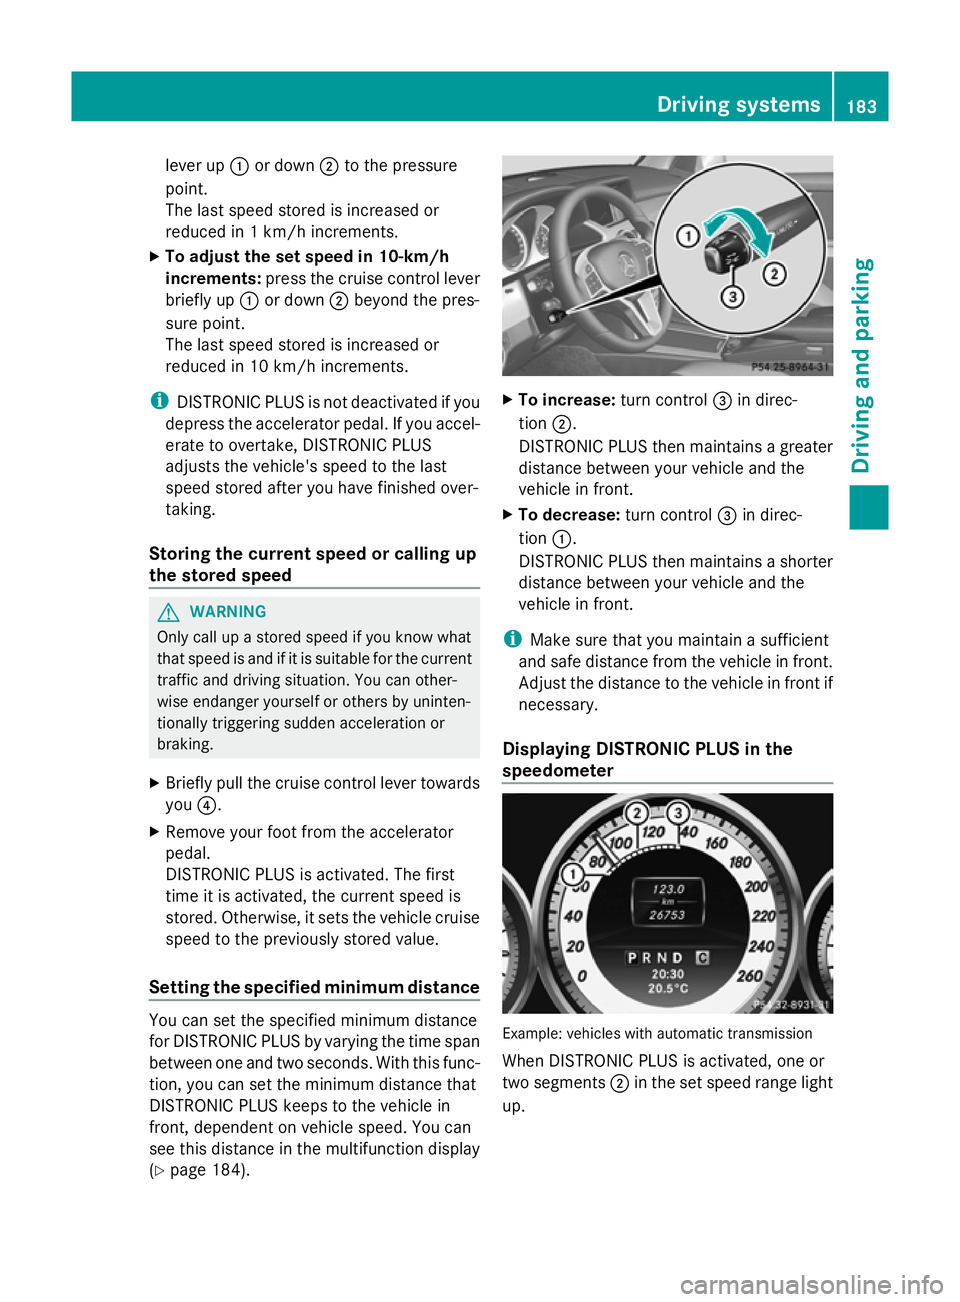
lever up
:or down ;to the pressure
point.
The last speed stored is increased or
reduced in 1 km/h increments.
X To adjust the set speed in 10-km/h
increments: press the cruise control lever
briefly up :or down ;beyond the pres-
sure point.
The last speed stored is increased or
reduced in 10 km/h increments.
i DISTRONIC PLUS is not deactivated if you
depress the accelerator pedal. If you accel-
erate to overtake, DISTRONIC PLUS
adjusts the vehicle's speed to the last
speed stored after you have finished over-
taking.
Storing the current speed or calling up
the stored speed G
WARNING
Only call up a stored speed if you know what
that speed is and if it is suitable for the current
traffic and driving situation. You can other-
wise endanger yourself or others by uninten-
tionally triggering sudden acceleration or
braking.
X Briefly pull the cruise control lever towards
you ?.
X Remove your foot from the accelerator
pedal.
DISTRONIC PLUS is activated. The first
time it is activated, the current speed is
stored. Otherwise, it sets the vehicle cruise
speed to the previously stored value.
Setting the specified minimum distance You can set the specified minimum distance
for DISTRONIC PLUS by varying the time span
between one and two seconds. With this func-
tion, you can set the minimum distance that
DISTRONIC PLUS keeps to the vehicle in
front, dependent on vehicle speed. You can
see this distance in the multifunction display
(Y page 184). X
To increase: turn control=in direc-
tion ;.
DISTRONIC PLUS then maintains a greater
distance between your vehicle and the
vehicle in front.
X To decrease: turn control=in direc-
tion :.
DISTRONIC PLUS then maintains a shorter
distance between your vehicle and the
vehicle in front.
i Make sure that you maintain a sufficient
and safe distance from the vehicle in front.
Adjust the distance to the vehicle in front if
necessary.
Displaying DISTRONIC PLUS in the
speedometer Example: vehicles with automatic transmission
When DISTRONIC PLUS is activated, one or
two segments
;in the set speed range light
up. Driving systems
183Driving and parking Z
Page 187 of 381
i
For design reasons, the speed displayed
in the speedometer may differ slightly from
the speed set for DISTRONIC PLUS.
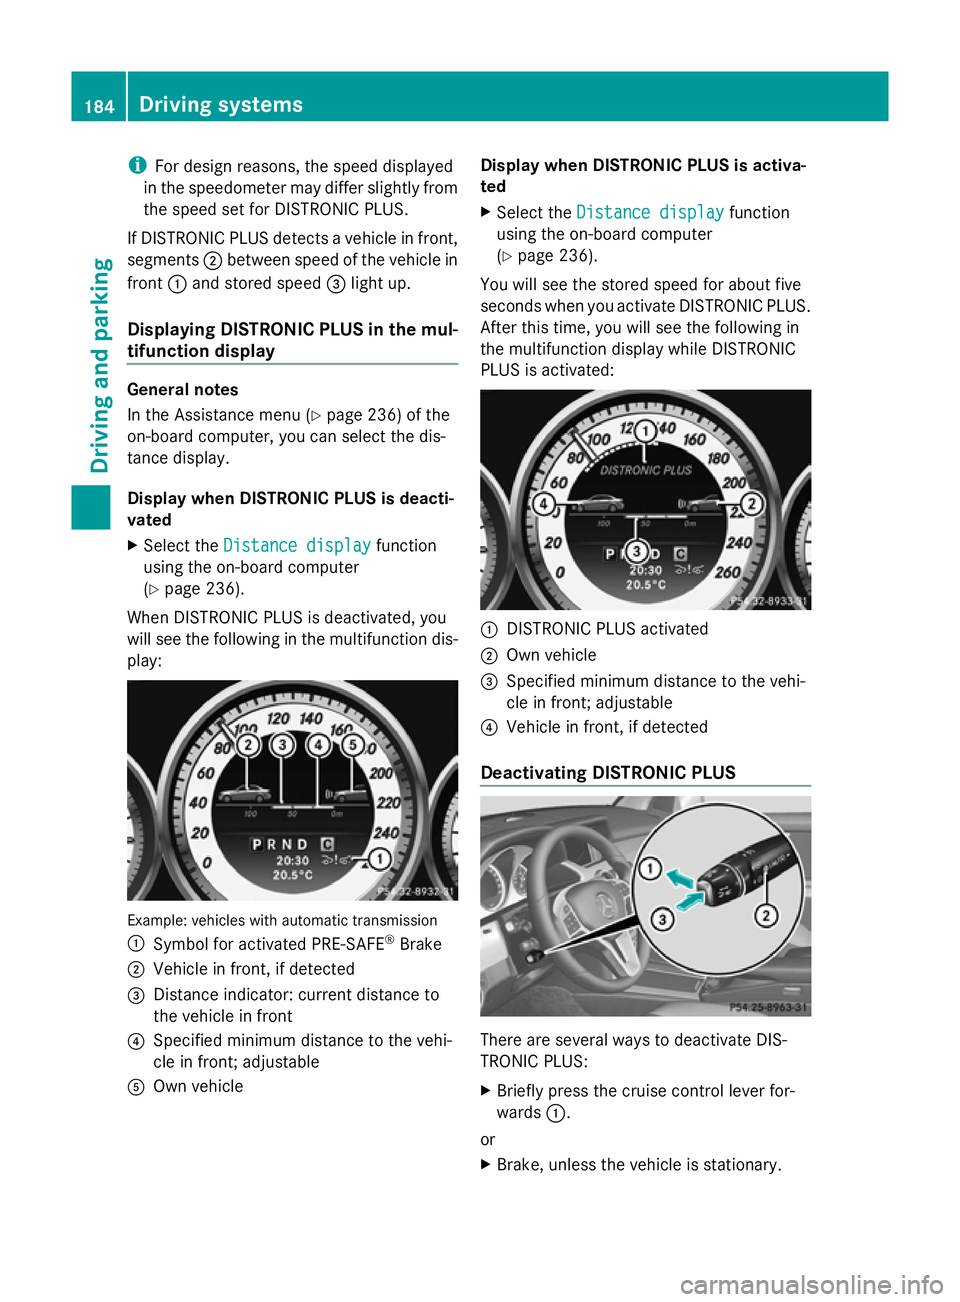
If DISTRONIC PLUS detects a vehicle in front,
segments ;between speed of the vehicle in
front :and stored speed =light up.
Displaying DISTRONIC PLUS in the mul-
tifunction display General notes
In the Assistance menu (Y
page 236) of the
on-board computer, you can select the dis-
tance display.
Display when DISTRONIC PLUS is deacti-
vated
X Select the Distance display
Distance display function
using the on-board computer
(Y page 236).
When DISTRONIC PLUS is deactivated, you
will see the following in the multifunction dis-
play: Example: vehicles with automatic transmission
: Symbol for activated PRE-SAFE ®
Brake
; Vehicle in front, if detected
= Distance indicator: current distance to
the vehicle in front
? Specified minimum distance to the vehi-
cle in front; adjustable
A Own vehicle Display when DISTRONIC PLUS is activa-
ted
X
Select the Distance display
Distance display function
using the on-board computer
(Y page 236).
You will see the stored speed for about five
seconds when you activate DISTRONIC PLUS.
After this time, you will see the following in
the multifunction display while DISTRONIC
PLUS is activated: :
DISTRONIC PLUS activated
; Own vehicle
= Specified minimum distance to the vehi-
cle in front; adjustable
? Vehicle in front, if detected
Deactivating DISTRONIC PLUS There are several ways to deactivate DIS-
TRONIC PLUS:
X
Briefly press the cruise control lever for-
wards :.
or
X Brake, unless the vehicle is stationary. 184
Driving systemsDriving and parking
Page 188 of 381
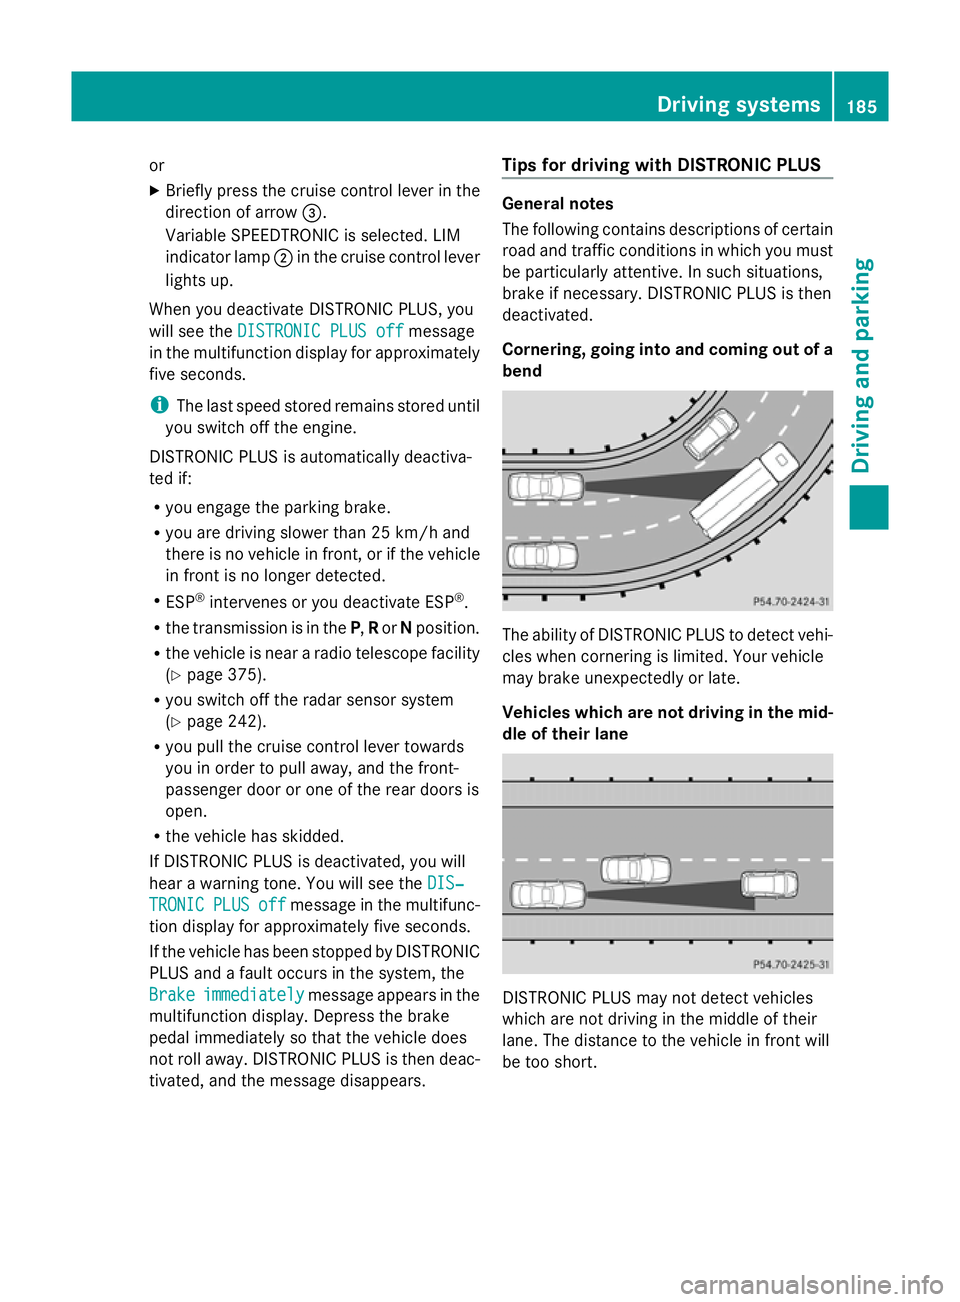
or
X
Briefly press the cruise control lever in the
direction of arrow =.
Variable SPEEDTRONIC is selected. LIM
indicator lamp ;in the cruise control lever
lights up.
When you deactivate DISTRONIC PLUS, you
will see the DISTRONIC PLUS off DISTRONIC PLUS off message
in the multifunction display for approximately
five seconds.
i The last speed stored remains stored until
you switch off the engine.
DISTRONIC PLUS is automatically deactiva-
ted if:
R you engage the parking brake.
R you are driving slower than 25 km/h and
there is no vehicle in front, or if the vehicle
in front is no longer detected.
R ESP ®
intervenes or you deactivate ESP ®
.
R the transmission is in the P,Ror Nposition.
R the vehicle is near a radio telescope facility
(Y page 375).
R you switch off the radar sensor system
(Y page 242).
R you pull the cruise control lever towards
you in order to pull away, and the front-
passenger door or one of the rear doors is
open.
R the vehicle has skidded.
If DISTRONIC PLUS is deactivated, you will
hear a warning tone. You will see the DIS‐
DIS‐
TRONIC TRONIC PLUS
PLUSoff
offmessage in the multifunc-
tion display for approximately five seconds.
If the vehicle has been stopped by DISTRONIC
PLUS and a fault occurs in the system, the
Brake Brake immediately
immediately message appears in the
multifunction display. Depress the brake
pedal immediately so that the vehicle does
not roll away. DISTRONIC PLUS is then deac-
tivated, and the message disappears. Tips for driving with DISTRONIC PLUS General notes
The following contains descriptions of certain
road and traffic conditions in which you must
be particularly attentive. In such situations,
brake if necessary. DISTRONIC PLUS is then
deactivated.
Cornering, going into and coming out of a
bend
The ability of DISTRONIC PLUS to detect vehi-
cles when cornering is limited. Your vehicle
may brake unexpectedly or late.
Vehicles which are not driving in the mid-
dle of their lane
DISTRONIC PLUS may not detect vehicles
which are not driving in the middle of their
lane. The distance to the vehicle in front will
be too short. Driving systems
185Driving and parking Z
Page 217 of 381
always drive at a higher or a lower speed than
that set on the on-board computer. G
WARNING
If you depress the accelerator pedal with DSR
activated, then the set speed can be excee-
ded. Drive downhill with special care and
always keep in mind that DSR brakes the vehi-
cle as soon as you remove your foot from the
accelerator pedal. The vehicle may brake sud-
denly due to DSR intervening, depending on
the downhill gradient and the difference
between the current speed and the set speed.
You could lose control of the vehicle and
cause an accident.
For information about driving off-road, see
(Y page 170).
Activating/deactivating DSR Activating
You can only activate DSR when driving at
speeds below 30 km/h.
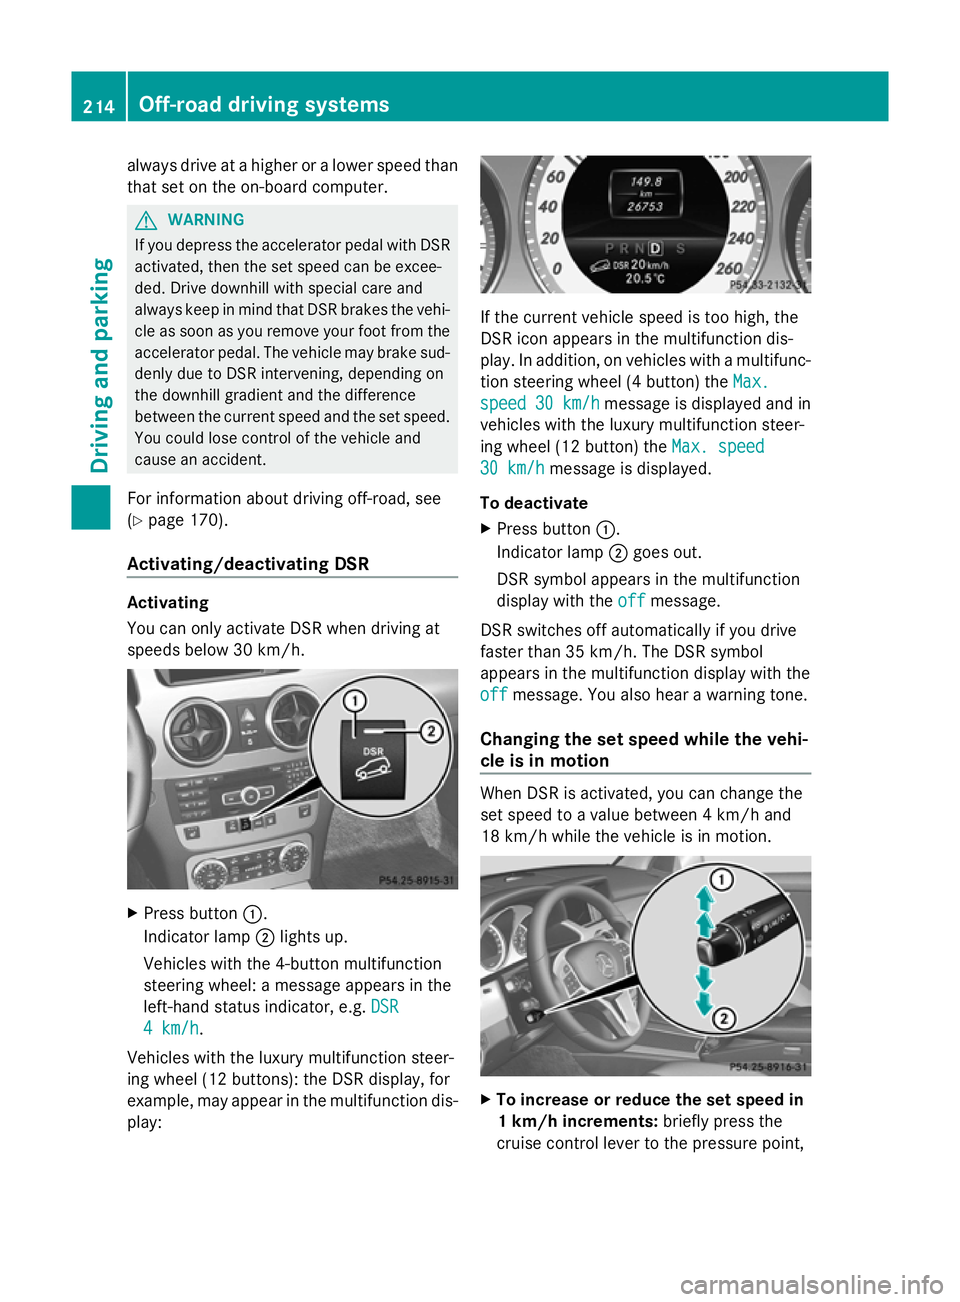
X
Press button :.
Indicator lamp ;lights up.
Vehicles with the 4-button multifunction
steering wheel: a message appears in the
left-hand status indicator, e.g. DSR DSR
4 km/h
4 km/h.
Vehicles with the luxury multifunction steer-
ing wheel (12 buttons): the DSR display, for
example, may appear in the multifunction dis-
play: If the current vehicle speed is too high, the
DSR icon appears in the multifunction dis-
play. In addition, on vehicles with a multifunc-
tion steering wheel (4 button) the
Max. Max.
speed
speed 30 km/h
30 km/h message is displayed and in
vehicles with the luxury multifunction steer-
ing wheel (12 button) the Max. speed Max. speed
30 km/h
30 km/h message is displayed.
To deactivate
X Press button :.
Indicator lamp ;goes out.
DSR symbol appears in the multifunction
display with the off offmessage.
DSR switches off automatically if you drive
faster than 35 km/h. The DSR symbol
appears in the multifunction display with the
off off message. You also hear a warning tone.
Changing the set speed while the vehi-
cle is in motion When DSR is activated, you can change the
set speed to a value between 4 km/h and
18 km/h while the vehicle is in motion.
X
To increase or reduce the set speed in
1 km/h increments: briefly press the
cruise control lever to the pressure point, 214
Off-road driving systemsDriving and parking
Page 218 of 381
up
: for a higher or down ;for a lower
set speed.
On vehicles with a 4-button multifunction
steering wheel, the set value appears in the
left-hand status indicator. On vehicles with
a luxury multifunction steering wheel (12
buttons), the set value appears in the mul-
tifunction display.
X To increase or reduce the set speed by
2 km/h increments: briefly press the
cruise control lever beyond the pressure
point up :for a higher or down ;for a
lower set speed.
On vehicles with a 4-button multifunction
steering wheel, the set value appears in the
left-hand status indicator. On vehicles with
a luxury multifunction steering wheel (12
buttons), the set value appears in the mul-
tifunction display. Off-road drive program
i The off-road drive program is only availa-
ble on vehicles with the Off-Road Engineer-
ing package.
The off-road drive program assists you in driv-
ing off-road. The engine’s performance char-
acteristics and the gearshifting characteris-
tics of the automatic transmission are adap-
ted for this purpose. ABS, ESP ®
and ETS pro-
grams especially adapted to off-road driving
are also activated.
Do not use the off-road drive program on
roads that are snow-covered or icy or if you
have fitted your vehicle with snow chains.
For information about driving off-road, see
(Y page 170). X
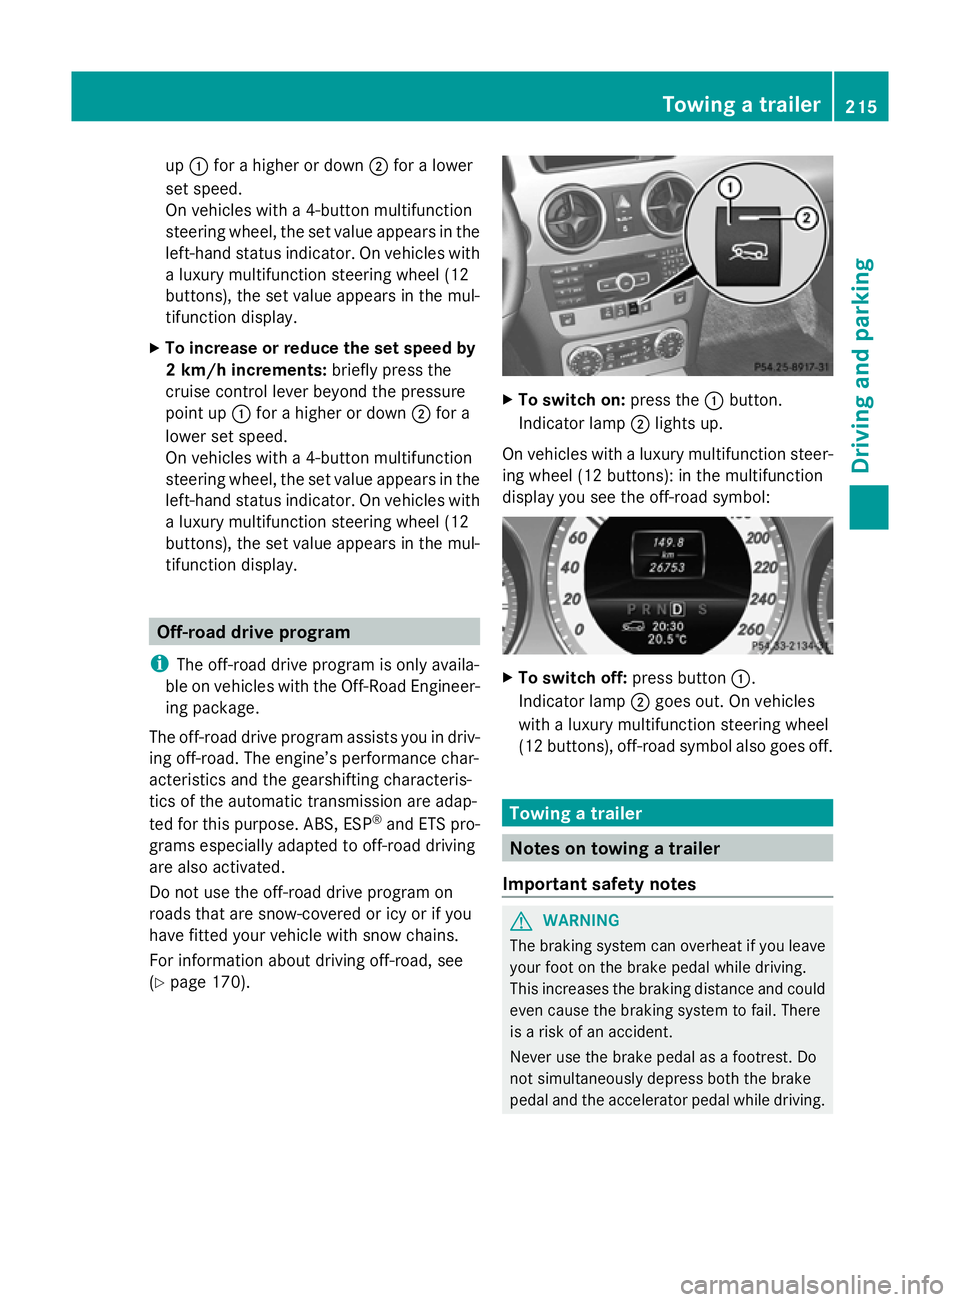
To switch on: press the:button.
Indicator lamp ;lights up.
On vehicles with a luxury multifunction steer-
ing wheel (12 buttons): in the multifunction
display you see the off-road symbol: X
To switch off: press button:.
Indicator lamp ;goes out. On vehicles
with a luxury multifunction steering wheel
(12 buttons), off-road symbol also goes off. Towing a trailer
Notes on towing a trailer
Important safety notes G
WARNING
The braking system can overheat if you leave
your foot on the brake pedal while driving.
This increases the braking distance and could
even cause the braking system to fail. There
is a risk of an accident.
Never use the brake pedal as a footrest. Do
not simultaneously depress both the brake
pedal and the accelerator pedal while driving. Towing a trailer
215Driving and parking Z
Page 220 of 381
The maximum noseweight of the trailer draw-
bar on the ball coupling is 80 kg. However,
the actual noseweight may not be higher than
the value which is given on the trailer tow
hitch or trailer identification plates. The low-
est weight applies.
! Use a drawbar noseweight as close as
possible to the maximum permissible nose-
weight. Do not use a noseweight of less
than 50kg, otherwise the trailer may come
loose.
Note that the payload and the rear axle load
are reduced by the actual payload.
i The height of the ball coupling changes
with the load of the vehicle. If necessary,
use a trailer with a height-adjustable draw-
bar.
Driving tips i
Observe the notes on ESP ®
trailer stabi-
lisation (Y page 69).
The maximum permissible speed for vehicle/
trailer combinations depends on the type of
trailer. Before beginning the journey, check
the trailer's documents to see what the max-
imum permitted speed is. Observe the legally
prescribed maximum speed in the relevant
country.
For certain Mercedes-Benz vehicles, the max-
imum permissible rear axle load is increased
when towing a trailer. Refer to the "Technical
data" section to find out whether this applies
to your vehicle. If you utilise any of the added
maximum rear axle load when towing a trailer,
the vehicle/trailer combination may not
exceed a maximum speed of 100 km/h for
reasons concerning the operating permit.
This also applies in countries in which the
permissible maximum speed for vehicle/
trailer combinations is above 100 km/h.
When towing a trailer, your vehicle's handling
characteristics will be different in comparison
to when driving without a trailer, and it will
consume more fuel. Change into a lower gear in good time on long
and steep downhill gradients. On vehicles
with automatic transmission, you have to
select shift range
1,2or 3.
i This also applies if you have activated
cruise control or SPEEDTRONIC.
This will use the braking effect of the engine,
so less braking will be required to prevent the
vehicle from gaining speed. This relieves the
load on the brake system and prevents the
brakes from overheating and wearing too
quickly. If you need additional braking,
depress the brake pedal repeatedly rather
than continuously.
Driving tips R
Maintain a greater distance from the vehi-
cle in front than when driving without a
trailer.
R Avoid braking abruptly. If possible, brake
gently at first to allow the trailer to run on.
Then, increase the braking force rapidly.
R The values given for gradient-climbing
capabilities from a standstill refer to sea
level. When driving in mountainous areas,
note that the power output of the engine,
and consequently the vehicle's gradient-
climbing capability, decrease with increas-
ing altitude.
If the trailer swings from side to side:
X Do not accelerate.
X Do not countersteer.
X Brake if necessary. Fitting the ball coupling
X Make a note of the ball coupling key num-
ber.
i You can use this number to obtain a
replacement key from a Mercedes-Benz
Service Centre. Towing a trailer
217Driving and parking Z
Page 231 of 381
Speedometer with segments
The segments in the speedometer indicate
which speed range is available.
R Cruise control activated (Y page 173):
The segments light up from the stored
speed to the maximum speed.
R Variable SPEEDTRONIC activated
(Y page 176):
The segments light up from the start of the
scale to the selected limit speed.
R DISTRONIC PLUS activated (Y page 178):
One or two segments in the set speed
range light up.
R DISTRONIC PLUS detects a vehicle in front:
The segments between the speed of the
vehicle in front and the stored speed light
up. Operating the on-board computer
Overview The on-board computer is activated as soon
as you turn the key to position 1in the ignition
lock.
You can control the multifunction display and
the settings in the on-board computer using
the buttons on the multifunction steering
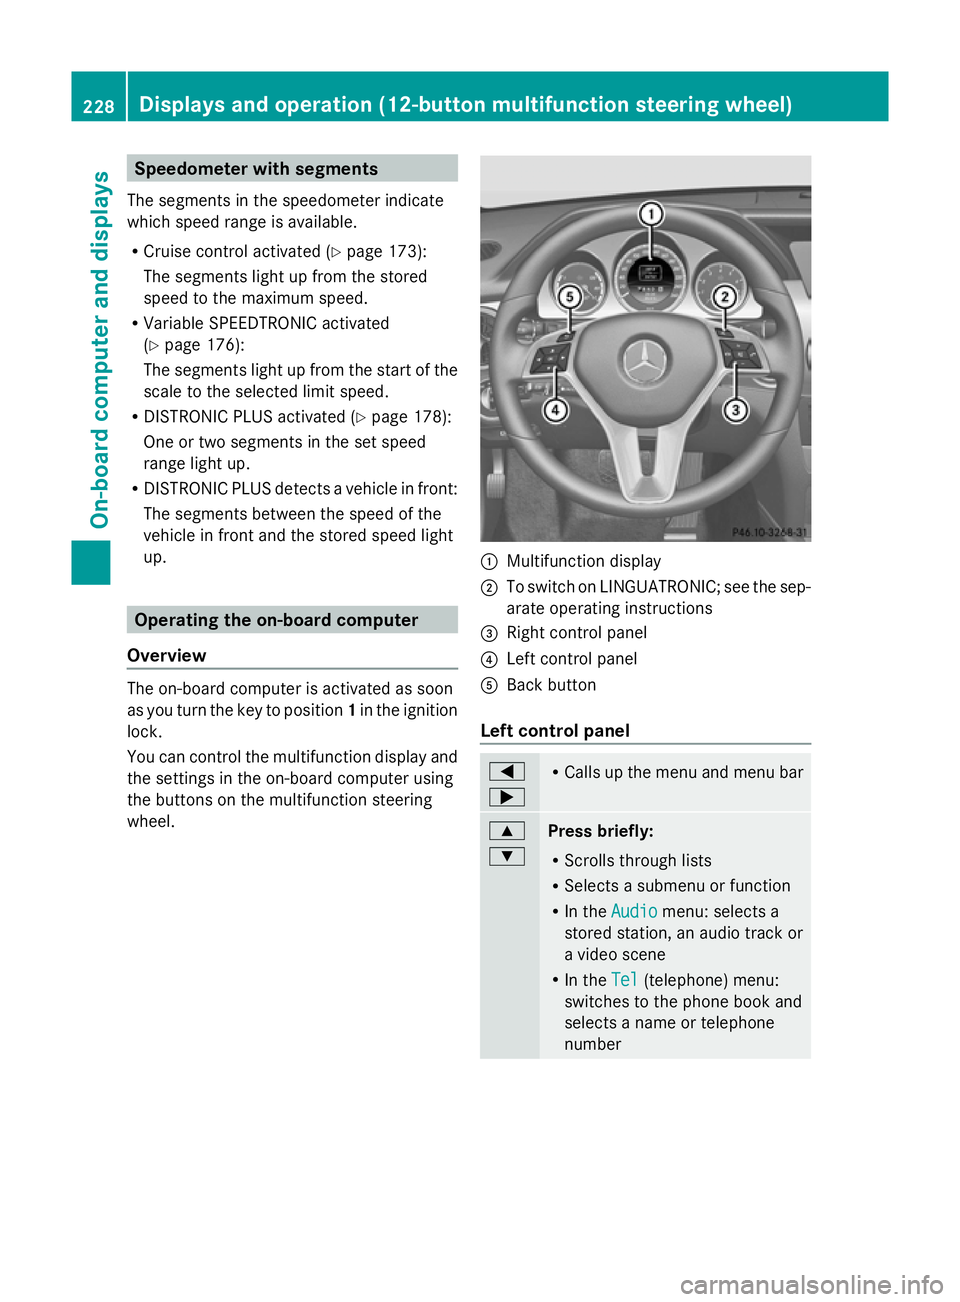
wheel. :
Multifunction display
; To switch on LINGUATRONIC; see the sep-
arate operating instructions
= Right control panel
? Left control panel
A Back button
Left control panel =
; R
Calls up the menu and menu bar 9
:
Press briefly:
R
Scrolls through lists
R Selects a submenu or function
R In the Audio Audio menu: selects a
stored station, an audio track or
a video scene
R In the Tel Tel(telephone) menu:
switches to the phone book and
selects a name or telephone
number 228
Displays and operation (12-button multifunction steering wheel)On-board computer and displays
Page 233 of 381
Text field
:shows the selected menu or
submenu as well as display messages.
i You can set the time using the audio sys-
tem or COMAND Online; see the separate
operating instructions.
Vehicles with manual transmission: the
indicators in the lower part of the multifunc-
tion display differ from the display shown
here.
The following messages can appear in the
multifunction display:
Z Gearshift recommendation
(Ypage 155)
¯ Cruise control (Y page 173)
È SPEEDTRONIC (Y page 176)
è Rear window wiper
(Ypage 123)
_ Adaptive Main-beam Assist
(Ypage 116)
À ATTENTION ASSIST
(Ypage 201)
¤ ECO start/stop function
(Ypage 150)
Ä Speed Limit Assist
(Ypage 202)
à Lane Keeping Assist
(Ypage 205) or Active Lane
Keeping Assist (Y page 210)
ë HOLD function (Y page 186)
Ä PRE-SAFE®
Brake (Y page 69)
fDSR DSR DSR (Y
page 213)
120 km/h! 120 km/h! Maximum permissible speed
exceeded (only for certain coun-
tries) Menu overview
Operating the on-board computer
(Y page 228). Depending on the equipment fitted in the
vehicle, you can call up the following menus:
R
Trip Trip menu (Y page 230)
R Navi Navi menu (navigation instructions)
(Y page 232)
R Audio
Audio menu (Y page 233)
R Tel
Tel menu (telephone) (Y page 234)
R Assist.
Assist. menu (assistance)
R Serv.
Serv. menu (Y page 238)
R Settings
Settings menu (Ypage 238)
The Audio
Audio ,Navi
Navi andTel
Tel menus differ slightly
in vehicles with an audio system and in vehi-
cles with COMAND Online. The examples
given in this Owner's Manual apply to vehicles
equipped with COMAND Online. Trip menu
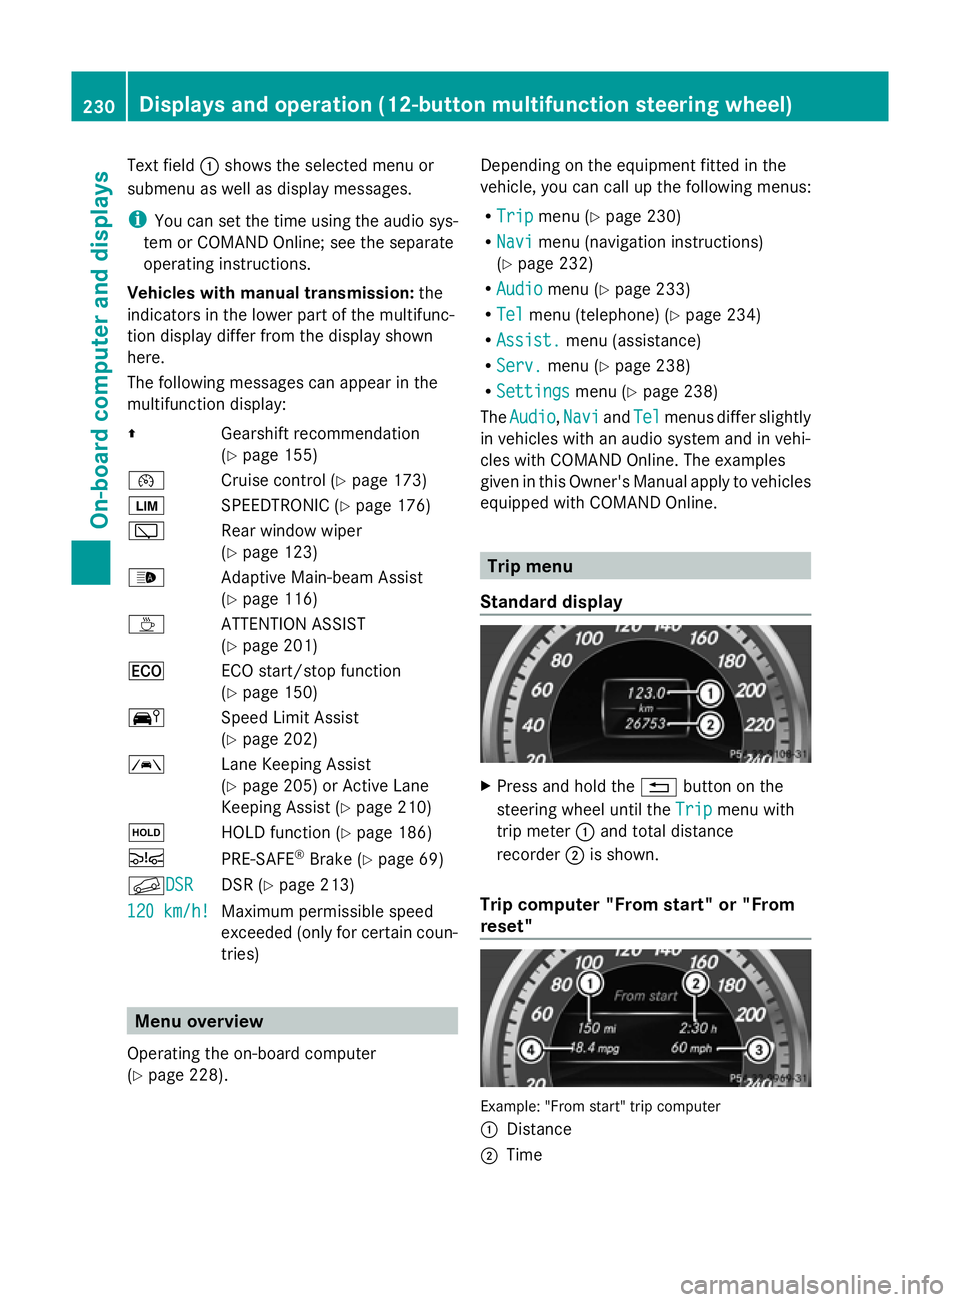
Standard display X
Press and hold the %button on the
steering wheel until the Trip Tripmenu with
trip meter :and total distance
recorder ;is shown.
Trip computer "From start" or "From
reset" Example: "From start" trip computer
:
Distance
; Time 230
Displays and operation (12-button multifunction steering wheel)On-board computer and displays