2012 MERCEDES-BENZ GLK SUV trailer
[x] Cancel search: trailerPage 25 of 381

Towing
Important safety notes ..................342
With the rear axle raised ................344
Towing a trailer
Active Blind Spot Assist .................210
Active Lane Keeping Assist .... 207, 213
Active Parking Assist .....................196
Lights display message (12-but-
ton multifunction steering wheel) ..260
Lights display message (4-button
multifunction steering wheel) ........257
Towing away
Fitting the towing eye ....................343
Removing the towing eye ...............344
With both axles on the ground .......344
Tow-starting
Emergency engine starting ............345
Fitting the towing eye ....................343
Important safety notes ..................342
Removing the towing eye ...............344
Trailer coupling
see Towing a trailer
Trailer towing
7-pin connector ............................. 221
Blind Spot Assist ............................ 205
Cleaning the trailer tow hitch ......... 321
Coupling up a trailer ......................220
Decoupling a trailer .......................220
Driving tips .................................... 215
ESP ®
................................................ 69
Fitting the ball coupling .................217
Important safety notes ..................215
Mounting dimensions ....................373
Parktroni c...................................... 191
Power supply ................................. 221
Removing the ball coupling ............220
Shift range ..................................... 158
Storing the ball coupling ................220
Trailer loads ................................... 374
Transmission
see Automatic transmission
see Manual transmission
Transmission position display .........156
Transmission position display
(DIRECT SELECT lever) ......................156
Transporting the vehicle ..................345Travelling uphill
Brow of hill ..................................... 173
Driving downhill ............................. 173
Maximum gradient-climbing capa-
bility .............................................. .173
Trim pieces (cleaning instructions) .323
Trip computer On-board computer (12-button
multifunction steering wheel) ........230
On-board computer (4-button
multifunction steering wheel) ........226
Trip meter
Displaying/resetting (4-button
multifunction steering wheel) ........226
Displaying (12-button multifunc-
tion steering wheel) .......................230
Resetting (12-button multifunc-
tion steering wheel) .......................232
Turn signal
Display message (12-button mul-
tifunction steering wheel) ..............261
Display message (4-button multi-
function steering wheel) ................258
see Turn signals
Turn signals
Changing bulbs (front) ...................120
Changing bulbs (rear) ....................121
Switching on/off ........................... 113
TV
Operating (on-board computer) .....234
see Separate operating instructions
Two-way radio
Frequencies ................................... 363
Installation ..................................... 363
Transmission output (maximum) .... 363
Type identification plate
see Vehicle identification plate
Tyre pressure
Display message (12-button mul-
tifunction steering wheel) ..............277
Display message (4-button multi-
function steering wheel) ................276
Not reached (TIREFIT) ....................331
Pressure loss warning ....................355
Reached (TIREFIT) ..........................331
Recommended ............................... 353
Tyres
Checking ........................................ 351 22
Index
Page 72 of 381
If ESP
®
is deactivated and one or more wheels
start to spin, the ÷ESP®
warning lamp in
the instrument cluster flashes. In such situa-
tions, ESP ®
will not stabilise the vehicle.
It may be best to deactivate ESP ®
in the fol-
lowing situations:
R when using snow chains
R in deep snow
R on sand or gravel
If you deactivate ESP ®
:
R ESP ®
no longer improves driving stability.
R the engine's torque is no longer limited, and
the drive wheels can spin. The spinning of
the wheels results in a cutting action, which
provides better grip.
R traction control is still activated.
R ESP ®
still provides support when you
brake.
Off-road ESP ®
(vehicles with off-road
engineering package) An ESP
®
system specifically suited to off-road
terrain is activated automatically once the off-
road drive program (Y page 215) is activated.
The off-road ESP ®
intervenes with a delay if
there is oversteering or understeering, thus
improving traction.
ESP ®
trailer stabilisation G
WARNING
If road and weather conditions are poor,
trailer stabilisation will not be able to prevent
the vehicle/trailer combination from swerv-
ing. Trailers with a high centre of gravity can
tip over before ESP ®
can detect this. There is
a risk of an accident.
Always adapt your driving style to the prevail-
ing road and weather conditions.
If your vehicle/trailer combination begins to
lurch, you can only stabilise the vehicle/
trailer combination by depressing the brake
firmly. In this situation, ESP
®
assists you and can
detect if the vehicle/trailer combination
begins to lurch. ESP ®
slows the vehicle down
by braking and limiting the engine output until
the vehicle/trailer combination has stabi-
lised.
Trailer stabilisation is active above speeds of
about 65 km/h.
Trailer stabilisation does not work if ESP ®
is
deactivated or disabled because of a mal-
function. EBD (electronic brake force distribu-
tion)
i Observe the "Important safety notes" sec-
tion (Y page 65). G
WARNING
If EBD has malfunctioned, the rear wheels can
still lock, e.g. under full braking. This increa-
ses the risk of skidding and an accident.
You should therefore adapt your driving style
to the different handling characteristics. Have
the brake system checked at a qualified spe-
cialist workshop.
Observe the notes on warning and indicator
lamps (Y page 286) as well as display mes-
sages (Y page 248) (4-button multifunction
steering wheel) and (Y page 253) (12-button
multifunction steering wheel).
EBD monitors and controls the brake pres-
sure on the rear wheels to improve driving
stability while braking. PRE-SAFE
®
Brake
i Observe the "Important safety notes" sec-
tion (Y page 65).
PRE-SAFE ®
Brake is only available in vehicles
with DISTRONIC PLUS.
PRE-SAFE ®
Brake can help you to minimise
the risk of a collision with a vehicle ahead or
reduce the effects of such a collision. If PRE- Driving safety systems
69Safety Z
Page 116 of 381
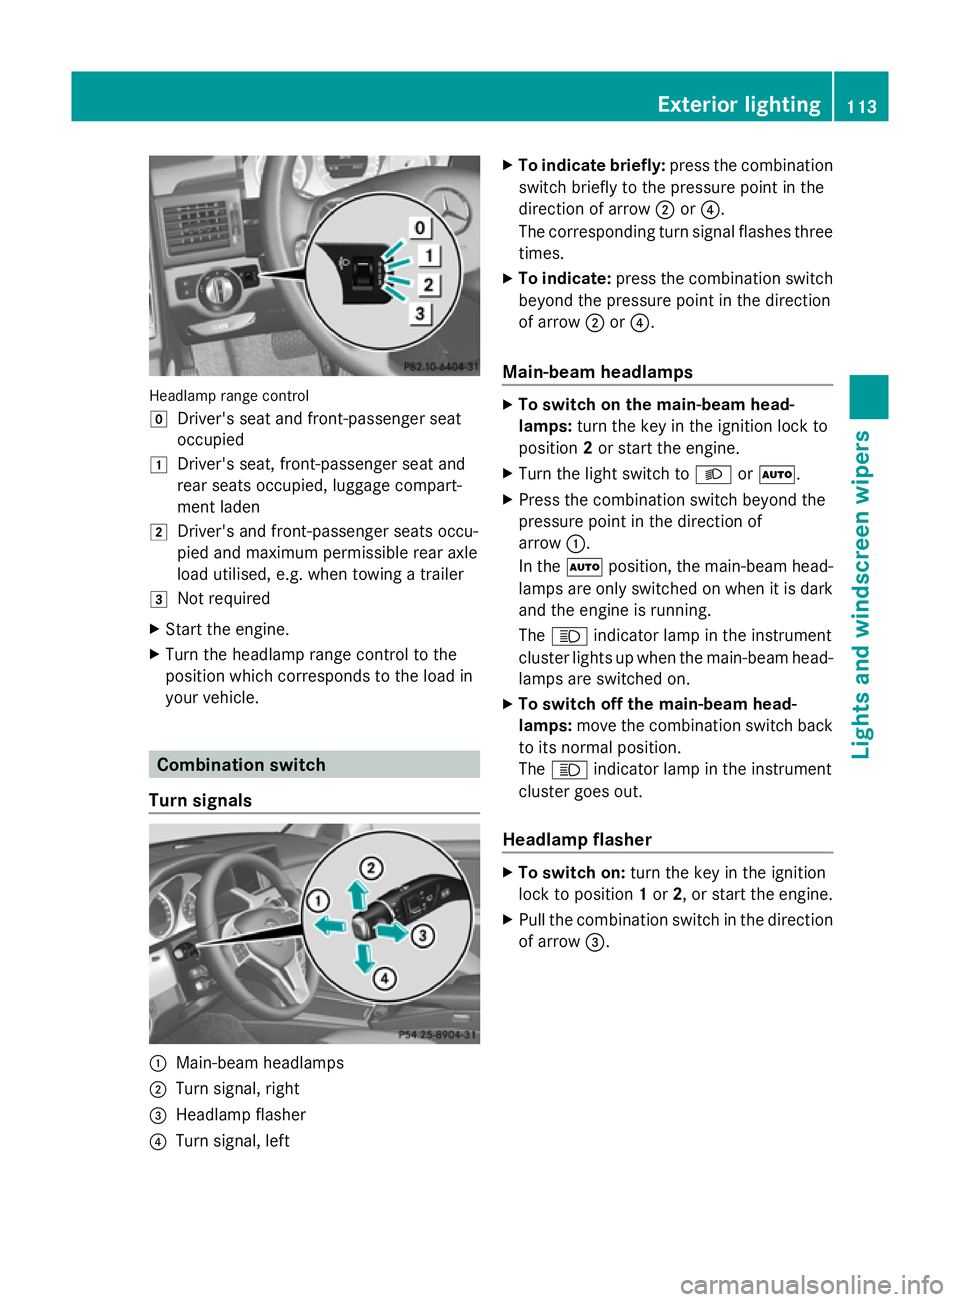
Headlamp range control
g
Driver's seat and front-passenger seat
occupied
1 Driver's seat, front-passenger seat and
rear seats occupied, luggage compart-
ment laden
2 Driver's and front-passenger seats occu-
pied and maximum permissible rear axle
load utilised, e.g. when towing a trailer
3 Not required
X Start the engine.
X Turn the headlamp range control to the
position which corresponds to the load in
your vehicle. Combination switch
Turn signals :
Main-beam headlamps
; Turn signal, right
= Headlamp flasher
? Turn signal, left X
To indicate briefly: press the combination
switch briefly to the pressure point in the
direction of arrow ;or?.
The corresponding turn signal flashes three
times.
X To indicate: press the combination switch
beyond the pressure point in the direction
of arrow ;or?.
Main-beam headlamps X
To switch on the main-beam head-
lamps: turn the key in the ignition lock to
position 2or start the engine.
X Turn the light switch to LorÃ.
X Press the combination switch beyond the
pressure point in the direction of
arrow :.
In the Ãposition, the main-beam head-
lamps are only switched on when it is dark
and the engine is running.
The K indicator lamp in the instrument
cluster lights up when the main-beam head-
lamps are switched on.
X To switch off the main-beam head-
lamps: move the combination switch back
to its normal position.
The K indicator lamp in the instrument
cluster goes out.
Headlamp flasher X
To switch on: turn the key in the ignition
lock to position 1or 2, or start the engine.
X Pull the combination switch in the direction
of arrow =. Exterior lighting
113Lights and windscreen wipers Z
Page 148 of 381
Useful information
............................146
Running-in notes ............................... 146
Driving ............................................... 146
Manual transmission ........................154
Automatic transmission ...................155
Refuelling ........................................... 161
Parking ............................................... 164
Driving tips ........................................ 165
Driving systems ................................ 173
Off-road driving systems ..................213
Towing a trailer ................................. 215 145Driving and parking
Page 157 of 381
Problem Possible causes/consequences and
M
MSolutions The coolant tempera-
ture display is showing
more than 120 †. The
coolant warning lamp
may also glow and a
warning tone may
sound. The coolant level is too low. The coolant is too hot and the engine
is no longer being cooled sufficiently.
X
Stop as soon as possible and allow the engine and the coolant
to cool down.
X Check the coolant level (Y page 316). Observe the warning
notes as you do so and top up the coolant if necessary. If the coolant level is correct, the engine radiator fan may be faulty.
The coolant is too hot and the engine is no longer being cooled
sufficiently.
X
If the coolant temperature is below 120 †, you can continue
driving to the nearest qualified specialist workshop.
X Avoid heavy loads on the engine as you do so, e.g. driving in
mountainous terrain and stop-start traffic. Manual transmission
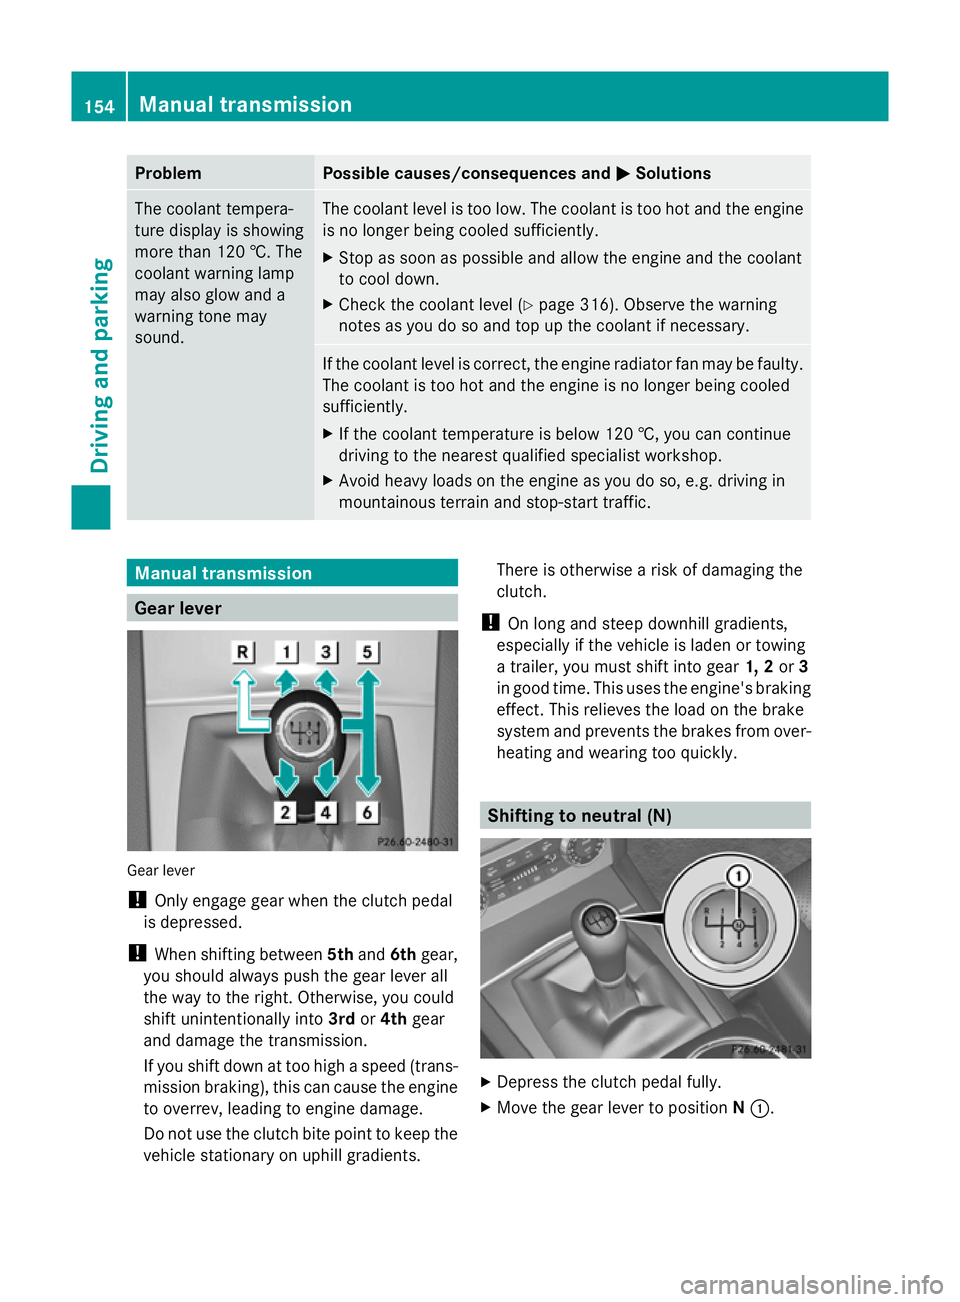
Gear lever
Gear lever
!
Only engage gear when the clutch pedal
is depressed.
! When shifting between 5thand 6thgear,
you should always push the gear lever all
the way to the right. Otherwise, you could
shift unintentionally into 3rdor4th gear
and damage the transmission.
If you shift down at too high a speed (trans-
mission braking), this can cause the engine
to overrev, leading to engine damage.
Do not use the clutch bite point to keep the
vehicle stationary on uphill gradients. There is otherwise a risk of damaging the
clutch.
! On long and steep downhill gradients,
especially if the vehicle is laden or towing
a trailer, you must shift into gear 1, 2or3
in good time. This uses the engine's braking
effect. This relieves the load on the brake
system and prevents the brakes from over-
heating and wearing too quickly. Shifting to neutral (N)
X
Depress the clutch pedal fully.
X Move the gear lever to position N:. 154
Manual transmissionDriving and parking
Page 161 of 381
Kickdown
Use kickdown for maximum acceleration.
X Depress the accelerator pedal beyond the
pressure point.
The transmission shifts to a lower gear
depending on the engine speed.
X Ease off the accelerator pedal once the
desired speed is reached.
The automatic transmission shifts back up.
Towing a trailer X
Drive in the middle of the engine speed
range on uphill gradients.
X Shift down to shift range 3or
2(Y page 159)depending on the uphill or
downhill gradient, even if cruise control or
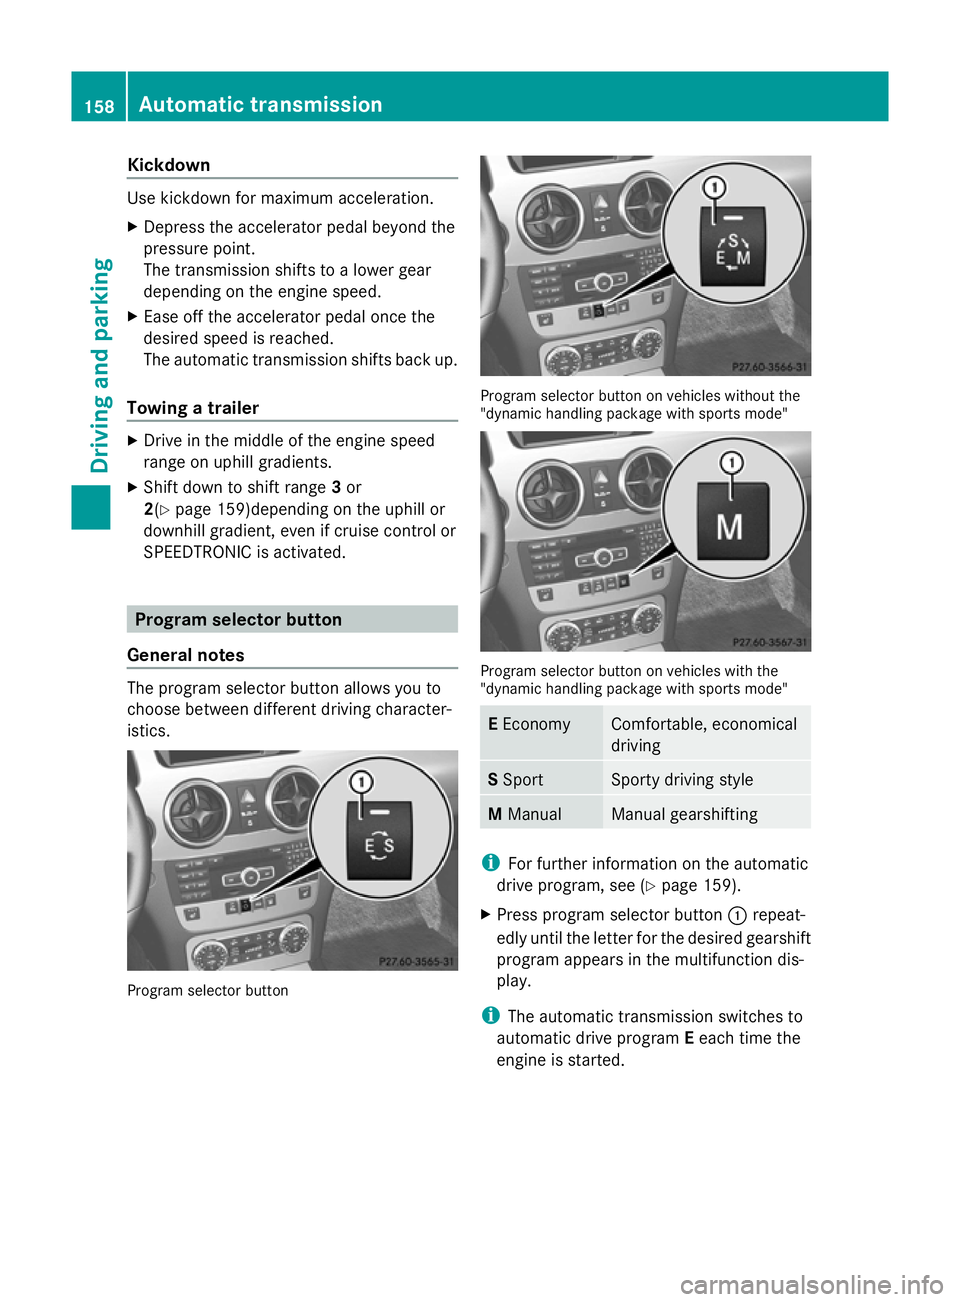
SPEEDTRONIC is activated. Program selector button
General notes The program selector button allows you to
choose between different driving character-
istics. Program selector button Program selector button on vehicles without the
"dynamic handling package with sports mode"
Program selector button on vehicles with the
"dynamic handling package with sports mode"
E
Economy Comfortable, economical
driving
S
Sport Sporty driving style
M
Manual Manual gearshifting
i
For further information on the automatic
drive program, see (Y page 159).
X Press program selector button :repeat-
edly until the letter for the desired gearshift
program appears in the multifunction dis-
play.
i The automatic transmission switches to
automatic drive program Eeach time the
engine is started. 158
Automatic trans
missionDriving and parking
Page 170 of 381
i
The ECO display summarises the driving
characteristics from the start of the journey
to its completion. Therefore, there are
dynamic changes in the bars at the start of
a journey. During a prolonged driving time,
these changes are smaller. For dynamic
changes, perform a manual reset.
For further information on the ECO display,
see (Y page 231). Short journeys
! Vehicles with a diesel particle filter: if
the vehicle is mostly driven for short dis-
tances, it is possible that malfunctions may
occur during the automatic cleaning of the
diesel particle filter. This may lead to fuel
collecting in the engine oil and cause
engine failure. Therefore, if you frequently
drive short distances, you should take a 20
minute trip on a motorway or rural road at
least every 500km. Braking
Important safety notes G
WARNING
If you shift down on a slippery road surface in
an attempt to increase the engine's braking
effect, the drive wheels could lose their grip.
This increases the risk of skidding and having
an accident.
Do not shift down for additional engine brak-
ing on a slippery road surface.
Downhill gradients On long and steep downhill gradients, you
must select shift range
1,2or 3in good time.
Take particular note of this when driving a
laden vehicle and when towing a trailer.
i This also applies if you have activated
cruise control or SPEEDTRONIC. This will use the braking effect of the engine,
so less braking will be required to prevent the
vehicle from gaining speed. This relieves the
load on the brake system and prevents the
brakes from overheating and wearing too
quickly.
Heavy and light loads
G
WARNING
The braking system can overheat if you leave
your foot on the brake pedal while driving.
This increases the braking distance and could
even cause the braking system to fail. There
is a risk of an accident.
Never use the brake pedal as a footrest. Do
not simultaneously depress both the brake
pedal and the accelerator pedal while driving.
! Depressing the brake pedal constantly
results in excessive and premature wear to
the brake pads.
If the brakes have been subjected to a heavy
load, do not stop the vehicle immediately.
Drive on for a short while. This allows the air-
flow to cool the brakes more quickly.
If the brakes have been used only moderately,
you should occasionally test their effective-
ness. To do this, brake more firmly from a
higher speed. This improves the grip of the
brakes.
Wet road surfaces If you have driven for a long time in heavy rain
without braking, there may be a delayed reac-
tion from the brakes when braking for the first
time. This may also occur after the vehicle has
been washed.
You have to depress the brake pedal more
firmly. Maintain a greater distance from the
vehicle in front.
After driving on a wet road or having the vehi-
cle washed, brake firmly while paying atten-
tion to the traffic conditions. This will warm
up the brake discs, thereby drying them more Driving tips
167Driving and parking Z
Page 176 of 381
R
Observe the warnings for off-road driving
(Y page 170).
R Drive slowly.
R Accelerate gently and make sure that the
wheels are gripping.
R Avoid high engine speeds, except when
driving on sandy and muddy routes with
high driving resistance.
R Select a shift range appropriate to the gra-
dient.
R Before tackling steep downhill gradients,
select shift range 1.
Maximum gradient-climbing capability On good road surfaces, 70% of the maximum
gradient-climbing capability is available.
i If the load on the front axle is reduced
when pulling away on a steep uphill slope,
the front wheels have a tendency to spin.
4ETS recognises this and brakes the
wheels accordingly. The rear wheel torque
is increased and it is easier to pull away.
Hilltops When driving up an uphill gradient, slightly
reduce pressure on the accelerator immedi-
ately before reaching the brow of the hill.
Make use of the vehicle's own impetus to
travel over the brow.
This style of driving prevents:
R the vehicle from lifting off the ground on the
brow of a hill
R the vehicle from travelling too quickly down
the other side.
Driving downhill R
Drive slowly.
R Do not drive at an angle down steep
inclines. Steer into the line of fall and drive
with the front wheels aligned straight. Oth-
erwise, the vehicle could slip sideways, tip
and overturn. R
Before tackling steep downhill gradients,
select shift range 1.
R Activate DSR. If this is not sufficient, brake
gently. When doing so, make sure that the
vehicle is facing in the direction of the line
of fall.
R Check that the brakes are working normally
after a long downhill stretch.
i Off-road ABS is activated when the off-
road drive program is selected.
At speeds below 30 km/h, the front wheels
lock cyclically during braking. The digging-
in effect achieved in the process reduces
the stopping distance when driving off-
road. The steerability of the vehicle is con-
siderably reduced if the wheels lock. Driving systems
Cruise control
Important safety notes Cruise control maintains a constant road
speed for you. It brakes automatically in order
to avoid exceeding the set speed. You must
select a low gear in good time on long and
steep downhill gradients, especially if the
vehicle is laden or towing a trailer. On vehicles
with automatic transmission, select shift
range
1,2or 3. By doing so, you will make
use of the braking effect of the engine. This
relieves the load on the brake system and
prevents the brakes from overheating and
wearing too quickly. G
WARNING
Do not change down for additional engine
braking on a slippery road surface. This could
cause the drive wheels to lose their grip and
the vehicle could skid.
Use cruise control only if road and traffic con-
ditions make it appropriate to maintain a
steady speed for a prolonged period. You can
store any road speed above 30 km/h. Driving systems
173Driving and parking Z