2012 MERCEDES-BENZ GLK SUV low beam
[x] Cancel search: low beamPage 233 of 381
Text field
:shows the selected menu or
submenu as well as display messages.
i You can set the time using the audio sys-
tem or COMAND Online; see the separate
operating instructions.
Vehicles with manual transmission: the
indicators in the lower part of the multifunc-
tion display differ from the display shown
here.
The following messages can appear in the
multifunction display:
Z Gearshift recommendation
(Ypage 155)
¯ Cruise control (Y page 173)
È SPEEDTRONIC (Y page 176)
è Rear window wiper
(Ypage 123)
_ Adaptive Main-beam Assist
(Ypage 116)
À ATTENTION ASSIST
(Ypage 201)
¤ ECO start/stop function
(Ypage 150)
Ä Speed Limit Assist
(Ypage 202)
à Lane Keeping Assist
(Ypage 205) or Active Lane
Keeping Assist (Y page 210)
ë HOLD function (Y page 186)
Ä PRE-SAFE®
Brake (Y page 69)
fDSR DSR DSR (Y
page 213)
120 km/h! 120 km/h! Maximum permissible speed
exceeded (only for certain coun-
tries) Menu overview
Operating the on-board computer
(Y page 228). Depending on the equipment fitted in the
vehicle, you can call up the following menus:
R
Trip Trip menu (Y page 230)
R Navi Navi menu (navigation instructions)
(Y page 232)
R Audio
Audio menu (Y page 233)
R Tel
Tel menu (telephone) (Y page 234)
R Assist.
Assist. menu (assistance)
R Serv.
Serv. menu (Y page 238)
R Settings
Settings menu (Ypage 238)
The Audio
Audio ,Navi
Navi andTel
Tel menus differ slightly
in vehicles with an audio system and in vehi-
cles with COMAND Online. The examples
given in this Owner's Manual apply to vehicles
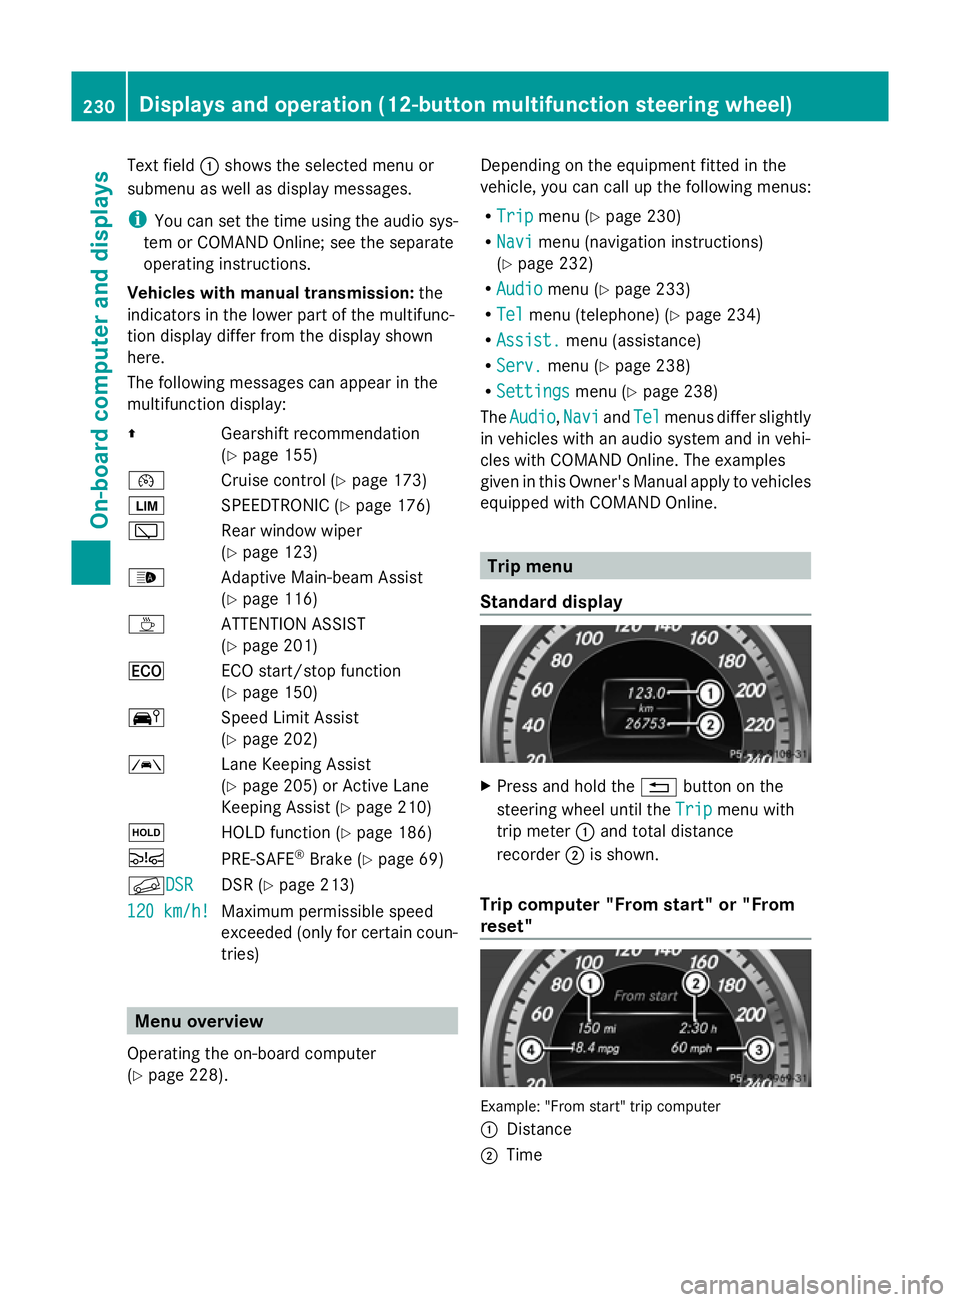
equipped with COMAND Online. Trip menu
Standard display X
Press and hold the %button on the
steering wheel until the Trip Tripmenu with
trip meter :and total distance
recorder ;is shown.
Trip computer "From start" or "From
reset" Example: "From start" trip computer
:
Distance
; Time 230
Displays and operation (12-button multifunction steering wheel)On-board computer and displays
Page 243 of 381
X
Press the :or9 button to select the
Brightness Display/Switches:
Brightness Display/Switches: func-
tion.
You will see the selected setting.
X Press ato confirm.
X Press the :or9 button to adjust the
brightness to any level from Level 1 Level 1to
Level 5
Level 5 (bright).
X Press the aor% button to save the
setting.
Switching the Intelligent Light System
on/off
X Press the =or; button on the steer-
ing wheel to select the Settings
Settings menu.
X Press the :or9 button to select the
Light
Light submenu.
X Press ato confirm.
X Press the :or9 button to select the
Intell. Light Sys.
Intell. Light Sys. function.
If the Intell. Light Sys. Intell. Light Sys. function has
been switched on, the cone of light and the
L symbol in the multifunction display
are shown in red.
X Press the abutton to save the setting.
When you activate Intell. Light Sys.
Intell. Light Sys.,
you activate the following functions:
R motorway mode
R active light function
R cornering light function
R extended range foglamps
If you set the dipped-beam headlamps for
driving on the right/left, the multifunction
display shows the Intell. Intell.Light
LightSystem:
System:
System inoperative Inactive for
System inoperative Inactive for
left-side traffic left-side traffic orIntell. Light
Intell. Light
System:
System: System
Systeminoperative
inoperative Inactive
Inactive
for
for right-side
right-side traffic
trafficdisplay message
instead of the Intell.
Intell. Light
LightSys.
Sys.function
in the Light
Light submenu.
Further information on the Intelligent Light
System (Y page 114). Switching Adaptive Highbeam Assist on/
off
X
Press the =or; button on the steer-
ing wheel to select the Settings
Settings menu.
X Press the :or9 button to select the
Light Light submenu.
X Press ato confirm.
X Press the :or9 button to select the
Adapt. main beam
Adapt. main beam function.
If the Adapt. main beam
Adapt. main beam function has
been switched on, the cone of light and the
_ symbol in the upper multifunction
display are shown in red.
X Press the abutton to save the setting.
For further information about Adaptive High-
beam Assist, see (Y page 116).
Activating/deactivating the surround
lighting and exterior lighting delayed
switch-off
X Press the =or; button on the steer-
ing wheel to select the Settings
Settings menu.
X Press the :or9 button to select the
Light Light submenu.
X Press ato confirm.
X Press the :or9 button to select the
Surround lighting
Surround lighting function.
When the Surround lighting
Surround lighting function is
activated, the light cone and the area
around the vehicle are displayed in red in
the multifunction display.
X Press the abutton to save the setting.
Deactivating delayed switch-off of the exte-
rior lighting temporarily:
X Before leaving the vehicle, turn the key to
position 0in the ignition lock.
X Turn the key to position 2in the ignition
lock.
The exterior lighting delayed switch-off is
deactivated.
Delayed switch-off of the exterior lighting is
reactivated the next time you start the
engine. 240
Displays and operation (12-button multifunction steering wheel)On-board computer and displays
Page 244 of 381
If you have activated the
Surround light‐
Surround light‐
ing
ing function and the light switch is set to
Ã, the following functions are activated
when it is dark:
R surround lighting: the exterior lighting
remains lit for 40 seconds after unlocking
with the key. If you start the engine, the
surround lighting is switched off and auto-
matic headlamp mode is activated
(Y page 111).
R exterior lighting delayed switch-off: the
exterior lighting remains lit for
60 seconds after the engine is switched off.
If you close all the doors and the tailgate,
the exterior lighting goes off after
5 seconds.
i Depending on your vehicle's equipment,
when the surround lighting and delayed
switch-off exterior lighting are on, the fol-
lowing light up:
R side lamps
R foglamps
R dipped-beam headlamps
R daytime driving lights
R surround lighting in the exterior mirrors
Activating/deactivating the interior light-
ing delayed switch-off
If you activate the Light. delay
Light. delay function,
the interior lighting remains on for
20 seconds after you remove the key from the
ignition lock.
X Press the =or; button on the steer-
ing wheel to select the Settings
Settings menu.
X Press the :or9 button to select the
Light
Light submenu.
X Press ato confirm.
X Press the :or9 button to select the
Light. delay
Light. delay function.
When the Light. delay Light. delay function is acti-
vated, the vehicle interior is displayed in
red in the multifunction display.
X Press the abutton to save the setting. Vehicle Setting permanent SPEEDTRONIC
X
Press the =or; button on the steer-
ing wheel to select the Settings Settingsmenu.
X Press the :or9 button to select the
Vehicle
Vehicle submenu.
X Press ato confirm.
X Press :or9 to select the Limit
Limit
speed (winter tyres):
speed (winter tyres): function.
You will see the current setting.
X Press ato confirm.
X Press the :or9 button to adjust
permanent SPEEDTRONIC in increments of
ten (230 km/h 230 km/h to160 km/h 160 km/h). The Off
Offset-
ting switches permanent SPEEDTRONIC
off.
X Press the abutton to store the entry.
For further information on permanent SPEED-
TRONIC (Y page 178).
Switching the automatic locking feature
on/off
X Press the =or; button on the steer-
ing wheel to select the Settings Settingsmenu.
X Press the :or9 button to select the
Vehicle
Vehicle submenu.
X Press ato confirm.
X Press the :or9 button to select the
Auto. door locks
Auto. door locks function.
When the Auto. door locks
Auto. door locks function is
activated, the vehicle doors are displayed
in red in the multifunction display.
X Press the abutton to save the setting.
If you activate the Auto. door locks
Auto. door locks func-
tion, the vehicle is centrally locked above a
speed of around 15 km/h.
For further information on the automatic lock-
ing feature, see (Y page 83). Displays and operation (12-button multifunction steering wheel)
241On-board computer and displays Z
Page 263 of 381
Display messages Possible causes/consequences and
M
MSolutions b
malfunction malfunction The exterior lighting is faulty.
X
Visit a qualified specialist workshop. Vehicles with trailer tow hitch: a fuse may have blown.
X Check the fuses (Y page 346).
X If necessary, replace the blown fuse. Observe the warning notes
as you do so.
If the display message continues to be displayed:
X Visit a qualified specialist workshop. b
AUTO AUTO
lights
lights inoper‐
inoper‐
ative
ative The light sensor is faulty.
X
Visit a qualified specialist workshop. b
Switch off lights Switch off lights The lights are still switched on when you leave the vehicle. A
warning tone also sounds.
X
Turn the light switch to Ã.Lights (12-button multifunction steering wheel)
i Display messages about LEDs:
This display message will only appear if all LEDs have failed. Display messages Possible causes/consequences and
M MSolutions b
Left cornering Left cornering
light light
orRight cor‐
Right cor‐
nering light
nering light The left or right-hand cornering light is faulty.
X
Check whether you are permitted to replace the bulb yourself
(Y page 118).
or
X Visit a qualified specialist workshop. b
Left dipped beam Left dipped beam
or
Right dipped Right dipped
beam
beam The left or right-hand dipped-beam headlamp is faulty.
X
Check whether you are permitted to replace the bulb yourself
(Y page 118).
or
X Visit a qualified specialist workshop. b
Trailer left tail Trailer left tail
lamp lamp
orTrailer
Trailer
right tail lamp right tail lamp The left or right-hand trailer tail lamp is faulty.
X
Check whether you are permitted to replace the bulb yourself.
or
X Visit a qualified specialist workshop. 260
Display
messagesOn-board computer and displays
Page 266 of 381
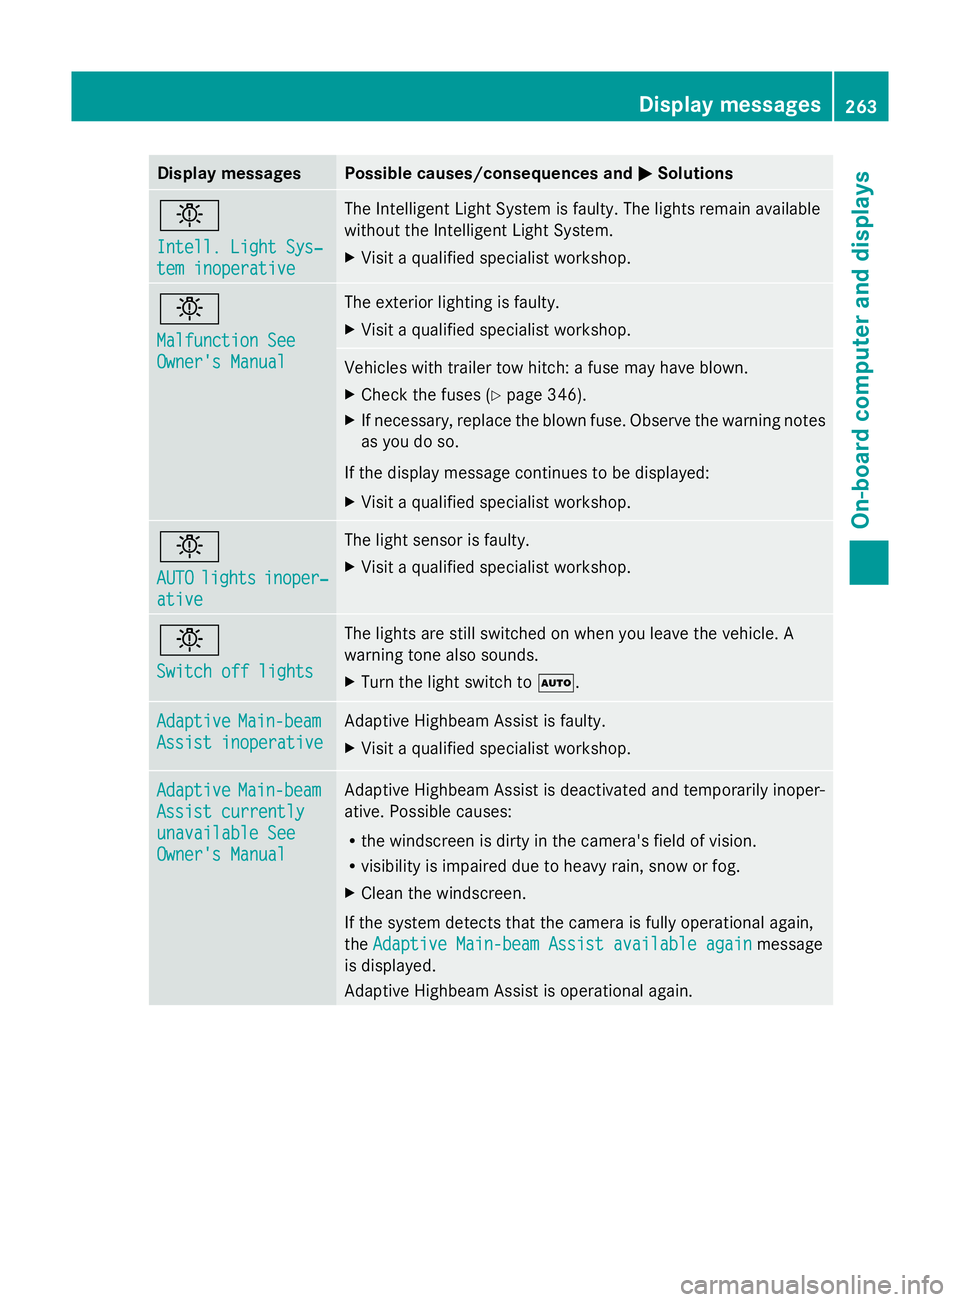
Display messages Possible causes/consequences and
M
MSolutions b
Intell. Light Sys‐ Intell. Light Sys‐
tem inoperative tem inoperative The Intelligent Light System is faulty. The lights remain available
without the Intelligent Light System.
X
Visit a qualified specialist workshop. b
Malfunction See Malfunction See
Owner's Manual Owner's Manual The exterior lighting is faulty.
X
Visit a qualified specialist workshop. Vehicles with trailer tow hitch: a fuse may have blown.
X
Check the fuses (Y page 346).
X If necessary, replace the blown fuse. Observe the warning notes
as you do so.
If the display message continues to be displayed:
X Visit a qualified specialist workshop. b
AUTO AUTO
lights
lights inoper‐
inoper‐
ative
ative The light sensor is faulty.
X
Visit a qualified specialist workshop. b
Switch off lights Switch off lights The lights are still switched on when you leave the vehicle. A
warning tone also sounds.
X
Turn the light switch to Ã.Adaptive Adaptive
Main-beam
Main-beam
Assist inoperative
Assist inoperative Adaptive Highbeam Assist is faulty.
X
Visit a qualified specialist workshop. Adaptive Adaptive
Main-beam
Main-beam
Assist currently
Assist currently
unavailable See unavailable See
Owner's Manual Owner's Manual Adaptive Highbeam Assist is deactivated and temporarily inoper-
ative. Possible causes:
R
the windscreen is dirty in the camera's field of vision.
R visibility is impaired due to heavy rain, snow or fog.
X Clean the windscreen.
If the system detects that the camera is fully operational again,
the Adaptive Main-beam Assist available again Adaptive Main-beam Assist available again message
is displayed.
Adaptive Highbeam Assist is operational again. Display
messages
263On-board computer and displays Z