2012 MERCEDES-BENZ GLK SUV height
[x] Cancel search: heightPage 195 of 381
Problems with PARKTRONIC
Problem Possible causes/consequences and
M
MSolutions Only the red segments
in the PARKTRONIC
warning displays are lit.
You also hear a warning
tone for approximately
two seconds.
PARKTRONIC is deacti-
vated after approx-
imately five seconds,
and the indicator lamp
in the PARKTRONIC
button lights up. PARKTRONIC has malfunctioned and has switched off.
X
If problems persist, have PARKTRONIC checked at a qualified
specialist workshop. Only the red segments
in the PARKTRONIC
warning displays are lit.
PARKTRONIC is deacti-
vated after approx-
imately five seconds. The PARKTRONIC sensors are dirty or there is interference.
X
Clean the PARKTRONIC sensors (Y page 321).
X Switch the ignition back on. The problem may be caused by an external source of radio or
ultrasound waves.
X
See if PARKTRONIC functions in a different location. Active Parking Assist
Important safety notes Active Parking Assist is an electronic parking
aid with ultrasound. Ultrasound is used to
measure the road on both sides of the vehicle.
A suitable parking space is indicated by the
parking symbol. Active steering intervention
can assist you during parking. You may also
use PARKTRONIC (Y page 188). When PARK-
TRONIC is switched off, Active Parking Assist
is also unavailable. G
WARNING
Active Parking Assist is merely an aid and may
sometimes recommend parking spaces that
are not suitable for parking. For example,
these might be spaces where parking is pro-
hibited, driveways, unsuitable surfaces, etc.
Active Parking Assist measures the parking
space as you drive past it. Any later changes to the parking space are not taken into
account. For instance, this may be the case
when the vehicle parked in front of or behind
the space changes its position or when an
obstacle is moved into the parking space.
Active Parking Assist does not relieve you of
the responsibility of paying attention. If you
rely solely on Active Parking Assist, you could
cause an accident and injure yourself and oth-
ers.
You are always responsible for safety and
must continue to pay attention to your imme-
diate surroundings when parking and
manoeuvring. G
WARNING
Objects located above the height range of
Active Parking Assist will not be detected
when the parking space is measured. These
are not taken into account when the parking 192
Driving systemsDriving and parking
Page 203 of 381
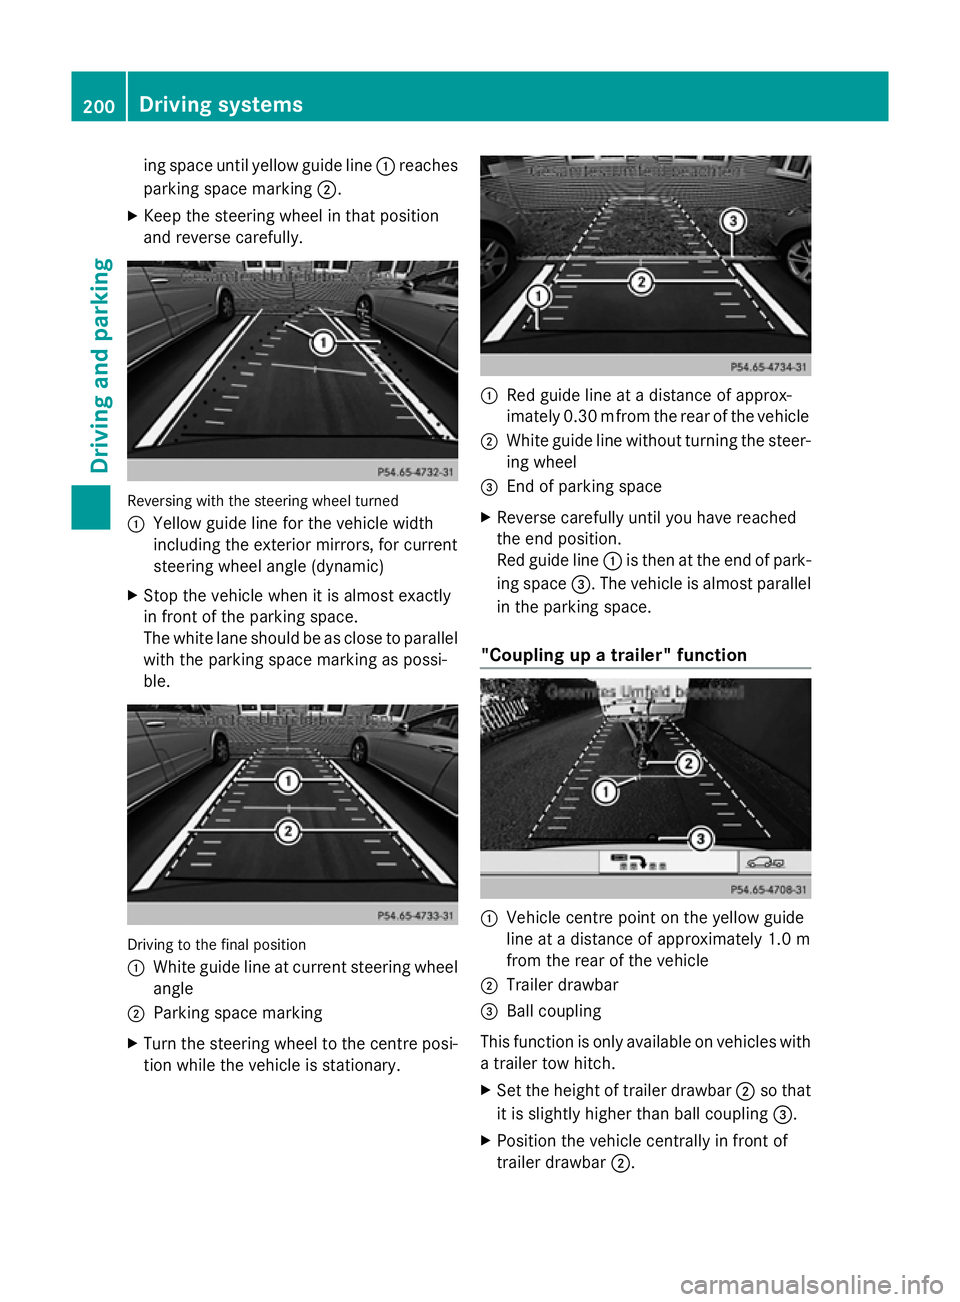
ing space until yellow guide line
:reaches
parking space marking ;.
X Keep the steering wheel in that position
and reverse carefully. Reversing with the steering wheel turned
:
Yellow guide line for the vehicle width
including the exterior mirrors, for current
steering wheel angle (dynamic)
X Stop the vehicle when it is almost exactly
in front of the parking space.
The white lane should be as close to parallel
with the parking space marking as possi-
ble. Driving to the final position
:
White guide line at current steering wheel
angle
; Parking space marking
X Turn the steering wheel to the centre posi-
tion while the vehicle is stationary. :
Red guide line at a distance of approx-
imately 0.30 mfrom the rear of the vehicle
; White guide line without turning the steer-
ing wheel
= End of parking space
X Reverse carefully until you have reached
the end position.
Red guide line :is then at the end of park-
ing space =. The vehicle is almost parallel
in the parking space.
"Coupling up a trailer" function :
Vehicle centre point on the yellow guide
line at a distance of approximately 1.0 m
from the rear of the vehicle
; Trailer drawbar
= Ball coupling
This function is only available on vehicles with
a trailer tow hitch.
X Set the height of trailer drawbar ;so that
it is slightly higher than ball coupling =.
X Position the vehicle centrally in front of
trailer drawbar ;.200
Driving systemsDriving and parking
Page 220 of 381
The maximum noseweight of the trailer draw-
bar on the ball coupling is 80 kg. However,
the actual noseweight may not be higher than
the value which is given on the trailer tow
hitch or trailer identification plates. The low-
est weight applies.
! Use a drawbar noseweight as close as
possible to the maximum permissible nose-
weight. Do not use a noseweight of less
than 50kg, otherwise the trailer may come
loose.
Note that the payload and the rear axle load
are reduced by the actual payload.
i The height of the ball coupling changes
with the load of the vehicle. If necessary,
use a trailer with a height-adjustable draw-
bar.
Driving tips i
Observe the notes on ESP ®
trailer stabi-
lisation (Y page 69).
The maximum permissible speed for vehicle/
trailer combinations depends on the type of
trailer. Before beginning the journey, check
the trailer's documents to see what the max-
imum permitted speed is. Observe the legally
prescribed maximum speed in the relevant
country.
For certain Mercedes-Benz vehicles, the max-
imum permissible rear axle load is increased
when towing a trailer. Refer to the "Technical
data" section to find out whether this applies
to your vehicle. If you utilise any of the added
maximum rear axle load when towing a trailer,
the vehicle/trailer combination may not
exceed a maximum speed of 100 km/h for
reasons concerning the operating permit.
This also applies in countries in which the
permissible maximum speed for vehicle/
trailer combinations is above 100 km/h.
When towing a trailer, your vehicle's handling
characteristics will be different in comparison
to when driving without a trailer, and it will
consume more fuel. Change into a lower gear in good time on long
and steep downhill gradients. On vehicles
with automatic transmission, you have to
select shift range
1,2or 3.
i This also applies if you have activated
cruise control or SPEEDTRONIC.
This will use the braking effect of the engine,
so less braking will be required to prevent the
vehicle from gaining speed. This relieves the
load on the brake system and prevents the
brakes from overheating and wearing too
quickly. If you need additional braking,
depress the brake pedal repeatedly rather
than continuously.
Driving tips R
Maintain a greater distance from the vehi-
cle in front than when driving without a
trailer.
R Avoid braking abruptly. If possible, brake
gently at first to allow the trailer to run on.
Then, increase the braking force rapidly.
R The values given for gradient-climbing
capabilities from a standstill refer to sea
level. When driving in mountainous areas,
note that the power output of the engine,
and consequently the vehicle's gradient-
climbing capability, decrease with increas-
ing altitude.
If the trailer swings from side to side:
X Do not accelerate.
X Do not countersteer.
X Brake if necessary. Fitting the ball coupling
X Make a note of the ball coupling key num-
ber.
i You can use this number to obtain a
replacement key from a Mercedes-Benz
Service Centre. Towing a trailer
217Driving and parking Z
Page 318 of 381
Closing the bonnet
G
WARNING
Make sure that nobody can become trapped
as you close the bonnet.
X Lower the bonnet and let it fall from a
height of approximately 20 cm.
X Check that the bonnet has engaged prop-
erly.
If the bonnet can be raised slightly, it is not
properly engaged. Open it again and close
it with a little more force. Radiator
Vehicles with a diesel engine: do not cover
the radiator. Do not use thermal mats, insect
protection covers or anything similar. Doing
so can cause the Onboard Diagnostics Sys-
tem to display inaccurate values. Some of
these values are legally required and must
always be correct. Engine oil
General notes on oil level Depending on your driving style, the vehicle
consumes up to 0.8 l of oil per 1,000 km. The
oil consumption may be higher than this when
the vehicle is new or if you frequently drive at
high engine speeds.
Depending on the engine, the oil dipstick may
be installed at a different location.
When checking the oil level:
R park the vehicle on a level surface.
R the engine should be switched off for
approximately five minutes if the engine is
at normal operating temperature.
R if the engine is not at normal operating
temperature, e.g. if the engine was only
started briefly: wait about 30 minutes
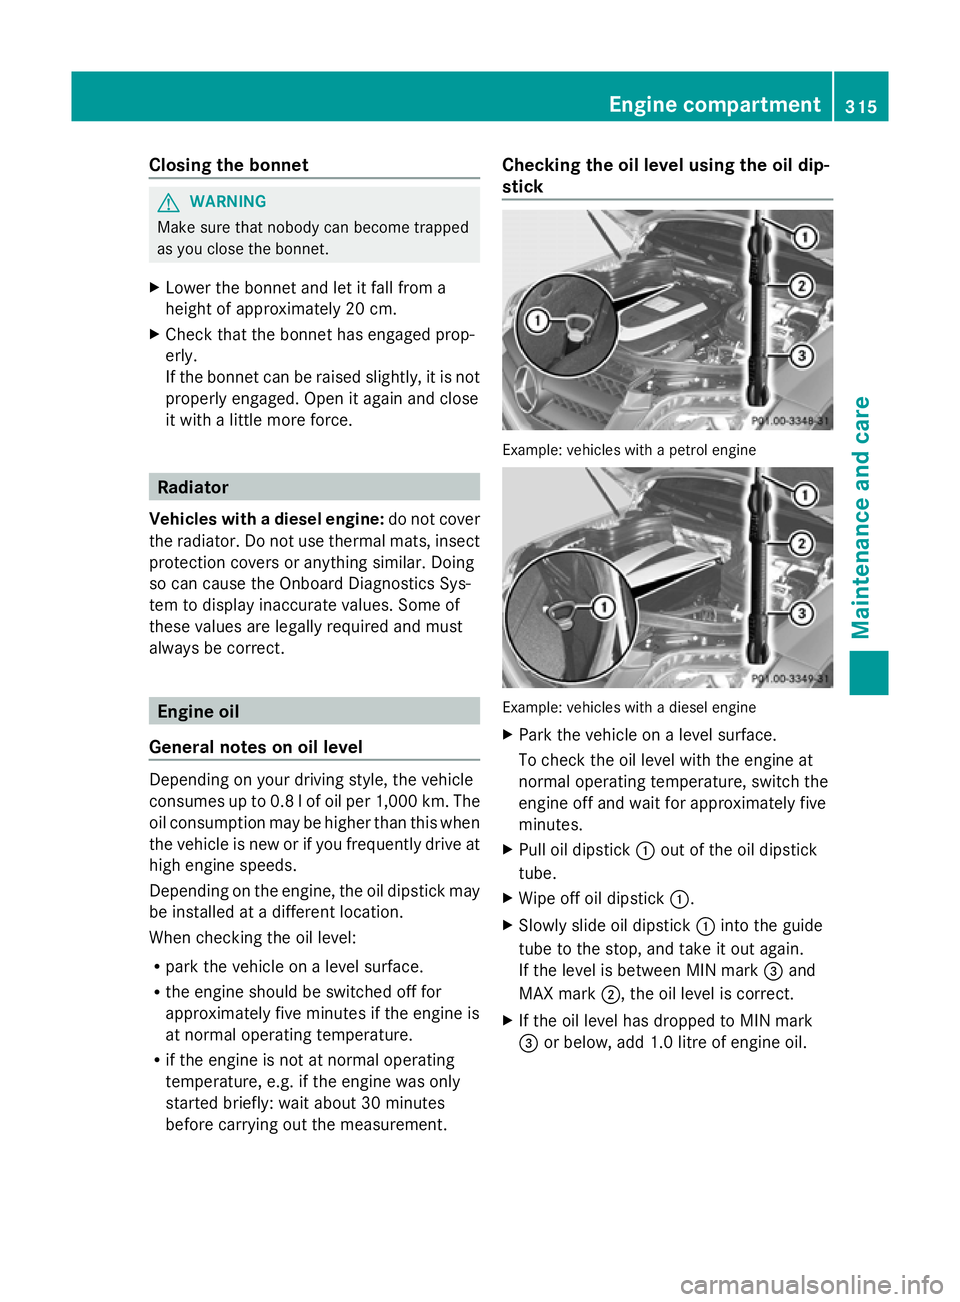
before carrying out the measurement. Checking the oil level using the oil dip-
stick Example: vehicles with a petrol engine
Example: vehicles with a diesel engine
X
Park the vehicle on a level surface.
To check the oil level with the engine at
normal operating temperature, switch the
engine off and wait for approximately five
minutes.
X Pull oil dipstick :out of the oil dipstick
tube.
X Wipe off oil dipstick :.
X Slowly slide oil dipstick :into the guide
tube to the stop, and take it out again.
If the level is between MIN mark =and
MAX mark ;, the oil level is correct.
X If the oil level has dropped to MIN mark
= or below, add 1.0 litre of engine oil. Engine compartment
315Maintenance and care Z
Page 337 of 381
The following must be observed when raising
the vehicle:
R to raise the vehicle, only use the vehicle-
specific jack that has been tested and
approved by Mercedes-Benz. If the jack is
used incorrectly, it could tip over while the
vehicle is raised.
R the jack is designed only to raise and hold
the vehicle for a short time while a wheel
is being changed. It is not suited for per-
forming maintenance work under the vehi-
cle.
R avoid changing the wheel on uphill and
downhill slopes.
R before raising the vehicle, secure it from
rolling away by applying the parking brake
and inserting wheel chocks. Never disen-
gage the parking brake while the vehicle is
raised.
R the jack must be placed on a firm, flat and
non-slip surface. On a loose surface, a
large, load-bearing underlay must be used.
On a slippery surface, a non-slip underlay
must be used, e.g. rubber mats.
R do not use wooden blocks or similar
objects as a jack underlay. Otherwise, the
jack will not be able to achieve its load-
bearing capacity due to the restricted
height.
R make sure that the distance between the
underside of the tyres and the ground does
not exceed 3 cm.
R never place your hands or feet under the
raised vehicle.
R never lie under the raised vehicle.
R never start the engine when the vehicle is
raised.
R never open or close a door or the tailgate
when the vehicle is raised.
R make sure that no persons are present in
the vehicle when the vehicle is raised. X
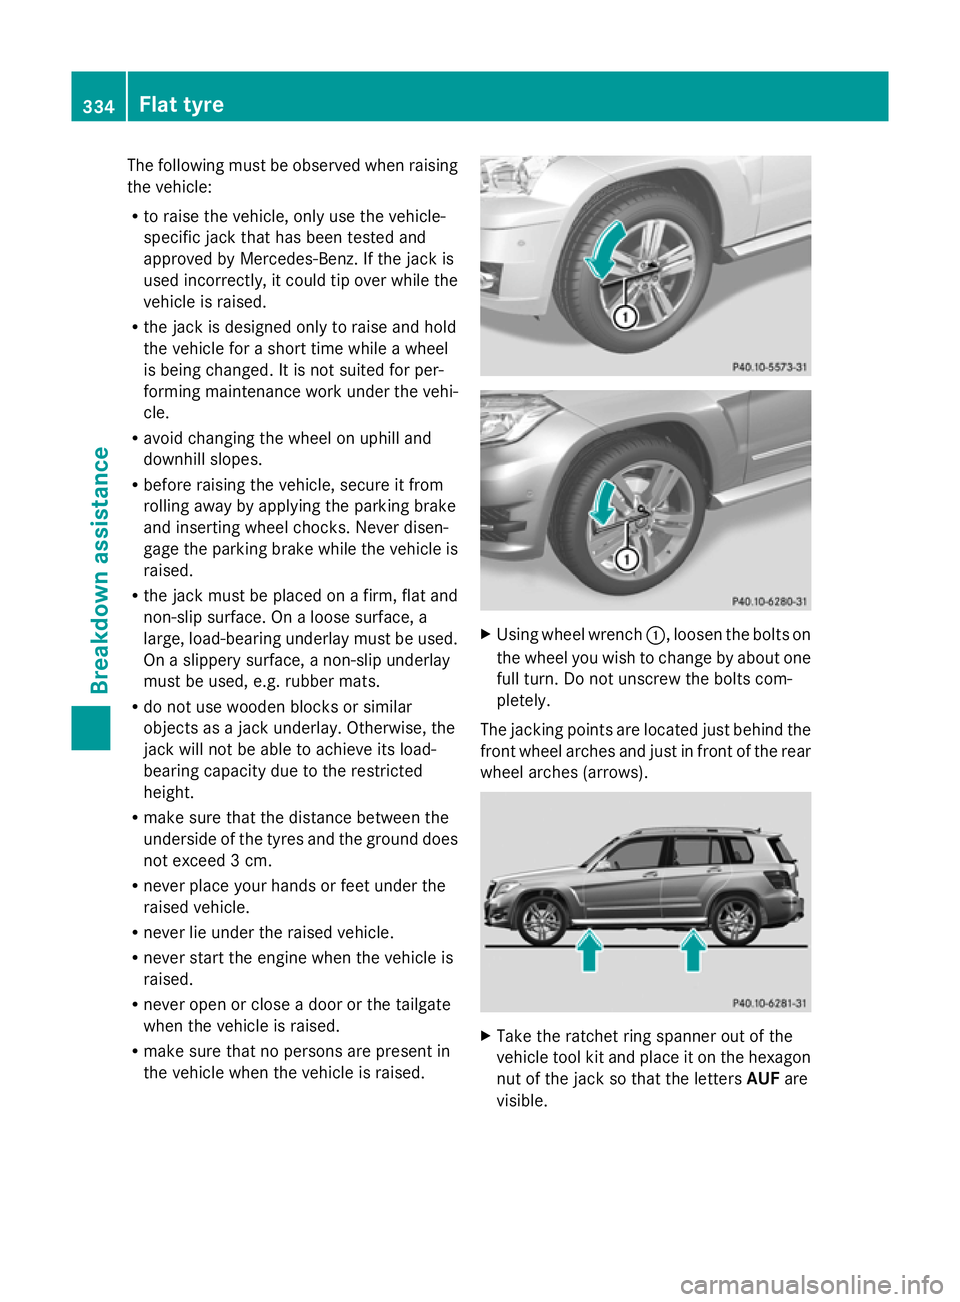
Using wheel wrench :, loosen the bolts on
the wheel you wish to change by about one
full turn. Do not unscrew the bolts com-
pletely.
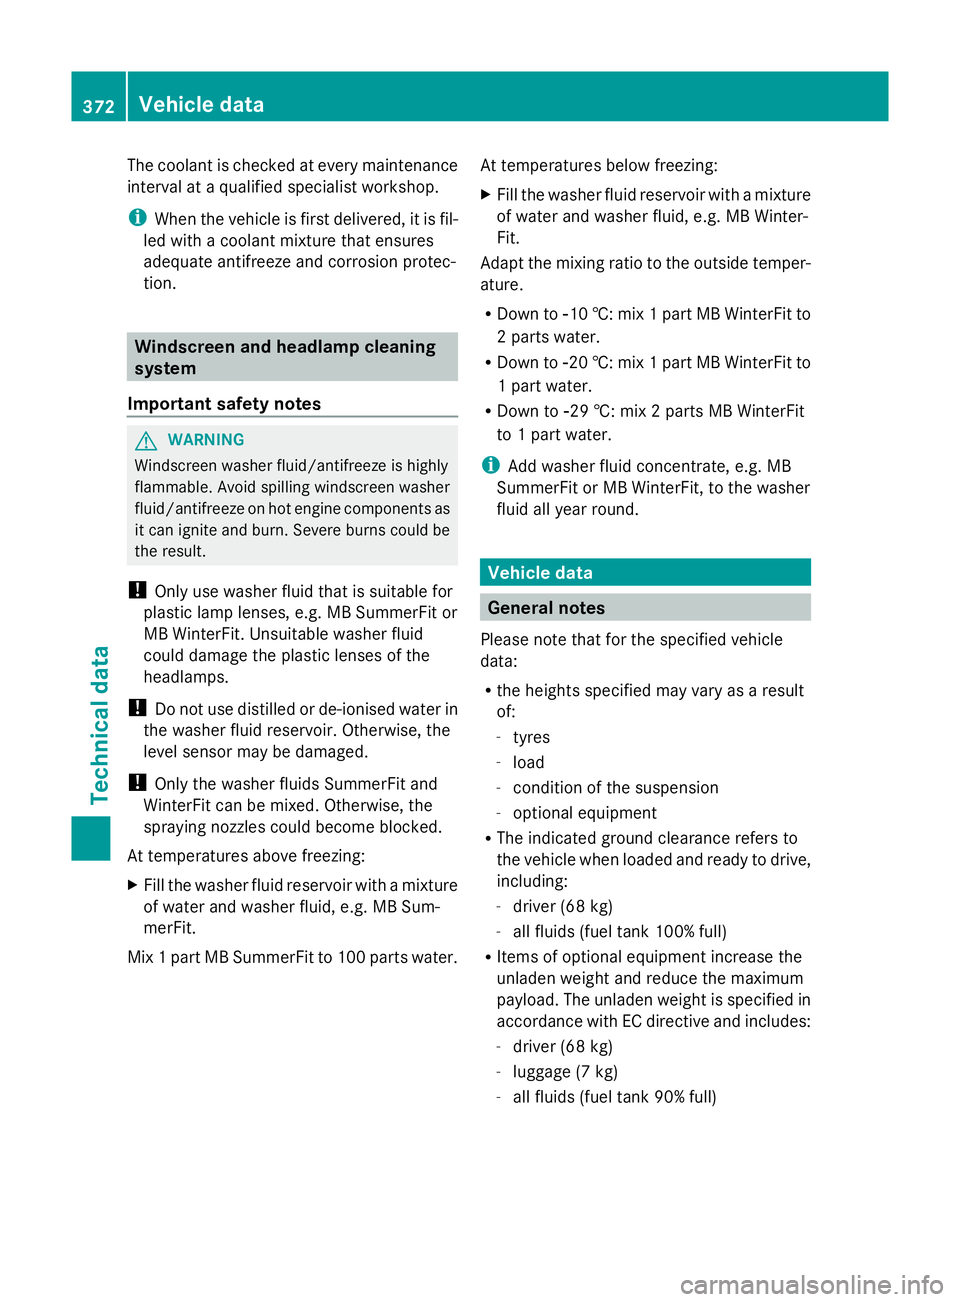
The jacking points are located just behind the
front wheel arches and just in front of the rear
wheel arches (arrows). X
Take the ratchet ring spanner out of the
vehicle tool kit and place it on the hexagon
nut of the jack so that the letters AUFare
visible. 334
Flat tyreBreakdown assistance
Page 375 of 381
The coolant is checked at every maintenance
interval at a qualified specialist workshop.
i When the vehicle is first delivered, it is fil-
led with a coolant mixture that ensures
adequate antifreeze and corrosion protec-
tion. Windscreen and headlamp cleaning
system
Important safety notes G
WARNING
Windscreen washer fluid/antifreeze is highly
flammable. Avoid spilling windscreen washer
fluid/antifreeze on hot engine components as
it can ignite and burn. Severe burns could be
the result.
! Only use washer fluid that is suitable for
plastic lamp lenses, e.g. MB SummerFit or
MB WinterFit. Unsuitable washer fluid
could damage the plastic lenses of the
headlamps.
! Do not use distilled or de-ionised water in
the washer fluid reservoir. Otherwise, the
level sensor may be damaged.
! Only the washer fluids SummerFit and
WinterFit can be mixed. Otherwise, the
spraying nozzles could become blocked.
At temperatures above freezing:
X Fill the washer fluid reservoir with a mixture
of water and washer fluid, e.g. MB Sum-
merFit.
Mix 1 part MB SummerFit to 100 parts water. At temperatures below freezing:
X
Fill the washer fluid reservoir with a mixture
of water and washer fluid, e.g. MB Winter-
Fit.
Adapt the mixing ratio to the outside temper-
ature.
R Down to Ò10 †: mix 1 part MB WinterFit to
2 parts water.
R Down to Ò20 †: mix 1 part MB WinterFit to
1 part water.
R Down to Ò29 †: mix 2 parts MB WinterFit
to 1 part water.
i Add washer fluid concentrate, e.g. MB
SummerFit or MB WinterFit, to the washer
fluid all year round. Vehicle data
General notes
Please note that for the specified vehicle
data:
R the heights specified may vary as a result
of:
-tyres
- load
- condition of the suspension
- optional equipment
R The indicated ground clearance refers to
the vehicle when loaded and ready to drive,
including:
-driver (68 kg)
- all fluids (fuel tank 100% full)
R Items of optional equipment increase the
unladen weight and reduce the maximum
payload. The unladen weight is specified in
accordance with EC directive and includes:
- driver (68 kg)
- luggage (7 kg)
- all fluids (fuel tank 90% full) 372
Vehicle dataTechnical data
Page 376 of 381
R
vehicle-specific weight information can be
found on the vehicle identification plate
(Y page 364).
R only for certain countries: you can find vehi-
cle-specific vehicle data in the COC docu-
ments (CERTIFICATE OF CONFORMITY).
These documents are delivered with your
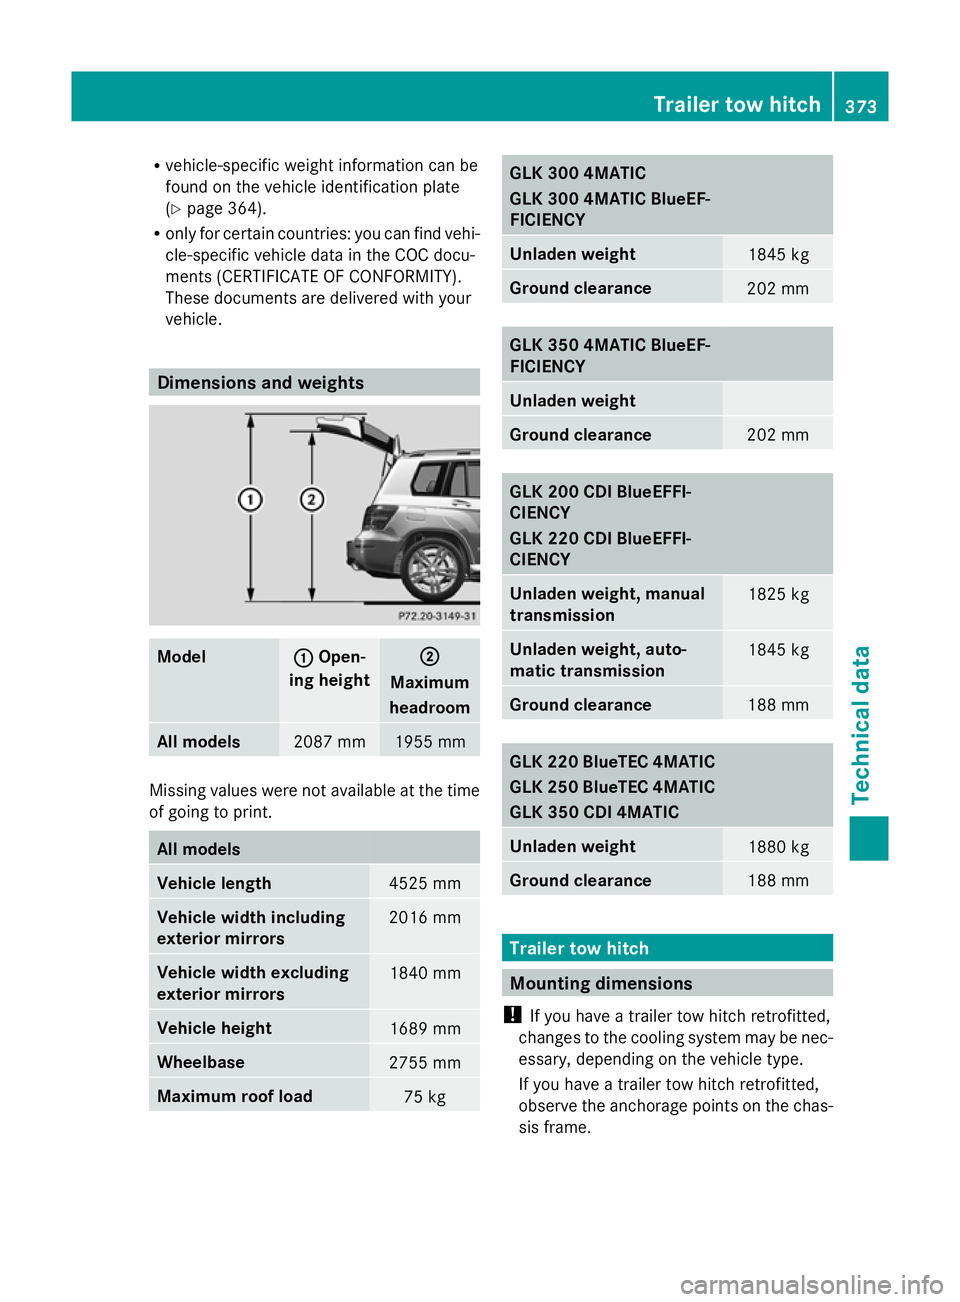
vehicle. Dimensions and weights
Model : :
Open-
ing height ;
;
Maximum
headroom All models
2087 mm 1955 mm
Missing values were not available at the time
of going to print. All models
Vehicle length
4525 mm
Vehicle width including
exterior mirrors
2016 mm
Vehicle width excluding
exterior mirrors
1840 mm
Vehicle height
1689 mm
Wheelbase
2755 mm
Maximum roof load
75 kg GLK 300 4MATIC
GLK 300 4MATIC BlueEF-
FICIENCY
Unladen weight
1845 kg
Ground clearance
202 mm
GLK 350 4MATIC BlueEF-
FICIENCY
Unladen weight
Ground clearance
202 mm
GLK 200 CDI BlueEFFI-
CIENCY
GLK 220 CDI BlueEFFI-
CIENCY
Unladen weight, manual
transmission
1825 kg
Unladen weight, auto-
matic transmission
1845 kg
Ground clearance
188 mm
GLK 220 BlueTEC 4MATIC
GLK 250 BlueTEC 4MATIC
GLK 350 CDI 4MATIC
Unladen weight
1880 kg
Ground clearance
188 mm
Trailer tow hitch
Mounting dimensions
! If you have a trailer tow hitch retrofitted,
changes to the cooling system may be nec-
essary, depending on the vehicle type.
If you have a trailer tow hitch retrofitted,
observe the anchorage points on the chas-
sis frame. Trailer tow hitch
373Technical data Z