2012 MERCEDES-BENZ GLK SUV door lock
[x] Cancel search: door lockPage 59 of 381

The front-passenger airbag is not disabled:
R
on vehicles without automatic child seat
recognition on the front-passenger seat
R in vehicles with automatic child seat rec-
ognition in the front-passenger seat, if no
special child restraint system with trans-
ponders for automatic child seat recogni-
tion in the front-passenger seat has been
fitted
R on vehicles with automatic child seat rec-
ognition on the front-passenger seat, if the
PASSENGER AIRBAG OFF indicator lamp
4 is not lit.
To make you aware of this danger, a corre-
sponding warning sticker has been affixed on
the dashboard and on both sides of the sun
visor on the front-passenger side.
Information about recommended child
restraint systems is available at any
Mercedes-Benz Service Centre.
Do not use a rearward-facing child restraint
system for a child on a seat which is already
protected by an airbag.
Automatic child seat recognition on the
front-passenger seat If your vehicle does not have automatic child
seat recognition 1
on the front-passenger
seat, this is indicated by a special sticker. The
sticker is affixed to the side of the dashboard
on the front-passenger side. The sticker is visible when you open the front-passenger
door.
The front-passenger seat sensor system for
child restraint systems detects whether a
special Mercedes-Benz child seat with a
transponder for automatic child seat recog-
nition has been fitted. In this case,
4
PASSENGER AIRBAG OFF indicator lamp :
lights up. The front-passenger front airbag is
disabled. G
WARNING
If the 4 PASSENGER AIRBAG OFF indica-
tor lamp does not light up when the child
restraint system is fitted, the front-passenger
airbag has not been disabled. If the front-
passenger airbag deploys, the child could be
seriously or even fatally injured.
Proceed as follows:
R do not use a rearward-facing child restraint
system on the front-passenger seat.
R fit a rearward-facing child restraint system
on a suitable rear seat.
or
R only use a forward-facing child restraint
system on the front-passenger seat and
move the front-passenger seat to the rear-
most position.
R have the automatic child seat recognition
checked at a qualified specialist workshop.
To ensure that the automatic child seat rec-
ognition on the front-passenger seat func-
1 Vehicles without automatic child seat recognition on the front-passenger seat: if you turn the key to position
2 in the ignition lock, the 4PASSENGER AIRBAG OFF indicator lamp lights up briefly but has no function.
It does not indicate that there is automatic child seat recognition on the front-passenger seat. 56
Children in the vehicleSafety
Page 67 of 381

Weight
catego-
ries Size cate-
gory Manufac-
turer Type Approval
number
(E1 ...) Order
number Auto-
matic
child seat
recogni-
tion
B1 Britax
Römer DUO PLUS 03 301133
04 301133 A000 970
11 00 Yes
A – – – – –
Child-proof locks
Important safety notes G
WARNING
Activate the child-proof locks for the rear
doors and the override switch for the rear
windows when children are travelling in the
vehicle. Otherwise, the children could open
doors or side windows while the vehicle is in
motion and injure themselves or others. G
WARNING
Do not leave children unsupervised in the
vehicle, even if they are secured in a child
restraint system. They could injure them-
selves on parts of the vehicle. They could also
be seriously or even fatally injured by pro-
longed exposure to extreme heat or cold.
Do not expose the child restraint system to
direct sunlight. Parts of the child restraint sys-
tem could heat up and the child could burn
herself/himself on them.
If a child opens a door, the child or other per-
sons could be injured as a result. They could
get out and injure themselves or be injured by
a passing vehicle.
Child-proof locks for the rear doors You secure each door individually with the
child-proof locks on the rear doors. A door
secured with a child-proof lock cannot be
opened from inside the vehicle. When the
vehicle is unlocked, the door can be opened
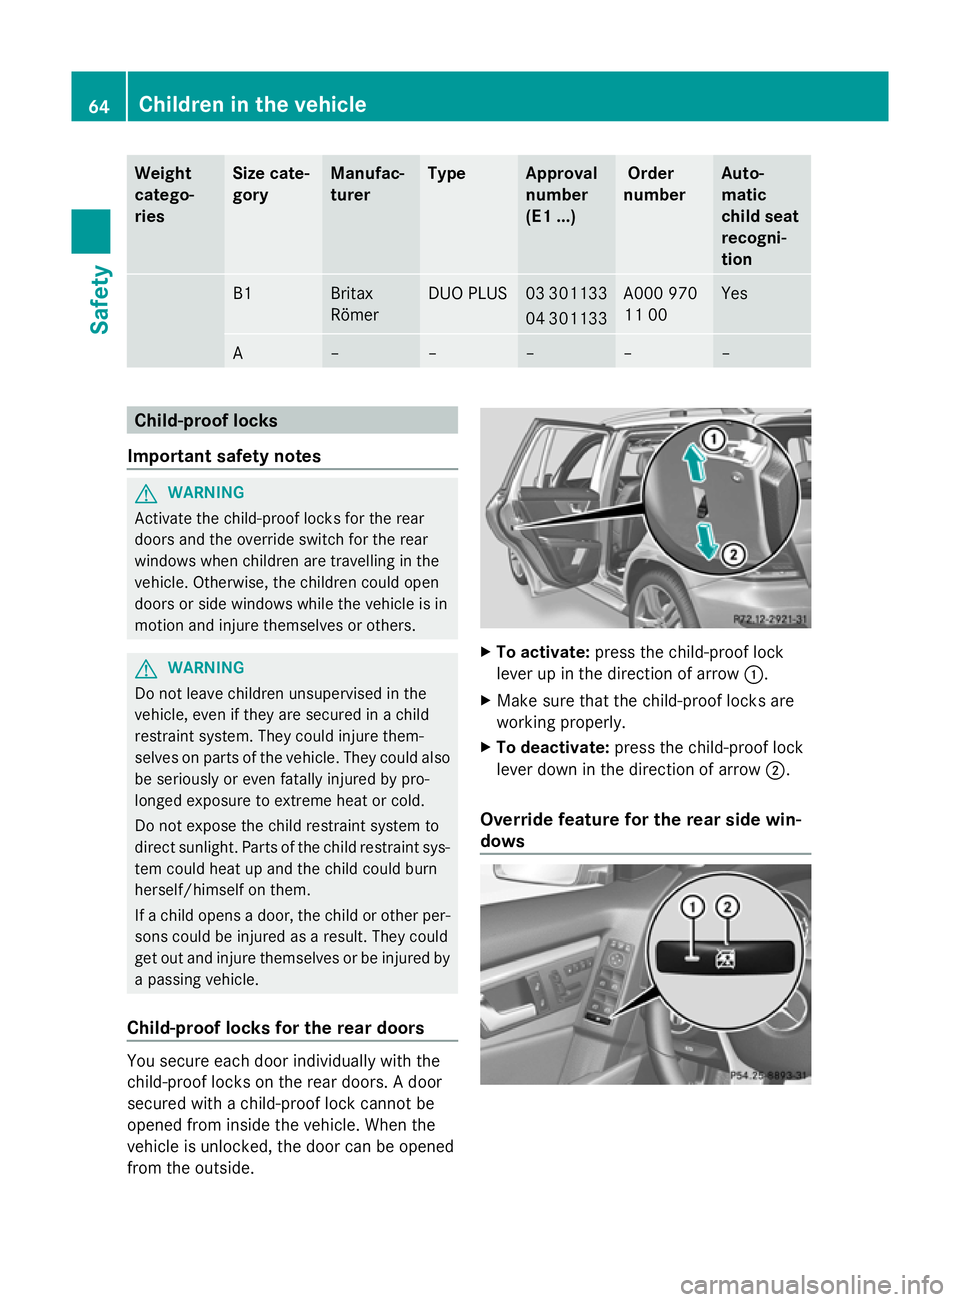
from the outside. X
To activate: press the child-proof lock
lever up in the direction of arrow :.
X Make sure that the child-proof locks are
working properly.
X To deactivate: press the child-proof lock
lever down in the direction of arrow ;.
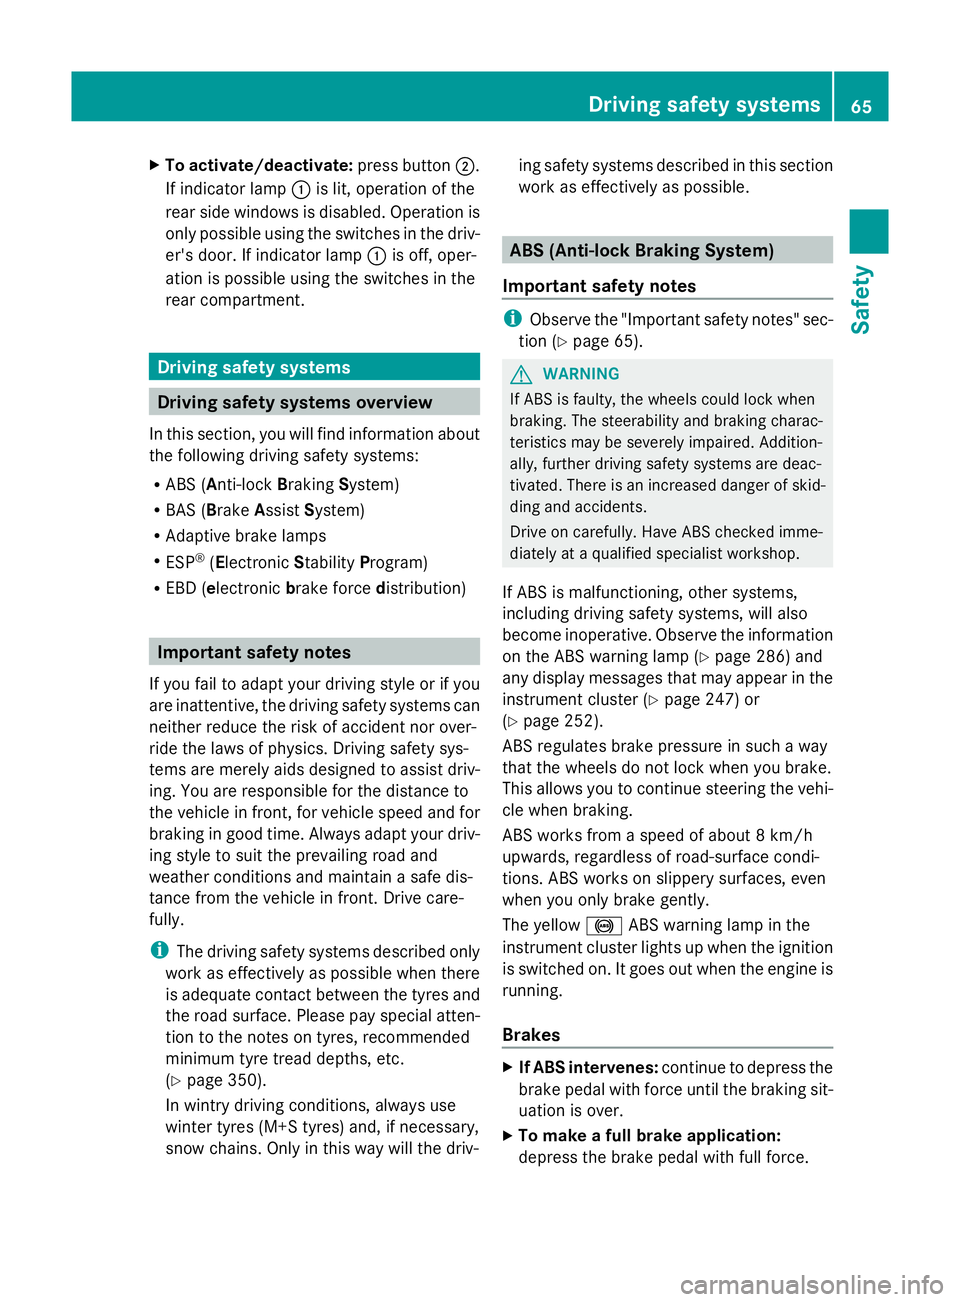
Override feature for the rear side win-
dows 64
Children in the vehicleSafety
Page 68 of 381

X
To activate/deactivate: press button;.
If indicator lamp :is lit, operation of the
rear side windows is disabled. Operation is
only possible using the switches in the driv-
er's door. If indicator lamp :is off, oper-
ation is possible using the switches in the
rear compartment. Driving safety systems
Driving safety systems overview
In this section, you will find information about
the following driving safety systems:
R ABS ( Anti-lock BrakingSystem)
R BAS ( Brake Assist System)
R Adaptive brake lamps
R ESP ®
(Electronic StabilityProgram)
R EBD ( electronic brake force distribution) Important safety notes
If you fail to adapt your driving style or if you
are inattentive, the driving safety systems can
neither reduce the risk of accident nor over-
ride the laws of physics. Driving safety sys-
tems are merely aids designed to assist driv-
ing. You are responsible for the distance to
the vehicle in front, for vehicle speed and for
braking in good time. Always adapt your driv-
ing style to suit the prevailing road and
weather conditions and maintain a safe dis-
tance from the vehicle in front. Drive care-
fully.
i The driving safety systems described only
work as effectively as possible when there
is adequate contact between the tyres and
the road surface. Please pay special atten-
tion to the notes on tyres, recommended
minimum tyre tread depths, etc.
(Y page 350).
In wintry driving conditions, always use
winter tyres (M+S tyres) and, if necessary,
snow chains. Only in this way will the driv- ing safety systems described in this section
work as effectively as possible. ABS (Anti-lock Braking System)
Important safety notes i
Observe the "Important safety notes" sec-
tion (Y page 65). G
WARNING
If ABS is faulty, the wheels could lock when
braking. The steerability and braking charac-
teristics may be severely impaired. Addition-
ally, further driving safety systems are deac-
tivated. There is an increased danger of skid-
ding and accidents.
Drive on carefully. Have ABS checked imme-
diately at a qualified specialist workshop.
If ABS is malfunctioning, other systems,
including driving safety systems, will also
become inoperative. Observe the information
on the ABS warning lamp ( Ypage 286) and
any display messages that may appear in the
instrument cluster (Y page 247) or
(Y page 252).
ABS regulates brake pressure in such a way
that the wheels do not lock when you brake.
This allows you to continue steering the vehi-
cle when braking.
ABS works from a speed of about 8 km/h
upwards, regardless of road-surface condi-
tions. ABS works on slippery surfaces, even
when you only brake gently.
The yellow !ABS warning lamp in the
instrument cluster lights up when the ignition
is switched on. It goes out when the engine is
running.
Brakes X
If ABS intervenes: continue to depress the
brake pedal with force until the braking sit-
uation is over.
X To make a full brake application:
depress the brake pedal with full force. Driving safety systems
65Safety Z
Page 74 of 381

In these cases, PRE-SAFE
®
Brake may:
R give an unnecessary warning and then
brake the vehicle
R neither give a warning nor intervene
There is a risk of an accident.
Always pay particular attention to the traffic
situation and be ready to brake, especially if
PRE-SAFE ®
Brake warns you. Terminate the
intervention in a non-critical driving situation.
In particular, the detection of obstacles can
be impaired if there is:
R dirt on the sensors or anything else cover-
ing the sensors
R snow or heavy rain
R interference by other radar sources
R the possibility of strong radar reflections,
for example, in multi-storey car parks
R a narrow vehicle travelling in front, e.g. a
motorcycle
R a vehicle travelling in front on a different
line G
WARNING
PRE-SAFE ®
Brake does not react:
R to people or animals
R to oncoming vehicles
R to crossing traffic
R when cornering
As a result, PRE-SAFE ®
Brake may neither
give warnings nor intervene in all critical sit-
uations. There is a risk of an accident.
Always pay careful attention to the traffic sit-
uation and be ready to brake.
In order to maintain the appropriate distance
to the vehicle in front and thus prevent a col-
lision, you must apply the brakes yourself.
X To activate/deactivate: activate or deac-
tivate PRE-SAFE ®
Brake in the on-board
computer (Y page 237).
When PRE-SAFE ®
Brake is activated, the
Ä symbol appears in the multifunction display, as long as the HOLD function is
deactivated (Y
page 186).
On vehicles with Parking Guidance, the
Ä symbol is displayed when Pis
engaged or you are driving faster than
35 km/h.
For PRE-SAFE ®
Brake to assist you when driv-
ing, the radar sensor system must:
R be switched on (Y page 242)
R be operational (Y page 272)
Vehicles with COMAND and a navigation sys-
tem: the radar sensor system is switched off
automatically in the vicinity of radio telescope
facilities (Y page 375).
Vehicles without COMAND and a navigation
system and vehicles for Australia: the radar
sensor system and on-board computer must
be switched off in the vicinity of radio tele-
scope facilities (Y page 242).
Following damage to the front end of the vehi-
cle, have the configuration and operation of
the radar sensors checked at a qualified spe-
cialist workshop. This also applies to colli-
sions at slow speeds where there is no visible
damage to the front of the vehicle. Anti-theft systems
Immobiliser
The immobiliser prevents your vehicle from
being started without the correct key.
X To activate with the key: remove the key
from the ignition lock.
X To activate with KEYLESS-GO: switch the
ignition off and open the driver's door.
X To deactivate: switch on the ignition.
i The immobiliser is always deactivated
when you start the engine. Anti-theft systems
71Safety Z
Page 75 of 381

ATA (Anti-Theft Alarm system)
A visual and audible alarm is triggered if the
alarm system is primed and you open:
R a door
R the vehicle with the emergency key ele-
ment
R the tailgate
R the bonnet
The alarm is not switched off, even if you
close the open door that has triggered it, for
example. X
To prime: lock the vehicle with the key or
KEYLESS-GO.
Indicator lamp :flashes. The alarm sys-
tem is primed after approximately
15 seconds.
X To switch off: unlock the vehicle with the
key or KEYLESS-GO.
X To stop the alarm using the key: insert
the key into the ignition lock.
The alarm is switched off.
or
X Press the %or& button on the key.
The alarm is switched off.
X To stop the alarm using KEYLESS-GO:
grasp the outside door handle. The key
must be outside the vehicle.
The alarm is switched off.
or
X Press the Start/Stop button on the dash-
board. The key must be inside the vehicle.
The alarm is switched off. Tow-away protection
An audible and visual alarm is triggered if your
vehicle's angle of inclination is altered while
tow-away protection is primed. This occurs if
the vehicle is jacked up on one side, for exam-
ple.
X To prime: lock the vehicle with the key or
KEYLESS-GO.
Tow-away protection is primed after
approximately 30 seconds.
X To switch off: unlock the vehicle with the
key or KEYLESS-GO.
Tow-away protection is switched off auto-
matically.
To prevent a false alarm, deactivate tow-away
protection manually if your vehicle:
R it is being transported
R it is being loaded onto a ferry or car trans-
porter, for example
R is parked on a movable surface, e.g. in a
split-level garage
Deactivating:
X Remove the key from the ignition lock. X
Press button :.
Indicator lamp ;lights up briefly.
X Lock the vehicle with the key or KEYLESS-
GO.
Tow-away protection is deactivated. 72
Anti-theft systemsSafety
Page 76 of 381

Tow-away protection remains deactivated
until:
R
the vehicle is unlocked again
R a door is opened and closed again
R the vehicle is locked again Interior motion sensor
When the interior motion sensor is primed, a
visual and audible alarm is triggered if move-
ment is detected in the vehicle interior. This
occurs if someone reaches into the vehicle
interior, for example.
Priming:
X Make sure that:
R
the side windows are closed.
R the panorama sliding sunroof is closed.
R there are no objects, e.g. mascots, hang-
ing on the rear-view mirror or on the grab
handles on the roof trim.
This will prevent false alarms.
X Lock the vehicle with the key or KEYLESS-
GO.
The interior motion sensor is primed after
approximately 30 seconds.
Switching off:
X Unlock the vehicle with the key or KEY-
LESS-GO.
The interior motion sensor is switched off
automatically.
To prevent a false alarm, deactivate the inte-
rior motion sensor if you lock your vehicle
and:
R people or animals remain in the vehicle.
R the side windows remain open.
R the panorama sliding sunroof remains
open.
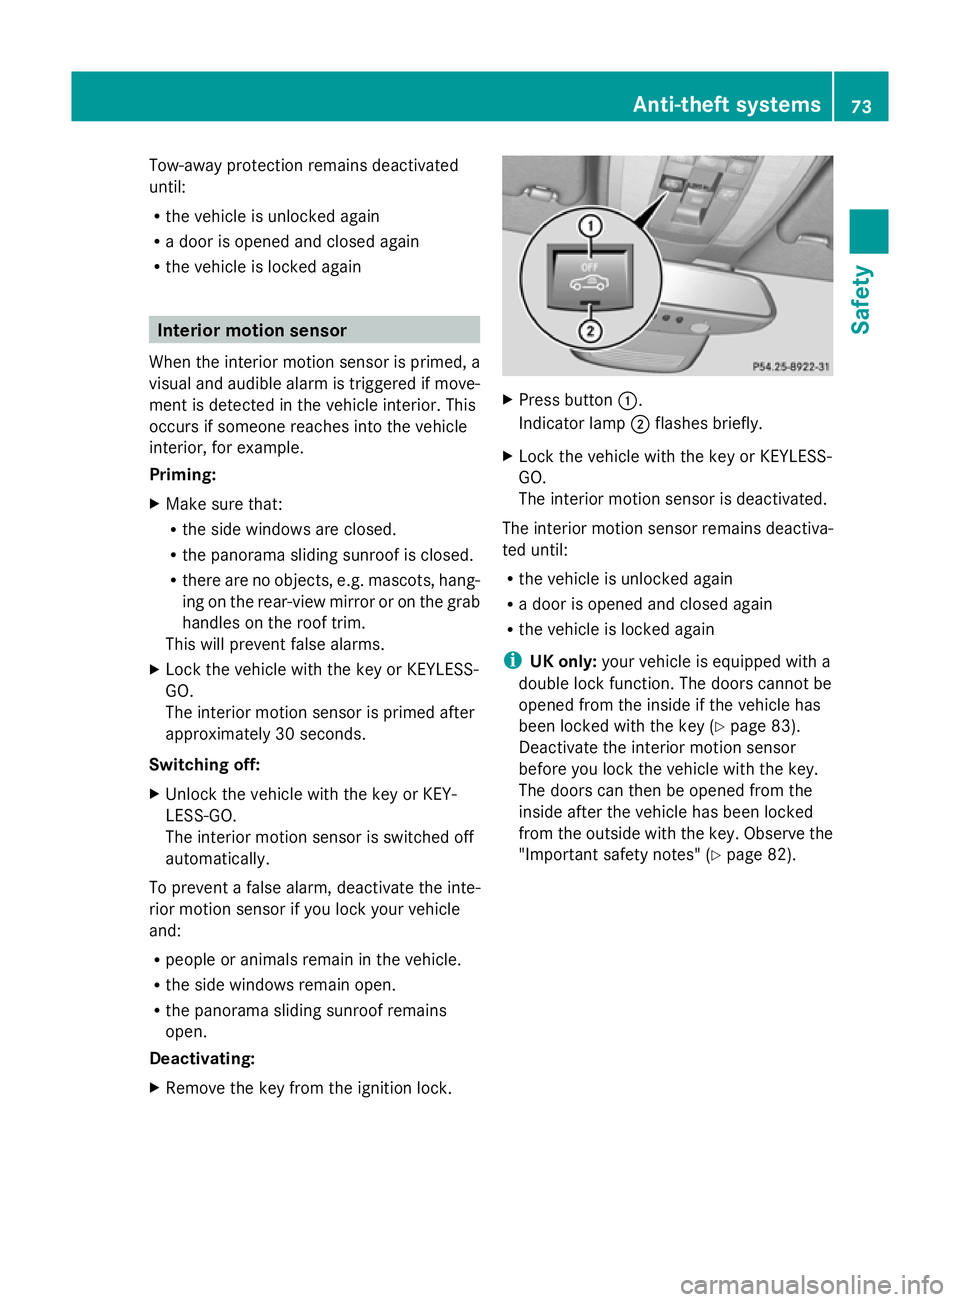
Deactivating:
X Remove the key from the ignition lock. X
Press button :.
Indicator lamp ;flashes briefly.
X Lock the vehicle with the key or KEYLESS-
GO.
The interior motion sensor is deactivated.
The interior motion sensor remains deactiva-
ted until:
R the vehicle is unlocked again
R a door is opened and closed again
R the vehicle is locked again
i UK only: your vehicle is equipped with a
double lock function. The doors cannot be
opened from the inside if the vehicle has
been locked with the key (Y page 83).
Deactivate the interior motion sensor
before you lock the vehicle with the key.
The doors can then be opened from the
inside after the vehicle has been locked
from the outside with the key. Observe the
"Important safety notes" (Y page 82). Anti-theft systems
73Safety Z
Page 79 of 381

Useful information
i This Owner's Manual describes all mod-
els, series and optional equipment for your
vehicle that were available at the time of
going to press. National variations are pos-
sible. Note that your vehicle may not be
equipped with all of the functions descri-
bed. This is also the case for systems and
functions relevant to safety.
i Read the information on qualified special-
ist workshops: (Y page 27). Key
Important safety notes
G
WARNING
Only for the United Kingdom: if the vehicle
has been locked with the key, the double lock
function is activated as standard. It is then not
possible to open the doors from inside the
vehicle.
Therefore, do not leave any people behind in
the vehicle, particularly children, elderly peo-
ple or people in need of special assistance if
the vehicle has been locked with the key. As
a result, they may not be able to free them-
selves in the event of an emergency. As a
result, they could be seriously or even fatally
injured by prolonged exposure to extremely
high or low temperatures, for example. In this
case, rescuing people from outside the vehi-
cle is difficult.
Deactivate the interior motion sensor before
you lock the vehicle with the key. The doors
can then be opened from the inside after the
vehicle has been locked from the outside with
the key. G
WARNING
If children are left unsupervised in the vehicle,
they could: R
open a door from inside the vehicle at any
time, even if it has been locked
R start the vehicle using a key which has been
left in the vehicle
R release the parking brake
They could thereby endanger themselves and
others. Never leave children unsupervised in
the vehicle. Always take the key with you
when leaving the vehicle, even if you are only
leaving it for a short time. G
WARNING
If a key ring is too heavy or too large, the
weight acting on the key could cause it to turn
in the ignition lock or catch on the steering
wheel. This could cause the engine to be
switched off suddenly. You may lose control
of the vehicle and cause an accident. Do not
attach any heavy or large key rings to the key
that is inserted in the ignition.
R Do not keep the KEYLESS-GO key:
-with electronic devices, e.g. a mobile
phone or another key
- with metallic objects, e.g. coins or metal
film
- with metallic objects, e.g. a metal case
This can affect the key's functionality.
Keep the key away from strong magnetic
fields. Otherwise, the remote control function
could be affected. Key functions
The key centrally locks/unlocks:
R the doors
R the tailgate
R the fuel filler flap 76
KeyOpening and closing
Page 80 of 381

:
& To lock the vehicle
; F To open/close the tailgate
= % To unlock the vehicle
When unlocking, the turn signals flash once.
When locking, they flash three times.
When it is dark, the surround lighting also
comes on if it is activated in the on-board
computer (Y page 240).
You can also set an audible signal to confirm
that the vehicle has been locked. The audible
signal can be activated and deactivated using
the on-board computer (Y page 242).
X To unlock centrally: press the%but-
ton.
If you do not open the vehicle within approx-
imately 40 seconds of unlocking:
R the vehicle is locked again.
R the anti-theft system is primed again.
X To lock centrally: press the&button. KEYLESS-GO
General notes Bear in mind that the engine can be started
by any of the vehicle occupants if there is a
KEYLESS-GO key in the vehicle.
Locking/unlocking centrally You can start, lock or unlock the vehicle using
KEYLESS-GO. To do this, you only need carry
the key with you. You can combine the KEY-
LESS-GO functions with the functions of a conventional key. Unlock the vehicle by using
KEYLESS-GO, for instance, and lock it using
the
& button on the key.
When locking or unlocking with KEYLESS-GO,
the distance between the key and the corre-
sponding door handle must not be greater
than 1 m.
KEYLESS-GO checks whether a valid key is in
the vehicle by periodically establishing a radio
connection between the vehicle and the key.
This happens:
R when the external door handles are
touched
R when starting the engine
R while the vehicle is in motion X
To unlock the vehicle: touch the inner
surface of the door handle.
X To lock the vehicle: touch sensor sur-
face :.
X Convenience closing feature: touch
recessed sensor surface ;for an exten-
ded period.
Further information on the convenience clos-
ing feature (Y page 90).
If you pull on the handle of the tailgate, only
the luggage compartment of the vehicle is
unlocked.
If the vehicle has been parked for a long time,
the sensor surfaces are deactivated automat-
ically. In order to unlock the door, pull the
door handle. In order to reactivate the sensor
surface, switch the ignition on again. Key
77Opening and closing Z