2012 MERCEDES-BENZ G-CLASS SUV light
[x] Cancel search: lightPage 134 of 357
X
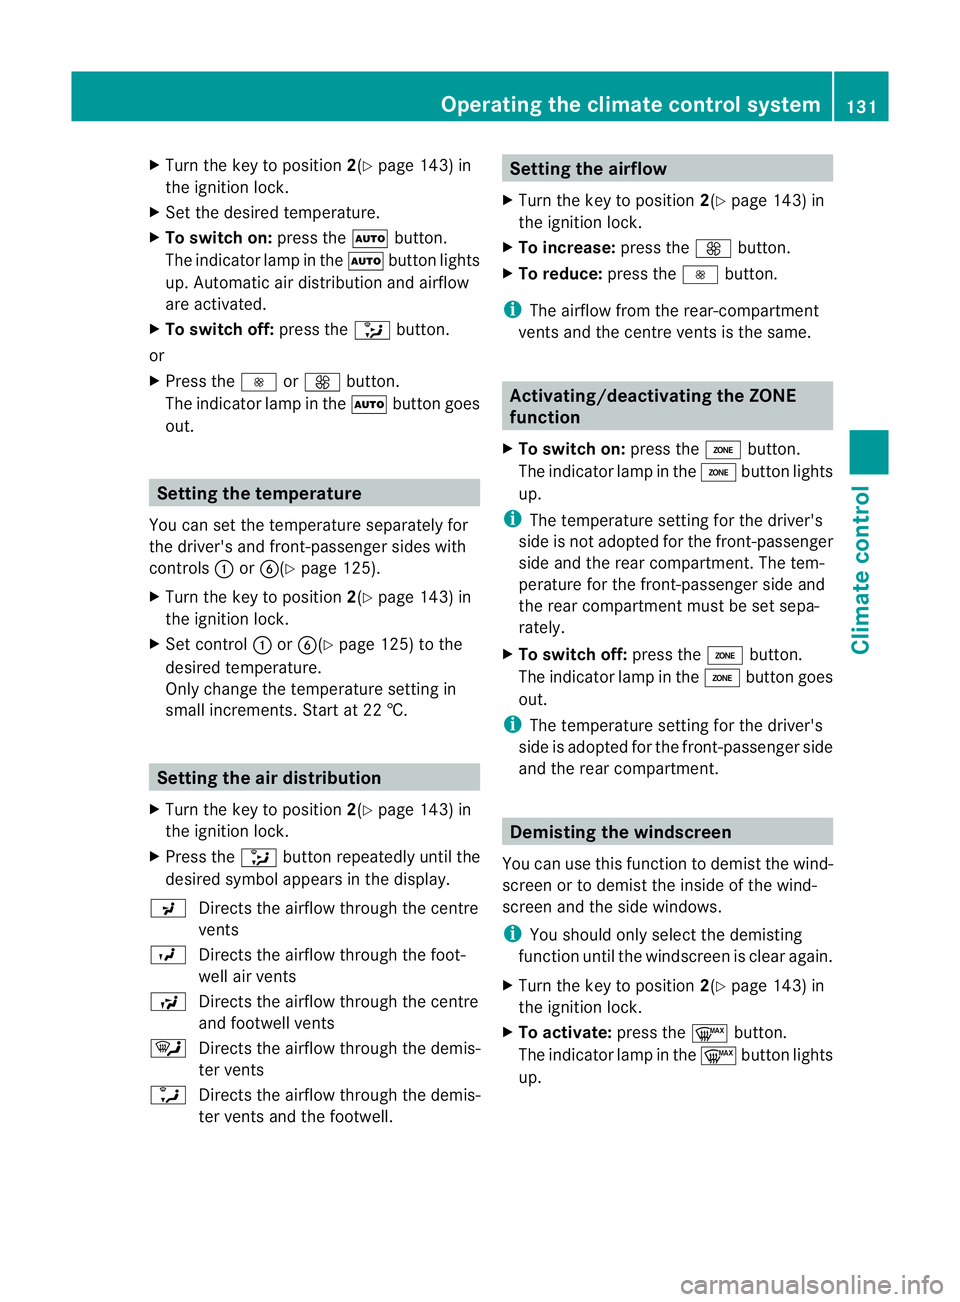
Turn the key to position 2(Ypage 143) in
the ignition lock.
X Set the desired temperature.
X To switch on: press theÃbutton.
The indicator lamp in the Ãbutton lights
up. Automatic air distribution and airflow
are activated.
X To switch off: press the_button.
or
X Press the IorK button.
The indicator lamp in the Ãbutton goes
out. Setting the temperature
You can set the temperature separately for
the driver's and front-passenger sides with
controls :orB(Y page 125).
X Turn the key to position 2(Ypage 143) in
the ignition lock.
X Set control :orB(Y page 125) to the
desired temperature.
Only change the temperature setting in
small increments. Start at 22 †. Setting the air distribution
X Turn the key to position 2(Ypage 143) in
the ignition lock.
X Press the _button repeatedly until the
desired symbol appears in the display.
P Directs the airflow through the centre
vents
O Directs the airflow through the foot-
well air vents
S Directs the airflow through the centre
and footwell vents
¯ Directs the airflow through the demis-
ter vents
a Directs the airflow through the demis-
ter vents and the footwell. Setting the airflow
X Turn the key to position 2(Ypage 143) in
the ignition lock.
X To increase: press theKbutton.
X To reduce: press theIbutton.
i The airflow from the rear-compartment
vents and the centre vents is the same. Activating/deactivating the ZONE
function
X To switch on: press theábutton.
The indicator lamp in the ábutton lights
up.
i The temperature setting for the driver's
side is not adopted for the front-passenger
side and the rear compartment. The tem-
perature for the front-passenger side and
the rear compartment must be set sepa-
rately.
X To switch off: press theábutton.
The indicator lamp in the ábutton goes
out.
i The temperature setting for the driver's
side is adopted for the front-passenger side
and the rear compartment. Demisting the windscreen
You can use this function to demist the wind-
screen or to demist the inside of the wind-
screen and the side windows.
i You should only select the demisting
function until the windscreen is clear again.
X Turn the key to position 2(Ypage 143) in
the ignition lock.
X To activate: press the¬button.
The indicator lamp in the ¬button lights
up. Operating the climate control system
131Climate control Z
Page 135 of 357

The climate control system switches to the
following functions:
R
cooling with air dehumidification (only
with engine running)
R high airflow (depending on the outside
temperature)
R high temperature (depending on the out-
side temperature)
R air distribution to the windscreen and
fronts ide windows
R air-recirculation mode off
X To deactivate: press the¬button.
The indicator lamp in the ¬button goes
out. The previous settings are reactivated.
The cooling with air dehumidification func-
tion remains on. Air-recirculation mode
remains deactivated.
or
X Press the Ãbutton.
The indicator lamp in the ¬button goes
out. Airflow and air distribution are set to
automatic mode.
or
X Turn controls :orB clockwise or anti-
clockwise (Y page 125).
or
X Press the KorI button. Demisting the windows
Windows misted up on th einside X
Activate the Ácooling with air dehu-
midification function.
X Activate automatic mode Ã.
X If the windows continue to mist up, activate
the demisting function (Y page 131).
i You should only select this setting until
the windscreen is clear again. Windows misted up on the outside X
Switch on the windscreen wipers
(Y page 119).
X Press the _button repeatedly until the
P orO symbol appears in the dis-
play.
i You should only select this setting until
the windscreen is clear again. Switching the windscreen heating
on/off
X
Turn the key to position 2(Ypage 143) in
the ignition lock.
X To switch on: press button;.
Indicator lamp :lights up.
X To switch off: press button;.
Indicator lamp :goes out.
i At outside temperatures above 10 †, the
windscreen heating cannot be activated.
Indicator lamp :lights up briefly when you
attempt to activate it and then goes out
again.
i The windscreen heating has a high cur-
rent draw. You should therefore switch it
off as soon as the windscreen is clear. The
windscreen heating otherwise switches
itself off automatically after 10 minutes.
i If the battery voltage is too low, the wind-
screen heating may switch off. If the wind-
screen heating is automatically deactiva-
ted, indicator lamp :flashes. The wind-
screen heating will automatically switch 132
Operating the climate control systemClimate control
Page 136 of 357
back on as soon as ther
eis sufficient volt-
age. Switching the rear window heating
on/off
Switching on/off G
WARNING
Cleara ll windows of ice or snow before setting
off .O therwise, impaired visibility could
endanger you and others.
X Turn the key to position 2(Ypage 143) in
the ignition lock.
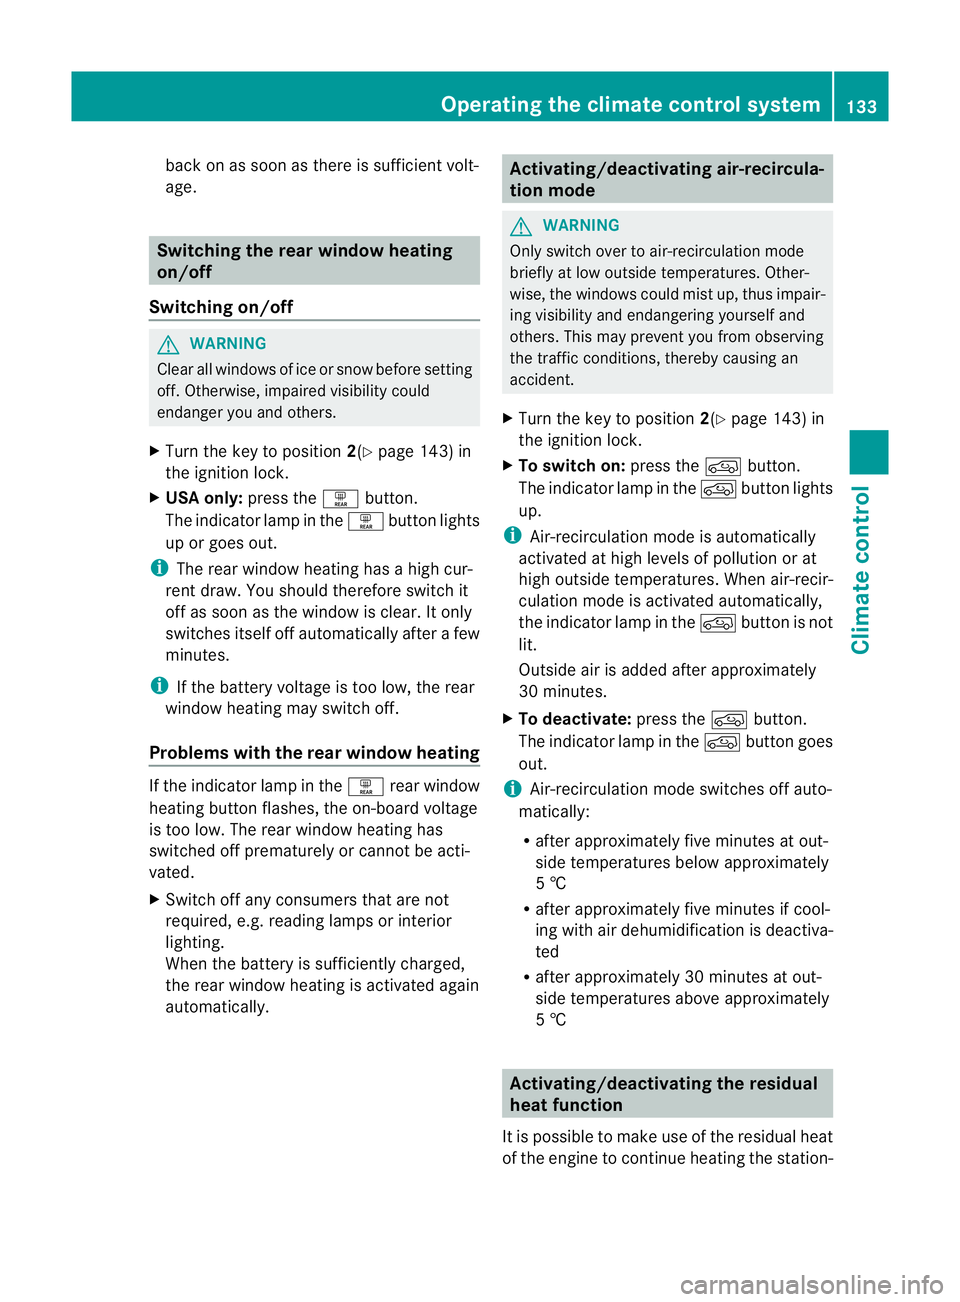
X USA only: press theªbutton.
The indicator lamp in the ªbutton lights
up or goes out.
i The rea rwindow heating has ahigh cur-
ren tdraw.Y ou should therefore switch it
off as soon as the window is clear. It only
switches itself off automatically after a few
minutes.
i If the battery voltage is too low, the rear
window heating may switch off.
Problems with the rear window heating If the indicator lamp in the
ªrear window
heating button flashes, the on-board voltage
is too low. The rear window heating has
switched off prematurely or cannot be acti-
vated.
X Switch off any consumers that are not
required, e.g. reading lamps or interior
lighting.
When the battery is sufficiently charged,
the rear window heating is activated again
automatically. Activating/deactivating air-recircula-
tion mode
G
WARNING
Only switch over to air-recirculation mode
briefly at low outside temperatures. Other-
wise, the windows could mist up, thus impair-
ing visibility and endangering yourself and
others. This may prevent you from observing
the traffic conditions, thereby causing an
accident.
X Turn the key to position 2(Ypage 143) in
the ignition lock.
X To switch on: press thedbutton.
The indicator lamp in the dbutton lights
up.
i Air-recirculation mode is automatically
activated at high levels of pollution or at
high outside temperatures. When air-recir-
culation mode is activated automatically,
the indicator lamp in the dbutton is not
lit.
Outside air is added after approximately
30 minutes.
X To deactivate: press thedbutton.
The indicator lamp in the dbutton goes
out.
i Air-recirculation mode switches off auto-
matically:
R after approximately five minutes at out-
side temperatures below approximately
5 †
R after approximately five minutes if cool-
ing with air dehumidification is deactiva-
ted
R after approximately 30 minutes at out-
side temperatures above approximately
5 † Activating/deactivating the residual
heat function
It is possible to make use of the residual heat
of the engine to continue heating the station- Operating the climate control system
133Climate control Z
Page 137 of 357

ary vehicle for up to 30 minutes after the
engine has been switched off
.The heating
time depends on the coolant temperature and
on the interior temperature that has been set.
i The blower will run at a low speed regard-
less of the airflow setting.
i If you activate the residual heat function
at high temperatures, only the ventilation
will be activated.
X Turn the key to position 0(Ypage 143) in
the ignition lock or remove it.
X To activate: press theÁbutton.
The indicator lamp in the Ábutton lights
up.
X To deactivate: press theÁbutton.
The indicator lamp in the Ábutton goes
out.
i Residual heat is deactivated automati-
cally:
R after approximately 30 minutes
R when the ignition is switched on
R if the battery voltage drops
R if the coolant temperature is too low Auxiliary heating
Important safety notes G
WARNING
Exhaust fumes are produced when the auxili-
ary heating is in operation. Inhaling these
exhaust fumes can be poisonous. You should
therefore switch off the auxiliary heating in
confined spaces without an extraction sys-
tem, e.g. a garage. G
WARNING
When operating the auxiliary heating parts of
the vehicle can get very hot. Make sure that
the exhaust system does not under any cir-
cumstances come into contact with easily
ignitable material such as dry grass or fuels.
The material could otherwise ignite and set the vehicle alight. Choose your parking spot
accordingly.
Operating the auxiliary heating is thus pro-
hibited at filling stations or when your vehicle
is being refuelled. You must therefore switch
off the auxiliary heating at filling stations.
! Operating the auxiliary heating/ventila-
tion draws on the vehicle battery. After you
have heated or ventilated the vehicle a
maximum of two times, drive for a longer
distance.
i Switch the auxiliary heating on regularly
once a month for approximately ten
minutes.
The auxiliary heating heats the air in the vehi-
cle interior without using the heat of the run-
ning engine. The auxiliary heating is operated
directly using the vehicle's fuel. For this rea-
son, the tank content must be at least at
reserve fuel level to ensure that the auxiliary
heating functions.
The auxiliary heating/ventilation automati-
cally adjusts to changes in temperature and
weather conditions. For this reason, the aux-
iliary heating could switch from ventilation
mode to heating mode or from heating mode
to ventilation mode.
You cannot use the auxiliary ventilation to
cool the vehicle interior to a temperature
lower than the outside temperature.
Before switching on X
Turn the key to position 2(Ypage 143) in
the ignition lock.
X Set the temperature.
The auxiliary heating/ventilation can be acti-
vated even when climate control is set to
manual. Optimum comfort can be attained
when the system is set to automatic mode.
Set the temperature to 22 †.
The auxiliary heating/ventilation can be acti-
vated or deactivated using the remote control
or the button on the centre console. 134
Operating the climate control systemClimate control
Page 138 of 357
The on-board computer can be used to spec-
ify up to three departure times, one of which
may be preselected (Y page 223).
Switching the auxiliar yheating/venti-
lation on/off using the centre console
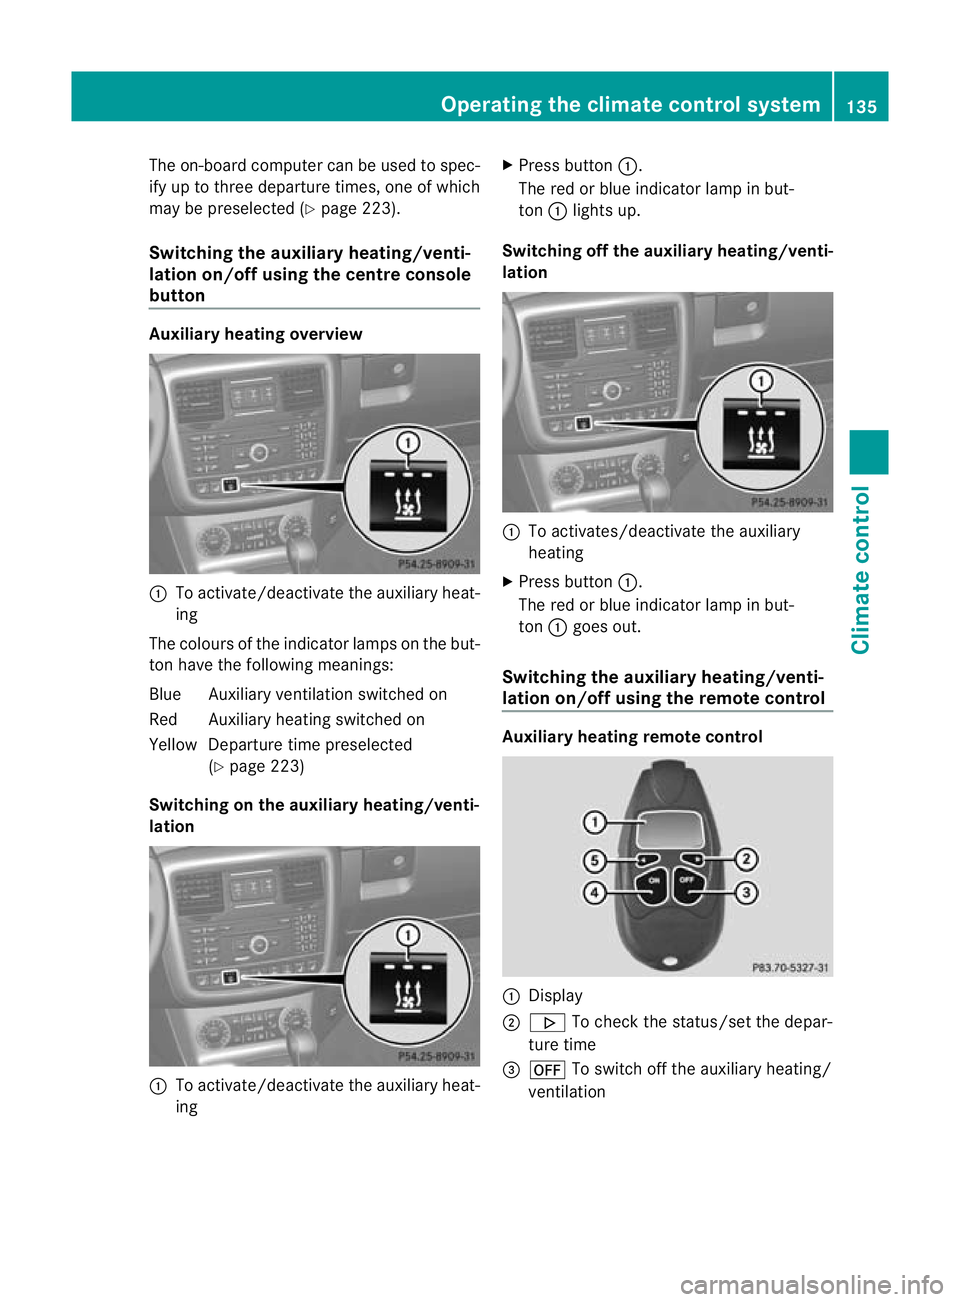
button Auxiliar
yheating overview :
To activate/deactivate th eauxiliary heat-
ing
The colours of the indicator lamps on the but-
to nh ave the following meanings:
Blue Auxiliary ventilatio nswitched on
Red Auxiliary heating switched on
Yellow Departure time preselected (Ypage 223)
Switching on the auxiliary heating/venti-
lation :
To activate/deactivate th eauxiliary heat-
ing X
Press button :.
The red or blue indicator lamp in but-
ton :lights up.
Switching off the auxiliary heating/venti-
lation :
To activates/deactivate th eauxiliary
heating
X Press button :.
The red or blue indicator lamp in but-
ton :goes out.
Switching the auxiliary heating/venti-
lation on/off using the remote control Auxiliar
yheating remote control :
Display
; . To check the status/set the depar-
ture time
= ^ To switch off the auxiliary heating/
ventilation Operating the climate control system
135Climate control Z
Page 146 of 357
G
WARNING
Unsuitable footwea rcan hinder correc tusage
of the pedals, e.g.:
R shoes with thick soles
R shoes with high heels
R slippers
There is a risk of an accident.
Wear suitable footwear to ensure correct
usage of the pedals. G
WARNING
If you switch off the ignition while driving,
safety-relevant functions are only available
with limitations, or not at all. This could affect,
for example, the power steering and the brake
boosting effect. You will require considerably
more effort to steer and brake. There is a risk
of an accident.
Do not switch off the ignition while driving. G
WARNING
If the parking brake has not been fully
released when driving, the parking brake can:
R overheat and cause a fire
R lose its hold function.
There is a risk of fire and an accident. Release
the parking brake fully before driving off.
! Warm up the engine quickly. Do not use
the engine's full performance until it has
reached operating temperature.
Only set the automatic transmission to the
respective drive positions when the vehicle
is stationary.
Where possible, avoid spinning the drive
wheels when pulling away on slippery
roads. Otherwise, you could damage the
drive train.
! Avoid high engine speeds when the
engine is cold. The engine's service life
could otherwise be significantly shortened.
Do not use the engine's full performance
until it has reached operating temperature. !
AMG vehicles: at low engine oil temper-
atures (below +20 †), the maximum
engine speed is restricted in order to pro-
tect the engine. To protect the engine and
maintain smooth engine operation, avoid
driving at full throttle when the engine is
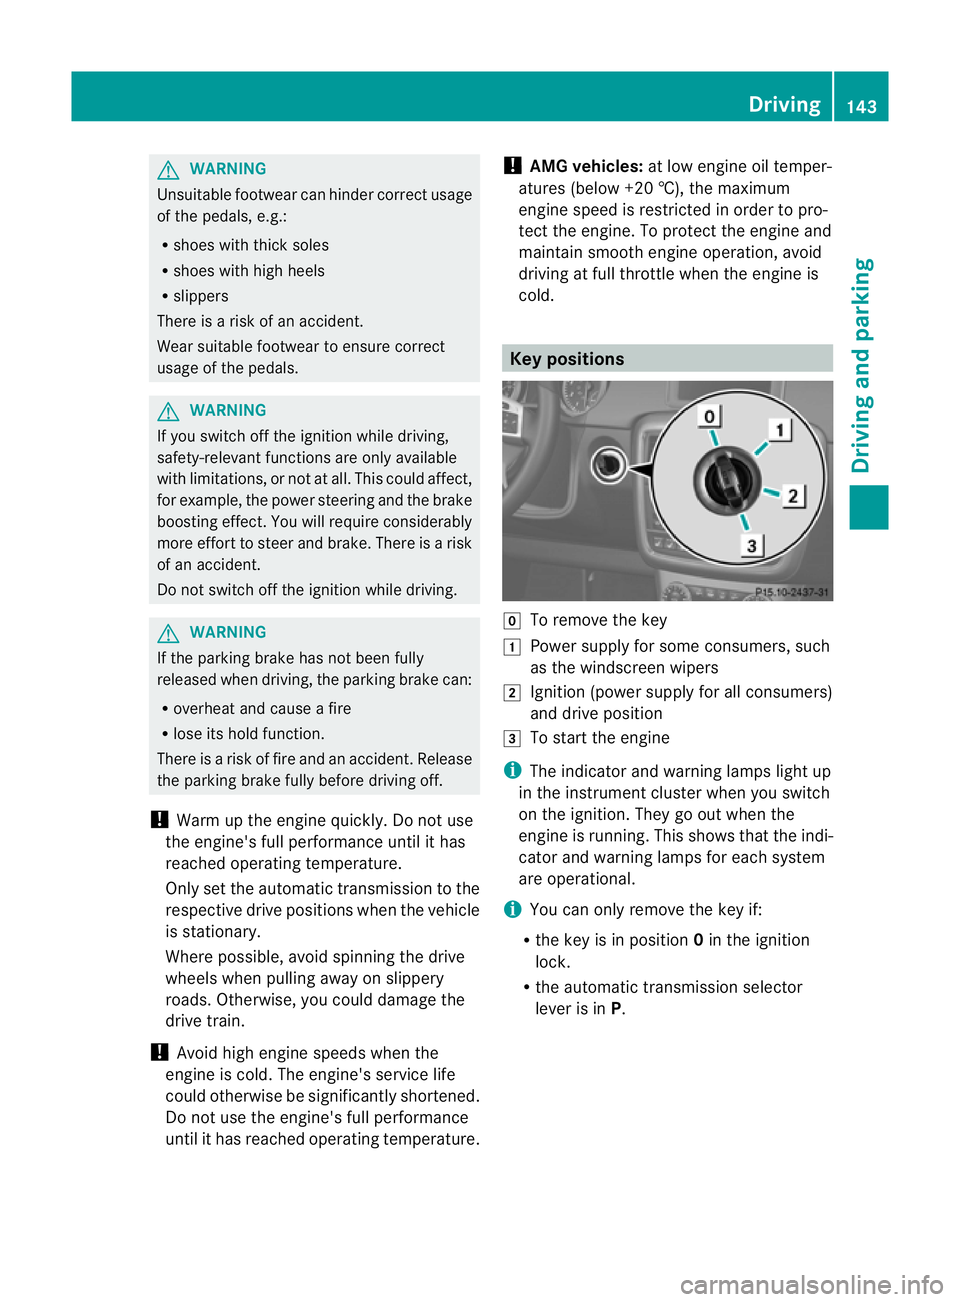
cold. Key positions
g
To remove the key
1 Power supply for some consumers, such
as the windscreen wipers
2 Ignition (power supply for all consumers)
and drive position
3 To start the engine
i The indicator and warning lamps light up
in the instrument cluster when you switch
on the ignition. They go out when the
engine is running. This shows that the indi-
cator and warning lamps for each system
are operational.
i You can only remove the key if:
R the key is in position 0in the ignition
lock.
R the automatic transmission selector
lever is in P. Driving
143Driving and parking Z
Page 147 of 357
Starting the engine
Important safety notes G
WARNING
Combustion engines emit poisonous exhaust
gases such as carbon monoxide. Inhaling
these exhaust gases leads to poisoning. There
is a risk of fatal injury. Therefore never leave
the engine running in enclosed spaces with-
out sufficient ventilation.
! Do not depress the accelerator pedal
when starting the engine.
Starting procedure X
Shift the automatic transmission to posi-
tion P.
The transmission position display in the
multifunction display shows P.
i You can also start the engine when the
automatic transmission is in position N.
i For further information about the auto-
matic transmission, see (Y page 149).
i If you depress the brake when starting the
engine, pedal travel is unusually long and
there is less pedal resistance.
X Make sure that the parking brake is
applied.
X To start a petrol engine: turn the key to
position 3in the ignition lock
(Y page 143) and release it as soon as the
engine is running.
X To startad iesel engine: turn the key to
position 2in the ignition lock
(Y page 143).
The % preglow indicator lamp in the
instrumen tcluster lights up.
X When the %preglow indicator lamp
goes out, tur nthe key to position
3(Y page 143)and release it as soon as the
engine is running.
i You can start the engine without preglow
if the engine is warm. i
You can also use the touch-start function.
To do this, turn the key to position 3
(Y page 143) and release it immediately.
The engine then starts automatically. Pulling away
Automatic transmission G
WARNING
If the engine speed is above the idling speed
and you engage transmission position Dor
R, the vehicle could pull away suddenly. There
is a risk of an accident.
When engaging transmission position Dor R,
always firmly depress the brake pedal and do
not simultaneously accelerate.
! Only shift the automatic transmission to
reverse gear Ror park position Pwhen the
vehicle is stationary. Otherwise, the auto-
matic transmission could be damaged.
! If a warning tone sounds and the
Release park. brake message appears
in the multifunction display, the parking
brake is still applied. Release the parking
brake.
X Depress the brake pedal and keep it
depressed.
X Shift the automatic transmission to posi-
tion Dor R.
i Before driving off, wait until the gear
change is fully completed.
X Release the parking brake (Y page 164).
X Release the brake pedal.
X Carefully depress the accelerator pedal.
i It is only possible to shift the automatic
transmission from position Pto a different
position if you depress the brake pedal.
Only then is the selector lever lock
released.
i The vehicle locks centrally once you have
pulled away.T he locking knobs in the doors
drop down. 144
DrivingDriving and parking
Page 149 of 357

If the ECO start/stop function has been man-
ually deactivated (Y
page 146) or if a mal-
function has caused the system to be deac-
tivated, the ¤symbol is not displayed.
The Stop/Start active or
Stop/Start inactive message in the AMG menu in the
multifunction display goes out.
Activating/deactivating the ECO start/
stop function ECO button
X
To switch off: in drive program C, press
button :.
or
X Switch to drive program Sor M
(Y page 152).
Indicator lamp ;on button :and the
¤ symbol in the multifunction display go
out.
The Stop/Start active or
Stop/Start inactive message in the AMG menu in the
multifunction display goes out.
X To switch on: press button:.
Indicator lamp ;lights up. If drive pro-
gram Sor Mis active, the automatic trans-
missio nswitches to drive program C.
If all conditions for automatic engine
switch-off (Y page 146) are fulfilled, the
¤ symbol is shown in gree ninthe mul-
tifunction display. In addition, the Stop/Start active message is shown in the
AMG menu in the multifunction display.
If not all conditions for automatic engine
switch-off (Y page 146) are fulfilled, the ¤
symbol is not shown. If this is the
case, the ECO start/stop function is not
available. In addition, the Stop/Start inactive message is shown in the AMG
menu in the multifunction display.
i If indicator lamp ;is off, the ECO start/
stop function has been deactivated man-
ually or as the result of a malfunction. The
engine will then not be switched off auto-
matically when the vehicle stops.
i The stop/start function is automatically
activated each time you start the engine
with the ignition key.
Automatic engine switch-off If the vehicle is braked to a standstill in trans-
mission position
Dor N, the ECO start/stop
function switches off the engine automati-
cally.
The ECO start/stop function is operational
and the ¤symbol is displayed in green in
the multifunction display if:
R the indicator lamp in the ECO button is lit
green
R none of the off-road programs are selected
R the vehicle is stationary
R the outside temperature is within the com-
fort range
R the engine is at normal operating temper-
ature
R the set temperature for the vehicle interior
has been reached
R the battery is sufficiently charged
R the system detects that the windscreen is
not misted up when the air-conditioning
system is switched on
R the bonnet is closed
R the driver's door is closed and the driver's
seat belt is fastened
If not all conditions for automatic engine
switch-off are fulfilled, the ¤symbol is
shown in yellow. 146
DrivingDriving and parking