2012 MERCEDES-BENZ G-CLASS SUV light
[x] Cancel search: lightPage 75 of 357

Problems with the key
Problem Possible causes/consequences and
M Solutions
You cannot lock or
unlock the vehicle
using the key. The key battery is discharged or nearly discharged.
X
Point the tip of the key at the driver's door handle from a dis-
tance of approximately 50 cm and try to unlock or lock the
vehicle again.
If this does not work:
X Check the key battery (Y page 71) and replace it if necessary
(Y page 71).
X Lock (Y page 74) or unlock (Y page 75) the vehicle using
the emergency key element. The key is faulty.
X
Lock or unlock the vehicle using the emergency key element
(Y page 74).
X Have the key checked at a qualified specialist workshop. You have lost a key. X
Have the key deactivated at a qualified specialist workshop.
X Report the loss immediately to the vehicle insurers.
X If necessary, have the locks replaced as well. You have lost the emer-
gency key element. X
Report the loss immediately to the vehicle insurers.
X If necessary, have the locks replaced as well. Problem Possible causes/consequences and
M Solutions
The engine cannot be
started using the key. The key has been in position
0(Ypage 143) for a considerable
time.
X Remove the key and reinsert it into the ignition lock.
X Start the engine. The on-board voltage is too low.
X
Switch off non-essential consumers, e.g. seat heating or interior
lighting, and try to turn the key again.
If this does not work:
X Check the battery and charge it if necessary (Y page 311).
or
X Jump-start the vehicle (Y page 313).
or
X Consult a qualified specialist workshop. 72
KeyOpening and closing
Page 81 of 357
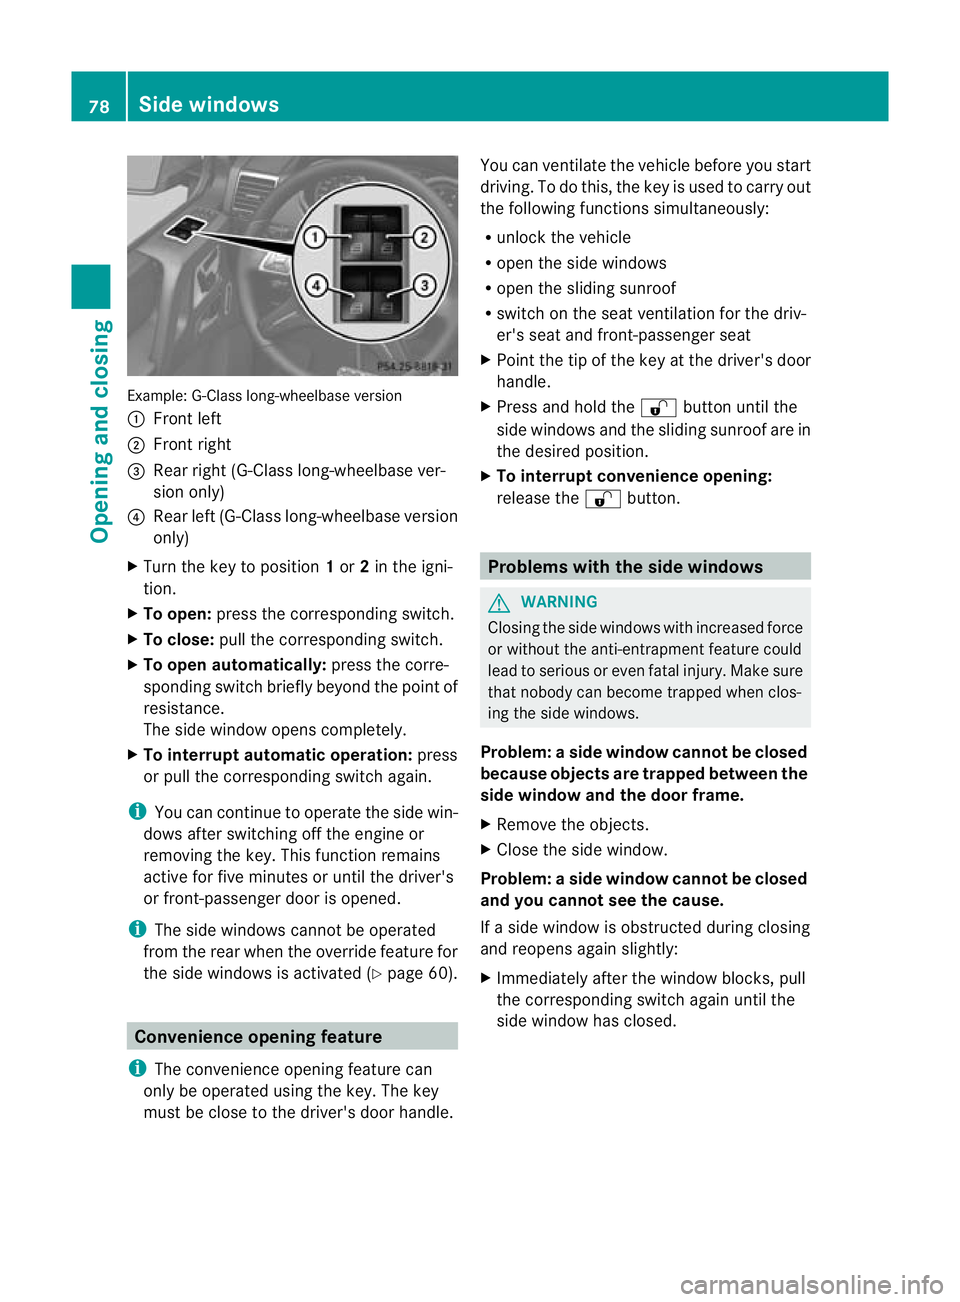
Example: G-Class long-wheelbase version
: Front left
; Front right
= Rear right (G-Class long-wheelbase ver-
sion only)
? Rear left (G-Class long-wheelbase version
only)
X Turn the key to position 1or 2in the igni-
tion.
X To open: press the corresponding switch.
X To close: pull the corresponding switch.
X To open automatically: press the corre-
sponding switch briefly beyond the point of
resistance.
The side window opens completely.
X To interrupt automatic operation: press
or pull the corresponding switch again.
i You can continue to operate the side win-
dows after switching off the engine or
removing the key. This function remains
active for five minutes or until the driver's
or front-passenger door is opened.
i The side windows canno tbe operated
from the rear when the override feature for
the side windows is activated (Y page 60).Convenience opening feature
i The convenience opening feature can
only be operated using the key. The key
must be close to the driver's door handle. You can ventilate the vehicle before you start
driving. To do this, the key is used to carry out
the following functions simultaneously:
R unlock the vehicle
R open the side windows
R open the sliding sunroof
R switch on the seat ventilation for the driv-
er's seat and front-passenger seat
X Point the tip of the key at the driver's door
handle.
X Press and hold the %button until the
side windows and the sliding sunroof are in
the desired position.
X To interrupt convenience opening:
release the %button. Problems with the side windows
G
WARNING
Closing the side windows with increased force
or without the anti-entrapment feature could
lead to serious or even fatal injury. Make sure
that nobody can become trapped when clos-
ing the side windows.
Problem: aside window cannot be closed
because objects are trapped between the
side window and the door frame.
X Remove the objects.
X Close the side window.
Problem :aside window cannot be closed
and you cannot see the cause.
If a side window is obstructed during closing
and reopens again slightly:
X Immediately afte rthe window blocks, pull
the corresponding switch again until the
side window has closed. 78
Side windowsOpening and closing
Page 82 of 357
If a side window is obstructed again during
closing and reopens again slightly:
X Immediately after the window blocks, pull
the corresponding switch again until the
side window has closed.
i If a side window no longer opens or closes
due to a malfunction, contact a qualified
specialist workshop. Sliding sunroof
Important safety notes
G
WARNING
While opening and closing the sliding sunroof,
body parts in close proximity could become
trapped .There is a risk of injury.
Make sure that no body parts are in close
proximity during the opening and closing pro-
cedures.
If somebody becomes trapped:
R release the switch immediately, or
R during automatic operation, push the
switch briefly in any direction
The opening or closing procedure will be stop-
ped. G
WARNING
If children operate the sliding sunroof they
could become trapped, particularly if they are
left unsupervised. There is a risk of injury.
When leaving the vehicle, always take the key
with you and lock the vehicle. Never leave
children unattended in the vehicle.
! Only open the panorama sliding sunroof
if it is free of snow and ice. Otherwise, mal-
functions may occur.
Do not allow anything to protrude from the
sliding sunroof. Otherwise, the seals could
be damaged.
i Resonance noises can occur in addition
to the usual airflow noises when the sliding
sunroof is open. They are caused by minor
pressure fluctuations in the vehicle interior. Change the position of the sliding sunroof
or open a side window slightly to reduce or
eliminate these noises. Opening and closing the sliding sun-
roof
Overhead control panel
:
To raise
; To open
= To close/lower
X Turn the key to position 1or
2(Y page 143) in the ignition.
X Press or pull the ¡switch in the corre-
sponding direction.
X To open automatically: press the¡
switch briefly beyond the point of resist-
ance in the direction of arrow ;.
The sliding sunroof opens completely.
X To interrupt automatic operation: press
or pull the ¡switch again.
i The automatic operation is only available
for opening. Operating the sliding sunroof man-
ually
The actuator is located in the luggage com-
partment, on the left-hand side behind the
rear wall trim. Sliding sunroof
79Opening and closing Z
Page 84 of 357
If the sliding sunroof is obstructed during
closing and reopens again slightly:
X Immediately after the sliding sunroof
blocks, pull the ¡switch in the over-
head control panel down to the point of
resistance and hold it until the sliding sun-
roof is closed.
If the sliding sunroof is obstructed again dur-
ing closing and reopens again slightly:
X Immediately after the sliding sunroof
blocks, pull the ¡switch in the over-
head control panel down to the point of
resistance and hold it until the sliding sun-
roof is closed. Soft top (G-Class Cabriolet)
Important safety notes
G
WARNING
If the closed soft top is not locked, it can open
while the vehicle is in motion. This could
cause you to lose control of the vehicle .There
is a risk of an accident.
Only drive with the soft top fully open or
closed.
! Never sit on the soft top or store heavy
objects on it. Otherwise, the soft top will be
damaged.
! The soft top swings upwards when it is
opened or closed. In order to avoid dam-
aging the soft top or other parts of the vehi-
cle when opening or closing the soft top,
observe the following:
R there must be sufficient clearance above
the vehicle.
R the tonneau cover must not be attached
to the opened soft top.
R the luggage compartmentc over must
not be pushed up by the load.
R there must not be any objects on the lug-
gage compartment cover.
R no roof rack must be fitted. R
the outside temperature must be over
−15 †.
R the fabric must not be dirty, wet or fro-
zen.
R the vehicle must not be parked at a steep
angle, e.g. off-road.
R zip fasteners and quick-release fasteners
must be closed.
The soft top can only be opened and closed if
the vehicle is stationary.
i Make sure the soft top is dry before open-
ing it. Water could otherwise enter the vehi-
cle interior or luggage compartment.
i Avoid repeatedly opening and closing the
soft top. This discharges the battery. Operating the soft top
Opening X
Move the selector lever to P.
X Apply the parking brake.
X Turn the key to position 2in the ignition
lock.
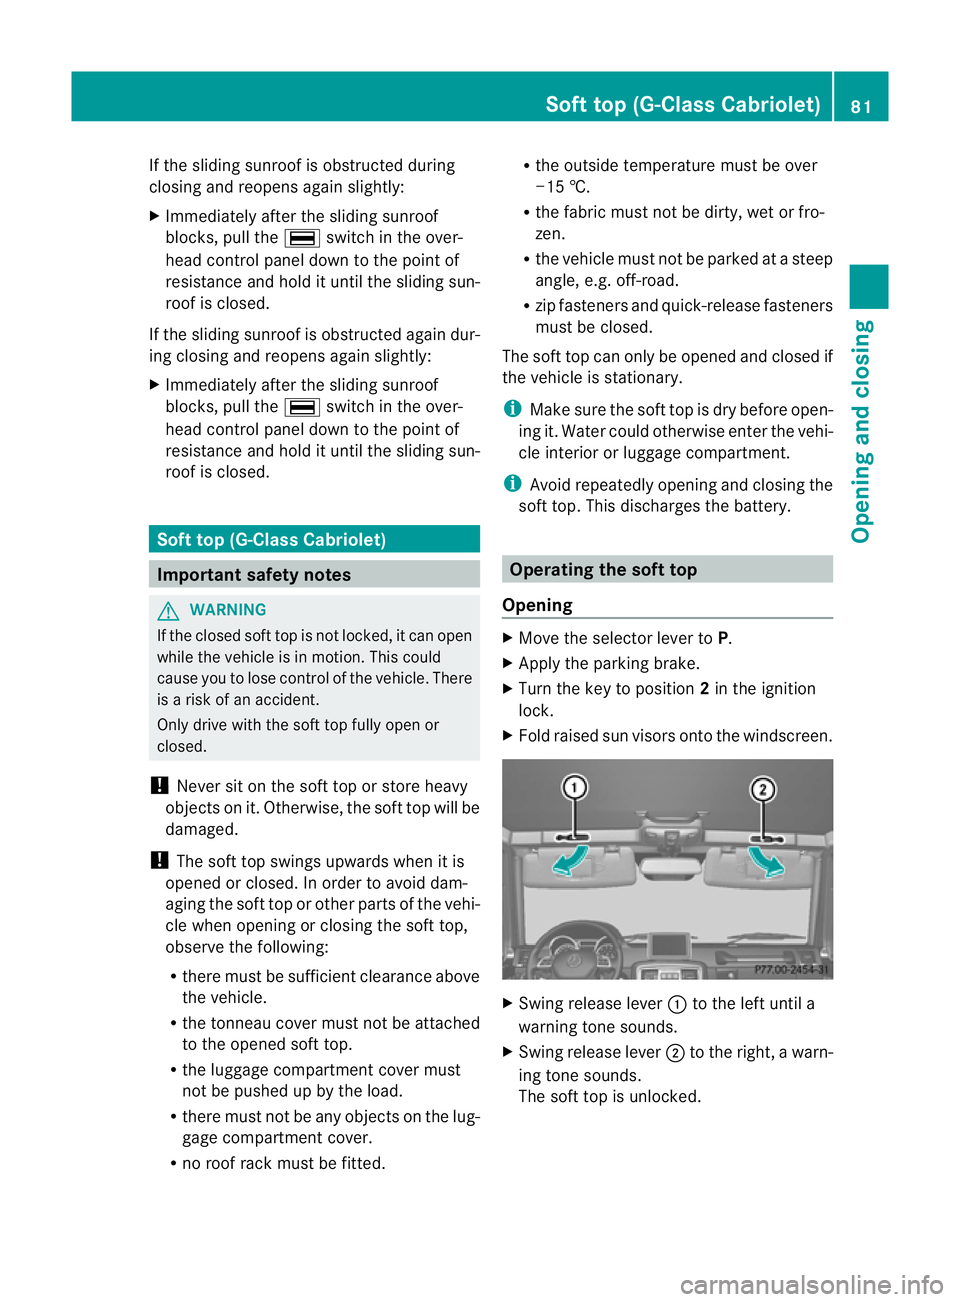
X Fold raised sun visors onto the windscreen. X
Swing release lever :to the left until a
warning tone sounds.
X Swing release lever ;to the right, a warn-
ing tone sounds.
The soft top is unlocked. Soft top (G-Class Cabriolet)
81Opening and closing Z
Page 86 of 357
G
WARNING
If anywhere other than the indicated gripping
points is gripped, you or others can become
trapped or stuck. There is a risk of injury.
Take off jewellery and watches. Only hold the
indicated gripping points. Do not reach
between the cover halves and into the hinges.
X Move the selector leve rtoP.
X Apply the parking brake.
X Remove the key from the ignition lock.
X Fold raised su nvisors down. X
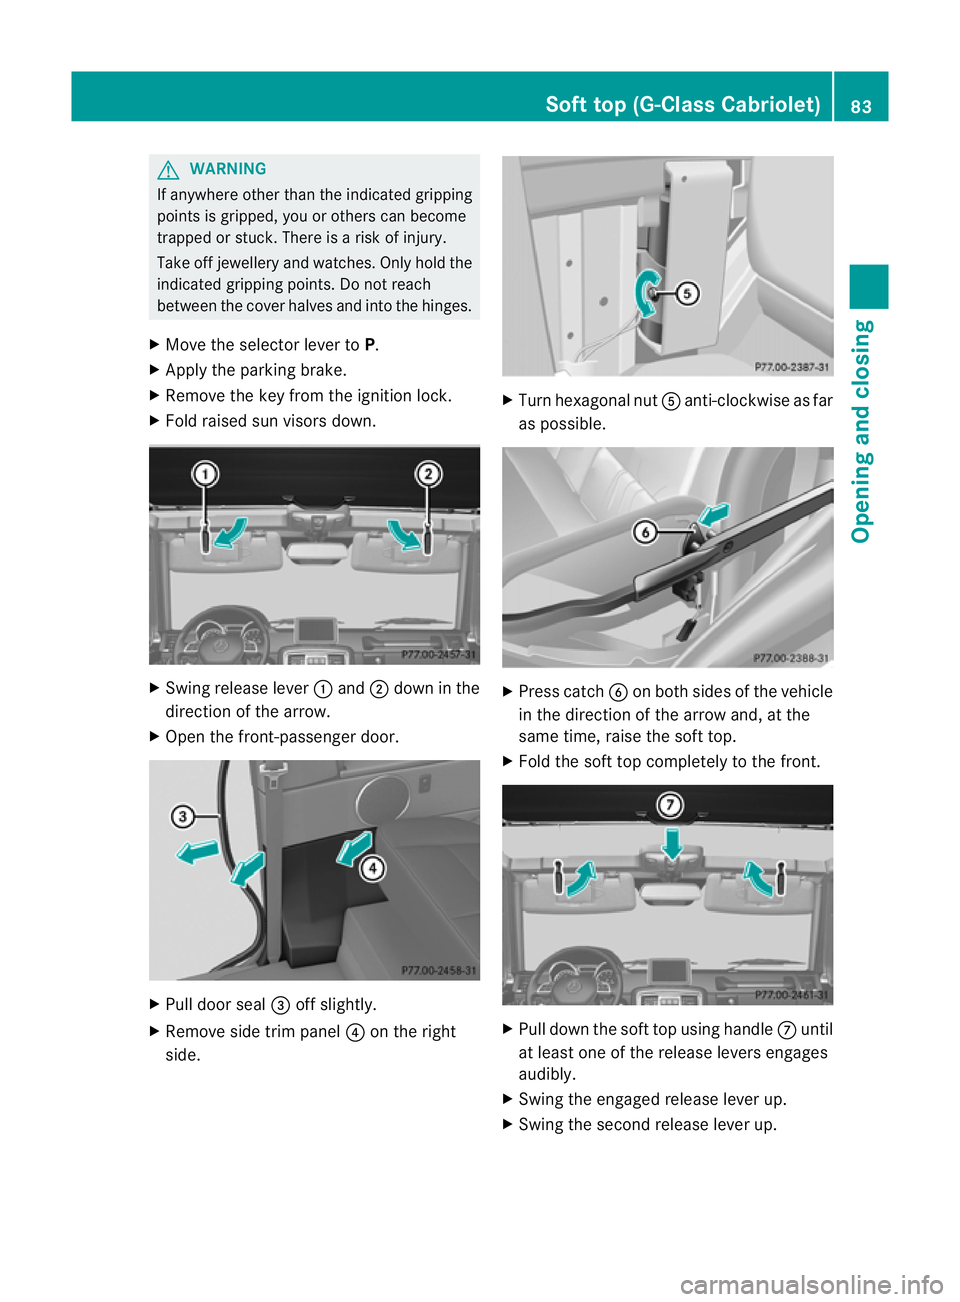
Swing release lever :and ;down in the
direction of the arrow.
X Open the front-passenger door. X
Pull door seal =off slightly.
X Remove side trim panel ?on the right
side. X
Turn hexagonal nut Aanti-clockwise as far
as possible. X
Press catch Bon both sides of the vehicle
in the direction of the arrow and, at the
same time, raise the soft top.
X Fold the soft top completely to the front. X
Pull down the soft top using handle Cuntil
at least one of the release levers engages
audibly.
X Swing the engaged release lever up.
X Swing the second release lever up. Soft top (G-Class Cabriolet)
83Opening and closing Z
Page 93 of 357
Useful information
i This Owner's Manual describes all mod-
els, series and optional equipment for your
vehicle that were available at the time of
going to press. Country-specific differen-
ces are possible. Note that your vehicle
may not be fitted with all features descri-
bed. This is also the case for systems and
functions relevant to safety.
i Read the information on qualified special-
ist workshops: (Y page 22). Correct driver's seat position
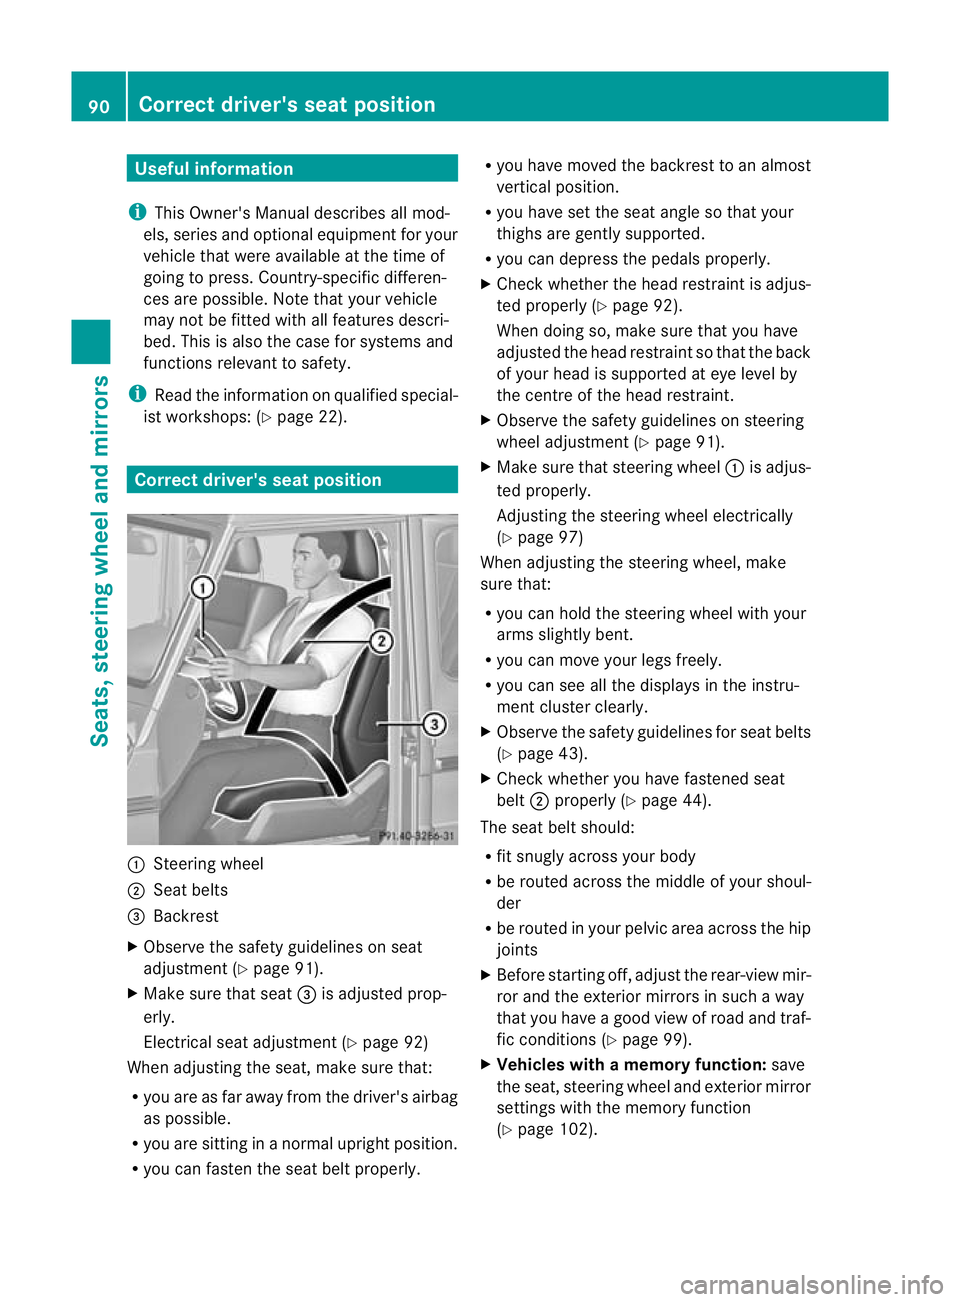
:
Steering wheel
; Seat belts
= Backrest
X Observe the safety guidelines on seat
adjustment (Y page 91).
X Make sure that seat =is adjusted prop-
erly.
Electrical seat adjustment (Y page 92)
When adjusting the seat, make sure that:
R you are as far away from the driver's airbag
as possible.
R you are sitting in a normal upright position.
R you can faste nthe seat belt properly. R
you have moved the backrest to an almost
vertical position.
R you have set the seat angle so that your
thighs are gently supported.
R you can depress the pedals properly.
X Check whether the head restraint is adjus-
ted properly (Y page 92).
When doing so, make sure that you have
adjusted the head restraint so that the back
of your head is supported at eye level by
the centre of the head restraint.
X Observe the safety guidelines on steering
wheel adjustment (Y page 91).
X Make sure that steering wheel :is adjus-
ted properly.
Adjusting the steering wheel electrically
(Y page 97)
When adjusting the steering wheel, make
sure that:
R you can hold the steering wheel with your
arms slightly bent.
R you can move your legs freely.
R you can see all the displays in the instru-
ment cluster clearly.
X Observe the safety guidelines for seat belts
(Y page 43).
X Check whether you have fastened seat
belt ;properly (Y page 44).
The seat belt should:
R fit snugly across your body
R be routed across the middle of your shoul-
der
R be routed in your pelvic area across the hip
joints
X Before starting off, adjust the rear-view mir-
ror and the exterior mirrors in such a way
that you have a good view of road and traf-
fic conditions (Y page 99).
X Vehicles with a memory function: save
the seat, steering wheel and exterior mirror
settings with the memory function
(Y page 102). 90
Correct driver's seat positionSeats, steering wheel and mirrors
Page 99 of 357
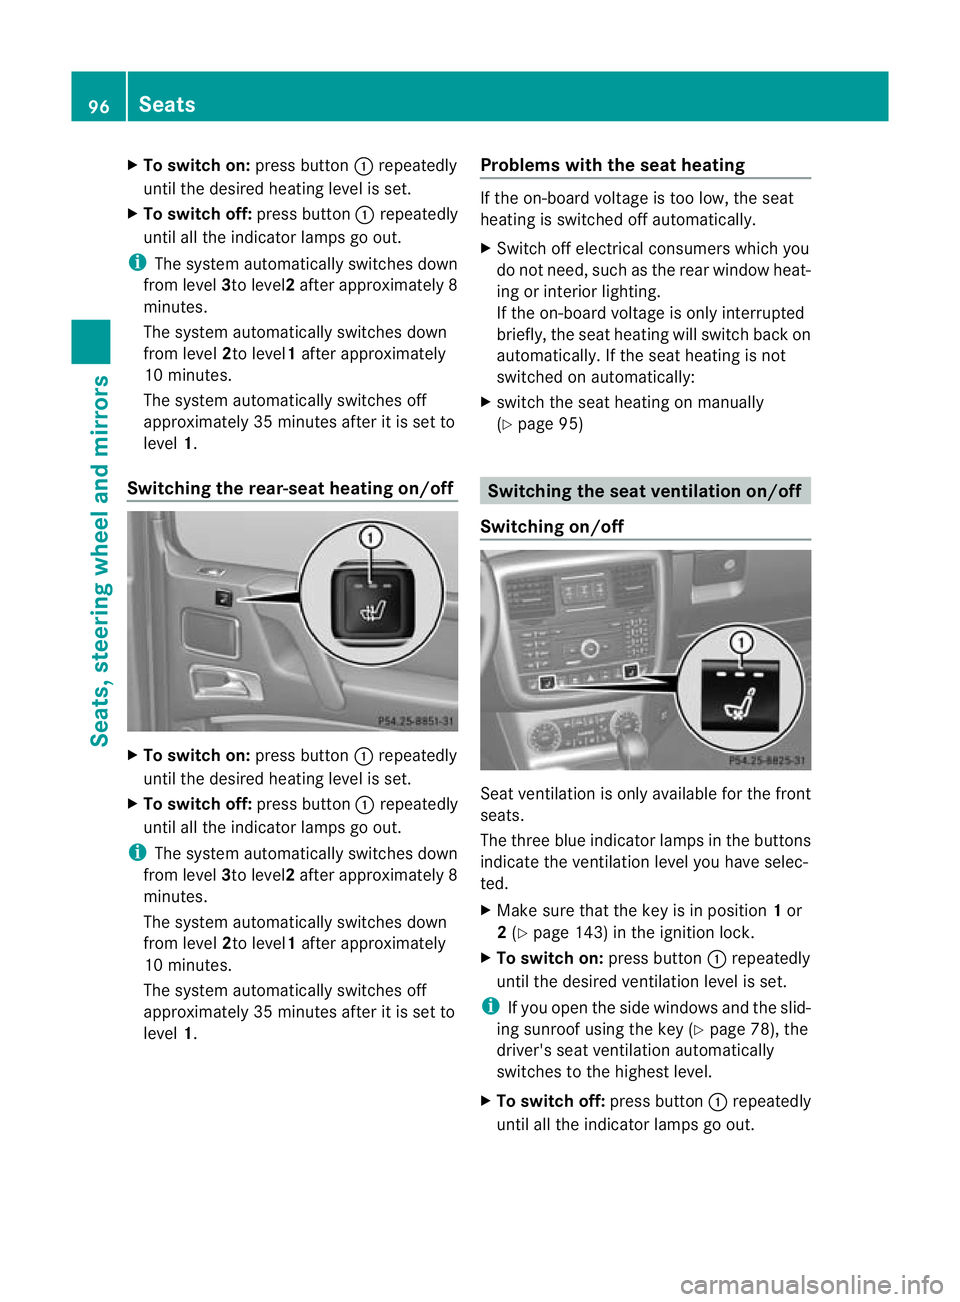
X
To switc hon:press button :repeatedly
until the desired heating level is set.
X To switch off: press button:repeatedly
until all the indicator lamps go out.
i The system automatically switches down
from level 3to level2after approximately 8
minutes.
The system automatically switches down
from level 2to level1 after approximately
10 minutes.
The system automatically switches off
approximately 35 minutes after it is set to
level 1.
Switching the rear-seat heating on/off X
To switch on: press button:repeatedly
until the desired heating level is set.
X To switch off: press button:repeatedly
until all the indicator lamps go out.
i The system automatically switches down
from level 3to level2after approximately 8
minutes.
The system automatically switches down
from level 2to level1 after approximately
10 minutes.
The system automatically switches off
approximately 35 minutes after it is set to
level 1. Problems with the seat heating If the on-board voltage is too low, the seat
heating is switched off automatically.
X
Switch off electrical consumers which you
do not need, such as the rear window heat-
ing or interior lighting.
If the on-board voltage is only interrupted
briefly, the seat heating will switch back on
automatically. If the seat heating is not
switched on automatically:
X switch the seat heating on manually
(Y page 95) Switching the seat ventilation on/off
Switching on/off Seat ventilation is only available for the front
seats.
The three blue indicator lamps in the buttons
indicate the ventilation level you have selec-
ted.
X
Make sure that the key is in position 1or
2 (Y page 143) in the ignition lock.
X To switch on: press button:repeatedly
until the desired ventilation level is set.
i If you open the side windows and the slid-
ing sunroof using the key (Y page 78), the
driver's seat ventilation automatically
switches to the highest level.
X To switch off: press button:repeatedly
until all the indicator lamps go out. 96
SeatsSeats, steering wheel and mirrors
Page 100 of 357
i
If the battery voltage is too low, the seat
ventilation may switch off.
Problems with the seat ventilation If one or all of the indicator lamps in the seat
ventilation button are flashing, the seat ven-
tilatio nhas switched off automatically. The
vehicle's electrical system voltage is too low
because too many electrical consumers are
switched on.
X Switch off electrical consumers that you do
no tn eed, such as the rear window heating
or interior lighting.
Once the battery is sufficiently charged, the
seat ventilation will switch back on auto-
matically. Steering wheel
Important safety notes
G
WARNING
Do not adjust the steering wheel while driving.
Adjusting the steering wheel while driving
could cause the driver to lose control of the
vehicle.
The electrical steering wheel adjustment can
be operated at any time. Therefore, do not
leave children unattended in the vehicle or
with access to an unlocked vehicle. Children
having unsupervised access to a vehicle could
result in an acciden tand/o rserious personal
injury. Adjusting the steering wheel
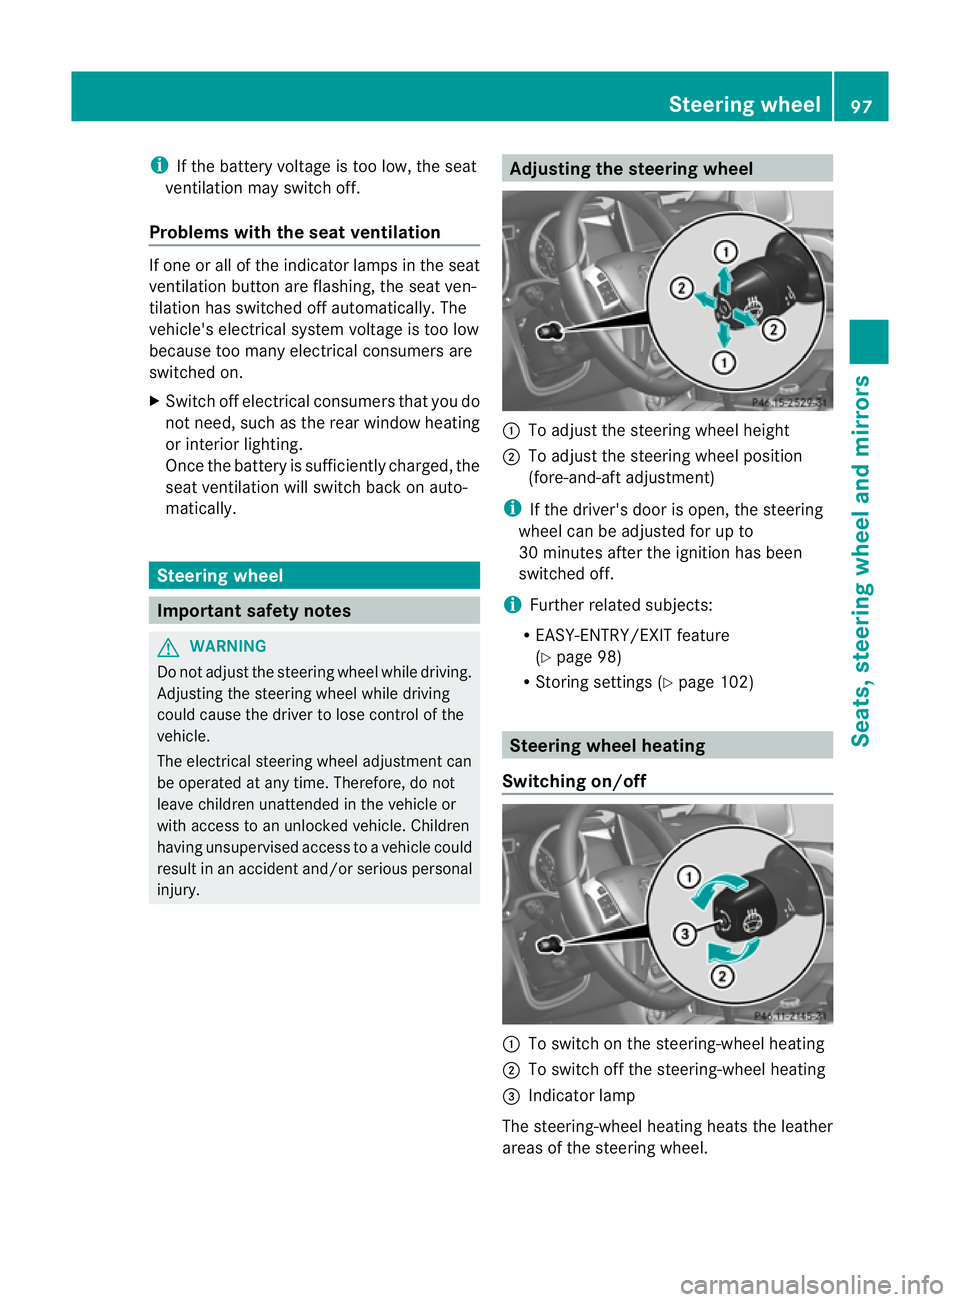
:
To adjust the steering wheel height
; To adjust the steering wheel position
(fore-and-aft adjustment)
i If the driver's door is open, the steering
wheel can be adjusted for up to
30 minutes after the ignition has been
switched off.
i Further related subjects:
R EASY-ENTRY/EXIT feature
(Y page 98)
R Storing settings (Y page 102) Steering wheel heating
Switching on/off :
To switch on the steering-wheel heating
; To switch off the steering-wheel heating
= Indicator lamp
The steering-wheel heating heats the leather
areas of the steering wheel. Steering wheel
97Seats, steering wheel and mirrors Z