2012 MERCEDES-BENZ G-CLASS SUV ignition
[x] Cancel search: ignitionPage 164 of 357

AdBlue
®
must not come into contact with
your skin, eyes or clothing.
R If you ge tAdBlue ®
in your eyes or on your
skin, rinse thoroughly without delay using
clear water.
R If AdBlue ®
has been swallowed, rinse your
mouth out immediately with plenty of clean
water, and drink plenty of water.
R Change immediately out of clothing conta-
minated with AdBlue ®
.
R If you notice allergic reactions, visit a doc-
tor immediately.
Keep AdBlue ®
away from children.
Have the AdBlue ®
tank refilled at a qualified
specialist workshop. However, you can also
top up the AdBlue ®
tank:
R with AdBlue ®
refill bottles
R with an AdBlue ®
refill canister
If the outside temperature is below Ò11 †, it
may be difficult to top up. If AdBlue ®
is frozen
and there is an active warning indicator, top-
ping up may not be possible. Park the vehicle
in a warm place, e.g. in a garage, until
AdBlue ®
has become liquid again. Topping up
is then possible again. Alternatively, have the
AdBlue ®
tank refilled at a qualified specialist
workshop.
Have the AdBlue ®
supply checked at a quali-
fied specialist workshop before the following
types of journeys:
R journeys abroad outside of Europe
R off-road driving
X If necessary, have AdBlue ®
topped up.
Before a longer stay outside of Europe, con-
sult a qualified specialist workshop.
For further information on AdBlue ®
, see
(Y page 345). Opening the AdBlue
®
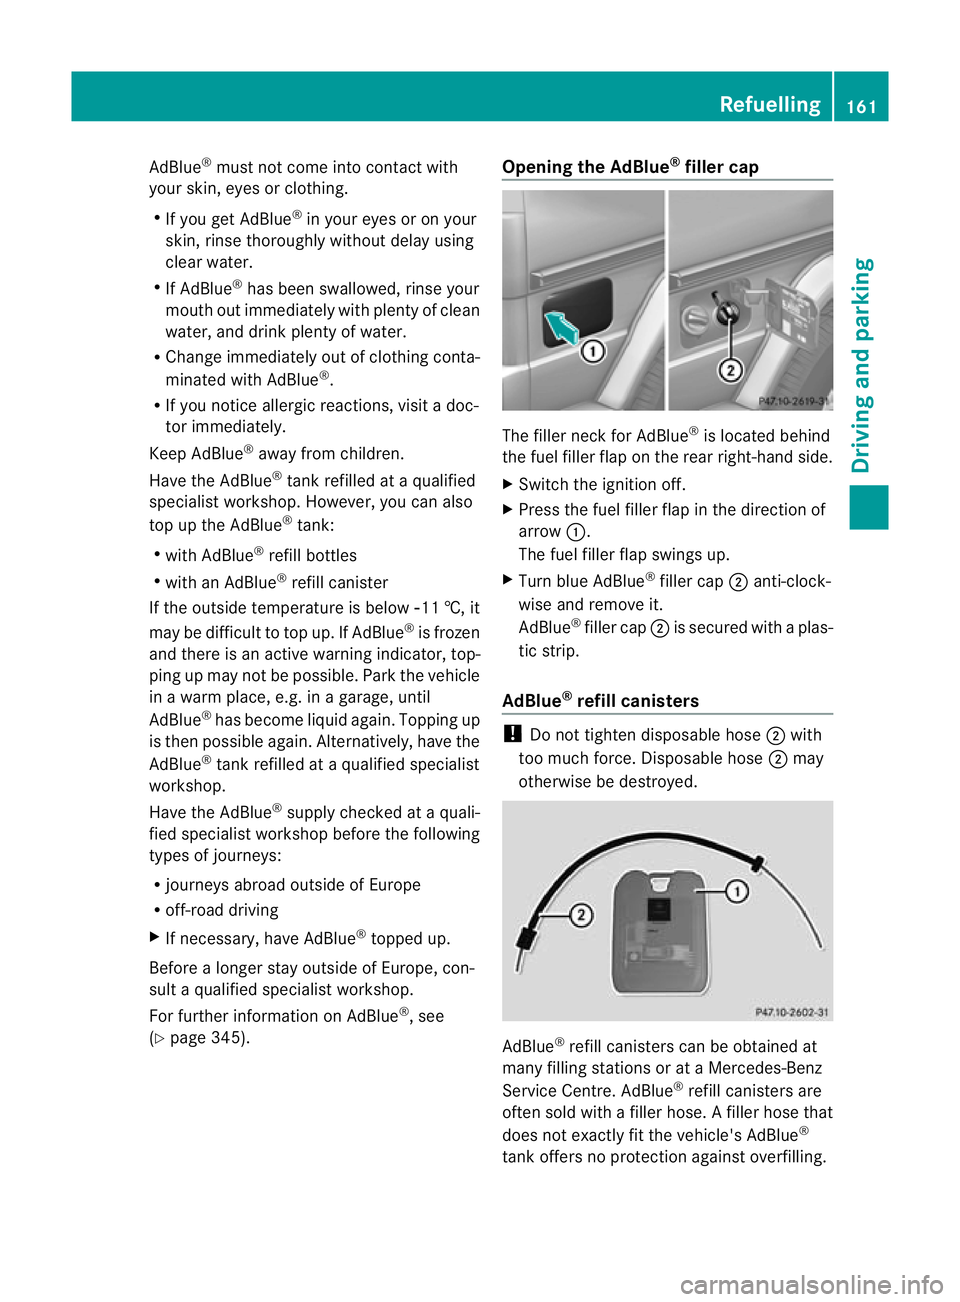
filler cap The filler neck for AdBlue
®
is located behind
the fuel filler flap on the rear right-hand side.
X Switch the ignition off.
X Press the fuel filler flap in the direction of
arrow :.
The fuel filler flap swings up.
X Turn blue AdBlue ®
filler cap ;anti-clock-
wise and remove it.
AdBlue ®
filler cap ;is secured with a plas-
tic strip.
AdBlue ®
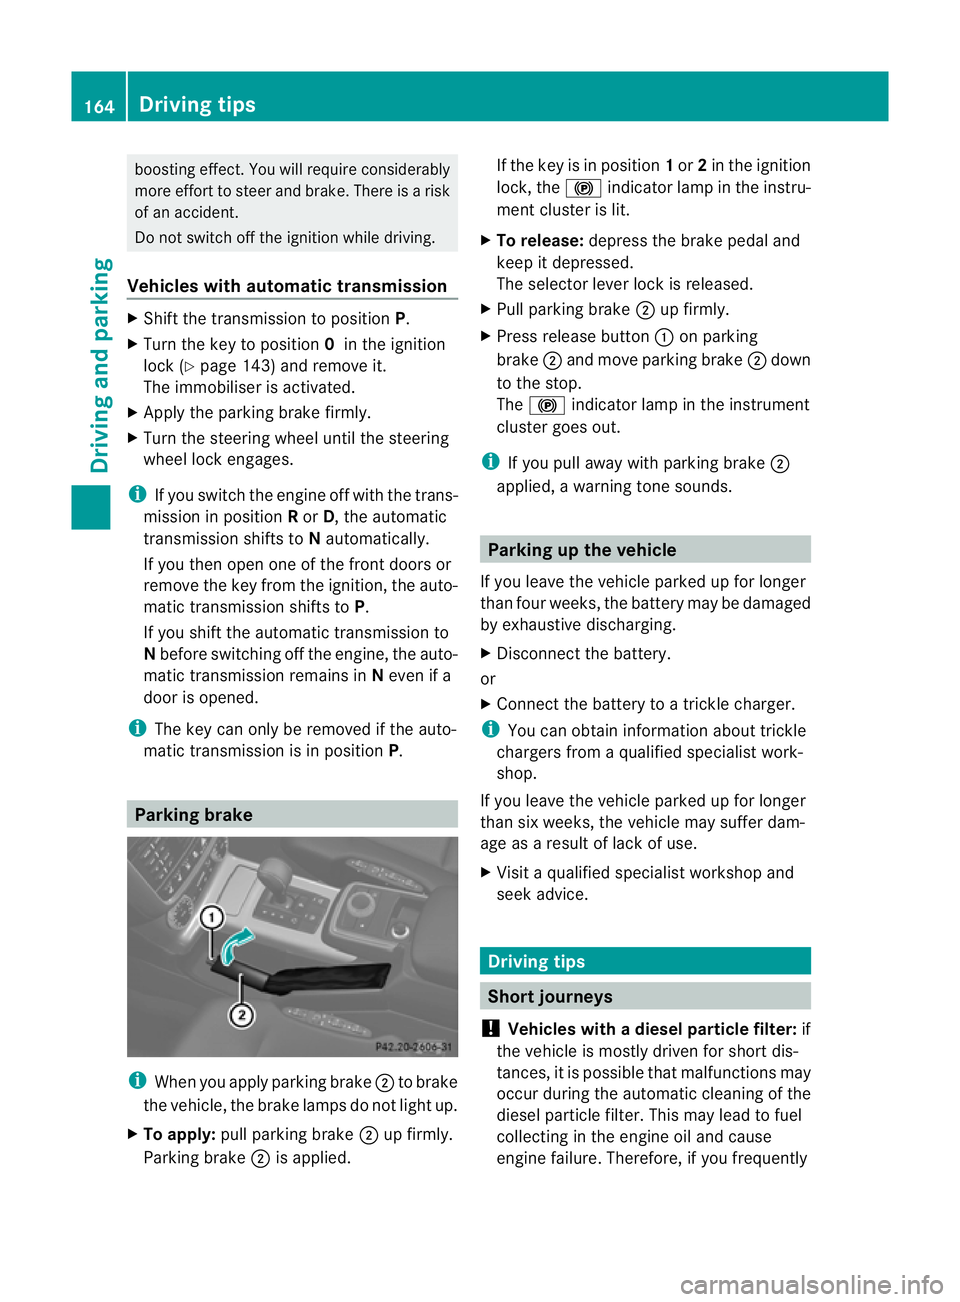
refill canisters !
Do not tighten disposable hose ;with
too much force. Disposable hose ;may
otherwise be destroyed. AdBlue
®
refill canisters can be obtained at
many filling stations or at a Mercedes-Benz
Service Centre. AdBlue ®
refill canisters are
often sold with a filler hose. Afiller hose that
does not exactly fit the vehicle's AdBlue ®
tank offers no protection against overfilling. Refuelling
161Driving and parking Z
Page 166 of 357

X
Turn AdBlue ®
refill bottle :anti-clockwise
and remove it.
X Screw the protective cap onto AdBlue ®
refill bottle :again.
Closing the AdBlue ®
filler cap and fuel
filler flap X
Fit blue AdBlue ®
filler cap ;on the filler
neck and turn it clockwise.
X To close the fuel filler flap, press it in the
direction of arrow :.
i The Refill AdBlue See Owner's Man‐
ual message goes out at the latest after
a driving distance of several kilometres.
i Have the AdBlue ®
supply topped up fully
if necessary. Mercedes-Benz recommends
that you use a qualified specialist workshop
for this purpose. Parking
Important safety notes
G
WARNING
If you leave children unsupervised in the vehi-
cle, they could set it in motion by, for example:
R releasing the parking brake
R shifting the automatic transmission out of
the parking position P
R starting the engine.
They could also operate the vehicle's equip-
ment.T here is a risk of an accident and injury. When leaving the vehicle, always take the key
with you and lock the vehicle. Never leave
children unsupervised in the vehicle.
G
WARNING
If flammable materials such as leaves, grass
or twigs are exposed to prolonged contact to
parts of the exhaust system that heat up, they
could ignite. There is a risk of fire.
Park the vehicle so that no flammable mate-
rials come into contact with parts of the vehi-
cle which are hot. Take particular care not to
park on dry grassland or harvested grain
fields. G
WARNING
If you switch off the ignition while driving,
safety-relevant functions are only available
with limitations, or not at all. This could affect,
for example, the power steering and the brake
boosting effect.Y ou will require considerably
more effort to steer and brake. There is a risk
of an accident.
Do not switch off the ignition while driving.
To ensure that the vehicle is secured against
rolling away unintentionally:
R the parking brake must be applied.
R the transmission must be in position Pand
the key must be removed from the ignition
lock
R the transfer case must not be in position
N.
R on uphill or downhill gradients, turn the
front wheels towards the kerb. Switching off the engine
Important safety notes G
WARNING
If you switch off the ignition while driving,
safety-relevant functions are only available
with limitations, or not at all. This could affect,
for example, the power steering and the brake Parking
163Driving and parking
Z
Page 167 of 357

boosting effect. You will require considerably
more effor
tto steer and brake. There is a risk
of an accident.
Do not switch off the ignition while driving.
Vehicles with automatic transmission X
Shift the transmission to position P.
X Turn the key to position 0in the ignition
lock (Y page 143) and remove it.
The immobiliser is activated.
X Apply the parking brake firmly.
X Turn the steering wheel until the steering
wheel lock engages.
i If you switch the engine off with the trans-
mission in position Ror D, the automatic
transmission shifts to Nautomatically.
If you then open one of the front doors or
remove the key from the ignition, the auto-
matic transmission shifts to P.
If you shift the automatic transmission to
N before switching off the engine, the auto-
matic transmission remains in Neven if a
door is opened.
i The key can only be removed if the auto-
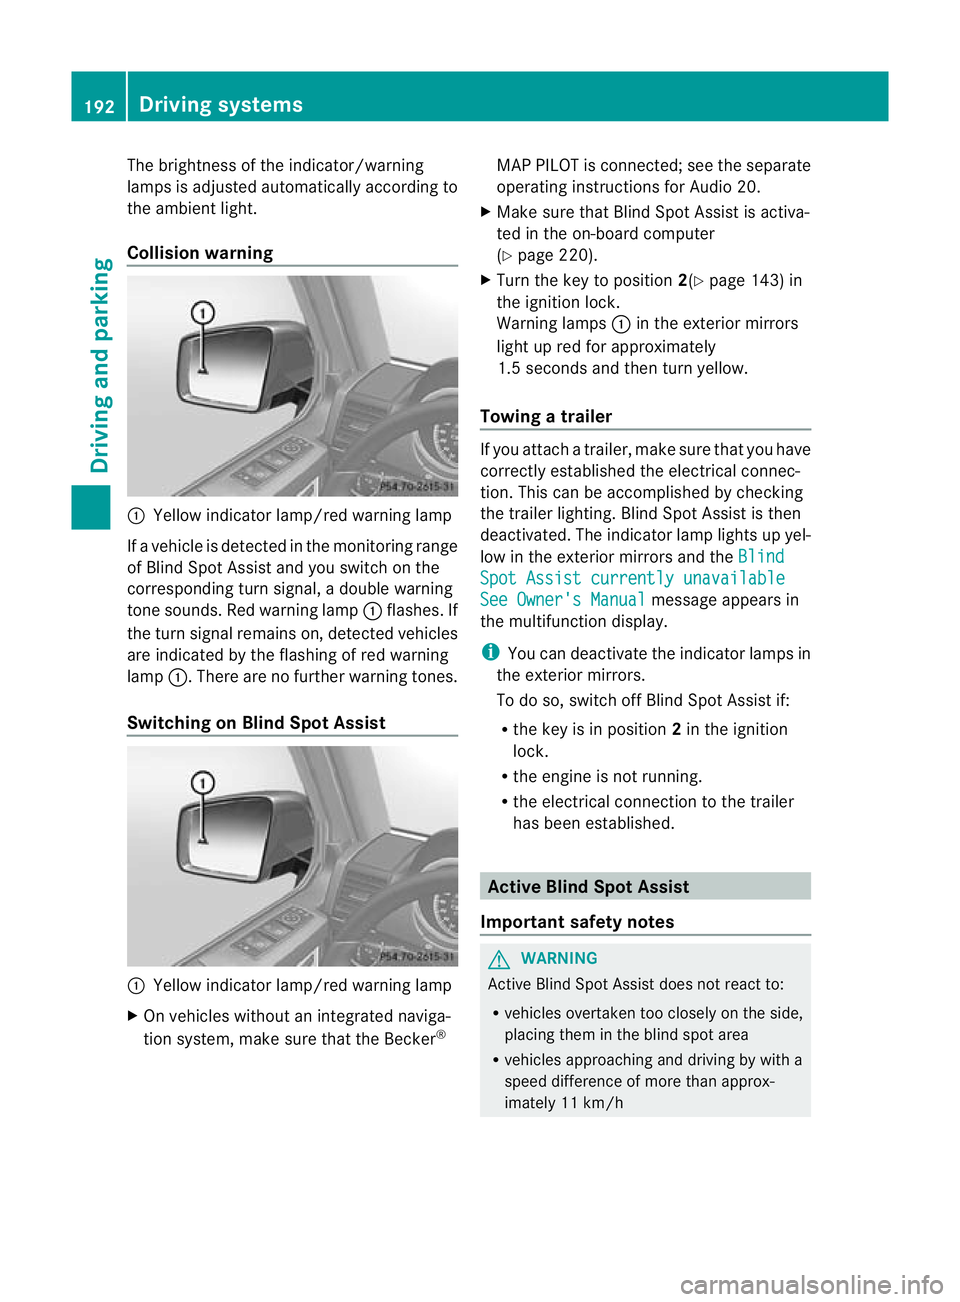
matic transmission is in position P.Parking brake
i
When you apply parking brake ;to brake
the vehicle, the brake lamps do not light up.
X To apply: pull parking brake ;up firmly.
Parking brake ;is applied. If the key is in position
1or 2in the ignition
lock, the !indicator lamp in the instru-
ment cluster is lit.
X To release: depress the brake pedal and
keep it depressed.
The selector lever lock is released.
X Pull parking brake ;up firmly.
X Press release button :on parking
brake ;and move parking brake ;down
to the stop.
The ! indicator lamp in the instrument
cluster goes out.
i If you pull away with parking brake ;
applied, a warning tone sounds. Parking up the vehicle
If you leave the vehicle parked up for longer
than four weeks, the battery may be damaged
by exhaustive discharging.
X Disconnect the battery.
or
X Connect the battery to a trickle charger.
i You can obtain information about trickle
chargers from a qualified specialist work-
shop.
If you leave the vehicle parked up for longer
than six weeks, the vehicle may suffer dam-
age as a result of lack of use.
X Visit a qualified specialist workshop and
seek advice. Driving tips
Short journeys
! Vehicles with adiesel particle filter: if
the vehicle is mostly driven for short dis-
tances, it is possible that malfunctions may
occur during the automatic cleaning of the
diesel particle filter. This may lead to fuel
collecting in the engine oil and cause
engine failure. Therefore, if you frequently 164
Driving tipsDriving and parking
Page 195 of 357

The brightness of the indicator/warning
lamps is adjusted automatically according to
the ambient light.
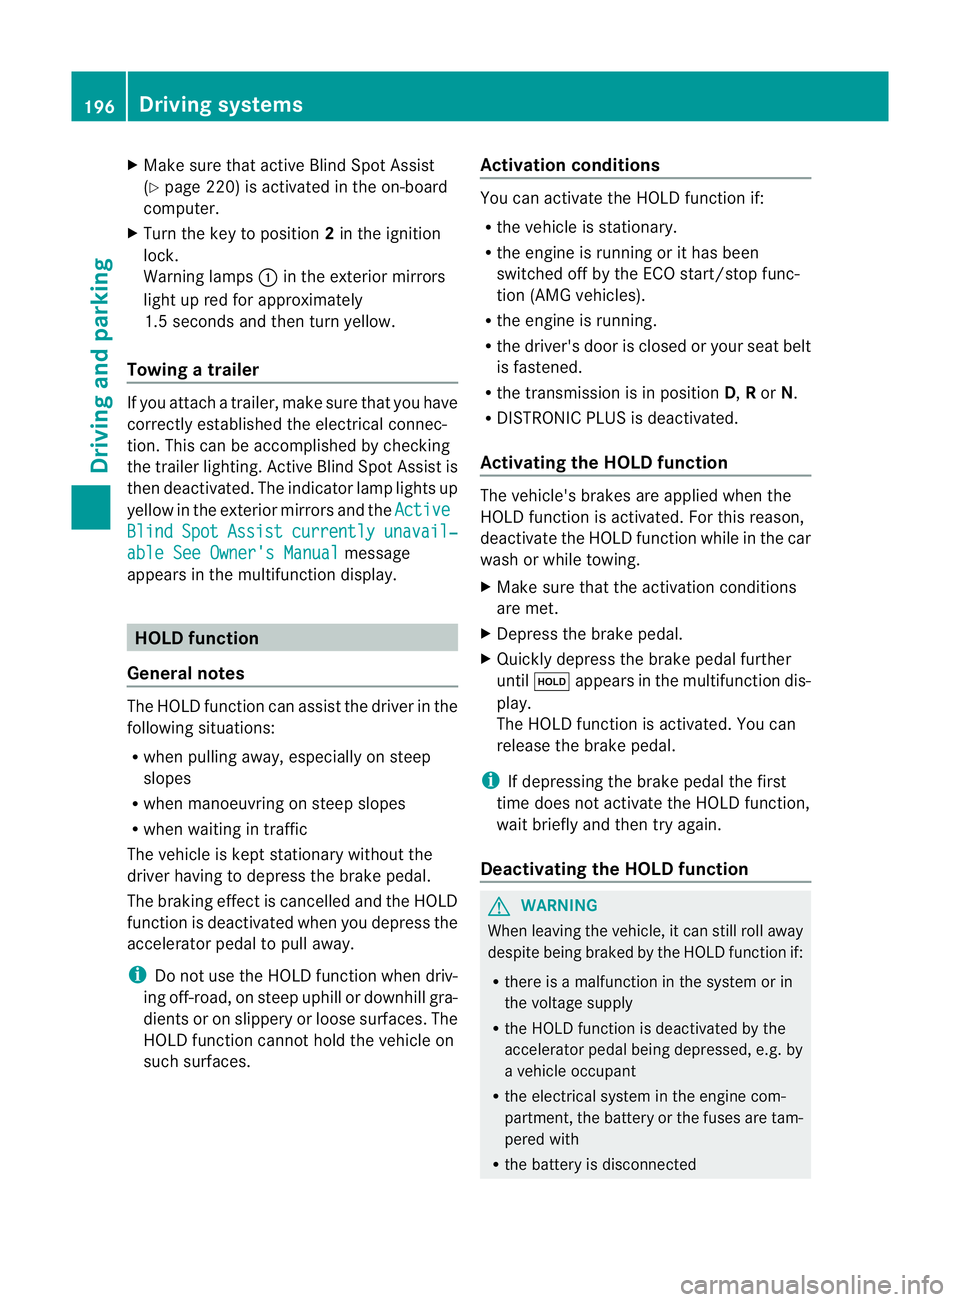
Collision warning
:
Yellow indicator lamp/red warning lamp
If a vehicle is detected in the monitoring range
of Blind Spot Assist and you switch on the
corresponding turn signal, a double warning
tone sounds. Red warning lamp :flashes. If
the turn signal remains on, detected vehicles
are indicated by the flashing of red warning
lamp :.There are no further warning tones.
Switching on Blind Spot Assist :
Yellow indicator lamp/red warning lamp
X On vehicles without an integrated naviga-
tion system, make sure that the Becker ®MAP PILOT is connected; see the separate
operating instructions for Audio 20.
X Make sure that Blind Spot Assist is activa-
ted in the on-board computer
(Y page 220).
X Turn the key to position 2(Ypage 143) in
the ignition lock.
Warning lamps :in the exterior mirrors
light up red for approximately
1.5 seconds and then turn yellow.
Towing atrailer If you attach a trailer, make sure tha
tyou have
correctly established the electrical connec-
tion. This can be accomplished by checking
the trailer lighting. Blind Spot Assist is then
deactivated. The indicator lamp lights up yel-
low in the exterior mirrors and the Blind Spot Assist currently unavailable
See Owner's Manual message appears in
the multifunction display.
i You can deactivate the indicator lamps in
the exterior mirrors.
To do so, switch off Blind Spot Assist if:
R the key is in position 2in the ignition
lock.
R the engine is not running.
R the electrical connection to the trailer
has been established. Active Blind Spot Assist
Important safety notes G
WARNING
Active Blind Spot Assist does not react to:
R vehicles overtaken too closely on the side,
placing them in the blind spot area
R vehicles approaching and driving by with a
speed difference of more than approx-
imately 11 km/h 192
Driving systemsDriving and parking
Page 199 of 357

X
Make sure that active Blind Spot Assist
(Y page 220) is activated in the on-board
computer.
X Turn the key to position 2in the ignition
lock.
Warning lamps :in the exterior mirrors
light up red for approximately
1.5 seconds and then turn yellow.
Towing atrailer If you attach a trailer, make sure tha
tyou have
correctly established the electrical connec-
tion. This can be accomplished by checking
the trailer lighting. Active Blind Spot Assist is
then deactivated. The indicator lamp lights up
yellow in the exterior mirrors and the ActiveBlind Spot Assist currently unavail‐
able See Owner's Manual message
appears in the multifunction display. HOLD function
General notes The HOLD function can assist the driver in the
following situations:
R
when pulling away, especially on steep
slopes
R when manoeuvring on steep slopes
R when waiting in traffic
The vehicle is kept stationary without the
driver having to depress the brake pedal.
The braking effect is cancelled and the HOLD
function is deactivated when you depress the
accelerator pedal to pull away.
i Do not use the HOLD function when driv-
ing off-road, on steep uphill or downhill gra-
dients or on slippery or loose surfaces. The
HOLD function cannot hold the vehicle on
such surfaces. Activation conditions You can activate the HOLD function if:
R
the vehicle is stationary.
R the engine is running or it has been
switched off by the ECO start/stop func-
tion (AMG vehicles).
R the engine is running.
R the driver's door is closed or your seat belt
is fastened.
R the transmission is in position D,Ror N.
R DISTRONIC PLUS is deactivated.
Activating the HOLD function The vehicle's brakes are applied when the
HOLD function is activated. For this reason,
deactivate the HOLD function while in the car
wash or while towing.
X
Make sure that the activation conditions
are met.
X Depress the brake pedal.
X Quickly depress the brake pedal further
until ë appears in the multifunction dis-
play.
The HOLD function is activated. You can
release the brake pedal.
i If depressing the brake pedal the first
time does not activate the HOLD function,
wait briefly and then try again.
Deactivating the HOLD function G
WARNING
When leaving the vehicle, it can still roll away
despite being braked by the HOLD function if:
R there is a malfunction in the system or in
the voltage supply
R the HOLD function is deactivated by the
accelerator pedal being depressed, e.g. by
a vehicle occupant
R the electrical system in the engine com-
partment, the battery or the fuses are tam-
pered with
R the battery is disconnected 196
Driving systemsDriving and parking
Page 200 of 357

There is a risk of an accident.
Before leaving the vehicle, always deactivate
the HOLD function and secure the vehicle
from rolling away.
The HOLD function is deactivated automati-
cally if:
R you accelerate and the transmission is in
position Dor R.
R you shift the transmission to position P.
R you depress the brake pedal again with a
certain amount of pressure until ëdis-
appears from the multifunction display.
R you activate DISTRONIC PLUS.
On steep uphill or downhill gradients or if
there is a malfunction, the transmission may
also be automatically shifted into position P.4MATIC (permanent all-wheel drive)
! Never tow the vehicle with one axle
raised. This may damage the transfer case.
Damage of this sort is not covered by the
Mercedes-Benz implied warranty. All
wheels must remain either on the ground
or be fully raised. Observe the instructions
for towing the vehicle with all wheels in full
contact with the ground.
! When testing the parking brake, operate
the vehicle only briefly (for a maximum of
ten seconds) on a brake test dynamometer.
When doing this, turn the key to position
0 or 1in the ignition .Failure to do this can
cause damage to the drive train or the
brake system.
! A function or performance test should
only be carried out on atwin-axle dyna-
mometer. Before you operate the vehicle
on such a dynamometer, please consult a
qualified workshop .You could otherwise
damage the drive train or the brake system.
4MATIC ensures that all four wheels are per-
manently driven. Together with ESP ®
and
4ETS, it improves the traction of your vehicle whenever a drive wheel spins due to insuffi-
cient grip.
If a drive wheel spins due to insufficient grip:
R
when pulling away, only depress the accel-
erator pedal as far as is necessary.
R accelerate less when driving.
If you fail to adapt your driving style, 4MATIC
can neither reduce the risk of accident nor
override the laws of physics. 4MATIC cannot
take account of road, weather and traffic con-
ditions. 4MATIC is only an aid. You are
responsible for the distance to the vehicle in
front, for vehicle speed, for braking in good
time and for staying in lane. Only engage
4MATIC when the current road, weather and
traffic conditions permit it to be done safely,
and adapt your driving style accordingly.
Drive carefully and maintain a suitable dis-
tance to the vehicle in front.
i In wintry driving conditions, the maximum
effect of 4MATIC can only be achieved if
you use winter tyres (M+ Styres), with snow
chains if necessary.
Fo rinformation abou tdriving off-road, see
(Y page 169). PARKTRONIC
Important safety notes !
When parking, pay particular attention to
objects above or below the sensors, such
as flower pots or trailer drawbars .PARK-
TRONIC does not detect such objects when
they are in the immediate vicinity of the
vehicle. You could damage the vehicle or
the objects.
The sensors may not detect snow and
objects which absorb ultrasoni csources.
Ultrasonic sources, such as an automatic
car wash, a lorry's compressed-air brakes
or a pneumatic drill, could cause PARK-
TRONIC to malfunction.
PARKTRONIC may not function correctly on
uneven terrain. Driving systems
197Driving and parking Z
Page 201 of 357

PARKTRONIC is an electronic parking aid with
ultrasonic sensors
.Itindicates visually and
audibly the distance between your vehicle
and an object.
PARKTRONIC is only an aid. It is not a replace-
ment for your attention to your immediate
surroundings. You are always responsible for
safe manoeuvring, parking and exiting a park-
ing space. Check in front, behind and to the
sides of the vehicle before manoeuvring,
parking or exiting a parking space. There
must not be any persons, animals or objects
in the area in which yo uare manoeuvring.
PARKTRONIC cannot identify any persons or
objects outside of the detection range. As a
result, PARKTRONIC cannot warn you about
objects in this area.
PARKTRONIC is activated automatically if
you:
R switch on the ignition
R shift the transmission to position D,Ror N
R release the parking brake
PARKTRONIC is deactivated at speeds above
18 km/h. It is reactivated at lower speeds.
PARKTRONIC monitors the area around your
vehicle using six sensors in the front bumper
and four sensors in the rear bumper.
Range of the sensors General notes
:
Example: sensors in the front bumper,
left-hand side Side view
Top view
The sensors must be free of dirt, ice and
slush. Otherwise, they may not function cor-
rectly. Clean the sensors regularly, taking
care not to scratch or damage them
(Y
page 298).
Front sensors Centre Approximately 100 cm
Corners Approximately 60 cm
Rear sensors
Centre Approximately 90 cm
(from spare wheel)
Corners Approximately 80 cm
Minimum distance
Centre Approximately 20 cm
Corners Approximately 20 cm
If there is an obstacle withi
nthis range, the
relevant warning displays light up and a warn-
ing tone sounds. If the distance falls below
the minimum, the distance may no longer be
shown. 198
Driving systemsDriving and parking
Page 202 of 357

Warning displays
Warning display for the front area
:
Segments on the left-hand side of the
vehicle
; Segments on the right-hand side of the
vehicle
= Segments showing operational readiness
The warning displays show the distance
between the sensors and the obstacle. The
warning display for the front area is located
on the dashboard above the centre airv ents.
The warning display for the rear area is loca-
ted on the roof lining in the rear compart-
ment.
The warning display for each side of the vehi-
cle is divided into five yellow and two red seg-
ments. PARKTRONIC is operational if yellow
segments showing operational readiness =
light up.
The selected transmission position and the
direction in which the vehicle is rolling deter-
mine which warning display is active when the
engine is running. Transmission
position Warning display
D
Front area activated
R,
Nor the vehicle
is rolling back-
wards Rear and front areas
activated
P
No areas activated One or more segments light up as the vehicle
approaches an obstacle, depending on the
vehicle's distance from the obstacle.
From the:
R
sixth segmen tonwards, you will hea ran
intermittent warning ton efor approx-
imately two seconds.
R seventh segment onwards, you will hear a
warning tone for approximately two sec-
onds. This indicates that you have now
reached the minimum distance.
Deactivating/activating PARKTRONIC :
Indicator lamp
; To deactivate/activate PARKTRONIC
If indicator lamp :lights up, PARKTRONIC is
deactivated.
i PARKTRONIC is automatically activated
when you turn the key to position 2in the
ignition lock.
Towing atrailer PARKTRONIC is deactivated for the rea
rarea
when you establish an electrical connection
between yourv ehicle and a trailer. Driving systems
199Driving and parking Z