2012 MERCEDES-BENZ G-CLASS SUV clock
[x] Cancel search: clockPage 120 of 357

Fron
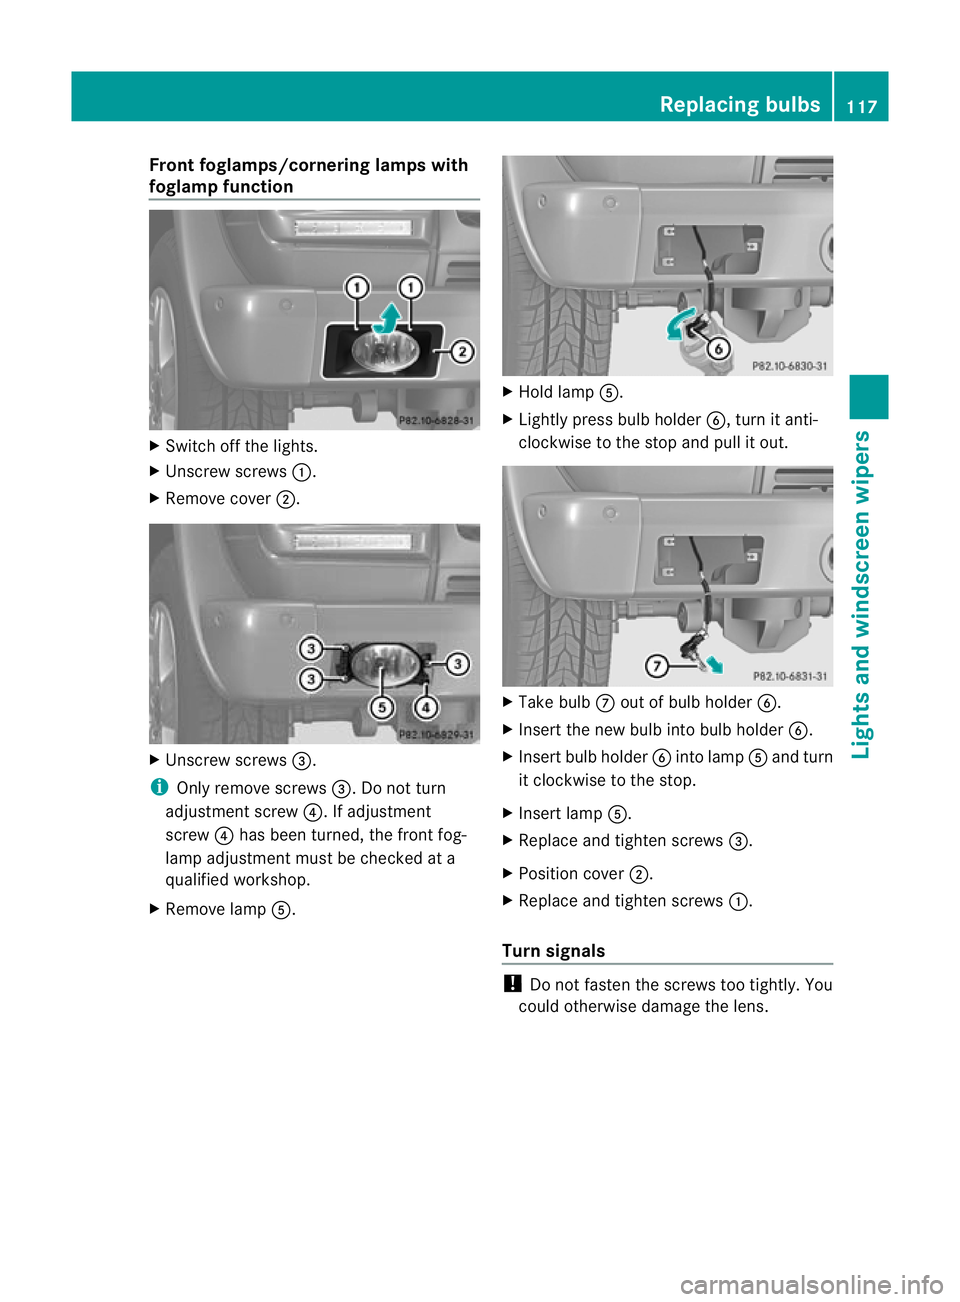
tfoglamps/cornering lamps with
foglamp function X
Switch off the lights.
X Unscrew screws :.
X Remove cover ;. X
Unscrew screws =.
i Only remove screws =. Do not turn
adjustment screw ?. If adjustment
screw ?has been turned, the front fog-
lamp adjustment must be checked at a
qualified workshop.
X Remove lamp A. X
Hold lamp A.
X Lightly press bulb holder B, turn it anti-
clockwise to the stop and pull it out. X
Take bulb Cout of bulb holder B.
X Inser tthe new bulb into bulb holder B.
X Insert bulb holder Binto lamp Aand turn
it clockwise to the stop.
X Insert lamp A.
X Replace and tighten screws =.
X Position cover ;.
X Replace and tighten screws :.
Turn signals !
Do not fasten the screws too tightly. You
could otherwise damage the lens. Replacing bulbs
117Lights and windscreen wipers Z
Page 121 of 357

X
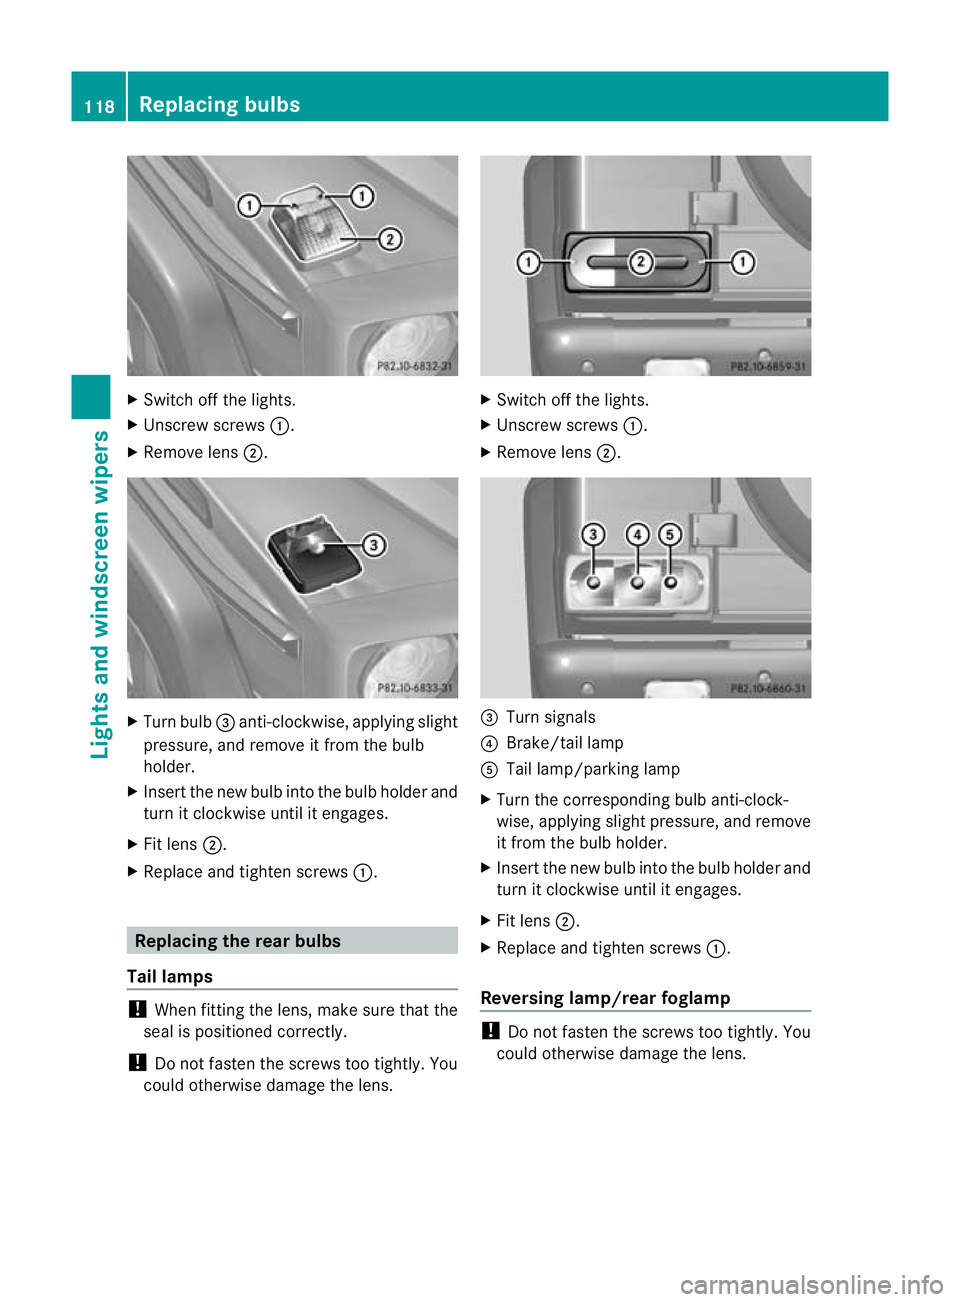
Switch off the lights.
X Unscrew screws :.
X Remove lens ;. X
Turn bulb =anti-clockwise, applying slight
pressure, and remove it from the bulb
holder.
X Insert the new bulb into the bulb holde rand
tur nitc lockwise until it engages.
X Fit lens ;.
X Replace and tighten screws :.Replacing the rear bulbs
Tail lamps !
When fitting the lens, make sure that the
seal is positioned correctly.
! Do not fasten the screws too tightly. You
could otherwise damage the lens. X
Switch off the lights.
X Unscrew screws :.
X Remove lens ;. =
Turn signals
? Brake/tail lamp
A Tail lamp/parking lamp
X Turn the corresponding bulb anti-clock-
wise, applying slight pressure, and remove
it fro mthe bulb holder.
X Insert the new bulb into the bulb holder and
turn it clockwise until it engages.
X Fit lens ;.
X Replace and tighten screws :.
Reversing lamp/rear foglamp !
Do not fasten the screws too tightly. You
could otherwise damage the lens. 118
Replacing bulbsLights and windscreen wipers
Page 122 of 357

Example: rea
rfoglamp
X Switch off the lights.
X Unscrew screws ;.
X Remove lens :. X
Turn bulb =anti-clockwise, applying slight
pressure, and remove it from the bulb
holder.
X Insert the new bulb into the bulb holder and
turn it clockwise until it engages.
X Fit lens :.
X Replace and tighten screws ;.Windscreen wipers
Switching the windscreen wipers on/
off G
WARNING
The windscreen will not longer be wiped prop-
erly if the wiper blades are worn. This could
prevent you from observing the traffic condi-
tions, thereby causing an accident .Replace the wiper blades twice a year, ideally in spring
and autumn.
! Do not operate the windscreen wipers
when the windscreen/rear window is dry,
as this could damage the wiper blades.
Moreover, dust that has collected on the
windscreen/rear window can scratch the
glass if wiping takes place when the wind-
screen/rear window is dry.
If it is necessary to operate the windscreen
wipers/rear window wiper in dry weather
conditions, always use washer fluid.
! If the windscreen wipers leave smears on
the windscreen/rear window after the vehi-
cle has been washed in an automatic car
wash, this may be due to wax or other res-
idue. Clean the windscreen/rear window
with washer fluid after an automatic car
wash.
! Intermittent wiping with rain sensor: due
to optical influences and the windscreen
becoming dirty in dry weather conditions,
the windscreen wipers may be activated
inadvertently. This could damage the wind-
screen wiper blades or scratch the wind-
screen.
For this reason, you should always switch
off the windscreen wipers in dry weather. Combination switch
1
$ Windscreen wipers off
2 Ä Intermittentw ipe, low (rain sensor
set to low sensitivity)
3 Å Intermitten twipe, high (rain sensor
set to high sensitivity) Windscreen wipers
119Lights and windscreen wipers Z
Page 135 of 357

The climate control system switches to the
following functions:
R
cooling with air dehumidification (only
with engine running)
R high airflow (depending on the outside
temperature)
R high temperature (depending on the out-
side temperature)
R air distribution to the windscreen and
fronts ide windows
R air-recirculation mode off
X To deactivate: press the¬button.
The indicator lamp in the ¬button goes
out. The previous settings are reactivated.
The cooling with air dehumidification func-
tion remains on. Air-recirculation mode
remains deactivated.
or
X Press the Ãbutton.
The indicator lamp in the ¬button goes
out. Airflow and air distribution are set to
automatic mode.
or
X Turn controls :orB clockwise or anti-
clockwise (Y page 125).
or
X Press the KorI button. Demisting the windows
Windows misted up on th einside X
Activate the Ácooling with air dehu-
midification function.
X Activate automatic mode Ã.
X If the windows continue to mist up, activate
the demisting function (Y page 131).
i You should only select this setting until
the windscreen is clear again. Windows misted up on the outside X
Switch on the windscreen wipers
(Y page 119).
X Press the _button repeatedly until the
P orO symbol appears in the dis-
play.
i You should only select this setting until
the windscreen is clear again. Switching the windscreen heating
on/off
X
Turn the key to position 2(Ypage 143) in
the ignition lock.
X To switch on: press button;.
Indicator lamp :lights up.
X To switch off: press button;.
Indicator lamp :goes out.
i At outside temperatures above 10 †, the
windscreen heating cannot be activated.
Indicator lamp :lights up briefly when you
attempt to activate it and then goes out
again.
i The windscreen heating has a high cur-
rent draw. You should therefore switch it
off as soon as the windscreen is clear. The
windscreen heating otherwise switches
itself off automatically after 10 minutes.
i If the battery voltage is too low, the wind-
screen heating may switch off. If the wind-
screen heating is automatically deactiva-
ted, indicator lamp :flashes. The wind-
screen heating will automatically switch 132
Operating the climate control systemClimate control
Page 161 of 357

X
Turn the fuel filler cap anti-clockwise and
remove it.
AdBlue ®
vehicles: do not confuse the fuel
filler cap with the blue AdBlue ®
filler cap.
X Insert the fuel filler cap into the holder
bracket on the inside of filler flap ?.
i AdBlue ®
vehicles do not have a bracket
on the inside of the filler flap.
X Completely insert the filler neck of the fuel
pump nozzle into the tank and refuel.
i Do not add any more fuel after the pump
stops filling for the first time. Otherwise,
fuel may leak out.
Closing X
Replace the fuel filler cap and turn it clock-
wise. The fuel filler cap audibly engages.
X Press the fuel filler flap closed until it
engages. Fuel filler flap emergency release
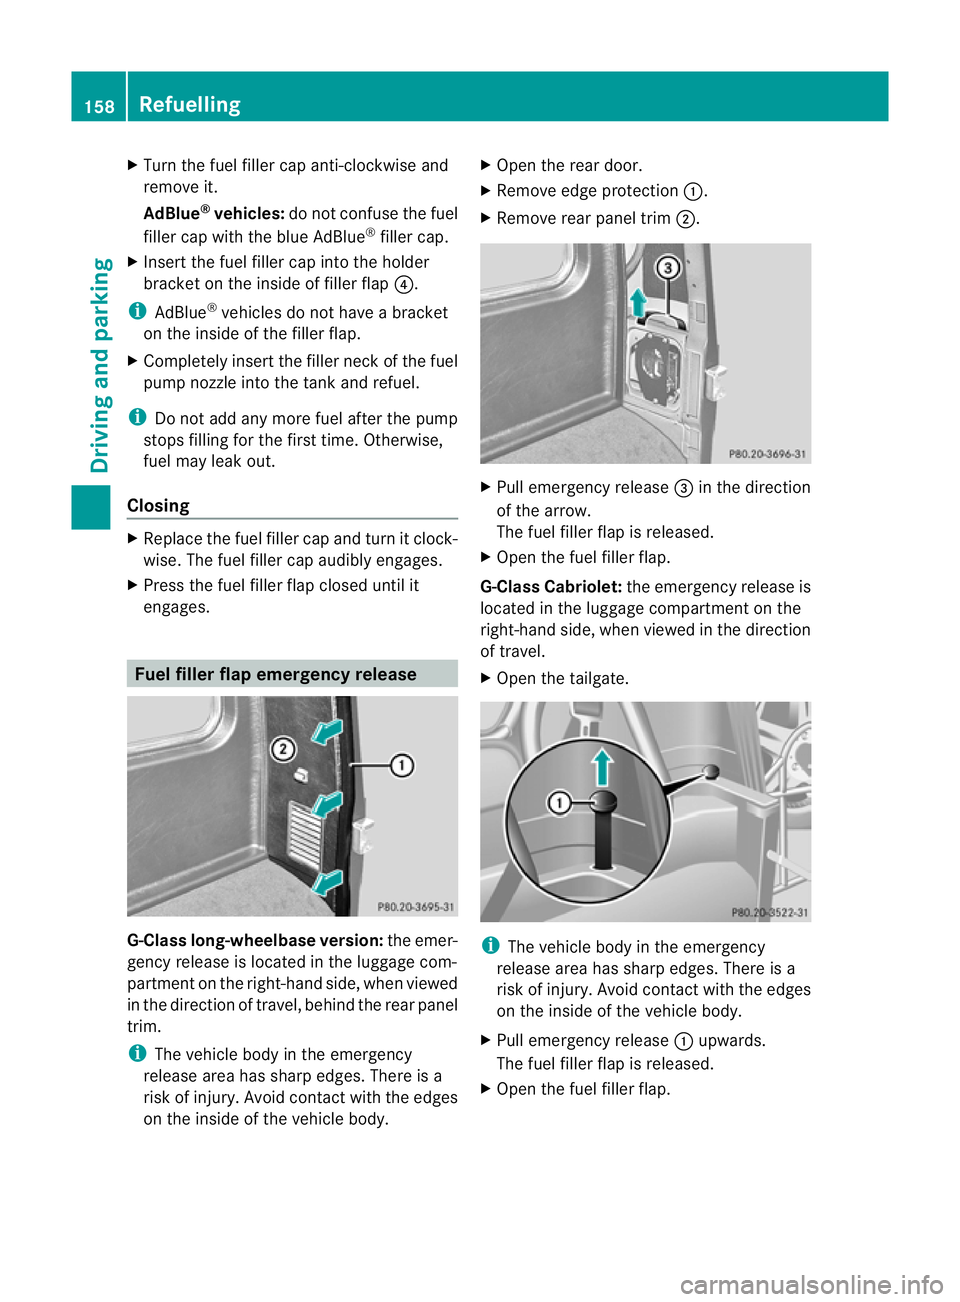
G-Class long-wheelbase version:
the emer-
gency release is located in the luggage com-
partmen tonthe right-hand side, when viewed
in the direction of travel, behind the rear panel
trim.
i The vehicle body in the emergency
release area has sharp edges. There is a
risk of injury. Avoid contact with the edges
on the inside of the vehicle body. X
Open the rear door.
X Remove edge protection :.
X Remove rear panel trim ;. X
Pull emergency release =in the direction
of the arrow.
The fuel filler flap is released.
X Open the fuel filler flap.
G-Class Cabriolet: the emergency release is
located in the luggage compartmentont he
right-hand side, when viewed in the direction
of travel.
X Open the tailgate. i
The vehicle body in the emergency
release area has sharp edges. There is a
risk of injury. Avoid contact with the edges
on the inside of the vehicle body.
X Pull emergency release :upwards.
The fuel filler flap is released.
X Open the fuel filler flap. 158
RefuellingDriving and parking
Page 164 of 357

AdBlue
®
must not come into contact with
your skin, eyes or clothing.
R If you ge tAdBlue ®
in your eyes or on your
skin, rinse thoroughly without delay using
clear water.
R If AdBlue ®
has been swallowed, rinse your
mouth out immediately with plenty of clean
water, and drink plenty of water.
R Change immediately out of clothing conta-
minated with AdBlue ®
.
R If you notice allergic reactions, visit a doc-
tor immediately.
Keep AdBlue ®
away from children.
Have the AdBlue ®
tank refilled at a qualified
specialist workshop. However, you can also
top up the AdBlue ®
tank:
R with AdBlue ®
refill bottles
R with an AdBlue ®
refill canister
If the outside temperature is below Ò11 †, it
may be difficult to top up. If AdBlue ®
is frozen
and there is an active warning indicator, top-
ping up may not be possible. Park the vehicle
in a warm place, e.g. in a garage, until
AdBlue ®
has become liquid again. Topping up
is then possible again. Alternatively, have the
AdBlue ®
tank refilled at a qualified specialist
workshop.
Have the AdBlue ®
supply checked at a quali-
fied specialist workshop before the following
types of journeys:
R journeys abroad outside of Europe
R off-road driving
X If necessary, have AdBlue ®
topped up.
Before a longer stay outside of Europe, con-
sult a qualified specialist workshop.
For further information on AdBlue ®
, see
(Y page 345). Opening the AdBlue
®
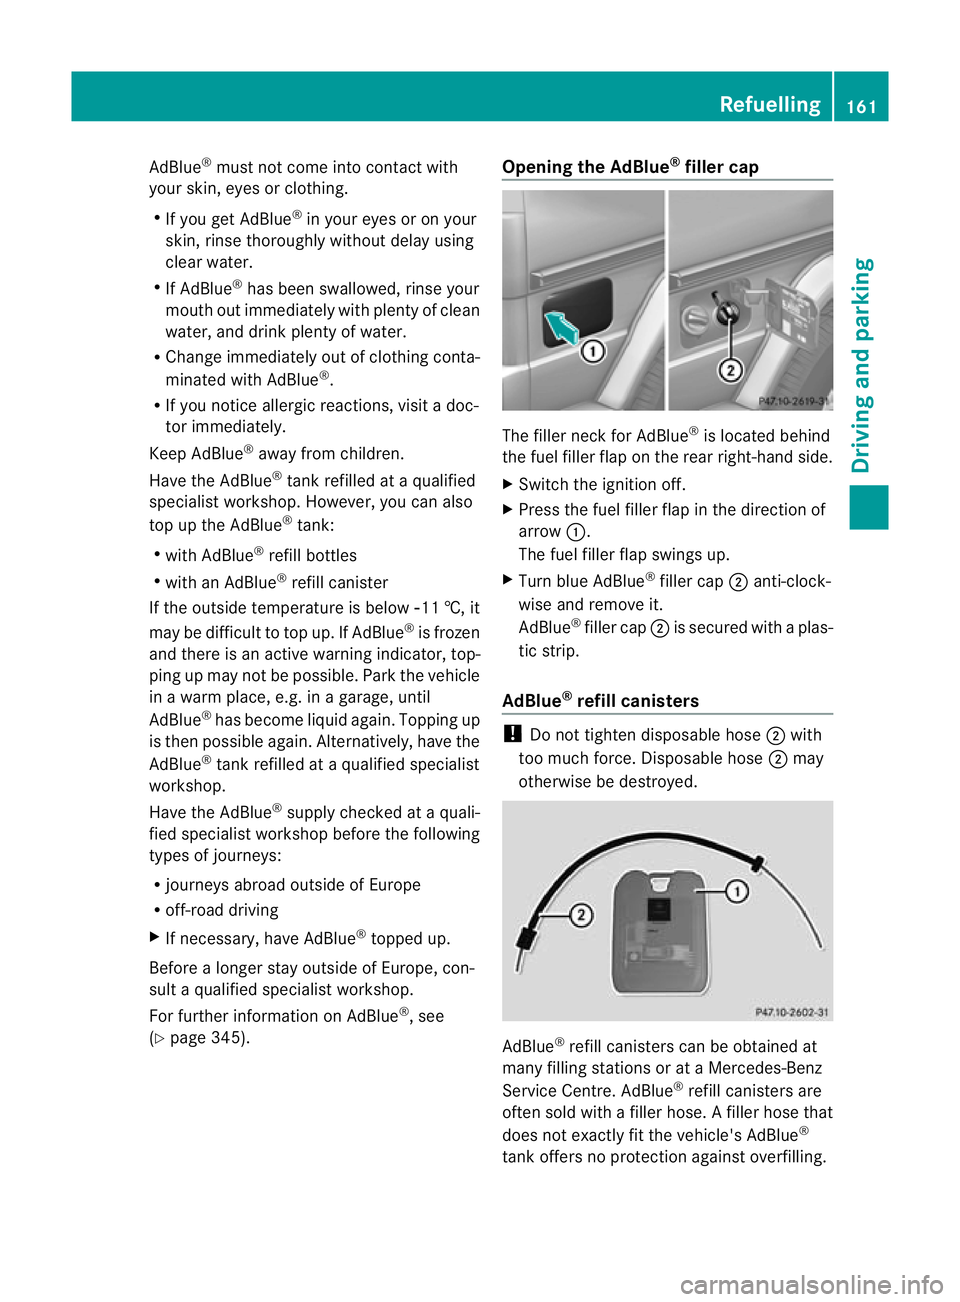
filler cap The filler neck for AdBlue
®
is located behind
the fuel filler flap on the rear right-hand side.
X Switch the ignition off.
X Press the fuel filler flap in the direction of
arrow :.
The fuel filler flap swings up.
X Turn blue AdBlue ®
filler cap ;anti-clock-
wise and remove it.
AdBlue ®
filler cap ;is secured with a plas-
tic strip.
AdBlue ®
refill canisters !
Do not tighten disposable hose ;with
too much force. Disposable hose ;may
otherwise be destroyed. AdBlue
®
refill canisters can be obtained at
many filling stations or at a Mercedes-Benz
Service Centre. AdBlue ®
refill canisters are
often sold with a filler hose. Afiller hose that
does not exactly fit the vehicle's AdBlue ®
tank offers no protection against overfilling. Refuelling
161Driving and parking Z
Page 165 of 357

AdBlue
®
may leak ou tas a result of overfilling.
Mercedes-Benz offers a special disposable
hose with overfill protection. You can obtain
this from any Mercedes-Benz Service Centre.
AdBlue ®
is available in a variety of containers
and receptacles. Only use the disposable
hose with Mercedes-Benz AdBlue ®
refill can-
isters. X
Unscrew the cap from the opening on top
of AdBlue ®
refill canister :.
X Place disposable hose ;on the opening
of AdBlue ®
refill canister :and screw it
on clockwise until hand-tight.
i Disposable hose ;remains closed until
you fasten disposable hose ;to the
AdBlue ®
filler neck of the vehicle.
X Place disposable hose ;on the filler neck
of the vehicle and screw it on clockwise
until hand-tight. When you feel resistance,
disposable hose ;is sufficiently secured.
X Lift up and tip AdBlue ®
refill canister :.
i Filling stops when the AdBlue ®
tank is
completely filled. Do not fill the AdBlue ®
tank any further. AdBlue ®
refill canis-
ter :can be removed when it has been
only partially emptied.
X Turn disposable hose ;on the filler neck
of the vehicle anti-clockwise and remove it. X
Turn disposable hose ;on the opening of
AdBlue ®
refill canister :anti-clockwise
and remove it.
X Reseal AdBlue ®
refill canister :with the
cap.
AdBlue ®
refill bottle !
Screw on the AdBlue ®
refill bottle only
hand-tight. It may otherwise be destroyed. AdBlue
®
refill bottles can be obtained at many
filling stations or at aMercedes-BenzS ervice
Centre. Refill bottles without a threaded seal
offer no protection against overfilling.
AdBlue ®
may leak out as a result of overfilling.
Mercedes Benzo ffers special refill bottles
with a threaded cap. These are available at
any Mercedes-Benz Service Centre.
X Unscrew the protective cap from AdBlue ®
refill bottle :.
X Set AdBlue ®
refill bottle :as show nonthe
filler neck and screw it on hand-tight.
X Press AdBlue ®
refill bottle :towards the
filler neck.
The AdBlue ®
tank is filled. This could last
up to one minute.
i When the AdBlue ®
refill bottle is no longer
pressed down, filling stops. The bottle may
be taken off again after being only partially
emptied.
X Release AdBlue ®
refill bottle :.162
RefuellingDriving and parking
Page 166 of 357

X
Turn AdBlue ®
refill bottle :anti-clockwise
and remove it.
X Screw the protective cap onto AdBlue ®
refill bottle :again.
Closing the AdBlue ®
filler cap and fuel
filler flap X
Fit blue AdBlue ®
filler cap ;on the filler
neck and turn it clockwise.
X To close the fuel filler flap, press it in the
direction of arrow :.
i The Refill AdBlue See Owner's Man‐
ual message goes out at the latest after
a driving distance of several kilometres.
i Have the AdBlue ®
supply topped up fully
if necessary. Mercedes-Benz recommends
that you use a qualified specialist workshop
for this purpose. Parking
Important safety notes
G
WARNING
If you leave children unsupervised in the vehi-
cle, they could set it in motion by, for example:
R releasing the parking brake
R shifting the automatic transmission out of
the parking position P
R starting the engine.
They could also operate the vehicle's equip-
ment.T here is a risk of an accident and injury. When leaving the vehicle, always take the key
with you and lock the vehicle. Never leave
children unsupervised in the vehicle.
G
WARNING
If flammable materials such as leaves, grass
or twigs are exposed to prolonged contact to
parts of the exhaust system that heat up, they
could ignite. There is a risk of fire.
Park the vehicle so that no flammable mate-
rials come into contact with parts of the vehi-
cle which are hot. Take particular care not to
park on dry grassland or harvested grain
fields. G
WARNING
If you switch off the ignition while driving,
safety-relevant functions are only available
with limitations, or not at all. This could affect,
for example, the power steering and the brake
boosting effect.Y ou will require considerably
more effort to steer and brake. There is a risk
of an accident.
Do not switch off the ignition while driving.
To ensure that the vehicle is secured against
rolling away unintentionally:
R the parking brake must be applied.
R the transmission must be in position Pand
the key must be removed from the ignition
lock
R the transfer case must not be in position
N.
R on uphill or downhill gradients, turn the
front wheels towards the kerb. Switching off the engine
Important safety notes G
WARNING
If you switch off the ignition while driving,
safety-relevant functions are only available
with limitations, or not at all. This could affect,
for example, the power steering and the brake Parking
163Driving and parking
Z