2012 MERCEDES-BENZ G-CLASS SUV clock
[x] Cancel search: clockPage 11 of 357
Door
Automati clocking (on-board com-
puter) ............................................ .223
Automatic locking (switch) .............. .74
Central locking/unlocking (key) ......68
Display message ............................ 249
Emergency locking ........................... 75
Emergency unlocking .......................74
Important safety notes ....................73
Opening (from the inside) ................73
Door control panel
Overview .......................................... 35
Doors
Overview .......................................... 73
Draught stop ........................................ 84
Drive program Automatic ...................................... 153
Display ........................................... 150
Manual .......................................... .154
Driver's seat
Display message ............................ 249
Drive system
Active Blind Spot Assist .................192
Driving abroad
Symmetrical dipped bea m............. 104
Driving in mountainous terrain
Approach/departure angl e............ 172
Driving downhill ............................. 173
Gradient-climbing capability
(maximum) ..................................... 173
Driving off-road
see Off-road driving
Driving on flooded roads ..................167
Driving safety system Electronic Brake-force Distributio n..64
ESP ®
(Electronic Stability Program) .62
Important safety guidelines .............60
Driving safety systems
4ETS (Electronic Traction System) ...62
ABS (Anti-lock Braking System) .......60
ADAPTIVE BRAKE ............................. 64
Adaptive brake lamps ......................61
BAS (Brake Assist System) ..............61
Overview .......................................... 60
Driving system
Variabl eSPEEDTRONIC .................178Driving systems
Blind Spot Assist ............................ 190
Cruise control ................................ 173
Display message ............................ 241
Distronic Plu s................................ 182
HOLD function ............................... 196
PARKTRONI C................................. 197
Reversing camera ..........................200
SPEEDTRONIC ............................... 178
Driving tips
Aquaplaning ................................... 167
Automatic transmission .................152
Brakes ........................................... 165
DISTRONI CPLUS ........................... 189
Downhill gradient ........................... 165
Driving abroad ............................... 104
Driving in winter ............................ .168
Driving on flooded road s................ 167
Driving on sand .............................. 171
Driving over obstacles ...................171
Gravel road s.................................. 171
Icy road surfaces ........................... 168
Off-road driving .............................. 169
Off-road fording ............................. 167
Snow chains .................................. 324
Symmetrical dipped bea m............. 104
Towing atrailer .............................. 206
Travelling uphill .............................. 172
Tyr egrip ........................................ 166
Tyr eruts ........................................ 171
Wet road surface ........................... 165
DVD audio
Operating (on-board computer) .....218
DVD video
Operating (on-board computer) .....218 E
EASY-ENTRY feature Activating/deactivating .................224
Function/notes ................................ 98
EASY-EXIT feature
Function/notes ................................ 98
Switching on/off ........................... 224
EBD (electronic brake force distri-
bution)
Display message ............................ 231
Function/notes ................................ 64 8
Index
Page 77 of 357

The central locking button does not lock or
unlock the fuel filler flap.
X
To unlock: press button :.
X To lock: press button ;.
i You cannot unlock the vehicle centrally
from the inside if the vehicle has been
locked from the outside using the key.
i It is only possible to lock the vehicle cen-
trally if all doors are closed. Automatic locking feature
:
To switch off
; To activate
X To deactivate: press and hold button :
for about five seconds until a tone sounds.
X To activate: press and hold button ;for
about five seconds until a tone sounds.
i If you press one of the two buttons and
do not hear a tone, the relevant setting has
already been selected. The vehicle is locked automatically when the
ignition is switched on and the wheels are
turning.
You could therefore be locked out if:
R
the vehicle is being pushed.
R the vehicle is being towed.
R the vehicle is being tested on a dynamom-
eter.
You can also switch the automatic locking
function on and off using the on-board com-
puter (Y page 223). Unlocking the driver's door (emer-
gency key element)
If the vehicle can no longer be centrally
unlocked with the key, use the emergency
key element.
If you use the emergenc ykey element to
unlock and open the driver's door, the anti-
thef talarm system will be triggered
(Y page 64).
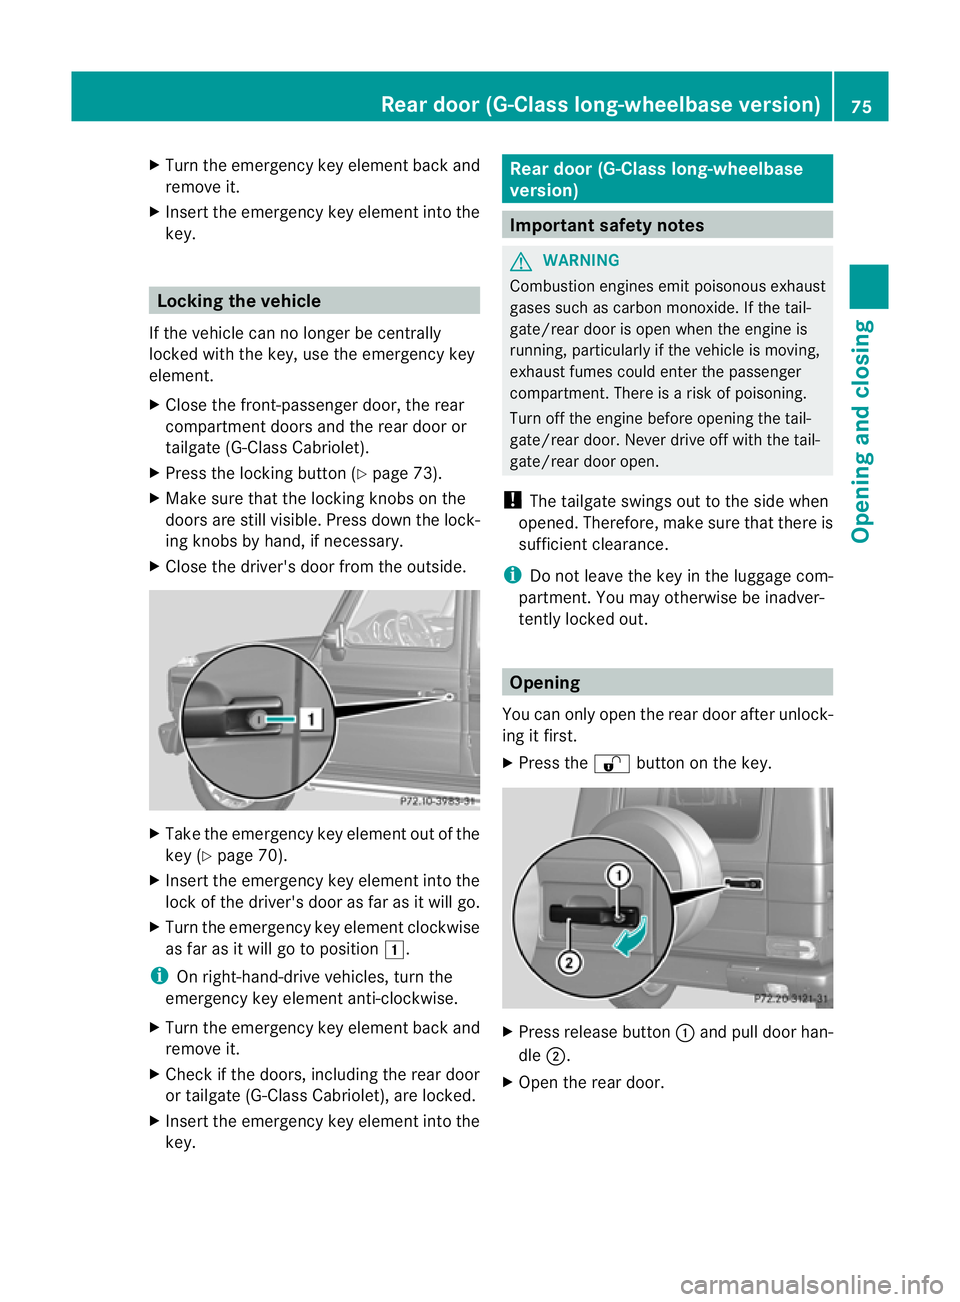
Take the emergency key elemen tout of the
key (Y page 70). X
Inser tthe emergency key element into the
lock of the driver's door as far as it will go.
X Turn the emergency key element anti-
clockwise to position 1.
The door is unlocked.
i On right-hand-drive vehicles, turn the
emergency key element clockwise. 74
DoorsOpening and closing
Page 78 of 357
X
Turn the emergency key element back and
remove it.
X Insert the emergency key element into the
key. Locking the vehicle
If the vehicle can no longer be centrally
locked with the key, use the emergency key
element.
X Close the front-passenger door, the rear
compartment doors and the rear door or
tailgate (G-Class Cabriolet).
X Press the locking button (Y page 73).
X Make sure that the lockin gknobs on the
doors are still visible .Press downt he lock-
ing knobs by hand, if necessary.
X Close the driver's door from the outside. X
Take the emergency key element out of the
key (Y page 70).
X Insert the emergency key element into the
lock of the driver's door as far as it will go.
X Turn the emergency key element clockwise
as far as it will go to position 1.
i On right-hand-drive vehicles, turn the
emergency key element anti-clockwise.
X Turn the emergency key element back and
remove it.
X Check if the doors, including the rear door
or tailgate (G-Class Cabriolet), are locked.
X Insert the emergency key element into the
key. Rear door (G-Class long-wheelbase
version)
Important safety notes
G
WARNING
Combustion engines emit poisonous exhaust
gases such as carbon monoxide. If the tail-
gate/rear door is open when the engine is
running, particularly if the vehicle is moving,
exhaust fumes could enter the passenger
compartment. There is a risk of poisoning.
Turn off the engine before opening the tail-
gate/rear door. Never drive off with the tail-
gate/rear door open.
! The tailgate swings out to the side when
opened. Therefore, make sure that there is
sufficient clearance.
i Do not leave the key in the luggage com-
partment.Y ou may otherwise be inadver-
tently locked out. Opening
You can only open the rear door after unlock-
ing it first.
X Press the %button on the key. X
Press release button :and pull door han-
dle ;.
X Open the rear door. Rear door (G-Class long-wheelbase version)
75Opening and closing Z
Page 79 of 357
Closing
X Push the rear door closed from outside the
vehicle.
X If necessary, loc kthe vehicle with the
& button on the key. Tailgate (G-Class Cabriolet)
Important safety notes
G
WARNING
Combustion engines emit poisonous exhaust
gases such as carbon monoxide. If the tailgate
is open when the engine is running, particu-
larly if the vehicle is moving, exhaust fumes
could enter the passenger compartment.
There is a risk of poisoning.
Turn off the engine before opening the tail-
gate. Never drive with the tailgate open. G
WARNING
If the spare wheel bracket is not correctly
closed and engaged, it could swing to the side
while the vehicle is in motion. There is a risk
of an accident and injury.
Close the spare wheel bracket completely
before the journey and make sure that it is
engaged. Opening
! Make sure that there is sufficient clear-
ance.
You can only open the tailgate after it has
been unlocked.
X Press the %button on the key.
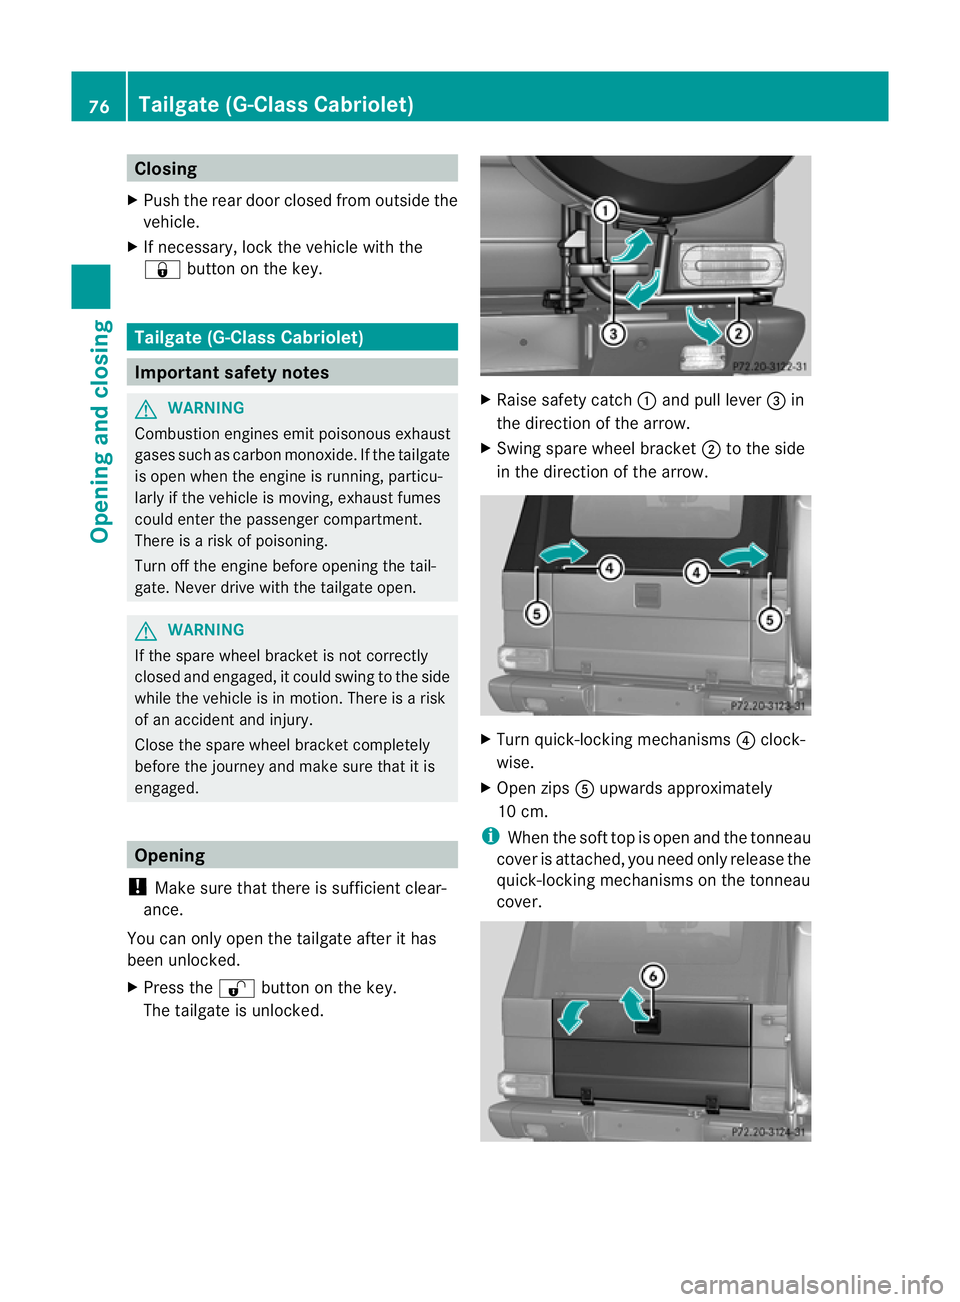
The tailgate is unlocked. X
Raise safety catch :and pull lever =in
the direction of the arrow.
X Swing spare wheel bracket ;to the side
in the direction of the arrow. X
Turn quick-locking mechanisms ?clock-
wise.
X Open zips Aupwards approximately
10 cm.
i When the soft top is open and the tonneau
cover is attached, you need only release the
quick-locking mechanisms on the tonneau
cover. 76
Tailgate (G-Class Cabriolet)Opening and closing
Page 83 of 357
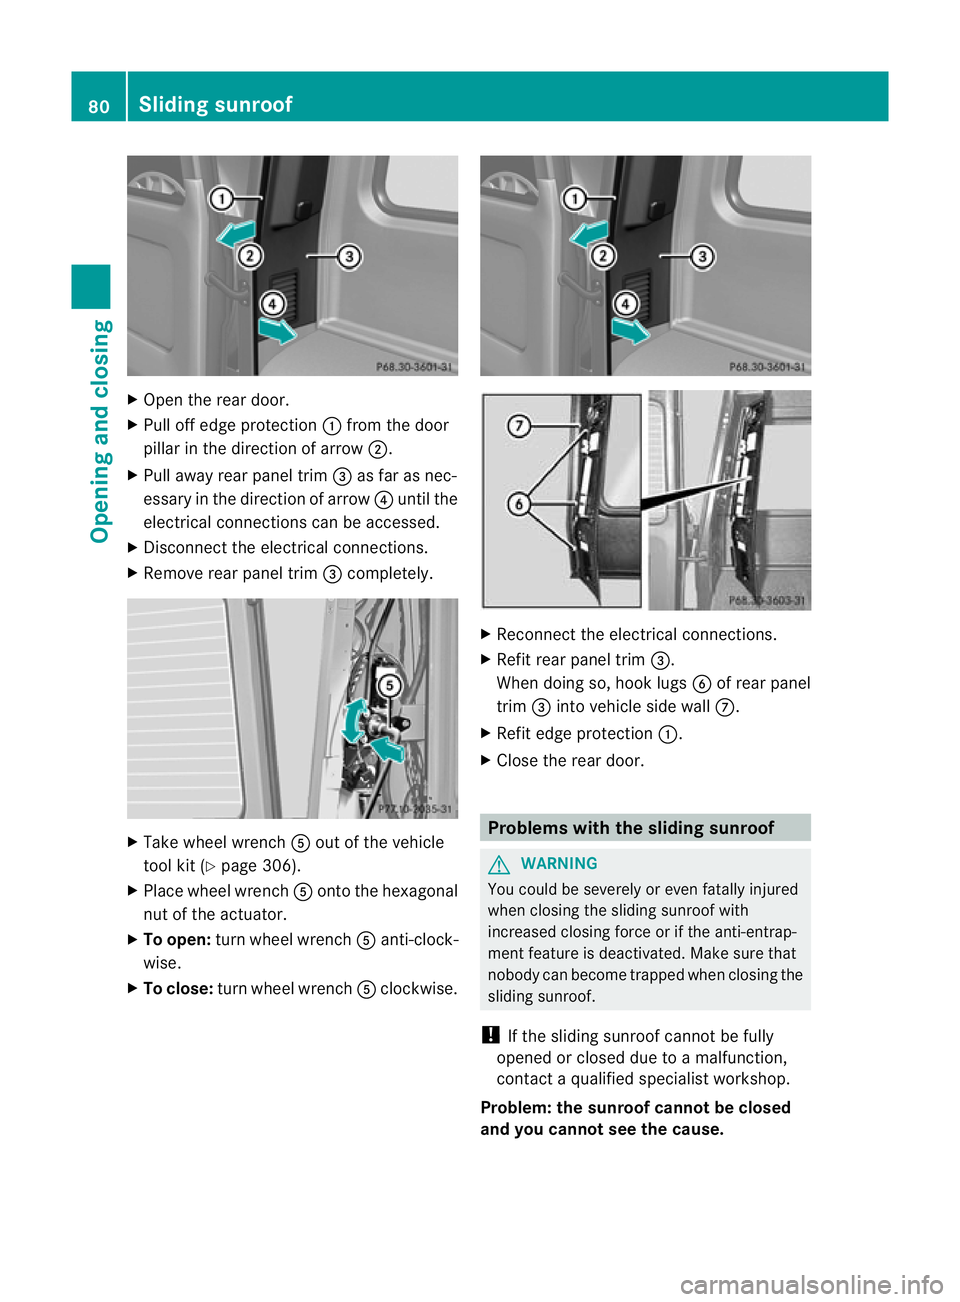
X
Open the rear door.
X Pull off edge protection :from the door
pillar in the direction of arrow ;.
X Pull away rear panel trim =as far as nec-
essary in the direction of arrow ?until the
electrical connections can be accessed.
X Disconnect the electrical connections.
X Remove rear panel trim =completely. X
Take wheel wrench Aout of the vehicle
tool kit (Y page 306).
X Place wheel wrench Aonto the hexagonal
nut of the actuator.
X To open: turn wheel wrench Aanti-clock-
wise.
X To close: turn wheel wrench Aclockwise. X
Reconnect the electrical connections.
X Refit rear panel trim =.
When doing so, hook lugs Bof rear panel
trim =into vehicle side wall C.
X Refit edge protection :.
X Close the rear door. Problems with the sliding sunroof
G
WARNING
You could be severely or even fatally injured
when closing the sliding sunroof with
increased closing force or if the anti-entrap-
ment feature is deactivated. Make sure that
nobody can become trapped when closing the
sliding sunroof.
! If the sliding sunroof cannot be fully
opened or closed due to a malfunction,
contact a qualified specialist workshop.
Problem: the sunroof cannot be closed
and you cannot see the cause. 80
Sliding sunroofOpening and closing
Page 86 of 357
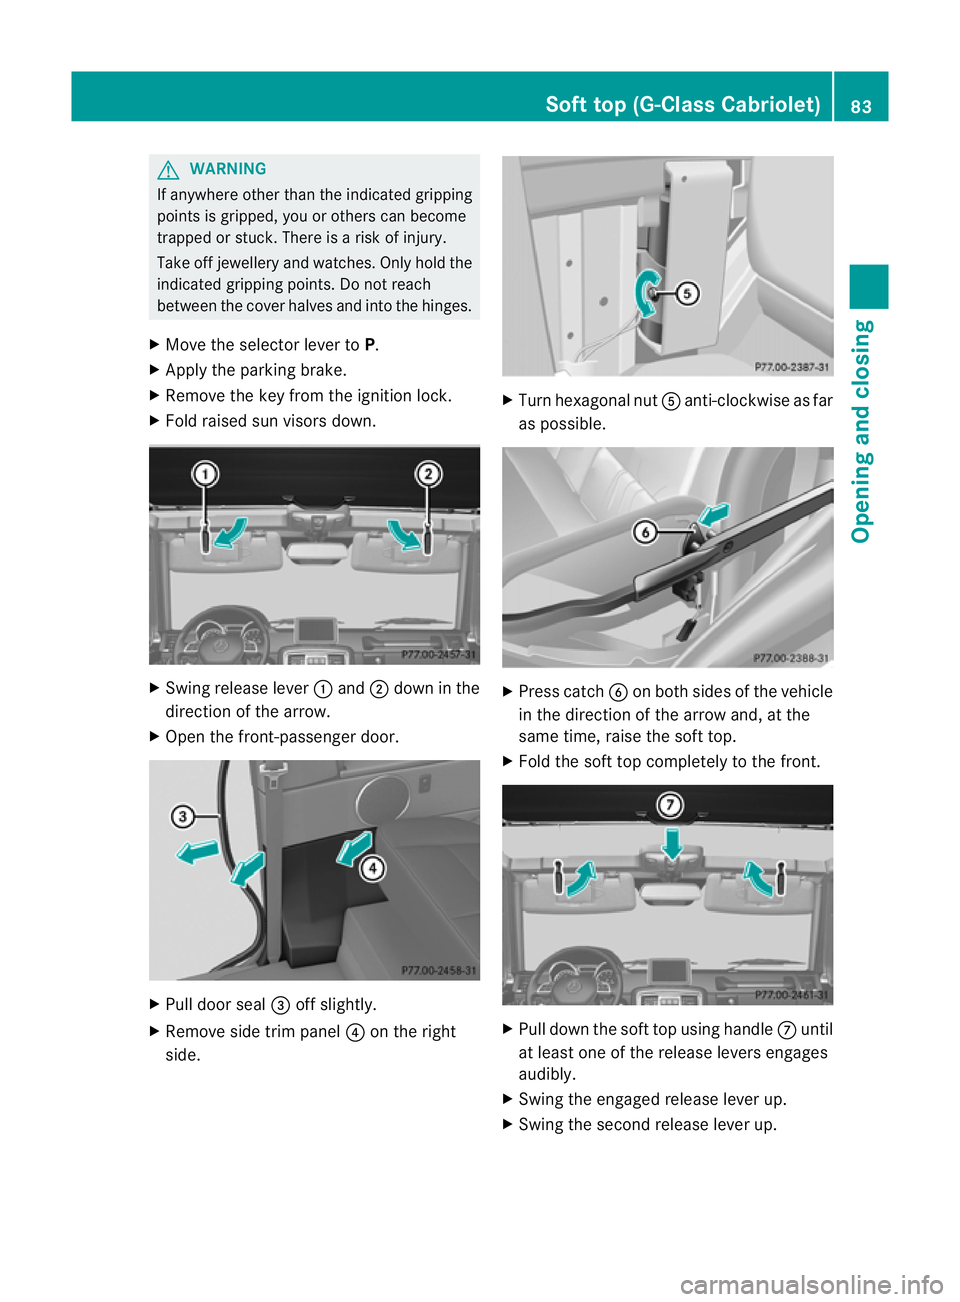
G
WARNING
If anywhere other than the indicated gripping
points is gripped, you or others can become
trapped or stuck. There is a risk of injury.
Take off jewellery and watches. Only hold the
indicated gripping points. Do not reach
between the cover halves and into the hinges.
X Move the selector leve rtoP.
X Apply the parking brake.
X Remove the key from the ignition lock.
X Fold raised su nvisors down. X
Swing release lever :and ;down in the
direction of the arrow.
X Open the front-passenger door. X
Pull door seal =off slightly.
X Remove side trim panel ?on the right
side. X
Turn hexagonal nut Aanti-clockwise as far
as possible. X
Press catch Bon both sides of the vehicle
in the direction of the arrow and, at the
same time, raise the soft top.
X Fold the soft top completely to the front. X
Pull down the soft top using handle Cuntil
at least one of the release levers engages
audibly.
X Swing the engaged release lever up.
X Swing the second release lever up. Soft top (G-Class Cabriolet)
83Opening and closing Z
Page 88 of 357
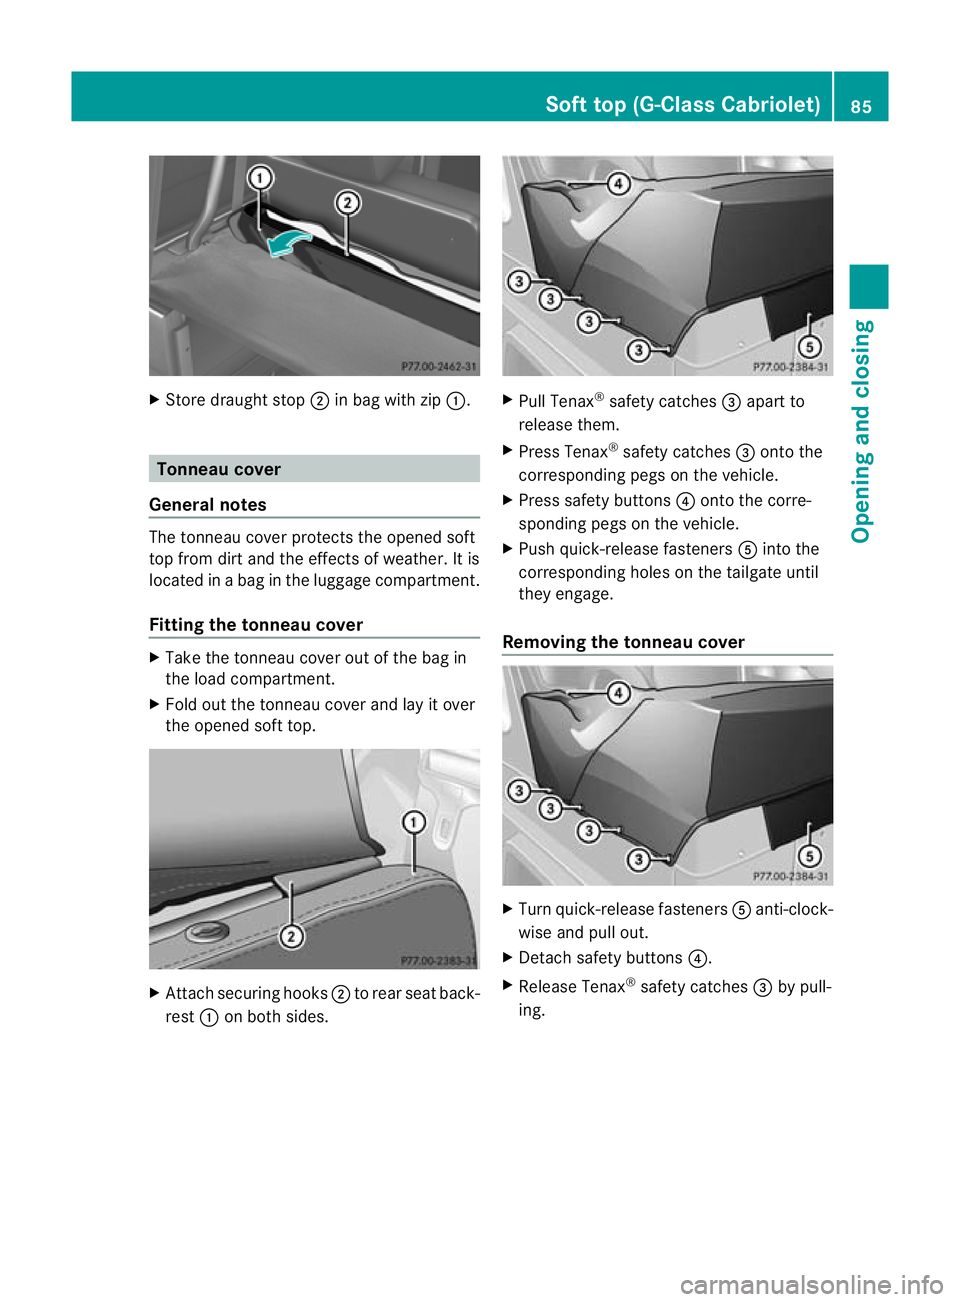
X
Store draught stop ;in bag with zip :. Tonneau cover
General notes The tonneau cove
rprotects the opened soft
top from dirt and the effects of weather. It is
located in a bag in the luggage compartment.
Fitting the tonneau cover X
Take the tonneau cover out of the bag in
the load compartment.
X Fold out the tonneau cover and lay it over
the opened soft top. X
Attach securing hooks ;to rear seat back-
rest :on both sides. X
Pull Tenax ®
safety catches =apart to
release them.
X Press Tenax ®
safety catches =onto the
corresponding pegs on the vehicle.
X Press safety buttons ?onto the corre-
sponding pegs on the vehicle.
X Push quick-release fasteners Ainto the
corresponding holes on the tailgate until
they engage.
Removing the tonneau cover X
Turn quick-release fasteners Aanti-clock-
wise and pull out.
X Detach safety buttons ?.
X Release Tenax ®
safety catches =by pull-
ing. Soft top (G-Class Cabriolet)
85Opening and closing Z
Page 119 of 357
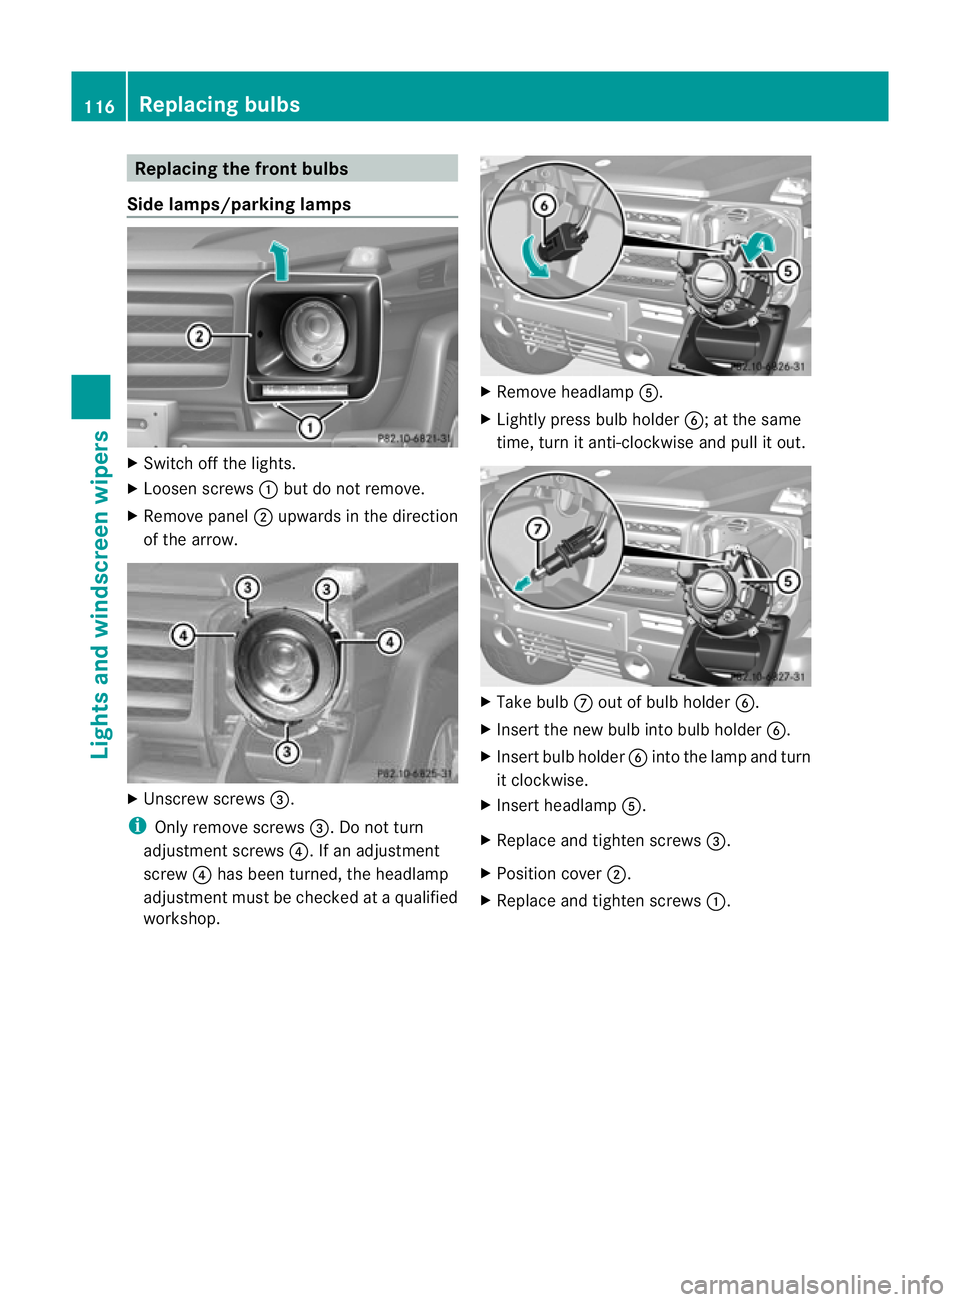
Replacing the fron
tbulbs
Side lamps/parking lamps X
Switch off the lights.
X Loose nscrews :but do not remove.
X Remove panel ;upwards in the direction
of the arrow. X
Unscrew screws =.
i Only remove screws =. Do not turn
adjustment screws ?. If an adjustment
screw ?has bee nturned, the headlamp
adjustmen tmust be checked at a qualified
workshop. X
Remove headlamp A.
X Lightly press bulb holder B; at the same
time, tur nitanti-clockwise and pull it out. X
Take bulb Coutofb ulb holder B.
X Inser tthe new bulb into bulb holder B.
X Insert bulb holder Binto the lamp and turn
it clockwise.
X Insert headlamp A.
X Replace and tighten screws =.
X Position cover ;.
X Replace and tighten screws :.116
Replacing bulbsLights and windscreen wipers