2012 MERCEDES-BENZ E-CLASS ESTATE clock
[x] Cancel search: clockPage 35 of 457
Instrumen
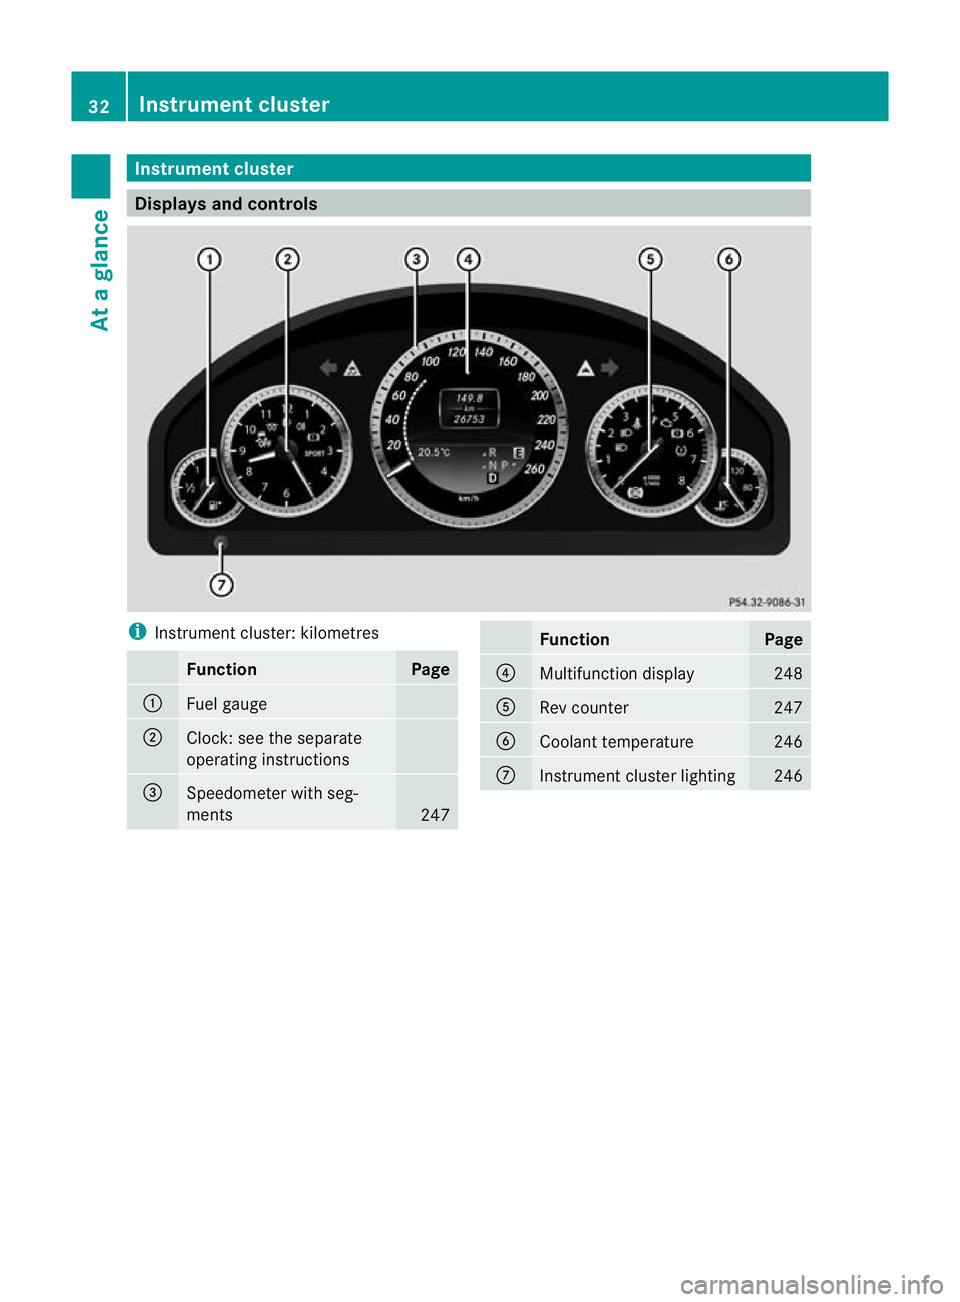
tcluster Displays and controls
i
Instrument cluster: kilometres Function Page
:
Fuel gauge
;
Clock
:see the separate
operating instructions =
Speedometer with seg-
ments
247 Function Page
?
Multifunction display 248
A
Rev counter 247
B
Coolant temperature 246
C
Instrument cluster lighting 24632
Instrument clusterAt a glance
Page 36 of 457
i
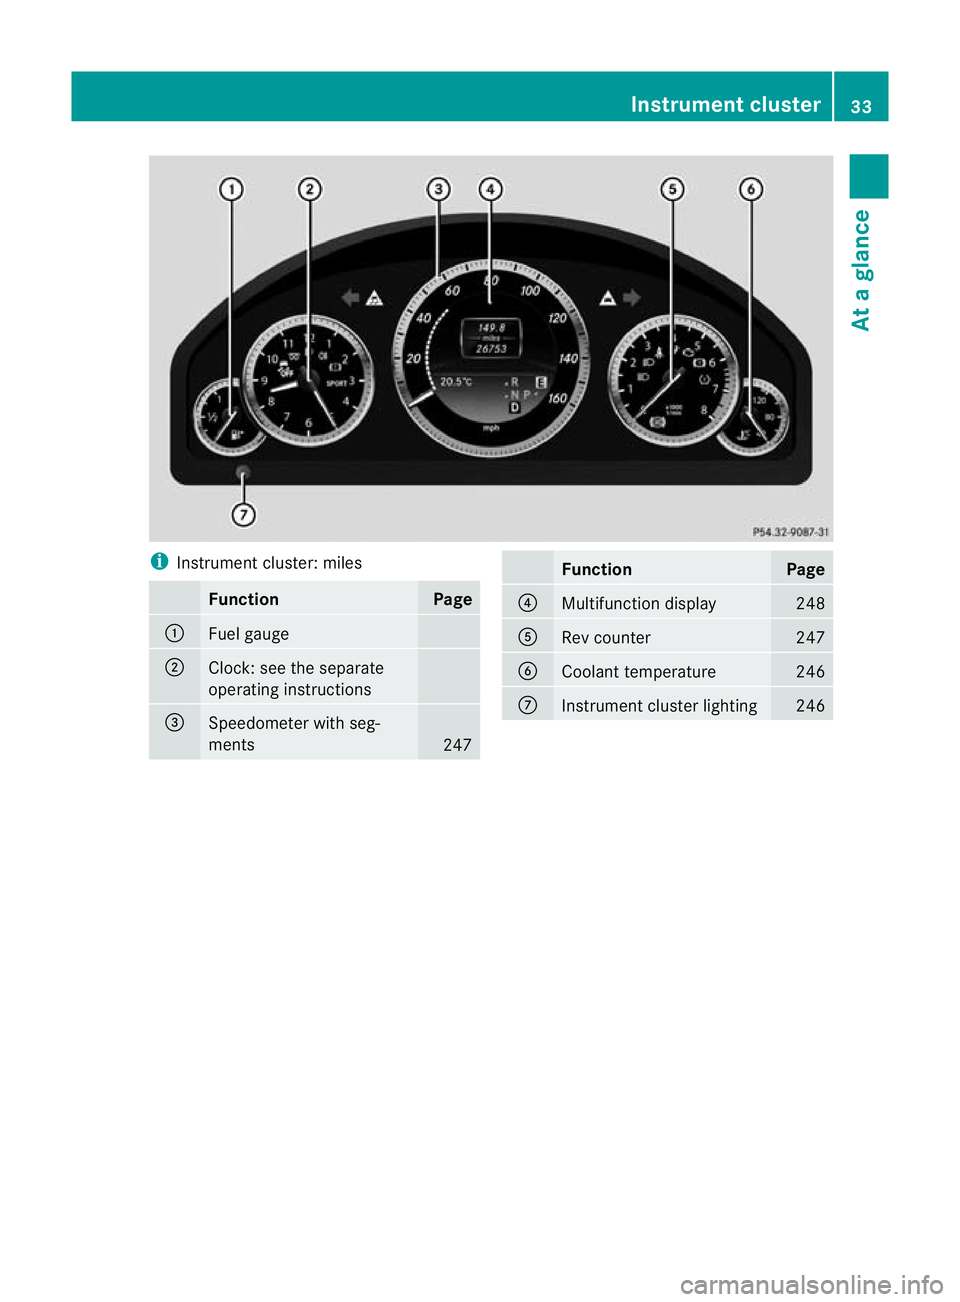
Instrument cluster: miles Function Page
:
Fuel gauge
;
Clock: see the separate
operating instructions
=
Speedometer with seg-
ments
247 Function Page
?
Multifunction display 248
A
Rev counter 247
B
Coolant temperature 246
C
Instrument cluster lighting 246Instrument cluster
33At a glance
Page 93 of 457
Automatic locking feature
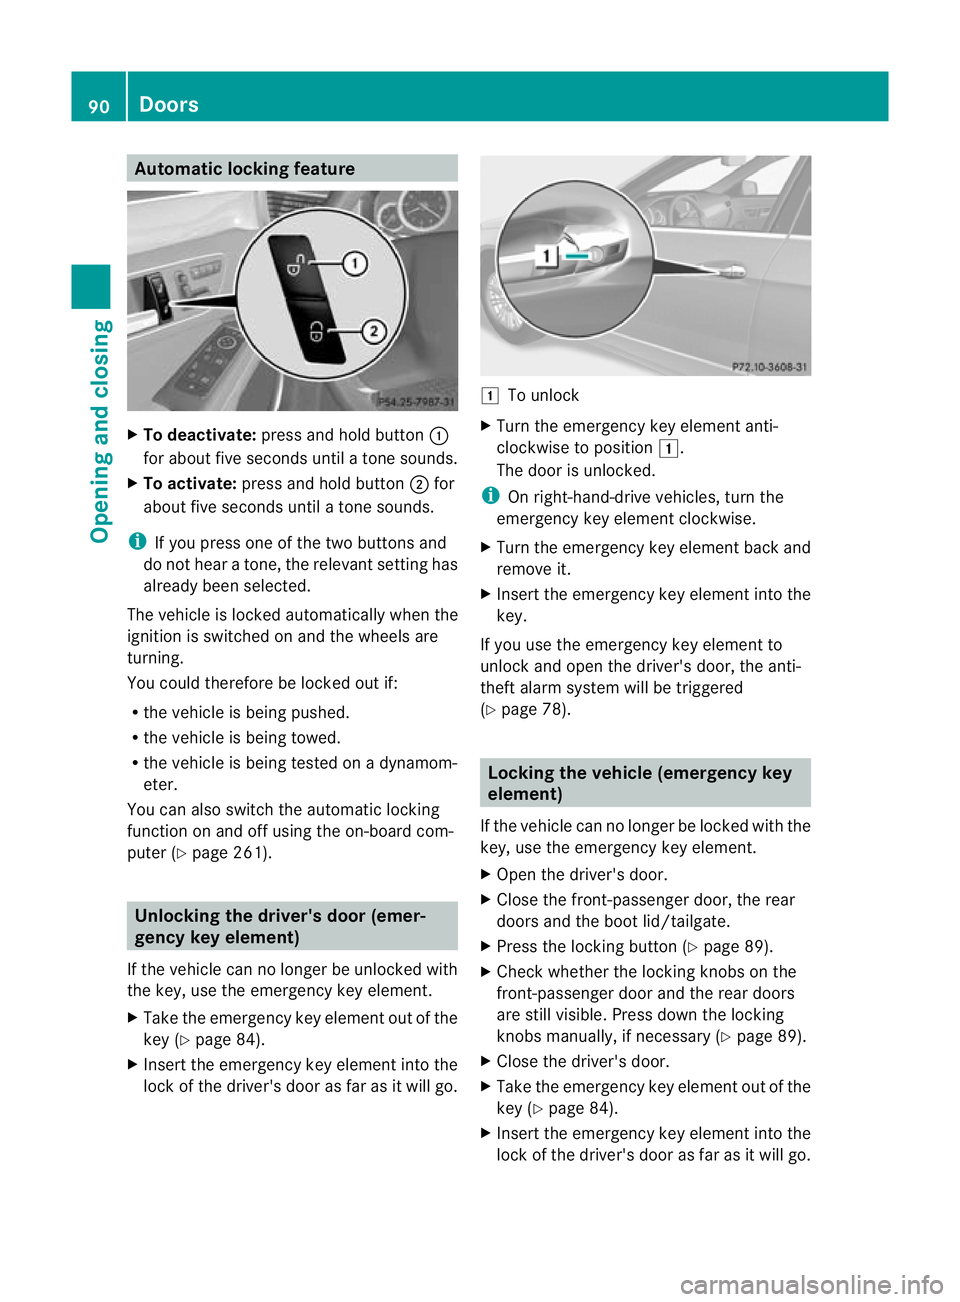
X
To deactivate: press and hold button :
for about five seconds until a tone sounds.
X To activate: press and hold button ;for
about five seconds until a tone sounds.
i If you press one of th etwo buttons and
do not hear a tone, the relevant setting has
already been selected.
The vehicle is locked automatically when the
ignitio nis switched on and the wheels are
turning.
You could therefore be locked out if:
R the vehicle is being pushed.
R the vehicle is being towed.
R the vehicle is being tested on a dynamom-
eter.
You can also switch the automatic locking
function on and off using the on-board com-
puter (Y page 261). Unlocking the driver's door (emer-
gencyk
ey element)
If the vehicle can no longer be unlocked with
the key, use the emergency key element.
X Take the emergency key element out of the
key (Y page 84).
X Inser tthe emergency key element into the
lock of the driver's door as far as it will go. 1
To unlock
X Turn the emergency key element anti-
clockwise to position 1.
The door is unlocked.
i On right-hand-drive vehicles, turn the
emergency key element clockwise.
X Turn the emergency key element back and
remove it.
X Insert the emergency key element into the
key.
If you use the emergency key element to
unlock and open the driver's door, the anti-
theft alarm system will be triggered
(Y page 78). Locking the vehicle (emergency key
element)
If the vehicle can no longer be locked with the
key, use the emergency key element.
X Open the driver's door.
X Close the front-passenger door, the rear
doors and the boot lid/tailgate.
X Press the locking button (Y page 89).
X Check whether the locking knobs on the
front-passenger door and the rear doors
are still visible. Press down the locking
knobs manually, if necessary (Y page 89).
X Close the driver's door.
X Take the emergency key element out of the
key (Y page 84).
X Insert the emergency key element into the
lock of the driver's door as far as it will go. 90
DoorsOpening and closing
Page 94 of 457
1
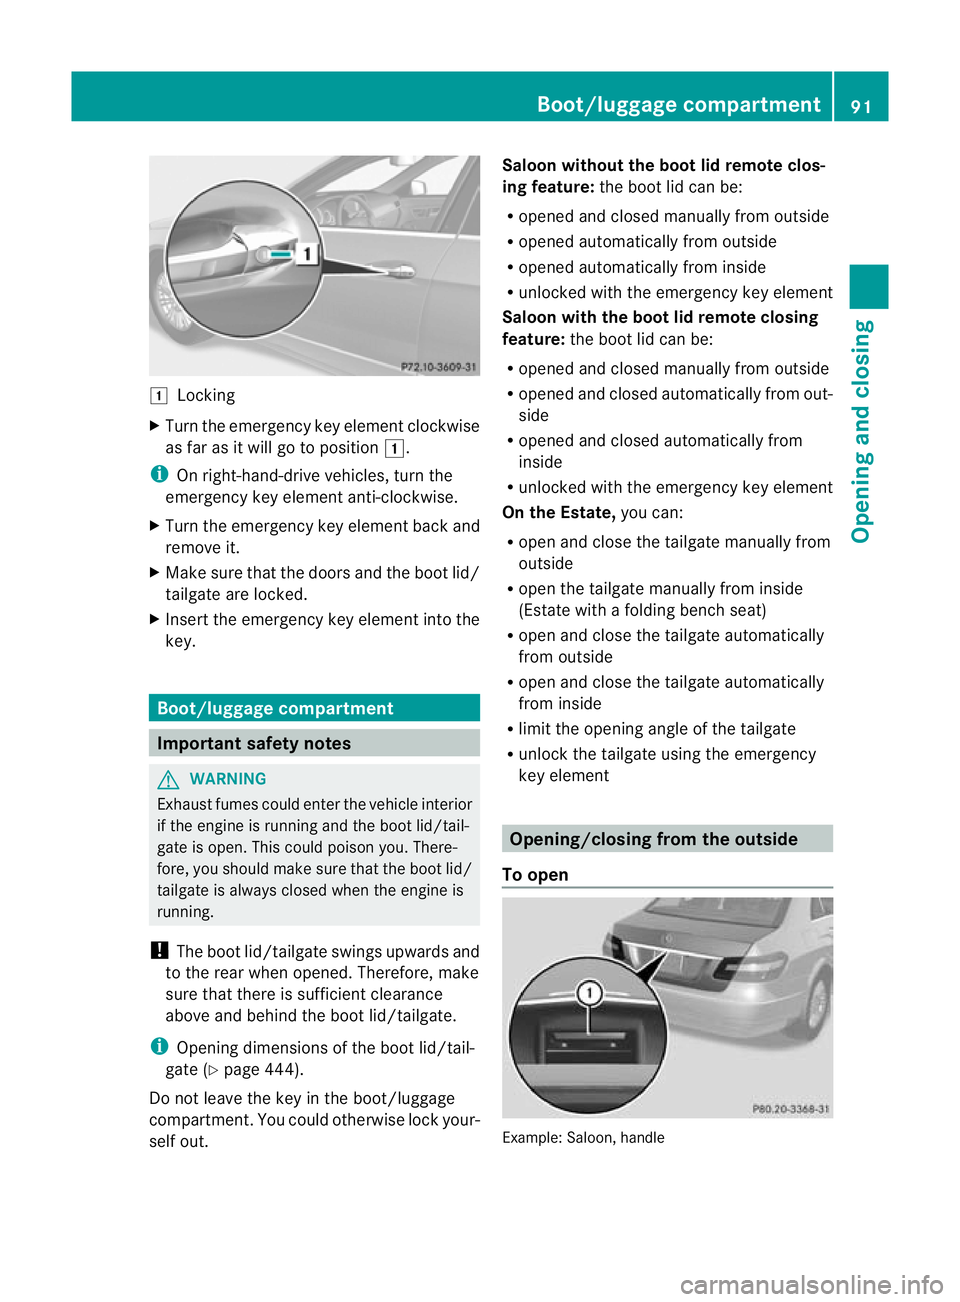
Locking
X Turn the emergency key element clockwise
as far as it will go to position 1.
i On right-hand-drive vehicles, turn the
emergency key element anti-clockwise.
X Turn the emergency key element back and
remove it.
X Make sure that the doors and the boot lid/
tailgate are locked.
X Insert the emergency key element into the
key. Boot/luggage compartment
Important safety notes
G
WARNING
Exhaust fumes could enter the vehicle interior
if the engine is running and the boot lid/tail-
gate is open. This could poiso nyou. There-
fore, you should make sure that the boot lid/
tailgate is always closed when the engine is
running.
! The boot lid/tailgate swings upwards and
to the rear when opened. Therefore, make
sure that there is sufficient clearance
above and behind the boot lid/tailgate.
i Opening dimensions of the boot lid/tail-
gate (Y page 444).
Do not leave the key in the boot/luggage
compartment. You could otherwise lock your-
self out. Saloon without the boot lid remote clos-
ing feature: the boot lid can be:
R opened and closed manually from outside
R opened automatically from outside
R opened automatically from inside
R unlocked with the emergenc ykey element
Saloon with the boot lid remote closing
feature: the boot lid can be:
R opened and closed manually from outside
R opened and closed automatically from out-
side
R opened and closed automatically from
inside
R unlocked with the emergency key element
On the Estate, you can:
R open and close the tailgate manually from
outside
R open the tailgate manually from inside
(Estate with a folding bench seat)
R open and close the tailgate automatically
from outside
R open and close the tailgate automatically
from inside
R limit the opening angle of the tailgate
R unlock the tailgate using the emergency
key element Opening/closing from the outside
To open Example: Saloon, handle Boot/luggage compartment
91Opening and closing Z
Page 98 of 457
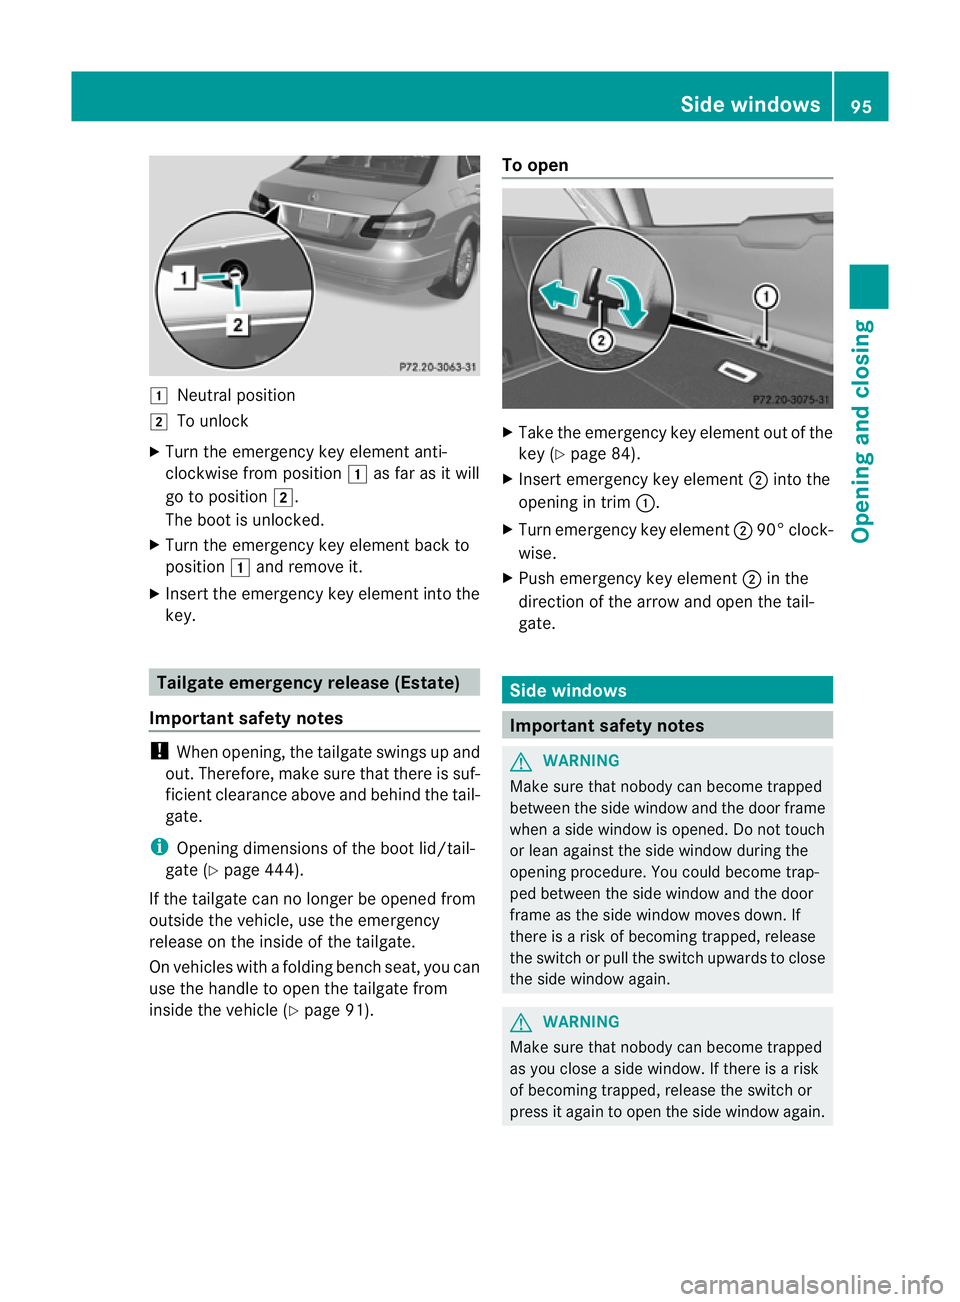
1
Neutral position
2 To unlock
X Turn the emergency key element anti-
clockwise from position 1as far as it will
go to position 2.
The boot is unlocked.
X Turn the emergency key element back to
position 1and remove it.
X Insert the emergency key element into the
key. Tailgate emergencyr
elease (Estate)
Important safety notes !
When opening, the tailgate swings up and
out .Therefore, make sure that there is suf-
ficient clearance above and behind the tail-
gate.
i Opening dimensions of the boot lid/tail-
gate (Y page 444).
If the tailgate can no longer be opened from
outside the vehicle, use the emergency
release on the inside of the tailgate.
On vehicles with a folding bench seat, you can
use the handle to open the tailgate from
inside the vehicle (Y page 91). To open X
Take the emergency key element out of the
key (Y page 84).
X Insert emergency key element ;into the
opening in trim :.
X Turn emergency key element ;90° clock-
wise.
X Push emergency key element ;in the
direction of the arrow and open the tail-
gate. Side windows
Important safety notes
G
WARNING
Make sure that nobody can become trapped
between the side window and the door frame
when a side window is opened. Do not touch
or lean against the side window during the
opening procedure. You could become trap-
ped between the side window and the door
frame as the side window moves down. If
there is a risk of becoming trapped, release
the switch or pull the switch upwards to close
the side window again. G
WARNING
Make sure that nobody can become trapped
as you close a side window. If there is a risk
of becoming trapped, release the switch or
press it again to open the side window again. Side windows
95Opening and closing Z
Page 127 of 457
Useful information
i This Owner's Manual describes all mod-
els, series and optional equipment for your
vehicle that were available at the time of
going to press. National variations are pos-
sible. Note that your vehicle may not be
equipped with all of the functions descri-
bed. This is also the case for systems and
functions relevant to safety.
i Read the information on qualified special-
ist workshops: (Y page 25). Exterior lighting
Important safety notes
For reasons of safety, Mercedes-Benz recom-
mends that you drive with the lights switched
on even during the daytime. In some coun-
tries, operation of the headlamps varies due
to legal requirements and self-imposed obli-
gations. Driving abroad
General notes If your journey takes you to countries where
vehicles are driven on the opposite side of the
road to the country in which the vehicle is
registered, your headlamps must be switched
to symmetrical dipped beam as soon as pos-
sible after crossing the border. This prevents
oncoming traffic from being dazzled. Sym-
metrical lights do not illuminate as large an
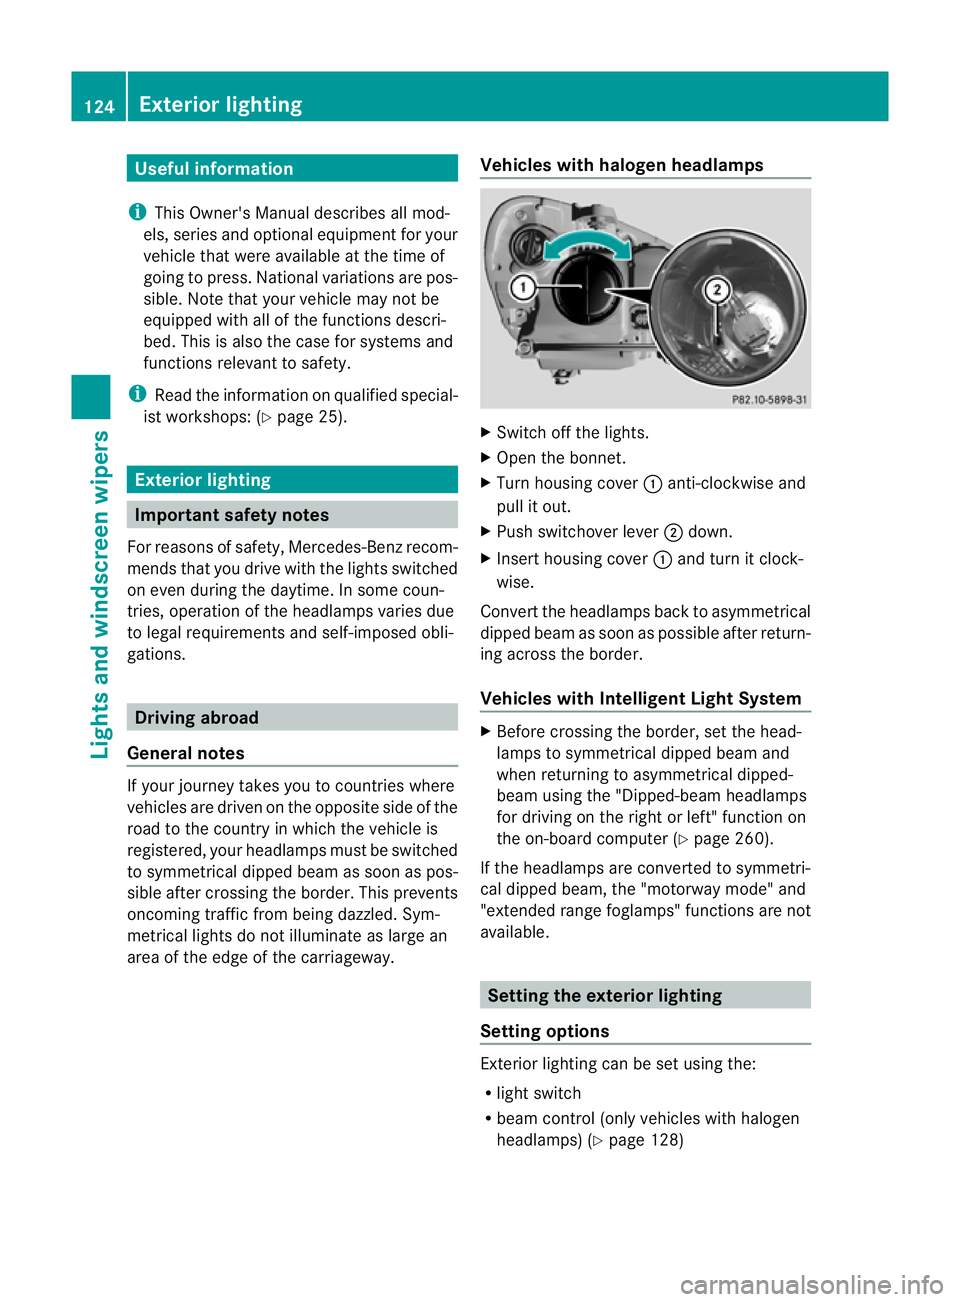
area of the edge of the carriageway. Vehicles with halogen headlamps X
Switch off the lights.
X Open the bonnet.
X Turn housing cover :anti-clockwise and
pull it out.
X Push switchover lever ;down.
X Insert housing cover :and turn it clock-
wise.
Conver tthe headlamps back to asymmetrical
dipped beam as soon as possible after return-
ing across the border.
Vehicles with Intelligent Light System X
Before crossing the border, set the head-
lamps to symmetrical dipped beam and
when returning to asymmetrical dipped-
beam using the "Dipped-beam headlamps
for driving on the right or left" function on
the on-board computer (Y page 260).
If the headlamps are converted to symmetri-
cal dipped beam, the "motorway mode" and
"extended range foglamps" functions are not
available. Setting the exterior lighting
Setting options Exterior lighting can be set using the:
R
light switch
R beam control (only vehicles with halogen
headlamps) (Y page 128)124
Exterior lightingLights and windscreen wipers
Page 139 of 457
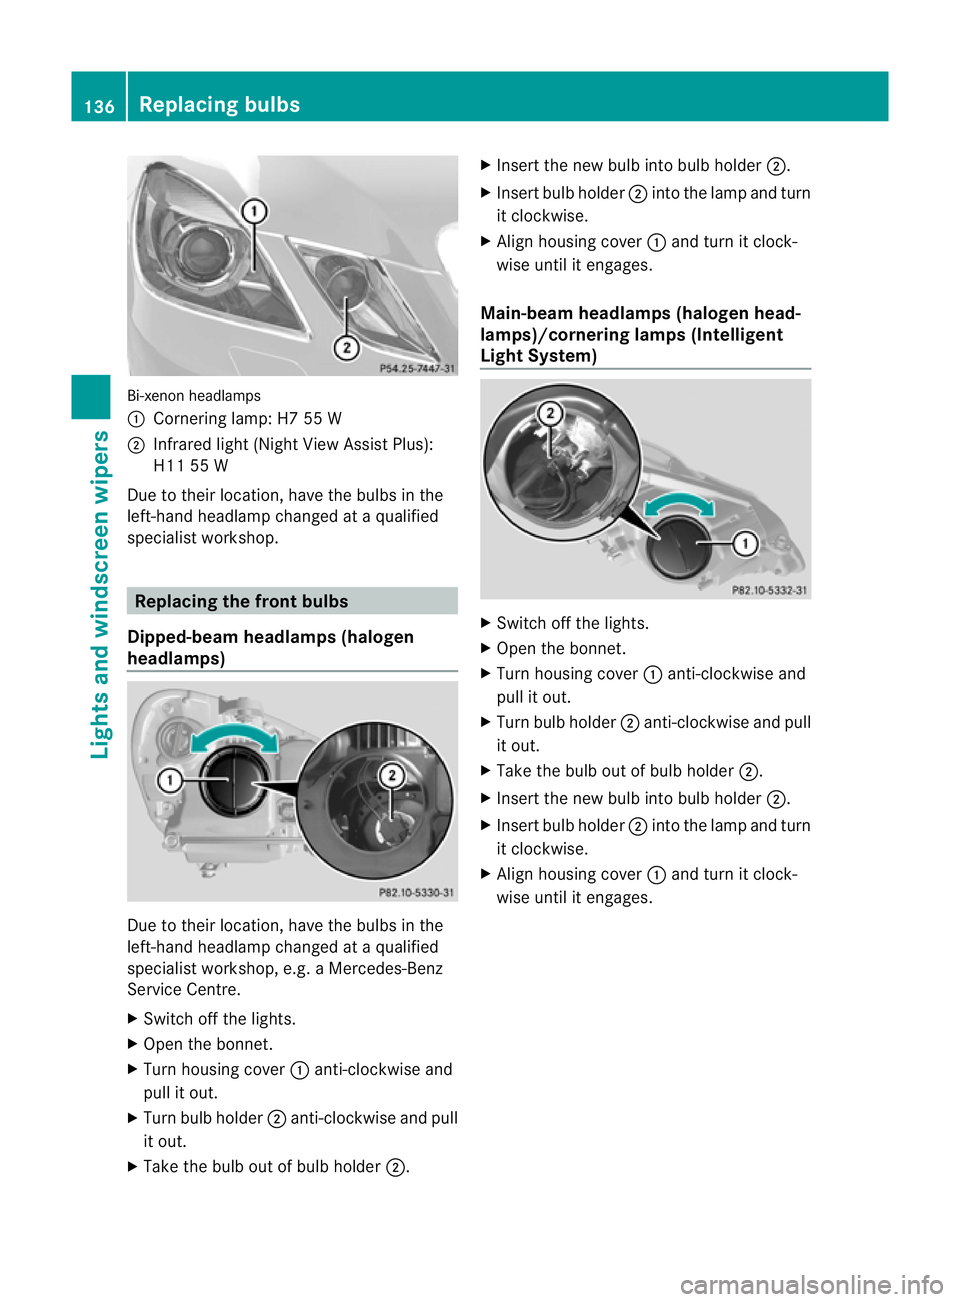
Bi-xeno
nheadlamps
: Cornering lamp: H7 55 W
; Infrared light (Night View Assist Plus):
H11 55 W
Due to their location, have the bulbs in the
left-hand headlamp changed at a qualified
specialist workshop. Replacing the front bulbs
Dipped-beam headlamps (halogen
headlamps) Due to their location, have the bulbs in the
left-hand headlamp changed at a qualified
specialist workshop, e.g. aMercedes-Benz
Service Centre.
X Switch off the lights.
X Open the bonnet.
X Turn housing cover :anti-clockwise and
pull it out.
X Turn bulb holder ;anti-clockwise and pull
it out.
X Take the bulb out of bulb holder ;.X
Inser tthe new bulb into bulb holder ;.
X Insert bulb holder ;into the lamp and turn
it clockwise.
X Align housing cover :and turn it clock-
wise until it engages.
Main-beam headlamps (halogen head-
lamps)/cornering lamps (Intelligent
Light System) X
Switch off the lights.
X Open the bonnet.
X Turn housing cover :anti-clockwise and
pull it out.
X Turn bulb holder ;anti-clockwise and pull
it out.
X Take the bulb out of bulb holder ;.
X Insert the new bulb into bulb holder ;.
X Insert bulb holder ;into the lamp and turn
it clockwise.
X Align housing cover :and turn it clock-
wise until it engages. 136
Replacing bulbsLights and windscreen wipers
Page 140 of 457
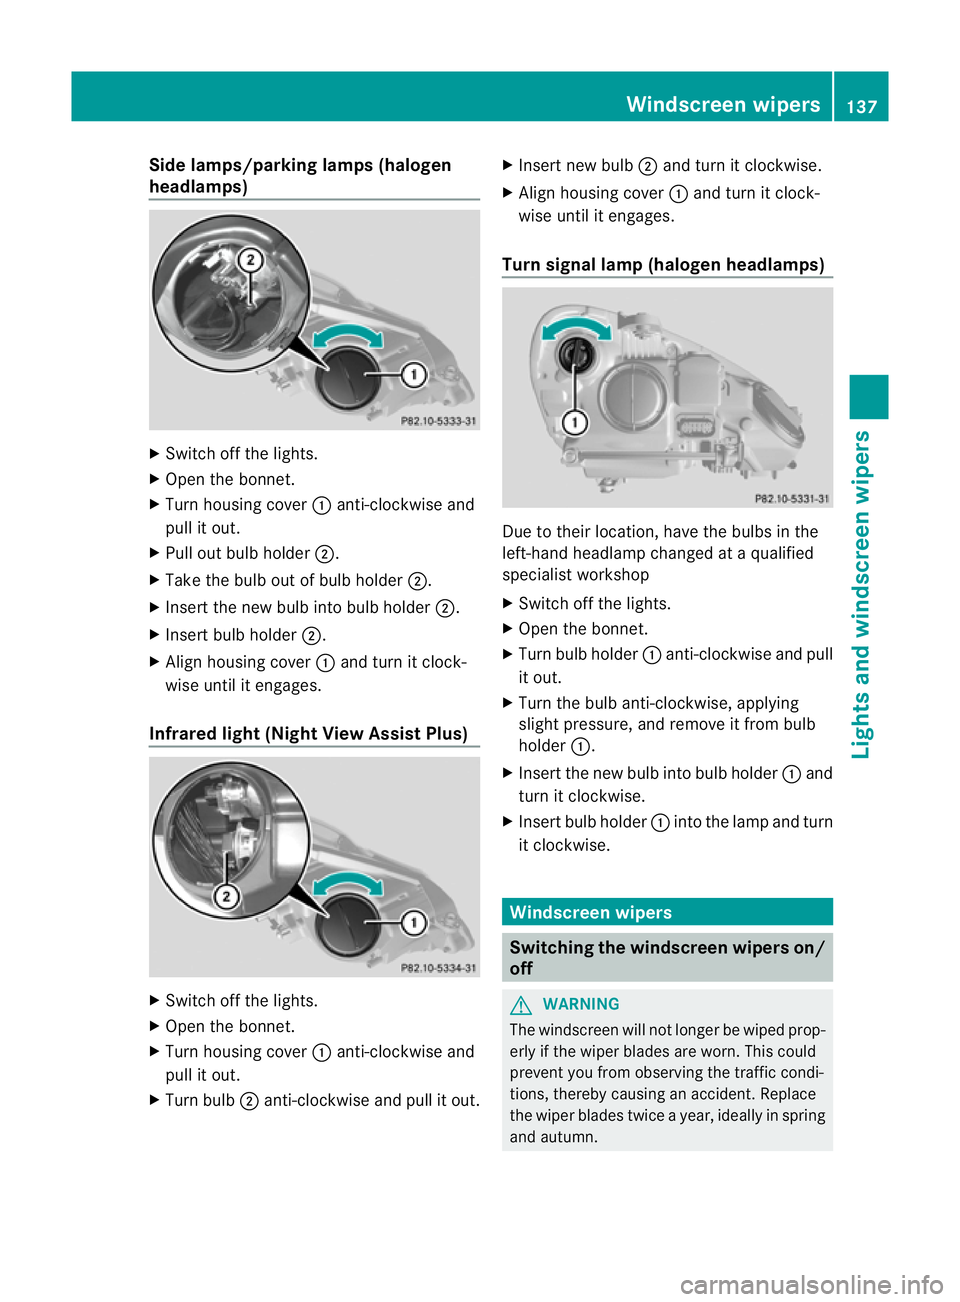
Side lamps/parking lamps(
halogen
headlamps) X
Switch off the lights.
X Open the bonnet.
X Turn housing cover :anti-clockwise and
pull it out.
X Pull out bulb holder ;.
X Take the bulb out of bulb holder ;.
X Insert the new bulb into bulb holder ;.
X Insert bulb holder ;.
X Align housing cover :and turn it clock-
wise until it engages.
Infrared light (Night View Assist Plus) X
Switch off the lights.
X Open the bonnet.
X Turn housing cover :anti-clockwise and
pull it out.
X Turn bulb ;anti-clockwise and pull it out. X
Insert new bulb ;and turn it clockwise.
X Align housing cover :and turn it clock-
wise until it engages.
Turn signal lamp (halogen headlamps) Due to their location, have the bulbs in the
left-hand headlamp changed at a qualified
specialist workshop
X
Switch off the lights.
X Open the bonnet.
X Turn bulb holder :anti-clockwise and pull
it out.
X Turn the bulb anti-clockwise, applying
slight pressure, and remove it from bulb
holder :.
X Insert the new bulb into bulb holder :and
turn it clockwise.
X Insert bulb holder :into the lamp and turn
it clockwise. Windscreen wipers
Switching the windscreen wipers on/
off
G
WARNING
The windscreen will not longe rbe wiped prop-
erly if the wiper blades are worn. This could
prevent you from observing the traffic condi-
tions, thereby causing an accident. Replace
the wiper blades twice a year, ideally in spring
and autumn. Windscreen wipers
137Lights and windscreen wipers Z