2012 MERCEDES-BENZ E-CLASS ESTATE stop start
[x] Cancel search: stop startPage 351 of 457
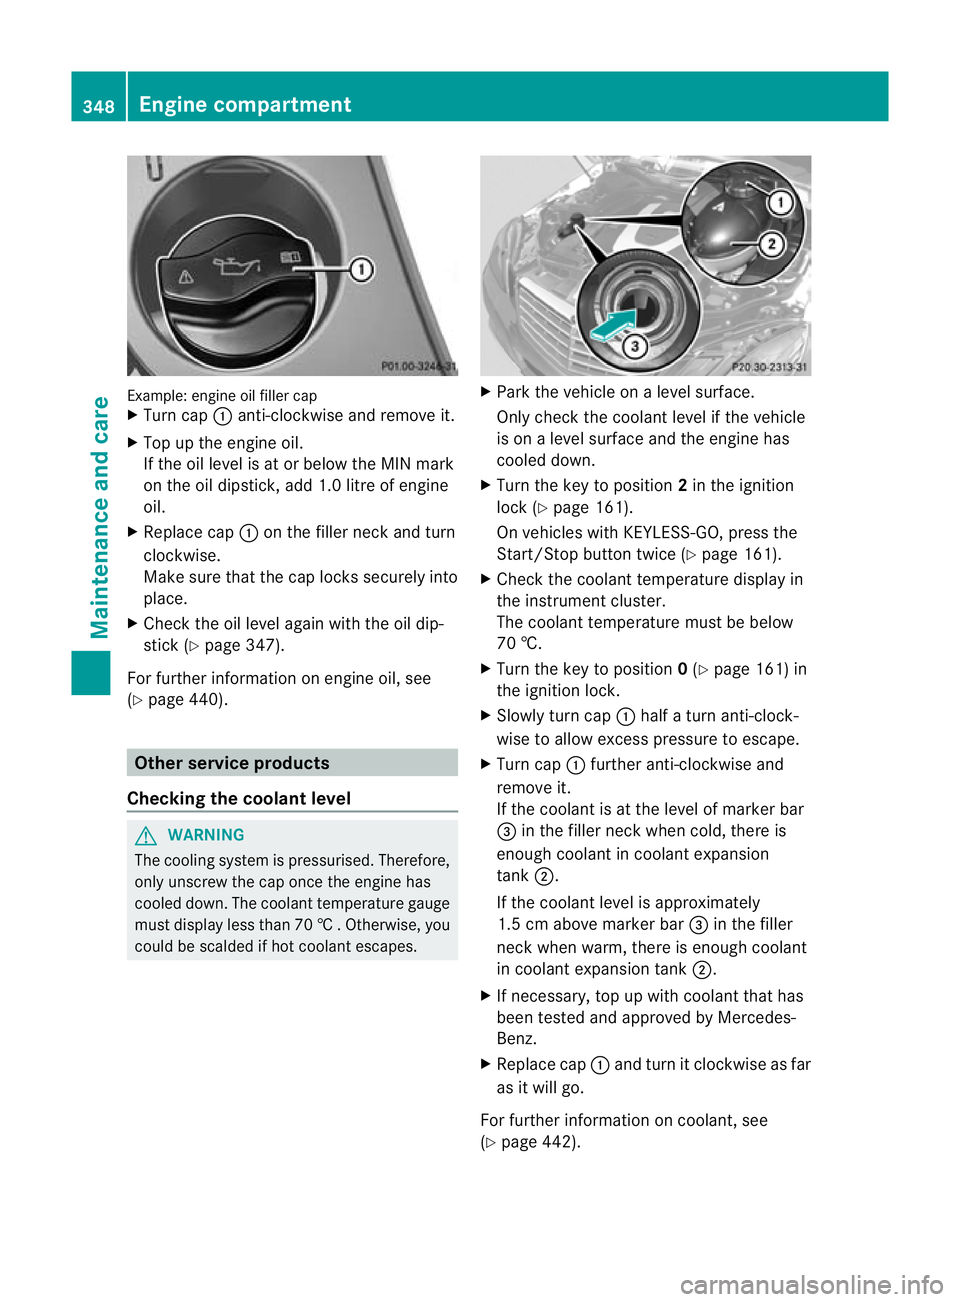
Example: engine oil fille
rcap
X Turn cap :anti-clockwise and remove it.
X Top up the engine oil.
If the oil level is at or below the MIN mark
on the oil dipstick, add 1. 0litre of engine
oil.
X Replace cap :on the filler neck and turn
clockwise.
Make sure that the cap locks securely into
place.
X Check the oil level again with the oil dip-
stick (Y page 347).
For further information on engine oil, see
(Y page 440). Other service products
Checking the coolant level G
WARNING
The cooling system is pressurised. Therefore,
only unscrew the cap once the engine has
cooled down. The coolan ttemperature gauge
must display less than 70 †.Otherwise, you
could be scalded if hot coolant escapes. X
Park the vehicle on a level surface.
Only check the coolant level if the vehicle
is on a level surface and the engine has
cooled down.
X Turn the key to position 2in the ignition
lock (Y page 161).
On vehicles with KEYLESS-GO, press the
Start/Stop button twice (Y page 161).
X Check the coolant temperature display in
the instrument cluster.
The coolant temperature must be below
70 †.
X Turn the key to position 0(Y page 161) in
the ignition lock.
X Slowly tur ncap : half a turn anti-clock-
wise to allow excess pressure to escape.
X Turn cap :further anti-clockwise and
remove it.
If the coolant is at the level of marker bar
= in the fille rneck when cold, there is
enough coolant in coolant expansion
tank ;.
If the coolant level is approximately
1.5 cm above marker bar =in the filler
neckw hen warm, there is enough coolant
in coolant expansion tank ;.
X If necessary, top up with coolant that has
been tested and approved by Mercedes-
Benz.
X Replace cap :and turn it clockwise as far
as it will go.
For further information on coolant, see
(Y page 442). 348
Engine compartmentMaintenance and care
Page 353 of 457
Information abou
tService Resetting the ASSYST PLUS service inter-
val display
!
If the ASSYST PLUS service interval dis-
play has been inadvertently reset, this set-
ting can be corrected at a qualified special-
ist workshop.
Have service work carried out as described
in the Service Booklet. This may otherwise
lead to increased wear and damage to the
major assemblies or the vehicle.
Aq ualified specialist workshop, e.g. a
Mercedes-Ben zService Centre, will reset the
ASSYST PLUS service interval display after
the service work has been carried out. You
can also obtain further information on main-
tenance work, for example.
Special service requirements
Arduous operating conditions or increased
loads on the vehicle will require some service
work to be performed more often than for a
vehicle in normal use. Such arduous condi-
tions include regular city driving with frequent
intermediate stops and use in mountainous
terrain or on poor road surfaces.
For example, if the vehicle is used under ardu-
ous operating conditions, have air filters,
engine oil and oil filters changed frequently
and chec kthe wheels often.F urther informa-
tion can be obtained at a qualified specialist
workshop, e.g. a Mercedes-Ben zService
Centre.
Driving abroad
An extensive Mercedes-Benz Service network
is also available in other countries. The
Service Hotline's curren ttelephone numbers
for use when you are abroad are to be found
in the "Mercedes-Benz Service24h" section
of the Service Booklet. AdBlue
®
service indicator
i For BlueTEC vehicles only. To function properly, BlueTEC exhaust gas
aftertreatment must be operated with the
reducing agent AdBlue
®
. AdBlue ®
is topped
up as part of the service. Under normal oper-
ating conditions, a full tank of AdBlue ®
should
last until the nexts ervice due date.
Depending on how and where the vehicle is
used, there may be an increase in the
AdBlue ®
consumption, resulting in the next
service due date being brought forward.
Certain display messages show that
AdBlue ®
must be topped up, e.g.
Refill AdBlue at workshop See Own‐ er's Manual
Refill AdBlue at workshop No start
in .. km
Aw
arning tone also sounds.
You can no longer start the engine when the
AdBlue ®
supply has been used up
(Y page 281).
! Have the AdBlue ®
tank topped up at a
qualified specialist workshop only. The
vehicle may otherwise be damaged or
soiled.
Before taking a trip with your vehicle outside
Europe, have the AdBlue ®
supply checked at
a qualified specialist workshop. If necessary,
have AdBlue ®
topped up. Before a longer stay
outside of Europe, consult a qualified special-
ist workshop.
Observe the notes on AdBlue ®
(Y page 440).
You can obtain further informatio nabout
BlueTEC exhaust gas aftertreatment and
AdBlue ®
from any Mercedes-Benz Service
Centre. Care
General notes
H
Environmental note
Dispose of empty packaging and cleaning
cloths in an environmentally responsible man-
ner. 350
CareMaintenance and care
Page 354 of 457
!
For cleaning your vehicle, do not use any
of the following:
R dry, rough or hard cloths
R abrasive cleaning agents
R solvents
R cleaning agents containing solvents
Do not scrub.
Do not touch the surfaces or protective
films with hard objects, e.g. a ring or ice
scraper. You could otherwise scratch or
damage the surfaces and protective film.
! Do not park up the vehicle for an extended
period straight after cleaning it, particularly
after having cleaned the wheels with wheel
cleaner. Wheel cleaners could cause
increased corrosion of the brake discs and
brake pads/linings. For this reason, you
should drive for a few minutes after clean-
ing. Braking heats the brake discs and the
brake pads/linings, thus drying them. The
vehicle can then be parked up.
Regular care of your vehicle is a condition for
retaining the quality in the long term.
Use care products and cleaning agents rec-
ommended and approved by Mercedes-Benz. Washing the vehicle and cleaning the
paintwork
Automatic car wash G
WARNING
Braking efficiency is reduced after washing
the vehicle. This could cause an accident. For
this reason, following a car wash, drive with
particular care until the brakes are dry. G
WARNING
The vehicle is braked when the HOLD function
or DISTRONIC PLUS is activated. Therefore,
deactivate the HOLD function and DISTRONIC
PLUS before the vehicle is washed in an auto-
matic car wash.
! Make sure that: R
the side windows and sliding sunroof are
closed completely.
R the blowerf or the ventilation/heating is
switched off (OFF button is depressed).
R the windscreen wiper switch is at posi-
tion 0.
The vehicle could otherwise be damaged.
! In car washes with a towing mechanism,
make sure that the automatic transmission
is in transmission position N; otherwise,
the vehicle could be damaged.
R Vehicles with DIRECT SELECT lever and
key:
do not remove the key from the ignition
lock. Do not open the driver's door or
front-passenger door when the engine is
switched off. Otherwise, the automatic
transmission selects park position P
automatically and locks the wheels. You
can prevent this by shifting the auto-
matic transmission to Nbeforehand.
R Vehicles with DIRECT SELECT lever and
KEYLESS-GO:
do not open the driver's door or front-
passenger door when the engine is
switched off. Otherwise, the automatic
transmission selects park position P
automatically and locks the wheels.
Observe the following to make sure that the
automatic transmission on vehicles with
DIRECT SELECT stays in position N:
X Make sure the vehicle is stationary and the
ignition is switched off.
X Turn the key to position 2(Ypage 161) in
the ignition lock.
Use the key instead of the Start/Stop but-
ton on vehicles with KEYLESS-GO.
X Depress and hold the brake pedal.
X Shift the automatic transmission to posi-
tion N.
X Release the brake pedal.
X Release the parking brake.
X Switch off the ignition and leave the key in
the ignition lock. Care
351Maintenance and care Z
Page 356 of 457
Care and treatment of matt paintwork
!
Never polish the vehicle or the light alloy
wheels .Polishing makes the paintwork
shiny.
! The following may cause the paint to
become shiny and thus reduce the matt
effect:
R Vigorous rubbing with unsuitable mate-
rials.
R Frequent use of car washes.
R Washing the vehicle in direct sunlight.
! Never use paint cleaner, buffing or pol-
ishing products, or gloss preserver, e.g.
wax. These products are only suitable for
high-gloss surfaces. Their use on vehicles
with matt finish leads to considerable sur-
face damage (shiny, spotted areas).
Always have paintwork repairs performed
at a qualified specialist workshop, e.g. a
Mercedes-Benz Service Centre.
! Do not use wash programs with a hot wax
treatment under any circumstances.
Observe these notes if your vehicle has a
clear matt finish. This will help you to avoid
damage to the paintwork due to incorrect
treatment.
These notes also apply to light-alloy wheels
with a clear matt finish.
i The vehicle should preferably be washed
by hand using a soft sponge, car shampoo
and plenty of water.
i Use only insect remover and car shampoo
from the range of recommended and
approved Mercedes-Benz care products. Cleaning vehicle parts
Cleaning the wheels !
Do not use acidic wheel cleaning products
to remove brake dust. This could damage
wheel bolts and brake components. !
Do not park up the vehicle for an extended
period straight after cleaning it, particularly
after having cleaned the wheels with wheel
cleaner. Wheel cleaners could cause
increased corrosion of the brake discs and
brake pads/linings. For this reason, you
should drive for a few minutes after clean-
ing. Braking heats the brake discs and the
brake pads/linings, thus drying them. The
vehicle can then be parked up.
Cleaning the windows G
WARNING
Switch off the windscreen wipers and remove
the key from the ignition lock before cleaning
the windscreen or the wiper blades. On vehi-
cles with KEYLESS-GO, press the Start/Stop
button repeatedly until all indicator lamps in
the instrument cluster have gone off. The
windscreen wipers could otherwise move and
injure you.
! Do not use dry cloths, abrasive products,
solvents or cleaning agents containing sol-
vents to clean the inside of the windows.
Do not touch the insides of the windows
with hard objects, e.g. an ice scraper or
ring. There is otherwise a risk of damaging
the windows.
! Clean the water drainage channels of the
windscreen and the rear window at regular
intervals. Deposits such as leaves, petals
and pollen may under certain circumstan-
ces prevent water from draining away.T his
can lead to corrosion damage and damage
to electronic components.
X Cleant he inside and outside of the win-
dows with a damp cloth and a cleaning
agent that is recommended and approved
by Mercedes-Benz.
Cleaning the wiper blades G
WARNING
Switch off the windscreen wipers and remove
the key from the ignition lock before cleaning Care
353Maintenance and care
Z
Page 357 of 457
the windscree
northe wiper blades. On vehi-
cles with KEYLESS-GO, press the Start/Stop
button repeatedly until all indicator lamps in
the instrument cluster have gone off. The
windscreen wipers could otherwise move and
injure you.
! Do not pull on the wiper blade. Otherwise,
the wiper blade could be damaged.
! Do not clean wiper blades too often and
do not rub them too hard. Otherwise, the
graphite coating could be damaged. This
could cause wiper noise.
! Hold the wiper arm securely when folding
back. The windscreen could be damaged if
the wiper arm hits against it suddenly.
X Fold the wiper arms away from the wind-
screen.
X Carefully clean the wiper blades with a
damp cloth.
X Fold the windscreen wipers back again
before switching on the ignition.
Cleaning the exterior lighting !
Only use cleaning agents or cleaning
cloths that are suitable for plastic lenses.
Unsuitable cleaning agents or cleaning
cloths could scratch or damage the plastic
lenses of the exterior lighting.
X Cleant he plastic lenses of the exterior
lighting using a wet sponge and a mild
cleaning agent, e.g. Mercedes-Ben zcar
shampoo or cleaning cloths.
Mirror turn signal !
Only use cleaning agents or cleaning
cloths that are suitable for plastic lenses.
Unsuitable cleaning agents or cleaning
cloths could scratch or damage the plastic
lenses of the mirror tur nsignals.
X Clean the plastic lenses of the mirror turn
signals in the exterior mirror housing using
a wet sponge and mild cleaning agent, e.g. Mercedes-Ben
zcar shampoo or cleaning
cloths.
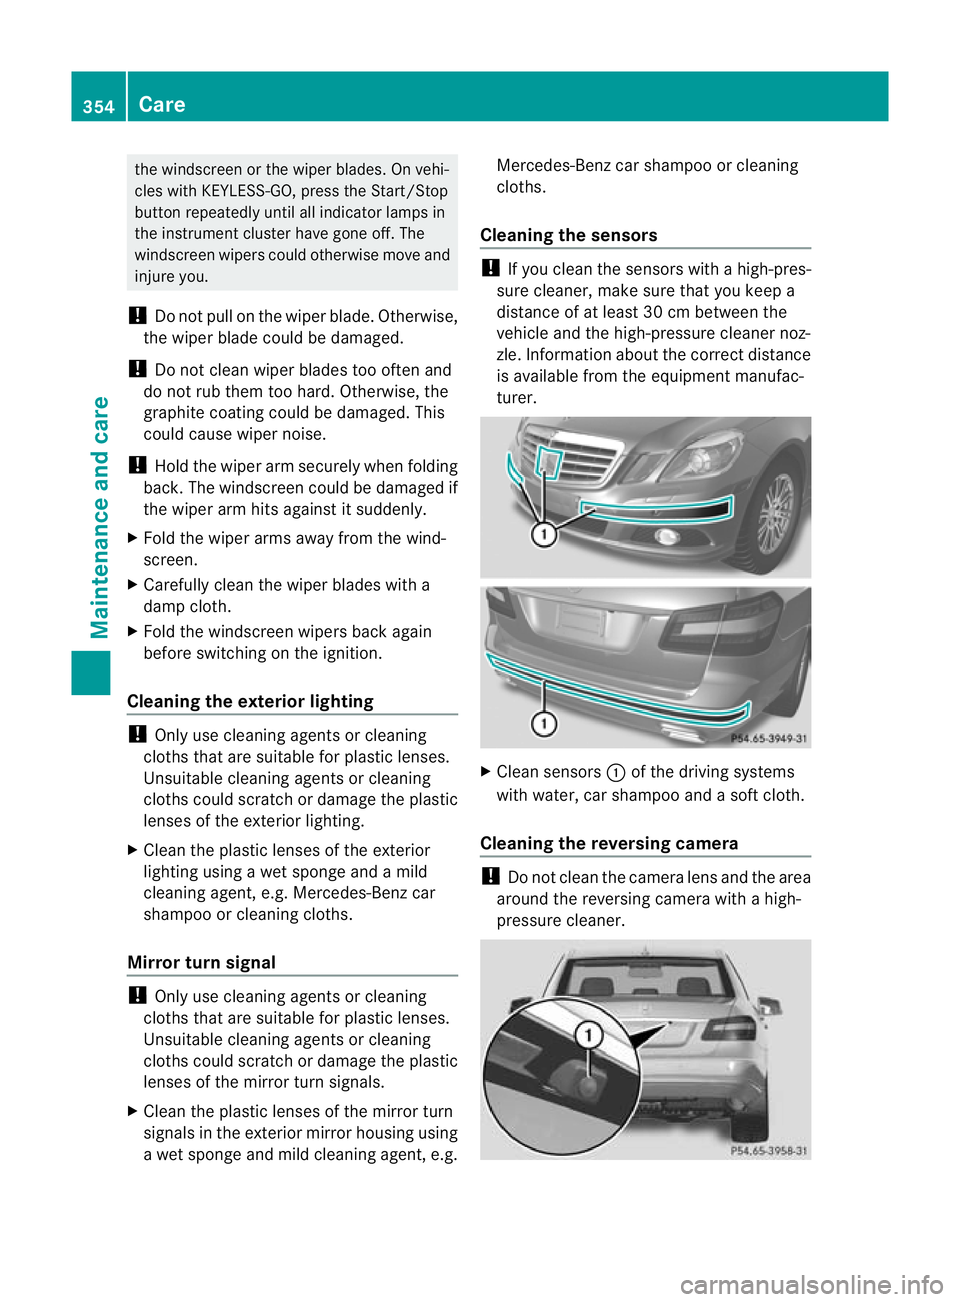
Cleaning the sensors !
If you clean the sensors with a high-pres-
sure cleaner, make sure that you keep a
distance of at least 30 cm between the
vehicle and the high-pressure cleane rnoz-
zle. Information about the correct distance
is available from the equipment manufac-
turer. X
Clean sensors :of the driving systems
with water, car shampoo and a soft cloth.
Cleaning the reversing camera !
Do not clean the camera lens and the area
around the reversing camera with a high-
pressure cleaner. 354
CareMaintenance and care
Page 366 of 457
Vehicles with
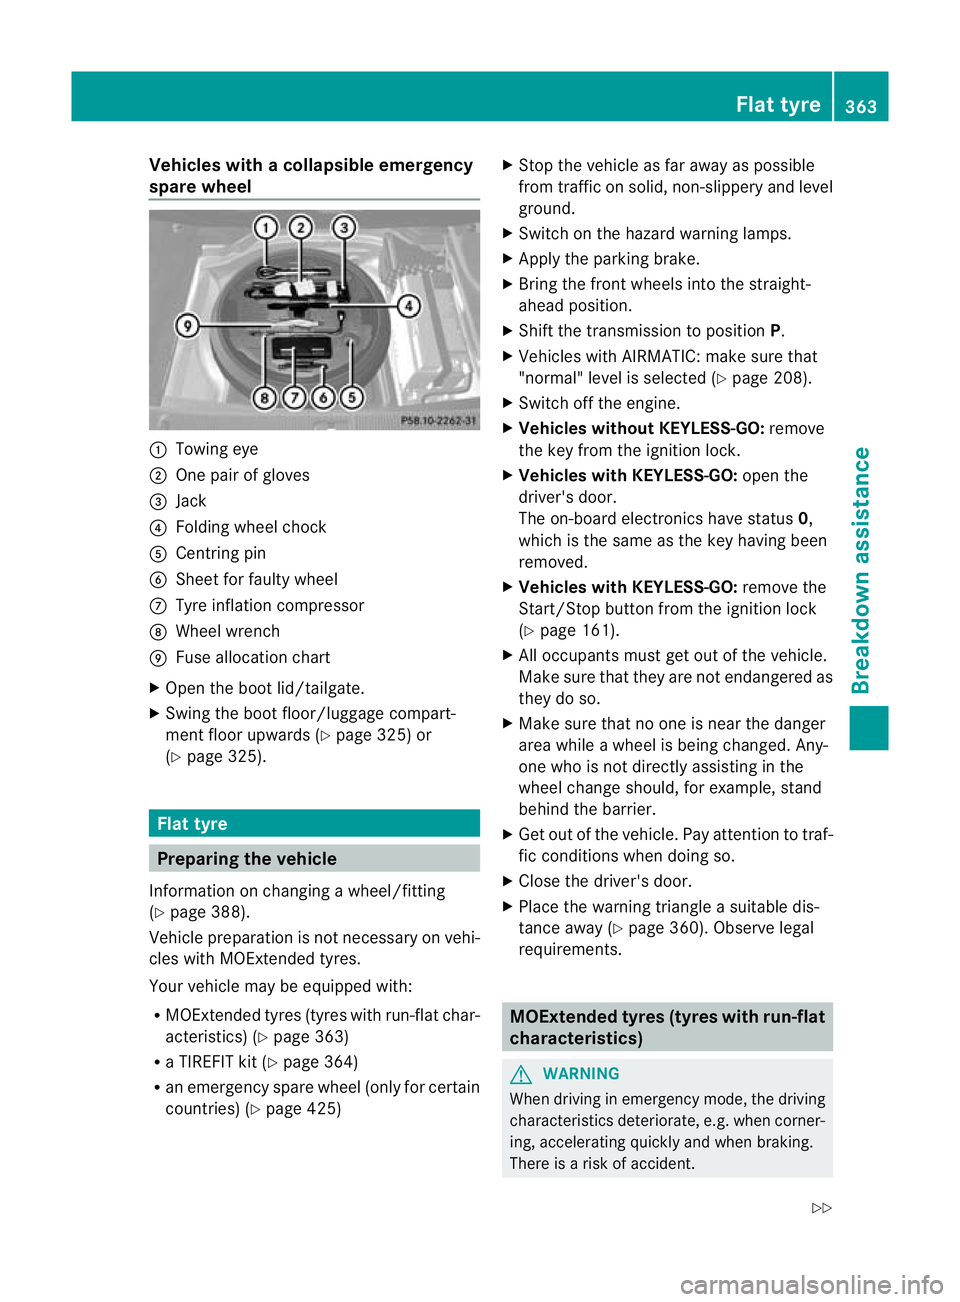
acollapsible emergency
spare wheel :
Towing eye
; One pair of gloves
= Jack
? Folding wheel chock
A Centring pin
B Sheet for faulty wheel
C Tyre inflatio ncompressor
D Wheel wrench
E Fuse allocation chart
X Open the boot lid/tailgate.
X Swing the boot floor/luggage compart-
ment floor upwards (Y page 325) or
(Y page 325). Flat tyre
Preparing the vehicle
Information on changing a wheel/fitting
(Y page 388).
Vehicle preparation is not necessary on vehi-
cles with MOExtended tyres.
Your vehicle may be equipped with:
R MOExtended tyres (tyres with run-flat char-
acteristics) (Y page 363)
R a TIREFIT kit (Y page 364)
R an emergency spare wheel (only for certain
countries) (Y page 425) X
Stop the vehicle as far away as possible
from traffic on solid, non-slippery and level
ground.
X Switch on the hazard warning lamps.
X Apply the parking brake.
X Bring the front wheels into the straight-
ahead position.
X Shift the transmission to position P.
X Vehicles with AIRMATIC: make sure that
"normal" level is selected (Y page 208).
X Switch off the engine.
X Vehicles without KEYLESS-GO: remove
the key from the ignition lock.
X Vehicles with KEYLESS-GO: open the
driver's door.
The on-board electronics have status 0,
which is the same as the key having been
removed.
X Vehicles with KEYLESS-GO: remove the
Start/Stop button from the ignition lock
(Y page 161).
X All occupants must get out of the vehicle.
Make sure that they are not endangered as
they do so.
X Make sure that no one is near the danger
area while a wheel is being changed. Any-
one who is not directly assisting in the
wheel change should, for example, stand
behind the barrier.
X Get out of the vehicle. Pay attention to traf-
fic conditions when doing so.
X Close the driver's door.
X Place the warning triangle a suitable dis-
tance away (Y page 360). Observe legal
requirements. MOExtended tyres (tyres with run-flat
characteristics)
G
WARNING
When driving in emergency mode, the driving
characteristics deteriorate, e.g. when corner-
ing, accelerating quickly and when braking.
There is a risk of accident. Flat tyre
363Breakdown assistance
Z
Page 367 of 457
Do not exceed the stated maximum speed.
Avoid abrupt steering and driving manoeu-
vres, and driving ove
robstacles (kerbs, pot-
holes, off-road). This applies in particular to a
laden vehicle.
Stop driving in emergency mode if:
R you hear banging noises.
R the vehicle starts to shake.
R you see smoke and smell rubber.
R ESP ®
is intervening constantly.
R there are tears in the sidewalls of the tyre.
After driving in emergency mode, have the
wheel rims checked at a qualified specialist
workshop with regard to their further use. The
faulty tyre must be replaced.
With MOExtended tyres (tyres with run-flat
characteristics), you can continue to drive
your vehicle even if there is a total loss of
pressure in one or more tyres.
MOExtended tyres may only be used in con-
junction with an active tyre pressure loss
warning system or with an active tyre pres-
sure monitor.
The maximum driving distance is approx-
imately 80 km when the vehicle is partially
laden, and approximately 30 km when the
vehicle is fully laden.
In addition to the vehicle load, the driving dis-
tance possible depends upon:
R speed
R road condition
R outside temperature
The driving distance possible in run-flat mode
may be reduced by extreme driving condi-
tions/manoeuvres, or it can be increased
through a moderate style of driving.
The maximum permissible distance which
can be driven in run-flat mode is counted from
the momen tthe tyre pressure loss warning
appears in the multifunction display.
You must not exceed a maximum speed of
80 km/h. i
When replacing one or all tyres, make
sure that you only use tyres marked
"MOExtended". Make sure that you only
use the size of tyre specified for the vehicle. TIREFIT kit
Using the TIREFIT kit TIREFIT is a tyre sealant.
You can use TIREFIT to seal punctures of up
to 4 mm, particularly those in the tyre tread.
You can use TIREFIT at outside temperatures
down to Ò20 †. G
WARNING
In the following situations, the tyre sealant is
unable to provide sufficient breakdown assis-
tance, as it is unable to seal the tyre properly:
R there are cuts or punctures in the tyre
larger than those mentioned above.
R the wheel rim is damaged.
R you have driven at very low tyre pressures
or on a flat tyre.
There is a risk of accident.
Do not drive any further. Contact a qualified
specialist workshop. G
WARNING
The tyre sealant is harmful and causes irrita-
tion. It must not come into contact with your
skin, eyes or clothing or be swallowed. Do not
inhale TIREFIT fumes. Keep tyre sealant away
from children. There is a risk of injury.
If you come into contact with the tyre sealant,
observe the following:
R Rinse off the tyre sealant from your skin
immediately with water.
R If the tyre sealant comes into contact with
your eyes, immediately rinse them thor-
oughly with clean water.
R If tyre sealant is swallowed, immediately
rinse your mouth out thoroughly and drink
plenty of water. Do not induce vomiting,
and seek medical attention immediately. 364
Flat tyreBreakdown assistance
Page 375 of 457
Towing and tow-starting
Important safety notes
G
WARNING
Hybrid vehicles: it is imperative tha tyou read
the "HYBRID" supplement. Otherwise, you
may not recognise dangers. G
WARNING
If you tow the vehicle, you must use a rigid
towing bar if:
R the engine is not running.
R there is a brake system malfunction.
R there is a malfunction in the power supply
or the vehicle's electrical system.
The power assistance for the steering and the
brake force booster do not work when the
engine is not running. You will need more
force to steer and brake, you may have to
depress the brake pedal with maximum force.
Before towing away, make sure that the steer-
ing can be moved and is not locked.
If you tow or tow-start another vehicle, its
weight must not exceed the maximum per-
missible gross vehicle weight of your vehicle. G
WARNING
The vehicle is braked when the HOLD function
or DISTRONIC PLUS is activated. Therefore,
deactivate HOLD and DISTRONIC PLUS if the
vehicle is to be towed.
! Only secure the tow rope or towing bar to
the towing eyes. The vehicle may otherwise
be damaged.
! Observe the following points when towing
with a tow rope:
R secure the tow rope on the same side on
both vehicles.
R the tow rope must not be longer than is
legally permitted. It should be marked in
the middle, e.g. with a white cloth
(30 x30c m) so thatothe rroad users are
aware that a vehicle is being towed. R
the tow rope may only be attached to the
towing eyes.
R observe the brake lamps of the towing
vehicle while driving. Always maintain a
distance so that the tow rope does not
sag.
R do not use steel cables or chains to tow
your vehicle. The vehicle could be dam-
aged.
! Do not use the towing eye for recovery,
this could damage the vehicle. If in doubt,
recover the vehicle with acrane.
! Pull away smoothly when towing away or
tow-starting a vehicle. If the tractive power
is too high, the vehicles could be damaged.
! To tow vehicles with KEYLESS-GO, use
the key instead of the Start/Stop button.
The automatic transmission may otherwise
switch to position Pwhen you open the
driver's or front-passenge rdoor which
could damage the transmission.
! You may tow the vehicle for a maximum
of 50km. A towing speed of 50 km/h must
not be exceeded.
For towing distances over 50 km, the entire
vehicle must be lifted up and transported.
! If you tow or tow-start another vehicle, its
weight must not exceed the maximu mper-
missible gross vehicle weight of your vehi-
cle.
Information on your vehicle's gross vehicle
weight rating can be found on the vehicle
identification plate (Y page 435).
Observe the legal requirement sfor the rele-
vant countries when towing and tow-starting.
It is better to have the vehicle transported
than to have it towed.
If the vehicle has suffered transmission dam-
age, have it transported on a transporter or
trailer.
When towing a vehicle with an automatic
transmission, the transmission must be in
position N. 372
Towing and tow-startingBreakdown assistance