2012 MERCEDES-BENZ E-CLASS ESTATE engine
[x] Cancel search: enginePage 179 of 457
Drive program
S(or, in the case of AMG vehi-
cles, drive programs Sand S+) is character-
ised by the following:
R sporty engine and automatic transmission
settings
R the vehicle pulling away in first gear
R the automatic transmission shifting up
later
R as a resul tofthe later automatic transmis-
sion shift points, the fuel consumption pos-
sibly being higher. Shift ranges
Introduction i
OnAMG vehicles andvehicles with
steering wheel gearshift paddles, you
can restrict or derestrict the shift range
using the steering wheel gearshift paddles.
On standard vehicles with aselector
lever , you can also restric torderestrict the
shift range using the selector lever.
When the automatic transmission is in posi-
tion D, it is possible to restrict or derestrict
the shift range (Y page 176).
The shift range selected is shown in the mul-
tifunction display. The automatic transmis-
sion shifts only as far as the selected gear.
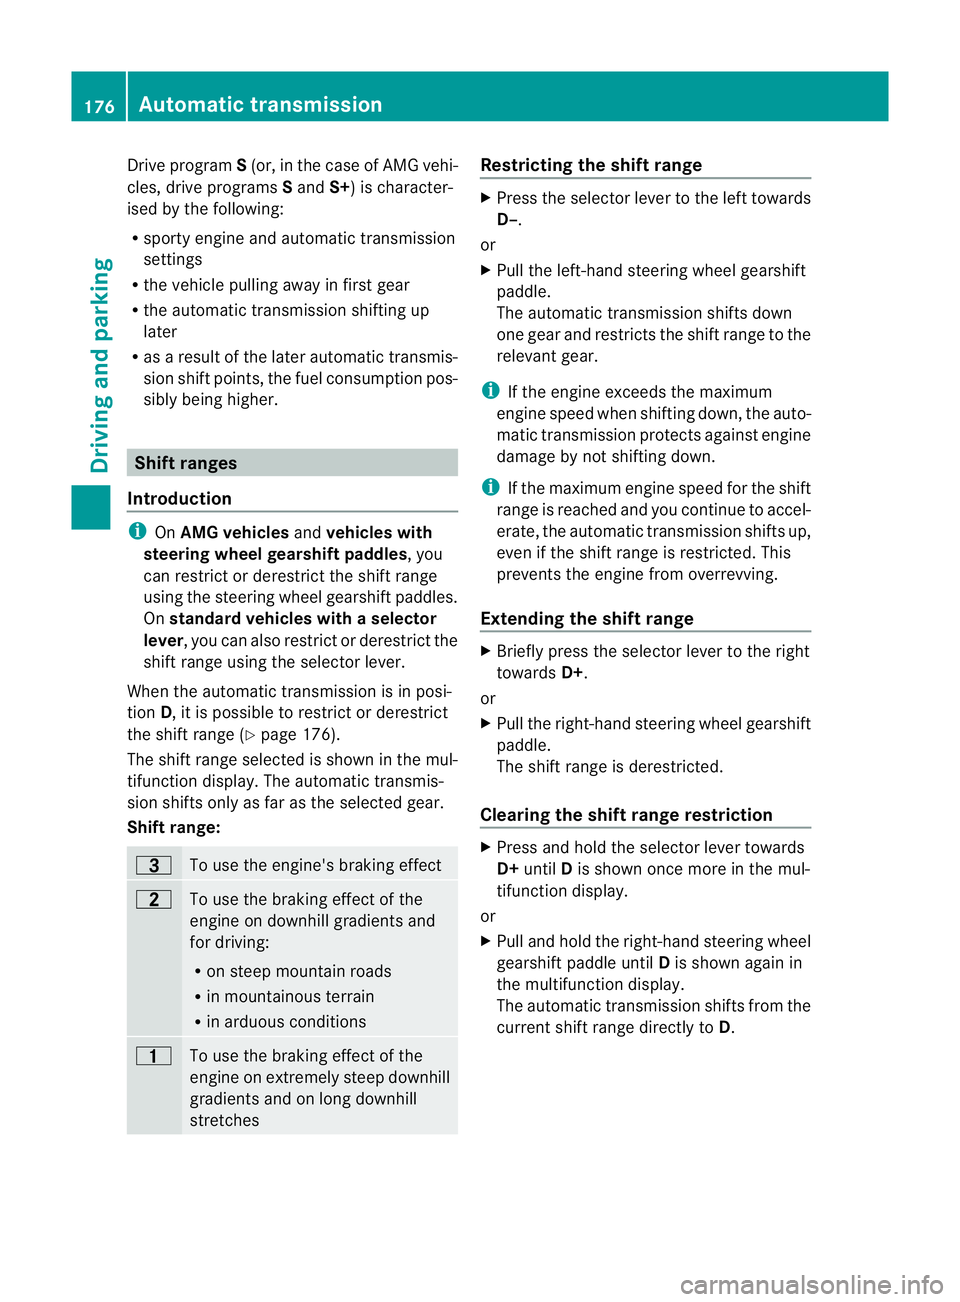
Shift range: =
To use the engine's brakin
geffect 5
To use the braking effect of the
engine on downhill gradients and
for driving:
R
on steep mountai nroads
R in mountainous terrain
R in arduous conditions 4
To use the braking effect of the
engine on extremely steep downhill
gradients and on long downhill
stretches Restricting the shift range
X
Press the selector lever to the left towards
D–.
or
X Pull the left-hand steerin gwheel gearshift
paddle.
The automatic transmission shifts down
one gear and restricts the shift range to the
relevant gear.
i If the engine exceeds the maximum
engine speed when shifting down, the auto-
matic transmission protects against engine
damage by not shifting down.
i If the maximum engine speed for the shift
range is reached and you continue to accel-
erate, the automatic transmission shifts up,
even if the shift range is restricted. This
prevents the engine from overrevving.
Extending the shift range X
Briefly press the selector lever to the right
towards D+.
or
X Pull the right-hand steering wheel gearshift
paddle.
The shift range is derestricted.
Clearing the shift range restriction X
Press and hold the selector lever towards
D+ until Dis shown once more in the mul-
tifunction display.
or
X Pull and hold the right-hand steering wheel
gearshift paddle until Dis shown again in
the multifunction display.
The automatic transmission shifts from the
current shift range directly to D.176
Automatic transmissionDriving and parking
Page 180 of 457
Selecting the ideal shift range
X
Press the selector lever to the left towards
D– and hold it in position.
or
X Pull the left-hand steering wheel gearshift
paddle and hold it in position.
The automatic transmission shifts to the
gear which allows optimum acceleration
and deceleration. To do this, the automatic
transmission shifts down one or more
gears. Manual drive program
Activating the manual drive program X
Press the program selector button
(Y page 174) repeatedly until Mappears in
the multifunction display.
X AMG vehicles: turn the drive program
selector (Y page 175) until Mappears in the
multifunction display.
The indicator Mon the drive program selec-
tor lights up in red.
AMG vehicles and vehicles with aDIRECT
SELECT lever: you can select manual drive
program Musing the program selector or the
drive program selector button. In manual
drive program M, you can change gear using
the steering wheel gearshif tpaddles if the
transmission is in position D.
Standar dvehicles with aselector lever:
you can selec tmanual drive program Musing
the program selector button. If the transmis-
sion is in position D, you can change gear
using the steering wheel gearshif tpaddles or
the selecto rlever in manual drive program
M.
Upshifting !
In manual gearshift program M, the auto-
matic transmission does not shift up auto-
matically even when the engine limiting
speed for the curren tgear is reached.
When the engine limiting speed is reached, the fuel supply is cut to preven
tthe engine
from overrevving. You must make sure that
the engine speed does not reach the red
area of the rev counter. Otherwise, there is
a risk of engine damage.
X Briefly press the selector lever to the right
towards D+.
or
X Pull the right-hand steering wheel gearshift
paddle.
The automatic transmission shifts up to the
next gear.
AMG vehicles
X If the colour in the multifunction display in
the speedometer changes to red and the
UP display message is shown, shift up a
gear.
Downshifting X
Briefly press the selector lever to the left
towards D–.
or
X Pull the left-hand steering wheel gearshift
paddle.
The automatic transmission shifts down to
the next gear.
i If you desire maximum acceleration, push
the selector lever to the left or pull and hold
the left-hand steering wheel gearshift pad-
dle until the transmission shifts to the opti-
mal gear for the current speed.
Kickdown You can also use kickdown for maximum
acceleration in manual drive program
M.
X Depress the accelerator pedal beyond the
pressure point.
The transmission shifts to a lower gear
depending on the engine speed.
i AMG vehicles: it is not possible to use
kickdown in manual drive program M. Automatic transmission
177Driving and parking Z
Page 182 of 457
Problems with the transmission
Problem Possible causes/consequences and
M Solutions
The transmission has
problems shifting gear. The transmission is losing oil.
X
Have the transmission checked at a qualified specialist work-
shop immediately. The acceleration ability
is deteriorating.
The transmission no
longer changes gear. The transmission is in emergency mode.
It is only possible to shift into secondgear and reverse gear.
X Stop.
X Shift the transmission to position P.
X Switch off the engine.
X Wait at least ten seconds before restarting the engine.
X Shift the transmission to position Dor R.
If D is selected, the transmission shifts into secondgear; ifRis
selected, the transmission shifts into reverse gear.
X Have the transmission checked at a qualified specialist work-
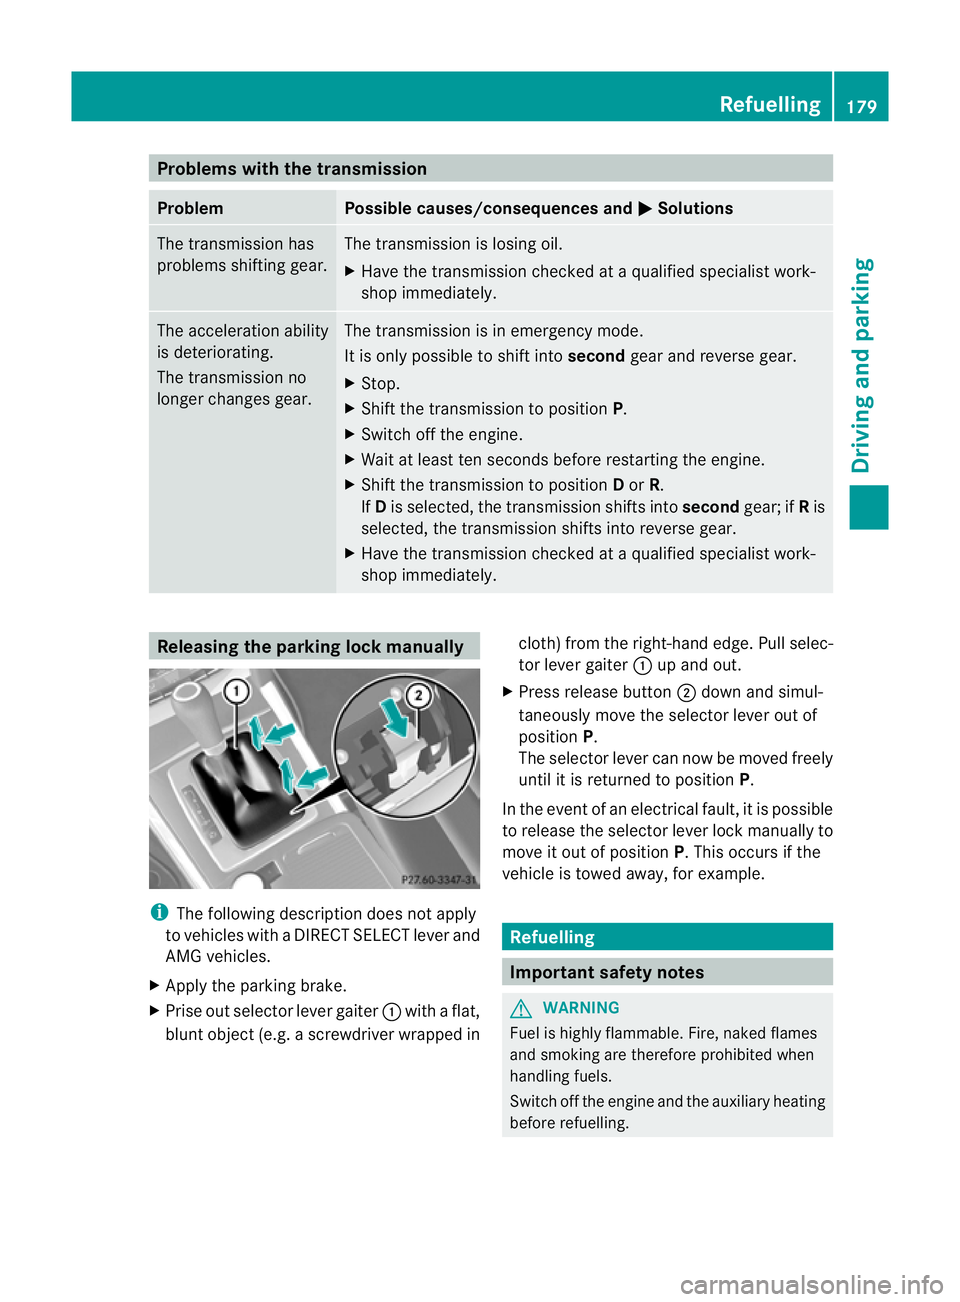
shop immediately. Releasing the parking lock manually
i
The following description does not apply
to vehicles with a DIRECT SELECT lever and
AMG vehicles.
X Apply the parking brake.
X Prise out selector lever gaiter :with a flat,
blunt object (e.g. a screwdriver wrapped in cloth) from the right-hand edge. Pull selec-
tor lever gaiter
:up and out.
X Press release button ;down and simul-
taneously move the selector lever out of
position P.
The selector lever can now be moved freely
until it is returned to position P.
In the event of an electrical fault, it is possible
to release the selector lever lock manually to
move it out of position P. This occurs if the
vehicle is towed away, for example. Refuelling
Important safety notes
G
WARNING
Fuel is highly flammable. Fire, naked flames
and smoking are therefore prohibited when
handling fuels.
Switch off the engine and the auxiliary heating
before refuelling. Refuelling
179Driving and parking Z
Page 183 of 457
G
WARNING
Avoid contact with fuels.
It is hazardous to yourh ealth if your skin
comes into direct contact with fuels or you
breathe in fuel vapours. G
WARNING
Do not use petrol to refuel a diesel tank .Never
mix diesel with petrol. Doing so could damage
the fuel system and the engine. The vehicle
could also catch fire.
! Do not use petrol to refuel vehicles with a
diesel engine. Do not use diesel to refuel
vehicles with a petrol engine. Even small
amounts of the wrong fuel result in damage
to the fuel system and the engine.
! Do not switch on the ignition if you acci-
dentally refuel with the wrong fuel. Other-
wise, the fuel will enter the fuel lines. Notify
a qualified specialist workshop and have
the fuel tank and fuel lines drained com-
pletely.
! Overfilling the fuel tank could damage the
fuel system.
! Take care not to spill any fuel on painted
surfaces. You could otherwise damage the
paintwork.
! Use a filter when adding fuel from a fuel
can. The fuel lines and/or the diesel injec-
tion system could otherwise be blocked by
particles from the fuel can.
Further information on fuel and on fuel grades
can be found in the "Fuel" section
(Y page 436). Refuelling
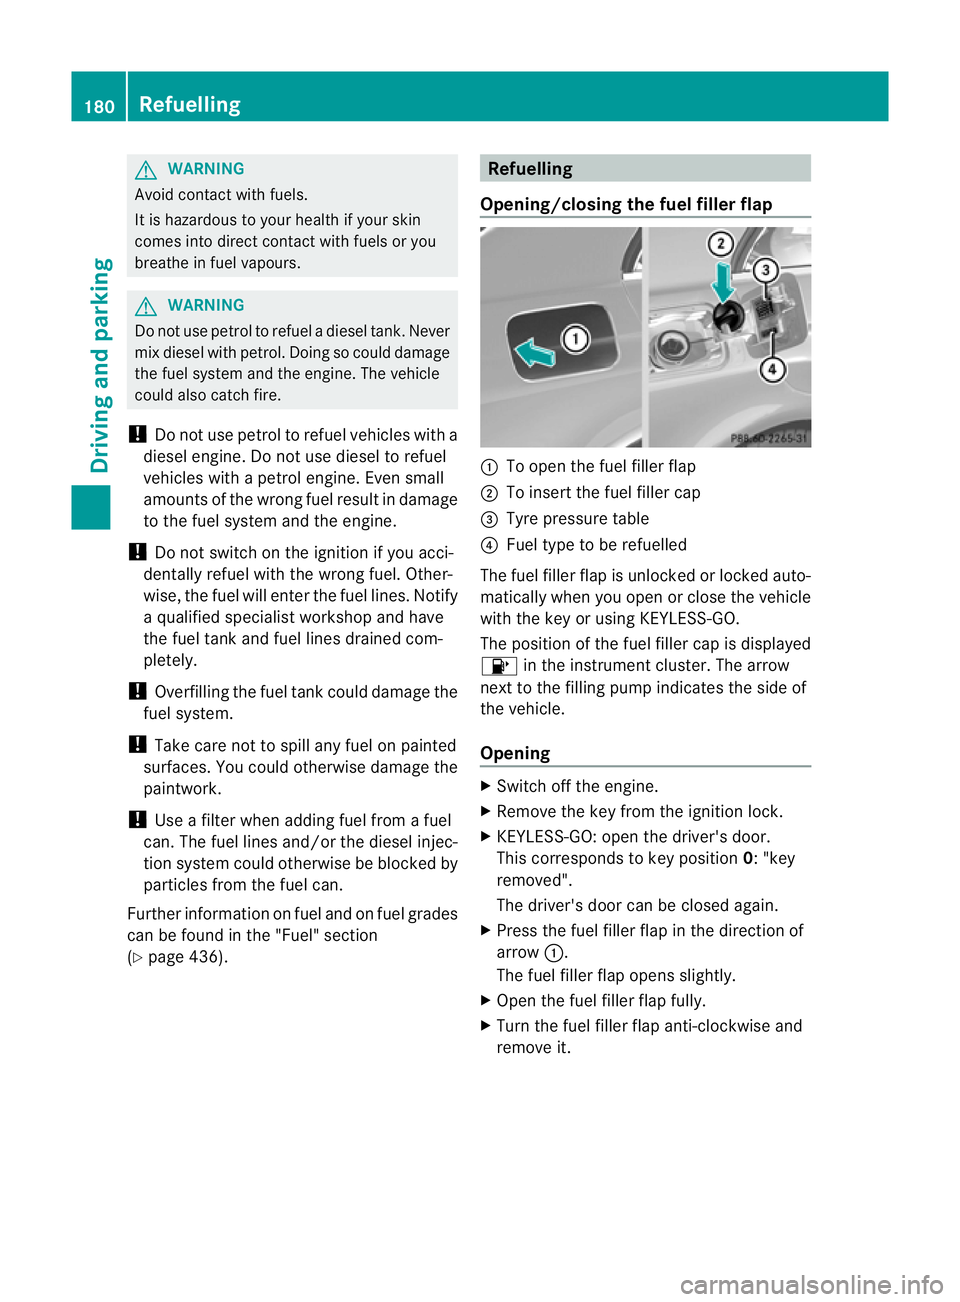
Opening/closing the fuel filler flap :
To open the fuel filler flap
; To insert the fuel filler cap
= Tyre pressure table
? Fuel type to be refuelled
The fuel filler flap is unlocked or locked auto-
matically when you open or close the vehicle
with the key or using KEYLESS-GO.
The position of the fuel filler cap is displayed
8 in the instrument cluster. The arrow
nextt o the filling pump indicates the side of
the vehicle.
Opening X
Switch off the engine.
X Remove the key from the ignition lock.
X KEYLESS-GO: open the driver's door.
This corresponds to key position 0: "key
removed".
The driver's door can be closed again.
X Press the fuel filler flap in the direction of
arrow :.
The fuel filler flap opens slightly.
X Open the fuel filler flap fully.
X Turn the fuel filler flap anti-clockwise and
remove it. 180
RefuellingDriving and parking
Page 185 of 457
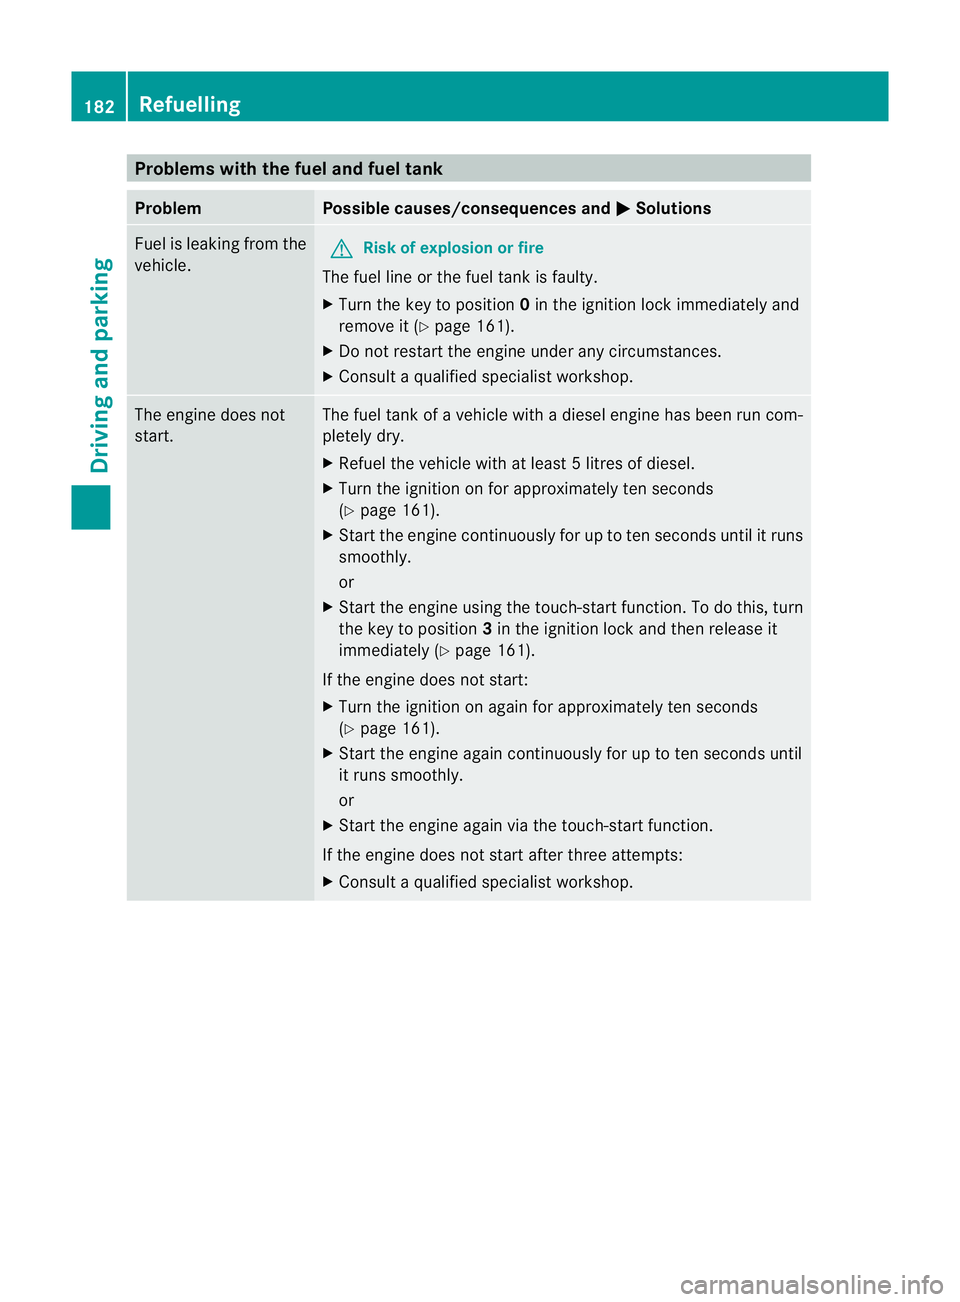
Problems with the fuel and fuel tank
Problem Possible causes/consequences and
M Solutions
Fuel is leaking from the
vehicle.
G
Risk of explosion or fire
The fuel line or the fuel tank is faulty.
X Turn the key to position 0in the ignition lock immediately and
remove it (Y page 161).
X Do not restart the engine under any circumstances.
X Consult a qualified specialist workshop. The engine does not
start. The fuel tank of a vehicle with a diesel engine has been run com-
pletely dry.
X
Refuel the vehicle with at least 5litres of diesel.
X Turn the ignition on for approximately ten seconds
(Y page 161).
X Start the engine continuously for up to ten seconds until it runs
smoothly.
or
X Start the engine using the touch-star tfunction .To do this, turn
the key to position 3in the ignition lock and then release it
immediately (Y page 161).
If the engine does not start:
X Turn the ignition on again for approximately ten seconds
(Y page 161).
X Start the engine again continuously for up to ten seconds until
it runs smoothly.
or
X Start the engine again via the touch-start function.
If the engine does not start after three attempts:
X Consult a qualified specialist workshop. 182
RefuellingDriving and parking
Page 186 of 457
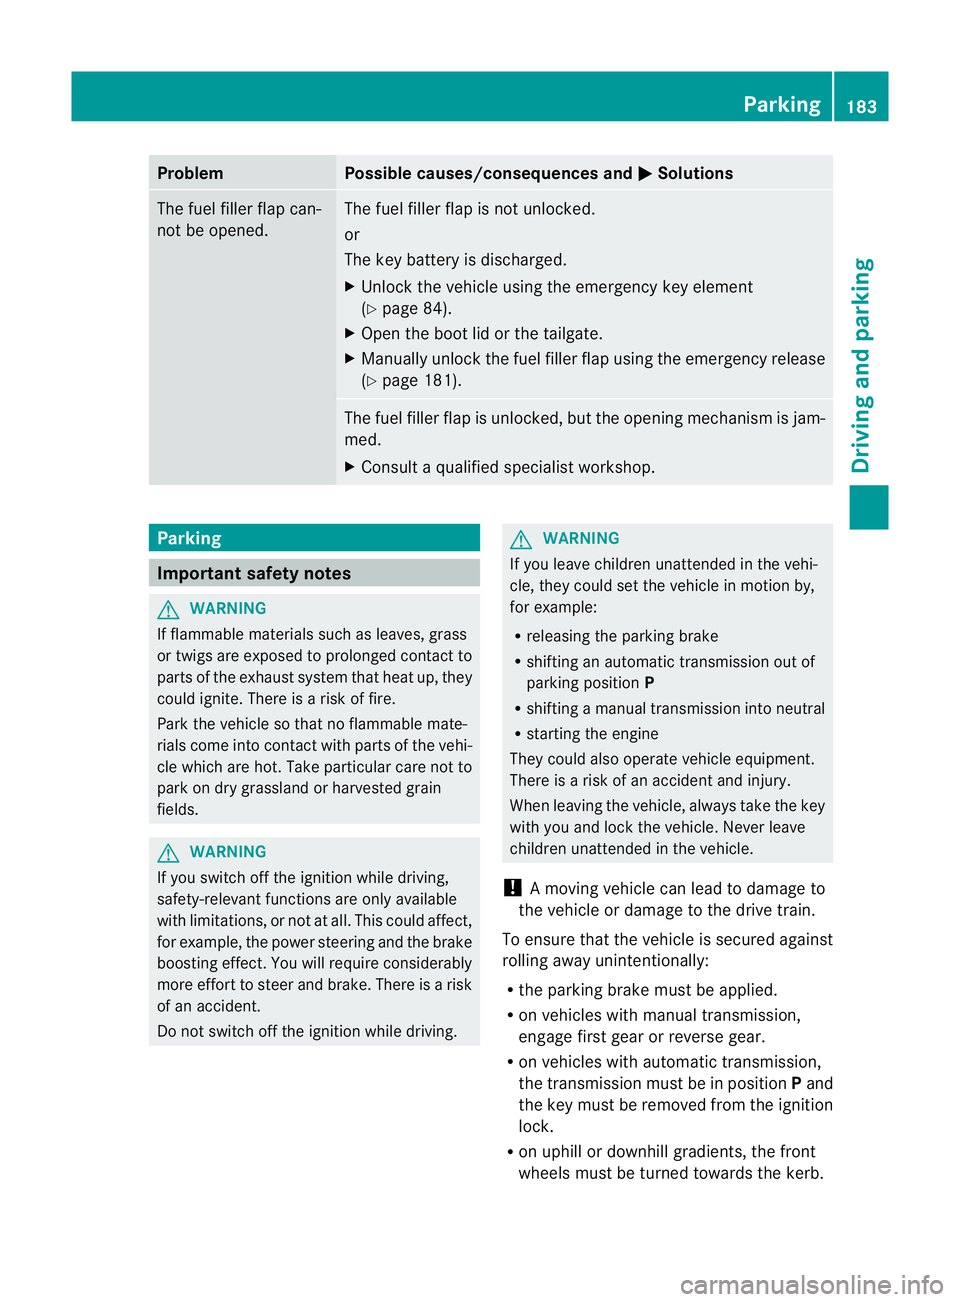
Problem Possible causes/consequences and
M Solutions
The fuel filler flap can-
not be opened. The fuel filler flap is not unlocked.
or
The key battery is discharged.
X
Unlock the vehicle using the emergency key element
(Y page 84).
X Open the boot lid or the tailgate.
X Manually unlock the fuel filler flap using the emergency release
(Y page 181). The fuel filler flap is unlocked, but the opening mechanism is jam-
med.
X
Consult a qualified specialist workshop. Parking
Important safety notes
G
WARNING
If flammable materials such as leaves, grass
or twigs are exposed to prolonged contact to
parts of the exhaust system that heat up, they
could ignite. There is a risk of fire.
Park the vehicle so that no flammable mate-
rials come into contact with parts of the vehi-
cle which are hot. Take particular care not to
park on dry grassland or harvested grain
fields. G
WARNING
If you switch off the ignition while driving,
safety-relevant functions are only available
with limitations, or not at all. This could affect,
for example, the power steering and the brake
boosting effect.Y ou will require considerably
more effort to steer and brake. There is a risk
of an accident.
Do not switch off the ignition while driving. G
WARNING
If you leave children unattended in the vehi-
cle, they could set the vehicle in motion by,
for example:
R releasing the parking brake
R shifting an automatic transmission out of
parking position P
R shifting a manual transmission into neutral
R starting the engine
They could also operate vehicle equipment.
There is a risk of an accident and injury.
When leaving the vehicle, always take the key
with you and lock the vehicle. Never leave
children unattended in the vehicle.
! Am oving vehicle can lead to damage to
the vehicle or damage to the drive train.
To ensure that the vehicle is secured against
rolling away unintentionally:
R the parking brake must be applied.
R on vehicles with manual transmission,
engage first gear or reverse gear.
R on vehicles with automatic transmission,
the transmission must be in position Pand
the key must be removed from the ignition
lock.
R on uphill or downhill gradients, the front
wheels must be turned towards the kerb. Parking
183Driving and parking Z
Page 187 of 457
Switching off the engine
Vehicles with manual transmission X
Shift to either first gear or reverse gear R.
X Turn the key to position 0in the ignition
lock and remove it.
The immobiliser is activated.
X Firmly depress the parking brake.
Vehicles with automatic transmission X
All vehicles (except AMG vehicles): shift
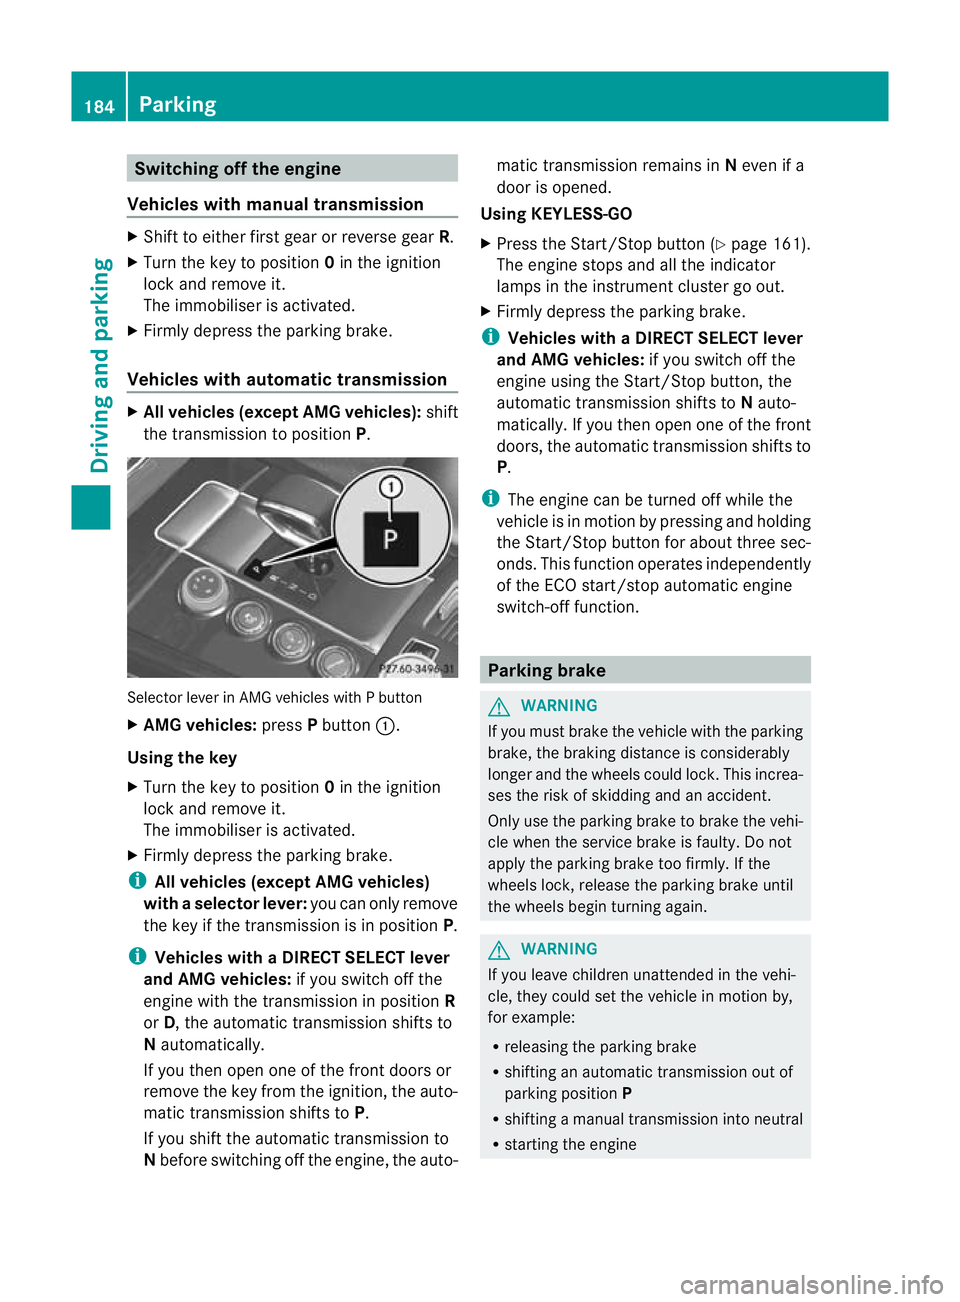
the transmission to position P.Selector lever in AMG vehicles with P button
X AMG vehicles: pressPbutton :.
Using the key
X Turn the key to position 0in the ignition
lock and remove it.
The immobiliser is activated.
X Firmly depress the parking brake.
i All vehicles (except AMG vehicles)
with aselector lever: you can only remove
the key if the transmission is in position P.
i Vehicles with aDIRECT SELECT lever
and AMG vehicles: if you switch off the
engine with the transmission in position R
or D, the automatic transmission shifts to
N automatically.
If you then open one of the front doors or
remove the key from the ignition, the auto-
matic transmission shifts to P.
If you shift the automatic transmission to
N before switching off the engine, the auto- matic transmission remains in
Neven if a
door is opened.
Using KEYLESS-GO
X Press the Start/Stop butto n(Ypage 161).
The engine stops and all the indicator
lamps in the instrument cluster go out.
X Firmly depress the parkin gbrake.
i Vehicles with aDIRECT SELECT lever
and AMG vehicles: if you switch off the
engine using the Start/Stop button, the
automatic transmission shifts to Nauto-
matically. If you then open one of the front
doors, the automatic transmission shifts to
P.
i The engine can be turned off while the
vehicle is in motion by pressing and holding
the Start/Stop butto nfor about three sec-
onds. This function operates independently
of the ECO start/stop automatic engine
switch-off function. Parking brake
G
WARNING
If you must brake the vehicle with the parking
brake, the braking distance is considerably
longer and the wheels could lock. This increa-
ses the risk of skidding and an accident.
Only use the parking brake to brake the vehi-
cle when the service brake is faulty. Do not
apply the parking brake too firmly. If the
wheels lock, release the parking brake until
the wheels begin turning again. G
WARNING
If you leave children unattended in the vehi-
cle, they could set the vehicle in motion by,
for example:
R releasing the parking brake
R shifting an automatic transmission out of
parking position P
R shifting a manual transmission into neutral
R starting the engine 184
ParkingDriving and parking
Page 188 of 457
They could also operate vehicle equipment.
There is a risk of an accident and injury.
When leaving the vehicle, always take the key
with you and lock the vehicle. Never leave
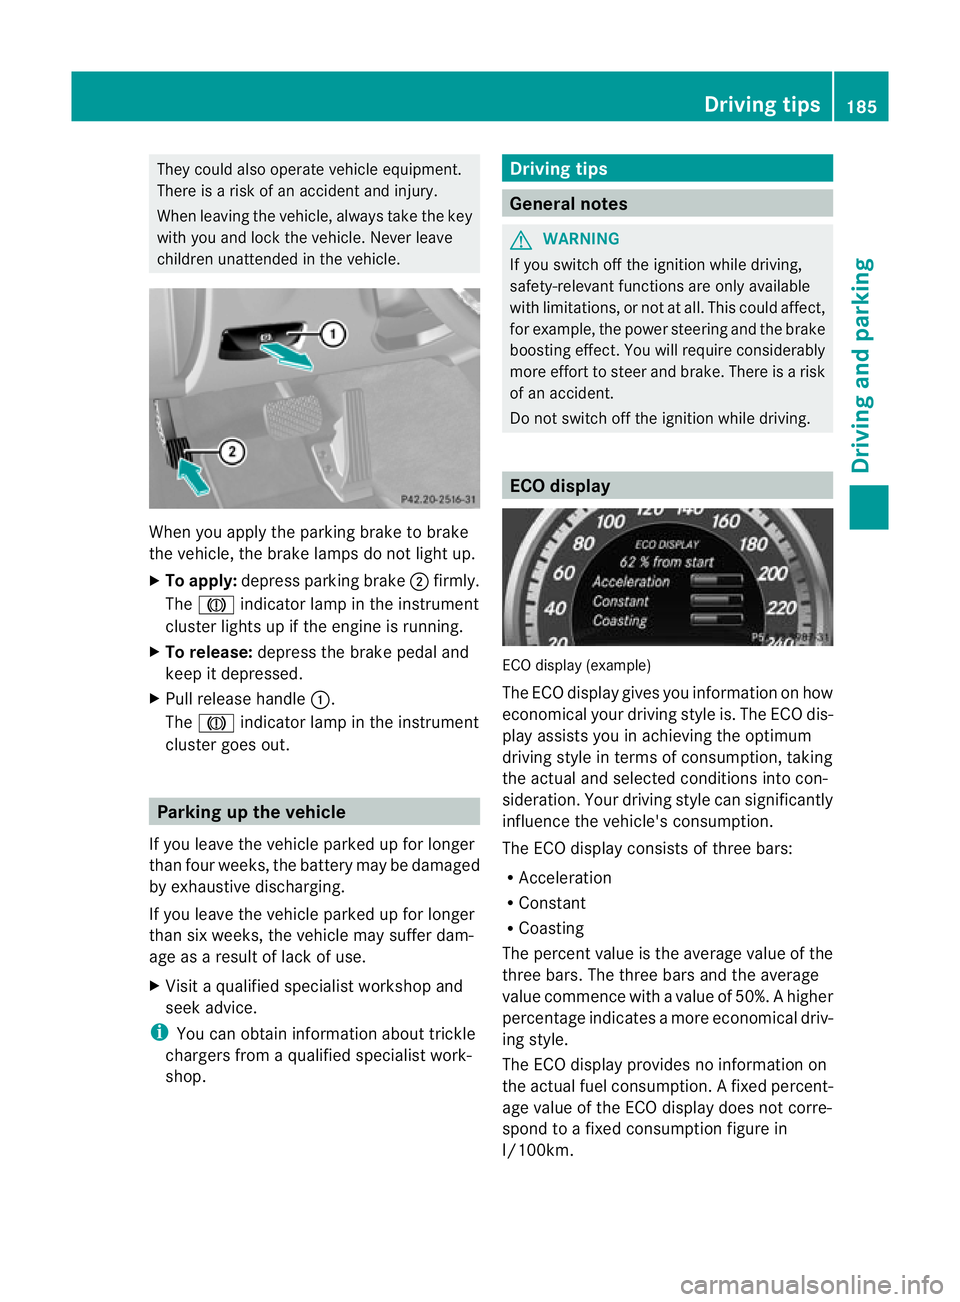
children unattended in the vehicle. When you apply the parking brake to brake
the vehicle, the brake lamps do not light up.
X To apply: depress parking brake ;firmly.
The J indicator lamp in the instrument
cluster lights up if the engine is running.
X To release: depress the brake pedal and
keep it depressed.
X Pull release handle :.
The J indicator lamp in the instrument
cluster goes out. Parking up the vehicle
If you leave the vehicle parked up for longer
than four weeks, the battery may be damaged
by exhaustive discharging.
If you leave the vehicle parked up for longer
than six weeks, the vehicle may suffer dam-
age as a result of lack of use.
X Visit a qualified specialist workshop and
seek advice.
i You can obtain information about trickle
chargers from a qualified specialist work-
shop. Driving tips
General notes
G
WARNING
If you switch off the ignition while driving,
safety-relevan tfunctions are only available
with limitations, or no tatall. This could affect,
for example, the power steering and the brake
boosting effect .You will require considerably
more effort to steer and brake. There is a risk
of an accident.
Do not switch off the ignition while driving. ECO display
ECO display (example)
The ECO display gives you information on how
economical your driving style is. The ECO dis-
play assists you in achieving the optimum
driving style in terms of consumption, taking
the actual and selected conditions into con-
sideration. Your driving style can significantly
influence the vehicle's consumption.
The ECO display consists of three bars:
R Acceleration
R Constant
R Coasting
The percent value is the average value of the
three bars. The three bars and the average
value commence with a value of 50%. Ahigher
percentage indicates a mor eeconomical driv-
ing style.
The ECO display provides no information on
the actual fuel consumption. Afixed percent-
age value of the ECO display does not corre-
spond to a fixed consumption figure in
l/100km. Driving tips
185Driving and parking Z