2012 MERCEDES-BENZ E-CLASS ESTATE fuel
[x] Cancel search: fuelPage 213 of 457
Vehicle level
The vehicle automatically sets the vehicle
level at the rea
raxle .Rear axle level control
ensures the best possible suspension and
that the ground clearance remains constant
even when the vehicle is loaded. This
improves driving safety and fuel consump-
tion.
Suspension tuning General notes
The electronically controlled damping system
works continuously. This improves driving
safety and ride comfort.
The damping is tuned individually to each
wheel and depends on:
R your driving style, e.g. sporty
R the road surface condition, e.g. bumps
R your individual selection of Sport, Sport +
or Comfort
If you select Sport or Sport + mode and
restart the engine, the suspension setting
reverts to Comfort mode.
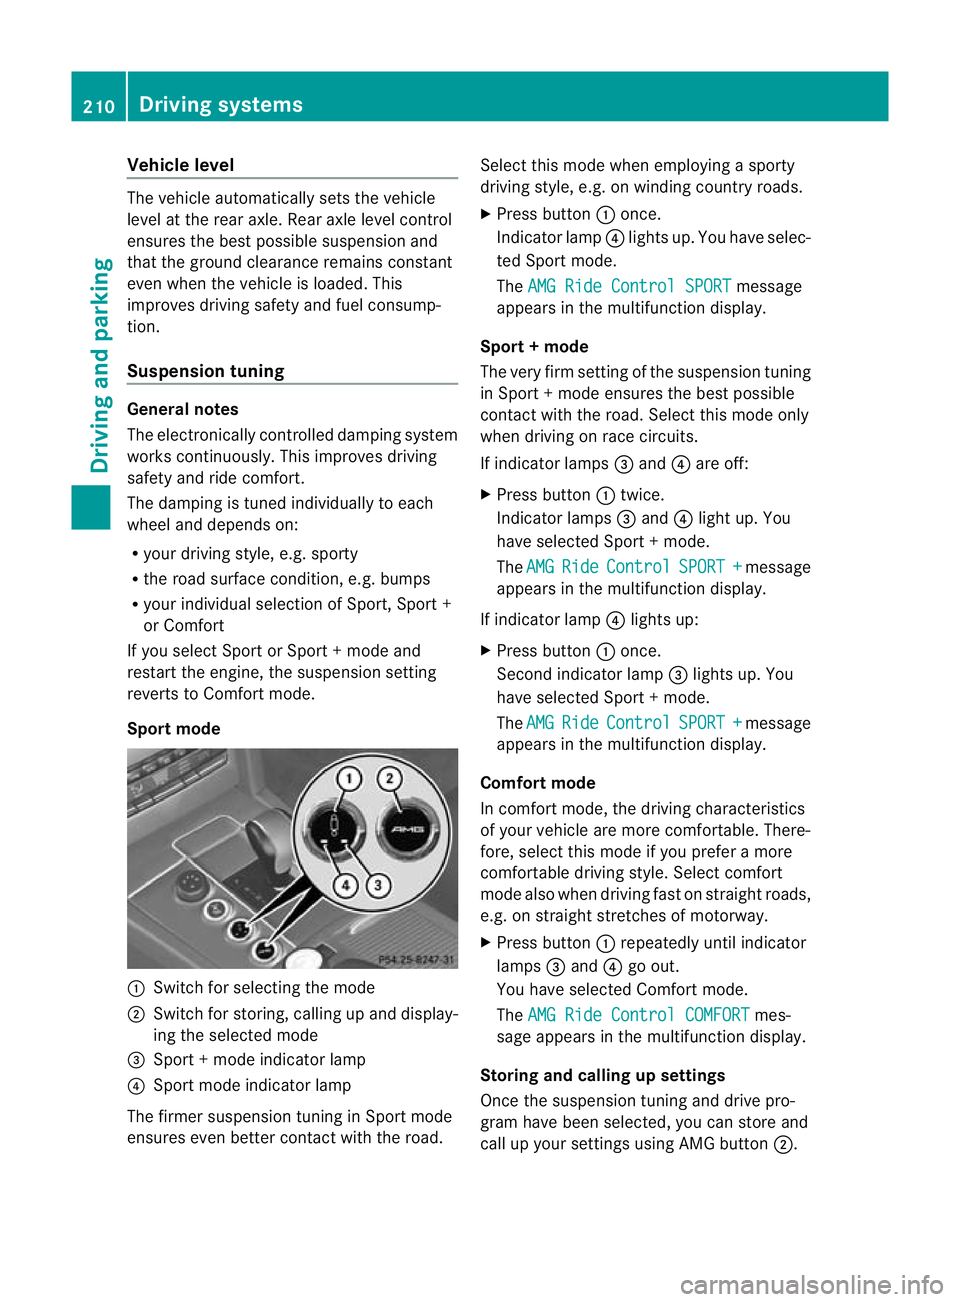
Sport mode :
Switch for selecting the mode
; Switch for storing, calling up and display-
ing the selected mode
= Sport + mode indicator lamp
? Sport mode indicator lamp
The firmer suspension tunin ginSport mode
ensures even better contact with the road. Select this mode when employing a sporty
driving style, e.g. on winding country roads.
X
Press button :once.
Indicator lamp ?lights up. You have selec-
ted Sport mode.
The AMG Ride Control SPORT message
appears in the multifunction display.
Sport + mode
The very firm setting of the suspension tuning
in Sport +mode ensures the best possible
contact with the road. Select this mode only
when driving on race circuits.
If indicator lamps =and ?are off:
X Press button :twice.
Indicator lamps =and ?light up. You
have selected Sport +mode.
The AMG Ride Control SPORT + message
appears in the multifunction display.
If indicator lamp ?lights up:
X Press button :once.
Second indicator lamp =lights up. You
have selected Sport +mode.
The AMG Ride Control SPORT + message
appears in the multifunction display.
Comfort mode
In comfort mode, the driving characteristics
of your vehicle are more comfortable. There-
fore, select this mode if you prefer a more
comfortable driving style. Select comfort
mode also when driving fast on straight roads,
e.g. on straight stretches of motorway.
X Press button :repeatedly until indicator
lamps =and ?go out.
You have selected Comfort mode.
The AMG Ride Control COMFORT mes-
sage appears in the multifunction display.
Storing and calling up settings
Once the suspension tuning and drive pro-
gram have been selected, you can store and
call up your settings using AMG button ;.210
Driving systemsDriving and parking
Page 239 of 457
Notes on towing
atrailer
General notes !
Use a drawbar noseweigh tas close as
possible to the maximum permissible nose-
weight. Do not use a noseweight of less
than 50kg, otherwise the trailer may come
loose.
Note that the payload and the rear axle load
are reduced by the actual payload.
i When towing a trailer, set the tyre pres-
sure on the rear axle of the towing vehicle
for a maximum load; see the tyre pressure
table in the fuel filler flap (Y page 383).
You will find installation dimensions and loads
in the "Technical data" section
(Y page 447).
The maximum noseweight of the trailer draw-
bar on the ball coupling is 84 kg. The actual
noseweight may however not be higher than
the value which is given on the trailer tow
hitch or trailer identification plates. The low-
est weight applies.
Missing values for the E300 model were not
available at the time of going to print.
Please note that whe ntowing a trailer, PARK-
TRONIC (Y page 211), Parking Guidance
(Y page 215) and Blind Spot Assist
(Y page 225) are only available with limita-
tions, or not at all.
i On vehicles without level control, the
height of the ball coupling will alter accord-
ing to the load placed on the vehicle. If nec-
essary, use a trailer with a height-adjusta-
ble drawbar.
Driving tips i
Observe the notes on ESP ®
trailer stabi-
lisation (Y page 75).
The maximum permissible speed for vehicle/
trailer combinations depends on the type of
trailer. Before beginning the journey, check
the trailer's documents to see what the max-
imum permitted speed is. Observe the legally prescribed maximum speed in the relevant
country.
For certain Mercedes-Benz vehicles, the max-
imum permissible rear axle load is increased
when towing a trailer. Refer to the "Technical
data" section to find out whether this applies
to your vehicle. If you utilise any of the added
maximum rear axle load when towing a trailer,
the vehicle/trailer combination may not
exceed a maximum speed of 100 km/h for
reasons concerning the operating permit.
This also applies in countries in which the
permissible maximum speed for vehicle/
trailer combinations is above 100 km/h.
When towing a trailer, your vehicle's handling
characteristics will be different in comparison
to when driving without a trailer and it will
consume more fuel.
Change into a lower gear in good time on long
and steep downhill gradients.
On long and steep downhill gradients, espe-
cially if the vehicle is laden or towing a trailer,
you must select shift range
1,2or 3.
i This also applies if you have activated
cruise control, SPEEDTRONIC or DIS-
TRONIC PLUS.
This will use the braking effect of the engine,
so less braking will be required to prevent the
vehicle from gaining speed. This relieves the
load on the brake system and prevents the
brakes from overheating and wearing too
quickly. If you need additional braking,
depress the brake pedal repeatedly rather
than continuously.
Driving tips If the trailer swings from side to side:
X
Do not accelerate.
X Do not countersteer.
X Brake if necessary. 236
Towing
atrailerDriving an d parking
Page 248 of 457
Displays and operation
Instrument cluster
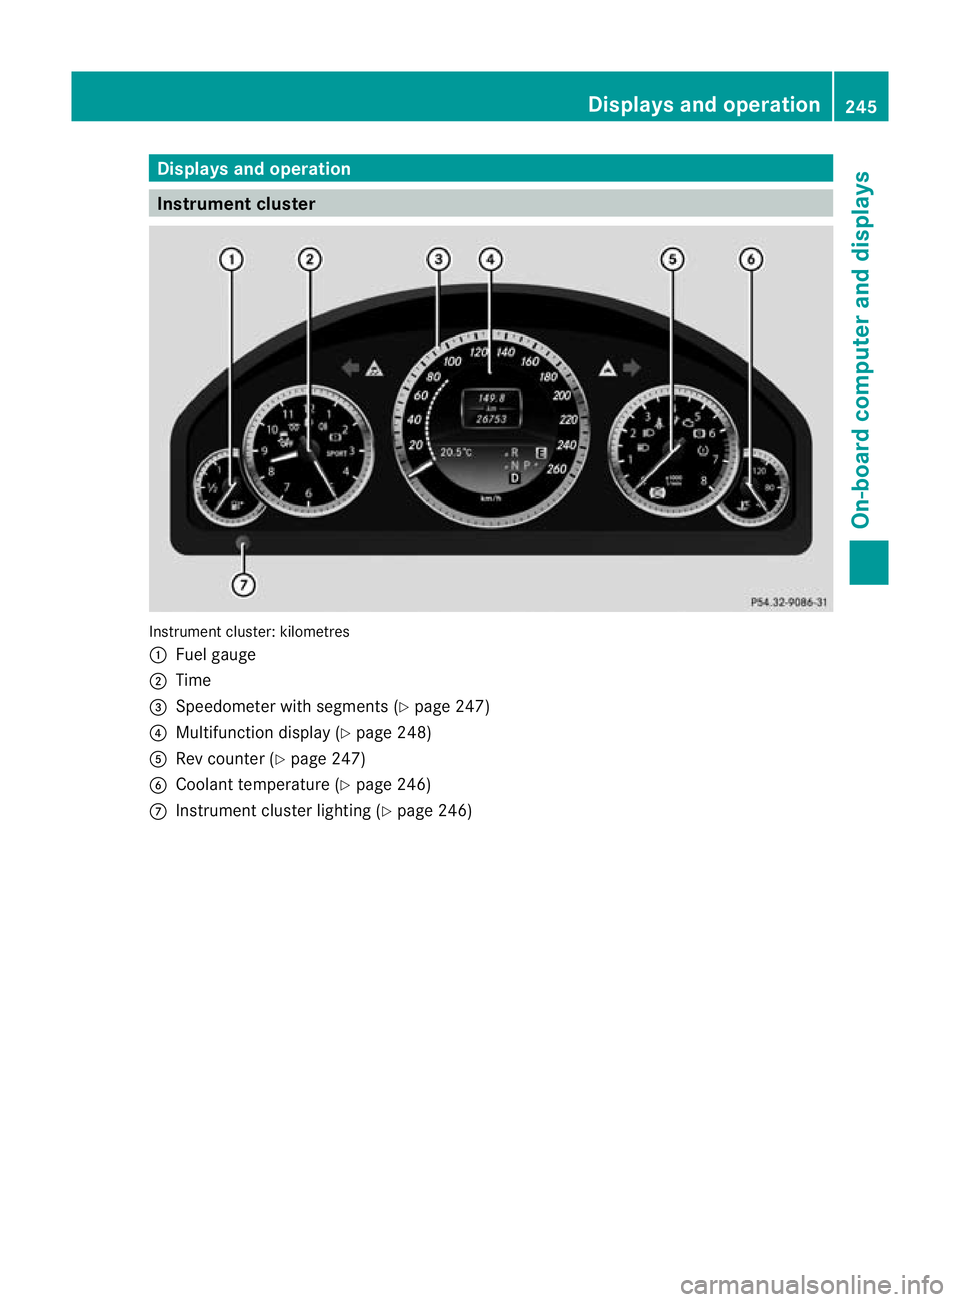
Instrument cluster: kilometres
:
Fuel gauge
; Time
= Speedometer with segments (Y page 247)
? Multifunction display (Y page 248)
A Rev counter (Y page 247)
B Coolant temperature ( Ypage 246)
C Instrumen tcluster lighting (Y page 246) Displays and operation
245On-board computer and displays Z
Page 249 of 457
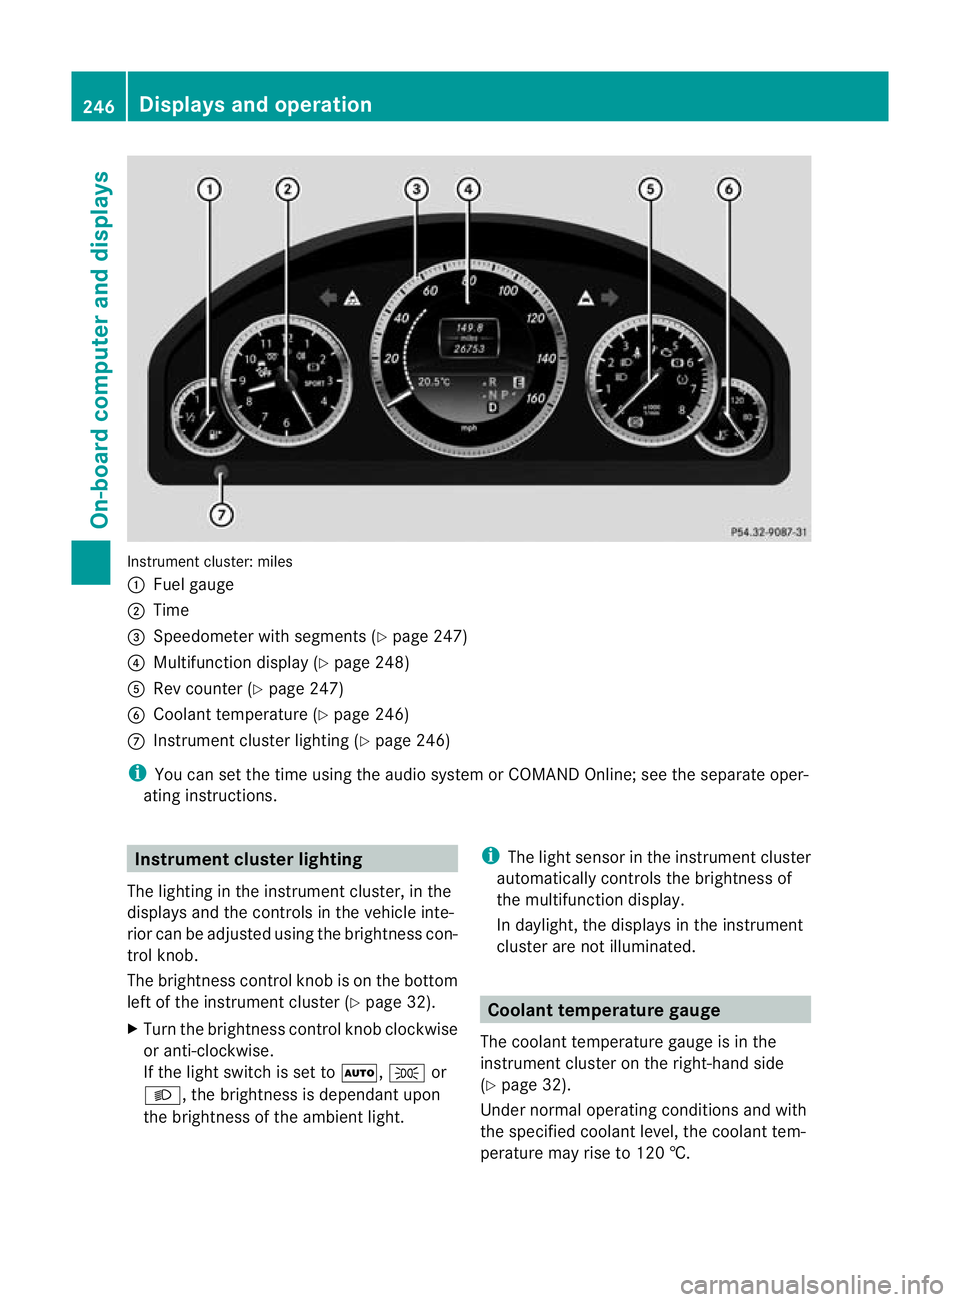
Instrument cluster: miles
:
Fuel gauge
; Time
= Speedometer with segments (Y page 247)
? Multifunction display (Y page 248)
A Rev counter (Y page 247)
B Coolant temperature (Y page 246)
C Instrument cluster lighting (Y page 246)
i You can set the time using the audio system or COMAND Online; see the separate oper-
ating instructions. Instrument clusterl
ighting
The lighting in the instrumen tcluster, in the
displays and the controls in the vehicle inte-
rior can be adjusted using the brightness con-
trol knob.
The brightness control knob is on the bottom
left of the instrument cluster (Y page 32).
X Turn the brightness control knob clockwise
or anti-clockwise.
If the light switch is set to Ã,Tor
L, the brightness is dependant upon
the brightness of the ambien tlight. i
The light sensor in the instrumen tcluster
automatically controls the brightness of
the multifunction display.
In daylight, the displays in the instrument
cluster are not illuminated. Coolant temperature gauge
The coolan ttemperature gauge is in the
instrument cluster on the right-hand side
(Y page 32).
Under normal operating conditions and with
the specified coolant level, the coolant tem-
perature may rise to 120 †. 246
Displays and operationOn-board computer and displays
Page 250 of 457
At high outside temperatures and when driv-
ing uphill, the coolant temperature may rise
to the end of the scale. Rev counter
! Do not drive in the overrevving range.
Doing so will damage the engine.
The red band in the rev counter indicates the
engine's overrevving range.
The fuel supply is interrupte dto protec tthe
engine when the red band is reached. Outside temperature display
G
WARNING
At temperatures just above freezing point, the
street may be icy, especially in wooded areas
or on bridges. If you do not adapt your driving
style to the conditions, the vehicle could skid.
For this reason, adapt your driving style and
speed to the weather conditions.
The outside temperature displayi s in the mul-
tifunction display (Y page 248).
Changes in the outside temperature are dis-
played after a short delay. Speedometer with segments
The segments in the speedometer indicate
which speed range is available.
R Cruise control activated (Y page 189):
The segments light up from the stored
speed to the maximum speed.
R Variable SPEEDTRONIC activated
(Y page 192):
The segments light up from the start of the
scale to the selected limit speed.
R DISTRONIC PLUS activated (Y page 195):
One or two segments in the set speed
range light up.
R DISTRONIC PLUS detects avehicle in front: The segments between the speed of the
vehicle in fron tand the stored speed light
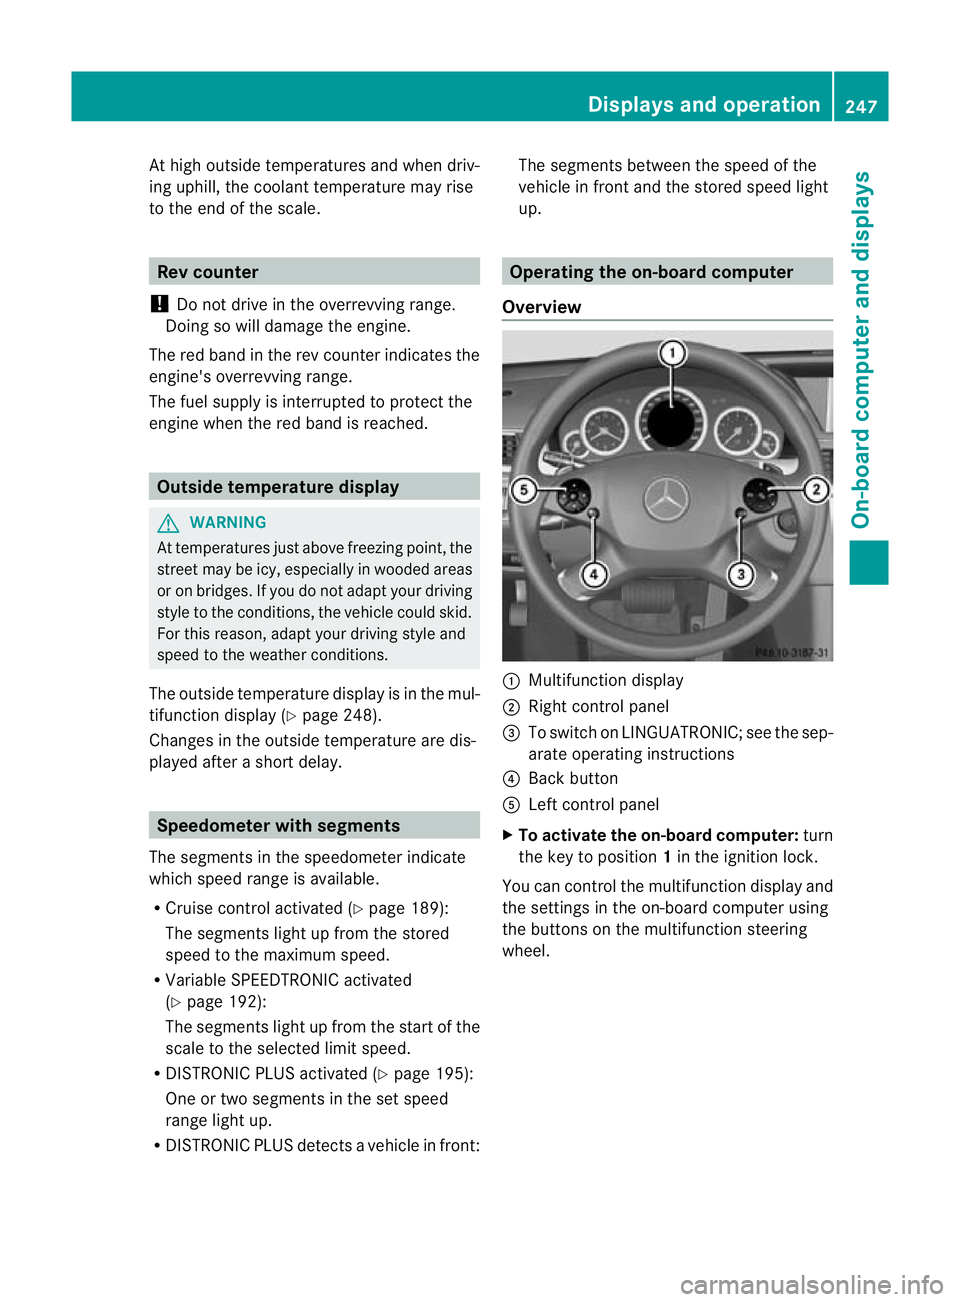
up. Operating the on-board computer
Overview :
Multifunctio ndisplay
; Right control panel
= To switch on LINGUATRONIC; see the sep-
arate operating instructions
? Back button
A Left control panel
X To activat ethe on-board computer: turn
the key to position 1in the ignition lock.
You can control the multifunction display and
the settings in the on-board computer using
the buttons on the multifunction steering
wheel. Displays and operation
247On-board computer and displays Z
Page 252 of 457
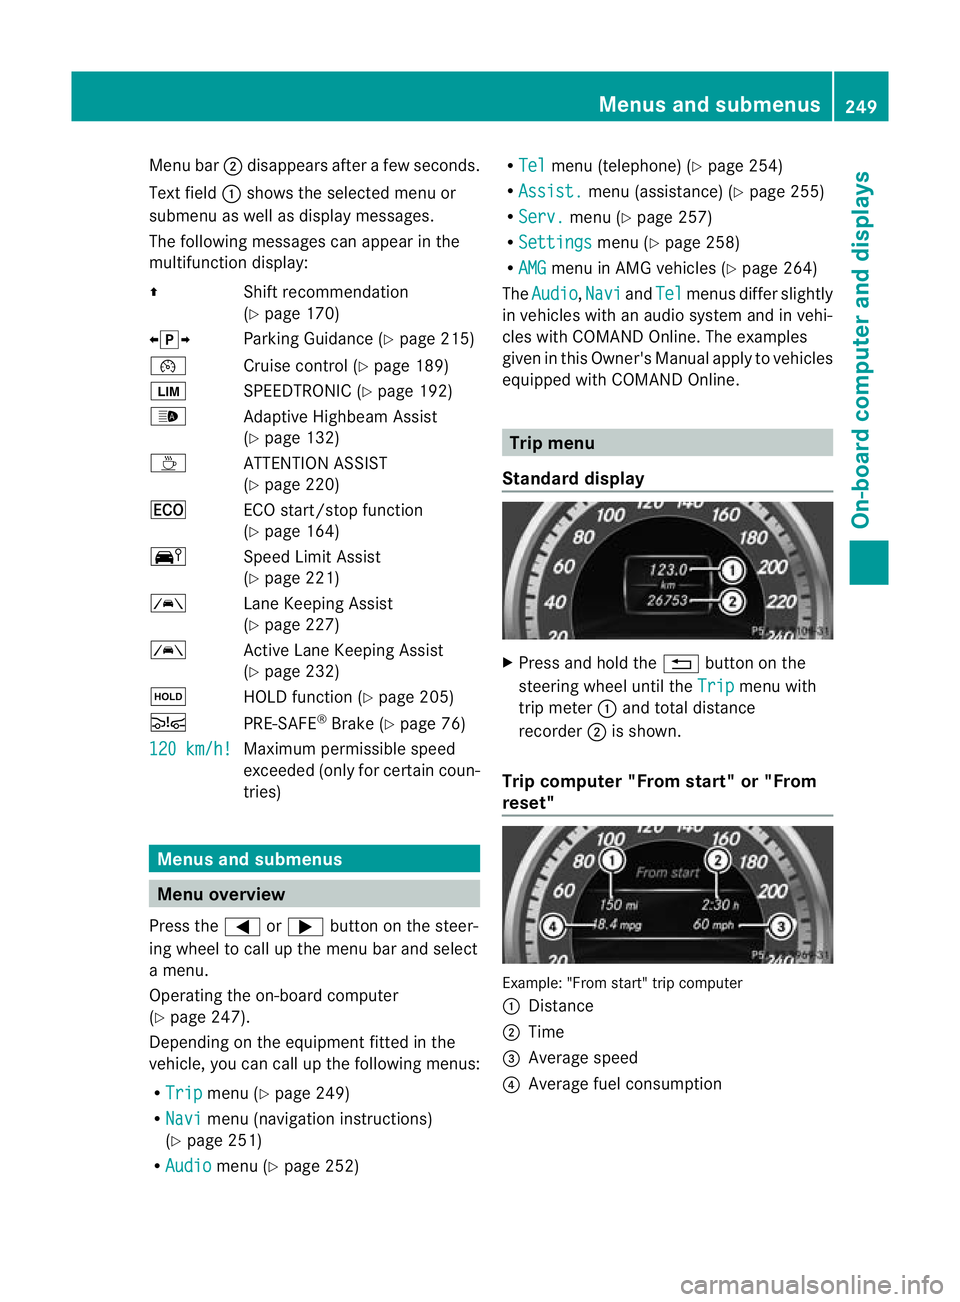
Menu bar
;disappears after a few seconds.
Text field :shows the selected menu or
submenu as well as display messages.
The following messages can appearint he
multifunction display:
Z Shift recommendation
(Ypage 170)
XjY Parking Guidance (Y page 215)
¯ Cruise control (Y page 189)
È SPEEDTRONIC (Y page 192)
_ Adaptive Highbeam Assist
(Ypage 132)
À ATTENTION ASSIST
(Ypage 220)
¤ ECO start/stop function
(Ypage 164)
Ä Speed Limit Assist
(Ypage 221)
à Lane Keeping Assist
(Ypage 227)
à Active Lane Keeping Assist
(Ypage 232)
ë HOLD function (Y page 205)
Ä PRE-SAFE®
Brake (Y page 76)
120 km/h! Maximum permissible speed
exceeded (only for certain coun-
tries)
Menus and submenus
Menu overview
Press the =or; button on the steer-
ing wheel to call up the menu bar and select
a menu.
Operating the on-board computer
(Y page 247).
Depending on the equipment fitted in the
vehicle, you can call up the following menus:
R Trip menu (Y
page 249)
R Navi menu (navigation instructions)
(Y page 251)
R Audio menu (Y
page 252) R
Tel menu (telephone) (Y
page 254)
R Assist. menu (assistance) (Y
page 255)
R Serv. menu (Y
page 257)
R Settings menu (Y
page 258)
R AMG menu in AMG vehicles (Y
page 264)
The Audio ,
Navi and
Tel menus differ slightly
in vehicles with an audio system and in vehi-
cles with COMAND Online. The examples
given in this Owner's Manual apply to vehicles
equipped with COMAND Online. Trip menu
Standard display X
Press and hold the %button on the
steering wheel until the Trip menu with
trip meter :and total distance
recorder ;is shown.
Trip computer "From start" or "From
reset" Example: "From start" trip computer
:
Distance
; Time
= Average speed
? Average fuel consumption Menus and submenus
249On-board computer and displays Z
Page 253 of 457
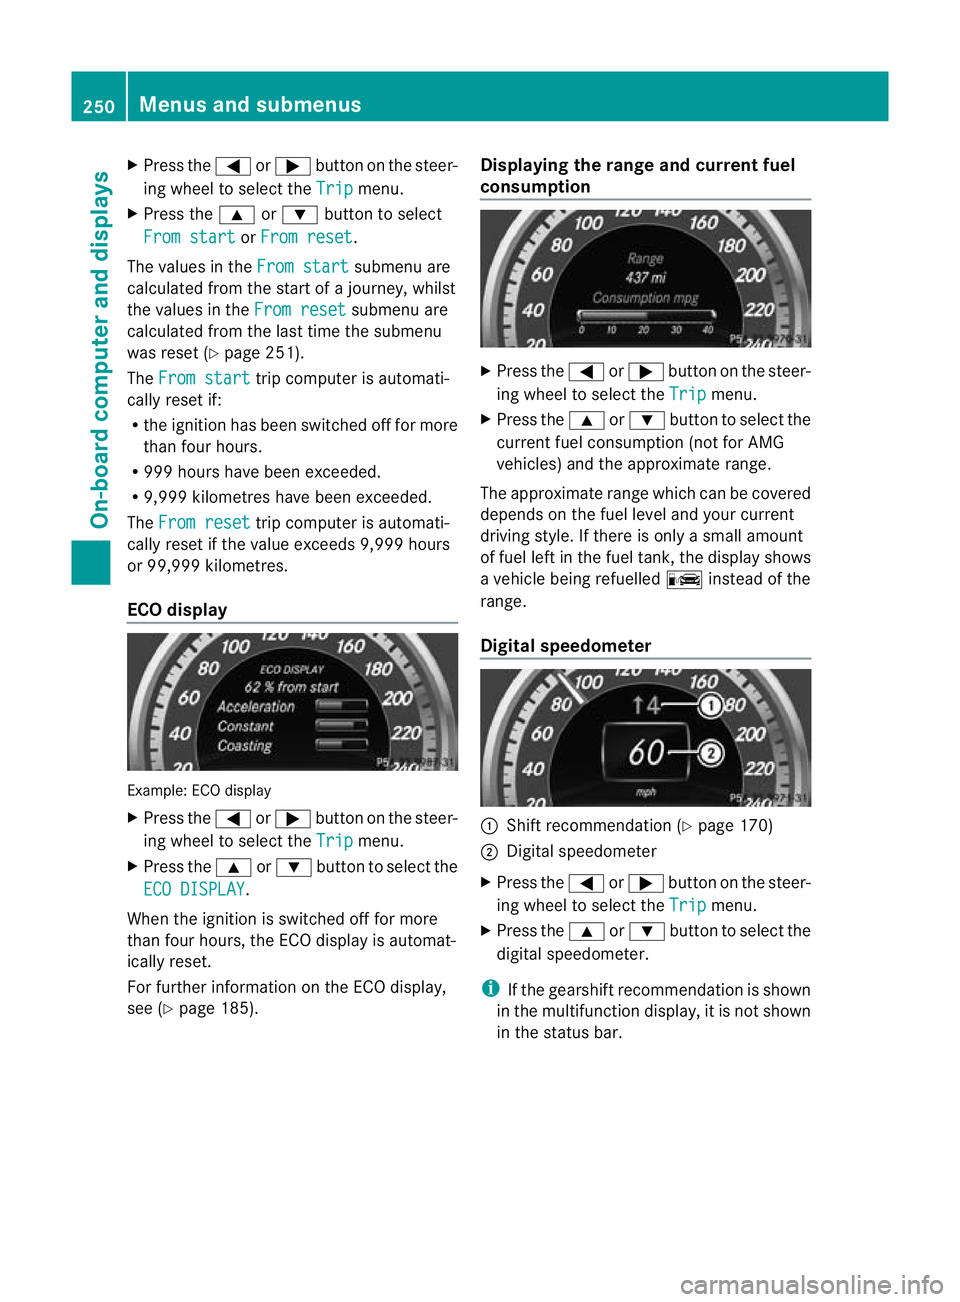
X
Press the =or; button on the steer-
ing wheel to select the Trip menu.
X Press the 9or: button to select
From start or
From reset .
The values in the From start submenu are
calculated from the start of a journey, whilst
the values in the From reset submenu are
calculated from the last time the submenu
was reset (Y page 251).
The From start trip computer is automati-
cally reset if:
R the ignition has been switched off for more
than four hours.
R 999 hours have been exceeded.
R 9,999 kilometres have been exceeded.
The From reset trip computer is automati-
cally reset if the value exceeds 9,999 hours
or 99,999 kilometres.
ECO display Example: ECO display
X Press the =or; button on the steer-
ing wheel to select the Trip menu.
X Press the 9or: button to select the
ECO DISPLAY .
When the ignition is switched off for more
than four hours, the ECO display is automat-
ically reset.
For further information on the ECO display,
see (Y page 185). Displaying the range and current fuel
consumption X
Press the =or; button on the steer-
ing wheel to select the Trip menu.
X Press the 9or: button to select the
current fuel consumption (not for AMG
vehicles) and the approximate range.
The approximate range which can be covered
depends on the fuel level and your current
driving style. If there is only a small amount
of fuel left in the fuel tank, the display shows
a vehicle being refuelled Cinstead of the
range.
Digital speedometer :
Shift recommendation (Y page 170)
; Digital speedometer
X Press the =or; button on the steer-
ing wheel to select the Trip menu.
X Press the 9or: button to select the
digital speedometer.
i If the gearshift recommendation is shown
in the multifunction display, it is not shown
in the status bar. 250
Menus and submenusOn-board computer and displays
Page 265 of 457
Activating/deactivating the acoustic
locking confirmation
If you switch on the
Acoustic Lock function,
an acoustic signal sounds when you loc kthe
vehicle.
X Press the =or; button on the steer-
ing wheel to select the Settings menu.
X Press the :or9 button to select the
Vehicle submenu.
X Press ato confirm.
X Press the :or9 button to select the
Acoustic Lock function.
If the Acoustic Lock function is activated,
the & symbol in the multifunction dis-
play lights up red.
X Press the abutton to save the setting.
Activating/deactivating the radar sensor
system
X Press the =or; button on the steer-
ing wheel to select the Settings menu.
X Press the :or9button to select the
Vehicle submenu.
X Press ato confirm.
X Press the 9or: button to select
Radar sensor (See Owner's Man.): .
You will see the selected setting: on or
off .
X Press the abutton to save the setting.
i You must deactivate the radar sensor sys-
tem in certain countries and near radio
telescope facilities. For further informa-
tion, see (Y page 451).
When you are close to radio telescope facili-
ties, the radar sensor system will be deacti-
vated automatically.
The following systems are switched off when
the radar sensor system is deactivated:
R DISTRONIC PLUS (Y page 195)
R BAS PLUS (Y page 71)
R PRE-SAFE ®
Brake (Y page 76) R
Blind Spot Assist (Y page 225)
R Active Blind Spot Assist (Y page 229)
Heating Auxiliary heating departure time
G
WARNING
Exhaust fumes are produced when the auxili-
ary heating is in operation. Inhaling these
exhaust fumes can be poisonous. You should
therefore switch off the auxiliary heating in
confined spaces without an extraction sys-
tem, e.g. a garage. G
WARNING
When operating the auxiliary heating parts of
the vehicle can get very hot. Make sure that
the exhaust system does not under any cir-
cumstances come into contact with easily
ignitable material such as dry grass or fuels.
The material could otherwise ignite and set
the vehicle alight. Choose your parking spot
accordingly.
Operating the auxiliary heating is thus pro-
hibited at filling stations or when your vehicle
is being refuelled. You must therefore switch
off the auxiliary heating at filling stations.
! Operating the auxiliary heating/ventila-
tion draws on the vehicle battery. After you
have heated or ventilated the vehicle a
maximum of two times, drive for a longer
distance.
This function is only available on vehicles with
auxiliary heating (Y page 151).
In the Heating submenu, you can select a
stored departure time or change a departure
time.
The auxiliary heating timer function calcu-
lates the switch-on time according to the out-
side temperature so that the vehicle is pre-
heated by the departure time. When the
departure time is reached, the auxiliary heat-
ing continues to heat for a further five
minutes and then switches off. The auxiliary 262
Menus and submenusOn-board computer and displays