2012 MERCEDES-BENZ E-CLASS ESTATE comand
[x] Cancel search: comandPage 81 of 457
X
To activate/deactivate: activate or deac-
tivate PRE-SAFE ®
Brake in the on-board
computer (Y page 256).
When PRE-SAFE ®
Brake is activated, the
Ä symbol appears in multifunctio ndis-
play, as long as the HOL Dfunction is deac-
tivated (Y page 205). On vehicles with the
Active Parking Assist driving system, the
Ä symbol is displayed when position P
is engaged or you are driving faste rthan
35 km/h.
For PRE-SAFE ®
Brake to assist you when driv-
ing, the radar sensor system must be
switched on (Y page 262) and be opera-
tional.
The radar sensor system is switched off auto-
matically in the vicinity of radio telescope
facilities in the following vehicles:
R vehicles with COMAND Online and naviga-
tion
R vehicles with Audio 20 and Becker ®
MAP
PILOT
Becker ®
MAP PILOT must be connected;
see the separate operating instructions.
The radar sensor system must be switched off
using the on-board computer in the vicinity of
radio telescope facilities in the following vehi-
cles:
R vehicles without COMAND Online and nav-
igation
R vehicles without Audio 20 and Becker ®
MAP PILOT
R vehicles for Australia
For information on switching off the radar
sensor system using the on-board computer,
see (Y page 262).
Following damage to the front end of the vehi-
cle, have the configuration and operation of
the radar sensors checked at a qualified spe-
cialist workshop. This also applies to colli-
sions at slow speeds where there is no visible
damage to the front of the vehicle. Anti-theft systems
Immobiliser
X To activate with the key: remove the key
from the ignition lock.
X To activate with KEYLESS-GO: switch the
ignition off and open the driver's door.
X To deactivate: switch on the ignition.
The immobiliser prevents your vehicle from
being started without the correct key.
When leaving the vehicle, always take the key
with you and lock the vehicle. Anyone can
start the engine if a valid key has been left
inside the vehicle.
i The immobiliser is always deactivated
when you start the engine. ATA (Anti-Theft Alarm system)
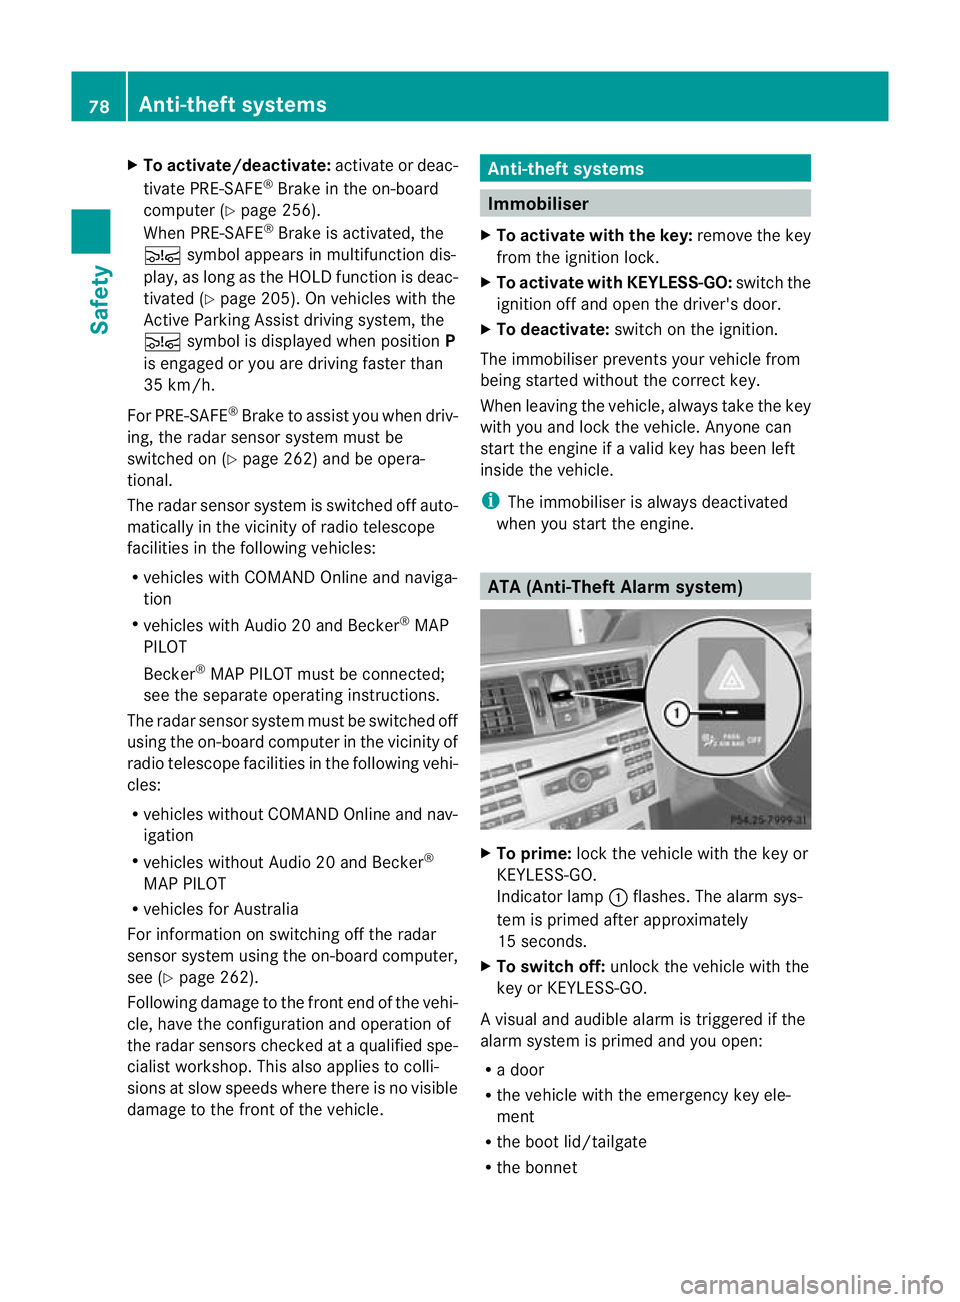
X
To prime: lock the vehicle with the key or
KEYLESS-GO.
Indicator lamp :flashes. The alarm sys-
tem is primed after approximately
15 seconds.
X To switch off: unlock the vehicle with the
key or KEYLESS-GO.
Av isual and audible alarm is triggered if the
alarm system is primed and you open:
R a door
R the vehicle with the emergency key ele-
ment
R the boot lid/tailgate
R the bonnet 78
Anti-theft systemsSafety
Page 202 of 457
Vehicles with COMAND APS/
Audio 50 APS
Example
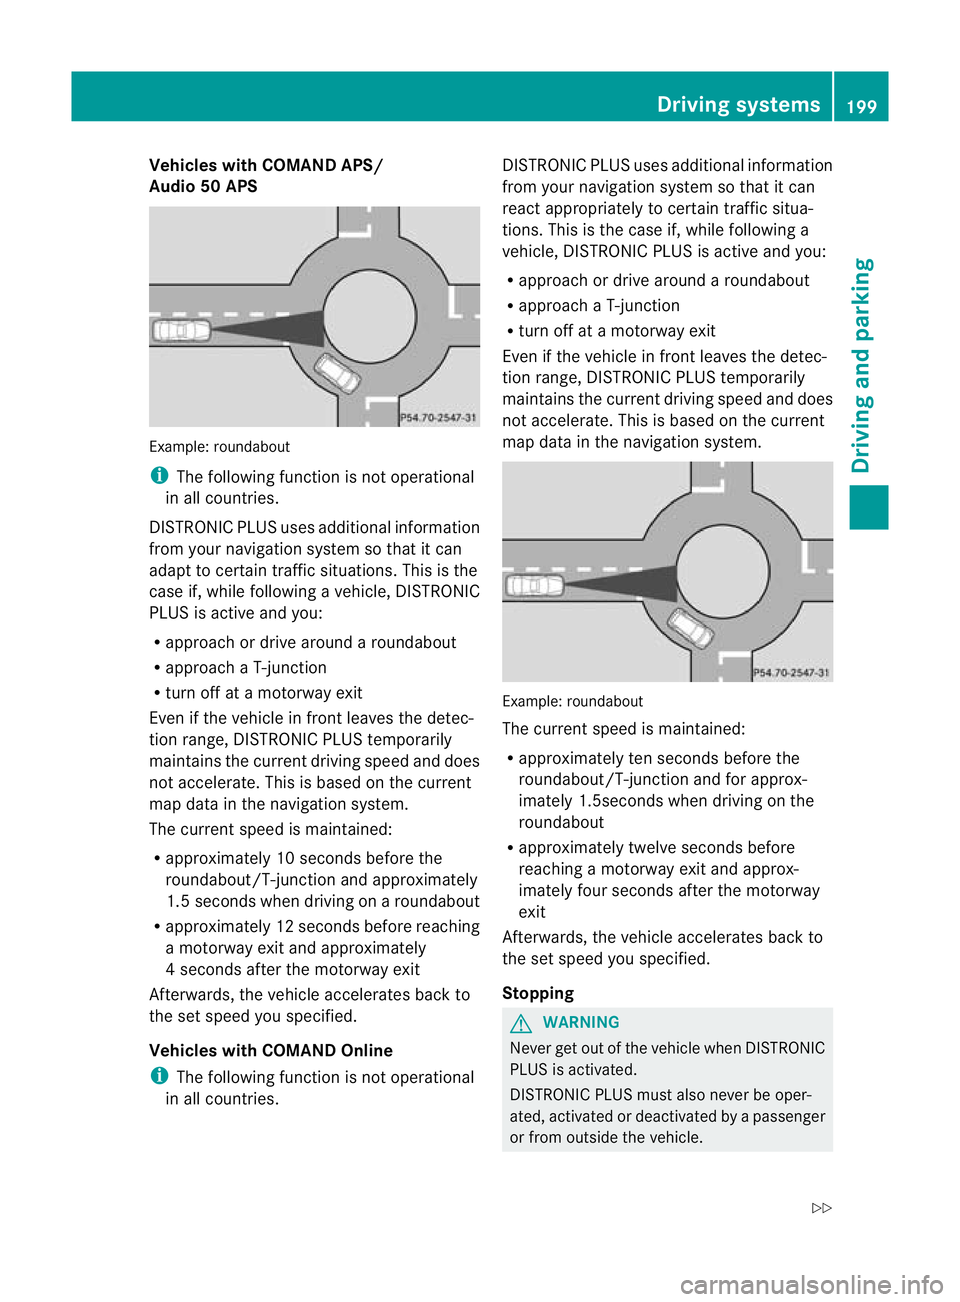
:roundabout
i The following function is not operational
in all countries.
DISTRONIC PLUS uses additional information
from your navigation system so that it can
adapt to certain traffic situations. This is the
case if, while following a vehicle, DISTRONIC
PLUS is active and you:
R approach or drive around a roundabout
R approach a T-junction
R turn off at a motorway exit
Even if the vehicle in front leaves the detec-
tion range, DISTRONIC PLUS temporarily
maintains the current driving speed and does
not accelerate. This is based on the current
map data in the navigation system.
The current speed is maintained:
R approximately 10 seconds before the
roundabout/T-junction and approximately
1.5 seconds when driving on a roundabout
R approximately 12 seconds before reaching
a motorway exit and approximately
4s econds after the motorway exit
Afterwards, the vehicle accelerates back to
the set speed you specified.
Vehicles with COMAND Online
i The following function is not operational
in all countries. DISTRONIC PLUS uses additional information
from your navigation system so that it can
react appropriately to certain traffic situa-
tions. This is the case if, while following a
vehicle, DISTRONIC PLUS is active and you:
R
approach or drive around a roundabout
R approach a T-junction
R turn off at a motorway exit
Even if the vehicle in front leaves the detec-
tion range, DISTRONIC PLUS temporarily
maintains the curren tdriving speed and does
not accelerate. This is based on the current
map data in the navigation system. Example
:roundabout
The current speed is maintained:
R approximately ten seconds before the
roundabout/T-junction and for approx-
imately 1.5seconds when driving on the
roundabout
R approximately twelve seconds before
reaching a motorway exit and approx-
imately four seconds after the motorway
exit
Afterwards, the vehicle accelerates back to
the set speed you specified.
Stopping G
WARNING
Never get out of the vehicle when DISTRONIC
PLUS is activated.
DISTRONIC PLUS must also never be oper-
ated, activated or deactivated by a passenger
or from outside the vehicle. Driving systems
199Driving and parking
Z
Page 221 of 457
X
Countersteering: while the vehicle is sta-
tionary, tur nthe steering wheel in the
specified direction until the arrow is white
and a warning tone sounds.
X To reverse into the parking space: main-
tain the steering wheel angle and reverse
carefully.
X Stop as soon as you hear a warning tone,
at the latest when PARKTRONIC sounds the
continuous warning tone.
The Parking Guidance finished mes-
sage appears in the multifunction display
and a tone sounds. You may be asked to
steer in a different direction and then
change gear. In this case, further displays
in the multifunction display will direct you
to the final position.
X Manoeuvre if necessary.
X Always observe the warning messages dis-
played by PARKTRONIC (Y page 213).
Cancelling Parking Guidance X
Press the PARKTRONIC button on the
centre console (Y page 213).
Parking Guidance is cancelled immediately
and PARKTRONIC is deactivated.
Parking Guidance is cancelled automatically
if it is no longer possible to guide you into the
parking space or if a malfunction occurs.
The parking space symbol goes out and a
warning tone sounds. The Parking Guid‐ance cancelled message appears in the
multifunction display.
Towing atrailer For vehicles with a trailer tow hitch, the min-
imum length for parking spaces is slightly
increased.
If you have attached a trailer to your vehicle,
you should not use Parking Guidance. When
the electrical connectio
nis established
between your vehicle and the trailer, Parking
Guidance ceases to be available. PARK-
TRONIC is deactivated for the rear area. Reversing camera
Important safety notes G
WARNING
Make sure that no persons or animals are in
the manoeuvring range. Otherwise, they
could be injured.
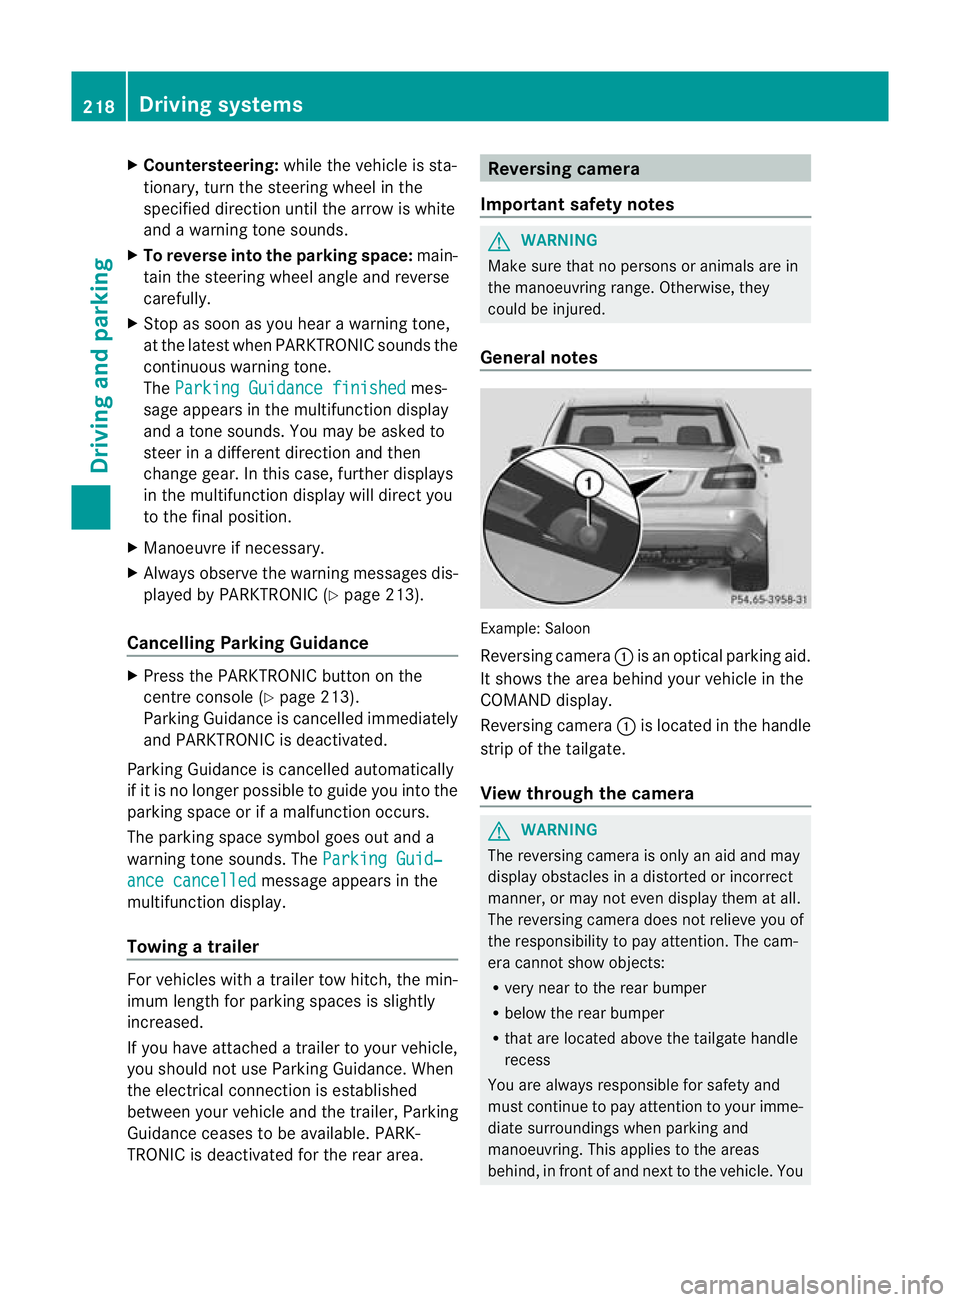
General notes Example: Saloon
Reversing camera
:is an optical parking aid.
It shows the area behind your vehicle in the
COMAND display.
Reversing camera :is located in the handle
strip of the tailgate.
View through the camera G
WARNING
The reversing camera is only an aid and may
display obstacles in a distorted or incorrect
manner, or may not even display them at all.
The reversing camera does not relieve you of
the responsibility to pay attention. The cam-
era cannot show objects:
R very near to the rear bumper
R below the rear bumper
R that are located above the tailgate handle
recess
You are always responsible for safety and
must continue to pay attention to your imme-
diate surroundings when parking and
manoeuvring. This applies to the areas
behind, in front of and next to the vehicle. You 218
Driving systemsDriving and parking
Page 222 of 457
could otherwise endanger yoursel
fand oth-
ers. G
WARNING
Unde rthe following circumstances, the
reversing camera will not function, or will
function in a limited manner:
R if the tailgate is open
R in heavy rain, snow or fog
R at night or in very dark places
R if the camera is exposed to very bright light
R if the area is lit by fluorescent light or LED
lighting (the display may flicker)
R if there is a sudden change in temperature,
e.g. when driving into a heated garage in
winter
R if the camera lens is dirty or obstructed
R if the rear of your vehicle is damaged. In this
event, have the camera position and setting
checked at a qualified specialist workshop.
Mercedes-Ben zrecommends that you use
a Mercedes-Benz Service Centre for this
purpose.
Do not use the reversing camera in these
types of situation .You could otherwise injure
others or damage objects and your vehicle
while you are parking.
The area behind the vehicle is displayed as a
mirror image, as in the rear-view mirror.
Activating the reversing camera X
Make sure that the key is in position 2in
the ignition lock.
X Make sure that the "Reversing camera"
function is selected in COMAND APS (see
the separate operating instructions for
COMAND APS).
X Engage reverse gear.
The area behind the vehicle is shown with
guide lines in the COMAND display. Guide lines in the COMAND display G
WARNING
Using the reversing camera can be dangerous
if you are colour blind or your ability to distin-
guish colours is impaired.
Only use the reversing camera if you can see
and distinguish between all the coloured
guide lines that are displayed by the reversing
camera in the COMAND display. G
WARNING
Please note that objects not at ground level
may appear to be further away than they
actually are. These include:
R the bumper of a vehicle that is parked
behind your vehicle
R a trailer drawbar
R the ball coupling of a trailer tow hitch
R the tail-end of a lorry
R slanted posts
The lines are only guides, not accurate meas-
urements of the distance to an obstacle.
Therefore, you should never pass the red line
when approaching an obstacle. You could oth-
erwise cause an accident and injure yourself
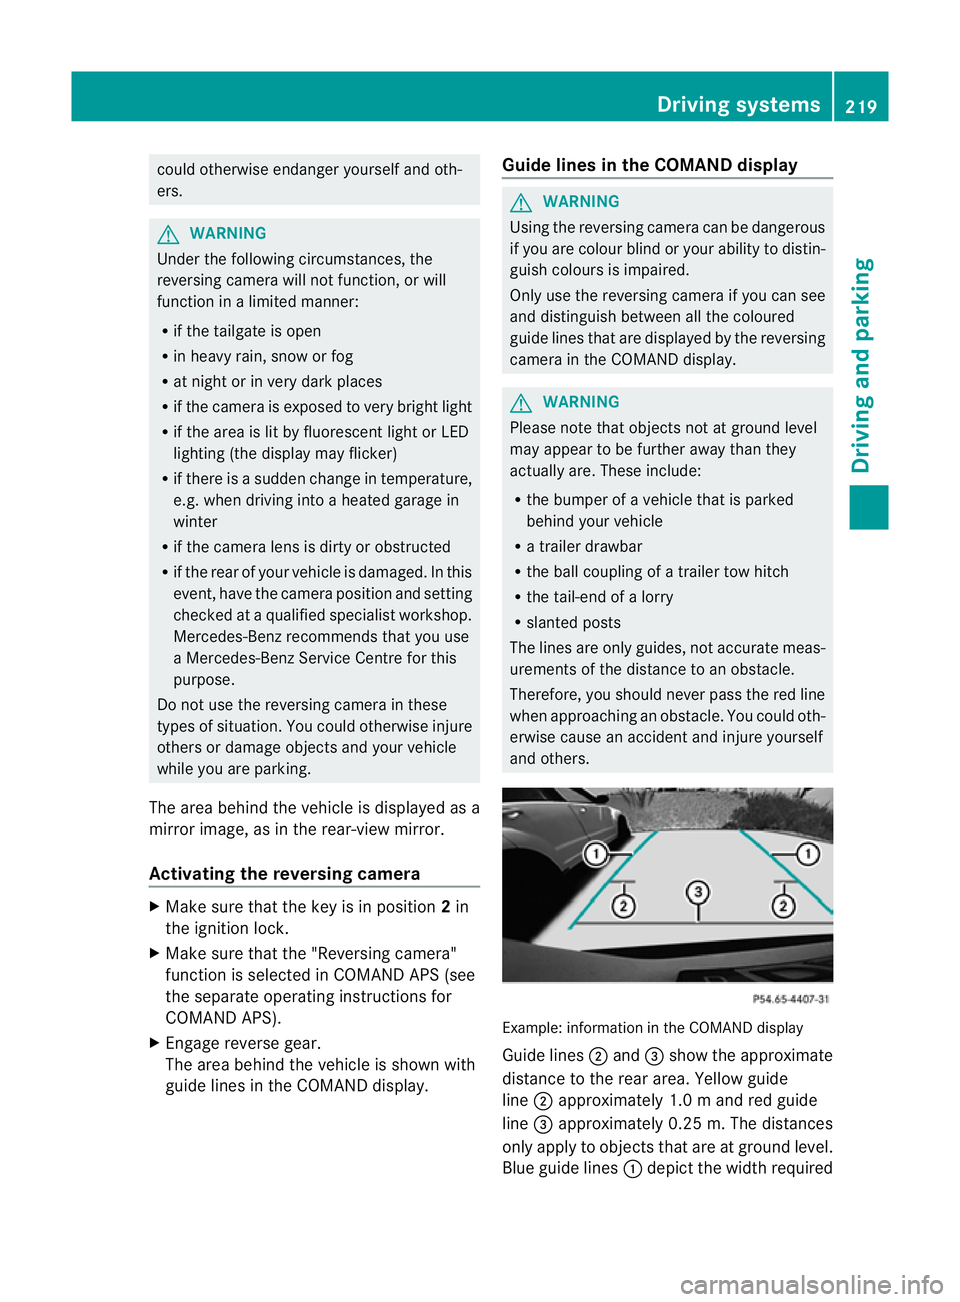
and others. Example: information in the COMAND display
Guide lines
;and =show the approximate
distance to the rear area. Yellow guide
line ;approximately 1.0 mand red guide
line =approximately 0.25 m. The distances
only apply to objects that are at ground level.
Blue guide lines :depict the width required Driving systems
219Driving and parking Z
Page 223 of 457
for the vehicle. They are used to align the
vehicle with the edge of the carriageway, e.g.
the kerb.
ATTENTIO
NASSIST
Important safety notes G
WARNING
ATTENTION ASSIST is only an aid and may
detect your tiredness or lapses in concentra-
tion too late or not at all. It is not asubstitute
for a well rested and attentive driver.
Fatigue may cause you to recognise hazard-
ous situations too late, misjudge a situation
or react slower. For this reason, make sure
you feel rested before you begin driving and
during your journey. Always take breaks in
good time and regularly, especially during
long journeys. Otherwise, you may fail to rec-
ognise dangers in time, cause an acciden tand
injure yoursel fand others.
General notes ATTENTIO
NASSIST helps you during long,
monotonous journeys such as on motorways
and trunk roads. It is active in the 80 km/h
to 180 km/h range.
If ATTENTION ASSIST detects typical indica-
tors of fatigue or increasing lapses in con-
centration on the part of the driver, it sug-
gests taking a break.
ATTENTIO NASSIST assesses your level of
fatigue or lapses in concentration by taking
the following criteria into account:
R your personal driving style, e.g. steering
characteristics
R journey-related parameters, e.g. time of
day, length of journey
The functionality of ATTENTION ASSIST is
restricted, and warnings may be delayed or
not occur at all:
R if the road condition is poor, e.g. if the sur-
face is uneven or if there are potholes
R if there is a strong sid ewind R
if you have adopted a sporty driving style
with high cornering speeds or high rates of
acceleration
R if you are predominantly driving slower
than 80 km/h or faster than 180 km/h
R if you are currently using COMAND APS or
making a telephone call with COMAND APS
R if the time has been set incorrectly
R in active driving situations, such as when
you change lanes or change your speed
Warning and display messages in the
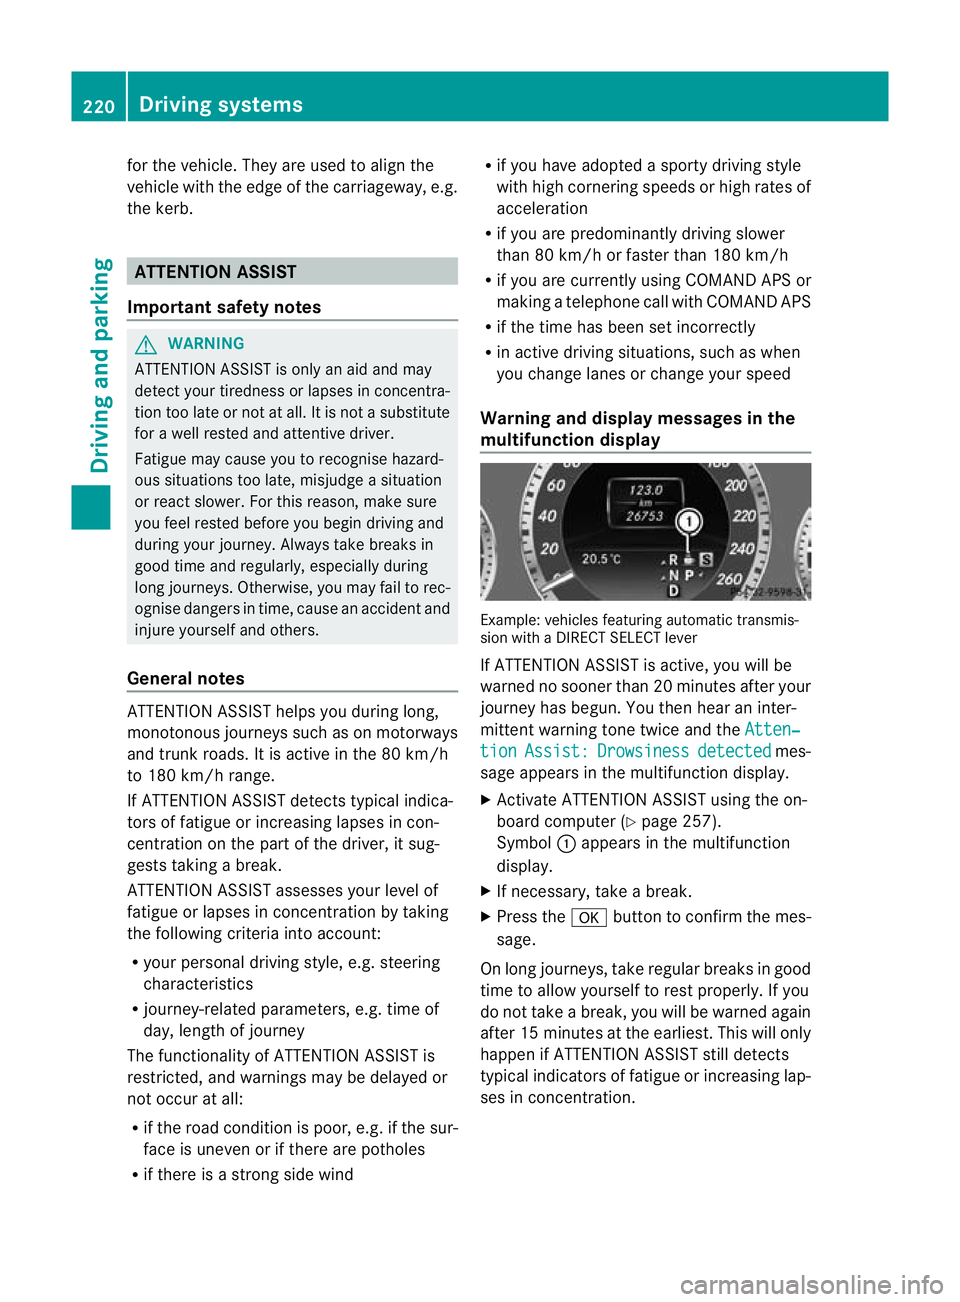
multifunction display Example: vehicles featuring automatic transmis-
sion with a DIRECT SELECT lever
If ATTENTION ASSIST is active, you will be
warned no sooner than 20 minutes after your
journey has begun. You the
nhear an inter-
mittent warning tone twice and the Atten‐ tion Assist: Drowsiness detected mes-
sage appears in the multifunction display.
X Activate ATTENTION ASSIST using the on-
board computer (Y page 257).
Symbol :appears in the multifunction
display.
X If necessary, take a break.
X Press the abutton to confirm the mes-
sage.
On long journeys, take regular breaks in good
time to allow yourself to rest properly. If you
do not take a break, you will be warned again
after 15 minutes at the earliest. This will only
happen if ATTENTION ASSIST still detects
typical indicators of fatigue or increasing lap-
ses in concentration. 220
Driving systemsDriving and parking
Page 225 of 457
Briefly showing detecte
dtraffic signs in
the multifunction display
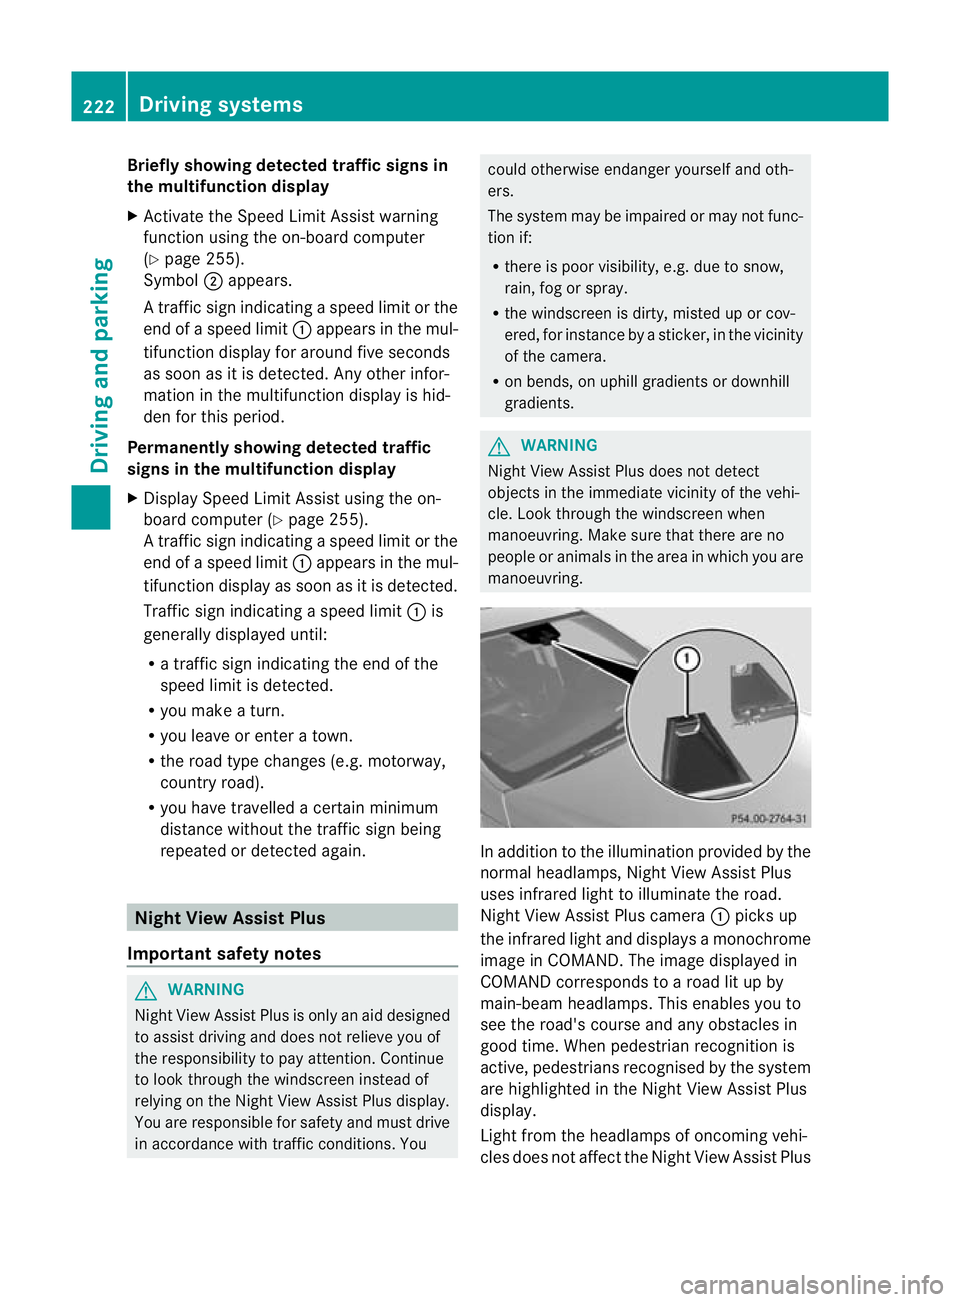
X Activate the Speed Limit Assist warning
functio nusing the on-board computer
(Y page 255).
Symbol ;appears.
At raffic sign indicating a speed limi torthe
end of a speed limit :appears in the mul-
tifunction display for around five seconds
as soon as it is detected. Any other infor-
mation in the multifunction display is hid-
den for this period.
Permanently showing detected traffic
signs in the multifunction display
X Display Speed Limit Assist using the on-
board computer (Y page 255).
At raffic sign indicating a speed limi torthe
end of a speed limit :appears in the mul-
tifunction display as soon as it is detected.
Traffic sign indicating a speed limit :is
generally displayed until:
R a traffic sign indicating the end of the
speed limit is detected.
R you make a turn.
R you leave or enter a town.
R the road type changes (e.g. motorway,
country road).
R you have travelled a certain minimum
distance without the traffic sign being
repeated or detected again. Night View Assist Plus
Important safety notes G
WARNING
Night View Assist Plus is only an aid designed
to assist driving and does not relieve you of
the responsibility to pay attention. Continue
to look through the windscreen instead of
relying on the Night View Assist Plus display.
You are responsible for safety and must drive
in accordance with traffic conditions. You could otherwise endanger yourself and oth-
ers.
The system may be impaired or may not func-
tion if:
R
there is poor visibility, e.g. due to snow,
rain, fog or spray.
R the windscreen is dirty, misted up or cov-
ered, for instance by a sticker, in the vicinity
of the camera.
R on bends, on uphill gradients or downhill
gradients. G
WARNING
Night View Assist Plus does not detect
objects in the immediate vicinity of the vehi-
cle. Look through the windscreen when
manoeuvring. Make sure that there are no
people or animals in the area in which you are
manoeuvring. In addition to the illumination provided by the
normal headlamps, Night View Assist Plus
uses infrared light to illuminate the road.
Night View Assist Plus camera
:picks up
the infrared light and displays a monochrome
image in COMAND. The image displayed in
COMAND corresponds to a road lit up by
main-beam headlamps. This enables you to
see the road's course and any obstacles in
good time. When pedestrian recognition is
active, pedestrians recognised by the system
are highlighted in the Night View Assist Plus
display.
Light from the headlamps of oncoming vehi-
cles does not affect the Night View Assist Plus 222
Driving systemsDriving and parking
Page 226 of 457
display in the multifunction display. This is
also the case if you cannot switch on the
main-beam headlamps due to oncoming traf-
fic.
i Infrared light is not visible to the human
eye and therefore does not dazzle. Night
View Assist Plus can therefore remain
switched on even if there is oncoming traf-
fic.
Activating Night View Assist Plus Activation conditions
You can only activate Night View Assist Plus
if:
R the key is in position 2in the ignition lock.
R it is dark.
R the light switch is in the ÃorL posi-
tion.
R reverse gear has not been engaged.
Activating Night View Assist Plus X
Make sure that COMAND APS is switched
on.
X Press button :.
The Night View Assist Plus display appears
in the COMAND display.
You can read about how to adjust the bright-
ness of the COMAND display in the COMAND
APS operating instructions.
i The infrared headlamps only switch on
when the vehicle is being driven at speeds
of at least 10 km/h. This means that you
do not have the full visual range while sta- tionary and cannot check whether Night
View Assist Plus is working.
Pedestrian recognition G
WARNING
Pedestrian recognition may be impaired or
inoperative if:
R pedestrians are partially or entirely
obscured by objects, e.g. by parked vehi-
cles.
R the silhouette of the pedestrian in the Night
View Assist Plus display is incomplete or
interrupted, e.g. by powerful light reflec-
tions.
R pedestrians do not contrast with the sur-
roundings.
R pedestrians are not in an upright position,
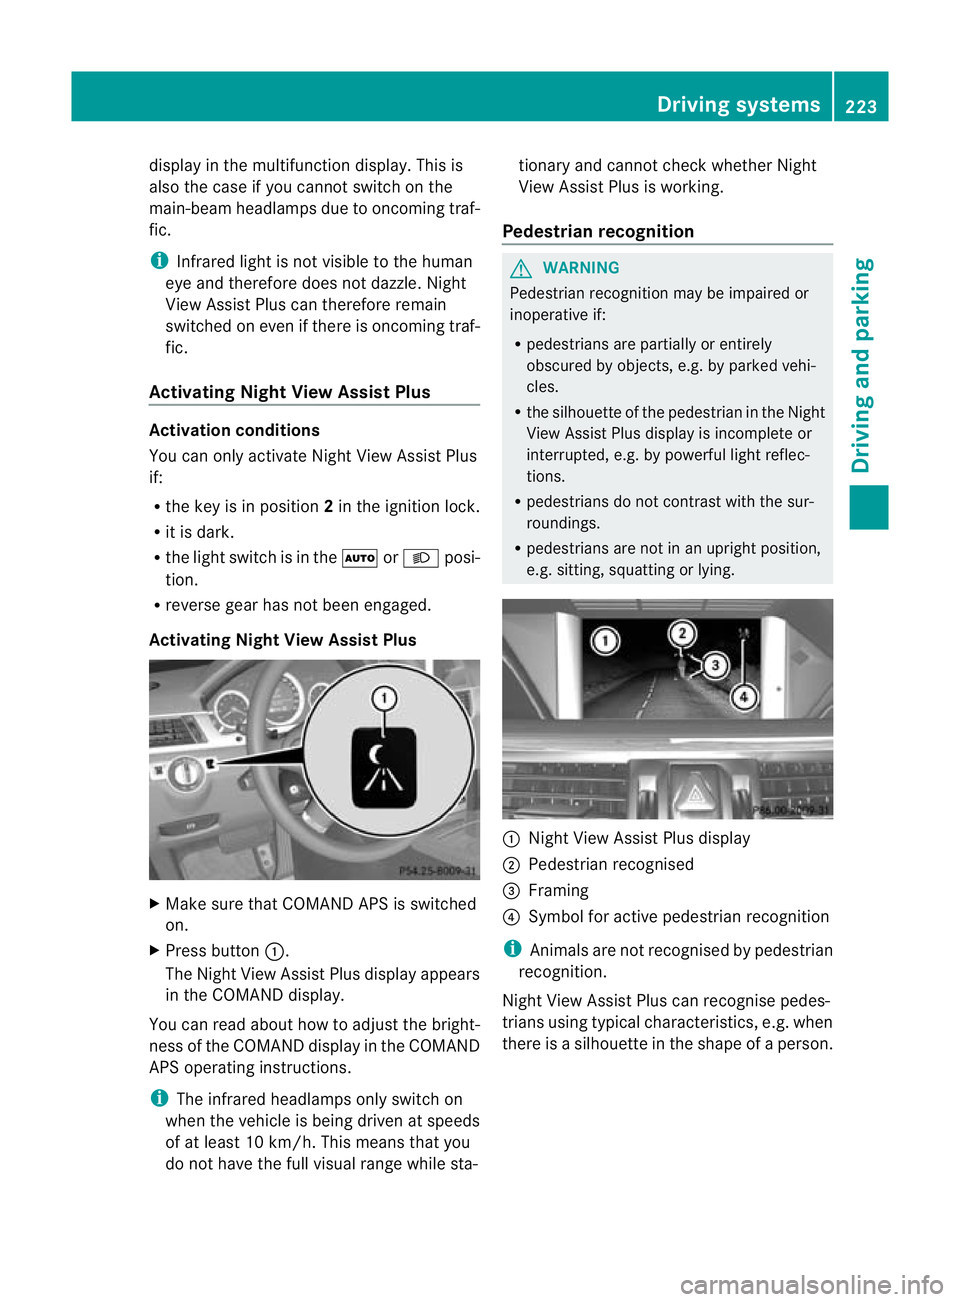
e.g. sitting, squatting or lying. :
Night View Assist Plus display
; Pedestrian recognised
= Framing
? Symbol for active pedestrian recognition
i Animals are not recognised by pedestrian
recognition.
Night View Assist Plus can recognise pedes-
trians using typical characteristics, e.g. when
there is a silhouette in the shape of a person. Driving systems
223Driving and parking Z
Page 249 of 457
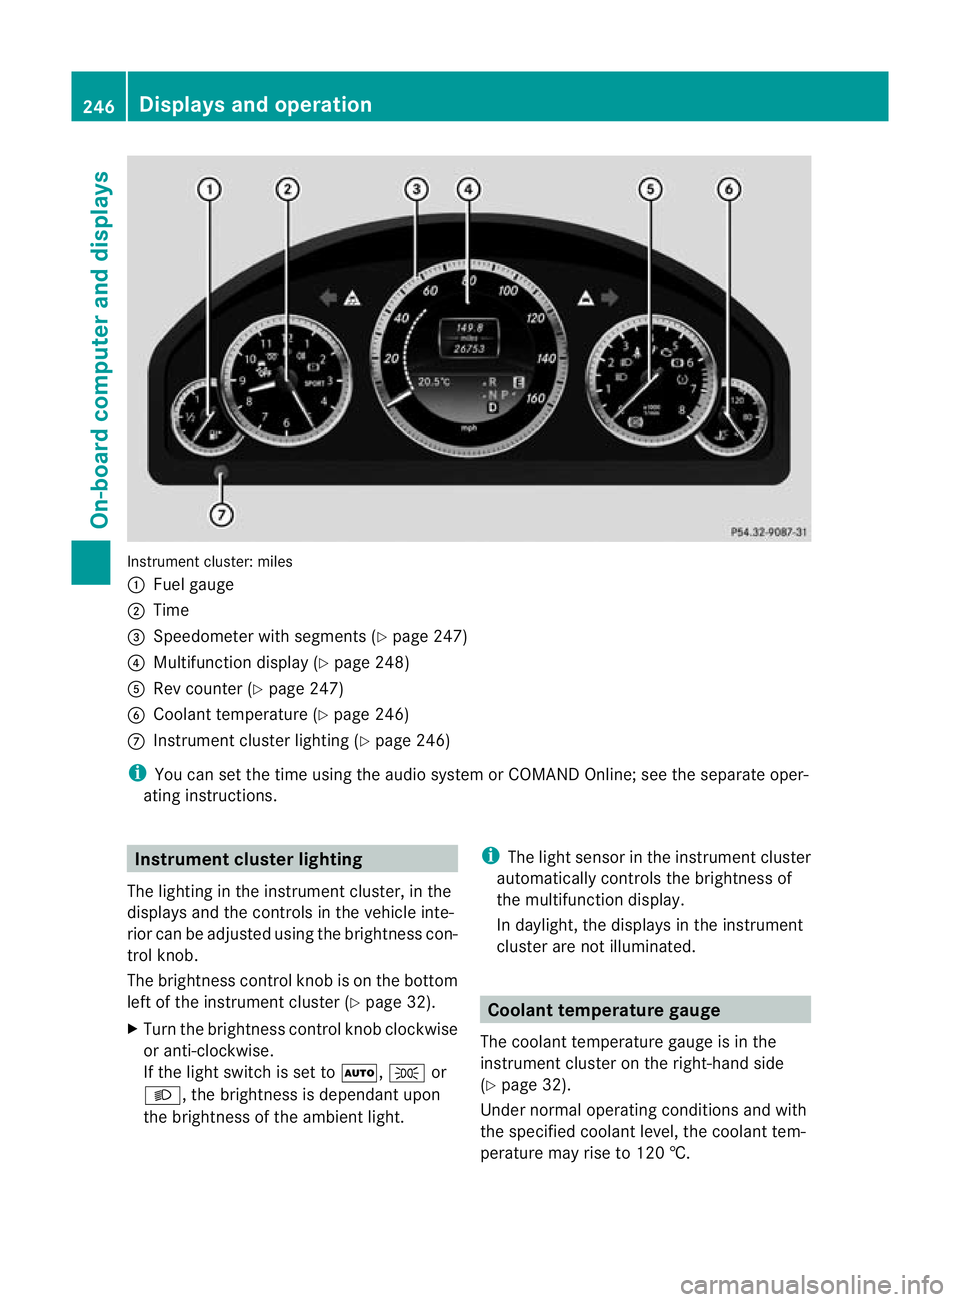
Instrument cluster: miles
:
Fuel gauge
; Time
= Speedometer with segments (Y page 247)
? Multifunction display (Y page 248)
A Rev counter (Y page 247)
B Coolant temperature (Y page 246)
C Instrument cluster lighting (Y page 246)
i You can set the time using the audio system or COMAND Online; see the separate oper-
ating instructions. Instrument clusterl
ighting
The lighting in the instrumen tcluster, in the
displays and the controls in the vehicle inte-
rior can be adjusted using the brightness con-
trol knob.
The brightness control knob is on the bottom
left of the instrument cluster (Y page 32).
X Turn the brightness control knob clockwise
or anti-clockwise.
If the light switch is set to Ã,Tor
L, the brightness is dependant upon
the brightness of the ambien tlight. i
The light sensor in the instrumen tcluster
automatically controls the brightness of
the multifunction display.
In daylight, the displays in the instrument
cluster are not illuminated. Coolant temperature gauge
The coolan ttemperature gauge is in the
instrument cluster on the right-hand side
(Y page 32).
Under normal operating conditions and with
the specified coolant level, the coolant tem-
perature may rise to 120 †. 246
Displays and operationOn-board computer and displays