2012 MERCEDES-BENZ E-CLASS ESTATE warning
[x] Cancel search: warningPage 138 of 457
Replacing bulbs
Important safety notes
Xenon bulbs G
DANGER
Xeno nbulbs are unde rhigh voltage. If you
touch the electrical contacts of a xenon bulb,
you could suffe ranelectric shoc kand be seri-
ously or eve nfatally injured. For this reason,
do not remove the cover of xenon bulbs.
Do no tchange the xenon bulbs yourself, but
have them replaced at a qualified workshop.
If your vehicle is equipped with xenon bulbs,
you can recognise this by the following: the
cone of light from the xenon bulbs moves
from the top to the bottom and back again
when you start the engine. For this to be
observed, the lights must be switched on
before starting the engine.
Bulbs and lamps are an important aspect of
vehicle safety. You must therefore make sure
that these function correctly at all times.
Have the headlamp setting checked regularly.
Other bulbs G
WARNING
Bulbs and lamps can be very hot. You should
therefore allow them to cool down before you
change them. Otherwise, you could be burned
if you touch them.
Keep bulbs out of the reach of children. Oth-
erwise, they could damage the bulbs, for
example, and injure themselves.
Never use a bulb which has been dropped.
Such a bulb may break or even explode and
injure you.
Halogen bulbs are pressurised and can
explode when you change them, particularly
if they are very hot. You should therefore wear
eye protection and gloves when you are
changing them.
There are bulbs other than the xenon bulbs
that you cannot replace. Replace only the bulbs listed (Y
page 135). Have the bulbs that
you cannot replace yourself changed at a
qualified specialist workshop.
If you require assistance changing bulbs, con-
sult a qualified specialist workshop.
Do not touch the glass tube of new bulbs with
your bare hands. Even minor contamination
can burn into the glass surface and reduce
the service life of the bulbs. Always use a lint-
free cloth or only touch the base of the bulb
when fitting.
Only use bulbs of the correct type.
If the new bulb still does not light up, consult
a qualified specialist workshop.
Bulbs and lamps are an important aspect of
vehicle safety. You must therefore make sure
that these function correctly at all times.
Have the headlamp setting checked regularly. Overview of bulb replacement
–bulbs
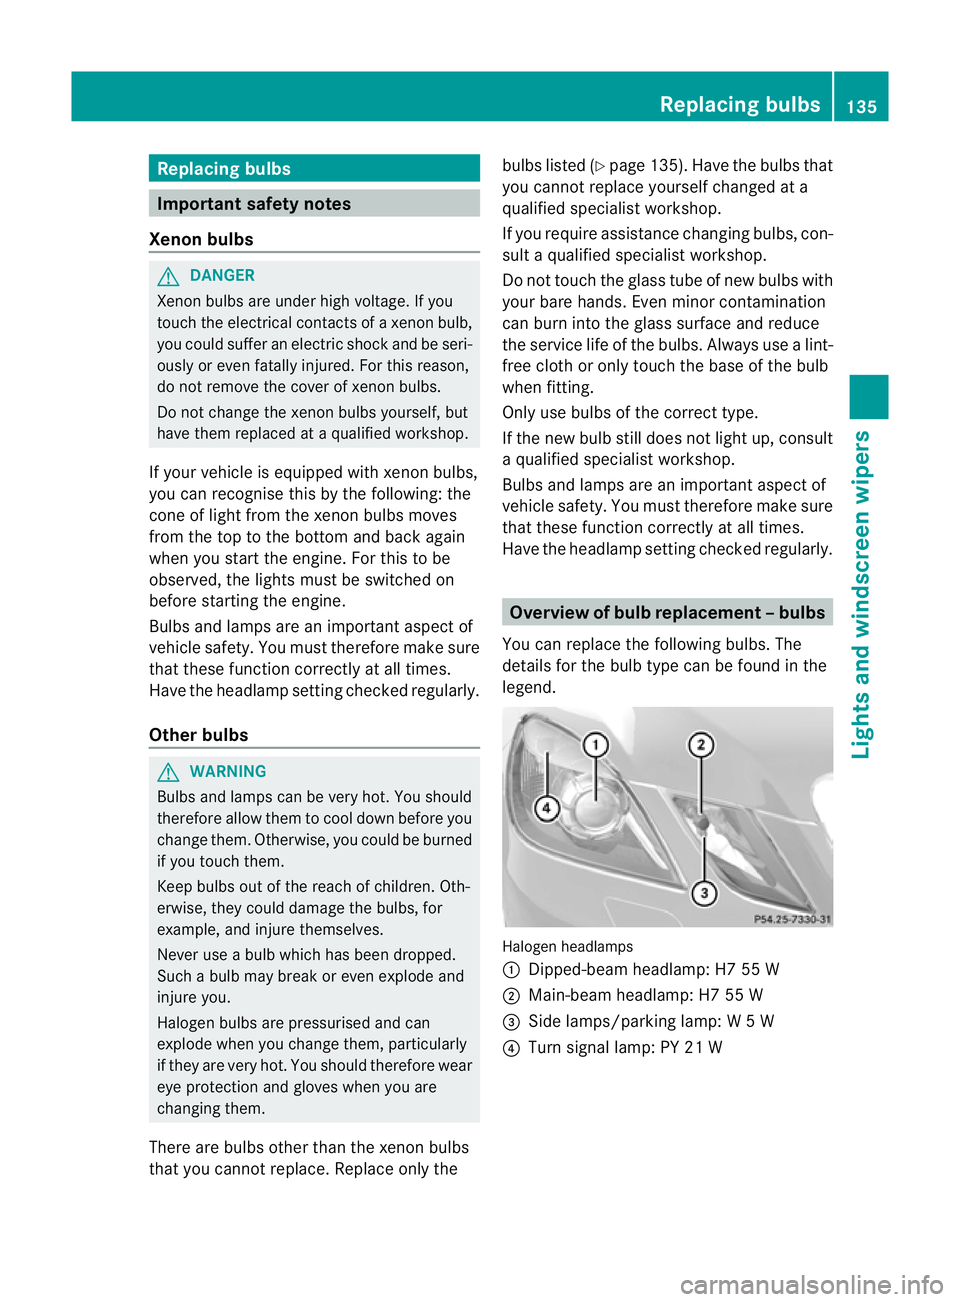
You can replace the following bulbs. The
details for the bulb type can be found in the
legend. Halogen headlamps
:
Dipped-bea mheadlamp: H7 55 W
; Main-beam headlamp: H7 55 W
= Side lamps/parking lamp: W5W
? Turn signal lamp: PY 21 W Replacing bulbs
135Lights and windscreen wipers Z
Page 140 of 457
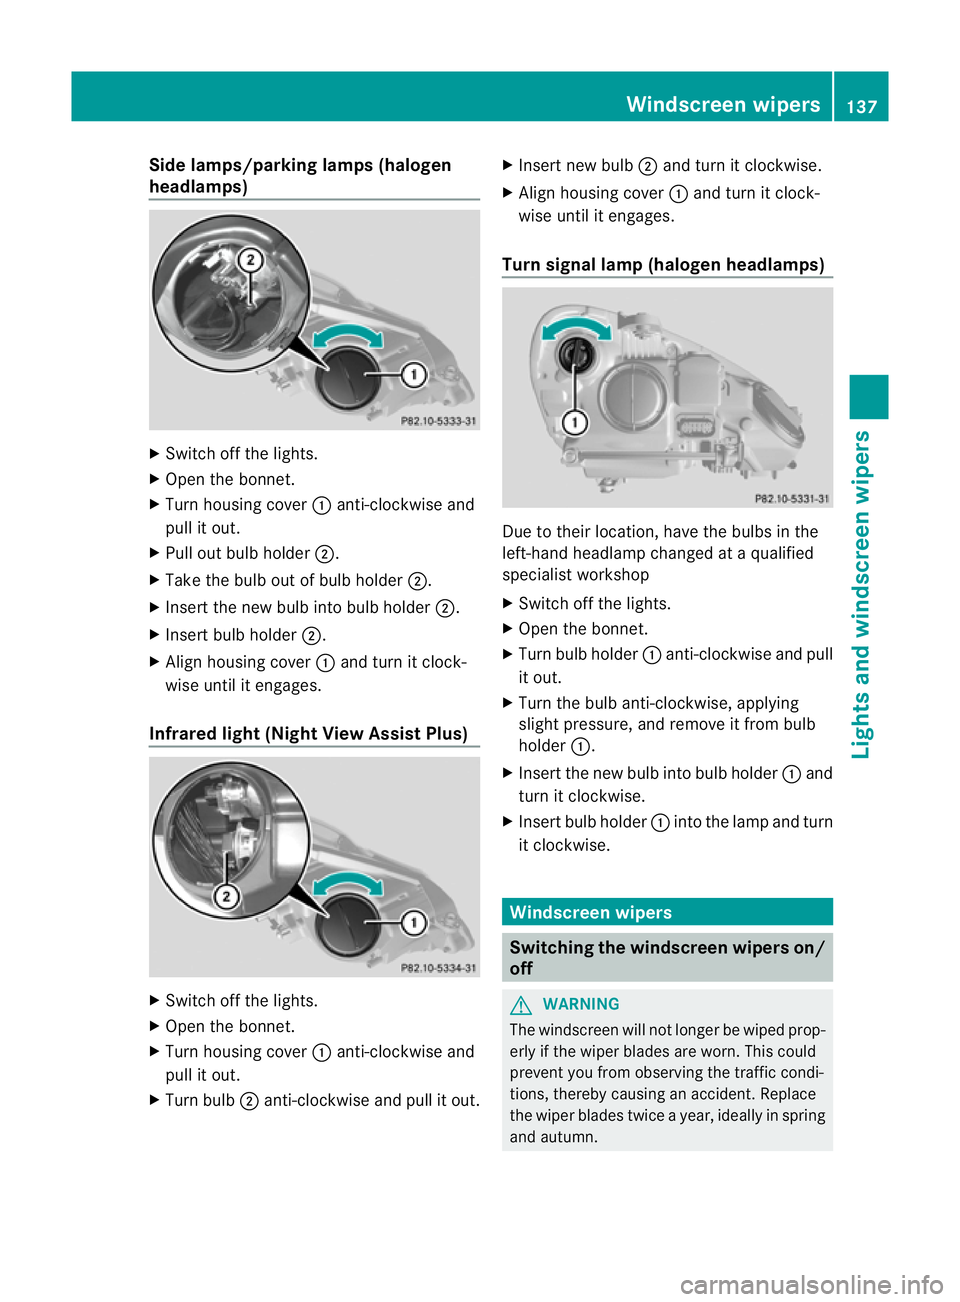
Side lamps/parking lamps(
halogen
headlamps) X
Switch off the lights.
X Open the bonnet.
X Turn housing cover :anti-clockwise and
pull it out.
X Pull out bulb holder ;.
X Take the bulb out of bulb holder ;.
X Insert the new bulb into bulb holder ;.
X Insert bulb holder ;.
X Align housing cover :and turn it clock-
wise until it engages.
Infrared light (Night View Assist Plus) X
Switch off the lights.
X Open the bonnet.
X Turn housing cover :anti-clockwise and
pull it out.
X Turn bulb ;anti-clockwise and pull it out. X
Insert new bulb ;and turn it clockwise.
X Align housing cover :and turn it clock-
wise until it engages.
Turn signal lamp (halogen headlamps) Due to their location, have the bulbs in the
left-hand headlamp changed at a qualified
specialist workshop
X
Switch off the lights.
X Open the bonnet.
X Turn bulb holder :anti-clockwise and pull
it out.
X Turn the bulb anti-clockwise, applying
slight pressure, and remove it from bulb
holder :.
X Insert the new bulb into bulb holder :and
turn it clockwise.
X Insert bulb holder :into the lamp and turn
it clockwise. Windscreen wipers
Switching the windscreen wipers on/
off
G
WARNING
The windscreen will not longe rbe wiped prop-
erly if the wiper blades are worn. This could
prevent you from observing the traffic condi-
tions, thereby causing an accident. Replace
the wiper blades twice a year, ideally in spring
and autumn. Windscreen wipers
137Lights and windscreen wipers Z
Page 142 of 457
Replacing the wiper blades
Important safety notes G
WARNING
The wiper arms could star tmoving and cause
an injury if you leave the windscreen wipers
switched on.
Remove the key from the ignition lock before
replacing the wiper blades.
! Never open the bonnet if a windscreen
wiper arm has been folded away from the
windscreen.
Never fold a windscreen wiper arm without
a wiper blade back onto the windscreen/
rear window.
Hold the windscreen wiper arm firmly when
you change the wiper blade. If you release
the windscreen wiper arm without a wiper
blade and it falls onto the windscreen, the
windscreen may be damaged by the force
of the impact.
Mercedes-Benz recommends that you have
the wiper blades changed at aqualified
specialist workshop.
! To avoid damaging the windscree nwiper
blades, make sure that you touch only the
wiper arm of the windscreen wiper.
Replacing the wiper blades Removing the wiper blades
X
Remove the key from the ignition lock or
tur nthe key to position 0(KEYLESS-GO).
X Fold the wiper arm away from the wind-
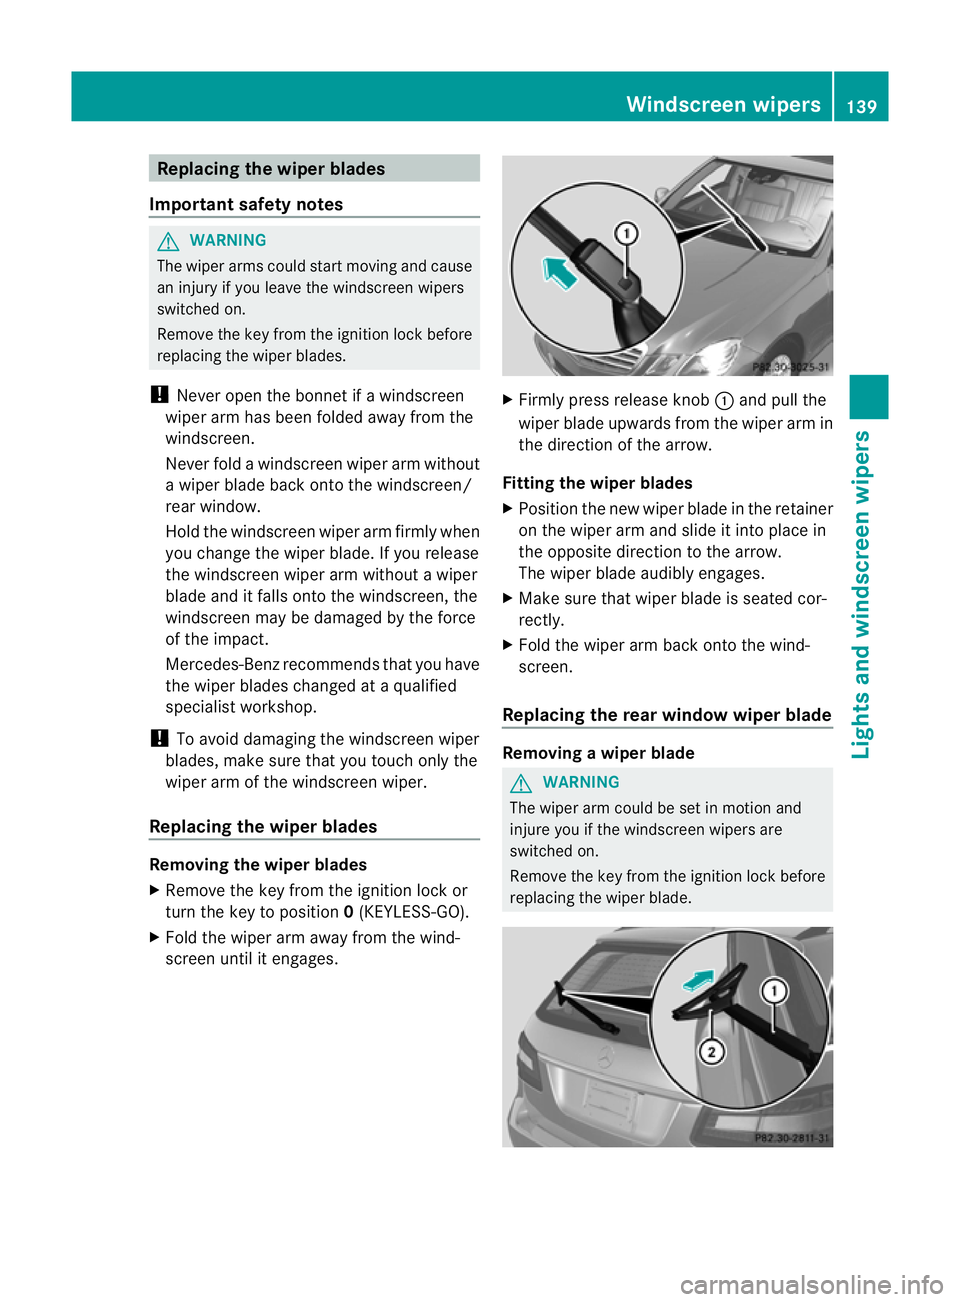
screen until it engages. X
Firmly press release knob :and pull the
wiper blade upwards from the wiper arm in
the direction of the arrow.
Fitting the wiper blades
X Position the new wiper blade in the retainer
on the wiper arm and slide it into place in
the opposite direction to the arrow.
The wiper blade audibly engages.
X Make sure that wiper blade is seated cor-
rectly.
X Fold the wiper arm back onto the wind-
screen.
Replacing the rear window wiper blade Removing
awiper blade G
WARNING
The wiper arm could be set in motion and
injure you if the windscreen wipers are
switched on.
Remove the key from the ignition lock before
replacing the wiper blade. Windscreen wipers
139Lights and windscreen wipers Z
Page 145 of 457
Useful information
i This Owner's Manual describes all mod-
els, series and optional equipment for your
vehicle that were available at the time of
going to press. National variations are pos-
sible. Note that your vehicle may not be
equipped with all of the functions descri-
bed. This is also the case for systems and
functions relevant to safety.
i Read the information on qualified special-
ist workshops: (Y page 25). Overview of climate control systems
Important safety notes
G
WARNING
Observe the settings recommended on the
following pages. The windows could other-
wise mist up. This may preven tyou from
observing the traffic conditions, thereby caus-
ing an accident.
Climate control regulates the temperature
and the humidity in the vehicle interior and
filters undesirable substances out of the air.
Climate control is only operational when the
engine is running. The system only works
optimally if the side windows and the roof are
closed.
The residual heat function can only be acti-
vated or deactivated with the ignition
switched off (Y page 150).
i Ventilate the vehicle for a brief period
during warm weather, e.g. using the con-
venience opening feature (Y page 96). This
will speed up the cooling process and the
desired vehicle interior temperature will be
reached more quickly.
i The integrated filter can filter out most
particles of dust and completely filters out
pollen. Aclogged filter reduces the amount
of air supplied to the vehicle interior .For
this reason, you should always observe the interval for replacing the filter, which is
specified in the Service Booklet
.As it
depends on environmental conditions, e.g.
heavy air pollution, the interval may be
shorter than stated in the Service Booklet.
i It is possible that the residual heat func-
tion may be activated automatically an hour
after the key has been removed. The vehi-
cle is then ventilated for 30minutes to dry
the air-conditioning system. 142
Overview of climate control systemsClimate control
Page 148 of 457
N
Reduces the airflow ( Ypage 148)
O To reduce the temperature (Y page 147)Information about using
THERMOTRONIC automatic climate
control
The following contains instructions and rec-
ommendations to enable you to get the most
out of your THERMOTRONIC automati ccli-
mate control.
R Activate climate control using the Ãand
¿ buttons .The indicator lamps above
the à and¿ buttons light up.
R In automatic mode, you can also use the
ñ button to set a climate mode
(FOCUS/MEDIUM/DIFFUSE). The
MEDIUM level is recommended.
R Set the temperature to 22 †.
R Only use the demisting function briefly until
the windscreen is clear again.
R Only use the air-recirculation mode briefly,
e.g. if there are unpleasant outside odours
or when in a tunnel. The windows could
otherwise mist up as no fresh air is drawn
into the vehicle in air-recirculation mode.
R Use the ZONE function to adopt the tem-
perature settings on the driver's side for
the front-passenger side and the rear com-
partment as well. The indicator lamp above
the á button goes out.
R Use the residual heat function if you want
to heat or ventilate the vehicle interior
when the ignition is switched off. The resid-
ual heat function can only be activated or
deactivated with the ignition switched off. Operating the climate control system
Switching climate control on/off
Points to observe before use i
If climate control is switched off, the air
supply and air circulation are also switched off. Only use this setting for a brief period.
The windows could otherwise mist up.
i Switch on climate control primarily using
the à button (Y page 146).
Switching on/off X
Turn the key to position 2in the ignition
lock.
X To switch on: press theÃbutton.
The indicator lamp above the Ãbutton
lights up. Airflow and air distribution are set
to automatic mode.
or
X Press the ^button.
The indicator lamp above the ^button
goes out. The previous settings are reacti-
vated.
X To switch off: press the^button.
The indicator lamp above the ^button
lights up. Activating/deactivating the cooling
with air dehumidification function
Points to observe before use G
WARNING
If the "cooling with air dehumidification" func-
tion is deactivated, the air inside the vehicle
will not be cooled (during warm weather) or
dehumidified. The windows could mist up
more quickly. This may prevent you from
observing the traffic conditions, thereby caus-
ing an accident.
The cooling with air dehumidification function
is only available when the engine is running.
The air inside the vehicle is cooled and dehu-
midified according to the temperature selec-
ted. Operating the climate control system
145Climate control Z
Page 152 of 457
X
THERMATIC automatic climate control:
press temperature button EorH up or
down (Y page 143).
THERMOTRONIC automatic climate
control: press temperature button For
J up or down (Y page 144).
or
X THERMATIC automatic climate control:
press switch Gup or down (Y page 143).
THERMOTRONIC automatic climate
control: press button Hup or down
(Y page 144). Demisting the windows
Windows misted up on the inside X
Activate the ¿cooling with ai rdehu-
midification function.
X Activate automatic mode Ã.
X If the windows continue to mist up, activate
the demisting function (Y page 148).
i You should only select this setting until
the windscreen is clear again.
Windows misted up on the outside X
THERMATIC automatic climat econtrol:
press switch Fup or down ( Ypage 143)
until the PorO symbol appears in
the display.
X THERMOTRONIC automatic climate
control: press button Iup or down
(Y page 144) until the PorO symbol
appears in the display.
i You should only selec tthis setting until
the windscreen is clear again. Rear window heating
Switching on/off G
WARNING
Clear all windows of ice or snow before setting
off. Otherwise, impaired visibility could
endanger you and others.
The rear window heating has ahigh current
draw. You should therefore switch it off as
soon as the window is clear .Itotherwise
switches off automatically after several
minutes.
If the battery voltage is too low, the rea rwin-
dow heating may switch off.
X Turn the key to position 2in the ignition
lock.
X Press the ¤button.
The indicator lamp above the ¤button
lights up or goes out.
Problems with the rea rwindow heating The rear window heating has switched off
prematurely or cannot be activated.
X
Switch off any consumers that are not
required, e.g. reading lamps or interior
lighting.
When the battery is sufficiently charged,
the rear window heating is activated again
automatically. Activating/deactivating air-recircula-
tion mode
G
WARNING
Only switch over to air-recirculatio nmode
briefly at low outside temperatures. Other-
wise, the windows could mist up, thus impair-
ing visibility and endangering yourself and
others. This may prevent you from observing
the traffic conditions, thereby causing an
accident.
You can deactivate the flow of fresh air if
unpleasant odours are entering the vehicle Operating the climate control system
149Climate control Z
Page 153 of 457
from outside. The aira
lready inside the vehi-
cle will the nbe recirculated.
The operation of air-recirculation mode is the
same for all control panels.
X Turn the key to position 2in the ignition
lock.
X To activate: press thegbutton.
The indicator lamp above the gbutton
lights up.
i In the event of high pollution levels 2
or at
high outside temperatures, air-recircula-
tion mode is automatically activated. When
air-recirculation mode is activated auto-
matically, the indicator lamp above the
g button does not light up.
Outside air is added after about
30 minutes.
X To deactivate: press thegbutton.
The indicator lamp above the gbutton
goes out.
i Air-recirculation mode deactivates auto-
matically:
R after approximately five minutes at out-
side temperatures below approximately
5 †
R after approximately five minutes if cool-
ing with air dehumidification is deactiva-
ted
R after approximately 30 minutes at out-
side temperatures above approximately
5 † Convenience opening/closing using
the air-recirculation button
G
WARNING
Make sure that nobody can become trapped
between the side window and the door frame
as the side windows are opened and closed.
Make sure that all objects and body parts are
clear of the side windows when they are being
opened or closed. You or the objects could be
drawn in or become trapped between the side window and the door frame as the window
moves. If there is
arisk of entrapment, oper-
ate the Wswitch to move the side window
in the opposite direction.
Make sure that nobody can become trapped
as the sliding sunroof/panorama sliding sun-
roof is opened and closed. If there is a risk of
entrapment, operate the 3switch to move
the sliding sunroof/panorama sliding sunroof
in the opposite direction.
X Convenience closing feature: press and
hold the gbutton until the side win-
dows and the sliding sunroof/panorama
sliding sunroof are closed.
The indicator lamp above the gbutton
lights up. Air-recirculatio nmode is activa-
ted.
X Convenience opening feature: press and
hold the gbutton until the side win-
dows and the sliding sunroof/panorama
sliding sunroof are opened. The side win-
dows and the sliding sunroof/panorama
sliding sunroof move back to their original
position.
The indicator lamp above the gbutton
goes out. Air-recirculation mode is deacti-
vated.
i If you open the side windows or the sliding
sunroof/panorama sliding sunroof man-
ually after closing them with the conveni-
ence closing feature, they will remain in this
position when opened using the conveni-
ence opening feature. Activating/deactivating the residual
heat function
The residual heat function is only available
with THERMOTRONIC automatic climate con-
trol.
It is possible to make use of the residual heat
of the engine to continue heating the station-
ary vehicle for up to 30 minutes after the
2 THERMOTRONIC automatic climate control only. 150
Operating the climate control systemClimate control
Page 154 of 457
engine has been switched off. The heating
time depends on the temperature that has
been set for the vehicle interior.
X To activate: press theÌbutton.
The indicator lamp above the Ìbutton
lights up.
i The blower will run at a low speed regard-
less of the airflow setting.
i If you activate the residual heat function
at high temperatures, only the ventilation
will be activated. The blower runs at
medium speed.
X To deactivate: press theÌbutton.
The indicator lamp above the Ìbutton
goes out.
i It is possible that the residual heat func-
tion may be activated automatically an hour
after the key has been removed. The vehi-
cle is then ventilated for 30minutes to dry
the air-conditioning system.
Residual heat is deactivated automatically:
R after approximately 30 minutes
R when the ignition is switched on
R if the battery voltage drops Auxiliary heating
Important safety notes G
WARNING
Exhaust fumes are produced when the auxili-
ary heating is in operation .Inhaling these
exhaus tfumes can be poisonous. You should
therefore switch off the auxiliary heating in
confined spaces without an extraction sys-
tem, e.g .agarage. G
WARNING
When operating the auxiliary heating parts of
the vehicle can get very hot. Make sure that
the exhaust system does not under any cir-
cumstances come into contact with easily
ignitable material such as dry grass or fuels. The material could otherwise ignite and set
the vehicle alight. Choose your parking spot
accordingly.
Operating the auxiliary heating is thus pro-
hibited at filling stations or when your vehicle
is being refuelled. You must therefore switch
off the auxiliary heating at filling stations.
! Operating the auxiliary heating/ventila-
tion draws on the vehicle battery. After you
have heated or ventilated the vehicle a
maximum of two times, drive for a longer
distance.
i Switch the auxiliary heating on regularly
once a month for about ten minutes.
The auxiliary heating heats the air in the
passenger compartment to the selected tem-
perature. It does not use the heat of the run-
ning engine to do this. The auxiliary heating
is operated directly using the vehicle's fuel.
For this reason, the tank content must be at
least at reserve fuel level to ensure that the
auxiliary heating functions.
The auxiliary heating/ventilation automati-
cally adjusts to changes in temperature and
weather conditions. For this reason, the aux-
iliary heating could switch from ventilation
mode to heating mode or from heating mode
to ventilation mode.
The auxiliary heating switches off automati-
cally after 50 minutes. This time limit can be
altered. To do this, visit a qualified specialist
workshop.
You cannot use the auxiliary ventilation to
cool the vehicle interior to a temperature
lower than the outside temperature.
Before switching on X
Turn the key to position 2in the ignition
lock.
X Set the temperature.
The auxiliary heating/ventilation can be acti-
vated even when climate control is set to
manual. Optimum comfort can be attained Operating the climate control system
151Climate control Z