2012 MERCEDES-BENZ E-CLASS ESTATE remove seats
[x] Cancel search: remove seatsPage 53 of 457
NECK-PRO luxury head restraints
NECK-PRO luxury head restraints
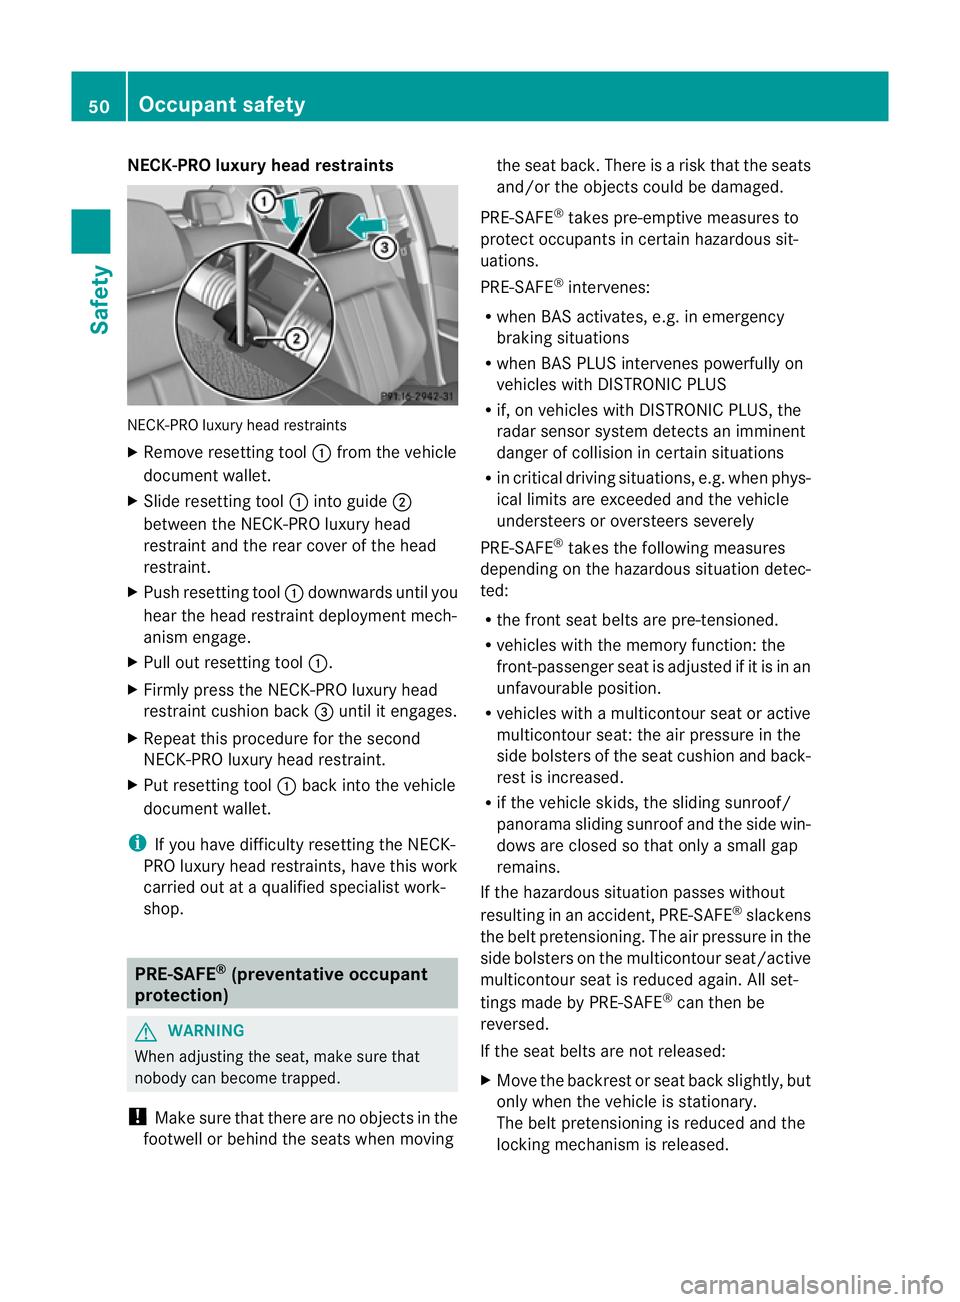
X Remove resetting tool :from the vehicle
document wallet.
X Slide resetting tool :into guide ;
between the NECK-PRO luxury head
restraint and the rear cover of the head
restraint.
X Push resetting tool :downwards until you
hear the head restraint deployment mech-
anism engage.
X Pull ou tresetting tool :.
X Firmly press the NECK-PRO luxury head
restraint cushion back =until it engages.
X Repeat this procedure for the second
NECK-PRO luxury head restraint.
X Put resetting tool :back into the vehicle
documen twallet.
i If you have difficulty resetting the NECK-
PRO luxury head restraints, have this work
carried out at a qualified specialist work-
shop. PRE-SAFE
®
(preventative occupant
protection) G
WARNING
When adjusting the seat, make sure that
nobody can become trapped.
! Make sure that there are no objects in the
footwell or behind the seats when moving the seat back
.There is a risk that the seats
and/or the objects could be damaged.
PRE-SAFE ®
takes pre-emptive measures to
protect occupants in certain hazardous sit-
uations.
PRE-SAFE ®
intervenes:
R when BAS activates, e.g. in emergency
braking situations
R when BAS PLUS intervenes powerfully on
vehicles with DISTRONIC PLUS
R if, on vehicles with DISTRONIC PLUS, the
radar sensor system detectsani mminent
dange rofcollision in certain situations
R in critical driving situations, e.g. when phys-
ical limits are exceeded and the vehicle
understeers or oversteers severely
PRE-SAFE ®
takes the following measures
depending on the hazardous situation detec-
ted:
R the front seat belts are pre-tensioned.
R vehicles with the memory function: the
front-passenger seat is adjusted if it is in an
unfavourable position.
R vehicles with a multicontour seat or active
multicontour seat: the air pressure in the
side bolsters of the seat cushion and back-
rest is increased.
R if the vehicle skids, the sliding sunroof/
panorama sliding sunroof and the side win-
dows are closed so that only a small gap
remains.
If the hazardous situation passes without
resulting in an accident, PRE-SAFE ®
slackens
the belt pretensioning. The air pressure in the
side bolsters on the multicontour seat/active
multicontour seat is reduced again. All set-
tings made by PRE-SAFE ®
can then be
reversed.
If the seat belts are not released:
X Move the backrest or seat back slightly, but
only when the vehicle is stationary.
The belt pretensioning is reduced and the
locking mechanism is released. 50
Occupant safetySafety
Page 64 of 457
Problems with child seat recognition
Problem Possible causes/consequences and
M Solutions
The
4 PASSENGER
AIRBAG OFF indicator
lamp on the centre con-
sole is lit. As
pecial Mercedes-Benz child seat with a transponder for auto-
matic child seat recognition has been fitted to the front-passenger
seat. The front-passenger fron tairbag has therefore been disabled
as desired. The
4 PASSENGER
AIRBAG OFF indicator
lamp on the centre con-
sole is lit.
or
The 6 warning lamp
lights up and/or the
4 PASSENGER AIR-
BAG OFF indicator
lamp does not light up
briefly when you switch
the ignition on. G
Risk of injury
There is no child seat fitted to the front-passenger seat .Automatic
child seat recognition is malfunctioning.
X Remove electronic equipmen tfrom the front-passenge rseat,
e.g.:
R laptop
R mobile phone
R cards with transponders, such as ski passes or access cards
If the 4 PASSENGER AIRBAG OFF indicator lamp is still lit:
X Visit a qualified specialist workshop. Integrated child seat
Important safety notes
G
WARNING
To reduce the risk of serious or even fatal
injury to the child in the event of a sudden
change in direction, braking or an accident:
R you must follow the manufacturer's instal-
lation instructions for the child seat when
fitting the integrated child seat (ICS) pad-
ded play table and side head restraint and
when fastening the seat belt.
R do not modify the integrated child seat, the
ICS padded play table or the side head
restraint. Do not use protective covers.
R make sure that the ICS padded play table
and the side head restraints do not become trapped or damaged. This could happen
when you
- close the doors
- adjust the seat
- store the ICS padded play table and the
side head restraints
- transport heavy objects
R replace the integrated child seat, the pad-
ded play table and the side head restraints
if these were damaged or subjected to
heavy loads during an accident.
R note: children who weigh less than
12.5 kg require a different child restraint
system. Information about other child
restraint systems is available from any
Mercedes-Benz Service Centre.
R the vehicle's rear seat backrest must be
locked in position.
The child seats are integrated into the right
and left-hand rear seat cushions. In conjunc-
tion with the componentsl isted in the follow-
ing table, they comply with the legal require-
ments of ECE R 44.04. Children in the vehicle
61Safety Z
Page 66 of 457
R
is routed as low as possible across the
pelvic area, in front of the hips
R is tightened across the lap by pulling
upwards on the shoulder section of the
seat belt
R is tigh tand is routed across the centre of
the child's shoulder
R is not twisted and does not pass across
the child's neck or under the child's arm
X Adjust the head restraint if necessary; see
(Y page 110).
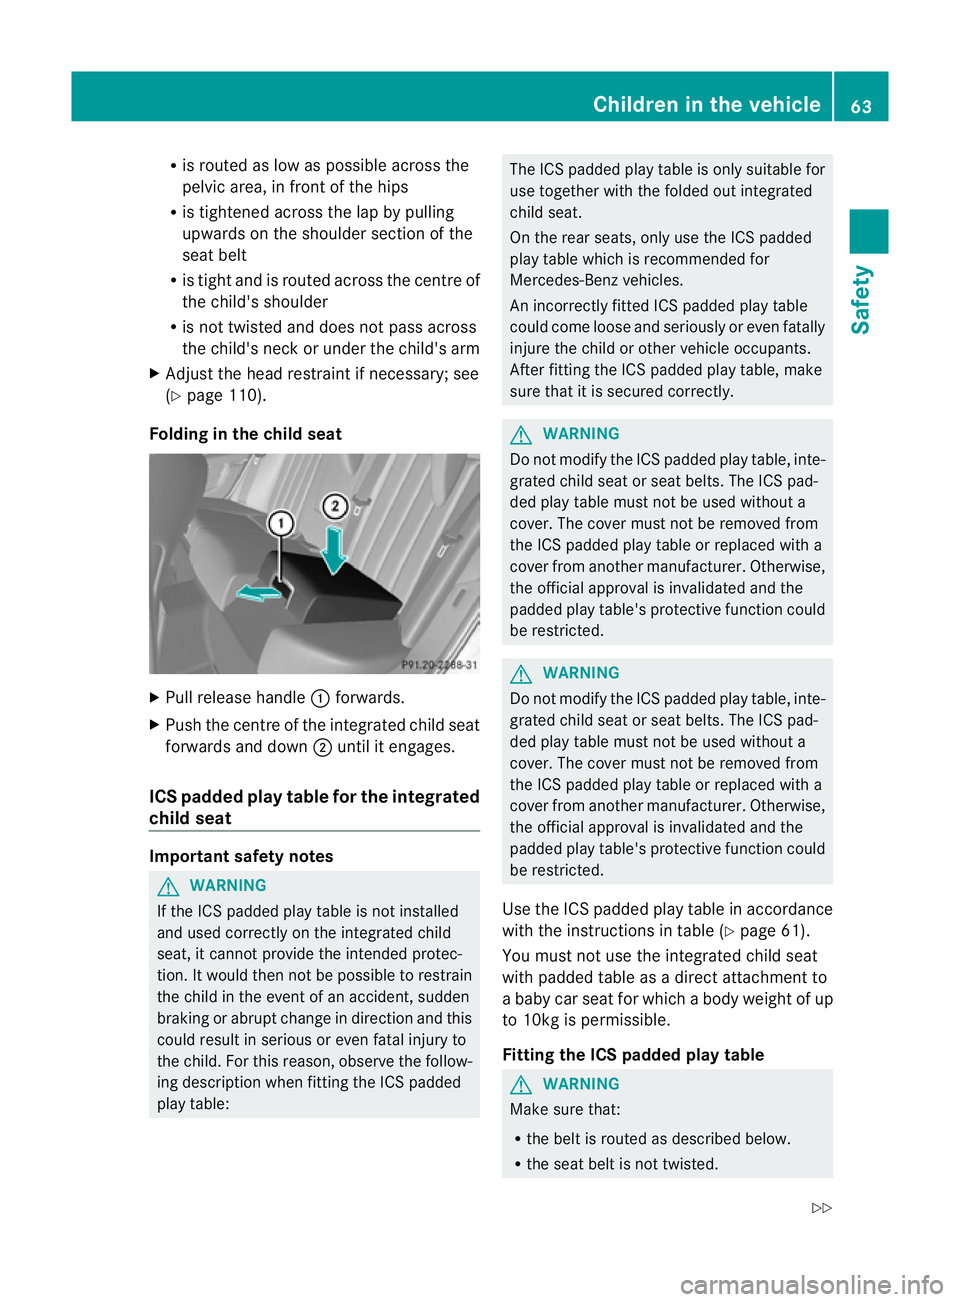
Folding in the chil dseat X
Pull release handle :forwards.
X Push the centre of the integrated child seat
forwards and down ;until it engages.
ICS padded play table for th eintegrated
child seat Important safety notes
G
WARNING
If the ICS padded play table is not installed
and used correctly on the integrated child
seat, it cannot provide the intended protec-
tion .Itw ould then not be possible to restrain
the child in the event of an accident, sudden
braking or abrupt change in direction and this
could result in serious or even fatal injury to
the child. For this reason, observe the follow-
ing description when fitting the ICS padded
play table: The ICS padded play table is only suitable for
use together with the folded out integrated
child seat.
On the rear seats, only use the ICS padded
play table which is recommended for
Mercedes-Benz vehicles.
An incorrectly fitted ICS padded play table
could come loose and seriously or even fatally
injure the child or other vehicle occupants.
After fitting the ICS padded play table, make
sure that it is secured correctly.
G
WARNING
Do not modify the ICS padded play table, inte-
grated child seat or seat belts. The ICS pad-
ded play table must not be used without a
cover. The cover must not be removed from
the ICS padded play table or replaced with a
cover from another manufacturer. Otherwise,
the official approval is invalidated and the
padded play table's protective function could
be restricted. G
WARNING
Do not modify the ICS padded play table, inte-
grated child seat or seat belts. The ICS pad-
ded play table must not be used without a
cover. The cover must not be removed from
the ICS padded play table or replaced with a
cover from another manufacturer. Otherwise,
the official approval is invalidated and the
padded play table's protective function could
be restricted.
Use the ICS padded play table in accordance
with the instructions in table (Y page 61).
You must not use the integrated child seat
with padded table as a direct attachment to
a baby car seat for which a body weight of up
to 10kg is permissible.
Fitting the ICS padded play table G
WARNING
Make sure that:
R the belt is routed as described below.
R the seat belt is not twisted. Children in the vehicle
63Safety
Z
Page 111 of 457
heating should also not be used to dry
the seats.
R clean the seat covers as recommended;
see "Interior care".
R do not transport heavy loads on the
seats. Do not place sharp objects on the
seat cushions, e.g. knives, nails or tools.
The seats should only be occupied by
passengers, if possible.
R when the seat heating is in operation, do
not cover the seats with insulating mate-
rials, e.g. blankets, coats, bags, seat cov-
ers, child seats or booster seats.
! Make sure that there are no objects in the
footwell or behind the seats when moving
the seat back. There is a risk that the seats
and/or the objects could be damaged.
i The head restraints in the front seats are
fitted with the NECK-PRO system
(Y page 48). For this reason, it is not pos-
sible to remove the head restraints from
the front seats.
Vehicles without the through-loading fea-
ture: the head restraints cannot be
removed from the rear compartments eats.
For more information, contact a qualified
specialist workshop.
i Further related subjects:
R Through-loading feature in the rear
bench seat (Saloon) (Y page 315)
R EASY-PACK through-loading feature in
the rear bench seat (Estate)
(Y page 317) Adjusting the seats manually and
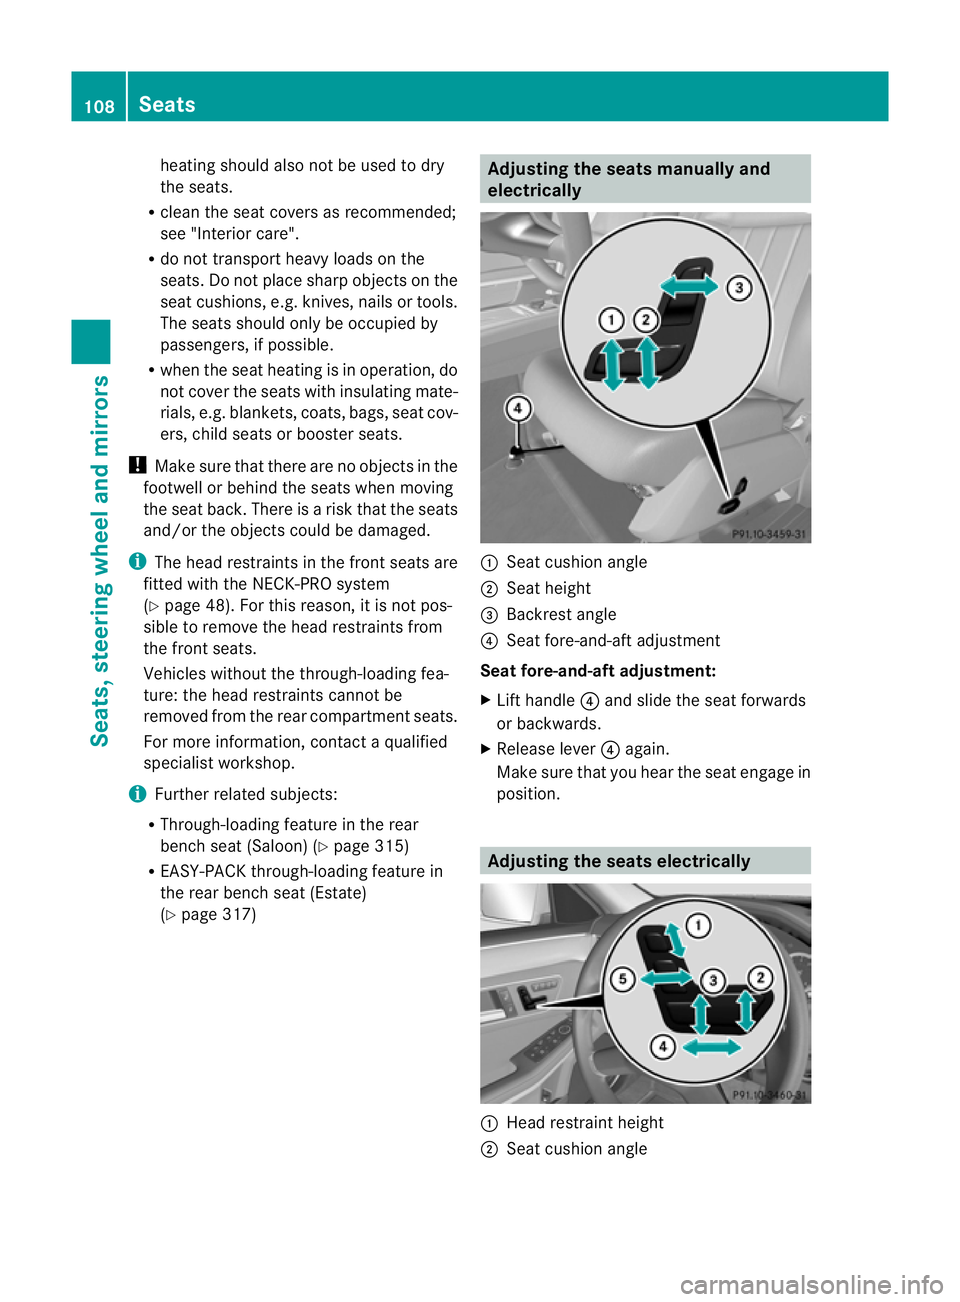
electrically
:
Seat cushion angle
; Seat height
= Backrest angle
? Seat fore-and-aft adjustment
Seat fore-and-aft adjustment:
X Lift handle ?and slide the seat forwards
or backwards.
X Release lever ?again.
Make sure that you hear the seat engage in
position. Adjusting the seats electrically
:
Head restraint height
; Seat cushion angle 108
SeatsSeats, steering wheel and mirrors
Page 114 of 457
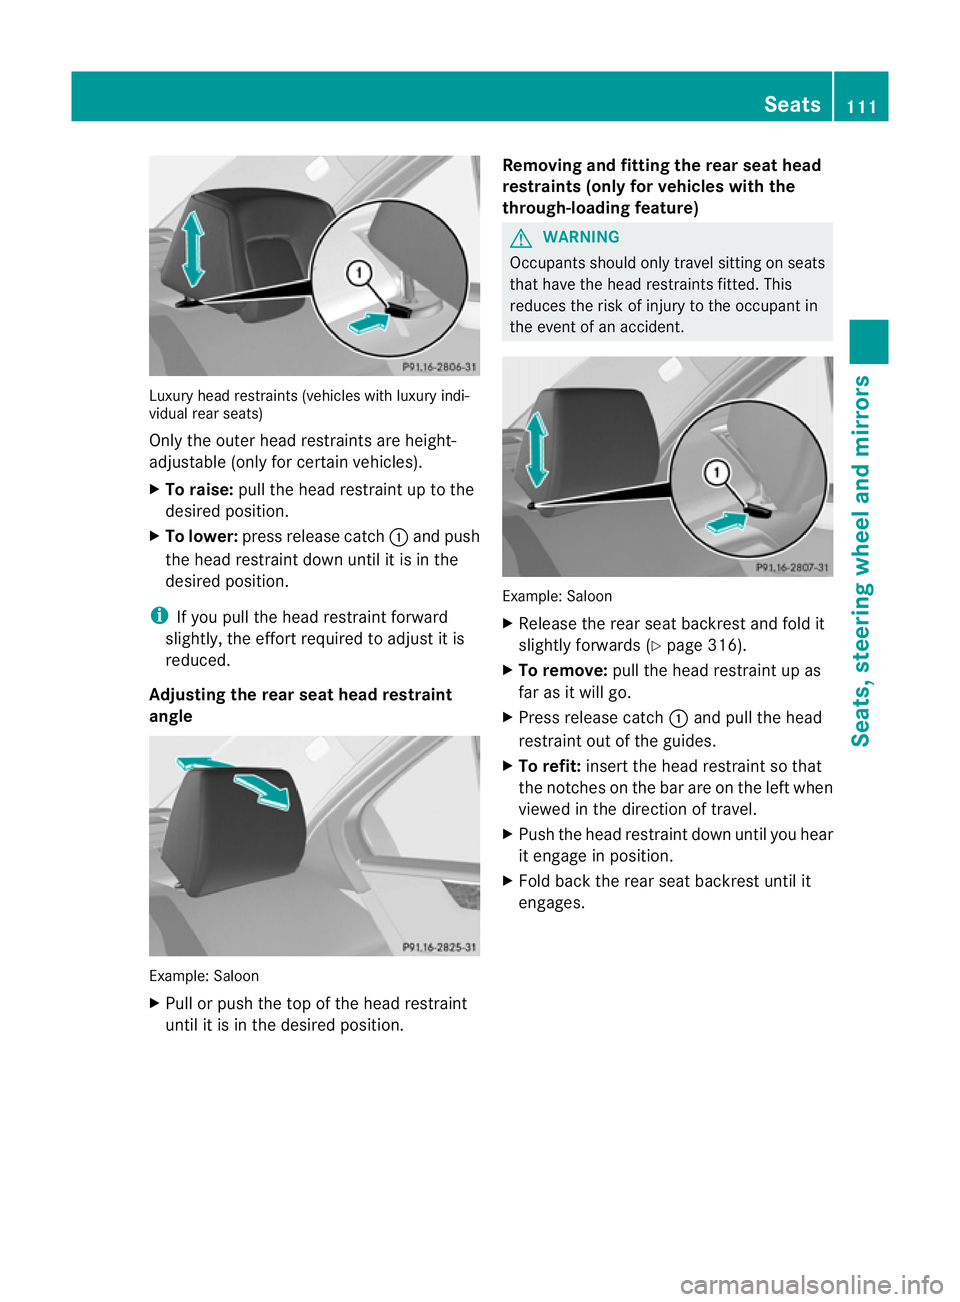
Luxury head restraints (vehicles with luxury indi-
vidual rear seats)
Only the outer head restraints are height-
adjustable (only for certain vehicles).
X To raise: pull the head restraint up to the
desired position.
X To lower: press release catch :and push
the head restraint down until it is in the
desired position.
i If you pull the head restraint forward
slightly, the effort required to adjust it is
reduced.
Adjusting the rear seat head restraint
angle Example: Saloon
X
Pull or push the top of the head restraint
until it is in the desire dposition. Removing and fitting the rear seat head
restraints (only for vehicles with the
through-loading feature) G
WARNING
Occupants should only travel sitting on seats
that have the head restraints fitted. This
reduces the risk of injury to the occupant in
the event of an accident. Example: Saloon
X
Release the rear seat backrest and fold it
slightly forwards (Y page 316).
X To remove: pull the head restraint up as
far as it will go.
X Press release catch :and pull the head
restraint out of the guides.
X To refit: insert the head restraint so that
the notches on the bar are on the left when
viewed in the direction of travel.
X Push the head restraint down until you hear
it engage in position.
X Fold back the rear seat backrest until it
engages. Seats
111Seats, steering wheel and mirrors Z
Page 117 of 457
The maximum permissible weight may be
reduced by:
R
extensive optional extras
R vehicle load
R towing a trailer
The combined luggage cover and net must be
fitted if you are using the folding bench seat
(Y page 320).
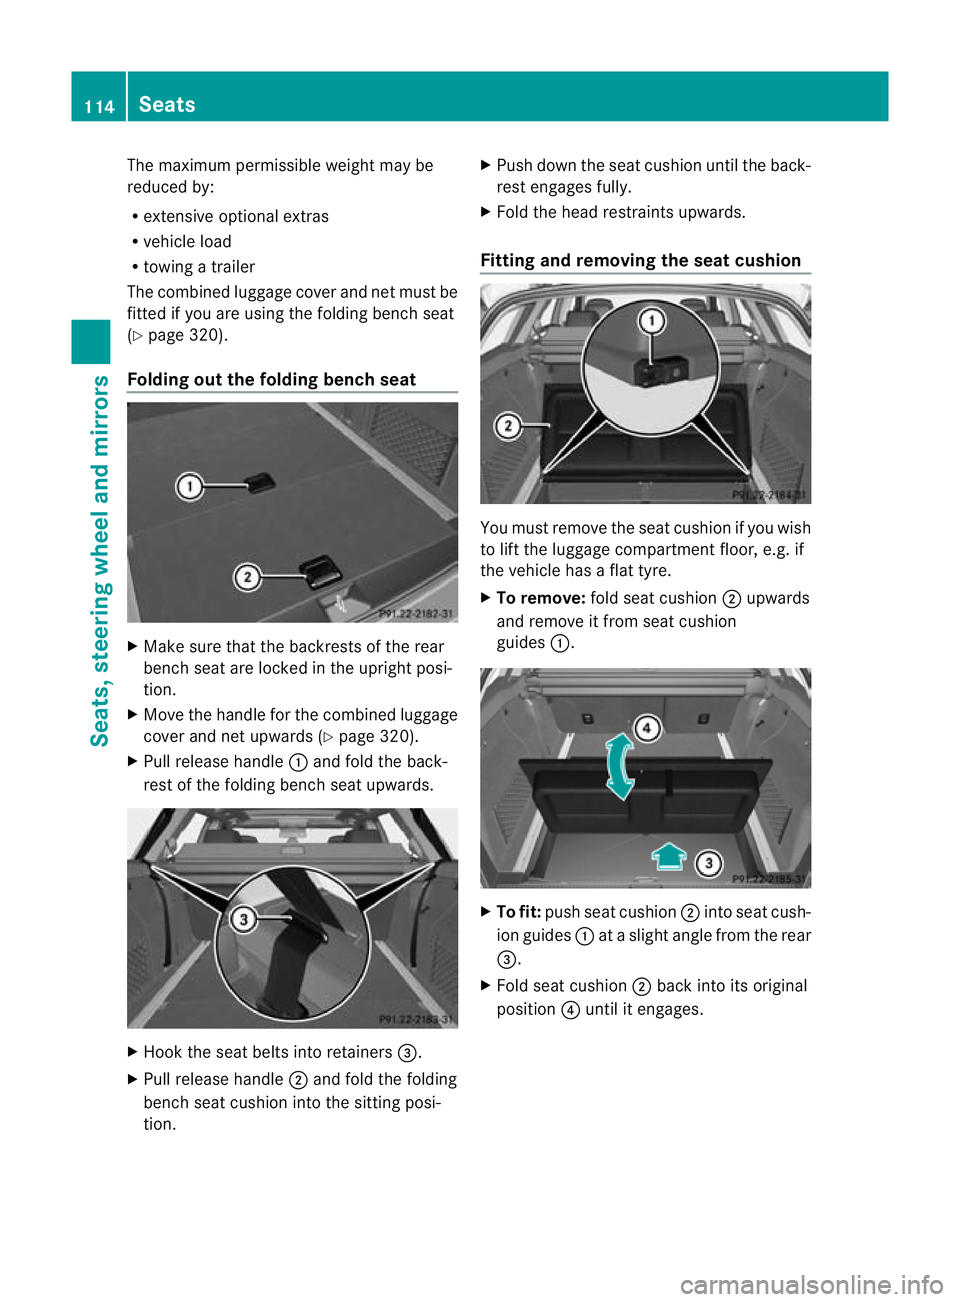
Folding out the folding bench seat X
Make sure that the backrests of the rear
bench seat are locked in the upright posi-
tion.
X Move the handle for the combined luggage
cover and net upwards (Y page 320).
X Pull release handle :and fold the back-
rest of the folding bench seat upwards. X
Hook the seat belts into retainers =.
X Pull release handle ;and fold the folding
bench seat cushion into the sitting posi-
tion. X
Push down the seat cushion until the back-
rest engages fully.
X Fold the head restraints upwards.
Fitting and removing the seat cushion You must remove the seat cushion if you wish
to lift the luggage compartment floor, e.g. if
the vehicle has a flat tyre.
X
To remove: fold seat cushion ;upwards
and remove it from seat cushion
guides :. X
To fit: push seat cushion ;into seat cush-
ion guides :at a slight angle from the rear
=.
X Fold seat cushion ;back into its original
position ?until it engages. 114
SeatsSeats, steering wheel and mirrors
Page 120 of 457
Steering wheel
Important safety notes
G
WARNING
Do not adjust the steering wheel while driving.
Adjusting the steering wheel while driving, or
driving without the steering wheel adjustment
feature locked could cause the driver to lose
control of the vehicle.
The electrical steering wheel adjustment fea-
ture can be operated at any time. Therefore,
do not leave children unattended in the vehi-
cle, or with access to an unlocked vehicle. A
child's unsupervised access to a vehicle could
result in an accident and/or serious personal
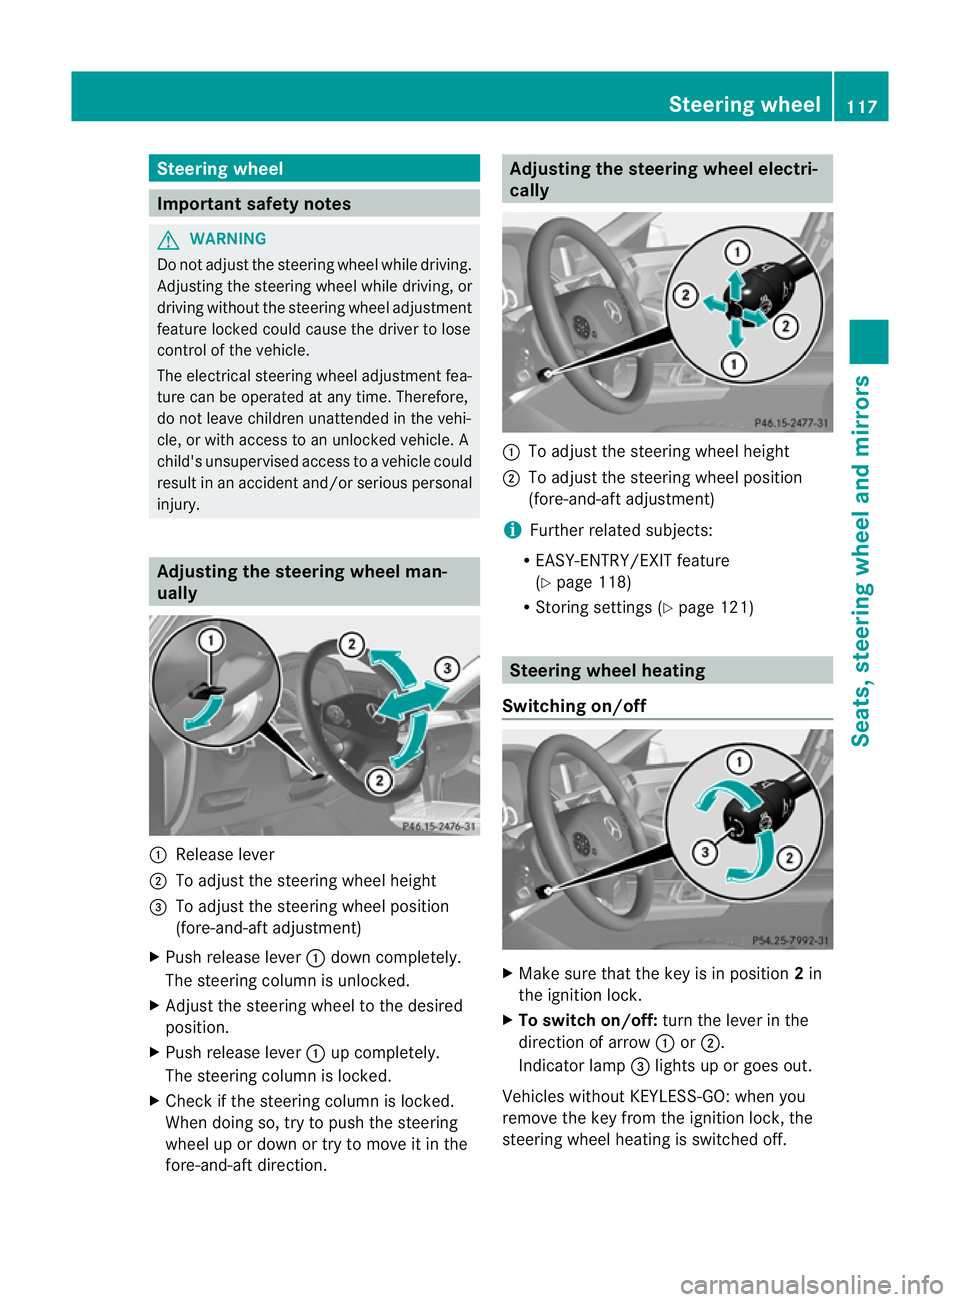
injury. Adjusting the steering wheel man-
ually
:
Release lever
; To adjust the steering wheel height
= To adjust the steering wheel position
(fore-and-aft adjustment)
X Push release lever :down completely.
The steering column is unlocked.
X Adjust the steering wheel to the desired
position.
X Push release lever :up completely.
The steering column is locked.
X Check if the steering column is locked.
When doing so, try to push the steering
wheel up or down or try to move it in the
fore-and-aft direction. Adjusting the steering wheel electri-
cally
:
To adjust the steering wheel height
; To adjust the steering wheel position
(fore-and-aft adjustment)
i Further related subjects:
R EASY-ENTRY/EXIT feature
(Y page 118)
R Storing settings (Y page 121) Steering wheel heating
Switching on/off X
Make sure that the key is in position 2in
the ignition lock.
X To switch on/off: turn the lever in the
direction of arrow :or;.
Indicator lamp =lights up or goes out.
Vehicles without KEYLESS-GO: when you
remove the key from the ignition lock, the
steering wheel heating is switched off. Steering wheel
117Seats, steering wheel and mirrors Z
Page 121 of 457
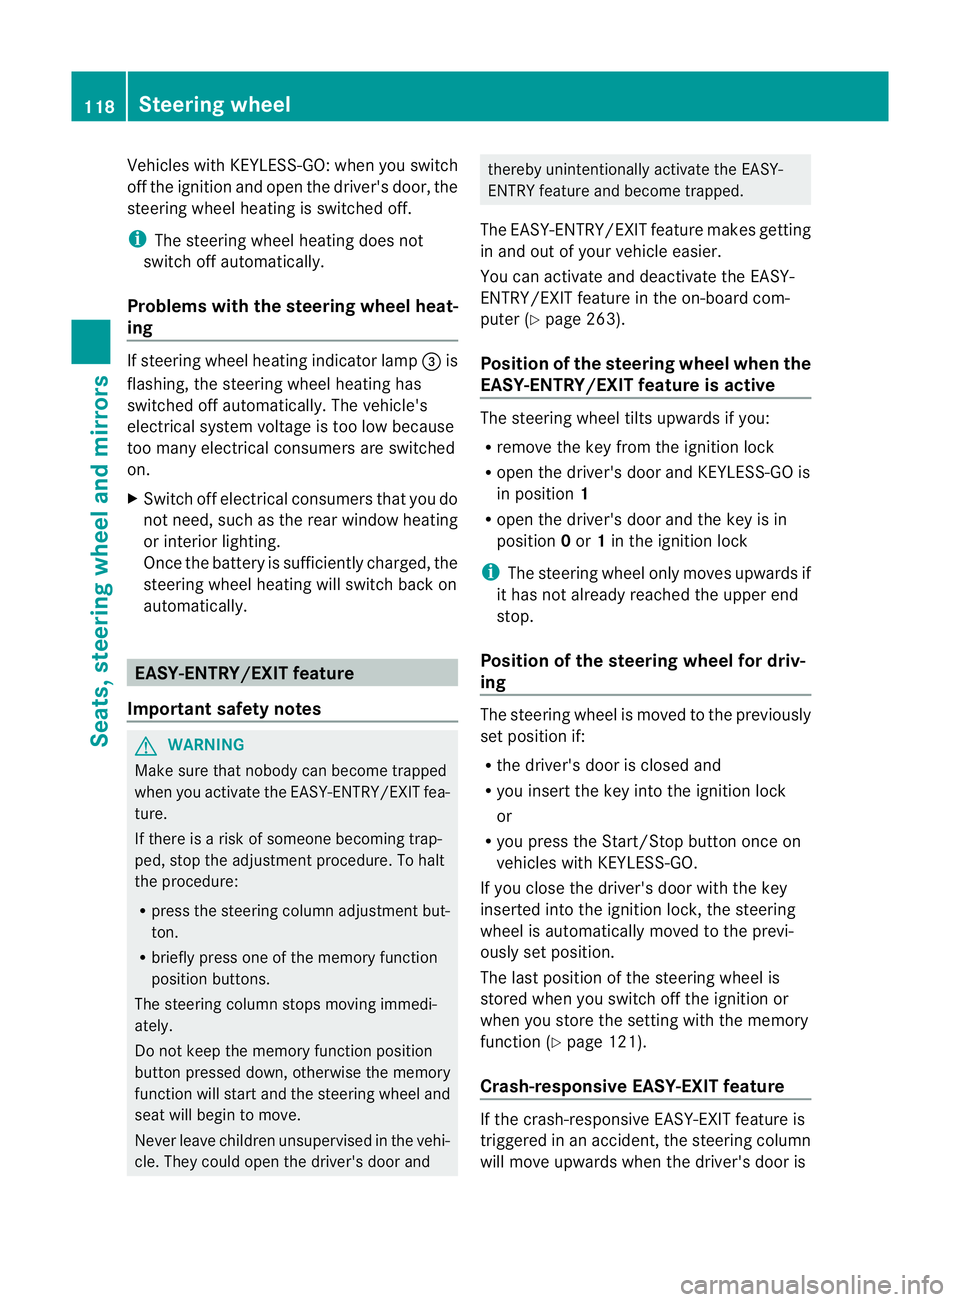
Vehicles with KEYLESS-GO: when you switch
off the ignition and open the driver's door, the
steering wheel heating is switched off.
i
The steering wheel heating does not
switch off automatically.
Problems with the steering wheel heat-
ing If steering wheel heating indicator lamp
=is
flashing, the steering wheel heating has
switched off automatically. The vehicle's
electrical system voltage is too low because
too many electrical consumers are switched
on.
X Switch off electrical consumers that you do
not need, such as the rear window heating
or interior lighting.
Once the battery is sufficiently charged, the
steering wheel heating will switch back on
automatically. EASY-ENTRY/EXIT feature
Important safety notes G
WARNING
Make sure that nobody can become trapped
when you activate the EASY-ENTRY/EXIT fea-
ture.
If there is a risk of someone becoming trap-
ped, stop the adjustment procedure. To halt
the procedure:
R press the steering column adjustment but-
ton.
R briefly press one of the memory function
position buttons.
The steering column stops moving immedi-
ately.
Do not keep the memory function position
button pressed down, otherwise the memory
function will start and the steering wheel and
seat will begin to move.
Never leave children unsupervised in the vehi-
cle. They could open the driver's door and thereby unintentionally activate the EASY-
ENTRY feature and become trapped.
The EASY-ENTRY/EXIT feature makes getting
in and out of yourv ehicle easier.
You can activate and deactivate the EASY-
ENTRY/EXIT feature in the on-board com-
puter (Y page 263).
Position of the steering wheel when the
EASY-ENTRY/EXIT feature is active The steering wheel tilts upwards if you:
R
remove the key from the ignition lock
R open the driver's door and KEYLESS-GO is
in position 1
R open the driver's door and the key is in
position 0or 1in the ignition lock
i The steering wheel only moves upwards if
it has not already reached the upper end
stop.
Position of the steering wheel for driv-
ing The steering wheel is moved to the previously
set position if:
R the driver's door is closed and
R you insert the key intot he ignition lock
or
R you press the Start/Stop button once on
vehicles with KEYLESS-GO.
If you close the driver's door with the key
inserted into the ignition lock, the steering
wheel is automatically moved to the previ-
ously set position.
The last position of the steering wheel is
stored when you switch off the ignition or
when you store the settingw ith the memory
function (Y page 121).
Crash-responsive EASY-EXIT feature If the crash-responsive EASY-EXIT feature is
triggered in an accident, the steering column
will move upwards when the driver's door is 118
Steering wheelSeats, steering wheel and mirrors