2012 MERCEDES-BENZ E-CLASS ESTATE rear view mirror
[x] Cancel search: rear view mirrorPage 15 of 457
Fuses
Allocatio nchart ............................. 376
Before changing ............................. 376
Fuse box in the boot ......................376
Fuse box in the engine compart-
ment .............................................. 376
Fuse box in the luggage compart-
ment .............................................. 377
Important safety notes ..................375 G
Garage door opener Clearing the memory .....................337
Frequencies ................................... 338
Important safety notes ..................335
Opening/closing the garage door ..337
Programming (button in the rear-
view mirror) ................................... 336
Gear indicator (on-board com-
puter) ................................................. .264
Gearshift program SETUP (on-board computer) ..........265
Genuine Mercedes-Benz parts .........432
Glove compartment ..........................311H
Handbrake see Parking brake
Hazard warning lamps ......................129
Headbag Display message ............................ 275
Headlamp
Cleaning system (function) ............130
Cleaning system (notes) ................443
Headlamps
Misting up ...................................... 133
Topping up the cleaning system ....349
see Automatic headlamp mode
Head restraints
Adjusting ....................................... 109
Adjusting (electrically). ..................110
Adjusting (manually). .....................109
Adjusting (rear) .............................. 110
Fitting/removing (rear) ..................111
Luxury ............................................ 110 Heating
see Climate control
High-pressure cleaners ....................352
Hill start assist .................................. 164
HOLD function Display message ............................ 283
Function/notes ............................. 205 I
ICS padded play table .........................63
Ignition lock see Key positions
Immobiliser .......................................... 78
In-car hotspot see Separate operating instructions
Indicator and warning lamps
Coolant .......................................... 305
DISTRONI CPLUS ........................... 307
Engine diagnostics .........................305
Fuel tank ........................................ 305
SPORT handling mode ...................303
Indicator lamps
Display message ............................ 276
see Warning and indicator lamps
Infrared lamps (changing bulbs) ......137
Insectp rotection on the radiator ....346
Inspection see ASSYST PLUS
Instrument cluster
Overview .................................. 32, 245
Settings ......................................... 258
Warning and indicator
lamps ...................................... .34, 298
Instrument cluster lighting ..............246
Integrated child seat ICS padded pla ytable ...................... 63
Important safety guidelines .............61
Side hea drestraints ...................... ...64
Storing, ICS padded play table and
sid eh ead restraint s......................... 65
Intelligen tLight System
Activating/deactivatin g................. 259
Display message ............................ 278
Overview ........................................ 130
Setting the dipped-bea mhead-
lamps for driving on the right/left .260 12
Index
Page 17 of 457
Switching the daytime driving
lights on/of
f(on-board computer) .259
Switching the exterio rlighting
delayed switch-off on/off (on-
board computer )............................ 260
Switching the surround lighting
on/off (on-board computer) ..........260
Turn signals ................................... 128
see Changing bulbs
see Interior lighting
Light sensor (display message) .......278
LIM indicator lamp Cruise control ................................ 190
DISTRONI CPLUS ........................... 196
Variabl eSPEEDTRONIC .................193
Limiting the speed
see SPEEDTRONIC
Loading guidelines ............................310
Loading sill protector ........................ 326
Locking see Centra llocking
Locking (doors)
Automatic ........................................ 90
Emergency locking ........................... 90
From inside (central locking but-
ton) .................................................. 89
Locking centrally
see Centra llocking
Locking verification signal (on-
board computer) ............................... 262
Luggage compartment cover ...........319
Luggage compartment enlarge-
ment ................................................... 317
Luggage compartment floor ............325
Luggage holde r(EASY-PACK load-
securing kit) ...................................... .324
Lumbar support Adjusting ....................................... 113
Adjusting the 4-way lumba rsup-
por t................................................ 113
Luxu ry head restraint .......................110 M
M+S tyres ........................................... 382
Main-beam headlamps Changing bulbs .............................. 136
Display message ............................ 277Switching Adaptive Highbeam
Assist on/off
................................. 132
Switching on/off ........................... 129
Manual transmission
Engaging neutral (ECO start/stop
function) ........................................ 170
Engaging revers egear ................... 170
Gea rlever ...................................... 169
Pulling away ................................... 163
Shifting to neutra l.......................... 170
Shift recommendatio n................... 170
Starting the engine ........................163
Massage function (PULSE) ...............112
Matt finish (cleaning instructions) ..353
Memory card (audio) .........................253
Memory function ............................... 121
Mercedes-Benz Service Centre see Qualified specialist workshop
Message memory (on-board com-
puter) ................................................. .268
Messages see Display messages
Mirror
see Vanity mirror (in sun visor)
Mirrors
see Exterior mirrors
see Rear-view mirror
Mobile phone
Frequencies ................................... 433
Installatio n..................................... 433
Menu (on-board computer) ............254
Notes/placing in the bracket ......... 333
Sliding adapter ............................... 335
Transmission output (maximum) .... 433
Mobile telephone
Pre-installe dbracket ...................... 334
Modifying the programming (key) .....84
MOExtended tyres .............................363
Motorway mode ................................ 131
MP3 Operating ...................................... .253
see Separate operating instructions
Multifunction display
Function/notes ............................. 248
Permanent displa y......................... 25914
Index
Page 19 of 457
Parking Guidance
Display message ............................ 286
Important safety notes ..................215
Trailer towing ................................. 218
Parking lamps
Changing bulbs .............................. 137
Display message ............................ 277
Switching on/off ........................... 128
Parking lamps (changing bulbs) ......137
PARKTRONIC Deactivating/activating .................213
Driving system ............................... 211
Function/notes ............................. 211
Important safety notes ..................211
Problem (fault) ............................... 215
Sensor range ................................. 211
Trailer towing ................................. 214
Warning displa y............................. 213
PASSENGE RAIRBAG OFF warning
lamp ...................................................... 57
Petrol .................................................. 437
Plastic hooks ..................................... 318
Plastic trim (cleaning instructions) .356
Power windows see Side windows
PRE-SAFE ®
(preventive occupant
safety system) Display message ............................ 272
Operation ........................................ .50
PRE-SAFE ®
Brake
Activating/deactivating .................256
Display message ............................ 273
Function/notes ................................ 76
Warning lamp ................................. 307
Product information ............................23
Program selector button ..................174
Protection of the environment General notes .................................. 23
Pulling away
Automatic transmission .................164
Manual transmission ..................... .163 Q
Qualifie dspecialis tworkshop ...........25 R
RACE START (AMG vehicles) .............207
RACETIMER (on-board computer) ....265
Radar sensors Overview ........................................ 451
Radar sensor system
Activating/deactivating .................262
Display message ............................ 283
Radiator cover ................................... 346
Radio Selecting astation ......................... 252
see separate operating instructions
Rain closing feature
Panorama sliding sunroo f.............. 101
Sliding sunroo f............................... 100
Reading lamp ..................................... 133
Rear bench seat Folding the backrest forwards/
back ............................................... 316
Rear compartment
Setting the airflow .........................148
Setting the airv ents...................... 156
Setting the temperature ................147
Rear-compartment seat belt sta-
tus indicator ........................................ 54
Rear foglamp Display message ............................ 277
Switching on/off ........................... 127
Rear seat
Display message ............................ 295
Rear Seat Entertainment System
see Separate operating instructions
Rear-view mirror
Anti-dazzle mode (automatic) ........120
Dipping (manual) ........................... 119
Rear window blind ............................330
Rear window heating Problem (fault) ............................... 149
Switching on/off ........................... 149
Rear window wiper
Replacing the wiper blade .............. 139
Switching on/off ........................... 138
Refuelling
Fuel gauge ............................... 32, 245
Important safety notes ..................17916
Index
Page 42 of 457
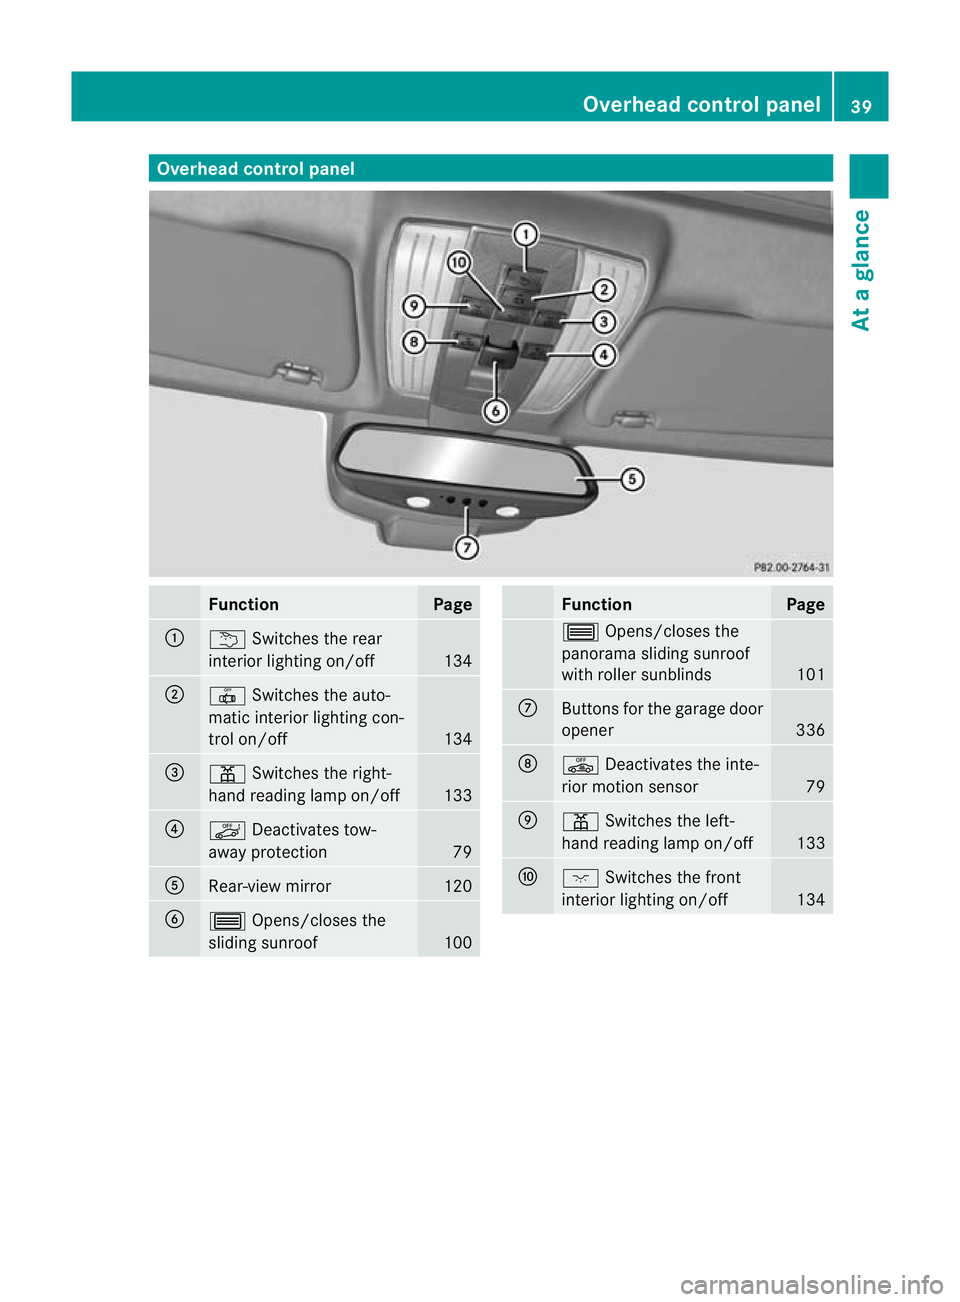
Overhea
dcontrol panel Function Page
:
u
Switches the rear
interio rlighting on/off 134
;
|
Switches the auto-
matic interior lighting con-
trol on/off 134
=
p
Switches the right-
hand reading lamp on/off 133
?
ë
Deactivates tow-
away protection 79
A
Rear-view mirror 120
B
3
Opens/closes the
sliding sunroof 100 Function Page
3
Opens/closes the
panorama sliding sunroof
with roller sunblinds 101
C
Buttons for the garage door
opener
336
D
ê
Deactivates the inte-
rior motion sensor 79
E
p
Switches the left-
hand reading lamp on/off 133
F
c
Switches the front
interior lighting on/off 134Overhead control panel
39At a glance
Page 83 of 457
Activating
X
Make sure that:
R
the side windows are closed.
R the sliding sunroof/panorama sliding
sunroo fis closed.
R there are no objects, e.g. mascots, hang-
ing on the rear-view mirror or on the grab
handles on the roof trim.
This will prevent false alarms.
X Make sure that:
R
the doors are closed.
R the sliding sunroof/panorama sliding
sunroof is closed.
R the boot lid/tailgate is closed.
Only then is the interior motion sensor
primed.
X Lock the vehicle with the key or KEYLESS-
GO.
The interior motion sensor is primed after
approximately 30 seconds.
To deactivate X
Unlock the vehicle with the key or KEY-
LESS-GO.
The interior motion sensor is switched off
automatically.
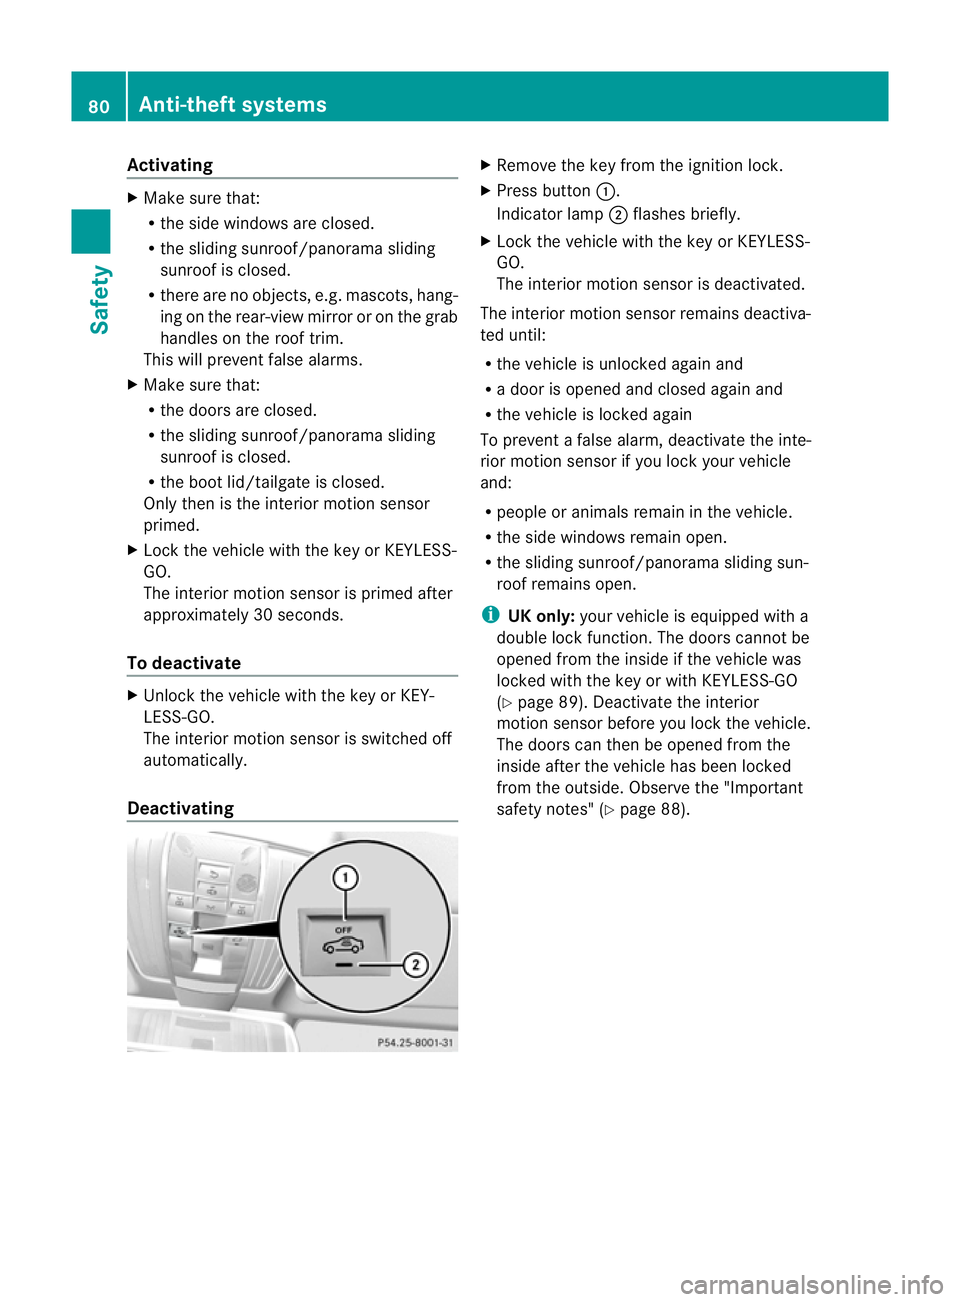
Deactivating X
Remove the key from the ignition lock.
X Press button :.
Indicator lamp ;flashes briefly.
X Lock the vehicle with the key or KEYLESS-
GO.
The interior motion sensor is deactivated.
The interior motion sensor remains deactiva-
ted until:
R the vehicle is unlocked againa nd
R a door is opened and closed agai nand
R the vehicle is locked again
To prevent a false alarm, deactivate the inte-
rio rm otion sensor if you lock your vehicle
and:
R people or animals remain in the vehicle.
R the side windows remain open.
R the sliding sunroof/panorama sliding sun-
roof remains open.
i UK only: your vehicle is equipped with a
double lock function. The doors cannot be
opened from the inside if the vehicle was
locked with the key or with KEYLESS-GO
(Y page 89). Deactivate the interior
motion sensor before you lock the vehicle.
The doors can then be opened from the
inside after the vehicle has been locked
from the outside. Observe the "Important
safety notes" (Y page 88).80
Anti-theft systemsSafety
Page 109 of 457
Useful information
i This Owner's Manual describes all mod-
els, series and optional equipment for your
vehicle that were available at the time of
going to press. National variations are pos-
sible. Note that your vehicle may not be
equipped with all of the functions descri-
bed. This is also the case for systems and
functions relevant to safety.
i Read the information on qualified special-
ist workshops: (Y page 25). Correct driver's seat position
X
Observe the safety guidelines on seat
adjustment (Y page 107).
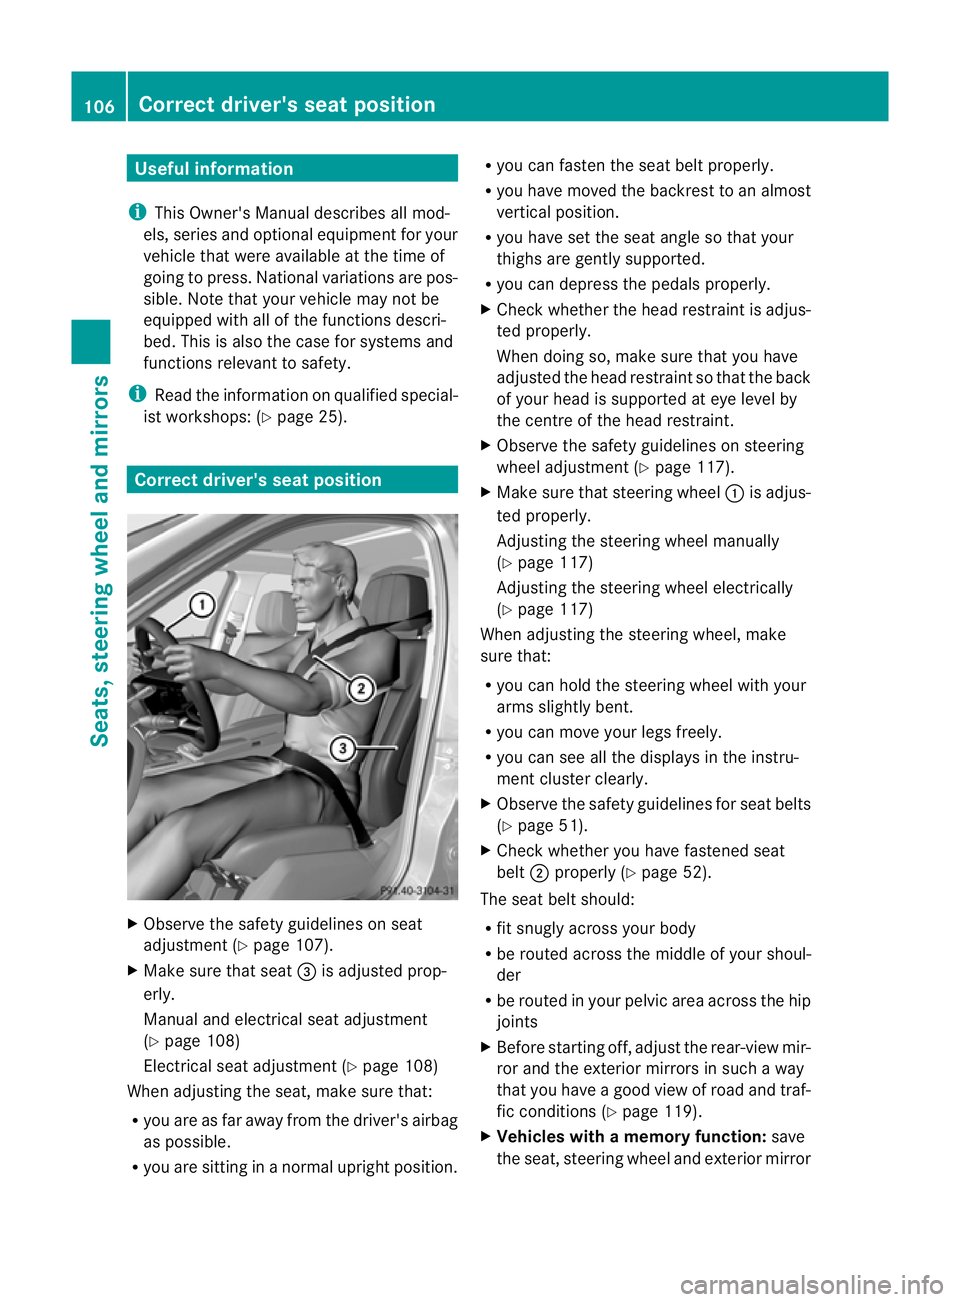
X Make sure that seat =is adjusted prop-
erly.
Manual and electrical seat adjustment
(Y page 108)
Electrical seat adjustment (Y page 108)
When adjusting the seat, make sure that:
R you are as far away from the driver's airbag
as possible.
R you are sitting in a normal upright position. R
you can fasten the seat belt properly.
R you have moved the backrest to an almost
vertical position.
R you have set the seat angle so that your
thighs are gently supported.
R you can depress the pedals properly.
X Check whether the head restraint is adjus-
ted properly.
When doing so, make sure that you have
adjusted the head restraint so that the back
of your head is supported at eye level by
the centre of the head restraint.
X Observe the safety guidelines on steering
wheel adjustment (Y page 117).
X Make sure that steering wheel :is adjus-
ted properly.
Adjusting the steering wheel manually
(Y page 117)
Adjusting the steering wheel electrically
(Y page 117)
When adjusting the steering wheel, make
sure that:
R you can hold the steering wheel with your
arms slightly bent.
R you can move your legs freely.
R you can see all the displays in the instru-
ment cluster clearly.
X Observe the safety guidelines for seat belts
(Y page 51).
X Check whether you have fastened seat
belt ;properly (Y page 52).
The seat belt should:
R fit snugly across your body
R be routed across the middle of your shoul-
der
R be routed in your pelvic area across the hip
joints
X Before starting off, adjust the rear-view mir-
ror and the exterior mirrors in such a way
that you have a good view of road and traf-
fic conditions (Y page 119).
X Vehicles with a memory function: save
the seat, steering wheel and exterior mirror 106
Correct driver's seat positionSeats, steering wheel and mirrors
Page 114 of 457
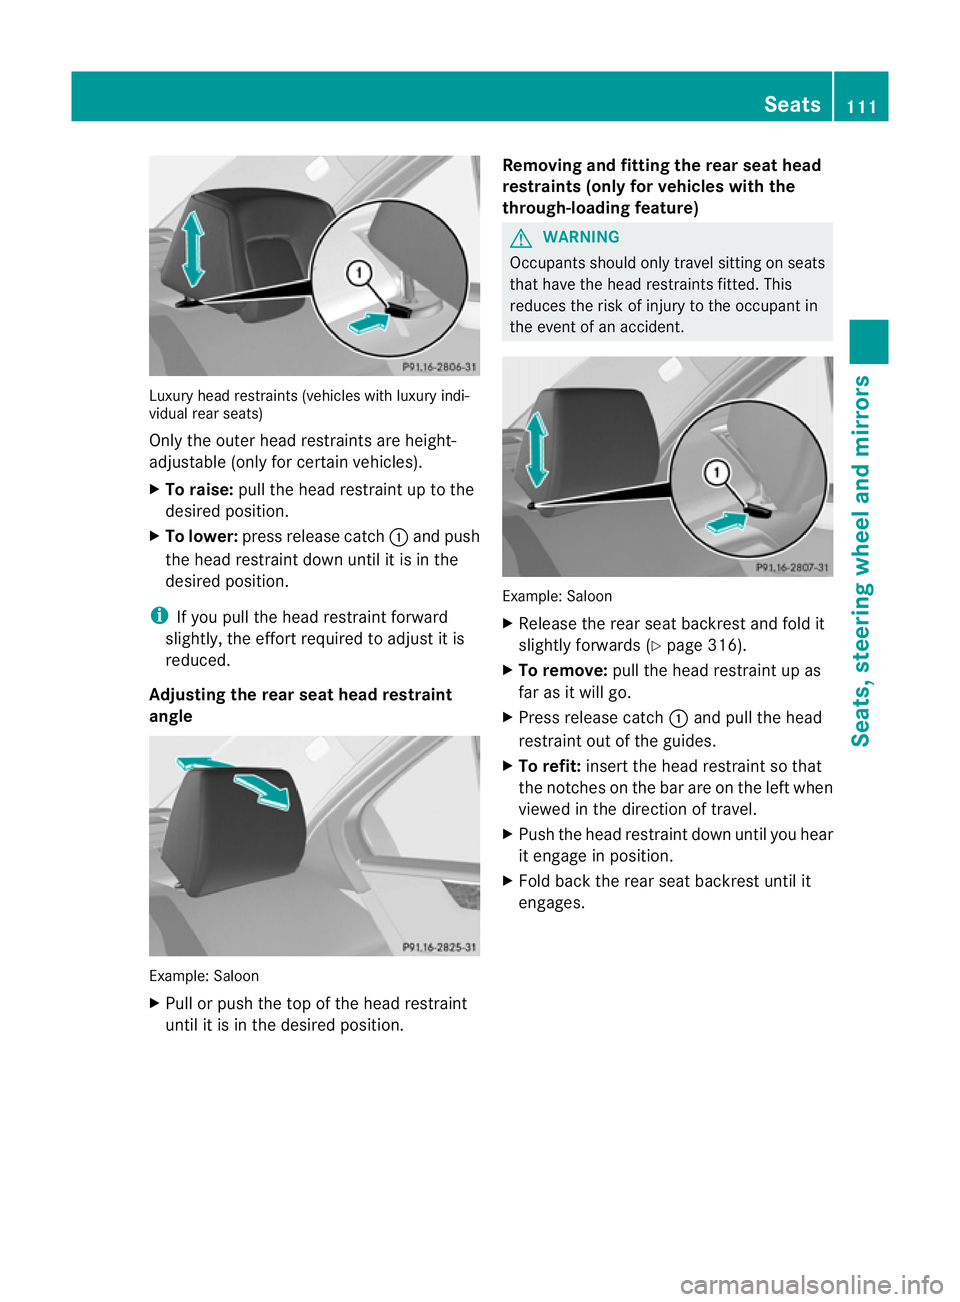
Luxury head restraints (vehicles with luxury indi-
vidual rear seats)
Only the outer head restraints are height-
adjustable (only for certain vehicles).
X To raise: pull the head restraint up to the
desired position.
X To lower: press release catch :and push
the head restraint down until it is in the
desired position.
i If you pull the head restraint forward
slightly, the effort required to adjust it is
reduced.
Adjusting the rear seat head restraint
angle Example: Saloon
X
Pull or push the top of the head restraint
until it is in the desire dposition. Removing and fitting the rear seat head
restraints (only for vehicles with the
through-loading feature) G
WARNING
Occupants should only travel sitting on seats
that have the head restraints fitted. This
reduces the risk of injury to the occupant in
the event of an accident. Example: Saloon
X
Release the rear seat backrest and fold it
slightly forwards (Y page 316).
X To remove: pull the head restraint up as
far as it will go.
X Press release catch :and pull the head
restraint out of the guides.
X To refit: insert the head restraint so that
the notches on the bar are on the left when
viewed in the direction of travel.
X Push the head restraint down until you hear
it engage in position.
X Fold back the rear seat backrest until it
engages. Seats
111Seats, steering wheel and mirrors Z
Page 122 of 457
opened. This occurs irrespective of the posi-
tion of the key in the ignition lock. This makes
it easier to exit the vehicle and rescue the
occupants.
The crash-responsive EASY-EXIT feature is
only operational if the EASY-EXIT/ENTRY fea-
ture is activated in the on-board computer. Mirrors
Rear-view mirror
X
Anti-dazzle mode: flick anti-dazzle
switch :forwards or back. Exterior mirrors
Adjusting the exterior mirrors G
WARNING
The exterior mirrors reduce the size of the
image. Objects are actually closer than they
appear. You could misjudge the distance from
vehicles driving behind and cause an acci-
dent, e.g. when changing lane. For this rea-
son, make sure of the actual distance from the
vehicle driving behind by glancing over your
shoulder. X
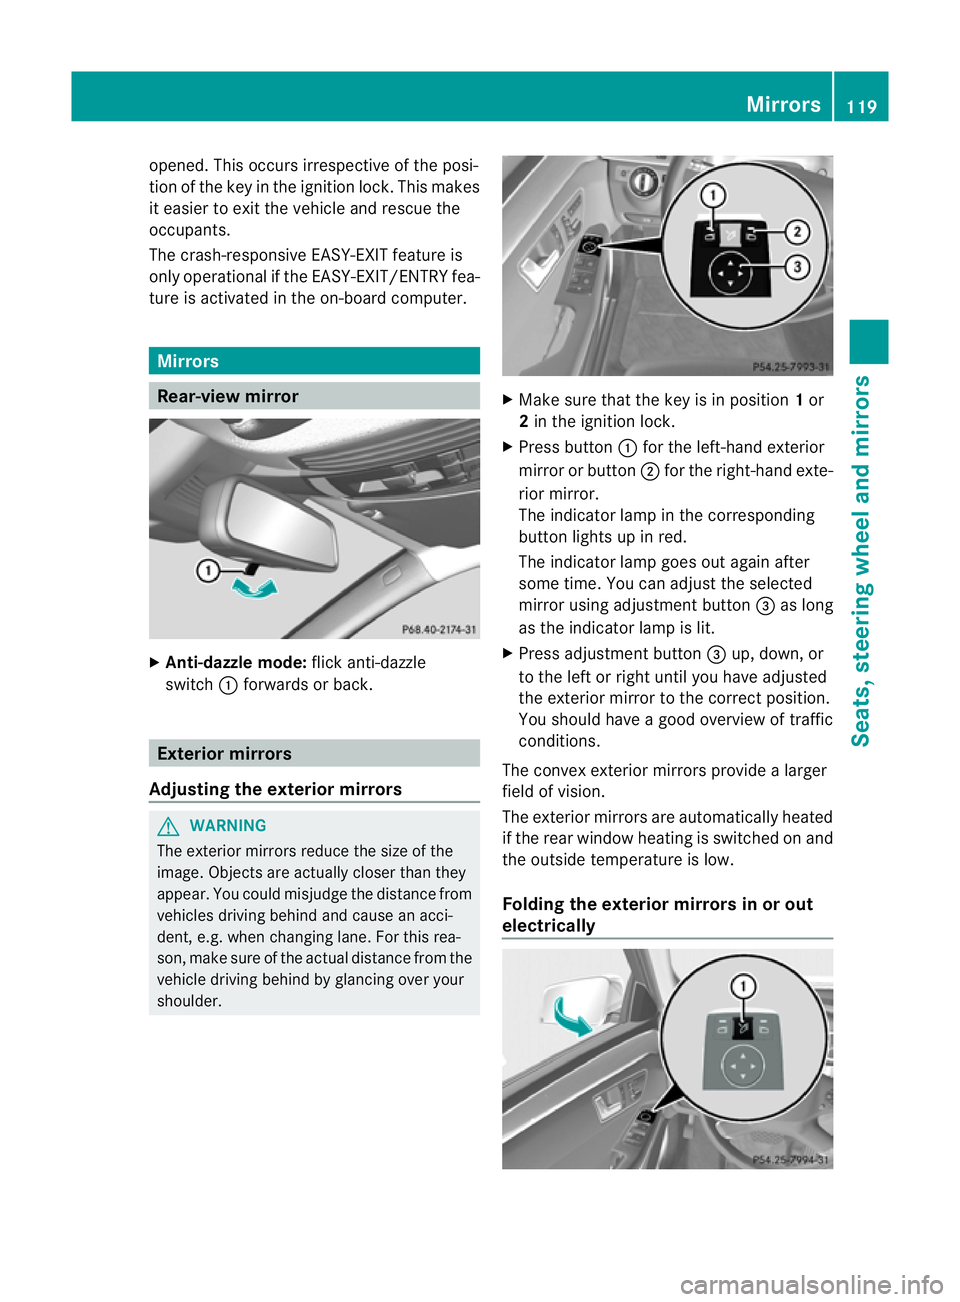
Make sure that the key is in position 1or
2 in the ignition lock.
X Press button :for the left-hand exterior
mirror or button ;for the right-hand exte-
rior mirror.
The indicator lamp in the corresponding
button lights up in red.
The indicator lamp goes out again after
some time. You can adjust the selected
mirror using adjustment button =as long
as the indicator lamp is lit.
X Press adjustmen tbutton =up, down, or
to the left or right until you have adjusted
the exterior mirror to the correct position.
You should have a good overview of traffic
conditions.
The convex exterio rmirrors provide a larger
field of vision.
The exterior mirrors are automatically heated
if the rear window heatin gis switched on and
the outside temperature is low.
Folding the exterior mirrors in or out
electrically Mirrors
119Seats, steering wheel and mirrors Z