Page 341 of 389
Coupé
X
To open: turn rotary catch :of cover ;
clockwise.
X Open cover ;downwards. Cabriolet
X
To open: raise boot floor :(Ypage 290).
X Using tabs =push back floo rcovering with
slits ;and lift it up. 338
Electrical fusesBreakdown assistance
Page 352 of 389

X
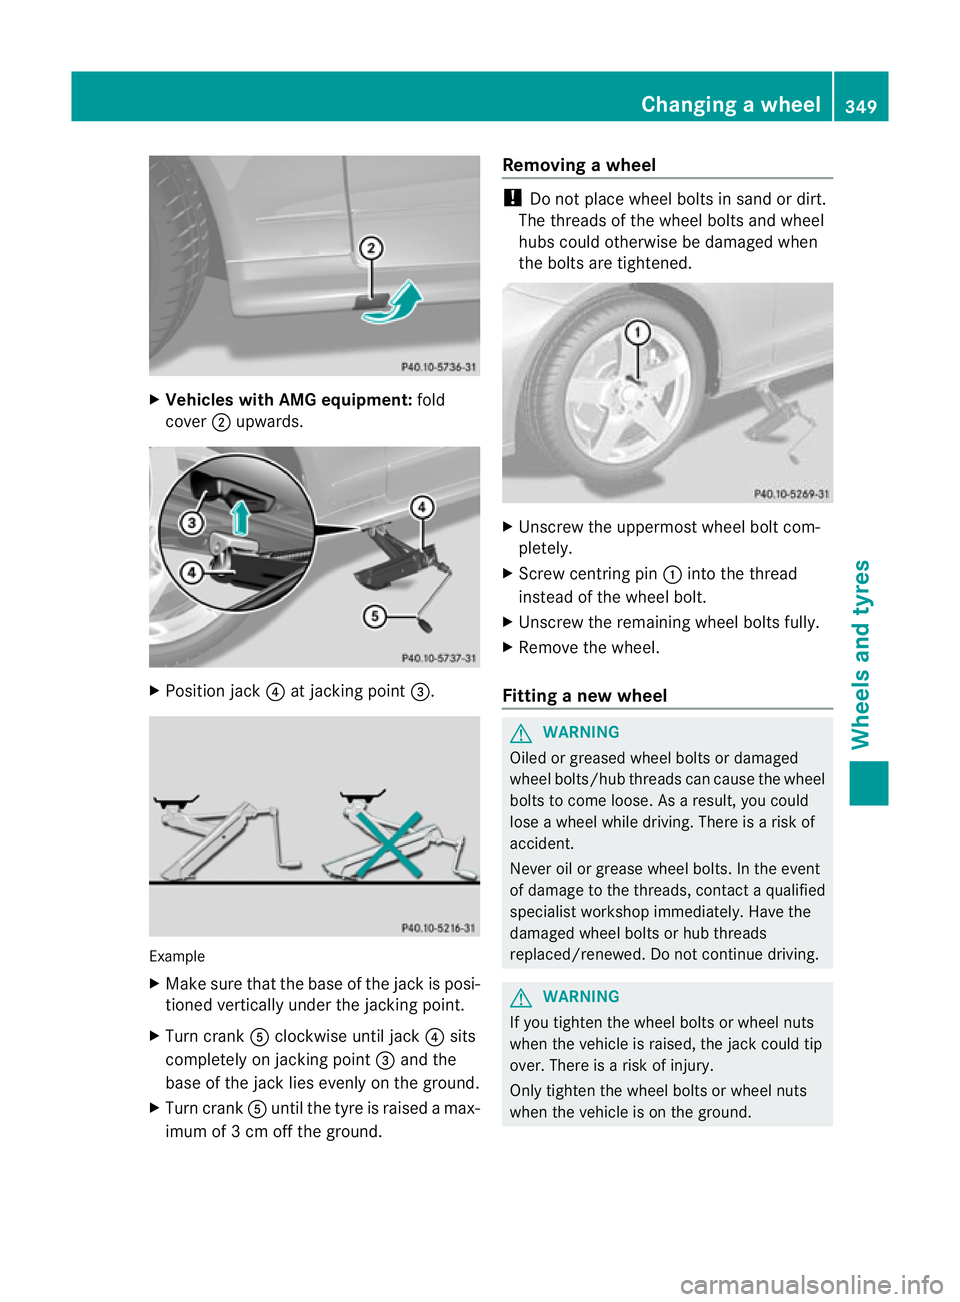
Vehicles with AMG equipment: fold
cover ;upwards. X
Position jack ?at jacking point =. Example
X
Make sure tha tthe base of the jack is posi-
tioned vertically under the jacking point.
X Turn crank Aclockwise until jack ?sits
completely on jacking point =and the
base of the jack lies evenly on the ground.
X Turn crank Auntil the tyre is raised a max-
imum of 3 cm off the ground. Removing
awheel !
Do not place wheel bolts in sand or dirt.
The threads of the wheel bolts and wheel
hubs could otherwise be damaged when
the bolts are tightened. X
Unscrew the uppermost wheel bol tcom-
pletely.
X Screw centring pin :into the thread
instead of the wheel bolt.
X Unscrew the remaining wheel bolts fully.
X Remove the wheel.
Fitting anew wheel G
WARNING
Oiled or greased wheel bolts or damaged
wheel bolts/hub threads can cause the wheel
bolts to come loose .As a result, you could
lose a wheel while driving. There is a risk of
accident.
Never oil or grease wheel bolts. In the event
of damage to the threads, contact a qualified
specialist workshop immediately.H ave the
damaged wheel bolts or hub threads
replaced/renewed. Do no tcontinue driving. G
WARNING
If you tighten the wheel bolts or wheel nuts
when the vehicle is raised, the jack could tip
over. There is a risk of injury.
Only tighten the wheel bolts or wheel nuts
when the vehicle is on the ground. Changing
awheel
349Wheels and tyres Z
Page 353 of 389

Always pay attentio
nto the instructions and
safety notices in "Changing a wheel"
(Y page 346).
Only use wheel bolts that have been designed
for the wheel and the vehicle. For safety rea-
sons, Mercedes-Benz recommends that you
only use wheel bolts which have been
approved for Mercedes-Benz vehicles and the
respective wheel. Positioning a wheel (example: vehicle with emer-
gency spare wheel)
X Clean the wheel and wheel hub contact
surfaces.
X Slide the wheel to be mounted onto the
centring pin and push it on.
X Tighten the wheel bolts until they are fin-
ger-tight.
X Unscrew the centring pin.
X Tighten the last wheel bolt until it is finger-
tight.
Lowering the vehicle G
WARNING
The wheels could work loose if the wheel nuts
and bolts are not tightened to the specified
tightening torque. There is a risk of accident.
Have the tightening torque immediately
checked at a qualified specialist workshop
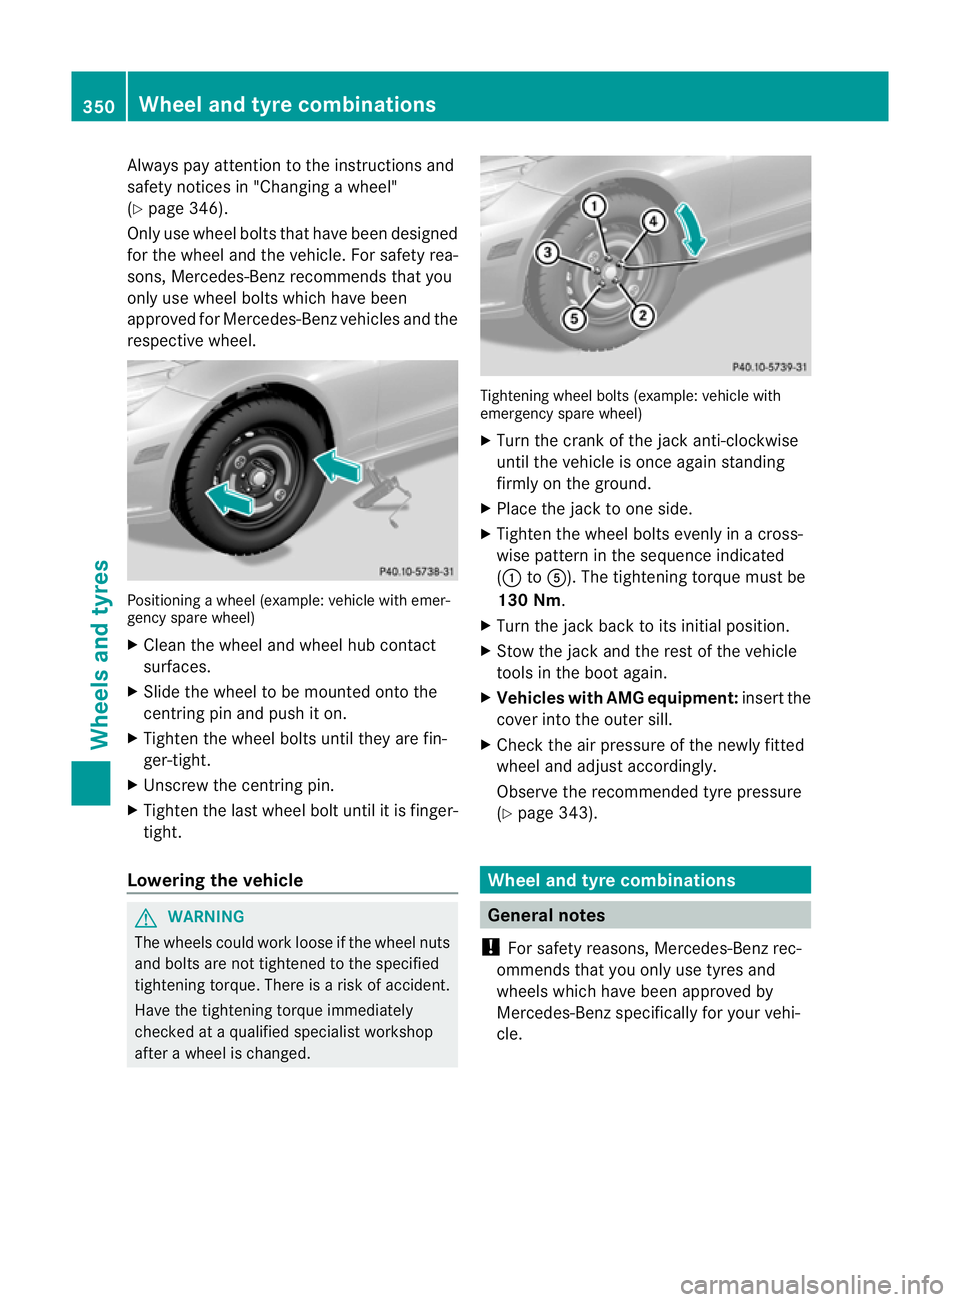
after a wheel is changed. Tightening wheel bolts (example: vehicle with
emergency spare wheel)
X Turn the crank of the jack anti-clockwise
until the vehicle is once again standing
firmly on the ground.
X Place the jack to one side.
X Tighten the wheel bolts evenly in a cross-
wise pattern in the sequence indicated
(: toA). The tightening torque must be
130 Nm.
X Turn the jack back to its initial position.
X Stow the jack and the rest of the vehicle
tools in the boot again.
X Vehicles with AMG equipment: insert the
cover into the outer sill.
X Check the air pressure of the newly fitted
wheel and adjust accordingly.
Observe the recommended tyre pressure
(Y page 343). Wheel and tyre combinations
General notes
! For safety reasons, Mercedes-Benz rec-
ommends that you only use tyres and
wheels which have been approved by
Mercedes-Benz specifically for your vehi-
cle. 350
Wheel and tyre combinationsWheels and tyres
Page 366 of 389

Emergency spare wheel
Important safety notes
G
WARNING
The wheel/tyre dimensions and the tyre type
of the spare wheel/emergency spare wheel
and the wheel to be replaced may differ. Fit-
ting a spare wheel/emergency spare wheel
may severely impair the driving characteris-
tics. There is a risk of accident.
To prevent hazardous situations:
R Adap tyour driving style accordingly and
drive carefully.
R Never fit more than one spare wheel/emer-
gency spare wheel if the dimesions are dif-
ferent to those of the wheel being replaced.
R Only use a spare wheel/emergency spare
wheel briefly if the dimesions are different
to those of the wheel being replaced.
R Do not switch off ESP ®
.
R Have the spare wheel/emergency spare
wheel in question replaced at the nearest
qualified specialist workshop. Make sure
that the wheel/tyre dimensions and tyre
type are correct.
When using an emergency spare wheel or
spare wheel of a different size, you must not
exceed the maximum speed of 80 km/h.
Snow chains must not be fitted to emergency
spare wheels. General notes
You should regularly check the pressure of all
your tyres, including the emergency spare
wheel, particularly prior to long trips, and cor-
rect the pressure as necessary (Y page 343).
The applicable value is found on the wheel or
under "Technical data" (Y page 364).
An emergency spare wheel may also be fitted
against the direction of rotation .Observe the
time restriction on use as well as the speed
limitation specified on the emergency spare
wheel. Replace the tyres after six years at the latest,
regardless of wear. This also applies to the
emergency spare wheel.
i
When you are driving with the emergency
spare wheel fitted, the tyre pressure loss
warning system cannot function reliably.
Only restart the tyre pressure loss warning
system when the defective wheel has been
replaced with a new wheel. "Minispare" emergency spare wheel
:
"Minispare" emergency spare wheel
; Vehicle tool kit tray
= Stowage tray
The "Minispare" emergency spare wheel can
be found in the stowage well under the boot
floor.
X Lift the boot floor upwards (Y page 290).
X Remove vehicle tool kit tray ;.
X Turn stowage tray =anti-clockwise and
remove it.
X Remove "Minispare" emergency spare
wheel :.
For further information on changing a wheel
and fitting the spare wheel, see
(Y page 324). Emergency spare wheel
363Wheels and tyres Z