2012 MERCEDES-BENZ E-CLASS COUPE clock
[x] Cancel search: clockPage 104 of 389
i
AIRCAP cannot be extended or retracted
if the vehicle speed exceeds 160 km/h.
Retracting AIRCAP X
Turn the key to position 2in the ignition
lock.
X Open the cover on the lower centre con-
sole.
X Press AIRCAP button :.
The two indicator lamps on the AIRCAP but-
ton go out. Wind deflector ;retracts.
The head restraints on the rea rbench seats
and AIRCAP draught stop =move to the
lower position simultaneously.
i If there are passengers wearing seat belts
in the rear compartment, the head
restraints on the rear bench seats and the
AIRCAP draught stop remain in the upper
position.
Retracting the head restraints on the
rear bench seats from the driver's seat To improve the rear view, you can retract the
head restraints on the rear bench seats indi-
vidually (Y page 111). The wind deflector
remains in its current position. Fitting/removing the AIRCAP draught
stop
Preparation You will need a
4mmAllen key to fit/remove
the AIRCAP draught stop.
Before fitting or removing the AIRCAP draught
stop:
X Turn the key to position 2in the ignition
lock.
X Open the folding roof fully (Y page 93).
X Extend the head restraints in the rear com-
partment fully (Y page 111). Removing
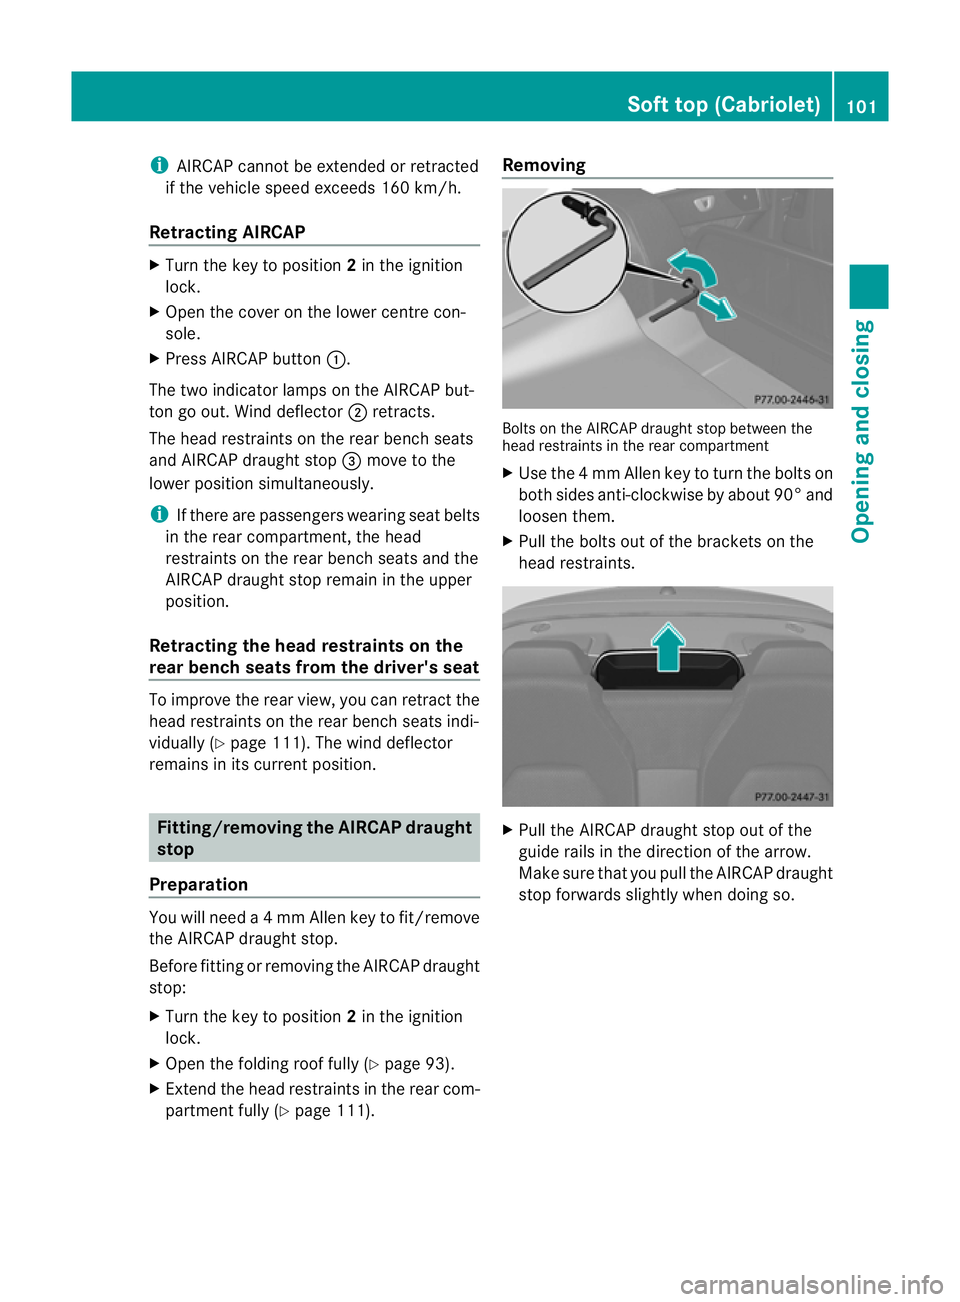
Bolts on the AIRCAP draught stop between the
head restraints in the rear compartment
X
Use the 4mmAllen key to tur nthe bolts on
both sides anti-clockwise by about 90° and
loosen them.
X Pull the bolts out of the brackets on the
head restraints. X
Pull the AIRCAP draught stop out of the
guide rails in the direction of the arrow.
Make sure that you pull the AIRCAP draught
stop forwards slightly when doing so. Soft top (Cabriolet)
101Opening and closing Z
Page 125 of 389
Useful information
i This Owner's Manual describes all mod-
els, series and optional equipment for your
vehicle that were available at the time of
going to press. National variations are pos-
sible. Note that your vehicle may not be
equipped with all of the functions descri-
bed. This is also the case for systems and
functions relevant to safety.
i Read the information on qualified special-
ist workshops: (Y page 23). Exterior lighting
Important safety notes
For reasons of safety, Mercedes-Benz recom-
mends that you drive with the lights switched
on even during the daytime. In some coun-
tries, operation of the headlamps varies due
to legal requirements and self-imposed obli-
gations. Driving abroad
General notes If your journey takes you to countries where
vehicles are driven on the opposite side of the
road to the country in which the vehicle is
registered, your headlamps must be switched
to symmetrical dipped beam as soon as pos-
sible after crossing the border. This prevents
oncoming traffic from being dazzled. Sym-
metrical lights do not illuminate as large an
area of the edge of the carriageway. Vehicles with halogen headlamps X
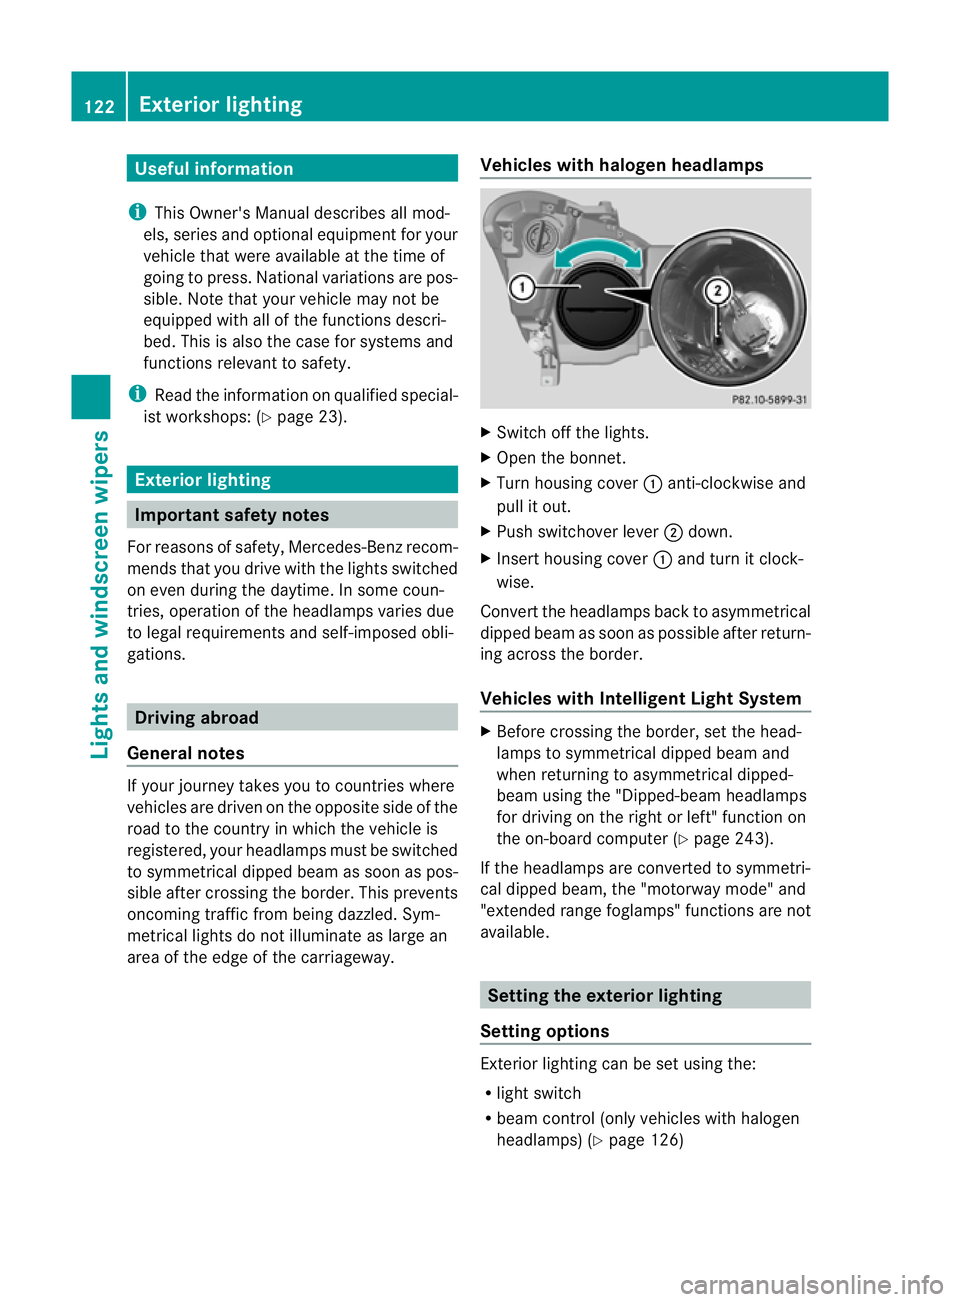
Switch off the lights.
X Open the bonnet.
X Turn housing cover :anti-clockwise and
pull it out.
X Push switchover lever ;down.
X Insert housing cover :and turn it clock-
wise.
Conver tthe headlamps back to asymmetrical
dipped beam as soon as possible after return-
ing across the border.
Vehicles with Intelligent Light System X
Before crossing the border, set the head-
lamps to symmetrical dipped beam and
when returning to asymmetrical dipped-
beam using the "Dipped-beam headlamps
for driving on the right or left" function on
the on-board computer (Y page 243).
If the headlamps are converted to symmetri-
cal dipped beam, the "motorway mode" and
"extended range foglamps" functions are not
available. Setting the exterior lighting
Setting options Exterior lighting can be set using the:
R
light switch
R beam control (only vehicles with halogen
headlamps) (Y page 126)122
Exterior lightingLights and windscreen wipers
Page 137 of 389
Replacing the fron
tbulbs
Dipped-beam headlamps (halogen
headlamps) Due to their location, have the bulbs in the
left-hand headlamp changed at a qualified
specialist workshop, e.g. aMercedes-Benz
Service Centre.
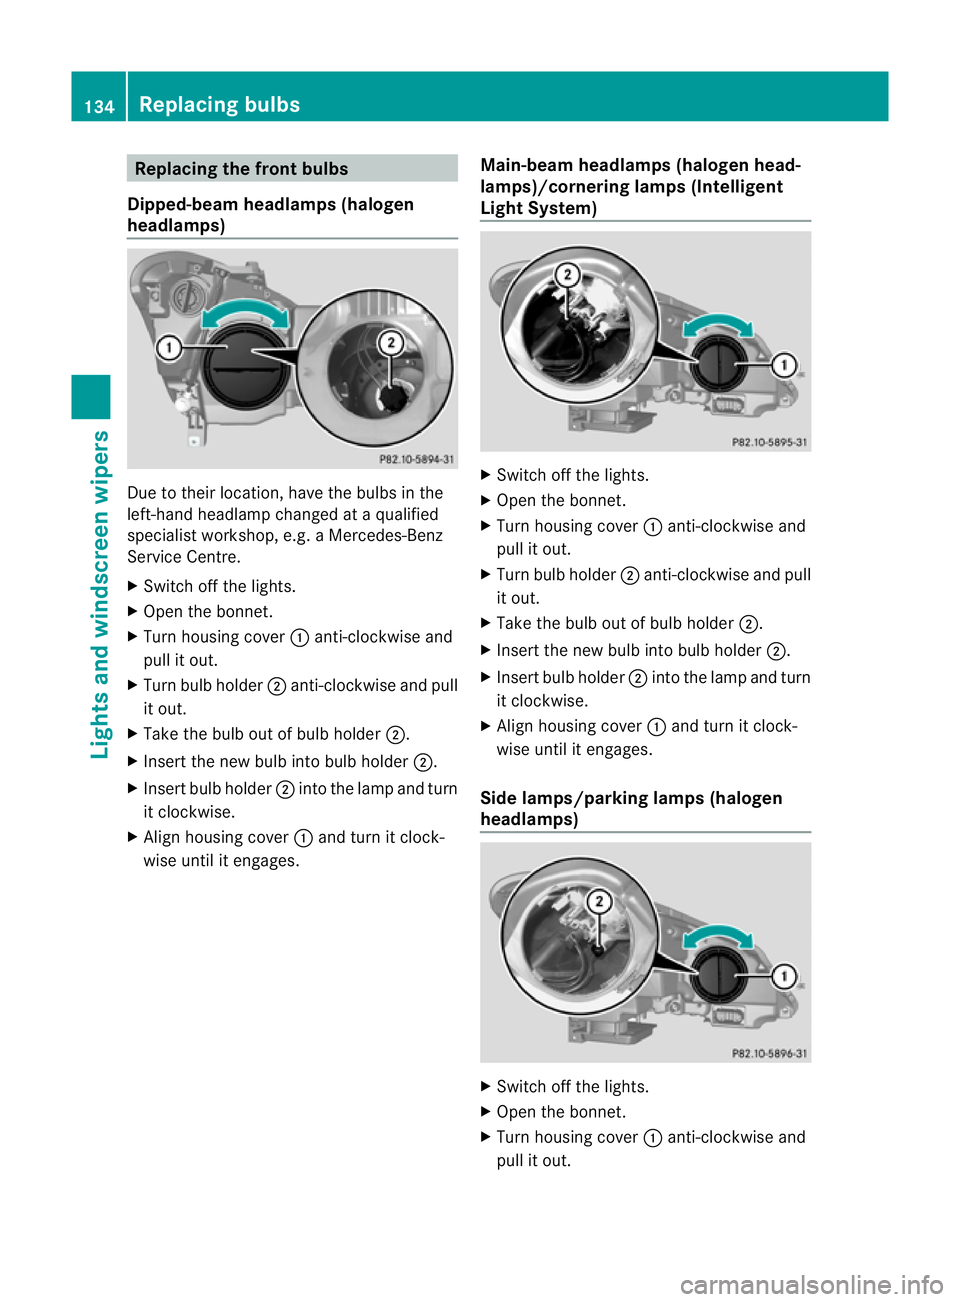
X Switch off the lights.
X Open the bonnet.
X Turn housing cover :anti-clockwise and
pull it out.
X Turn bulb holder ;anti-clockwise and pull
it out.
X Take the bulb out of bulb holder ;.
X Inser tthe new bulb into bulb holder ;.
X Insert bulb holder ;into the lamp and turn
it clockwise.
X Align housing cover :and turn it clock-
wise until it engages. Main-beam headlamps (halogen head-
lamps)/cornering lamps (Intelligent
Light System) X
Switch off the lights.
X Open the bonnet.
X Turn housing cover :anti-clockwise and
pull it out.
X Turn bulb holder ;anti-clockwise and pull
it out.
X Take the bulb out of bulb holder ;.
X Insert the new bulb into bulb holder ;.
X Insert bulb holder ;into the lamp and turn
it clockwise.
X Align housing cover :and turn it clock-
wise until it engages.
Side lamps/parking lamps (halogen
headlamps) X
Switch off the lights.
X Open the bonnet.
X Turn housing cover :anti-clockwise and
pull it out. 134
Replacing bulbsLights and windscreen wipers
Page 138 of 389

X
Pull out bulb holder ;.
X Take the bulb out of bulb holder ;.
X Inser tthe new bulb into bulb holder ;.
X Insert bulb holder ;.
X Align housing cover :and turn it clock-
wise until it engages.
Turn signal lamp (halogen headlamps) Due to their location, have the bulbs in the
left-hand headlamp changed at a qualified
specialist workshop
X Switch off the lights.
X Open the bonnet.
X Turn bulb holder :anti-clockwise and pull
it out.
X Turn the bulb anti-clockwise, applying
slight pressure, and remove it from bulb
holder :.
X Insert the new bulb into bulb holder :and
turn it clockwise.
X Insert bulb holder :into the lamp and turn
it clockwise. Windscreen wipers
Switching the windscreen wipers on/
off G
WARNING
The windscreen will not longer be wiped prop-
erly if the wiper blades are worn. This could
prevent you from observing the traffic condi- tions, thereby causing an accident. Replace
the wiper blades twice a year, ideally in spring
and autumn.
! Do not operate the windscreen wipers
when the windscreen is dry, as this could
damage the wiper blades. Moreover, dust
that has collected on the windscreen can
scratch the glass if wiping takes place when
the windscreen is dry.
If it is necessary to switch on the wind-
screen wipers in dry weather conditions,
always operate them using washer fluid.
! If the windscreen wipers leave smears on
the windscreen after the vehicle has been
washed in an automatic car wash, this may
be due to wax or other residue. Cleant he
windscreen with washer fluid after an auto-
matic car wash.
! Intermittent wiping with rain sensor: due
to optical influences and the windscreen
becoming dirty in dry weather conditions,
the windscreen wipers may be activated
inadvertently. This could damage the wind-
screen wiper blades or scratch the wind-
screen.
For this reason, you should always switch
off the windscreen wipers in dry weather. Combination switch
1
$ Windscreen wipers off
2 Ä Intermittent wipe, low (rain sensor
set to low sensitivity)
3 Å Intermittent wipe, high (rain sensor
set to high sensitivity) Windscreen wipers
135Lights and windscreen wipers Z
Page 157 of 389
Setting the centre air vents
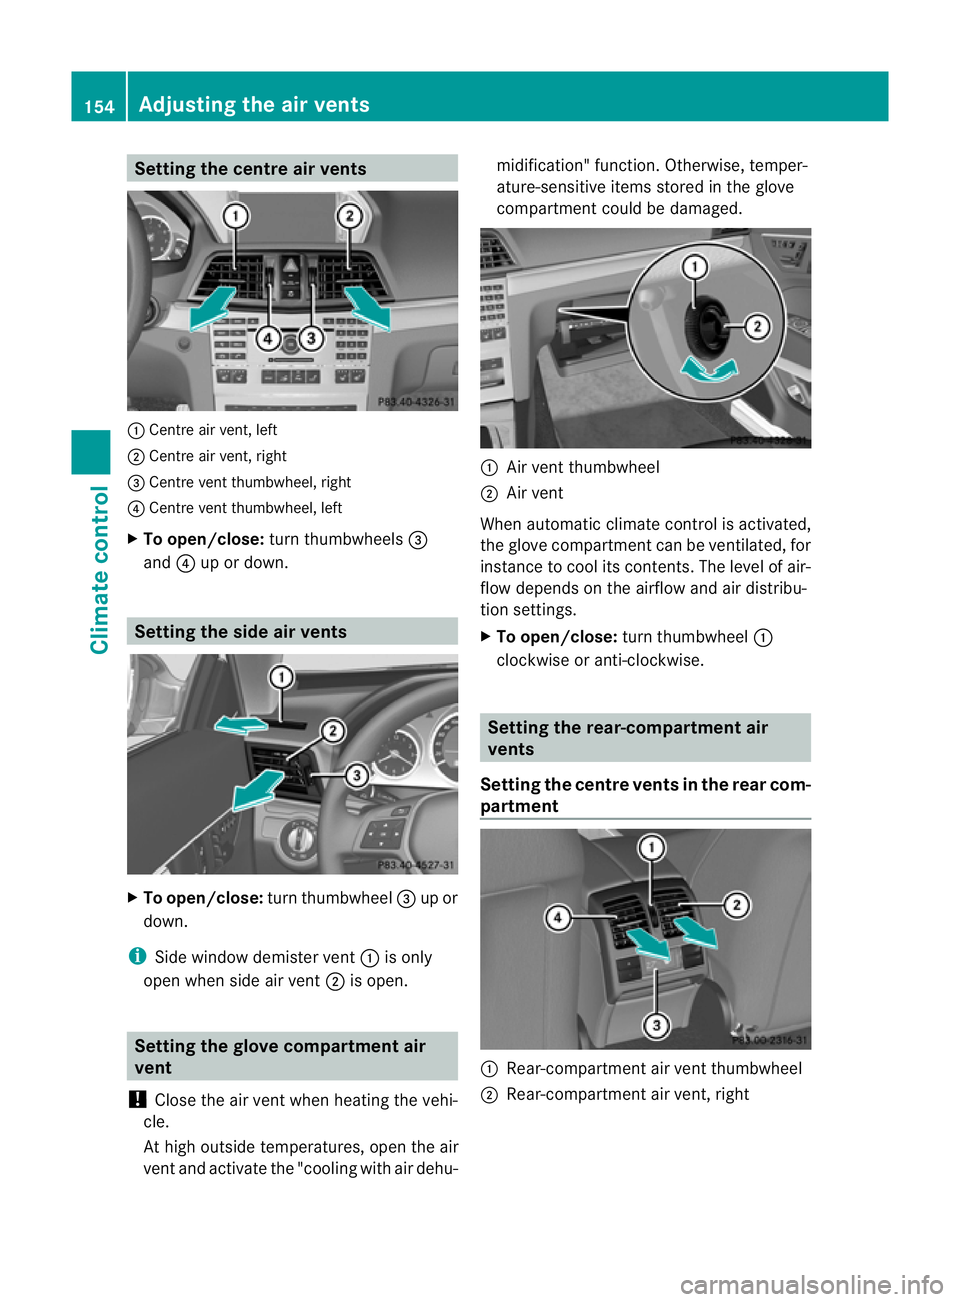
:
Centre air vent, left
; Centre air vent, right
= Centre vent thumbwheel, right
? Centre vent thumbwheel, left
X To open/close: turn thumbwheels =
and ?up or down. Setting the side air vents
X
To open/close: turn thumbwheel =up or
down.
i Side window demister vent :is only
open when side air vent ;is open. Setting the glove compartment air
vent
! Close the air vent when heating the vehi-
cle.
At high outside temperatures, open the air
vent and activate the "cooling with air dehu- midification" function. Otherwise, temper-
ature-sensitive items stored in the glove
compartmen
tcould be damaged. :
Air vent thumbwheel
; Air vent
When automatic climate control is activated,
the glove compartment can be ventilated, for
instance to cool its contents.T he level of air-
flow depends on the airflow and air distribu-
tion settings.
X To open/close: turn thumbwheel :
clockwise or anti-clockwise. Setting the rear-compartment air
vents
Setting the centre vents in the rear com-
partment :
Rear-compartment air vent thumbwheel
; Rear-compartment air vent, right 154
Adjusting the air ventsClimate control
Page 177 of 389
G
WARNING
Avoid contact with fuels.
It is hazardous to yourh ealth if your skin
comes into direct contact with fuels or you
breathe in fuel vapours. G
WARNING
Do not use petrol to refuel a diesel tank .Never
mix diesel with petrol. Doing so could damage
the fuel system and the engine. The vehicle
could also catch fire.
! Do not use petrol to refuel vehicles with a
diesel engine. Do not use diesel to refuel
vehicles with a petrol engine. Even small
amounts of the wrong fuel result in damage
to the fuel system and the engine.
! Do not switch on the ignition if you acci-
dentally refuel with the wrong fuel. Other-
wise, the fuel will enter the fuel lines. Notify
a qualified specialist workshop and have
the fuel tank and fuel lines drained com-
pletely.
! Overfilling the fuel tank could damage the
fuel system.
! Take care not to spill any fuel on painted
surfaces. You could otherwise damage the
paintwork.
! Use a filter when adding fuel from a fuel
can. The fuel lines and/or the diesel injec-
tion system could otherwise be blocked by
particles from the fuel can.
Further information on fuel and on fuel grades
can be found in the "Fuel" section
(Y page 372). Refuelling
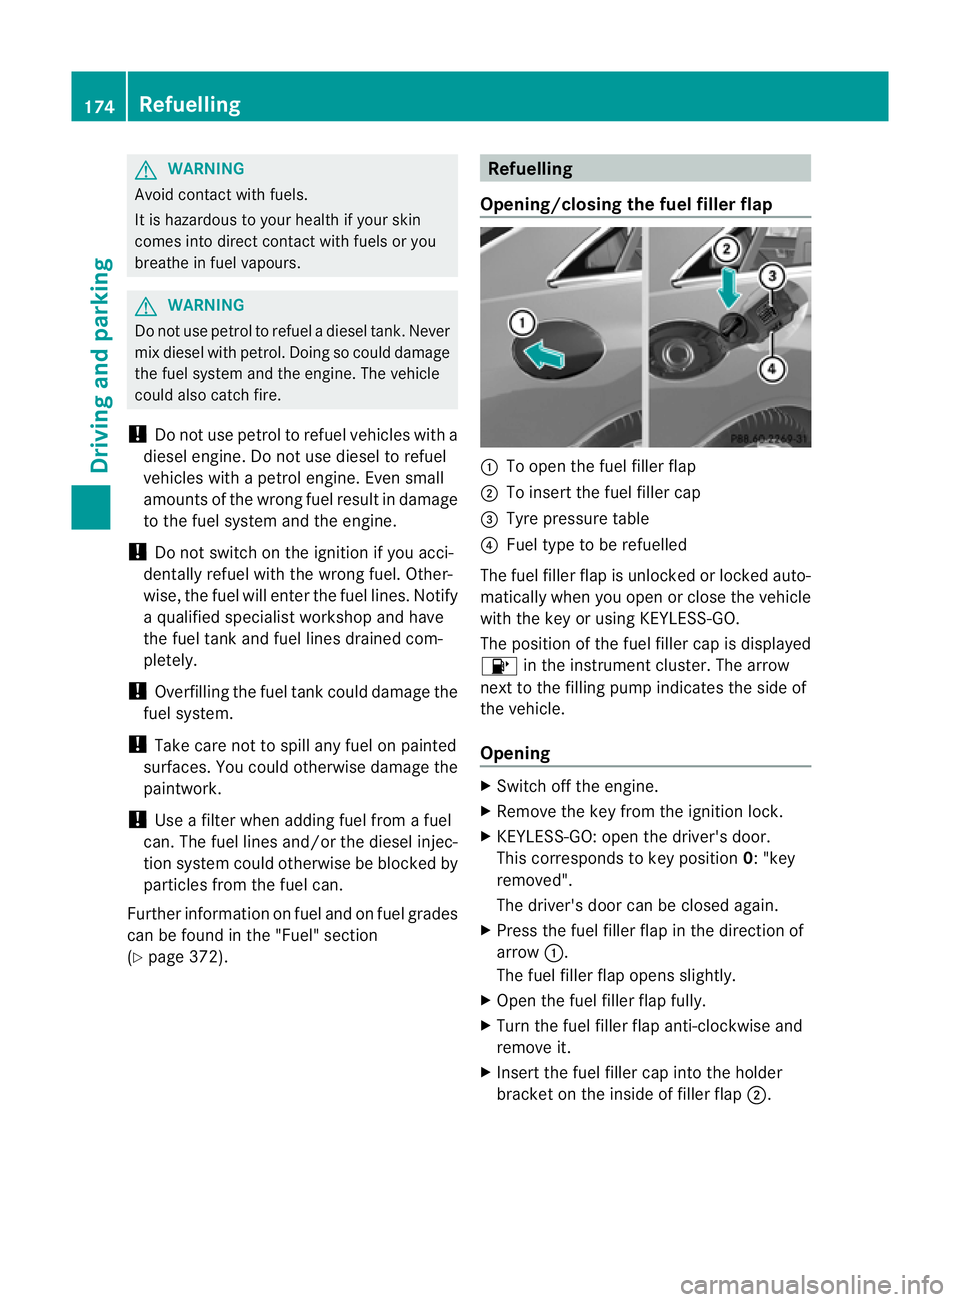
Opening/closing the fuel filler flap :
To open the fuel filler flap
; To insert the fuel filler cap
= Tyre pressure table
? Fuel type to be refuelled
The fuel filler flap is unlocked or locked auto-
matically when you open or close the vehicle
with the key or using KEYLESS-GO.
The position of the fuel filler cap is displayed
8 in the instrument cluster. The arrow
nextt o the filling pump indicates the side of
the vehicle.
Opening X
Switch off the engine.
X Remove the key from the ignition lock.
X KEYLESS-GO: open the driver's door.
This corresponds to key position 0: "key
removed".
The driver's door can be closed again.
X Press the fuel filler flap in the direction of
arrow :.
The fuel filler flap opens slightly.
X Open the fuel filler flap fully.
X Turn the fuel filler flap anti-clockwise and
remove it.
X Insert the fuel filler cap into the holder
bracket on the inside of filler flap ;.174
RefuellingDriving and parking
Page 178 of 389
X
Completely insert the fille rneck of the fuel
pump nozzle into the tank and refuel.
X Only fill the tank until the pump nozzle
switches off.
i Do not add any more fuel after the pump
stops filling for the first time. Otherwise,
fuel may leak out.
Closing X
Replace the cap on the filler necka nd turn
clockwise until it engages audibly.
X Close the fuel fille rflap.
i Close the fuel filler flap before locking the
vehicle. Otherwise, the locking pin of the
central locking prevents the fuel filler flap
fro mc losing. Refuelling
175Driving and parking Z
Page 225 of 389
On long and steep downhill gradients, espe-
cially if the vehicle is laden or towing a trailer,
you must select shift range
1,2or 3.
i This also applies if you have activated
cruise control, SPEEDTRONIC or DIS-
TRONIC PLUS.
This will use the braking effect of the engine,
so less braking will be required to prevent the
vehicle from gaining speed. This relieves the
load on the brake system and prevents the
brakes from overheating and wearing too
quickly. If you need additional braking,
depress the brake pedal repeatedly rather
than continuously.
Driving tips If the trailer swings from side to side:
X
Do not accelerate.
X Do not countersteer.
X Brake if necessary.
R Maintain a greater distance from the vehi-
cle in front than when driving without a
trailer.
R Avoid braking abruptly. If possible, brake
gently at first to allowt he trailer to run on.
Then, increase the braking force rapidly.
R The values given for gradient-climbing
capabilities from a standstill refer to sea
level. When driving in mountainous areas,
note that the power output of the engine,
and consequently the vehicle's gradient-
climbing capability, decrease with increas-
ing altitude. Folding out the ball coupling
G
WARNING
If the ball coupling is not correctly engaged,
the trailer can detach. There is a risk of an
accident.
Always engage the ball coupling as described. G
WARNING
If you release the ball coupling or it does not
engage correctly when folding in, it will swing
out. Within pivoting range of the ball coupling,
there is an increased risk of an accident and
injury.
Only release the ball coupling if the pivoting
range is unobstructed. Always make sure that
the ball coupling engages when folding in. Before you can tow a trailer with your vehicle,
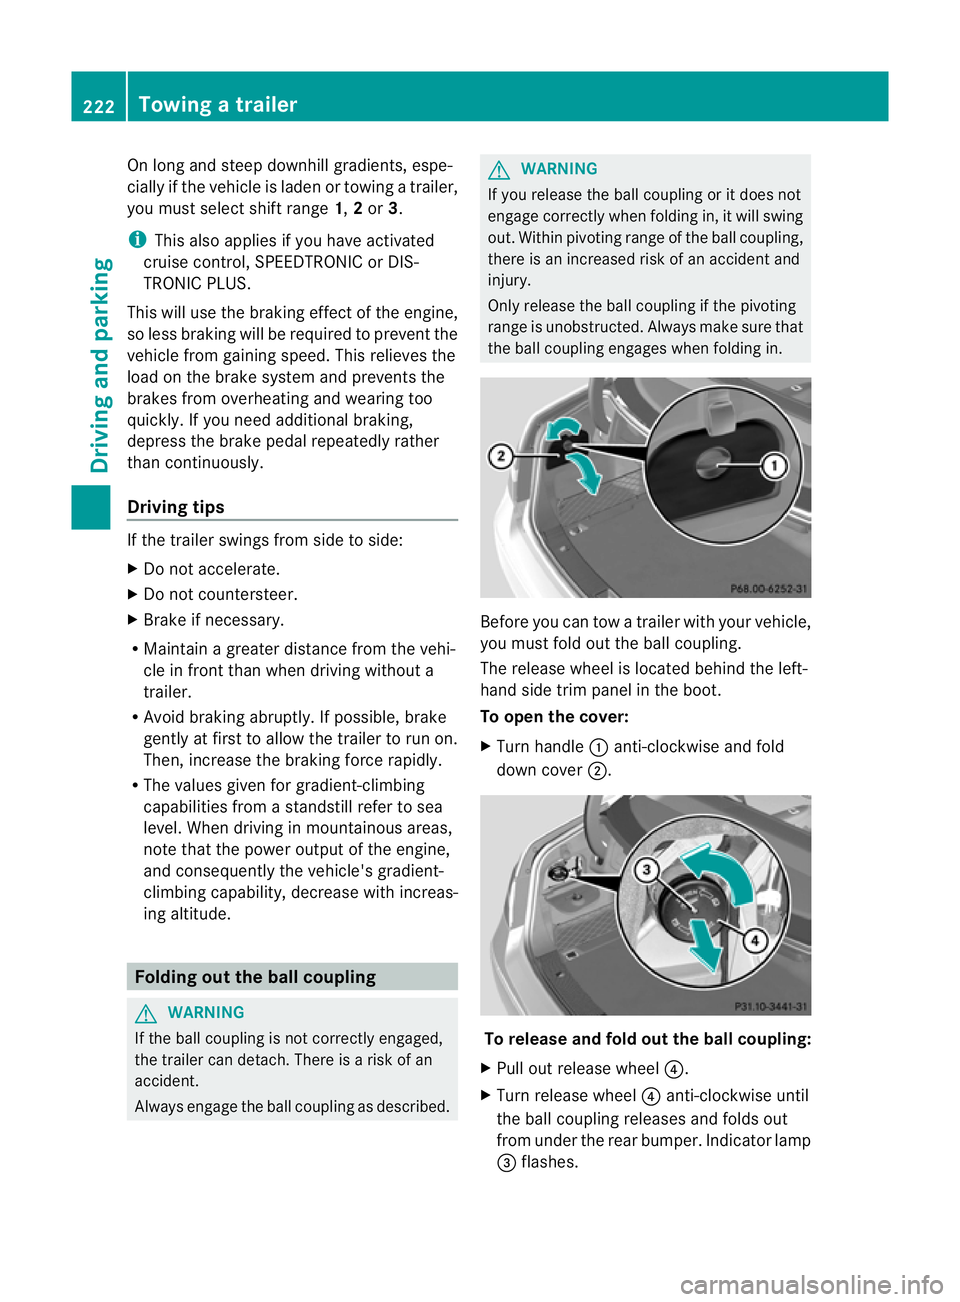
you must fold out the ball coupling.
The release wheel is located behind the left-
hand side trim panel in the boot.
To open the cover:
X
Turn handle :anti-clockwise and fold
down cover ;. To release and fold out the ball coupling:
X Pull out release wheel ?.
X Turn release wheel ?anti-clockwise until
the ball coupling releases and folds out
from under the rear bumper. Indicator lamp
= flashes. 222
Towing
atrailerDriving an d parking