2012 MERCEDES-BENZ CLS SHOOTING BRAKE parking brake
[x] Cancel search: parking brakePage 255 of 405
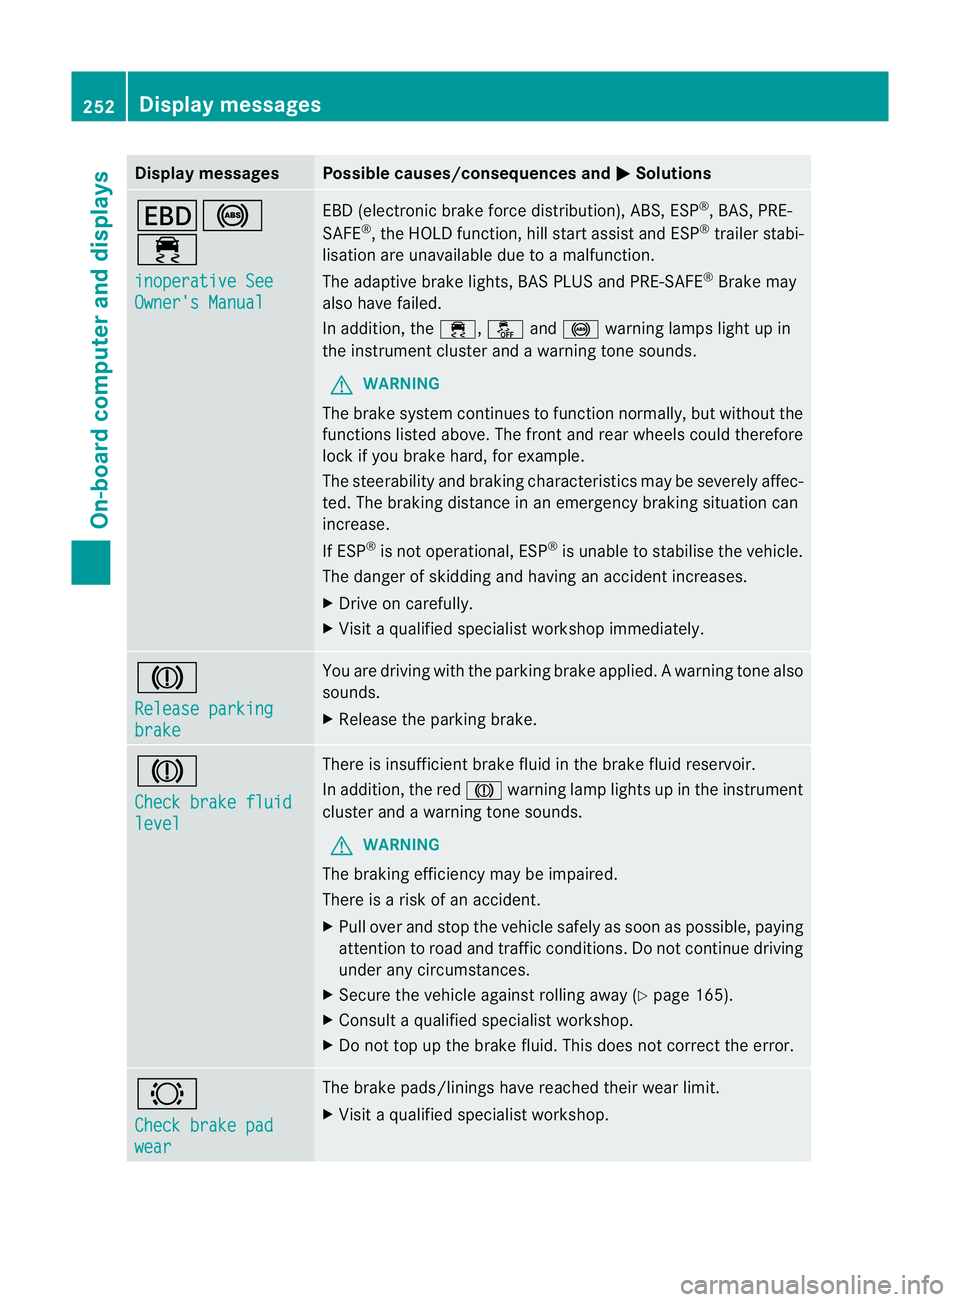
Display messages Possible causes/consequences and
M Solutions
T!
÷
inoperative See
Owner's Manual EBD (electronic brake force distribution), ABS, ESP
®
, BAS, PRE-
SAFE ®
, the HOLD function ,hill start assist and ESP ®
trailer stabi-
lisatio nare unavailable due to a malfunction.
The adaptive brake lights, BAS PLUS and PRE-SAFE ®
Brake may
also have failed.
In addition, the ÷,åand! warning lamps light up in
the instrument cluster and a warning tone sounds.
G WARNING
The brake system continues to function normally, but withou tthe
functions listed above. The front and rear wheels could therefore
lock if you brake hard, for example.
The steerability and braking characteristics may be severely affec-
ted. The braking distance in an emergency braking situation can
increase.
If ESP ®
is not operational, ESP ®
is unable to stabilise the vehicle.
The danger of skidding and having an accident increases.
X Drive on carefully.
X Visit a qualified specialist workshop immediately. J
Release parking
brake You are driving with the parking brake applied.
Awarning tone also
sounds.
X Release the parking brake. J
Check brake fluid
level There is insufficient brak
efluid in the brake fluid reservoir.
In addition, the red Jwarning lamp lights up in the instrument
cluster and a warning tone sounds.
G WARNING
The braking efficiency may be impaired.
There is a risk of an accident.
X Pull over and stop the vehicle safely as soon as possible, paying
attention to road and traffic conditions. Do not continue driving
under any circumstances.
X Secure the vehicle against rolling away (Y page 165).
X Consult a qualified specialist workshop.
X Do not top up the brake fluid. This does not correct the error. #
Check brake pad
wear The brake pads/linings have reached their wear limit.
X
Visit a qualified specialist workshop. 252
Display messagesOn-board computer and displays
Page 277 of 405
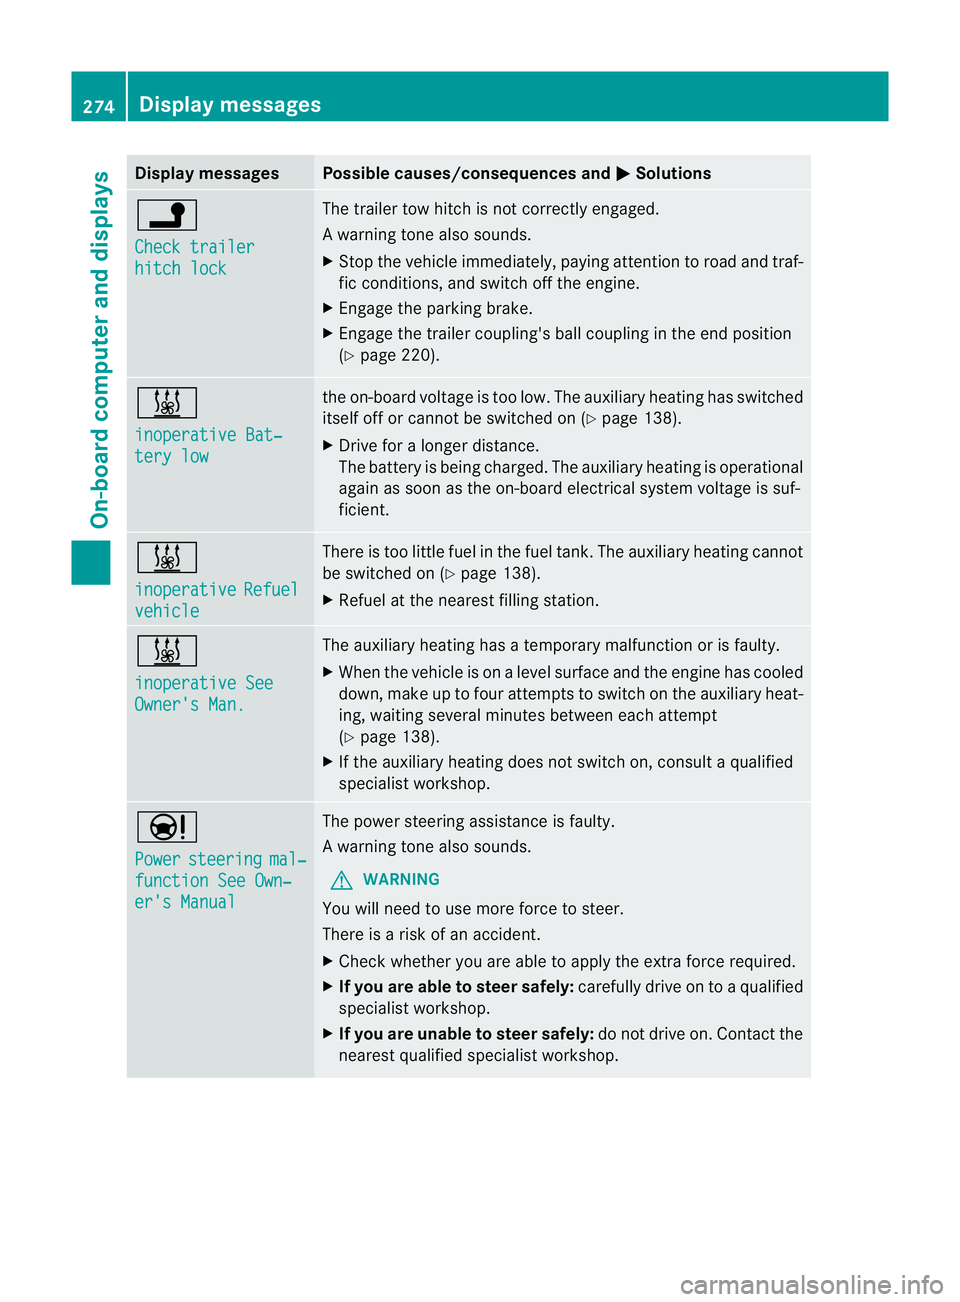
Display messages Possible causes/consequences and
M Solutions
j
Check trailer
hitch lock The trailer tow hitch is no
tcorrectly engaged.
Aw arning tone also sounds.
X Stop the vehicle immediately, paying attentio ntoroad and traf-
fic conditions, and switch off the engine.
X Engage the parking brake.
X Engage the trailer coupling's ball coupling in the end position
(Y page 220). &
inoperative Bat‐
tery low the on-board voltage is too low. The auxiliary heating has switched
itself off or cannot be switched on (Y
page 138).
X Drive for a longer distance.
The battery is being charged. The auxiliary heating is operational
again as soon as the on-board electrical system voltage is suf-
ficient. &
inoperative
Refuel
vehicle There is too little fuel in the fuel tank.T
he auxiliary heating cannot
be switched on (Y page 138).
X Refuel at the nearest filling station. &
inoperative See
Owner's Man. The auxiliary heating has a temporary malfunction or is faulty.
X
When the vehicle is on alevel surface and the engine has cooled
down, make up to four attempts to switch on the auxiliary heat-
ing, waiting several minutes between each attempt
(Y page 138).
X If the auxiliary heating does not switch on, consult a qualified
specialist workshop. Ð
Power
steering mal‐
function See Own‐
er's Manual The power steering assistance is faulty.
Aw
arning tone also sounds.
G WARNING
You will need to use more force to steer.
There is a ris kofanaccident.
X Check whethe ryou are able to apply the extra force required.
X If you are able to steer safely: carefully drive on to a qualified
specialist workshop.
X If you are unable to steer safely: do not drive on. Contact the
nearest qualified specialist workshop. 274
Display messagesOn-board computer and displays
Page 287 of 405
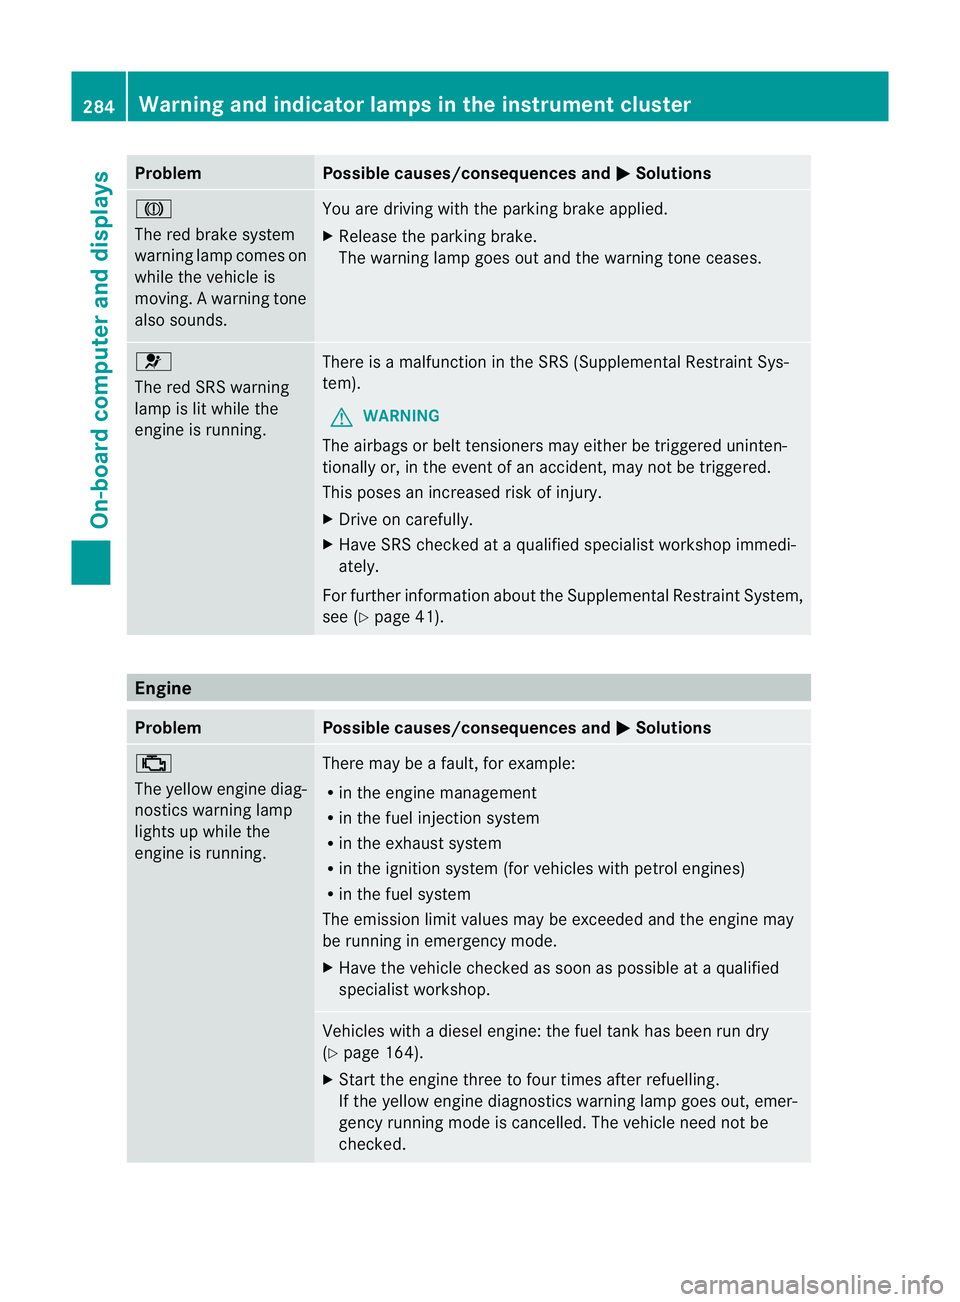
Problem Possible causes/consequences and
M Solutions
J
The red brake system
warning lamp comes on
while the vehicle is
moving. A warning tone
also sounds.
You are driving with the parking brake applied.
X
Release the parking brake.
The warning lamp goes out and the warning tone ceases. 6
The red SRS warning
lamp is lit while the
engine is running.
There is a malfunction in the SRS (Supplemental Restraint Sys-
tem).
G WARNING
The airbags or belt tensioners may either be triggered uninten-
tionally or, in the event of an accident, may not be triggered.
This poses an increased risk of injury.
X Drive on carefully.
X Have SRS checked at a qualified specialist workshop immedi-
ately.
For further information about the Supplemental Restraint System,
see (Y page 41). Engine
Problem Possible causes/consequences and
M Solutions
;
The yellow engine diag-
nostics warning lamp
lights up while the
engine is running. There may be a fault, for example:
R
in the engine management
R in the fuel injection system
R in the exhaust system
R in the ignition system (for vehicles with petrol engines)
R in the fuel system
The emission limit values may be exceeded and the engine may
be running in emergency mode.
X Have the vehicle checked as soon as possible at a qualified
specialist workshop. Vehicles with a diesel engine: the fuel tank has been run dry
(Y
page 164).
X Start the engine three to four times after refuelling.
If the yellow engine diagnostics warning lamp goes out, emer-
gency running mode is cancelled. The vehicle need not be
checked. 284
Warning and indicator lamps in the instrument clusterOn-board computer and displays
Page 329 of 405
R
Vehicles with a key:
do not remove the key from the ignition
lock. Do not open the driver's door or
front-passenger door when the engine is
switched off. Otherwise, the automatic
transmission selects park position P
automatically and locks the wheels. You
can prevent this by shifting the auto-
matic transmission to Nbeforehand.
R Vehicles with KEYLESS-GO:
do not open the driver's door or front-
passenger door when the engine is
switched off. Otherwise, the automatic
transmission selects park position P
automatically and locks the wheels.
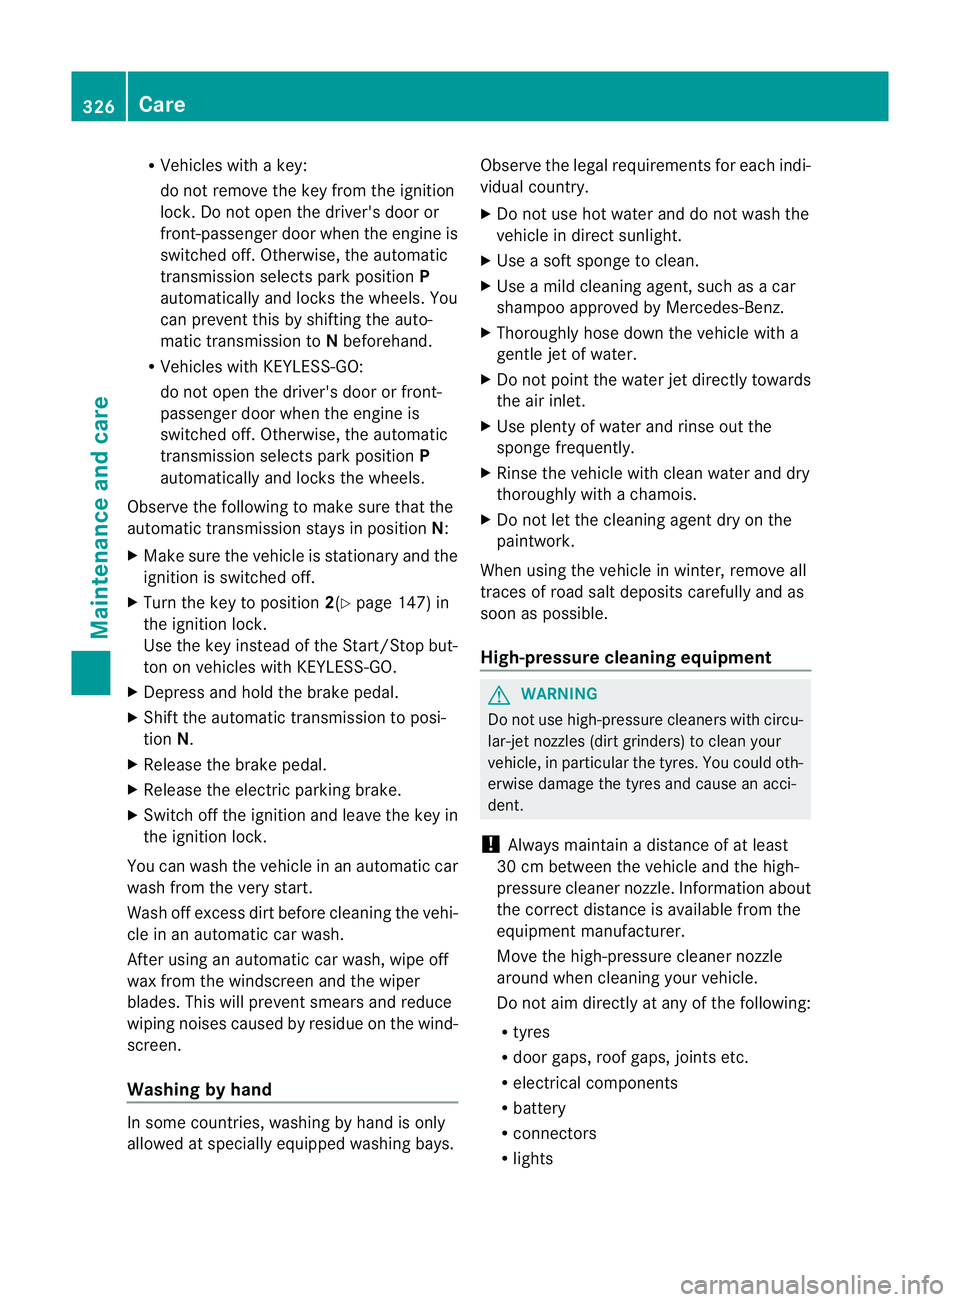
Observe the following to make sure that the
automatic transmission stays in position N:
X Make sure the vehicle is stationary and the
ignition is switched off.
X Turn the key to position 2(Ypage 147) in
the ignition lock.
Use the key instead of the Start/Stop but-
ton on vehicles with KEYLESS-GO.
X Depress and hold the brake pedal.
X Shift the automatic transmission to posi-
tion N.
X Release the brake pedal.
X Release the electric parking brake.
X Switch off the ignition and leave the key in
the ignition lock.
You can wash the vehicle in an automatic car
wash from the very start.
Wash off excess dirt before cleaning the vehi-
cle in an automatic car wash.
After using an automatic car wash, wipe off
wax from the windscreen and the wiper
blades. This will prevent smears and reduce
wiping noises caused by residueont he wind-
screen.
Washing by hand In some countries, washing by hand is only
allowed at specially equipped washing bays. Observe the legal requirements for each indi-
vidual country.
X
Do not use hot water and do not wash the
vehicle in direct sunlight.
X Use a soft sponge to clean.
X Use a mild cleaning agent, such as a car
shampoo approved by Mercedes-Benz.
X Thoroughly hose down the vehicle with a
gentle jet of water.
X Do not point the water jet directly towards
the air inlet.
X Use plenty of water and rinse out the
sponge frequently.
X Rinse the vehicle with clean water and dry
thoroughly with a chamois.
X Do not let the cleaning agent dry on the
paintwork.
When using the vehicle in winter, remove all
traces of road salt deposits carefully and as
soon as possible.
High-pressure cleaning equipment G
WARNING
Do not use high-pressure cleaners with circu-
lar-jet nozzles (dirt grinders) to clean your
vehicle, in particular the tyres. You could oth-
erwise damage the tyres and cause an acci-
dent.
! Always maintain a distance of at least
30 cm between the vehicle and the high-
pressure cleaner nozzle. Information about
the correct distance is available from the
equipment manufacturer.
Move the high-pressure cleaner nozzle
around when cleaning your vehicle.
Do not aim directly at any of the following:
R tyres
R door gaps, roof gaps, joints etc.
R electrical components
R battery
R connectors
R lights 326
CareMaintenance and care
Page 340 of 405
X
Stop the vehicle as far away as possible
from traffic on solid ,non-slippery and level
ground.
X Switch on the hazard warning lamps.
X Engage the parking brake.
X Bring the front wheels into the straight-
ahead position.
X Shift the transmission to position P.
X Vehicles with AIRMATIC: make sure that
"normal" level is selected (Y page 188).
X Switch off the engine.
X Vehicles without KEYLESS-GO: remove
the key from the ignition lock.
X Vehicles with KEYLESS-GO: open the
driver's door.
The on-board electronics have status 0,
which is the same as the key having been
removed.
X Vehicles with KEYLESS-GO: remove the
Start/Stop button from the ignition lock
(Y page 147).
X All occupants must get out of the vehicle.
Make sure that they are not endangered as
they do so.
X Occupants should stand clear of danger
whilst a wheel is being changed, e.g. behind
the barrier.
X Get out of the vehicle. Pay attention to traf-
fic conditions when doing so.
X Close the driver's door.
X Place the warning triangle a suitable dis-
tance away (Y page 334). Observe legal
requirements. MOExtended tyres (tyres with run-flat
characteristics) G
WARNING
When driving in emergency mode, the driving
characteristics deteriorate, e.g. when corner-
ing, accelerating quickly and when braking.
There is a risk of accident.
Do not exceed the stated maximum speed.
Avoid abrupt steering and driving manoeu- vres, and driving over obstacles (kerbs, pot-
holes, off-road). This applies in particular to a
laden vehicle.
Stop driving in emergency mode if:
R
you hear banging noises.
R the vehicle starts to shake.
R you see smoke and smell rubber.
R ESP ®
is intervening constantly.
R there are tears in the sidewalls of the tyre.
After driving in emergency mode, have the
wheel rims checked at a qualified specialist
workshop with regard to their further use. The
faulty tyre must be replaced.
With MOExtended tyres (tyres with run-flat
characteristics), you can continue to drive
your vehicle even if there is a total loss of
pressure in one or more tyres.
MOExtended tyres may only be used in con-
junction with an active tyre pressure loss
warning system or with an active tyre pres-
sure monitor.
The maximum driving distance is approx-
imately 80 km when the vehicle is partially
laden, and approximately 30 km when the
vehicle is fully laden.
In addition to the vehicle load, the driving dis-
tance possible depends upon:
R speed
R road condition
R outside temperature
The driving distance possible in run-flat mode
may be reduced by extreme driving condi-
tions/manoeuvres, or it can be increased
through a moderate style of driving.
The maximum permissible distance which
can be driven in run-flat mode is counted from
the moment the tyre pressure loss warning
appears in the multifunction display.
You must not exceed a maximum speed of
80 km/h.
i When replacing one or all tyres, make
sure that you only use tyres marked Flat tyre
337Breakdown assistance Z
Page 348 of 405
Do not use a rapid charging device to start the vehicle. If your vehicle's battery is discharged,
the engine can be jump-started from another vehicle or from a second battery using jump
leads. Observe the following points:
R the battery is not accessible in all vehicles .Ifthe other vehicle's battery is not accessible,
jump-start the vehicle using a second battery or ajump-starting device.
R vehicles with apetrol engine: only jump-star tthe vehicle when the engine and exhaust
system are cold.
R do not start the engine if the battery is frozen. Let the battery thaw first.
R jump-starting may only be performed from batteries with a nominal voltage of 12 V.
R only use jump leads that have a sufficient cross-section and insulated terminal clamps.
R if the battery is fully discharged, leave the battery that is being used to jump-start connected
for a few minutes before attempting to start. This charges the empty battery a little.
R make sure that the two vehicles do not touch.
Make sure that:
R The jump leads are not damaged.
R Non-insulated parts of the terminal clamps do not come into contact with other metal parts
while the jump leads are connected to the battery.
R The jump leads cannot come into contact with parts such as the V-belt pulley or the fan.
These parts move when the engine is started and while it is running.
X Firmly depress the parking brake.
X Shift the transmission to position P.
X Switch off all electrical consumers (e.g. radio, blower, etc.).
X Open the bonnet (Y page 320).
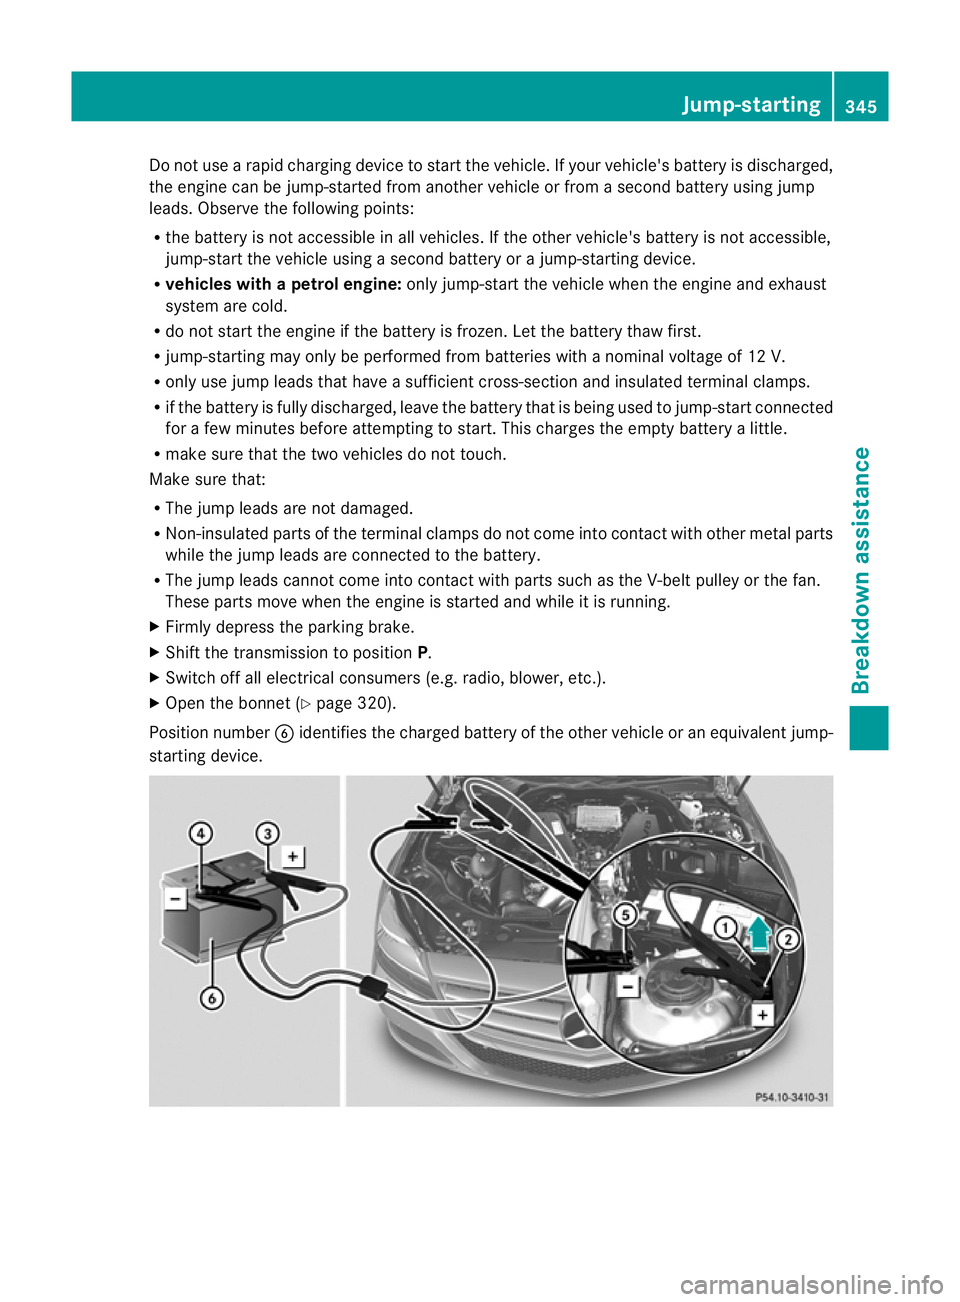
Position number Bidentifies the charged battery of the other vehicle or an equivalent jump-
starting device. Jump-starting
345Breakdown assistance Z
Page 352 of 405
The automatic transmission automatically
shifts to position
Pwhen you open the driver's
or front-passenger door or when you remove
the key from the ignition lock. In order to
ensure that the automatic transmission stays
in position Nwhen towing the vehicle, you
must observe the following points:
X Make sure that the vehicle is stationary and
that the key is in position 0in the ignition
lock.
X Turn the key to position 2in the ignition
lock.
On vehicles with KEYLESS-GO, use the key
instead of the Start/Stop button
(Y page 147).
X Depress and hold the brake pedal.
X Shift the automatic transmission to posi-
tion N.
X Release the brake pedal.
X Release the parking brake.
X Switch on the hazard warning lamps
(Y page 118).
X Leave the key in position 2in the ignition
lock.
i When towing with the hazard warning
lamps switched on, use the combination
switch as usual to signal achange of direc-
tion. In this case, only the turn signals for
the desired direction flash. When you reset
the combination switch, the hazard warn-
ing lamps start flashing again. Transporting the vehicle
! Only lash the vehicle down by the wheels
or wheel rims, not by parts of the vehicle
such as axle or steering components. Oth-
erwise, the vehicle could be damaged.
The towing eye can be used to pull the vehicle
onto a trailer or transporter for transporting
purposes.
The towing eyes or trailer tow hitch can be
used to pull the vehicle onto a trailer or trans-
porter if you wish to transport it. X
Turn the key to position 2in the ignition
lock.
X Shift the automatic transmission to posi-
tion N.
As soon as the vehicle is loaded:
X Prevent the vehicle from rolling away by
applying the parking brake.
X Shift the automatic transmission to posi-
tion P.
X Turn the key in the ignition lock to position
0and remove the key from the ignition
lock.
X Secure the vehicle. Notes for 4MATIC vehicles
! Vehicles with 4MATIC must not be towed
with the front or rear axle raised; otherwise,
the transmission may be damaged.
If the vehicle has transmission damage or
damage to the front or rear axle, have it trans-
ported on a transporter or trailer.
In the event of damage to the electrical
system
If the battery is defective, the automatic
transmission will be locked in position P. To
shift the automatic transmission to position
N, you must provide power to the vehicle's
electrical system in the same way as when
jump-starting (Y page 344).
Have the vehicle transported on a transporter
or trailer. Tow-starting (emergency engine
starting)
! Vehicles with automatic transmission
must not be tow-started. The transmission
may otherwise be damaged.
You can find information on "Jump-starting"
at (Y page 344). Towing and tow-starting
349Breakdown assistance Z
Page 357 of 405
Useful information
i This Owner's Manual describes all mod-
els, series and optional equipment for your
vehicle that were available at the time of
going to press. National variations are pos-
sible. Note that your vehicle may not be
equipped with all of the functions descri-
bed. This is also the case for systems and
functions relevant to safety.
i Read the information on qualified special-
ist workshops: (Y page 24). Important safety notes
G
WARNING
If wheels and tyres of the wrong size are used,
the wheel brakes or suspension components
may be damaged. There is arisk of accident.
Always replace wheels and tyres with those
that fulfil the specifications of the original part
(designation, manufacturer, model). G
WARNING
Af lat tyre severely impairs the driving, steer-
ing and braking characteristics of the vehicle.
There is a risk of accident.
Tyres without run-flat characteristics:
R do not drive with aflat tyre.
R immediately replace the flat tyre with your
emergency spare wheel or spare wheel, or
consult a qualified specialist workshop.
Tyres with run-flat characteristics:
R pay attention to the information and warn-
ing notices on MOExtended tyres (tyres
with run-flat characteristics).
Accessories that are not approved for your
vehicle by Mercedes-Ben zorare not being
used correctly can impair the operating
safety. Before purchasing and using non-approved
accessories, visit a qualified specialist work-
shop and enquire about:
R suitability
R legal stipulations
R factory recommendations
Information on the dimensions and types of
wheels and tyres for yourv ehicle can be
found under "Wheel/tyre combinations"
(Y page 367).
Information on air pressure for the tyres on
your vehicle can be found:
R on the tyre pressure label on the fuel filler
flap (Y page 162)
R under "Tyre pressure" (Y page 357)
R in the "Tyre pressure" section
Modification work on the brake system and
wheels is not permitted. The use of wheel
spacers or brake dust shields is not permit-
ted. This invalidates the general operating
permit for the vehicle.
i Further information on wheels and tyres
can be obtained at any qualified specialist
workshop. Operation
Information on driving
Check the tyre pressures when the vehicle is
heavily laden and, if necessary, adjust.
While driving, pay attention to vibrations,
noises and unusual handling characteristics,
e.g. pulling to one side. This may indicate that
the wheels or tyres are damaged. If you sus-
pect that a tyre is defective, reduce your
speed immediately. Stop the vehicle as soon
as possible to chec kthe wheels and tyres for
damage. Hidden tyre damage could also be
causing the unusual handling characteristics.
If you find no signs of damage, have the tyres
and wheels checked at a qualified specialist
workshop.
When parking your vehicle, make sure that
the tyres do not get deformed by the kerb or 354
OperationWheels and tyres