2012 MERCEDES-BENZ CLS SHOOTING BRAKE ECO mode
[x] Cancel search: ECO modePage 190 of 405
R
you depress the brake pedal again with a
certain amount of pressur euntil ë dis-
appears from the multifunctio ndisplay.
R you activate DISTRONIC PLUS.
When the HOLD function is activated, the
transmission is shifted automatically to posi-
tion Pif:
R the driver's door is open and the driver's
seat belt is unfastened.
R the engine is switched off, unless it is auto-
matically switched off by the ECO start/
stop function.
R the bonnet is opened.
R a system fault occurs.
R the power supply is not sufficient. RACE START
Important safety notes G
WARNING
RACE START is only available when SPORT
handling mode is activated. SPORT handling
mode will only be able to stabilise the vehicle
to a limited degree if the vehicle starts to skid
or a wheel starts to spin .The vehicle is there-
fore harder to control at the threshold range.
You could lose control of the vehicle and
cause an accident.
RACE START should only be used on closed
off circuits. Always adapt your driving style to
suit the prevailing road and weather condi-
tions.
i RACE START is only available in AMG vehi-
cles.
RACE START enables optimum acceleration
from a standing start. The precondition for
this is a suitable high-grip road surface. Activation conditions You can activate RACE START if:
R
the doors are closed.
R the engine is running and it has reached an
operating temperature of approximately
80 †. This is the case when the engine oil
temperature in the multifunction display
stops flashing.
R SPORT handling mode is activated
(Y page 68).
R the steering wheel is in the straight-ahead
position.
R the vehicle is stationary and the brake
pedal is depressed (left foot).
R the transmission is in position D.
Activating RACE START X
Depress the brake pedal with your left foot
and keep it depressed.
X Turn the drive program selector clockwise
(Y page 158) until the RSlamp lights up.
The Confirm RACE START: Cancel Pad‐
dle UP: Paddle DOWN message appears
in the multifunction display.
i If the activation conditions are no longer
fulfilled, RACE START is cancelled. The
RACE START cancelled message appears
in the multifunction display.
X To cancel: pull the left steering wheel shift
paddle (Y page 158).
or
X To confirm:p ull the right steering wheel
shif tpaddle (Y page 158).
The RACE START available Depress accelerator message appears in the mul-
tifunctio ndisplay.
i If you do not depress the accelerator
pedal fully within two seconds, RACE
START is cancelled. The RACE START not
possible See Owner's Manual message
appears in the multifunction display. Driving systems
187Driving and parking Z
Page 191 of 405
X
Fully depress the accelerato rpedal.
The engine speed rises to approximately
3,500 rpm.
The RACE START Release brake to start message appears in the multifunc-
tion display.
i If you do not release the brake pedal
within five seconds, RACE START is cancel-
led. The RACE START cancelled message
appears in the multifunction display.
X Take your foot off the brake, but keep the
accelerator pedal depressed.
The vehicle pulls away at maximum accel-
eration.
The RACE START active message appears
in the multifunction display.
RACE START is deactivated when the vehicle
reaches a speed of approximately 50 km/h.
Drive program S+is activated. SPORT han-
dling mode remains activated.
RACE START is deactivated immediately if
you release the accelerator pedal during
RACE START or if any of the activation condi-
tions are no longer fulfilled. The RACE START
not possible See Owner's Manual mes-
sage appears in the multifunction display.
i After using it several times in short suc-
cession, RACE START will be unavailable
until a certain distance has been driven. AIRMATIC
Vehicle level Important safety notes
G
WARNING
If you have selected "Comfort tuning", the
vehicle will be lowered if you lock it within
60 seconds of the engine being switched off.
Make sure, therefore, that nobody is in the
vicinity of the wheel housing or under the
vehicle when you lock the vehicle. Otherwise,
limbs could become trapped. !
The vehicle is lowered by about 15 mm if:
R you have selected "Comfort tuning"
R you switch off the engin eand
R you lock the vehicle withi napproximately
60 seconds
When parking, position your vehicle so that
it does not make contact with the kerb as
the vehicle is lowered. Your vehicle could
otherwise be damaged.
Observe the notes on driving with a trailer
(Y page 219).
Your vehicle regulates its height automati-
cally. All-round level control ensures the best
possible suspension and constan tground
clearance, even with a laden vehicle. When
you drive fast, the vehicle is lowered auto-
matically to improve driving safety and to
reduce fuel consumption.
The following vehicle levels are possible:
R normal
R raised: the vehicle is raised by about
25 mm when compared with the normal
level.
R lowered: the vehicle is lowered by about
10 mm when compared with the normal
level.
The "Normal" and "Raised" vehicle levels can
be set manually.
The "Lowered” vehicle level is set automati-
cally:
R at speeds above 140 km/h
R if you have selected the "Comfort "setting
(Y page 189) and then lock the vehicle
withi n60s econds of the engine being
switched off
R if you have selected the "Sports" setting
(Y page 189)
Setting the vehicle level G
WARNING
Make sure that nobody is in the vicinity of the
wheel housing or under the vehicle while low-
ering the vehicle when it is stationary. Other-
wise, limbs could become trapped. 188
Driving systemsDriving and parking
Page 193 of 405
X
Press button :.
Indicator lamp =lights up. You have selec-
ted "Comfort tuning".
The AIRMATIC COMFORT message appears
in the multifunction display. AMG RIDE CONTROL sports suspen-
sion
General notes i
AMG RIDE CONTROL sports suspension
is available for the CLS 63 AMG model.
Vehicle level The vehicle automatically sets the vehicle
level at the rear axle. Rear axle level control
ensures the best possible suspension and
that the ground clearance remains constant
even when the vehicle is loaded. This
improves driving safety and fuel consump-
tion.
Suspension tuning General notes
The electronically controlled damping system
works continuously. This improves driving
safety and ride comfort.
The damping is tuned individually to each
wheel and depends on:
R your driving style, e.g. sporty
R the road surface condition, e.g. bumps
R your individual selection of Sport, Sport +
or Comfort
If you select Sport or Sport + mode and
restart the engine, the suspension setting
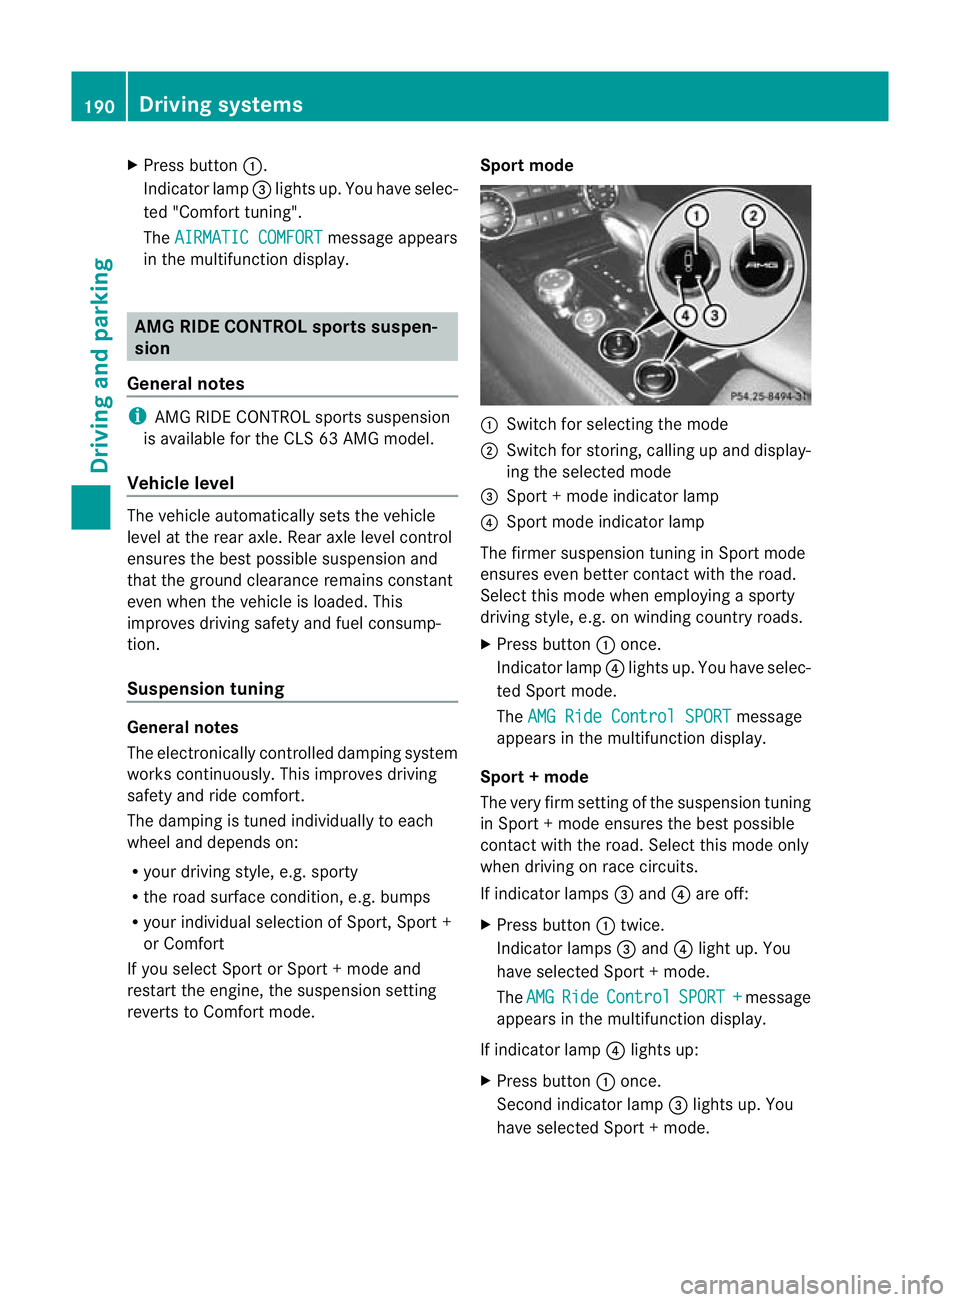
reverts to Comfort mode. Sport mode :
Switch for selecting the mode
; Switch for storing, calling up and display-
ing the selected mode
= Sport + mode indicator lamp
? Sport mode indicator lamp
The firmer suspension tunin ginSport mode
ensures even better contact with the road.
Select this mode when employing a sporty
driving style, e.g. on winding country roads.
X Press button :once.
Indicator lamp ?lights up. You have selec-
ted Sport mode.
The AMG Ride Control SPORT message
appears in the multifunction display.
Sport + mode
The very firm setting of the suspension tuning
in Sport +mode ensures the best possible
contact with the road. Select this mode only
when driving on race circuits.
If indicator lamps =and ?are off:
X Press button :twice.
Indicator lamps =and ?light up. You
have selected Sport +mode.
The AMG Ride Control SPORT + message
appears in the multifunction display.
If indicator lamp ?lights up:
X Press button :once.
Second indicator lamp =lights up. You
have selected Sport +mode. 190
Driving systemsDriving and parking
Page 202 of 405

Activating/deactivating the reversing
camera
X
To activate: make sure that the key is in
position 2in the ignition lock.
X Make sure that the "Activation by R gear"
setting is active in COMAND Online; see the
separate COMAND Online operating
instructions.
X Engage reverse gear.
The area behind the vehicle is shown with
guide lines in the COMAND display.
X To change the function mode for vehi-
cles with trailer tow hitch: using the
COMAND controller, select symbol :for
the "Reverse parking" function or sym-
bol ;for "Coupling up a trailer" (see the
separate COMAND Online operating
instructions).
The symbol of the selected function is high-
lighted.
To deactivate: the reversing camera is deac-
tivated if you:
R shif tthe transmission to position P
R drive forwards 10 m
R shift the transmission from Rto another
position (after 15 seconds)
R drive forwards at a speed of over
10 km/h Displays in the COMAND display G
WARNING
Using the reversing camera can be dangerous
if you are colour-blind or if your ability to dis-
tinguish colours is impaired.
Only use the reversing camera if you can see
and distinguish between all the coloured
guide lines that are displayed by the reversing
camera in the COMAND display. G
WARNING
Please note that objects not at ground level
may appear to be further away than they
actually are. These include:
R the bumper of a vehicle that is parked
behind your vehicle
R a trailer drawbar
R the ball coupling of a trailer tow hitch
R the tail-end of a lorry
R slanted posts
The lines are only guides, not accurate meas-
urements of the distance to an obstacle.
Therefore, you should never pass the red line
when approaching an obstacle. You could oth-
erwise cause an accident and injure yourself
and others. :
White guide line without turning the steer-
ing wheel, vehicle width including the
exterior mirrors (static)
; Yellow guide line at a distance of approx-
imately 4.0 mfrom the rear of the vehicle Driving systems
199Driving and parking Z
Page 236 of 405
to the top of the display as you approach the
point of the announced change of direction.
Change of direction announced with a
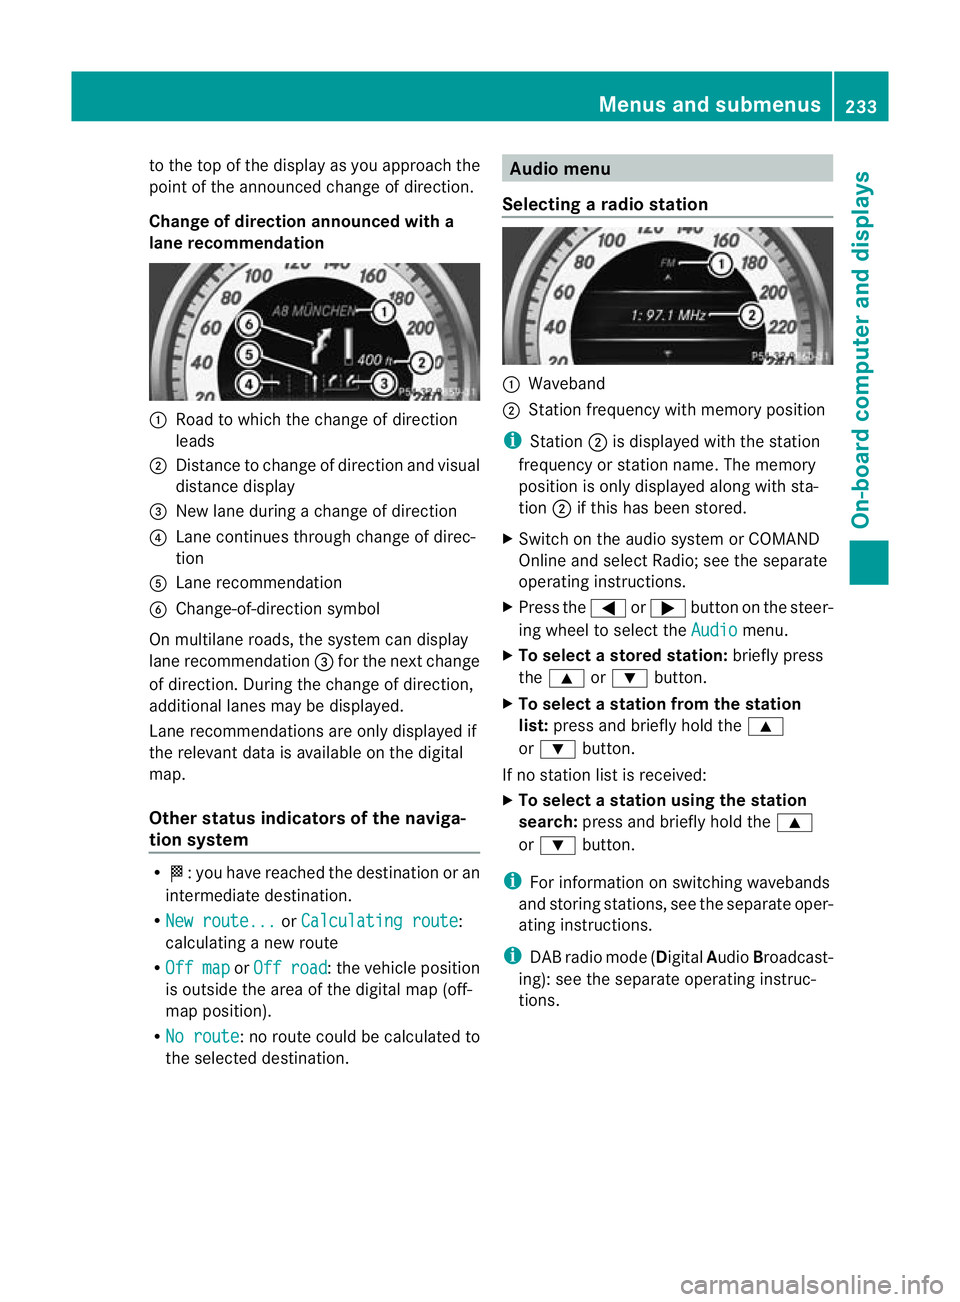
lane recommendation :
Road to which the change of direction
leads
; Distance to change of directio nand visual
distance display
= New lane during a change of direction
? Lane continues through change of direc-
tion
A Lane recommendation
B Change-of-direction symbol
On multilane roads, the system can display
lane recommendation =for the next change
of direction. During the change of direction,
additional lanes may be displayed.
Lane recommendations are only displayed if
the relevant data is availabl eonthe digital
map.
Other status indicators of the naviga-
tion system R
O:y ou have reached the destination or an
intermediate destination.
R New route... or
Calculating route :
calculating a new route
R Off map or
Off road :t
he vehicle position
is outside the area of the digital map (off-
map position).
R No route :n
o route could be calculated to
the selected destination. Audio menu
Selecting aradio station :
Waveband
; Station frequency with memory position
i Station ;is displayed with the station
frequency or station name. The memory
position is only displayed along with sta-
tion ;if this has bee nstored.
X Switch on the audio syste morCOMAND
Online and select Radio; see the separate
operating instructions.
X Press the =or; button on the steer-
ing wheel to select the Audio menu.
X To select astore dstation: briefly press
the 9 or: button.
X To select a station from the station
list: press and briefly hold the 9
or : button.
If no statio nlist is received:
X To select astation using the station
search: press and briefly hold the 9
or : button.
i For informatio nonswitching wavebands
and storing stations, see the separate oper-
ating instructions.
i DABradio mode ( DigitalAudioBroadcast-
ing): see the separate operating instruc-
tions. Menus and submenus
233On-board computer and displays Z
Page 245 of 405
Activating/deactivating the surround
lighting and exterior lightin
gdelayed
switch-off
X Press the =or; button on the steer-
ing wheel to selec tthe Settings menu.
X Press the :or9 button to select the
Light submenu.
X Press ato confirm.
X Press the :or9 button to select the
Surround lighting function.
When the Surround lighting function is
activated, the light cone and the area
around the vehicle are displayed in red in
the multifunction display.
X Press the abutton to save the setting.
Deactivating delayed switch-off of the exte-
rior lighting temporarily:
X Before leaving the vehicle, turn the key to
position 0in the ignition lock.
X Turn the key to position 2in the ignition
lock.
The exterior lighting delayed switch-off is
deactivated.
Delayed switch-off of the exterior lighting is
reactivated the next time you start the
engine.
If you have activated the Surround light‐ing function and the light switch is set to
Ã, the following functions are activated
when it is dark:
R surround lighting: the exterior lighting
remains lit for 40 seconds after unlocking
with the key. If you start the engine, the
surround lighting is switched off and auto-
matic headlamp mode is activated
(Y page 115).
R exterior lighting delayed switch-off: the
exterior lighting remains lit for
60 seconds after the engine is switched off.
If you close all the doors and the boot lid/
tailgate, the exterior lighting goes off after
5s econds.
i Depending on your vehicle's equipment,
when the surround lighting and delayed switch-off exterior lighting are on, the fol-
lowing light up:
R
side lamps
R dipped-beam headlamps
R daytime driving lights
R surround lighting in the exterior mirrors
Activating/deactivating the interior light-
ing delayed switch-off
If you activate the Lighting delayed sw.- off function, the interior lighting remains on
for 20seconds after you remove the key from
the ignition lock.
X Press the =or; button on the steer-
ing wheel to select the Settings menu.
X Press the :or9 button to select the
Light submenu.
X Press ato confirm.
X Press the :or9 button to select the
Light. delay function.
When the Lighting delayed sw.-off function is activated, the vehicle interior is
displayed in red in the multifunction dis-
play.
X Press the abutton to save the setting.
Vehicle Setting permanent SPEEDTRONIC
X
Press the =or; button on the steer-
ing wheel to select the Settings menu.
X Press the :or9 button to select the
Vehicle submenu.
X Press ato confirm.
X Press the :or9 button to select the
Limit speed (winter tyres): function.
You will see the curren tsetting.
X Press ato confirm.
X Press the :or9 button to adjust
permanent SPEEDTRONIC in increment sof
ten ( 230 km/h to
160 km/h ). The
Off set-
ting switches permanent SPEEDTRONIC
off.
X Press the abutton to store the entry. 242
Menus and submenusOn-board computer and displays
Page 249 of 405
submenu, you must turn the key to position
1
in the ignition lock. AMG menu in AMG vehicles
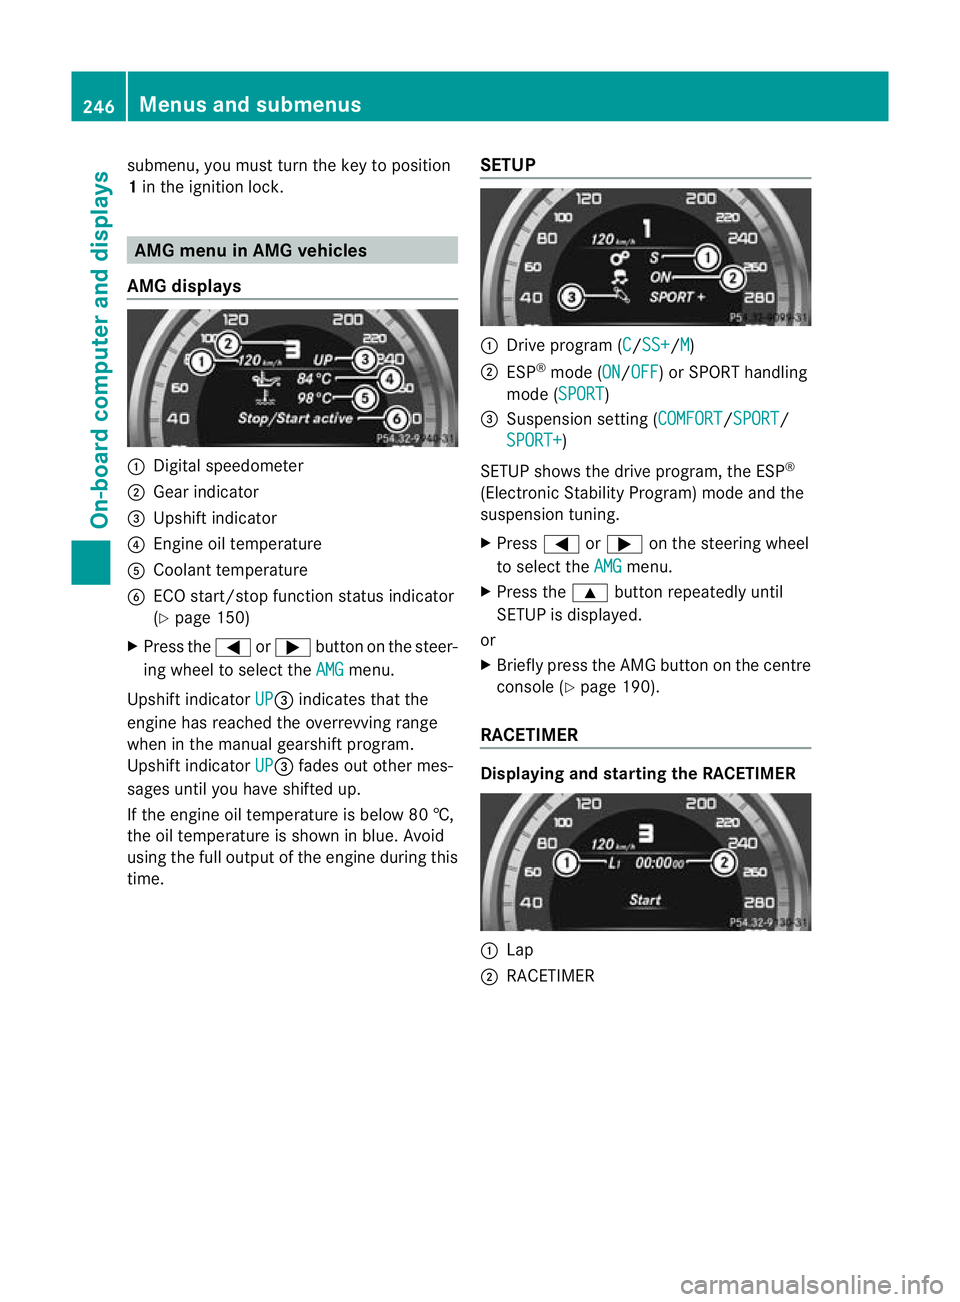
AMG displays :
Digital speedometer
; Gear indicator
= Upshift indicator
? Engine oil temperature
A Coolant temperature
B ECO start/stop function status indicator
(Y page 150)
X Press the =or; button on the steer-
ing wheel to select the AMG menu.
Upshift indicator UP =
indicates that the
engine has reached the overrevving range
when in the manual gearshift program.
Upshift indicator UP =
fades out other mes-
sages until you have shifted up.
If the engine oil temperature is below 80 †,
the oil temperature is shown in blue. Avoid
using the full output of the engine during this
time. SETUP :
Drive program (C /SS+ /M )
; ESP ®
mode (ON /OFF ) or SPORT handling
mode (SPORT )
= Suspension setting (COMFORT /SPORT /
SPORT+ )
SETUP shows the drive program, the ESP ®
(Electronic Stability Program) mode and the
suspension tuning.
X Press =or; on the steering wheel
to select the AMG menu.
X Press the 9button repeatedly until
SETUP is displayed.
or
X Briefly press the AMG button on the centre
console (Y page 190).
RACETIMER Displaying and starting the RACETIMER
:
Lap
; RACETIMER 246
Menus and submenusOn-board computer and displays
Page 313 of 405
An exterio
raerial has the following advan-
tages:
R it conducts the electromagnetic fields gen-
erated by a wireless device to the exterior.
R the field strength in the vehicle interior is
lower than in a vehicle that does not have
an exterior aerial.
i There are various mobile phone brackets
that may be fitted in your vehicle; in some
cases, these are country-specific.
i You can connect a Bluetooth ®
-capable
mobile phone with Audio 20, Audio 50 or
COMAND Online via the Bluetooth ®
inter-
face. This also applies if your vehicle is
equipped with convenience telephony.
More information on suitable mobile phones,
mobile phone brackets and on connecting
Bluetooth ®
-capable mobile phones with
Audio 20, Audio 50 or COMAND Online can
be obtained:
R at your Mercedes-Benz Service Centre
R on the Internet at http://www.mercedes-
benz.com/connect
i The functions and services available when
you use the phone depend on your mobile
phone model and service provider.
Using amobile phone If the mobile phone is inserted in the mobile
phone bracket, you can speak to the person
you are calling using the hands-free system.
X
Open the telephone compartment
(Y page 292).
X If required by the desig nofthe mobile
phone bracket, install the sliding adapter
(Y page 311).
X Insert the mobile phone into the mobile
phone bracket (see the separate installa-
tion instructions for the mobile phone fit-
ting).
i On some mobile phone brackets, you first
have to connect the mobile phone via Blue-
tooth ®
to the mobile phone bracket (see the separate operating instructions for the
mobile phone bracket).
If this is the case, the mobile phone does
not have to be inserted into the bracket for
you to be able to use the telephone func-
tions. However, the charging function and
aerial function are not available.
Operating the mobile phone You can operate the telephone using the
6
and~ buttons on the multifunction
steering wheel. You can operate other mobile
phone functions via the on-board computer
(Y page 235).
When you remove the key from the ignition
lock, the mobile phone stays switched on.
However, you can no longer use the hands-
free system.
If you have an active call and would like to
take the key out of the ignition lock, first
remove the mobile phone from the bracket.
Otherwise, the call is ended.
i When using a bracket connected to the
mobile phone via Bluetooth ®
:
If you wish to continue a call in private
mode, you will need to perform the neces-
sary steps on the mobile phone. Informa-
tion can be found in the separate mobile
phone operating instructions.
i When using a bracket connected to the
mobile phone via Bluetooth ®
and you wish
to proceed with a call:
Switch to private mode before removing
the key from the ignition lock. Otherwise, it
may take up to 20 seconds, before the
mobile phone separates from the system.
Only then can the telephone call continue.
Information on the necessary steps for set-
ting up "private mode" can be found in the
separate mobile phone operating instruc-
tions.
i Not all mobile phones support "private
mode". 310
FeaturesStowing and features