2012 MERCEDES-BENZ CLS SHOOTING BRAKE brake sensor
[x] Cancel search: brake sensorPage 74 of 405
If you approach an obstacle and PRE-SAFE
®
Brake detects a risk of a collision, the system
will alert you both visually and acoustically. If
you do not brake or take evasive action, the
system will warn you by automatically braking
the vehicle gently. If there is an increased risk
of collision, preventative passenger protec-
tion measures (PRE-SAFE ®
) are activated
(Y page 48). If, at speeds over 30 km/h, a risk
of collision remains and you do not brake,
take evasive action or significantly acceler-
ate, automatic braking may be performed up
to a level of automatic emergency braking.
Automatic emergency braking is not per-
formed until immediately prior to an accident
that can no longer be avoided. G
WARNING
PRE-SAFE ®
Brake will initially brake yourv ehi-
cle by a partial application of the brakes if a
danger of collision is detected. There may be
a collision unless you also brake. Automatic
emergency braking cannot prevent a colli-
sion. There is a risk of an accident.
Always apply the brakes yourself and try to
take evasive action. G
WARNING
PRE-SAFE ®
Brake cannot always clearly iden-
tify objects and complex traffic conditions.
In these cases, PRE-SAFE ®
Brake may:
R give an unnecessary warning and then
brake the vehicle
R neither give a warning nor intervene
There is a risk of an accident.
Always pay particular attention to the traffic
situation and be ready to brake, especially if
PRE-SAFE ®
Brake warns you. Terminate the
intervention in a non-critical driving situation.
In particular, the detection of obstacles can
be impaired if there is:
R dirt on the sensors or anything else cover-
ing the sensors
R snow or heavy rain
R interference by other radar sources R
the possibility of strong radar reflections,
for example, in multi-storey car parks
R a narrow vehicle travelling in front, e.g. a
motorcycle
R a vehicle travelling in front on a different
line G
WARNING
PRE-SAFE ®
Brake does not react:
R to people or animals
R to oncoming vehicles
R to crossing traffic
R when cornering
As a result, PRE-SAFE ®
Brake may neither
give warnings nor intervene in all critical sit-
uations. There is a risk of an accident.
Always pay careful attention to the traffic sit-
uation and be ready to brake.
In order to maintain the appropriate distance
to the vehicle in fron tand thus prevent a col-
lision, you must apply the brakes yourself.
X To activate/deactivate: activate or deac-
tivate PRE-SAFE ®
Brake in the on-board
computer (Y page 237).
When PRE-SAFE ®
Brake is activated, the
Ä symbol appears in multifunctio ndis-
play, as long as the HOL Dfunction is deac-
tivated (Y page 186). On vehicles with the
Active Parking Assist driving system, the
Ä symbol is displayed when position P
is engaged or you are driving faste rthan
35 km/h.
For PRE-SAFE ®
Brake to assist you when driv-
ing, the radar sensor system must be
switched on (Y page 243) and be opera-
tional.
The radar sensor system is switched off auto-
matically in the vicinity of radio telescope
facilities in the following vehicles:
R vehicles with COMAND Online and naviga-
tion
R vehicles with Audio 20 and Becker ®
MAP
PILOT Driving safety systems
71Safety Z
Page 79 of 405
Useful information
i This Owner's Manual describes all mod-
els, series and optional equipment for your
vehicle that were available at the time of
going to press. National variations are pos-
sible. Note that your vehicle may not be
equipped with all of the functions descri-
bed. This is also the case for systems and
functions relevant to safety.
i Read the information on qualified special-
ist workshops: (Y page 24). Key
Important safety notes
G
WARNING
Only for the United Kingdom: if the vehicle
has been locked with the key or with KEY-
LESS-GO, the double lock function is activa-
ted as standard. It is then not possible to open
the doors from inside the vehicle.
Therefore, do not leave any people behind in
the vehicle, particularly children, elderly peo-
ple or people requiring special assistance. As
a result, they may not be able to free them-
selves in the event of an emergency. They
could be seriously or even fatally injured by
prolonged exposure to extremely high or low
temperatures, for example. In this case, res-
cuing people from outside the vehicle is diffi-
cult.
Deactivate the interior motion sensor before
you lock the vehicle. The doors can then be
opened from the inside after the vehicle has
been locked from the outside. G
WARNING
If children are left unsupervised in the vehicle,
they could: R
open a door from inside the vehicle at any
time, even if it has been locked
R start the vehicle using akey which has been
left in the vehicle
R release the parking brake
They could thereby endanger themselves and
others. Never leave children unsupervised in
the vehicle. Always take the key with you
when leaving the vehicle, even if you are only
leaving it for a short time. G
WARNING
If a key ring is too heavy or too large, the
weight acting on the key could cause it to turn
in the ignition lock or catch on the steering
wheel. This could cause the engine to be
switched off suddenly. You may lose control
of the vehicle and cause an accident. Do not
attach any heavy or large key rings to the key
that is inserted in the ignition.
R Do not keep the key:
-with electronic devices, e.g. a mobile
phone or another key
- with metallic objects, e.g. coins or metal
foil
- inside metallic objects, e.g. a metal case
This can affect the key's functionality.
Keep the key away from strong magnetic
fields. Otherwise, the remote control function
could be affected. 76
KeyOpening and closing
Page 85 of 405
Problem Possible causes/consequences and
M Solutions
The engine cannot be
started using the key. the on-board voltage is too low.
X
Switch off non-essential consumers, e.g. seat heating or interior
lighting, and try to start the engine again.
If this does not work:
X Check the starter battery and charge it if necessary
(Y page 343).
or
X Jump-start the vehicle (Y page 344).
or
X Consult a qualified specialist workshop. The engine cannot be
started using KEYLESS-
GO. The key is in the
vehicle. Ad
oor is open. Therefore, the key cannot be detected as easily.
X Close the door and try to start the vehicle again. There is interference from a powerful source of radio waves.
X
Start your vehicle with the key in the ignition lock. Doors
Important safety notes
G
WARNING
Only for the United Kingdom: if the vehicle
has been locked with the key or with KEY-
LESS-GO, the double lock function is activa-
ted as standard. It is then not possible to open
the doors from inside the vehicle.
Therefore, do not leave any people behind in
the vehicle, particularly children, elderly peo-
ple or people requiring special assistance. As
a result, they may not be able to free them-
selves in the event of an emergency. They
could be seriously or even fatally injured by
prolonged exposure to extremely high or low
temperatures, for example. In this case, res-
cuing people from outside the vehicle is diffi-
cult.
Deactivate the interior motion sensor before
you lock the vehicle. The doors can then be
opened from the inside after the vehicle has
been locked from the outside. G
WARNING
If children are left unsupervised in the vehicle,
they could:
R open a door from inside the vehicle at any
time, even if it has been locked
R start the vehicle using akey which has been
left in the vehicle
R release the parking brake
They could thereby endanger themselves and
others. Never leave children unsupervised in
the vehicle. Always take the key with you
when leaving the vehicle, even if you are only
leaving it for a short time. Unlocking and opening the doors
from the inside
For all countries except the United King-
dom: you can open a door from inside the
vehicle even if it has been locked. If the vehi-
cle was locked with the key or with KEYLESS-
GO, opening a door from the inside will trigger
the anti-theft alarm system. Switch off the
alarm (Y page 72). 82
DoorsOpening and closing
Page 89 of 405
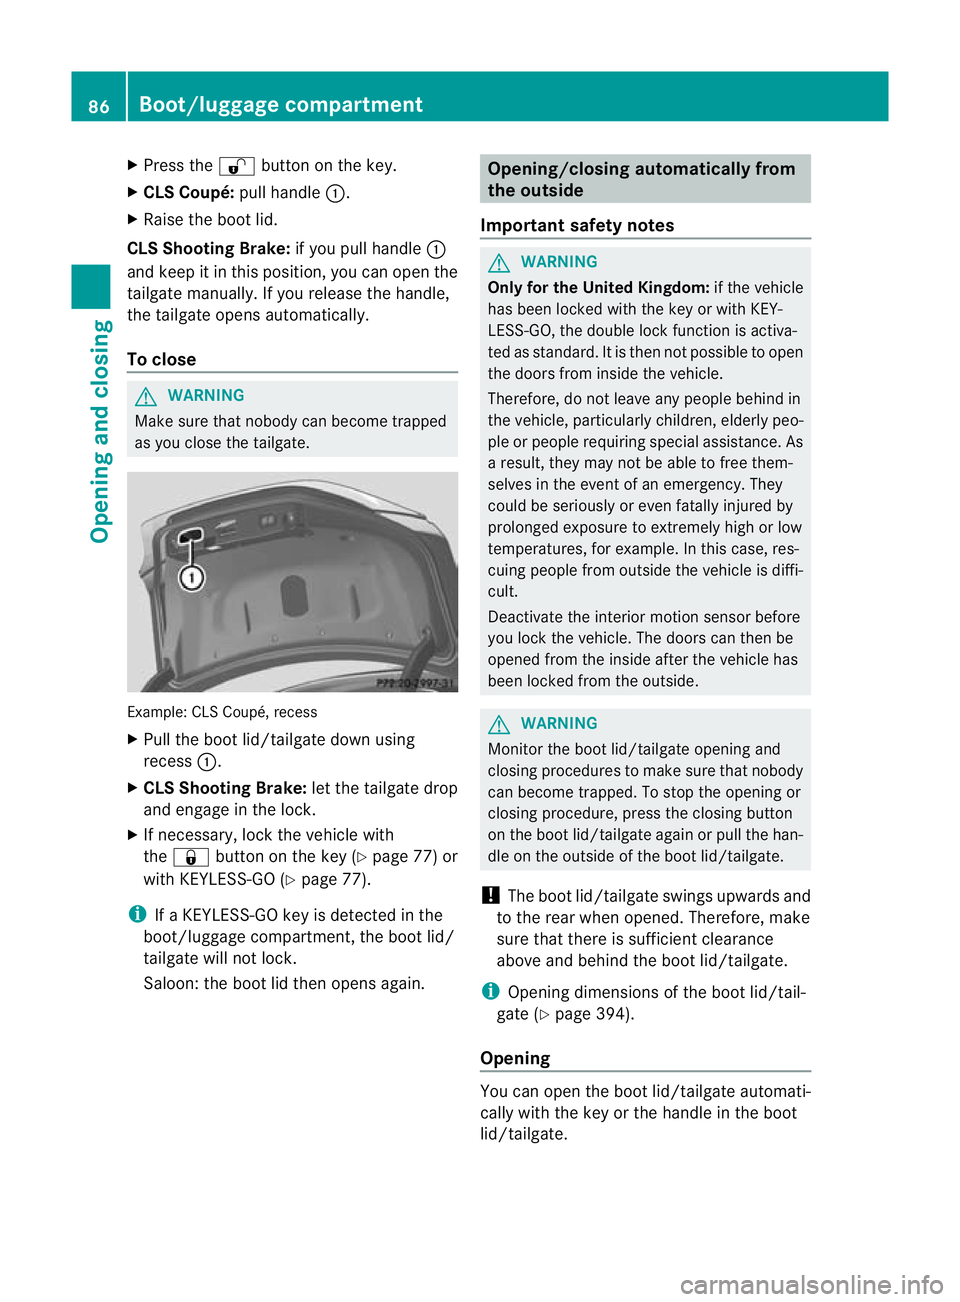
X
Press the %button on the key.
X CLS Coupé: pull handle:.
X Raise the boot lid.
CLS Shooting Brake: if you pull handle:
and keep it in this position, you can open the
tailgate manually. If you release the handle,
the tailgate opens automatically.
To close G
WARNING
Make sure that nobody can become trapped
as you close the tailgate. Example: CLS Coupé, recess
X
Pull the boot lid/tailgate down using
recess :.
X CLS Shooting Brake: let the tailgate drop
and engage in the lock.
X If necessary, lock the vehicle with
the & button on the key (Y page 77) or
with KEYLESS-GO (Y page 77).
i If a KEYLESS-GO key is detected in the
boot/luggage compartment, the boot lid/
tailgate will not lock.
Saloon: the boot lid then opens again. Opening/closing automatically from
the outside
Important safety notes G
WARNING
Only for the United Kingdom: if the vehicle
has been locked with the key or with KEY-
LESS-GO, the double lock function is activa-
ted as standard. It is then not possible to open
the doors from inside the vehicle.
Therefore, do not leave any people behind in
the vehicle, particularly children, elderly peo-
ple or people requiring special assistance. As
a result, they may not be able to free them-
selves in the event of an emergency. They
could be seriously or even fatally injured by
prolonged exposure to extremely high or low
temperatures, for example. In this case, res-
cuing people from outside the vehicle is diffi-
cult.
Deactivate the interior motion sensor before
you lock the vehicle. The doors can then be
opened from the inside after the vehicle has
been locked from the outside. G
WARNING
Monito rthe boot lid/tailgate opening and
closing procedures to make sure that nobody
can become trapped. To stop the opening or
closing procedure, press the closing button
on the boot lid/tailgate again or pull the han-
dle on the outside of the boot lid/tailgate.
! The boot lid/tailgate swings upwards and
to the rear when opened. Therefore, make
sure that there is sufficient clearance
above and behind the boot lid/tailgate.
i Opening dimensions of the boot lid/tail-
gate (Y page 394).
Opening You can open the boot lid/tailgate automati-
cally with the key or the handle in the boot
lid/tailgate. 86
Boot/luggage compartmentOpening and closing
Page 181 of 405
Otherwise, you may fail to recognise dangers
in time, cause an accident and injure yourself
and others. G
WARNING
DISTRONIC PLUS brakes your vehicle up to a
maximum of 4 m/s 2
depending on its speed.
This corresponds to approximately 40% of
your vehicle's maximum braking power. You
must also apply the brakes yourselfift his
braking power is not sufficient.
If DISTRONIC PLUS detects a risk of collision
with avehicle in front, an intermittent warning
tone sounds. In addition, the ·distance
warning lamp in the instrument cluster lights
up. Brake to avoid a collision.
General notes DISTRONIC PLUS regulates the speed and
automatically helps you maintain the dis-
tance to the vehicle detected in front. DIS-
TRONIC PLUS brakes automatically so that
the set speed is not exceeded.
On long and steep downhill gradients, espe-
cially if the vehicle is laden or towing a trailer
(CLS Shooting Brake only), you must select
shift range
1,2or 3in good time. By doing
so, you will make use of the braking effec tof
the engine .This relieves the load on the brake
system and prevents the brakes from over-
heating and wearing too quickly.
If DISTRONIC PLUS detects a slower-moving
vehicle in front, your vehicle is braked in order
to maintain the preset distance to the vehicle
in front.
If you want DISTRONIC PLUS to assist you,
the radar sensor system must be activated
(Y page 243) and operational.
The radar sensor system is switched off auto-
matically in the vicinity of radio telescope
facilities (Y page 398).
If there is no vehicle in front, DISTRONIC
PLUS operates in the same way as cruise
control in the speed range between
30 km/h and 200 km/h. If avehicle is driving in front of you, DISTRONIC operates in the
speed range between 0km/h and
200 km/h.
Do not use DISTRONIC PLUS on roads with
steep gradients.
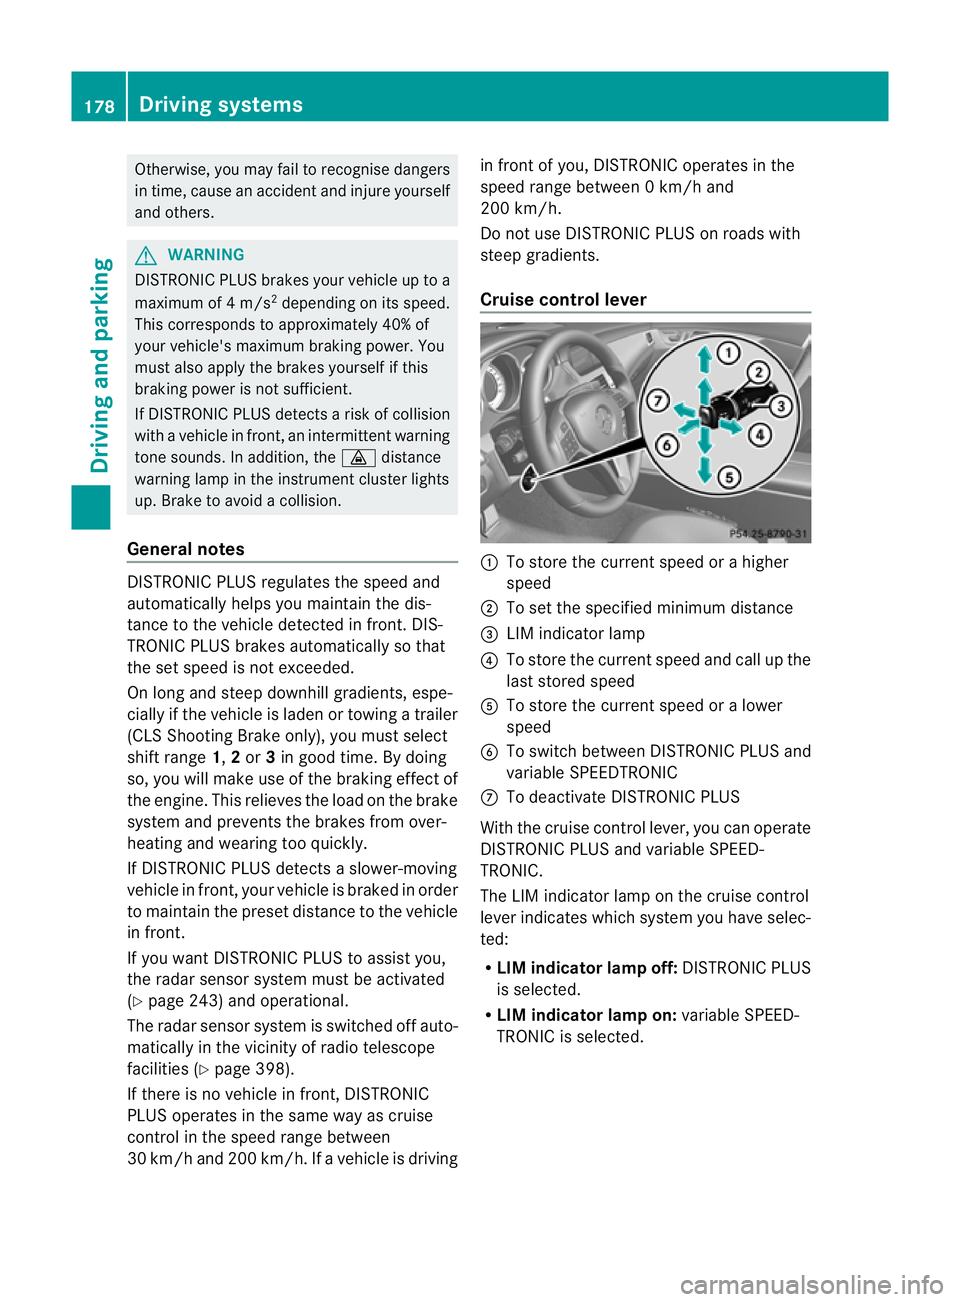
Cruise control lever :
To store the current spee dorahigher
speed
; To set the specified minimum distance
= LIM indicator lamp
? To store the current speed and call up the
last stored speed
A To store the current speed or a lower
speed
B To switch between DISTRONIC PLUS and
variable SPEEDTRONIC
C To deactivate DISTRONIC PLUS
With the cruise control lever, you can operate
DISTRONIC PLUS and variable SPEED-
TRONIC.
The LIM indicator lamp on the cruise control
lever indicates which system you have selec-
ted:
R LIM indicator lamp off: DISTRONIC PLUS
is selected.
R LIM indicator lamp on: variable SPEED-
TRONIC is selected. 178
Driving systemsDriving and parking
Page 187 of 405
You will see the stored speed for about five
seconds when you activate DISTRONIC PLUS.
X Selec tthe Distance display function
using the on-board computer
(Y page 237).
i You will see the stored speed for about
five seconds when you activate DISTRONIC
PLUS.
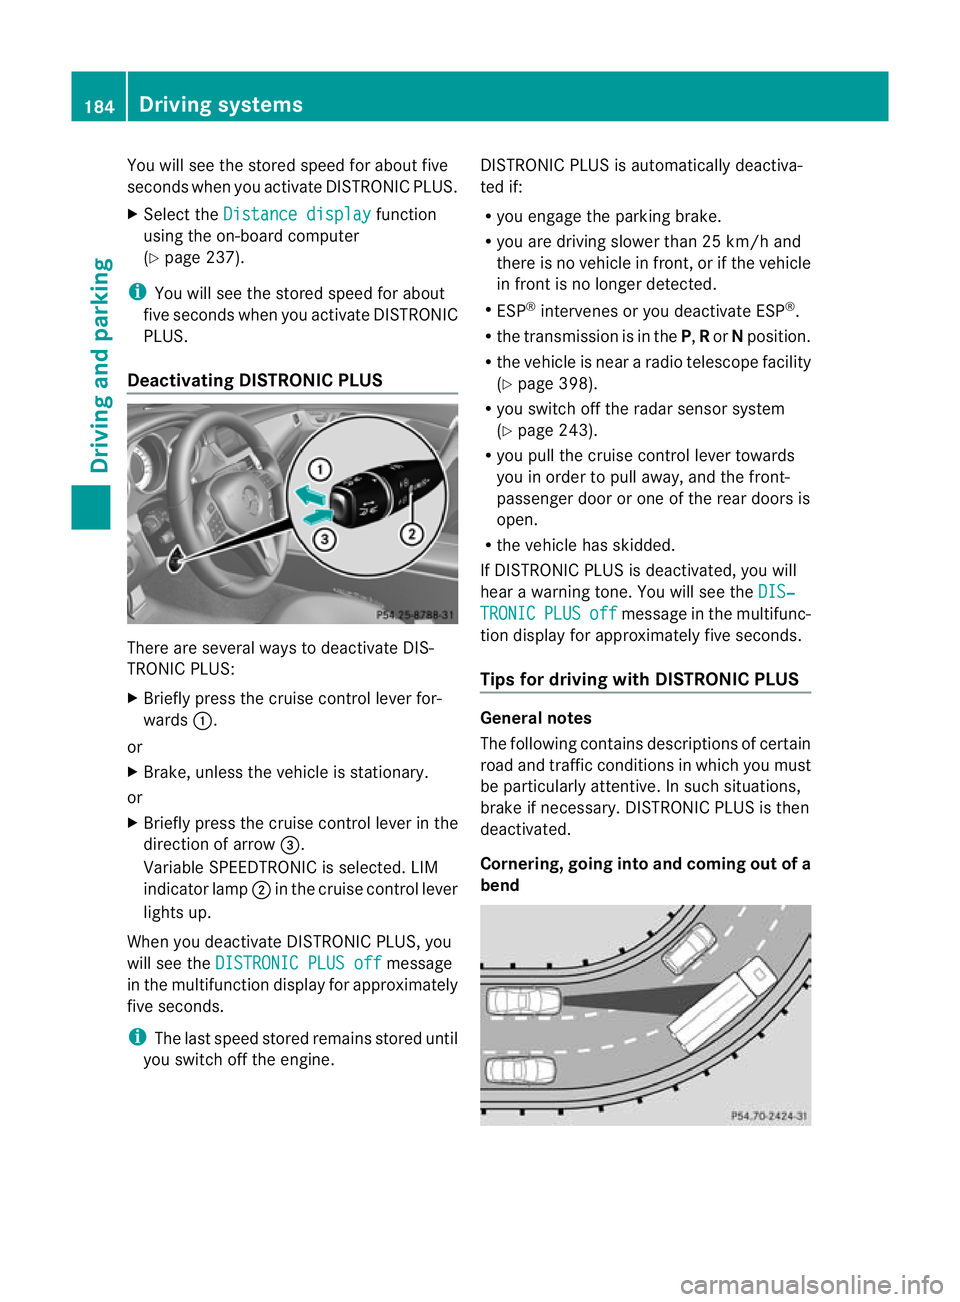
Deactivating DISTRONIC PLUS There are several ways to deactivate DIS-
TRONIC PLUS:
X Briefly press the cruise control lever for-
wards :.
or
X Brake, unless the vehicle is stationary.
or
X Briefly press the cruise control lever in the
direction of arrow =.
Variable SPEEDTRONIC is selected. LIM
indicator lamp ;in the cruise control lever
lights up.
When you deactivate DISTRONIC PLUS, you
will see the DISTRONIC PLUS off message
in the multifunction display for approximately
five seconds.
i The last speed stored remains stored until
you switch off the engine. DISTRONIC PLUS is automatically deactiva-
ted if:
R
you engage the parking brake.
R you are driving slower than 25 km/h and
there is no vehicle in front, or if the vehicle
in front is no longer detected.
R ESP ®
intervenes or you deactivate ESP ®
.
R the transmission is in the P,Ror Nposition.
R the vehicle is near a radio telescope facility
(Y page 398).
R you switch off the radar sensor system
(Y page 243).
R you pull the cruise control lever towards
you in order to pull away, and the front-
passenger door or one of the rear doors is
open.
R the vehicle has skidded.
If DISTRONIC PLUS is deactivated, you will
hear a warning tone. You will see the DIS‐ TRONIC PLUS off message in the multifunc-
tion display for approximately five seconds.
Tips for driving with DISTRONIC PLUS General notes
The following contains descriptions of certain
road and traffic conditions in which you must
be particularly attentive. In such situations,
brake if necessary. DISTRONIC PLUS is then
deactivated.
Cornering, going into and coming out of a
bend184
Driving systemsDriving and parking
Page 194 of 405
The
AMG Ride Control SPORT + message
appears in the multifunction display.
Comfort mode
In comfort mode, the driving characteristics
of your vehicle are more comfortable. There-
fore, select this mode if you prefer a more
comfortable driving style. Select comfort
mode also when driving fast on straight roads,
e.g. on straight stretches of motorway.
X Press button :repeatedly until indicator
lamps =and ?go out.
You have selected Comfort mode.
The AMG Ride Control COMFORT mes-
sage appears in the multifunction display.
Storing and calling up settings
Once the suspension tuning and drive pro-
gram have been selected, you can store and
call up your settings using AMG button ;.
X To store: press AMG button ;until you
hear a tone.
X To call up: press AMG button ;.
The stored suspension tuning and drive
program are selected.
X To display: briefly press AMG button ;.
Your selection appears in the multifunction
display. 4MATIC (permanent all-wheel drive)
G
WARNING
4MATIC cannot reduce the risk of an accident
if you drive too fast.
If a drive wheel spins due to insufficien tgrip:
R only depress the accelerator pedal as far as
necessary when pulling away.
R accelerate less when driving.
R adapt yourd riving style to suitr oad and
traffic conditions.
! Never tow the vehicle with one axle
raised. This may damage the transfer case.
Damage of this sort is not covered by the Mercedes-Benz implied warranty. All
wheels must remain either on the ground
or be fully raised. Observe the instructions
for towing the vehicle with all wheels in full
contact with the ground.
i In wintry driving conditions, the maximum
effect of 4MATIC can only be achieved if
you use winter tyres (M+ Styres), with snow
chains if necessary.
4MATIC ensures that all four wheels are per-
manently driven. Together with ESP ®
, it
improves the traction of your vehicle when-
eve radrive wheel spins due to insufficient
grip. PARKTRONIC
Important safety notes G
WARNING
PARKTRONIC is only an aid and may not
detec tall obstacles. It is not a substitute for
attentive driving.
You are always responsible for safety and
must continue to pay attention to your imme-
diate surroundings when parking and
manoeuvring. You could otherwise endanger
yourself and others. G
WARNING
Make sure that no persons or animals are in
the manoeuvring range. Otherwise, they
could be injured.
PARKTRONIC is an electronic parking aid with
ultrasonic sensors .Itindicates visually and
audibly the distance between your vehicle
and an object.
PARKTRONIC is activated automatically if
you:
R switch on the ignition
R shift the transmission to position D,Ror N
R release the parking brake
PARKTRONIC is deactivated at speeds above
18 km/h. It is reactivated at lower speeds. Driving systems
191Driving and parking Z
Page 195 of 405
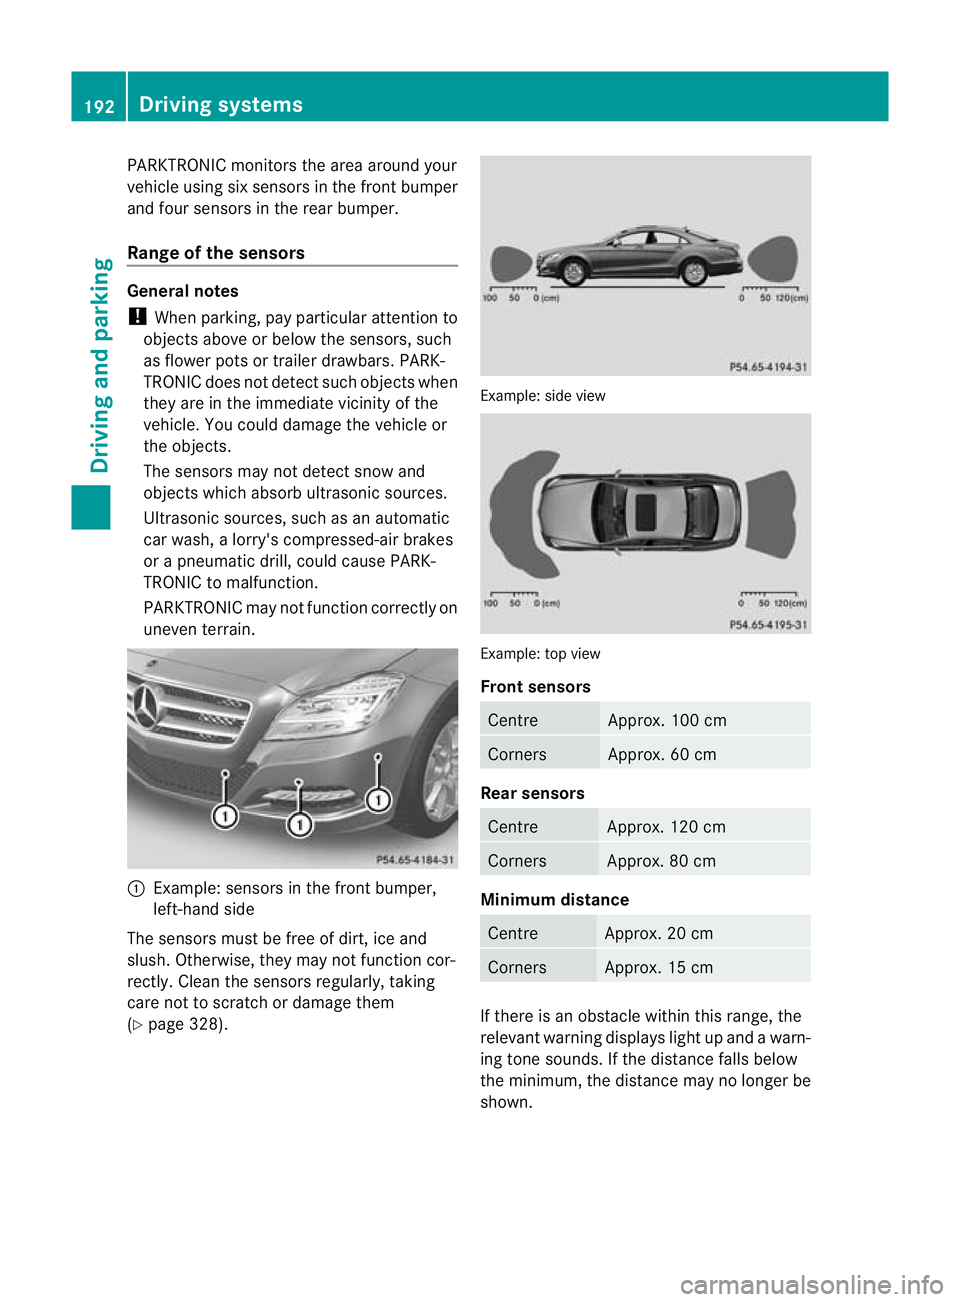
PARKTRONIC monitors the area around your
vehicle using six sensors in the frontb umper
and four sensors in the rear bumper.
Range of the sensors General notes
!
When parking, pay particular attention to
objects above or below the sensors, such
as flower pots or trailer drawbars. PARK-
TRONIC does no tdetec tsuch objects when
they are in the immediat evicinity of the
vehicle. You could damage the vehicle or
the objects.
The sensors may not detect snow and
objects which absorb ultrasonic sources.
Ultrasonic sources, such as an automatic
car wash, a lorry's compressed-air brakes
or a pneumatic drill, could cause PARK-
TRONIC to malfunction.
PARKTRONIC may not function correctly on
uneven terrain. :
Example: sensors in the front bumper,
left-hand side
The sensors must be free of dirt, ice and
slush. Otherwise, they may not function cor-
rectly. Clean the sensors regularly, taking
care not to scratch or damage them
(Y page 328). Example: side view
Example: top view
Front sensors
Centre Approx. 100 cm
Corners Approx. 60 cm
Rea
rsensors Centre Approx. 120 cm
Corners Approx. 80 cm
Minimum distance
Centre Approx. 20 cm
Corners Approx. 15 cm
If there is an obstacle within this range, the
relevant warning displays light up and a warn-
ing tone sounds. If th edistance falls below
the minimum, the distanc emay no longer be
shown. 192
Driving systemsDriving and parking