2012 MERCEDES-BENZ CLS SHOOTING BRAKE AUX
[x] Cancel search: AUXPage 145 of 405
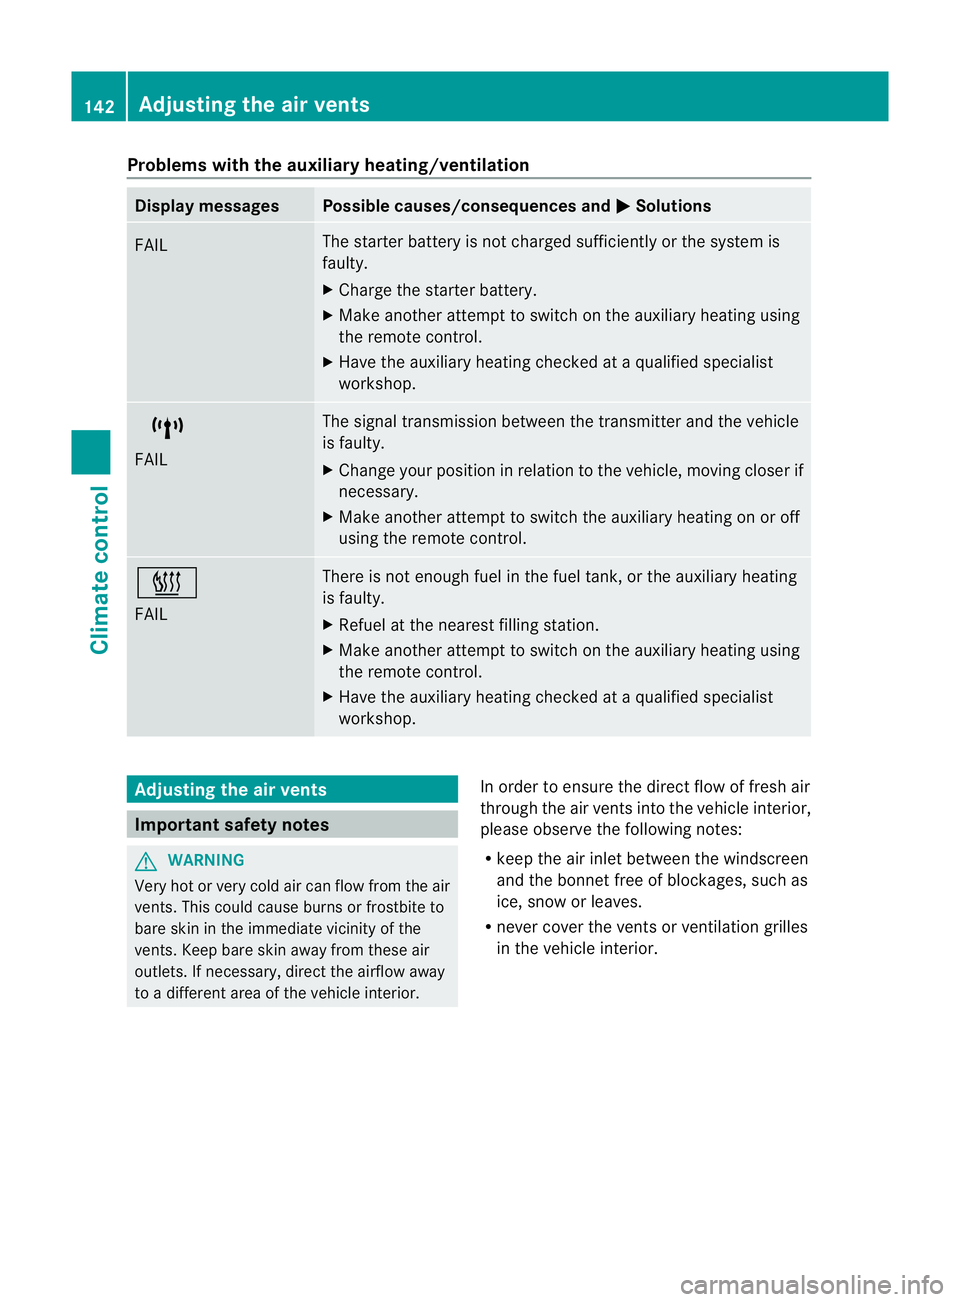
Problems with the auxiliary heating/ventilation
Display messages Possible causes/consequences and
M Solutions
FAIL The starter battery is not charged sufficiently or the system is
faulty.
X
Charge the starter battery.
X Make another attempt to switch on the auxiliary heating using
the remote control.
X Have the auxiliary heating checked at a qualified specialist
workshop. $
FAIL The signal transmission between the transmitter and the vehicle
is faulty.
X
Change your position in relation to the vehicle, moving closer if
necessary.
X Make another attempt to switch the auxiliary heating on or off
using the remote control. ©
FAIL There is not enough fuel in the fuel tank, or the auxiliary heating
is faulty.
X
Refuel at the nearest filling station.
X Make another attempt to switch on the auxiliary heating using
the remote control.
X Have the auxiliary heating checked at a qualified specialist
workshop. Adjusting the air vents
Important safety notes
G
WARNING
Very hot or very cold air can flow from the air
vents. This could cause burns or frostbite to
bare skin in the immediate vicinity of the
vents. Keep bare skin away from these air
outlets. If necessary, direct the airflow away
to a different area of the vehicle interior. In order to ensure the direct flow of fresh air
through the air vents into the vehicle interior,
please observe the following notes:
R
keep the air inlet between the windscreen
and the bonnet free of blockages, such as
ice, snow or leaves.
R never cover the vents or ventilation grilles
in the vehicle interior. 142
Adjusting the air ventsClimate control
Page 164 of 405
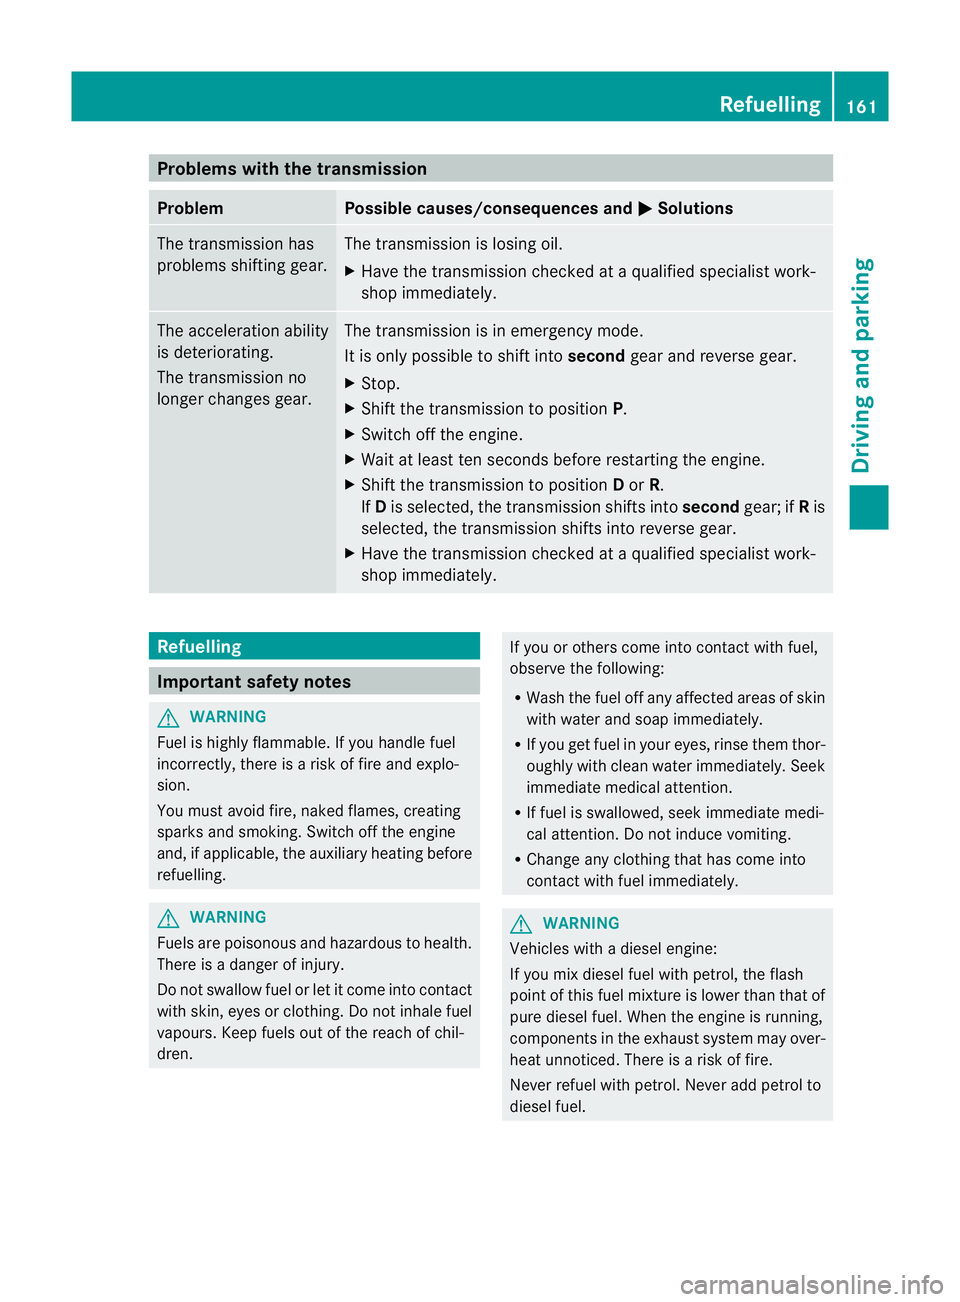
Problems with the transmission
Problem Possible causes/consequences and
M Solutions
The transmission has
problems shifting gear. The transmission is losing oil.
X
Have the transmission checked at a qualified specialist work-
shop immediately. The acceleration ability
is deteriorating.
The transmission no
longer changes gear. The transmission is in emergency mode.
It is only possible to shift into secondgear and reverse gear.
X Stop.
X Shift the transmission to position P.
X Switch off the engine.
X Wait at least ten seconds before restarting the engine.
X Shift the transmission to position Dor R.
If D is selected, the transmission shifts into secondgear; ifRis
selected, the transmission shifts into reverse gear.
X Have the transmission checked at a qualified specialist work-
shop immediately. Refuelling
Important safety notes
G
WARNING
Fuel is highly flammable. If you handle fuel
incorrectly, there is a risk of fire and explo-
sion.
You must avoid fire, naked flames, creating
sparks and smoking. Switch off the engine
and, if applicable, the auxiliary heating before
refuelling. G
WARNING
Fuels are poisonous and hazardous to health.
There is a danger of injury.
Do not swallow fuel or let it come into contact
with skin, eyes or clothing. Do not inhale fuel
vapours. Keep fuels out of the reach of chil-
dren. If you or others come into contact with fuel,
observe the following:
R
Wash the fuel off any affected areas of skin
with water and soap immediately.
R If you get fuel in your eyes, rinse them thor-
oughly with clean water immediately. Seek
immediate medical attention.
R If fuel is swallowed, seek immediate medi-
cal attention. Do not induce vomiting.
R Change any clothing that has come into
contact with fuel immediately. G
WARNING
Vehicles with a diesel engine:
If you mix diesel fuel with petrol, the flash
point of this fuel mixture is lower than that of
pure diesel fuel. When the engine is running,
components in the exhaust system may over-
heat unnoticed. There is arisk of fire.
Never refuel with petrol. Never add petrol to
diesel fuel. Refuelling
161Driving and parking Z
Page 173 of 405
The wear of individual components of the
brake system, such as the brake pads/linings
or brake discs, depends on the individual driv-
ing style and operating conditions.
For this reason, it is impossible to state a
mileage (service life) that will be valid under
all circumstances. An aggressive driving style
will lead to high wear. You can obtain further
information about this from your Mercedes-
Benz Service Centre.
New brake pads/brake pads and discs that
have been replaced only achieve optimum
braking effect after several hundred kilome-
tres of driving. Compensate for the reduced
braking effect by applying greater force to the
brake pedal. Always be aware of this and
adapt your driving and braking accordingly
during the running-in period.
Excessive heavy braking results in corre-
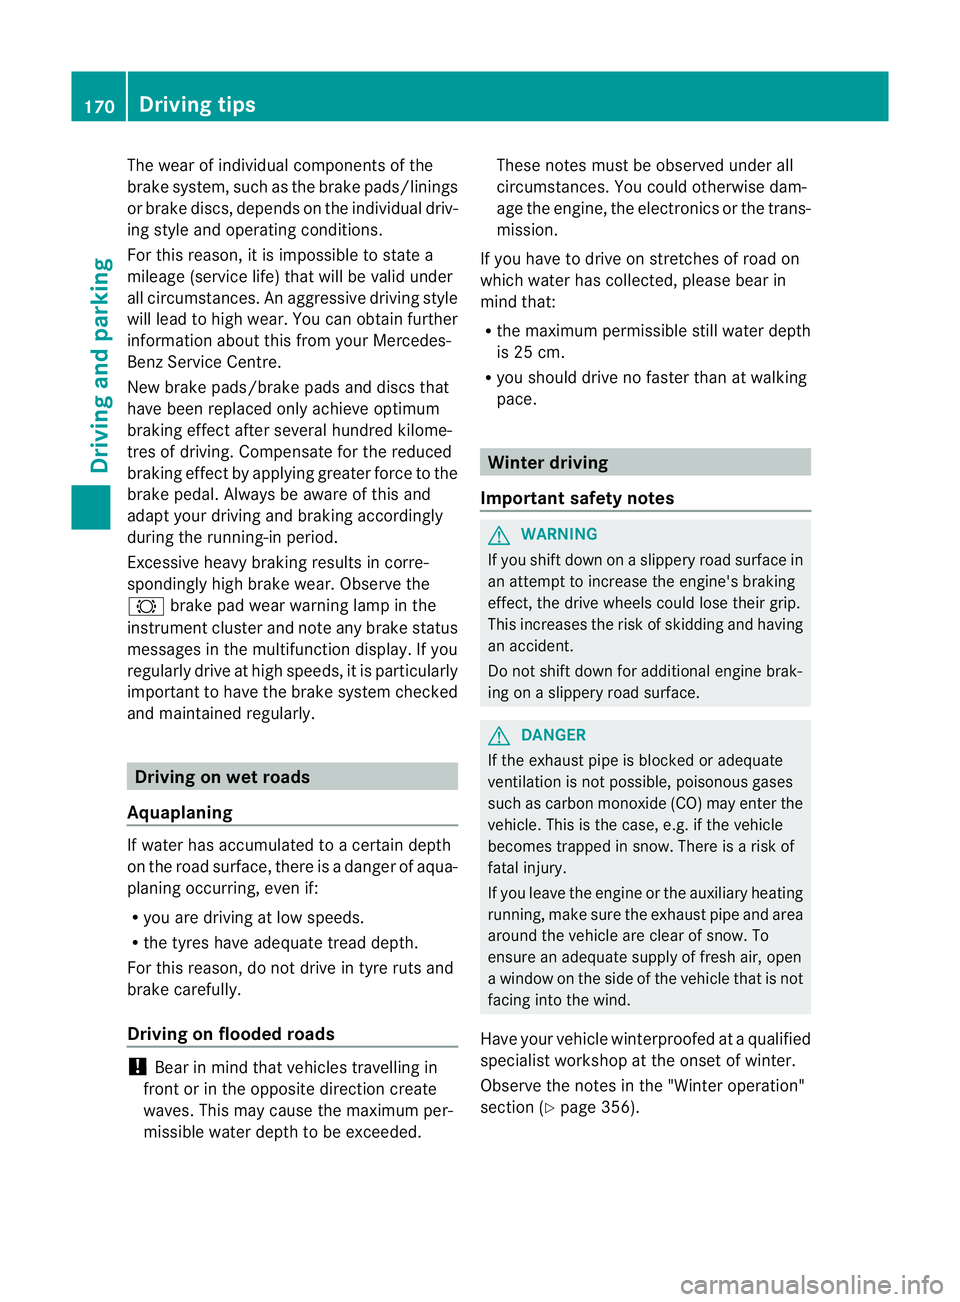
spondingly high brake wear. Observe the
# brake pad wear warning lamp in the
instrument cluster and note any brake status
messages in the multifunction display .Ifyou
regularly drive at high speeds, it is particularly
important to have the brake system checked
and maintained regularly. Driving on wet roads
Aquaplaning If water has accumulated to a certain depth
on the road surface, there is a danger of aqua-
planing occurring, even if:
R
you are driving at low speeds.
R the tyres have adequate tread depth.
For this reason, do not drive in tyre ruts and
brake carefully.
Driving on flooded roads !
Bear in mind that vehicles travelling in
front or in the opposite direction create
waves. This may cause the maximum per-
missible water depth to be exceeded. These notes must be observed under all
circumstances. You could otherwise dam-
age the engine, the electronics or the trans-
mission.
If you have to drive on stretches of road on
which water has collected, please bear in
mind that:
R the maximum permissible still water depth
is 25 cm.
R you should drive no faster than at walking
pace. Winter driving
Important safety notes G
WARNING
If you shift down on a slippery road surface in
an attempt to increase the engine's braking
effect, the drive wheels could lose their grip.
This increases the risk of skidding and having
an accident.
Do not shift down for additional engine brak-
ing on a slippery road surface. G
DANGER
If the exhaust pipe is blocked or adequate
ventilation is not possible, poisonous gases
such as carbon monoxide (CO) may enter the
vehicle. This is the case, e.g. if the vehicle
becomes trapped in snow. There is a risk of
fatal injury.
If you leave the engine or the auxiliary heating
running, make sure the exhaust pipe and area
around the vehicle are clear of snow. To
ensure an adequate supply of fresh air, open
a window on the side of the vehicle that is not
facing into the wind.
Have your vehicle winterproofed at a qualified
specialist workshop at the onset of winter.
Observe the notes in the "Winter operation"
section (Y page 356). 170
Driving tipsDriving and parking
Page 237 of 405
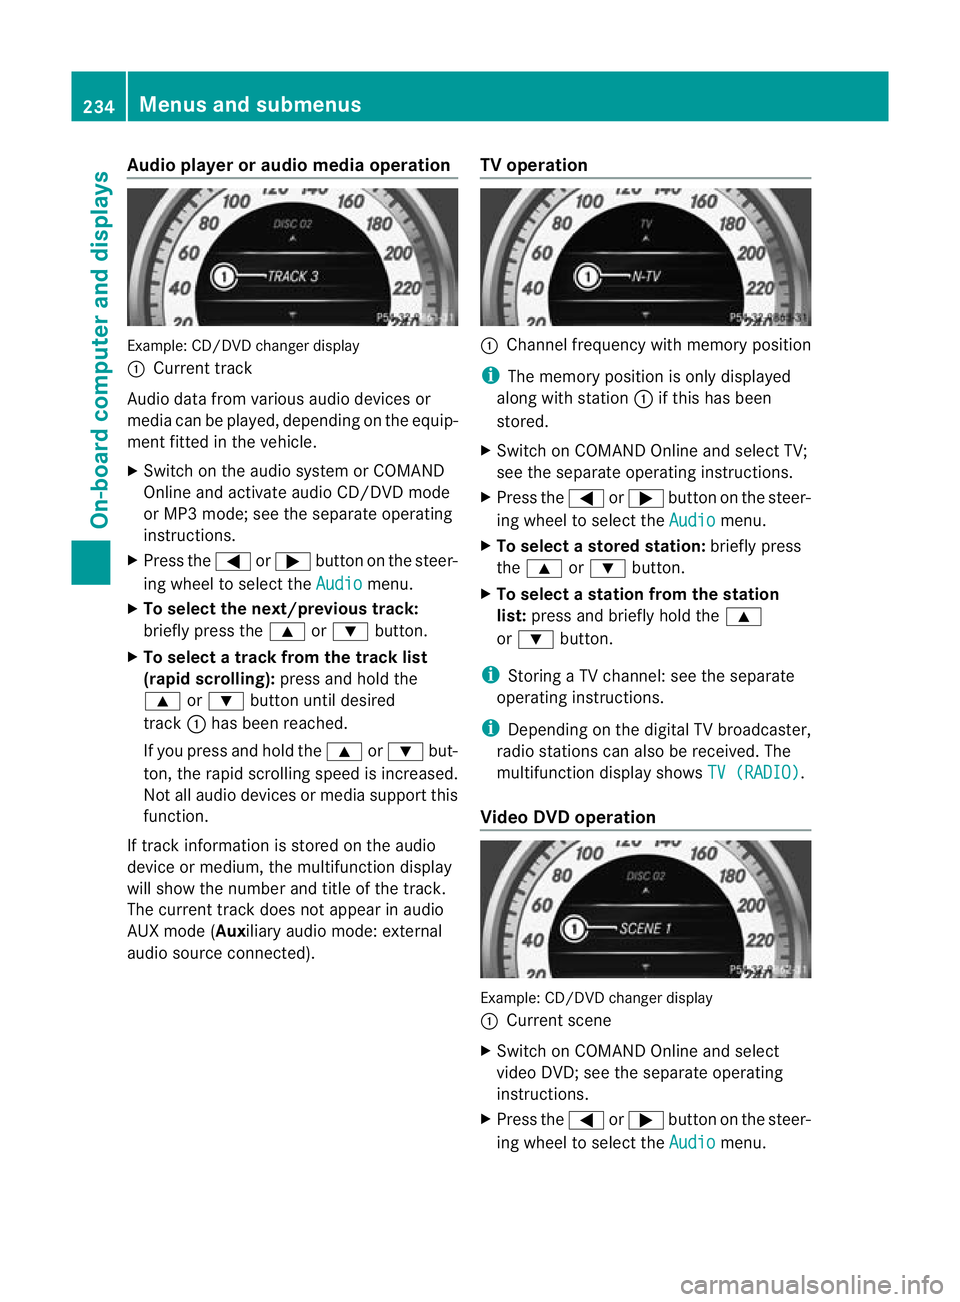
Audio player or audio media operation
Example: CD/DV
Dchanger display
: Current track
Audio data from various audiod evices or
media can be played, depending on the equip-
ment fitted in the vehicle.
X Switch on the audio system or COMAND
Online and activate audio CD/DVD mode
or MP3 mode; see the separate operating
instructions.
X Press the =or; button on the steer-
ing wheel to select the Audio menu.
X To select the next/previous track:
briefly press the 9or: button.
X To select a track from the track list
(rapid scrolling): press and hold the
9 or: button until desired
track :has been reached.
If you press and hold the 9or: but-
ton, the rapid scrolling speed is increased.
Not all audio devices or media support this
function.
If track information is stored on the audio
device or medium, the multifunction display
will show the number and title of the track.
The curren ttrack does not appear in audio
AUX mode (Auxiliary audio mode: external
audio source connected). TV operation :
Channel frequency with memory position
i The memory position is only displayed
along with station :if this has been
stored.
X Switch on COMAND Online and select TV;
see the separate operating instructions.
X Press the =or; button on the steer-
ing wheel to select the Audio menu.
X To selectas toredstation: briefly press
the 9 or: button.
X To select a station from the station
list: press and briefly hold the 9
or : button.
i Storing a TV channel :see the separate
operating instructions.
i Depending on the digital TV broadcaster,
radio stations can also be received. The
multifunction display shows TV (RADIO) .
Video DVD operation Example: CD/DVD changer display
:
Current scene
X Switch on COMAND Online and select
video DVD; see the separate operating
instructions.
X Press the =or; button on the steer-
ing wheel to select the Audio menu.234
Menus and submenusOn-board computer and displays
Page 242 of 405
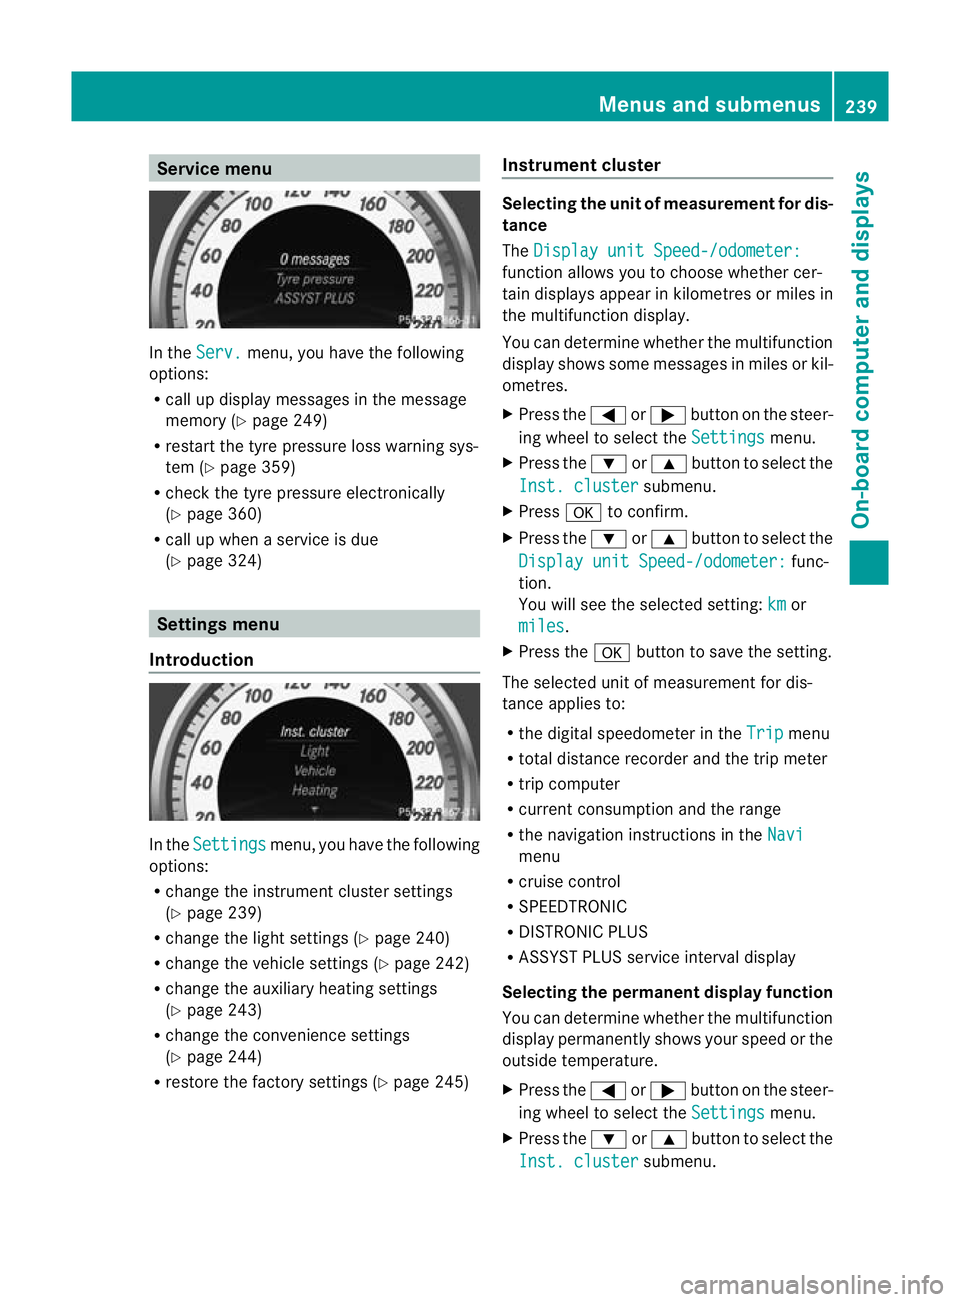
Service menu
In the
Serv. menu, you have the following
options:
R call up display messages in the message
memory (Y page 249)
R restart the tyre pressure loss warning sys-
tem (Y page 359)
R check the tyre pressure electronically
(Y page 360)
R call up when a service is due
(Y page 324) Settings menu
Introduction In the
Settings menu, you have the following
options:
R change the instrument cluster settings
(Y page 239)
R change the light settings (Y page 240)
R change the vehicle settings (Y page 242)
R change the auxiliary heating settings
(Y page 243)
R change the convenience settings
(Y page 244)
R restore the factory settings (Y page 245)Instrument cluster Selecting the unit of measurement for dis-
tance
The
Display unit Speed-/odometer: function allows you to choose whether cer-
tain displays appear in kilometres or miles in
the multifunction display.
You can determine whether the multifunction
display shows some messages in miles or kil-
ometres.
X
Press the =or; button on the steer-
ing wheel to select the Settings menu.
X Press the :or9 button to select the
Inst. cluster submenu.
X Press ato confirm.
X Press the :or9 button to select the
Display unit Speed-/odometer: func-
tion.
You will see the selected setting: km or
miles .
X Press the abutton to save the setting.
The selected unit of measurement for dis-
tance applies to:
R the digital speedometer in the Trip menu
R total distance recorder and the trip meter
R trip computer
R current consumption and the range
R the navigation instructions in the Navi menu
R cruise control
R SPEEDTRONIC
R DISTRONIC PLUS
R ASSYST PLUS service interval display
Selecting the permanent display function
You can determine whether the multifunction
display permanently shows your speed or the
outside temperature.
X Press the =or; button on the steer-
ing wheel to select the Settings menu.
X Press the :or9 button to select the
Inst. cluster submenu.Menus and submenus
239On-board computer and displays Z
Page 246 of 405
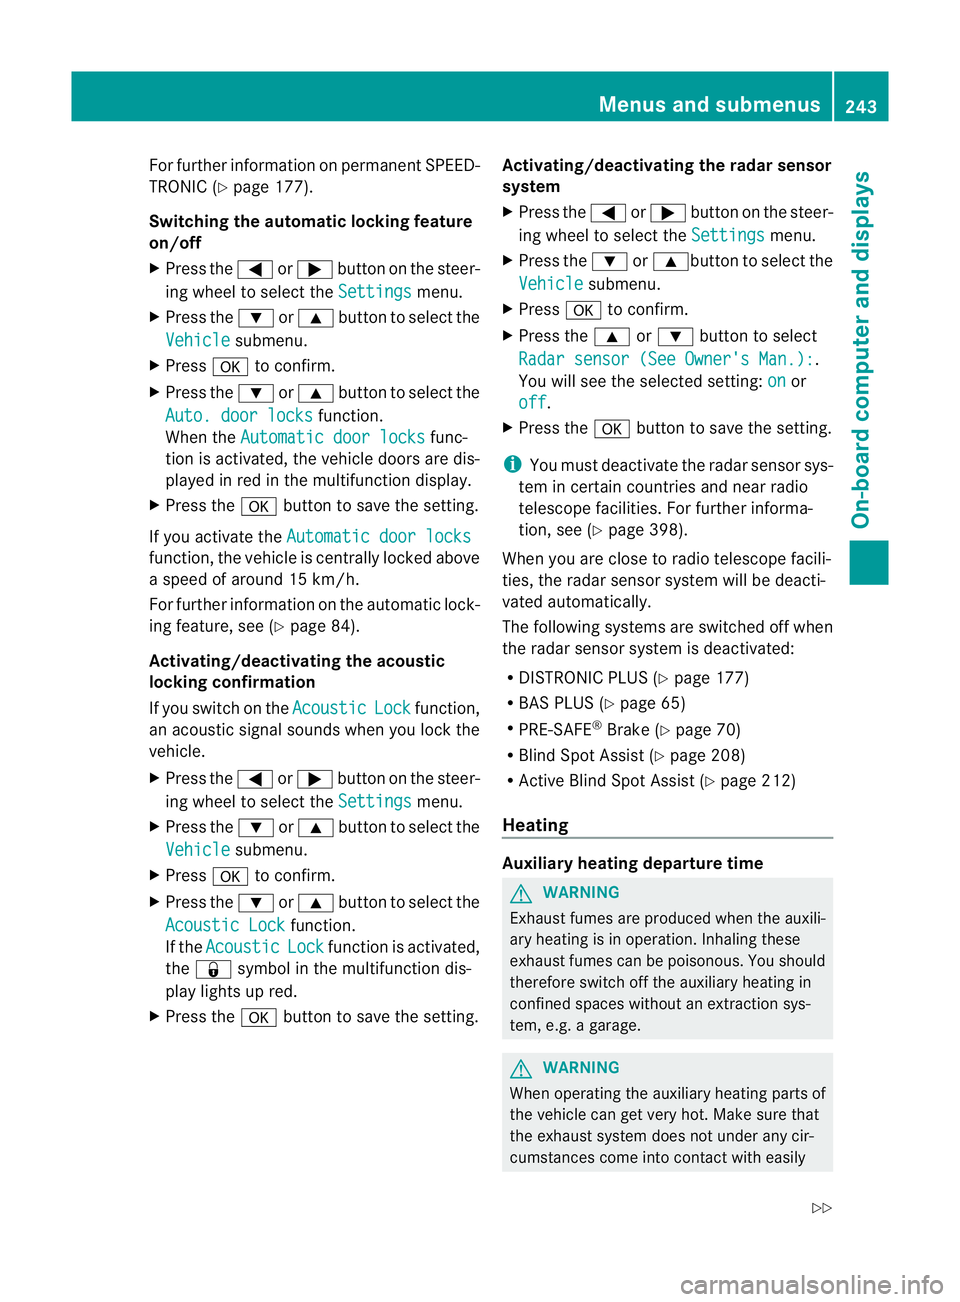
For further information on permanent SPEED-
TRONIC (Y
page 177).
Switching the automatic locking feature
on/off
X Press the =or; button on the steer-
ing wheel to select the Settings menu.
X Press the :or9 button to select the
Vehicle submenu.
X Press ato confirm.
X Press the :or9 button to select the
Auto. door locks function.
Whe nthe Automatic door locks func-
tion is activated, the vehicle doors are dis-
played in red in the multifunction display.
X Press the abutton to save the setting.
If you activate the Automatic door locks function, the vehicle is centrally locked above
a speed of around 15 km/h.
For further information on the automatic lock-
ing feature, see (Y page 84).
Activating/deactivating the acoustic
locking confirmation
If you switch on the Acoustic Lock function,
an acoustic signal sounds when you lock the
vehicle.
X Press the =or; button on the steer-
ing wheel to select the Settings menu.
X Press the :or9 button to select the
Vehicle submenu.
X Press ato confirm.
X Press the :or9 button to select the
Acoustic Lock function.
If the Acoustic Lock function is activated,
the & symbol in the multifunction dis-
play lights up red.
X Press the abutton to save the setting. Activating/deactivating the radar sensor
system
X
Press the =or; button on the steer-
ing wheel to select the Settings menu.
X Press the :or9button to select the
Vehicle submenu.
X Press ato confirm.
X Press the 9or: button to select
Radar sensor (See Owner's Man.): .
You will see the selected setting: on or
off .
X Press the abutton to save the setting.
i You must deactivate the radar sensor sys-
tem in certain countries and near radio
telescope facilities. For further informa-
tion, see (Y page 398).
When you are close to radio telescope facili-
ties, the radar sensor system will be deacti-
vated automatically.
The following systems are switched off when
the radar sensor system is deactivated:
R DISTRONIC PLUS (Y page 177)
R BAS PLUS (Y page 65)
R PRE-SAFE ®
Brake (Y page 70)
R Blind Spot Assist (Y page 208)
R Active Blind Spot Assist (Y page 212)
Heating Auxiliary heating departure time
G
WARNING
Exhaust fumes are produced when the auxili-
ary heating is in operation. Inhaling these
exhaust fumes can be poisonous. You should
therefore switch off the auxiliary heating in
confined spaces without an extraction sys-
tem, e.g. a garage. G
WARNING
When operating the auxiliary heating parts of
the vehicle can get very hot. Make sure that
the exhaust system does not under any cir-
cumstances come into contact with easily Menus and submenus
243On-board computer and displays
Z
Page 247 of 405
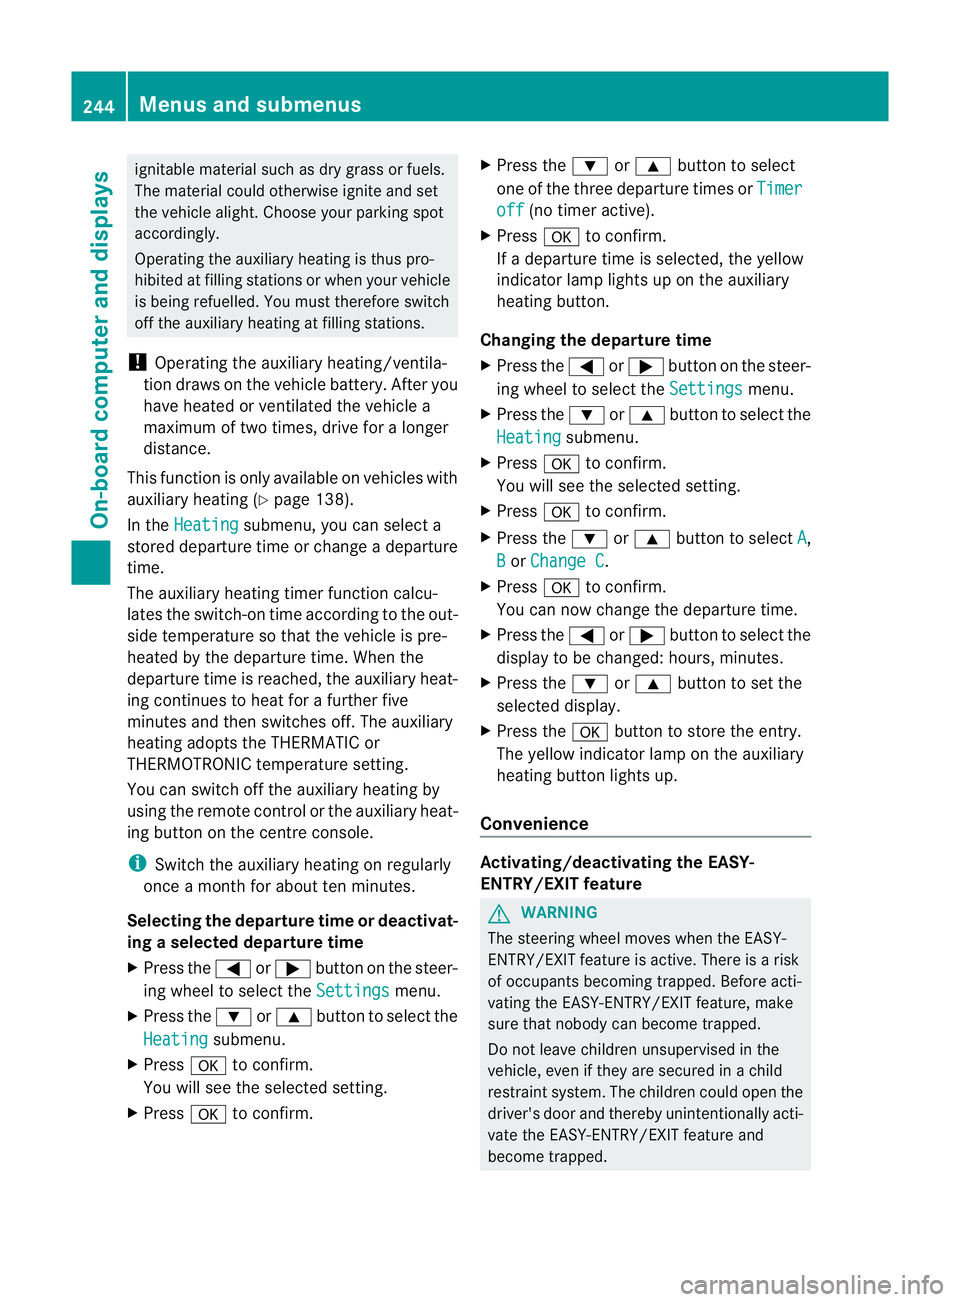
ignitable material such as dry grass or fuels.
The material could otherwise ignite and set
the vehicle alight .Choose your parking spot
accordingly.
Operating the auxiliary heating is thus pro-
hibited at filling stations or when your vehicle
is being refuelled. You must therefore switch
off the auxiliary heating at filling stations.
! Operating the auxiliary heating/ventila-
tion draws on the vehicle battery. After you
have heated or ventilated the vehicle a
maximum of two times, drive for a longer
distance.
This function is only available on vehicles with
auxiliary heating (Y page 138).
In the Heating submenu, you can select a
stored departure time or change a departure
time.
The auxiliary heating timer function calcu-
lates the switch-on time according to the out-
side temperature so that the vehicle is pre-
heated by the departure time. When the
departure time is reached, the auxiliary heat-
ing continues to heat for a further five
minutes and then switches off. The auxiliary
heating adopts the THERMATIC or
THERMOTRONIC temperature setting.
You can switch off the auxiliary heating by
using the remote control or the auxiliary heat-
ing button on the centre console.
i Switch the auxiliary heating on regularly
once a month for about ten minutes.
Selecting the departure time or deactivat-
ing a selected departure time
X Press the =or; button on the steer-
ing wheel to select the Settings menu.
X Press the :or9 button to select the
Heating submenu.
X Press ato confirm.
You will see the selected setting.
X Press ato confirm. X
Press the :or9 button to select
one of the three departure times or Timer off (no timer active).
X Press ato confirm.
If a departure time is selected, the yellow
indicator lamp lights up on the auxiliary
heating button.
Changing the departure time
X Press the =or; button on the steer-
ing wheel to select the Settings menu.
X Press the :or9 button to select the
Heating submenu.
X Press ato confirm.
You will see the selected setting.
X Press ato confirm.
X Press the :or9 button to select A ,
B or
Change C .
X Press ato confirm.
You can now change the departure time.
X Press the =or; button to select the
display to be changed: hours, minutes.
X Press the :or9 button to set the
selected display.
X Press the abutton to store the entry.
The yellow indicator lamp on the auxiliary
heating button lights up.
Convenience Activating/deactivating the EASY-
ENTRY/EXIT feature
G
WARNING
The steering wheel moves when the EASY-
ENTRY/EXIT feature is active. There is a risk
of occupants becoming trapped. Before acti-
vating the EASY-ENTRY/EXIT feature, make
sure that nobody can become trapped.
Do not leave children unsupervised in the
vehicle, even if they are secured in a child
restraint system. The children could open the
driver's door and thereby unintentionally acti-
vate the EASY-ENTRY/EXIT feature and
become trapped. 244
Menus and submenusOn-board computer and displays
Page 263 of 405
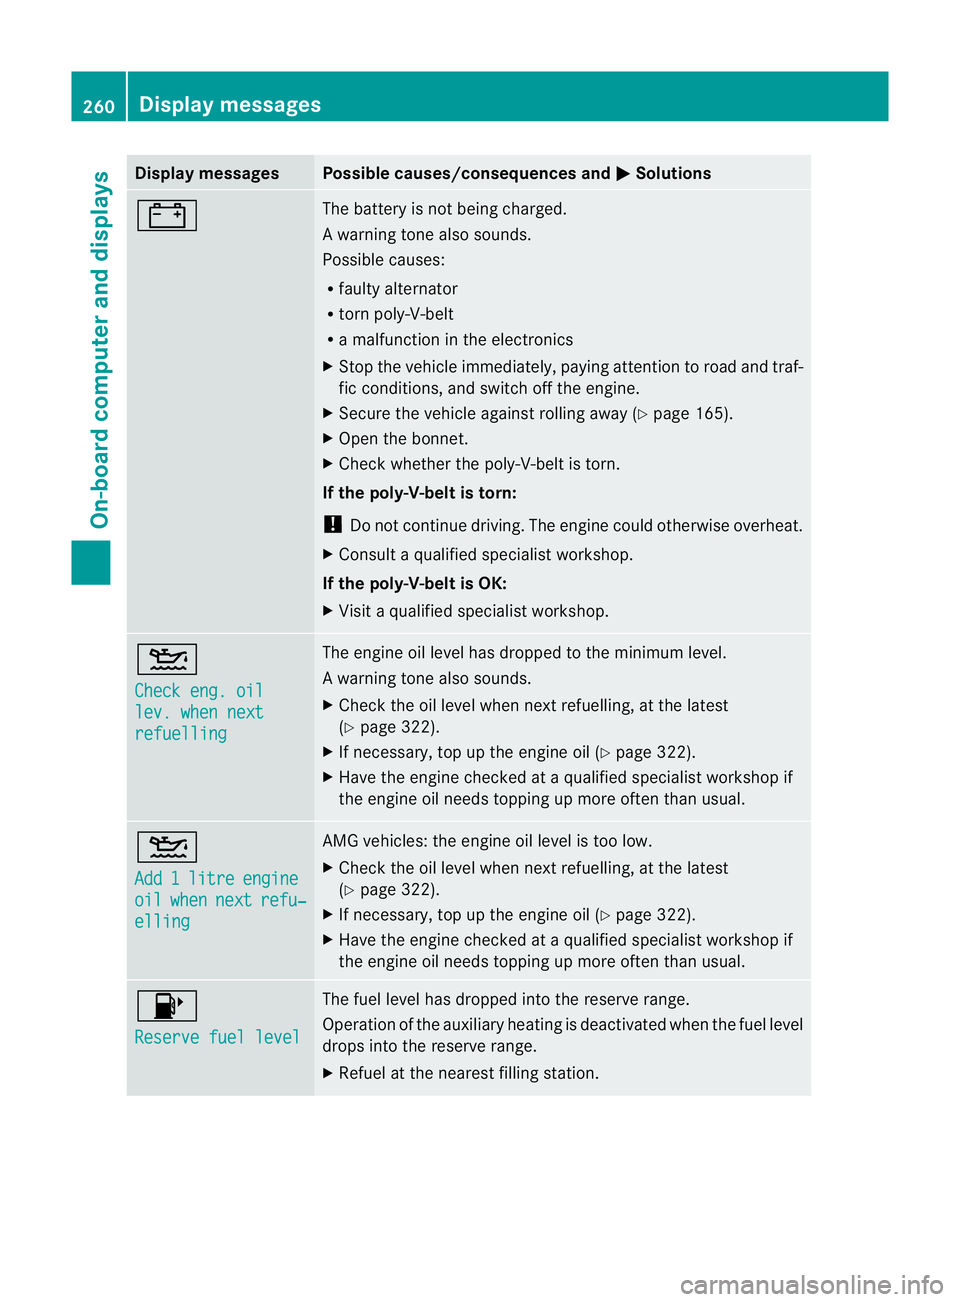
Display messages Possible causes/consequences and
M Solutions
# The battery is no
tbeing charged.
Aw arning tone also sounds.
Possible causes:
R faulty alternator
R torn poly-V-belt
R a malfunction in the electronics
X Stop the vehicle immediately, paying attentio ntoroad and traf-
fic conditions, and switch off the engine.
X Secure the vehicle against rolling away (Y page 165).
X Open the bonnet.
X Check whether the poly-V-belt is torn.
If the poly-V-belt is torn:
! Do not continue driving. The engine could otherwise overheat.
X Consult a qualified specialist workshop.
If the poly-V-belt is OK:
X Visit a qualified specialist workshop. 4
Check eng. oil
lev. when next
refuelling The engine oil level has dropped to the minimum level.
Aw
arning tone also sounds.
X Chec kthe oil level when next refuelling, at the latest
(Y page 322).
X If necessary, top up the engine oil (Y page 322).
X Have the engine checked at a qualified specialist workshop if
the engine oil needs topping up more often than usual. 4
Add
1 litre engine
oil when next refu‐
elling AMG vehicles: the engine oil level is too low.
X
Check the oil level when next refuelling, at the latest
(Y page 322).
X If necessary, top up the engine oil (Y page 322).
X Have the engine checked at a qualified specialist workshop if
the engine oil needs topping up more often than usual. 8
Reserve fuel level The fuel level has dropped into the reserve range.
Operation of the auxiliary heating is deactivated when the fuel level
drops into the reserve range.
X
Refuel at the nearest filling station. 260
Display messagesOn-board computer and displays