2012 MERCEDES-BENZ CLS SHOOTING BRAKE ESP
[x] Cancel search: ESPPage 298 of 405
Folding the seat backrest forwards
!
When folding the rear seat backrest for-
wards, ensure that there are no items lying
on the seat cushions. Thes eitems could
otherwise be damaged or could themselves
damage the rea rseats. The left-hand and right-hand rear seat backr-
ests can be folded forwards separately to
increase the luggage compartment capacity.
i When you fold one or both parts of the
rear seat backrests forwards, the headr-
ests are also lowered if necessary. In the
case of vehicles with memory function, the
respective fron tseat is moved forwards
slightly to avoid contact with the seat
behind it.
X Vehicles without memory function: if nec-
essary, move the driver's or front-
passenger seat forwards.
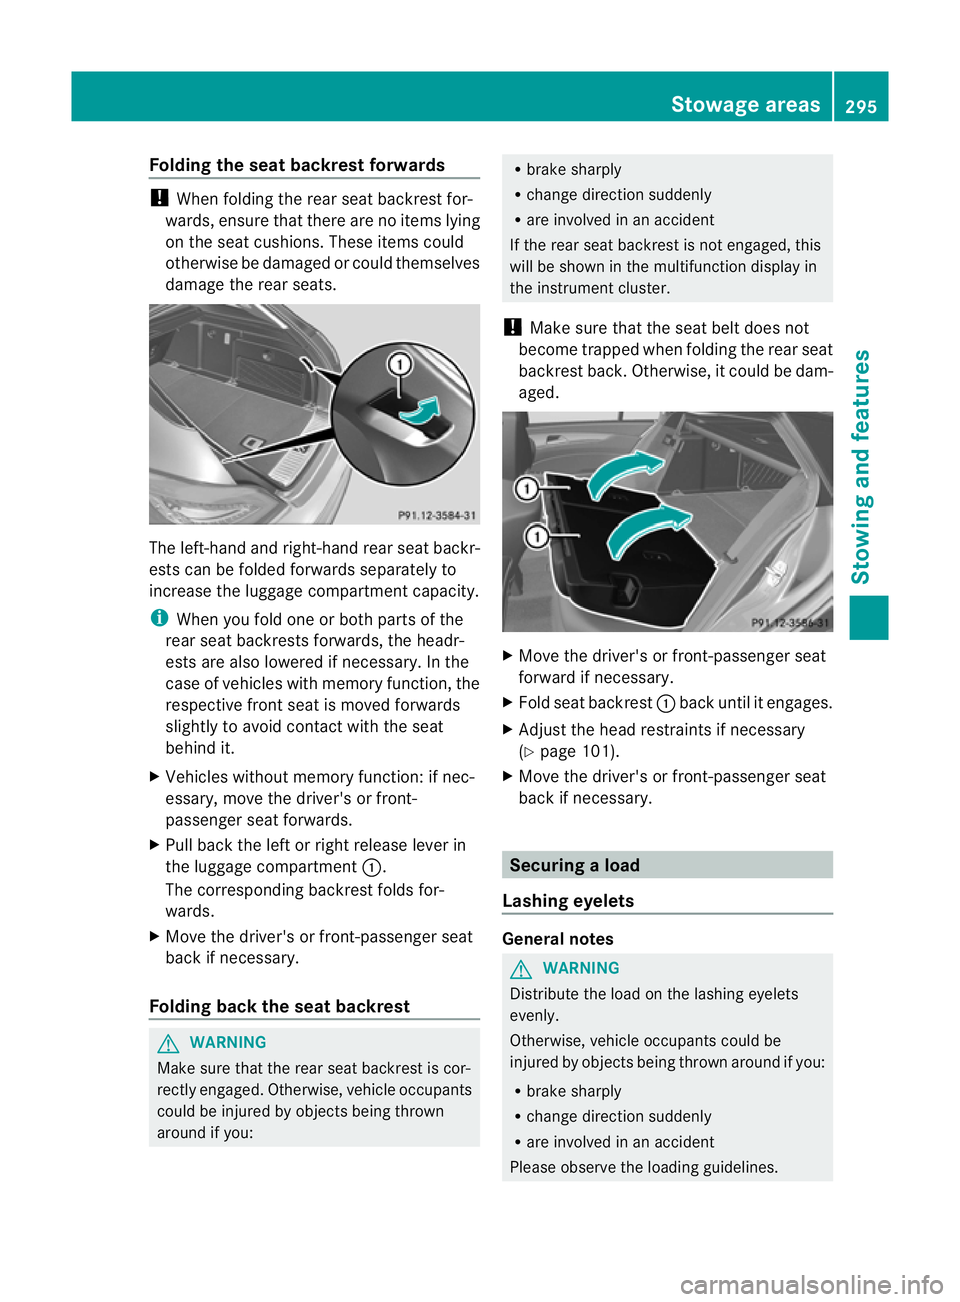
X Pull back the left or right release lever in
the luggage compartment :.
The corresponding backrest folds for-
wards.
X Move the driver's or front-passenger seat
back if necessary.
Folding back the seat backrest G
WARNING
Make sure that the rear seat backrest is cor-
rectly engaged. Otherwise, vehicle occupants
could be injured by objects being thrown
around if you: R
brake sharply
R change direction suddenly
R are involved in an accident
If the rear seat backrest is not engaged, this
will be shown in the multifunction display in
the instrument cluster.
! Make sure that the seat belt does not
become trapped when folding the rear seat
backrest back. Otherwise, it could be dam-
aged. X
Move the driver's or front-passenger seat
forward if necessary.
X Fold seat backrest :back until it engages.
X Adjust the head restraints if necessary
(Y page 101).
X Move the driver's or front-passenger seat
back if necessary. Securing
aload
Lashing eyelets General notes
G
WARNING
Distribute the load on the lashing eyelets
evenly.
Otherwise, vehicle occupants could be
injured by objects being thrown around if you:
R brake sharply
R change directio nsuddenly
R are involved in an accident
Please observe the loading guidelines. Stowage areas
295Stowing and featu res Z
Page 301 of 405
X
To fit: place luggage compartment
cover :into anchorage ;on the right or
left-hand side.
X Push in opposite end cap of luggage com-
partment cover :in the direction of the
arrow and insert luggage compartment
cover :into opposite anchorage ;.
Fitting/removing the sightproofing
plate There is a luggage cove
ronthe tailgate which
can be removed and then installed again to
ease loading and unloading. X
To remove: press buttons :on luggage
cover ;simultaneously and remove it in
the direction of the arrow.
X To install: insert luggage cover ;and
push it in the opposite direction to the
arrow until it engages. Safety net (CLS Shooting Brake)
Important safety notes G
WARNING
The safety net cannot secure heavy loads. You
should therefore always lash down the load.
You could otherwise be injured by objects
which have not been sufficiently secured
being thrown around in the event of sharp
braking, a sudden change of direction or an
accident. G
WARNING
In the event of sharp braking, a sudden
change of direction, or an accident, light loads
can be thrown about.
This could result in injury to yourself or others.
Therefore, if you are transporting light loads,
use the safety net.
The safety net is located in the stowage space
under the luggage compartmentf loor
(Y page 302).
X Open both Velcro fastener sand remove the
safety net.
X Unroll and unfold the safety net.
The joints on the uppe rand lowe rguide rod
should engage audibly.
The corresponding lashing eyelet sfor tight-
ening the safety net are in the luggage com-
partment in front of the rear bench seat
(Y page 295).
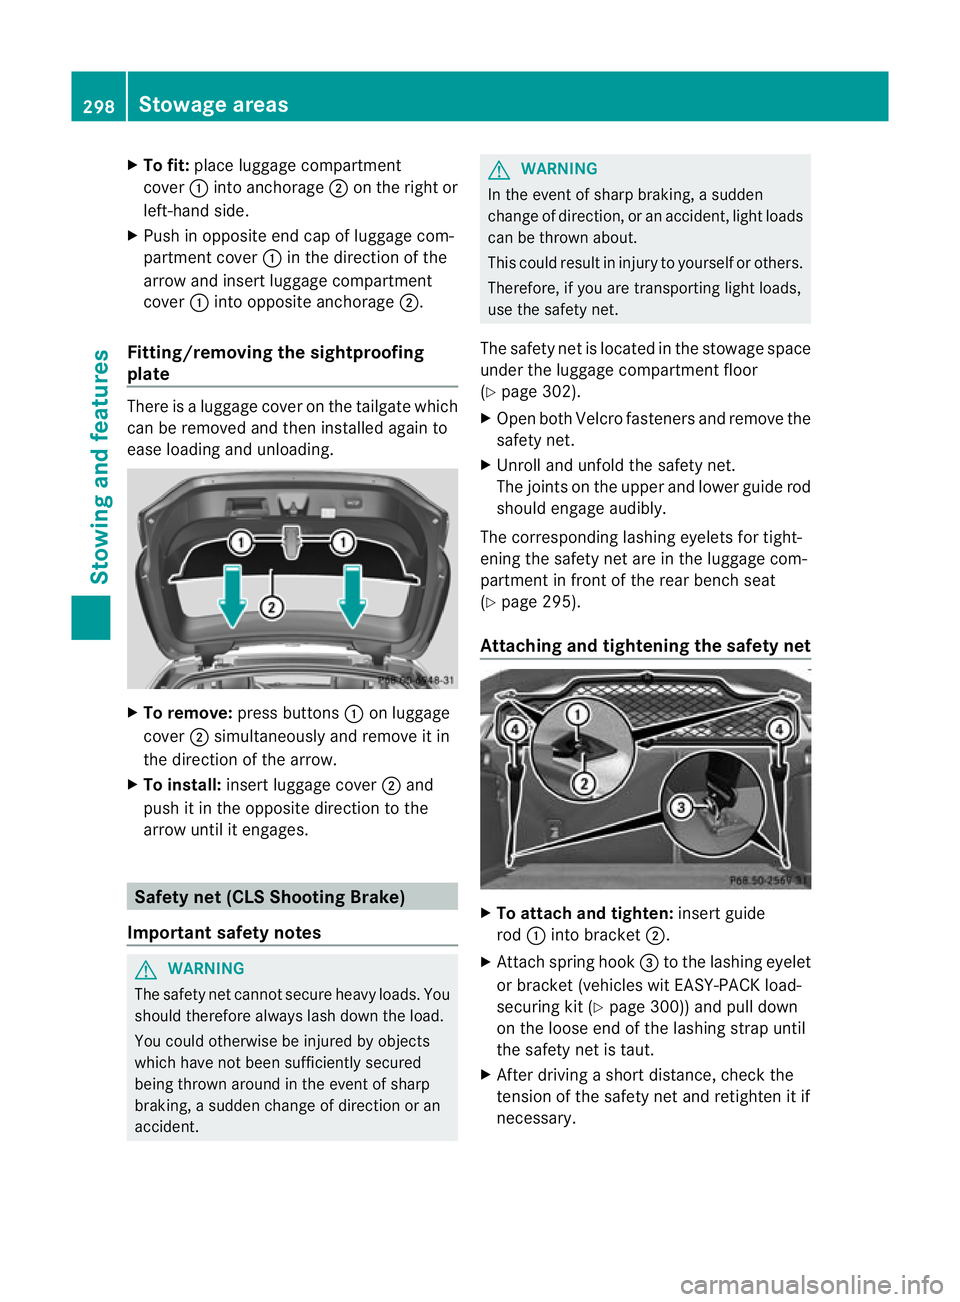
Attaching and tightening the safety net X
To attach and tighten: insert guide
rod :into bracket ;.
X Attach spring hook =to the lashing eyelet
or bracket (vehicles wit EASY-PACK load-
securing kit (Y page 300)) and pull down
on the loose end of the lashing strap until
the safety net is taut.
X After driving a short distance, check the
tension of the safety net and retighten it if
necessary. 298
Stowage areasStowing and features
Page 304 of 405
The luggage holder can be used to secure
light loads against the side wall of the luggage
compartment to prevent them from moving
around.
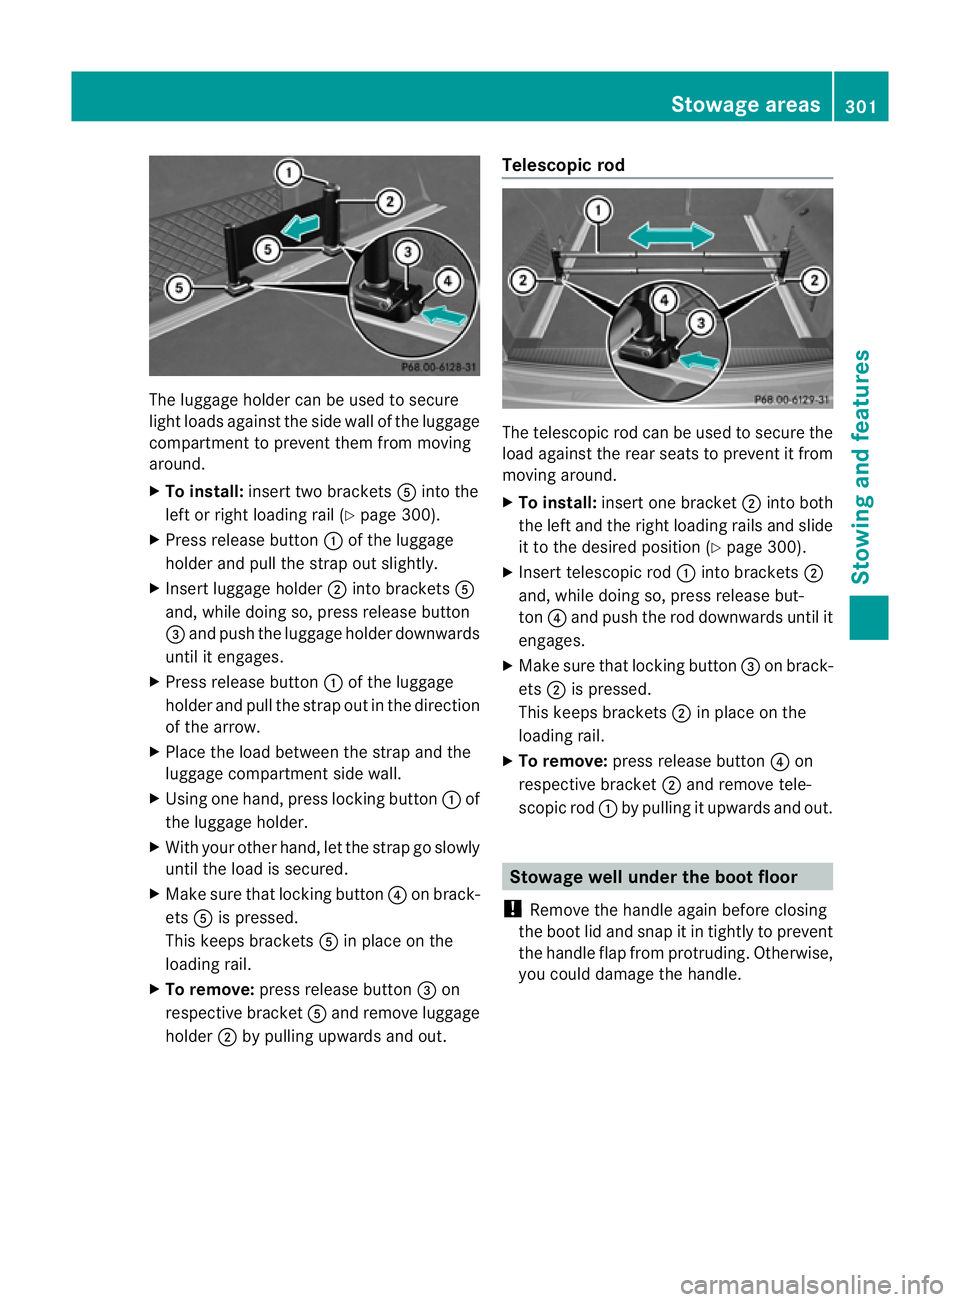
X To install: insert two brackets Ainto the
left or right loading rail (Y page 300).
X Press release button :of the luggage
holder and pull the strap out slightly.
X Insert luggage holder ;into brackets A
and, while doing so, press release button
= and push the luggage holder downwards
until it engages.
X Press release button :of the luggage
holder and pull the strap out in the direction
of the arrow.
X Place the load between the strap and the
luggage compartment side wall.
X Using one hand, press locking button :of
the luggage holder.
X With your other hand, let the strap go slowly
until the load is secured.
X Make sure that locking button ?on brack-
ets Ais pressed.
This keeps brackets Ain place on the
loading rail.
X To remove: press release button =on
respective bracket Aand remove luggage
holder ;by pulling upwards and out. Telescopic rod
The telescopic rod can be used to secure the
load against the rear seats to prevent it from
moving around.
X
To install: insert one bracket ;into both
the left and the right loading rails and slide
it to the desired position (Y page 300).
X Insert telescopic rod :into brackets ;
and, while doing so, press release but-
ton ?and push the rod downwards until it
engages.
X Make sure that locking button =on brack-
ets ;is pressed.
This keeps brackets ;in place on the
loading rail.
X To remove: press release button ?on
respective bracket ;and remove tele-
scopic rod :by pulling it upwards and out. Stowage well under the boot floor
! Remove the handle again before closing
the boot lid and snap it in tightly to prevent
the handle flap from protruding. Otherwise,
you could damage the handle. Stowage areas
301Stowing and features Z
Page 328 of 405
Special service requirements
Arduous operating conditions or increased
loads on the vehicle will require some service
work to be performed more often than for a
vehicle in normal use. Such arduous condi-
tions include regular city driving with frequent
intermediate stops and use in mountainous
terrain or on poor road surfaces.
For example, if the vehicle is used under ardu-
ous operating conditions, have air filters,
engine oil and oil filters changed frequently
and check the wheels often.F urther informa-
tion can be obtained at a qualified specialist
workshop, e.g. a Mercedes-Ben zService
Centre.
Driving abroad
An extensive Mercedes-Benz Service network
is also available in other countries. The
Service Hotline's curren ttelephone numbers
for use when you are abroad are to be found
in the "Mercedes-BenzS ervice24h" section
of the Service Booklet. Care
General Notes
H
Environmental note
Dispose of empty packaging and cleaning
cloths in an environmentally responsible man-
ner.
! For cleaning your vehicle, do not use any
of the following:
R dry, rough or hard cloths
R abrasive cleaning agents
R solvents
R cleaning agents containing solvents
Do not scrub.
Do not touch the surfaces or protective
films with hard objects, e.g. a ring or ice
scraper. You could otherwise scratch or
damage the surfaces and protective film. !
Do not park up the vehicle for an extended
period straight after cleaning it, particularly
after having cleaned the wheels with wheel
cleaner. Wheel cleaners could cause
increased corrosion of the brake discs and
brake pads/linings. For this reason, you
should drive for a few minutes after clean-
ing. Braking heats the brake discs and the
brake pads/linings, thus drying them. The
vehicle can then be parked up.
Regular care of your vehicle is a condition for
retaining the quality in the long term.
Use care products and cleaning agents rec-
ommended and approved by Mercedes-Benz. Washing the vehicle and cleaning the
paintwork
Automatic car wash G
WARNING
Braking efficiency is reduced after washing
the vehicle. This could cause an accident. For
this reason, following a car wash, drive with
particular care until the brakes are dry. G
WARNING
The vehicle is braked when the HOLD function
or DISTRONIC PLUS is activated. Therefore,
deactivat ethe HOLD function and DISTRONIC
PLUS before the vehicle is washed in an auto-
matic car wash.
! Make sure that:
R the side windows and sliding sunroof are
closed completely.
R the blower for the ventilation/heating is
switched off (OFF button is depressed).
R the windscreen wiper switch is at posi-
tion 0.
The vehicle could otherwise be damaged.
! In car washes with a towing mechanism,
make sure that the automatic transmission
is in transmission position N, otherwise the
vehicle could be damaged. Care
325Maintenance and care Z
Page 332 of 405
X
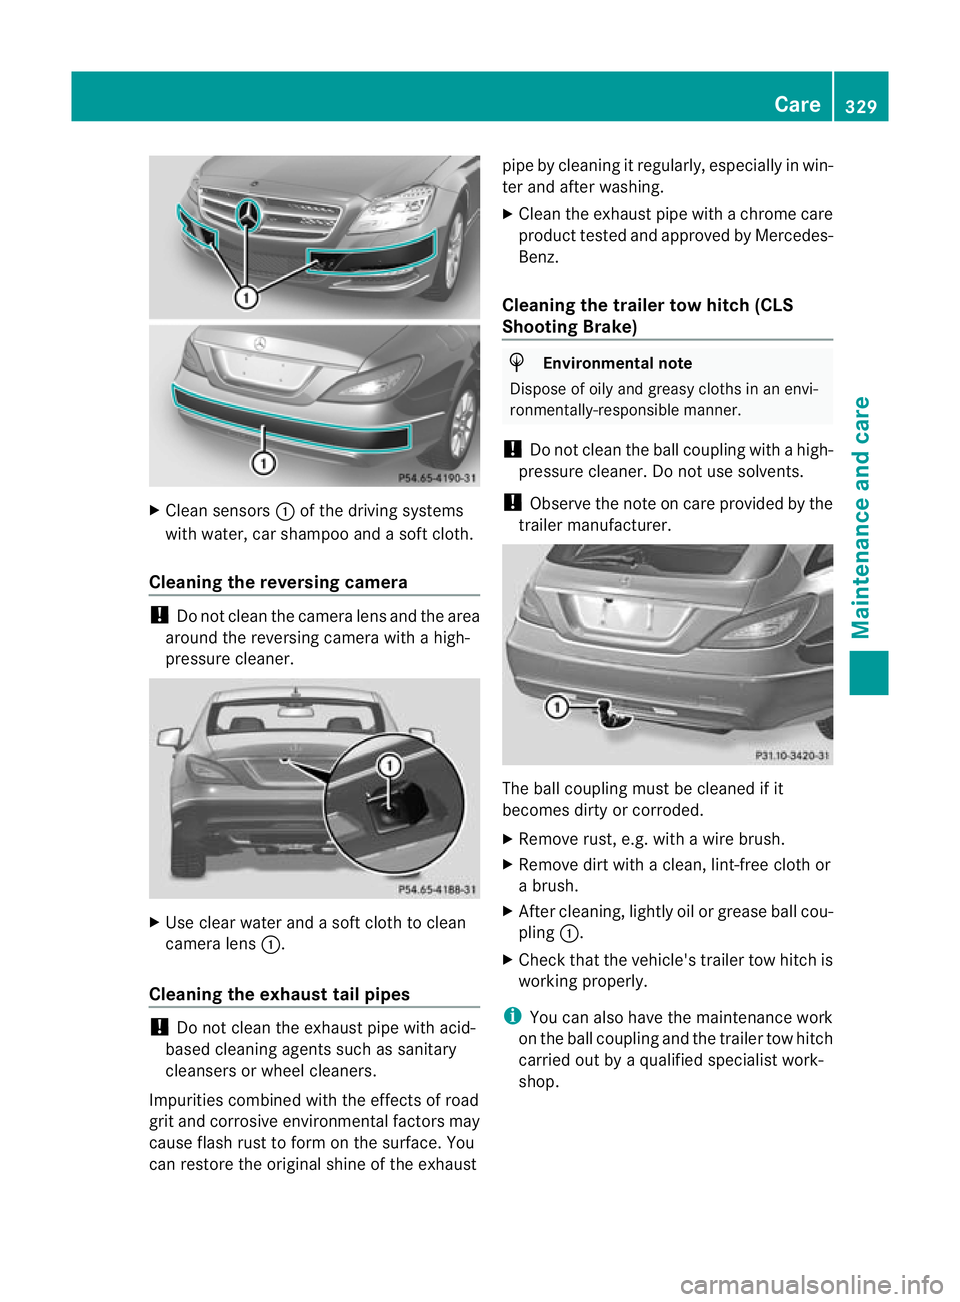
Clean sensors :of the driving systems
with water, car shampoo and a sof tcloth.
Cleaning the reversing camera !
Do not clean the camera lens and the area
around the reversing camera with a high-
pressure cleaner. X
Use clear water and a soft cloth to clean
camera lens :.
Cleaning the exhaust tail pipes !
Do not clean the exhaust pipe with acid-
based cleaning agents such as sanitary
cleansers or wheel cleaners.
Impurities combined with the effects of road
grit and corrosive environmental factors may
cause flash rust to form on the surface. You
can restore the original shine of the exhaust pipe by cleaning it regularly, especially in win-
ter and after washing.
X
Clean the exhaust pipe with a chrome care
produc ttested and approved by Mercedes-
Benz.
Cleaning the trailer tow hitch (CLS
Shooting Brake) H
Environmental note
Dispose of oily and greasy cloths in an envi-
ronmentally-responsible manner.
! Do not clean the ball coupling with a high-
pressure cleaner. Do not use solvents.
! Observe the note on care provided by the
trailer manufacturer. The ball coupling must be cleaned if it
becomes dirty or corroded.
X
Remove rust, e.g. with a wire brush.
X Remove dirt with a clean, lint-free cloth or
a brush.
X After cleaning, lightly oil or grease ball cou-
pling :.
X Check that the vehicle's trailer tow hitch is
working properly.
i You can also have the maintenance work
on the ball coupling and the trailer tow hitch
carried out by a qualified specialist work-
shop. Care
329Maintenance and care Z
Page 340 of 405
X
Stop the vehicle as far away as possible
from traffic on solid ,non-slippery and level
ground.
X Switch on the hazard warning lamps.
X Engage the parking brake.
X Bring the front wheels into the straight-
ahead position.
X Shift the transmission to position P.
X Vehicles with AIRMATIC: make sure that
"normal" level is selected (Y page 188).
X Switch off the engine.
X Vehicles without KEYLESS-GO: remove
the key from the ignition lock.
X Vehicles with KEYLESS-GO: open the
driver's door.
The on-board electronics have status 0,
which is the same as the key having been
removed.
X Vehicles with KEYLESS-GO: remove the
Start/Stop button from the ignition lock
(Y page 147).
X All occupants must get out of the vehicle.
Make sure that they are not endangered as
they do so.
X Occupants should stand clear of danger
whilst a wheel is being changed, e.g. behind
the barrier.
X Get out of the vehicle. Pay attention to traf-
fic conditions when doing so.
X Close the driver's door.
X Place the warning triangle a suitable dis-
tance away (Y page 334). Observe legal
requirements. MOExtended tyres (tyres with run-flat
characteristics) G
WARNING
When driving in emergency mode, the driving
characteristics deteriorate, e.g. when corner-
ing, accelerating quickly and when braking.
There is a risk of accident.
Do not exceed the stated maximum speed.
Avoid abrupt steering and driving manoeu- vres, and driving over obstacles (kerbs, pot-
holes, off-road). This applies in particular to a
laden vehicle.
Stop driving in emergency mode if:
R
you hear banging noises.
R the vehicle starts to shake.
R you see smoke and smell rubber.
R ESP ®
is intervening constantly.
R there are tears in the sidewalls of the tyre.
After driving in emergency mode, have the
wheel rims checked at a qualified specialist
workshop with regard to their further use. The
faulty tyre must be replaced.
With MOExtended tyres (tyres with run-flat
characteristics), you can continue to drive
your vehicle even if there is a total loss of
pressure in one or more tyres.
MOExtended tyres may only be used in con-
junction with an active tyre pressure loss
warning system or with an active tyre pres-
sure monitor.
The maximum driving distance is approx-
imately 80 km when the vehicle is partially
laden, and approximately 30 km when the
vehicle is fully laden.
In addition to the vehicle load, the driving dis-
tance possible depends upon:
R speed
R road condition
R outside temperature
The driving distance possible in run-flat mode
may be reduced by extreme driving condi-
tions/manoeuvres, or it can be increased
through a moderate style of driving.
The maximum permissible distance which
can be driven in run-flat mode is counted from
the moment the tyre pressure loss warning
appears in the multifunction display.
You must not exceed a maximum speed of
80 km/h.
i When replacing one or all tyres, make
sure that you only use tyres marked Flat tyre
337Breakdown assistance Z
Page 344 of 405
work on the battery carried out at a qualified
specialist workshop. G
WARNING
Work carried out incorrectly on the battery
can, for example, lead to a short circuit and
damage your vehicle's electroni csystem. This
can disrupt driving safet ysystems such as
ABS (anti-lock brakin gsystem) or ESP ®
(Elec-
tronic Stability Program).
R If ABS malfunctions, the wheels can lock
during braking. This limits the steerability
of the vehicle when braking and the braking
distance may increase .There is a risk of
accident.
R If ESP ®
malfunctions, the vehicle will not be
stabilised if it starts to skid or a wheel starts
to spin. There is a risk of accident.
You should therefore have all work involving
the battery carried out at a qualified specialist
workshop. G
WARNING
Electrostatic build-up can lead to the creation
of sparks, which could ignite the highly explo-
sive gases of a battery. There is a risk of an
explosion.
Before handling the battery, touch the vehicle
body to remove any existing electrostatic
build-up.
The highly flammable gas mixture is formed
when charging the battery or jump-starting.
Always make sure that neither you nor the
battery is electrostatically charged. For
example, electrostatic charge is caused by:
R wearing synthetic clothing.
R the friction of clothing on the seat.
R pulling or pushing the battery over carpets
or other synthetic materials.
R wiping the battery using a cloth. G
WARNING
During the charging process, a battery produ-
ces hydrogen gas. If a short circuit occurs or sparks are created, the hydrogen gas can
ignite. There is a risk of an explosion.
R
Make sure that the positive terminal of a
connected battery does not come into con-
tact with vehicle parts.
R Never place metal objectsort ools on a bat-
tery.
R It is important that you observe the descri-
bed order of the battery terminals when
connecting and disconnecting a battery.
R When jump-starting, make sure that the
battery poles with identical polarity are
connected.
R It is particularly important to observe the
described order when connecting and dis-
connecting the jump leads.
R Never connect or disconnect the battery
terminals while the engine is running. G
WARNING
Battery acid is caustic. There is a risk of injury.
Avoid contact with the skin, eyes or clothing.
Do not inhale any battery gases. Do not lean
over the battery. Keep children away from
batteries. Wash battery acid immediately with
water and seek medical attention. H
Environmental note Batteries contain pollutants.
It is illegal to dispose of them
with the household rubbish.
They must be collected sep-
arately and disposed of in an
environmentally responsible
recycling system.
Dispose of batteries in an
environmentally responsible
manner
.Take discharged
batteries to a qualified spe-
cialis tworkshop or to a col-
lection point for used batter-
ies.
! Have the battery checked regularly at a
qualified specialist workshop. Battery (vehicle)
341Breakdown assistance Z
Page 351 of 405
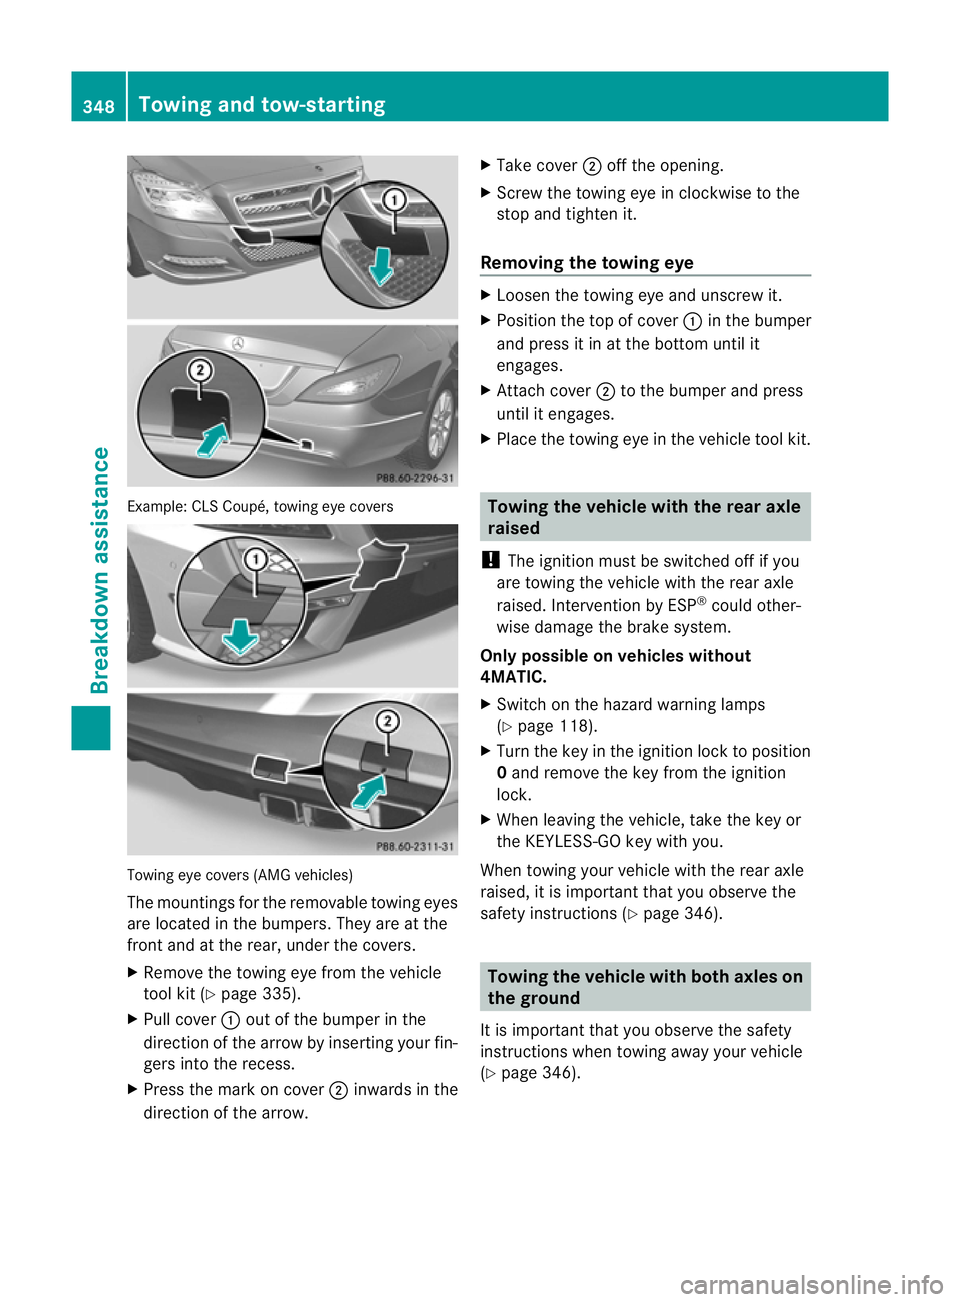
Example: CL
SCoupé, towing eye covers Towing eye covers (AMG vehicles)
The mountings for the removable towing eyes
are located in the bumpers. They are at the
front and at the rear, under the covers.
X Remove the towing eye from the vehicle
tool kit (Y page 335).
X Pull cover :out of the bumper in the
direction of the arrow by inserting your fin-
gers into the recess.
X Press the mark on cover ;inwards in the
direction of the arrow. X
Take cover ;off the opening.
X Screw the towing eye in clockwise to the
stop and tighten it.
Removing the towing eye X
Loosen the towing eye and unscrew it.
X Position the top of cover :in the bumper
and press it in at the bottom until it
engages.
X Attach cover ;to the bumper and press
until it engages.
X Place the towing eye in the vehicle tool kit. Towing the vehicle with the rear axle
raised
! The ignition must be switched off if you
are towing the vehicle with the rear axle
raised. Intervention by ESP ®
could other-
wise damage the brake system.
Only possible on vehicles without
4MATIC.
X Switch on the hazard warning lamps
(Y page 118).
X Turn the key in the ignition lock to position
0 and remove the key from the ignition
lock.
X When leaving the vehicle, take the key or
the KEYLESS-GO key with you.
When towing your vehicle with the rear axle
raised, it is important that you observe the
safety instructions (Y page 346). Towing the vehicle with both axles on
the ground
It is important that you observe the safety
instructions when towing away your vehicle
(Y page 346). 348
Towing and tow-startingBreakdown assistance