2012 MERCEDES-BENZ CLS SHOOTING BRAKE flat tire
[x] Cancel search: flat tirePage 14 of 405
Folding in whe
nlocking (on-board
computer) ...................................... 245
Out of position (troubleshooting) ...109
Parking position ............................. 110
Resetting ....................................... 109
Storing settings (memory func-
tion) ............................................... 111F
Faul tmessage
see Display messages
Filler cap
see Fuel filler flap
Fire extinguisher ............................... 335
First-aid kit ......................................... 334
Fitting awheel
Removing awheel .......................... 365
Fitting wheels
Fitting awheel ............................... 366
Lowering the vehicle ......................366
Raising the vehicle .........................364
Securing the vehicle against roll-
ing away ........................................ 363
Flat tyre
MOExtended tyres .........................337
Preparing the vehicle .....................336
TIREFIT kit ...................................... 338
Floormat ............................................ .317
Foglamps (extende drange) .............. 120
Frequencies Garage door opener .......................314
Mobile phone ................................. 383
Two-way radio ................................ 383
Front foglamps
Display message ............................ 257
Fuel
Additives ........................................ 389
Consumption information ..............390
Consumption statistics ..................231
Displaying the current consump-
tion ................................................ 231
Displaying the range ......................231
Fuel gauge ............................... 30, 227
Grade (petrol) ................................ 387
Important safety notes ..................386
Notes for AMG vehicles .................388
Problem (malfunction) ...................164Quality (diesel
)............................... 389
Refuelling ...................................... .161
Tank content/reserve fuel .............387
Fuel filler flap
Emergency release ........................163
Opening/closing ............................ 162
Fuel filte r(white display message) .261
Fuel level Calling up the range (on-board
computer) ...................................... 231
Gauge ...................................... 30, 227
Fuel reserve
see Fuel
Fuel tank
Capacity ........................................ 387
Problem (malfunction) ...................164
Fuse allocation chart (vehicle tool
kit) ...................................................... 335
Fuses Allocation chart ............................. 350
Before changing ............................. 350
Fuse box in the boot ......................351
Fuse box in the engine compart-
ment .............................................. 350
Fuse box in the luggage compart-
ment .............................................. 351
Important safety notes ..................350 G
Garage door opener Clearing the memory .....................313
Frequencies ................................... 314
Important safety notes ..................311
Opening/closing the garage door ..313
Programming (button in the rear-
view mirror) ................................... 312
Gear indicator (on-board com-
puter) ................................................. .246
Gearshift program SETUP (on-board computer) ..........246
Genuine Mercedes-Benz parts .........382
Glove compartment ..........................291 Index
11
Page 338 of 405
X
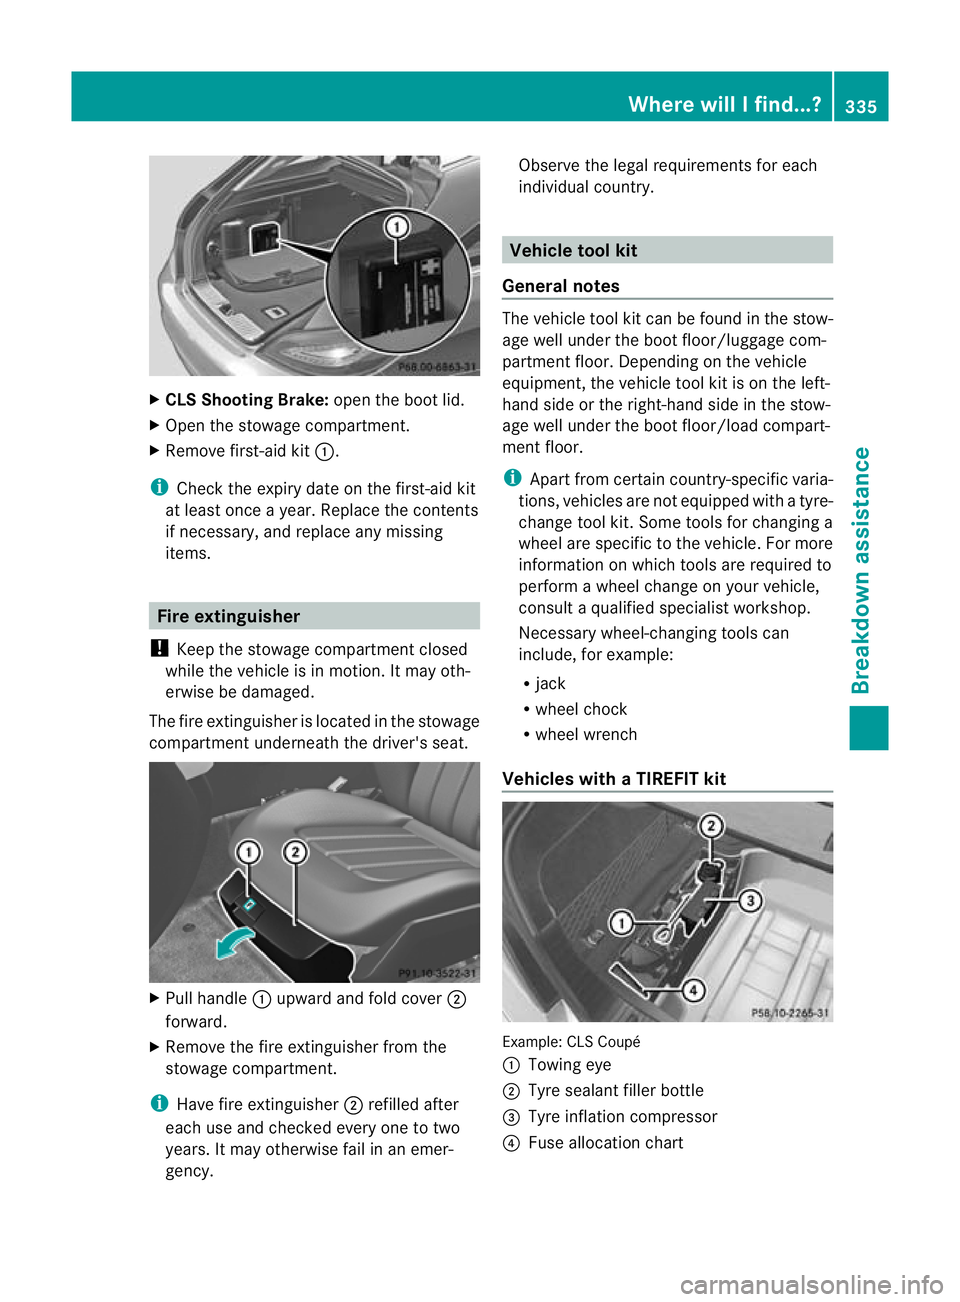
CLS Shooting Brake: open the boot lid.
X Open the stowage compartment.
X Remove first-aid kit :.
i Chec kthe expiry date on the first-aid kit
at least once a year. Replace the contents
if necessary, and replace any missing
items. Fire extinguisher
! Keep the stowage compartmentc losed
while the vehicle is in motion. It may oth-
erwise be damaged.
The fire extinguisher is located in the stowage
compartment underneath the driver's seat. X
Pull handle :upward and fold cover ;
forward.
X Remove the fire extinguisher fro mthe
stowage compartment.
i Have fire extinguisher ;refilled after
each use and checked every one to two
years. It may otherwise fail in an emer-
gency. Observe the legal requirements for each
individual country. Vehicle tool kit
General notes The vehicle tool kit can be found in the stow-
age well under the boot floor/luggage com-
partment floor. Depending on the vehicle
equipment, the vehicle tool kit is on the left-
hand side or the right-hand side in the stow-
age well under the boot floor/load compart-
ment floor.
i
Apart from certain country-specific varia-
tions, vehicles are not equipped with a tyre-
change tool kit. Some tools for changing a
wheel are specific to the vehicle. For more
information on which tools are required to
perform a wheel change on your vehicle,
consult a qualified specialist workshop.
Necessary wheel-changing tools can
include, for example:
R jack
R wheel chock
R wheel wrench
Vehicles with aTIREFIT kit Example: CLS Coupé
:
Towing eye
; Tyre sealan tfiller bottle
= Tyre inflation compressor
? Fuse allocation chart Where will I find...?
335Breakdown assistance
Page 339 of 405
X
Open the boot lid/tailgate.
X Swing the boot floor/luggage compart-
ment floor upwards (Y page 301) or
(Y page 302).
Vehicles with a"Minispare" emergency
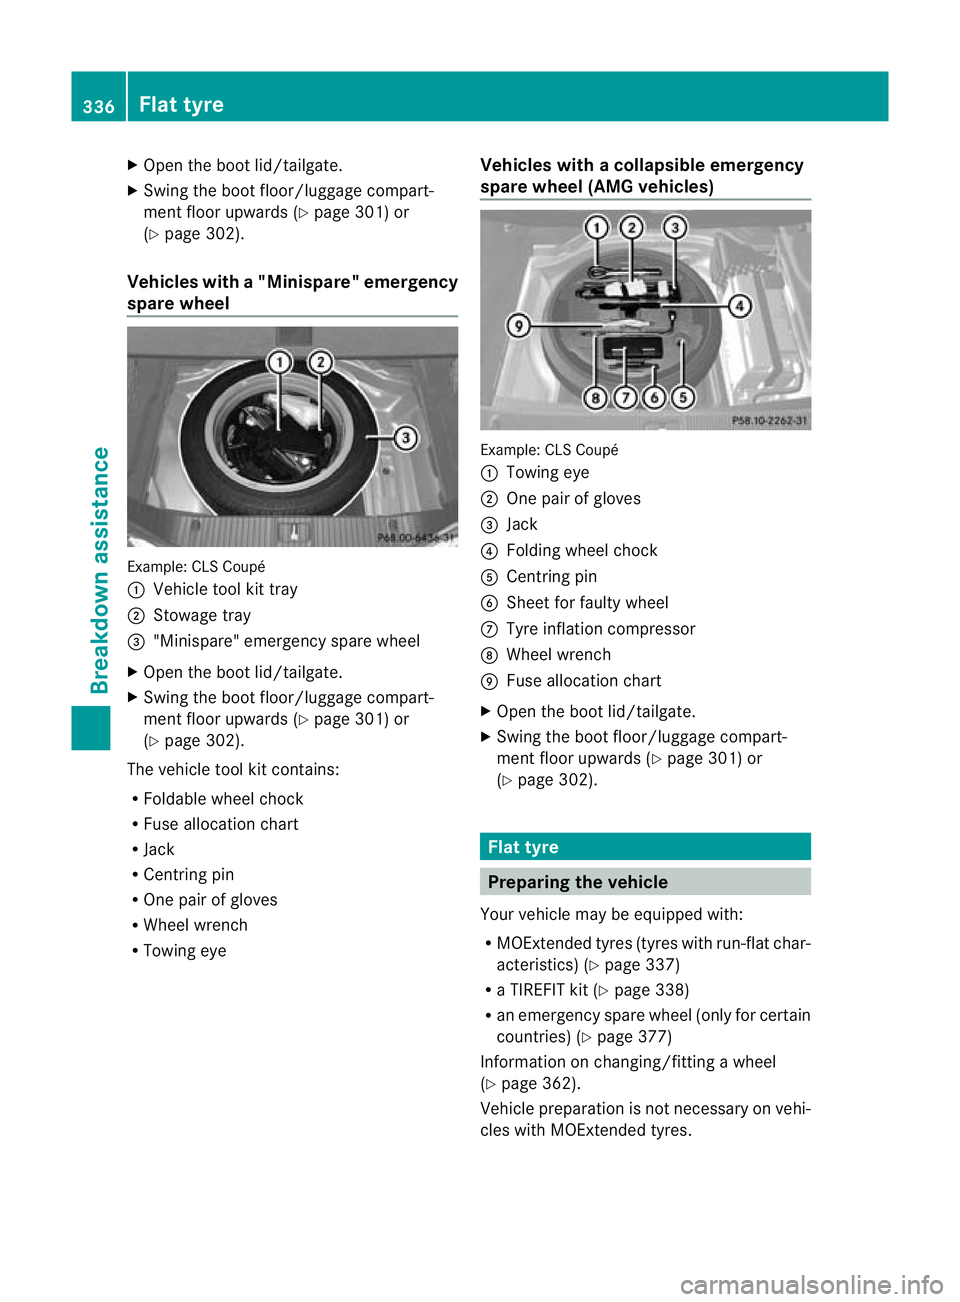
spare wheel Example
:CLS Coupé
: Vehicle tool kit tray
; Stowage tray
= "Minispare" emergency spare wheel
X Open the boot lid/tailgate.
X Swing the boot floor/luggage compart-
ment floor upwards (Y page 301) or
(Y page 302).
The vehicle tool kit contains:
R Foldable wheel chock
R Fuse allocation chart
R Jack
R Centring pin
R One pairofg loves
R Wheel wrench
R Towing eye Vehicles with
acollapsible emergency
spare wheel (AMG vehicles) Example: CLS Coupé
:
Towing eye
; One pair of gloves
= Jack
? Folding wheel chock
A Centring pin
B Sheet for faulty wheel
C Tyre inflatio ncompressor
D Wheel wrench
E Fuse allocation chart
X Open the boot lid/tailgate.
X Swing the boot floor/luggage compart-
ment floor upwards (Y page 301) or
(Y page 302). Flat tyre
Preparing the vehicle
Your vehicle may be equipped with:
R MOExtended tyres (tyres with run-flat char-
acteristics) (Y page 337)
R a TIREFIT kit (Y page 338)
R an emergency spare wheel (only for certain
countries) (Y page 377)
Information on changing/fitting a wheel
(Y page 362).
Vehicle preparation is not necessary on vehi-
cles with MOExtended tyres. 336
Flat tyreBreakdown assistance
Page 341 of 405
"MOExtended". Make sure that you only
use the size of tyre specified for the vehicle.
TIREFIT kit
Using the TIREFIT kit TIREFIT is a tyre sealant.
You can use TIREFIT to seal punctures of up
to 4 mm, particularly those in the tyre tread.
You can use TIREFIT at outside temperatures
down to Ò20 †. G
WARNING
In the following situations, the tyre sealan tis
unable to provide sufficient breakdown assis-
tance, as it is unable to seal the tyre properly:
R there are cuts or punctures in the tyre
larger than those mentione dabove.
R the wheel rim is damaged.
R you have driven at very low tyre pressures
or on a flat tyre.
There is a risk of accident.
Do not drive any further. Contact a qualified
specialist workshop. G
WARNING
The tyre sealant is harmful and causes irrita-
tion. It must not come into contact with your
skin, eyes or clothing or be swallowed. Do not
inhale TIREFIT fumes. Keep tyre sealant away
from children. There is a risk of injury.
If you come into contact with the tyre sealant,
observe the following:
R Rinse off the tyre sealant from your skin
immediately with water.
R If the tyre sealant comes into contact with
your eyes, immediately rinse them thor-
oughly with clean water.
R If tyre sealant is swallowed, immediately
rinse your mouth out thoroughly and drink
plenty of water. Do not induce vomiting,
and seek medical attention immediately. R
Immediately change out of clothing which
has come into contact with tyre sealant.
R If an allergic reaction occurs, seek medical
attention immediately.
! Do not operate the tyre inflation com-
pressor for longer than eight minutes at a
time without a break. It may otherwise
overheat.
The tyre inflation compressor can be oper-
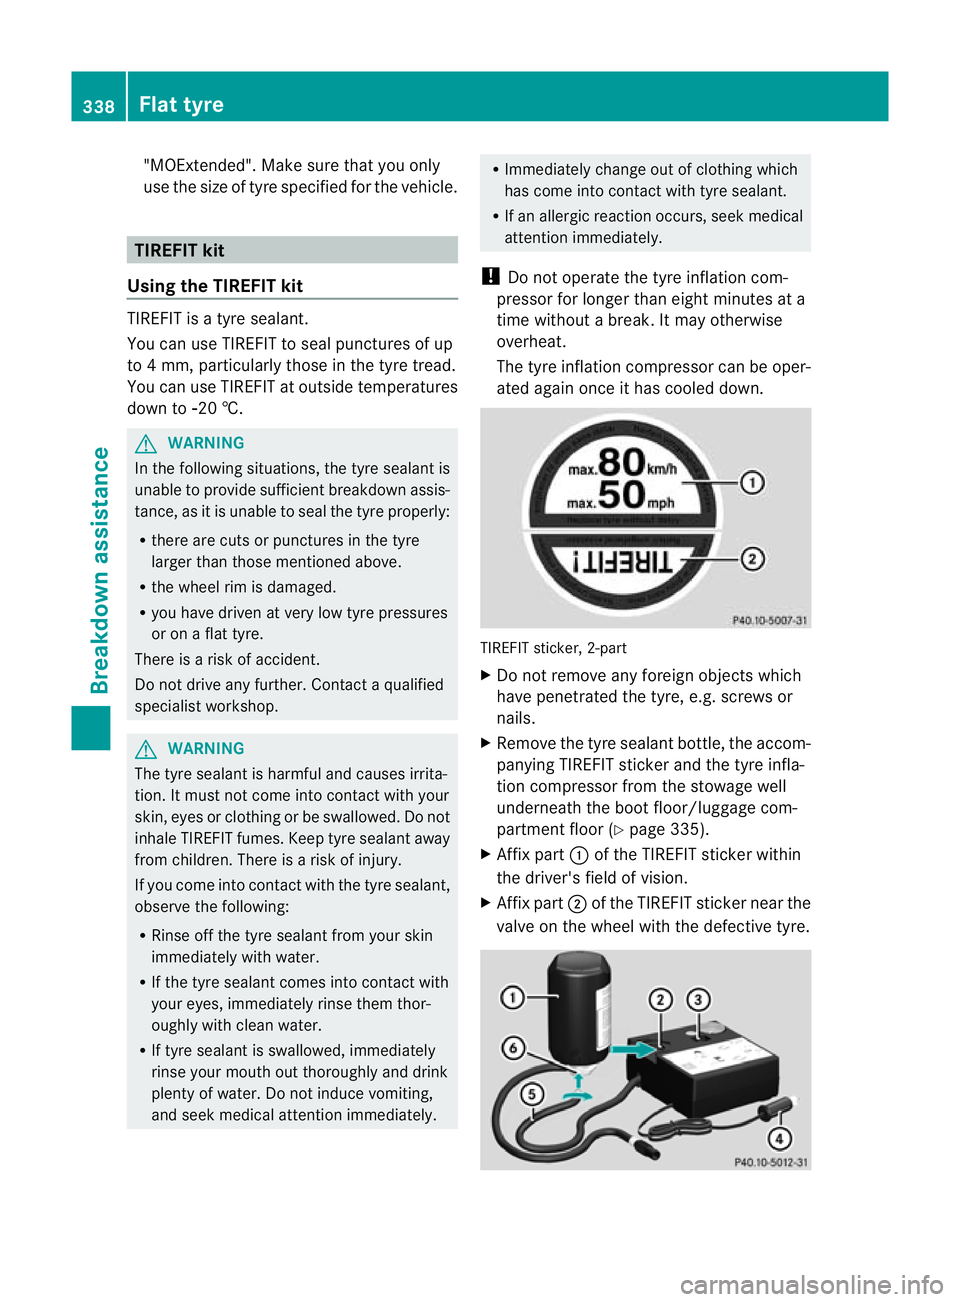
ated again once it has cooled down. TIREFIT sticker, 2-part
X
Do not remove any foreign objects which
have penetrated the tyre, e.g. screws or
nails.
X Remove the tyre sealant bottle, the accom-
panying TIREFIT sticker and the tyre infla-
tion compressor from the stowage well
underneath the boot floor/luggage com-
partment floor (Y page 335).
X Affix part :of the TIREFIT sticker within
the driver's field of vision.
X Affix part ;of the TIREFIT sticker near the
valve on the wheel with the defective tyre. 338
Flat tyreBreakdown assistance
Page 343 of 405
!
After use, excess tyre sealant may run out
of the filler hose. This could cause stains.
Therefore, place the filler hose in the plastic
bag which contained the TIREFIT kit. H
Environmental note
Have the used tyre sealant bottle disposed of
professionally, e.g. at aqualified specialist
workshop.
If a tyre pressure of 18 0kPa (1.8 bar/26 psi)
has been attained after five minutes:
X Switch off the tyre inflation compressor.
X Unscrew the filler hose from the valve of
the faulty tyre.
X Stow the tyre sealant bottle, the tyre infla-
tion compressor and the warning triangle.
X Pull away immediately.
The maximum speed for a tyre sealed with
tyre sealant is 80 km/h. The upper part of
the TIREFIT sticker must be affixed to the
instrument cluster in the driver's field of
vision.
X Stop after driving for approximately ten
minutes and check the tyre pressure with
the tyre inflation compressor.
The tyre pressure must now be at least
130 kPa (1.3 bar/19 psi). G
WARNING
If the required tyre pressure is not reached
after driving for a short period, the tyre is too
badly damaged. The tyre sealant cannot
repair the tyre in this instance. Damaged tyres
and a tyre pressure that is too low can signif-
icantly impair the vehicle's braking and driv-
ing characteristics .There is a risk of accident.
Do not continue driving. Contact a qualified
specialist workshop.
X Correct the tyre pressure if it is still at least
130 kPa (1.3 bar/19 psi) (see the fuel filler
flap for values).
X To increase the tyre pressure: switch on
the tyre inflation compressor. X
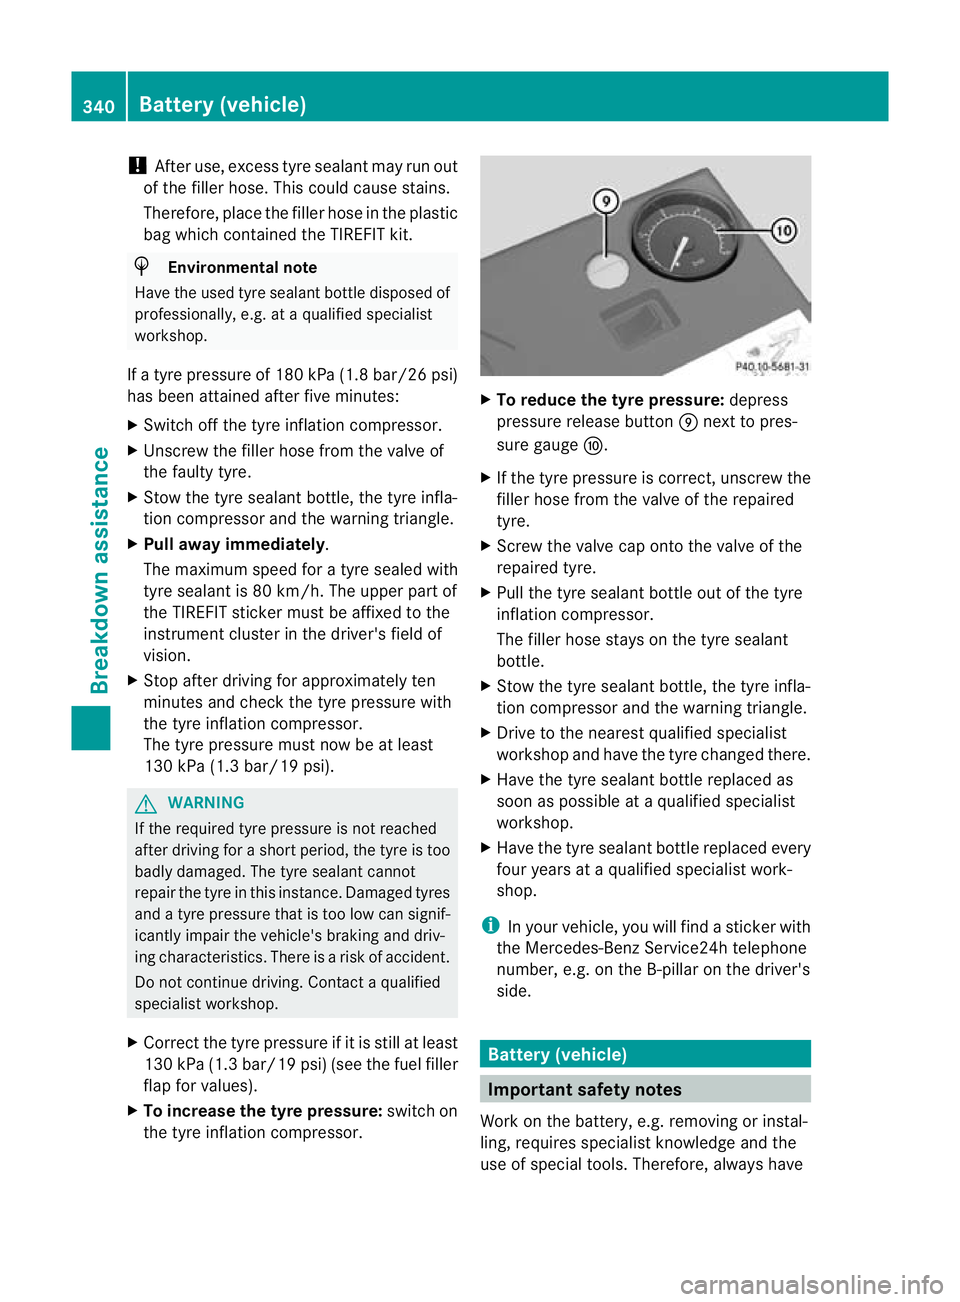
To reduce the tyre pressure: depress
pressure release button Enext to pres-
sure gauge F.
X If the tyre pressure is correct, unscrew the
filler hose from the valve of the repaired
tyre.
X Screw the valve cap onto the valve of the
repaired tyre.
X Pull the tyre sealant bottle out of the tyre
inflation compressor.
The filler hose stays on the tyre sealant
bottle.
X Stow the tyre sealant bottle, the tyre infla-
tion compressor and the warning triangle.
X Drive to the nearest qualified specialist
workshop and have the tyre changed there.
X Have the tyre sealant bottle replaced as
soon as possible at a qualified specialist
workshop.
X Have the tyre sealant bottle replaced every
four years at a qualified specialist work-
shop.
i In your vehicle, you will find a sticker with
the Mercedes-Ben zService24h telephone
number, e.g. on the B-pillar on the driver's
side. Battery (vehicle)
Important safety notes
Work on the battery, e.g. removing or instal-
ling, requires specialist knowledge and the
use of special tools. Therefore, always have 340
Battery (vehicle)Breakdown assistance
Page 358 of 405

other obstacles. If it is necessary to drive over
kerbs, speed humps or similar elevations, try
to do so slowly and at an obtuse angle. Oth-
erwise, the tyres, particularly the sidewalls,
may be damaged. Regular checking of wheels and tyres
G
WARNING
Damaged tyres can cause tyre inflation pres-
sure loss. As a result, you could lose control
of your vehicle. There is a risk of accident.
Check the tyres regularly for signs of damage
and replace any damaged tyres immediately.
Regularly check the wheels and tyres of your
vehicle for damage at least once a month, as
well as after driving off-road or on rough
roads. Damaged wheels can cause a loss of
tyre pressure. Pay particular attention to
damage such as:
R cuts in the tyres
R punctures
R tears in the tyres
R bulges on tyres
R deformation or severe corrosion on wheels
Regularly check the tyre tread depth and the
condition of the tread across the whole width
of all tyres ( Ypage 355). If necessary, turn
the front wheels to full lock in order to inspect
the inner side of the tyre surface.
All wheels must have a valve cap to protect
the valve against dirt and moisture. Do not fit
anything onto the valve other than the stand-
ard valve cap or other valve caps approved by
Mercedes-Benz for your vehicle. Do not fit any
other valve caps or systems, e.g. tyre pres-
sure monitoring systems.
Regularly check the pressure of all the tyres,
particularly prior to long trips. Adjust the tyre
pressure as necessary (Y page 357).
Observe the notes on the emergency spare
wheel (Y page 377). The service life of tyres depends on various
factors, including the following:
R
driving style
R tyre pressure
R tyre mileage Tyre tread
G
WARNING
Insufficient tyre tread will reduce tyre trac-
tion. The tyre is no longer able to dissipate
water. This means that on wet road surfaces,
the risk of aquaplaning increases, in particular
where speed is not adapted to suit the driving
conditions. There is a risk of accident.
If the tyre pressure is too high or too low, tyres
may exhibit different levels of wear at differ-
ent locations on the tyre tread. Thus, you
should regularly check the tread depth and
the condition of the tread across the entire
width of all tyres.
Minimum tyre tread depth for:
R summer tyres: 3 mm
R M+S tyres: 4 mm
For safety reasons, replace the tyres before
the legally prescribed limit for the minimum
tyre tread depth is reached.. Selecting, fitting and replacing tyres
R Only fit tyres and wheels of the same type
and make.
R Only fit tyres of the correct size onto the
wheels.
R Run in new tyres at moderate speeds for
the first 100 km. They only reach their full
performance after this distance.
R Do not drive with tyres which have too little
tread depth. This otherwise significantly
reduces the traction on wet roads (aqua-
planing).
R Replace the tyres after six years at the lat-
est, regardless of wear. Operation
355Wheels and tyres Z
Page 359 of 405
Observe the notes on the emergency spare
wheel (Y
page 377). MOExtended tyres (tyres with run-flat
characteristics)
With MOExtended tyres (tyres with run-flat
characteristics), you can continue to drive
your vehicle even if there is a total loss of
pressure in one or more tyres.
Only use MOExtended tyres in conjunction
with an activated tyre pressure loss warning
system or tyre pressure monitoring system
and only on tyres specifically inspected by
Mercedes-Benz.
Notes on driving with MOExtended tyres with
a flat tyre (Y page 337).
i Vehicles with MOExtended tyres are not
equipped with a TIREFIT kit at the factory.
It is therefore recommended that you addi-
tionally equip your vehicle with a TIREFIT kit
if you fit tyres that do not feature run-flat
characteristics, e.g. winter tyres. A TIREFIT
kit can be obtained from a qualified spe-
cialist workshop. Winter operation
General notes
Have your vehicle winterproofed at a qualified
specialist workshop at the onset of winter.
Observe the notes in the "Changing a wheel"
section (Y page 362). Driving with summer tyres
At temperatures below +7 †, summer tyres
lose elasticity and therefore traction and
braking power. Change the tyres on your vehi-
cle to M+S tyres. Using summer tyres at very
cold temperatures could cause tears to form,
thereby damaging the tyres permanently.
Mercedes-Benz cannot accept responsibility
for this type of damage. M+S tyres
G
WARNING
M+S tyres with a tyre tread depth of less than
4mma re not suitable for use in winter as they
do not provide sufficient traction. There is a
risk of accident.
M+S tyres with a tread depth of less than
4 mm must be replaced.
At temperatures below +7 †, use winter tyres
or all-seaso ntyres .Both types of tyre are
identified by the M+S marking.
Only winter tyres bearing the isnowflake
symbol in addition to the M+S marking pro-
vide the best possible grip in wintry road con-
ditions.
Only these tyres will allow driving safety sys-
tems such as ABS and ESP ®
to function opti-
mally in winter. These tyres have been devel-
oped specifically for driving in snow.
Use M+S tyres of the same make and tread
on all wheels to maintain safe handling char-
acteristics.
Always observe the maximum permissible
speed specified for the M+S tyres you have
fitted.
If you fit M+S tyres that have a lower maxi-
mum permissible speed than that of the vehi-
cle, affix a corresponding warning label in the
driver's field of vision. This can be obtained
at a qualified specialist workshop.
Under these circumstances, you should also
restrict the maximum speed of the vehicle
using permanent SPEEDTRONIC so that it
does not exceed the maximum permissible
speed for the M+S tyres (Y page 177).
When you have fitted the M+S tyres:
X Check the tyre pressures (Y page 357).
X Restart the tyre pressure loss warning sys-
tem (Y page 359).
X Restart the tyre pressure monitor
(Y page 361).
For more information on driving with an emer-
gency spare wheel, see (Y page 377).356
Winter operationWheels and tyres
Page 370 of 405

Tightening wheel bolts (example: vehicle with
emergency spare wheel)
X Turn the crank of the jack anti-clockwise
until the vehicle is once again standing
firmly on the ground.
X Place the jack to one side.
X Tighten the wheel bolts evenly in a cross-
wise pattern in the sequence indicated
(: toA). The tightening torque must be
130 Nm.
X Turn the jack back to its initial position.
X Stow the jack and the rest of the vehicle
tools in the boot again.
X Check the air pressure of the newly fitted
wheel and adjust accordingly.
Observe the recommended tyre pressure
(Y page 357).
i Vehicles with tire pressure control sys-
tem: all fitted wheels must be equipped
with functioning sensors. Wheel and tyre combinations
General notes
! For safety reasons, Mercedes-Benz rec-
ommends that you only use tyres and
wheels which have been approved by
Mercedes-Benz specifically for your vehi-
cle. These are specially adapted to the control
systems, such as ABS or ESP
®
and are
marked as follows:
R MO =Mercedes-BenzO riginal
R MOE =Mercedes-BenzO riginal Extended
(tyres featuring run-flat characteristics)
R MO1 =Mercedes-BenzO riginal (only cer-
tain AMG tyres)
Mercedes-Benz Original Extended tyres
may only be used on wheels that have been
specifically approved by Mercedes-Benz.
Only use tyres, wheels or accessories tes-
ted and approved by Mercedes-Benz. Cer-
tain characteristics, e.g. handling, vehicle
noise emissions or fuel consumption, may
otherwise be adversely affected. In addi-
tion, when driving with aload, tyre dimen-
sion variations could cause the tyres to
come into contact with the bodywork and
axle components.T his could result in dam-
age to the tyres or the vehicle.
Mercedes-Ben zaccepts no liability for
damage resulting from the use of tyres,
wheels or accessories othe rthan those tes-
ted and approved.
Further information about wheels, tyres
and approved combinations can be
obtained from any qualified specialist
workshop.
! Retreaded tyres are neither tested nor
recommended by Mercedes-Benz, since
previous damage cannot always be detec-
ted on retreaded tyres. As a result,
Mercedes-Ben zcannot guarantee vehicle
safety if retreaded tyres are fitted. Do not
fit used tyres if you have no information
about their previous usage.
! Large wheels :the lower the section width
for a certain wheel size, the lower the ride
comfort is on poor road surfaces. Roll com-
fort and suspension comfort are reduced
and the risk of damage to the wheels and
tyres as a result of driving over obstacles
increases. Wheel and tyre combinations
367Wheels and tyres Z