2012 MERCEDES-BENZ CLS COUPE towing
[x] Cancel search: towingPage 290 of 373
X
Remove th emobile phone bracke tfrom
sliding adapter :;see the separate mobile
phone bracket fitting instructions.
X Detach sliding adapter :using suitable
tool =and remove. Garage door opener
Important safety notes The HomeLink
®
garage door opener integra-
ted in the rear-view mirror allows you to oper-
ate up to three different door and gate sys-
tems.
i The garage door opener is only available
for certain countries. Observe the legal
requirements for each individualc ountry.
The HomeLink ®
garage door opener is
compatible with most European garage and
gate opener drives. More information on
HomeLink ®
and/or compatible products is
available from:
R at aq ualified specialised workshop
R the HomeLink ®
hotline
(0) 08000 466 354 65 (free of charge )or
+49 (0) 6838 907 277 (charges apply)
R on the Internet at:
http://www.homelink.com
Programming Programming buttons
G
WARNING
Only press the button on the integrated
garage door opene rifthere are no persons or
objects present within the sweep of the
garage door. Persons could otherwise be
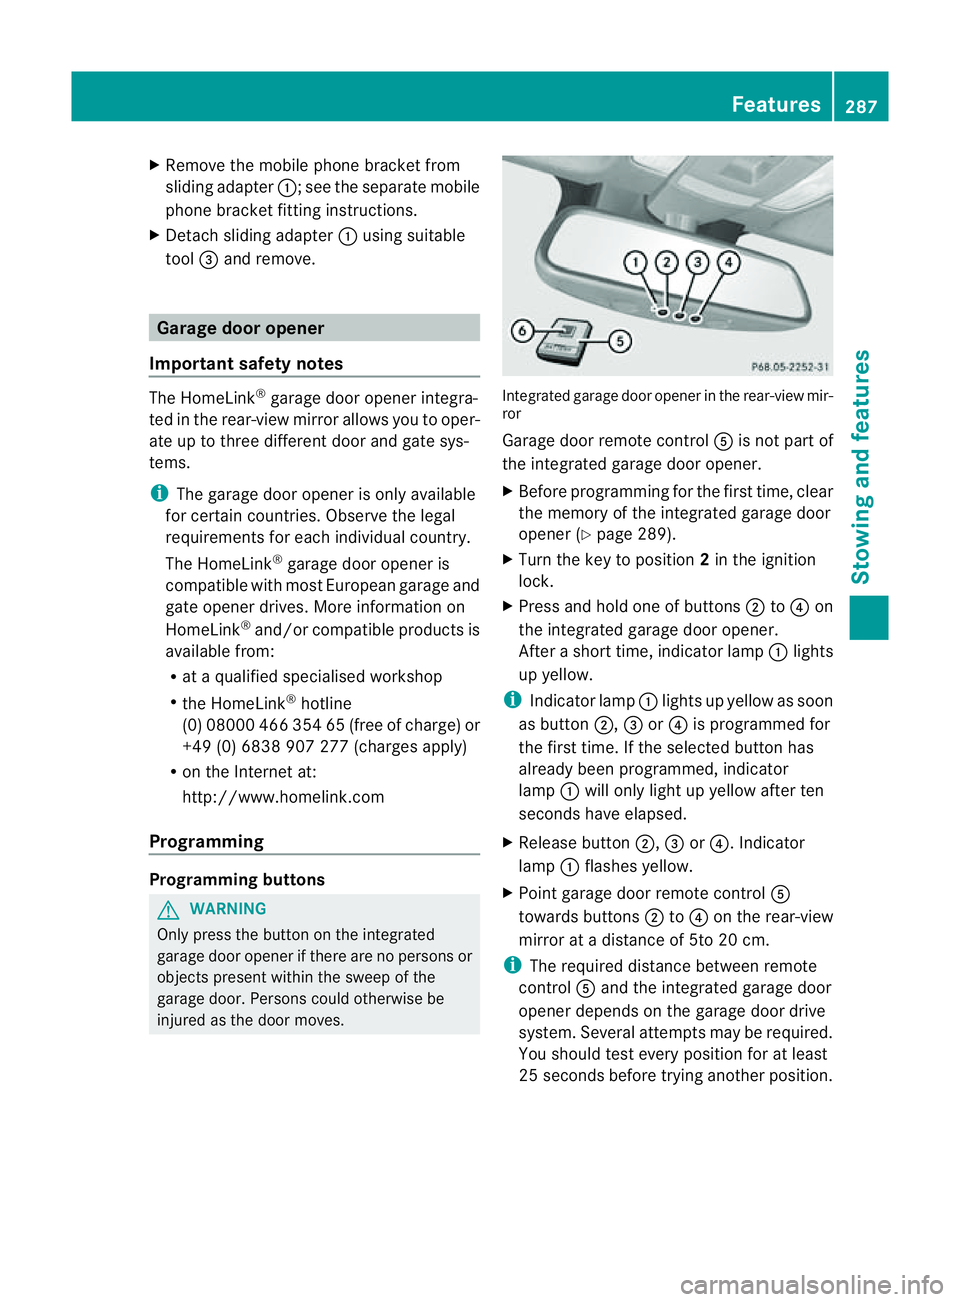
injured as the door moves. Integrated garage door opener in the rear-view mir-
ror
Garage door remote control Ais not part of
the integrated garage door opener.
X Before programming for the first time, clear
the memory of the integrated garage door
opener (Y page 289).
X Turn the key to position 2in the ignition
lock.
X Press and hold one of buttons ;to? on
the integrated garage door opener.
After ashort time, indicator lamp :lights
up yellow.
i Indicator lamp :lights up yellow as soon
as button ;,=or? is programmed for
the first time. If the selected button has
alreadyb een programmed, indicator
lamp :will only light up yellow after ten
seconds have elapsed.
X Release button ;,=or?.I ndicator
lamp :flashes yellow.
X Point garage door remote control A
towards buttons ;to? on the rear-view
mirror at adistance of 5to 20 cm.
i The required distance between remote
control Aand the integrated garage door
opener depends on the garage door drive
system. Several attemptsm ay be required.
You should test every positio nfor at least
25 seconds before trying another position. Features
287Stowing and features Z
Page 291 of 373
X
Press and hold button Bon remot econtrol
A until indicator lamp :lights up green.
If indicator lamp :lights up green or
flashes, then programming has been suc-
cessful.
X Release button Bof garage door drive
remote control A.
X If indicator lamp :lights up red: repeat
the programming procedure for the corre-
sponding button on the rear-view mirror.
When doing so, vary the distance between
remote control Aand the rear-view mirror.
i If the indicator lamp flashes green after
successful programming, the garage door
system is using arolling code. After pro-
gramming, you must synchronise the
garage door opener integrated in the rear-
view mirror with the receiver of the garage
door system.
Synchronising the rolling code
Your vehicle must be within range of the
garage door or exterior gate drive. Make sure
that neither your vehicle nor any persons/
object sare present within the sweep of the
door or gate.
Observe the safety notes when performing
the rolling code synchronisation.
X Turn the key to position 2in the ignition
lock.
X Press the programming button of the door
or gate drive (see the door or gate drive
operating instructions, e.g. under "Pro-
gramming of additional remote controls").
i Usually ,you now have 30seconds to ini-
tiate the next step.
X Press previously programmed button ;,
= or? of the integrated garage door
opener until the door closes.
The rolling code synchronisation is then
complete. Problems when programming
If you have problems when programming the
integrated garage door opener, please note
the following:
R
Check the transmitter frequency of garage
door drive remote control A.This can usu-
ally be found on the back of the remote
control.
R Replace the batteries in garage door
remote control A.This increases the like-
lihood that garage door remote control A
will transmit astronga nd precise signal to
the integrated garage door opener in the
rear-view mirror.
R When programming, hold remote control
A at varying distances and angles from the
button which you are programming. Try var-
ious angles at adistance between 5and
30 cm or at the same angle but at varying
distances.
R If there is another remote control for the
same garage door drive, perform the pro-
gramming steps again using this remote
control. Before performing these steps,
make sure that new batteries have been
fitted in garage door drive remote control
A.
R Note that some remote controls transmit
only for alimited period (the indicator lamp
on the remote control goes out). Press but-
ton Bon remote control Aagain before
transmission ends.
R Align the aerial cable of the garage door
opener unit. This can improve signal recep-
tion/transmission.
Opening or closing the garage door Once programmed, the integrated garage
door opener will assume the function of the
garage door system's remote control. Please
also read the operating instructions for the
garage door system.288
FeaturesStowing and features
Page 292 of 373
X
Turn the key to position 2in the ignition
lock.
X Press button ;,=or? which you have
programmed to operate the garage door.
Garage door system with afixed code: indi-
cator lamp :lights up green.
Garage door system with arolling code:
indicator lamp :flashes green.
i The transmitter will transmit asignal for
as long as the button is pressed. The trans-
mission is halted after amaximum of ten
seconds and indicator lamp :lights up
yellow. Press button ;,=or? again if
necessary.
Clearing the memory X
Turn the key to position 2in the ignition
lock.
X Press buttons ;and ?.
The indicator lamp lights up yellow.
X Press and hold buttons ;and ?until the
indicator lamp turns green.
i Make sure that you clear the memory of
the integrated garage door opener before
selling the vehicle.
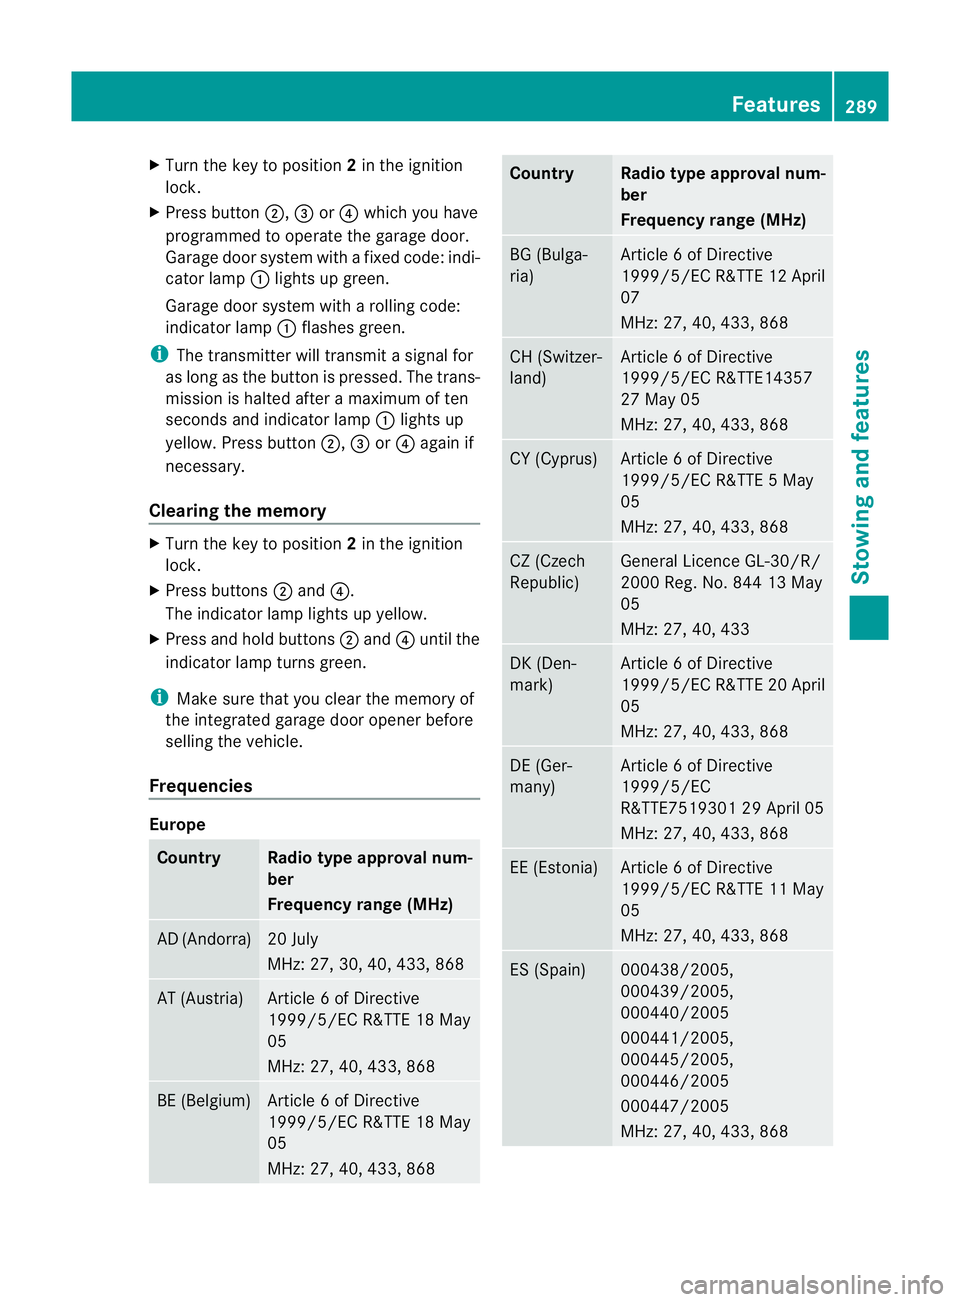
Frequencies Europe
Country Radio typea
pproval num-
ber
Frequency range (MHz) AD (Andorra) 20 July
MHz: 27, 30, 40, 433, 868
AT (Austria) Article
6ofDirective
1999/5/EC R&TTE 18 May
05
MHz: 27, 40, 433, 868 BE (Belgium) Article
6ofDirective
1999/5/EC R&TTE 18 May
05
MHz: 27, 40, 433, 868 Country Radio typea
pproval num-
ber
Frequency range (MHz) BG (Bulga-
ria) Article
6ofDirective
1999/5/EC R&TTE 12 April
07
MHz: 27, 40, 433, 868 CH (Switzer-
land) Article
6ofDirective
1999/5/EC R&TTE14357
27 May 05
MHz: 27, 40, 433, 868 CY (Cyprus) Article
6ofDirective
1999/5/EC R&TTE 5May
05
MHz: 27, 40, 433, 868 CZ (Czech
Republic) General Licenc
eGL-30/R/
2000 Reg. No. 844 13 May
05
MHz: 27, 40, 433 DK (Den-
mark) Article
6ofDirective
1999/5/EC R&TTE 20 April
05
MHz: 27, 40, 433, 868 DE (Ger-
many) Article
6ofDirective
1999/5/EC
R&TTE751930129A pril 05
MHz: 27, 40, 433, 868 EE (Estonia) Article
6ofDirective
1999/5/EC R&TTE 11 May
05
MHz: 27, 40, 433, 868 ES (Spain) 000438/2005,
000439/2005,
000440/2005
000441/2005,
000445/2005,
000446/2005
000447/2005
MHz: 27, 40, 433, 868 Features
289Stowing and features Z
Page 293 of 373
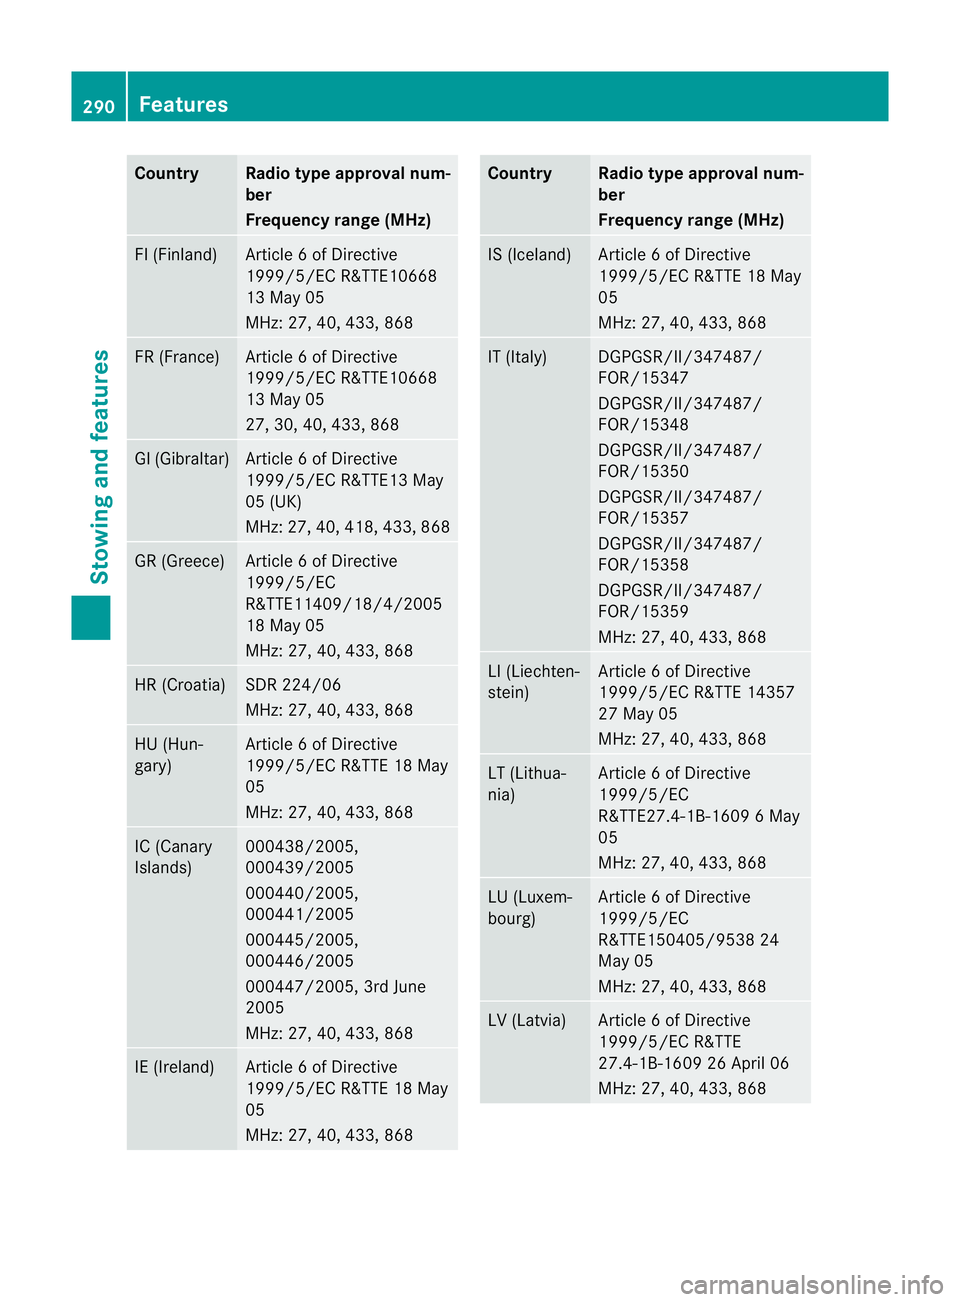
Country Radio type approval num-
ber
Frequency range (MHz)
FI (Finland) Article
6ofDirective
1999/5/E CR&TTE10668
13 May 05
MHz :27,40 ,433 ,868 FR (France) Article
6ofDirective
1999/5/E CR&TTE10668
13 May 05
27 ,30,40 ,433 ,868 GI (Gibraltar) Article
6ofDirective
1999/5/E CR&TTE1 3May
05 (UK)
MHz :27, 40 ,418, 433, 868 GR (Greece) Article
6ofDirective
1999/5/EC
R&TTE11409/18/4/2005
18 May 05
MHz: 27, 40, 433, 868 HR (Croatia) SDR 224/06
MHz: 27, 40, 433, 868
HU (Hun-
gary) Article
6ofDirective
1999/5/EC R&TT E18May
05
MHz: 27, 40, 433, 868 IC (Canary
Islands) 000438/2005,
000439/2005
000440/2005,
000441/2005
000445/2005,
000446/2005
000447/2005, 3rd June
2005
MHz: 27, 40, 433, 868
IE (Ireland) Article
6ofDirective
1999/5/EC R&TT E18May
05
MHz: 27, 40, 433, 868 Country Radio type approval num-
ber
Frequency range (MHz)
IS (Iceland) Article
6ofDirective
1999/5/EC R&TT E18May
05
MHz: 27, 40, 433, 868 IT (Italy) DGPGSR/II/347487/
FOR/15347
DGPGSR/II/347487/
FOR/15348
DGPGSR/II/347487/
FOR/15350
DGPGSR/II/347487/
FOR/15357
DGPGSR/II/347487/
FOR/15358
DGPGSR/II/347487/
FOR/15359
MHz: 27, 40, 433, 868
LI (Liechten-
stein) Article
6ofDirective
1999/5/EC R&TT E14357
27 May 05
MHz: 27, 40, 433, 868 LT (Lithua-
nia) Article
6ofDirective
1999/5/EC
R&TTE27.4-1B-1609 6May
05
MHz: 27, 40, 433, 868 LU (Luxem-
bourg) Article
6ofDirective
1999/5/EC
R&TTE150405/9538 24
May 05
MHz: 27, 40, 433, 868 LV (Latvia) Article
6ofDirective
1999/5/EC R&TTE
27.4-1B-1609 26 April 06
MHz: 27, 40, 433, 868 290
FeaturesStowing and features
Page 294 of 373
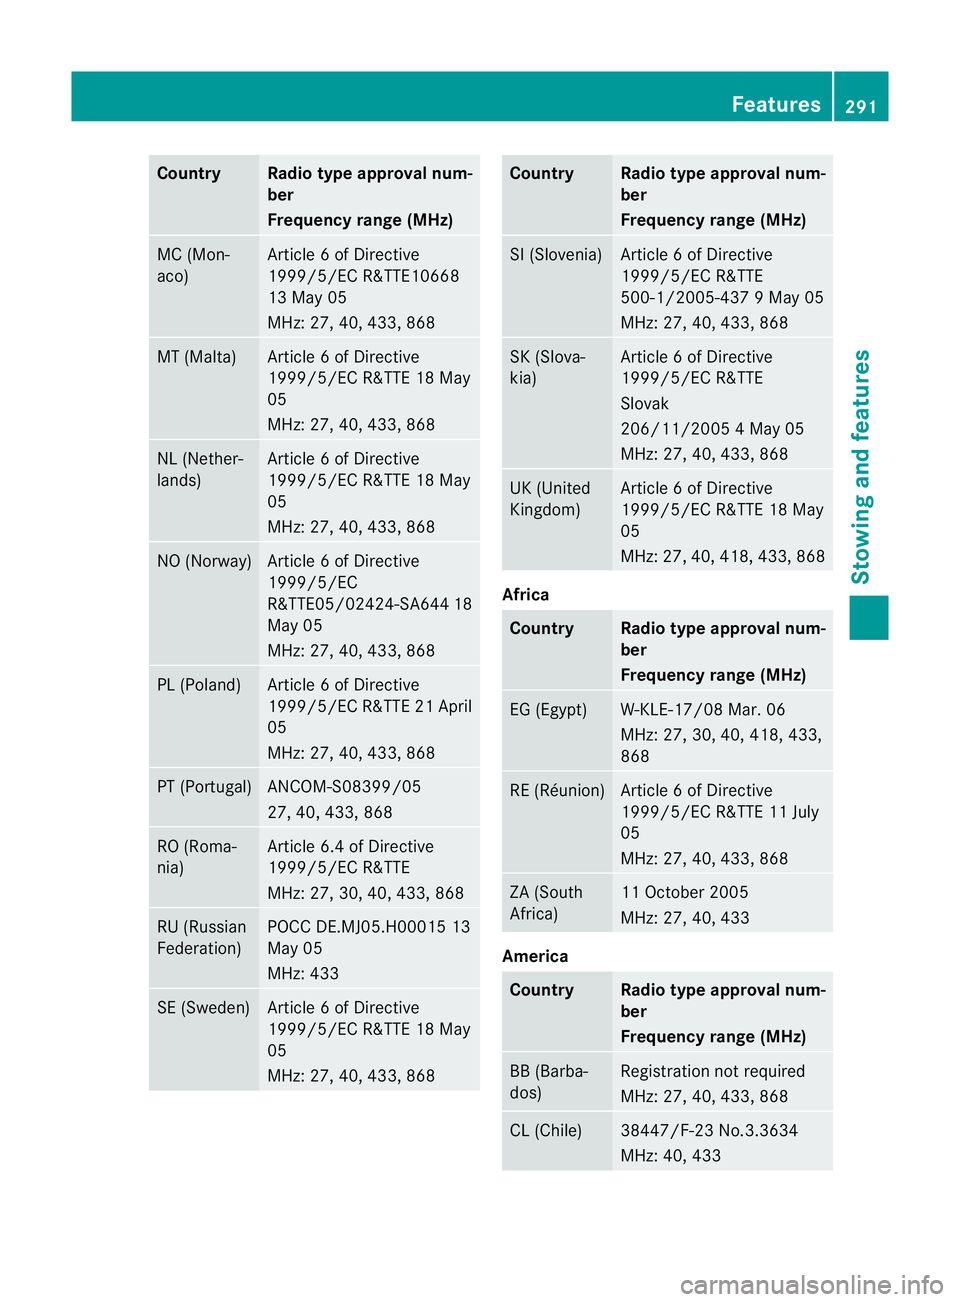
Country Radio type approval num-
ber
Frequency range (MHz)
MC (Mon-
aco) Article
6ofDirective
1999/5/E CR&TTE10668
13 May 05
MHz :27,40 ,433 ,868 MT (Malta) Article
6ofDirective
1999/5/E CR&TT E18M ay
05
MHz :27,40 ,433 ,868 NL (Nether-
lands) Article
6ofDirective
1999/5/E CR&TT E18M ay
05
MHz :27,40 ,433 ,868 NO (Norway) Article
6ofDirective
1999/5/EC
R&TTE05/02424-SA64 418
May 05
MHz: 27, 40, 433, 868 PL (Poland) Article
6ofDirective
1999/5/ECR &TTE 21 April
05
MHz: 27, 40, 433, 868 PT (Portugal) ANCOM-S08399/05
27, 40, 433, 868
RO (Roma-
nia) Article 6.4 of Directive
1999/5/EC R&TTE
MHz: 27, 30, 40, 433, 868
RU (Russian
Federation) POC
CDE.MJ05.H00015 13
May 05
MHz: 433 SE (Sweden) Article
6ofDirective
1999/5/EC R&TTE 18 May
05
MHz: 27, 40, 433, 868 Country Radio type approval num-
ber
Frequency range (MHz)
SI (Slovenia) Article
6ofDirective
1999/5/EC R&TTE
500-1/2005-437 9May 05
MHz: 27, 40, 433, 868 SK (Slova-
kia) Article
6ofDirective
1999/5/EC R&TTE
Slovak
206/11/2005 4May 05
MHz: 27, 40, 433, 868 UK (United
Kingdom) Article
6ofDirective
1999/5/EC R&TTE 18 May
05
MHz: 27, 40, 418, 433, 868 Africa
Country Radio type approval num-
ber
Frequency range (MHz)
EG (Egypt) W-KLE-17/08 Mar
.06
MHz: 27, 30, 40, 418, 433,
868 RE (Réunion) Article
6ofDirective
1999/5/EC R&TTE 11 July
05
MHz: 27, 40, 433, 868 ZA (South
Africa) 11 Octobe
r2005
MHz: 27, 40, 433 America
Country Radio type approval num-
ber
Frequency range (MHz)
BB (Barba-
dos) Registratio
nnot required
MHz: 27, 40, 433, 868 CL (Chile) 38447/F-23 No.3.3634
MHz: 40, 433 Features
291Stowing and features Z
Page 295 of 373
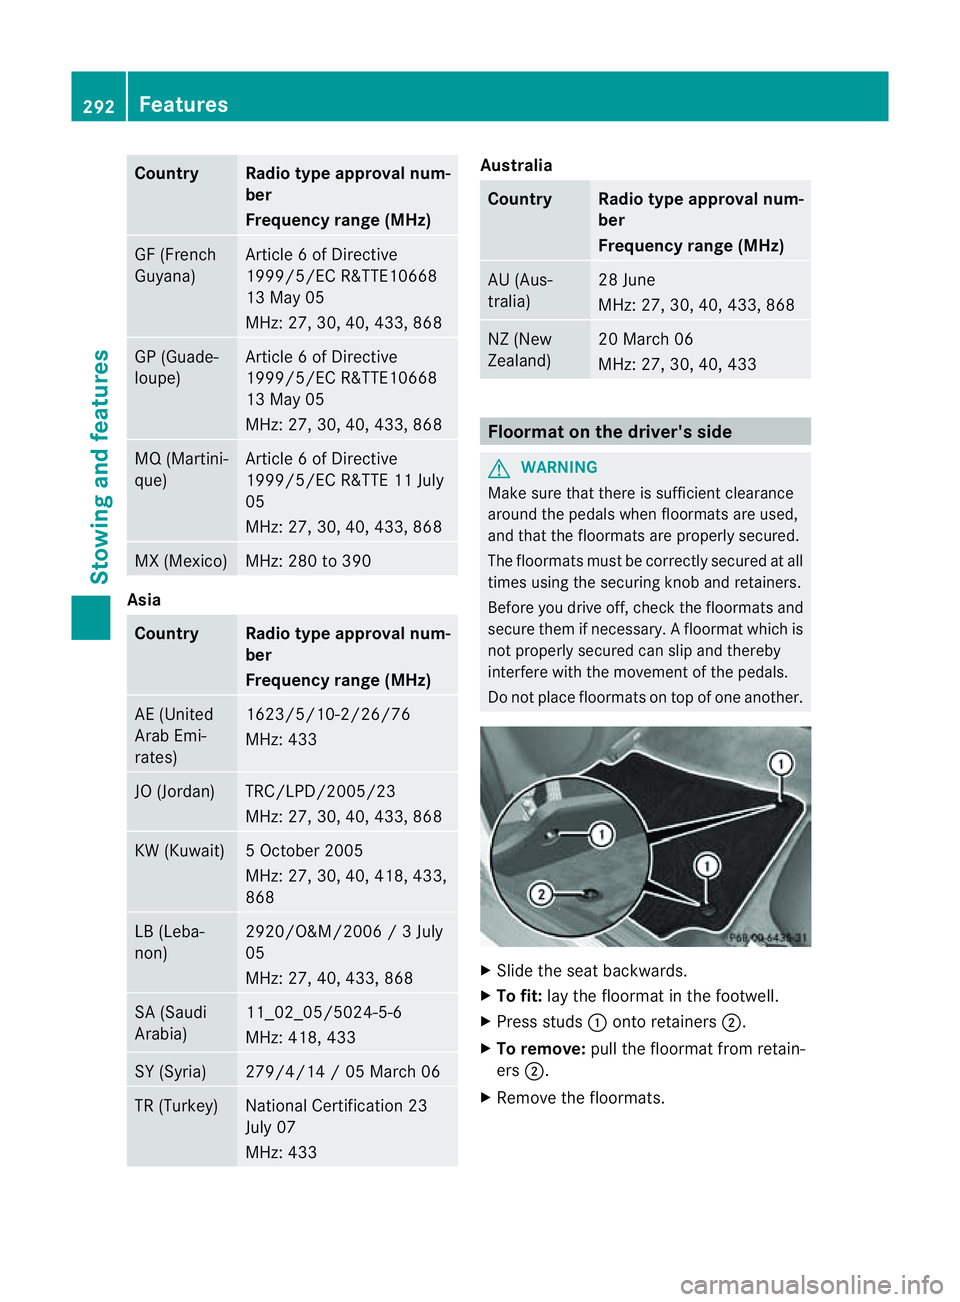
Country Radio type approval num-
ber
Frequency range (MHz)
GF (French
Guyana) Article
6ofDirective
1999/5/E CR&TTE10668
13 May 05
MHz :27,30 ,40, 433, 868 GP (Guade-
lo
up e) Article
6ofDirective
1999/5/EC R&TTE10668
13 May 05
MHz: 27, 30, 40, 433, 868 MQ (Martini-
que) Article
6ofDirective
1999/5/EC R&TT E11July
05
MHz: 27, 30, 40, 433, 868 MX (Mexico) MHz: 280 to 390
Asia
Country Radio type approval num-
ber
Frequency range (MHz)
AE (United
Arab Emi-
rates) 1623/5/10-2/26/76
MHz: 433
JO (Jordan) TRC/LPD/2005/23
MHz: 27, 30, 40, 433, 868
KW (Kuwait) 5O
ctober 2005
MHz: 27, 30, 40, 418, 433,
868 LB (Leba-
non) 2920/O&M/2006
/3July
05
MHz: 27, 40, 433, 868 SA (Saudi
Arabia) 11_02_05/5024-5-6
MHz: 418, 433
SY (Syria) 279/4/14
/05March 06 TR (Turkey) National Certification 23
July 07
MHz: 433 Australia
Country Radio type approval num-
ber
Frequency range (MHz)
AU (Aus-
tralia) 28 June
MHz: 27, 30, 40, 433, 868
NZ (New
Zealand) 20 March 06
MHz: 27, 30, 40, 433
Floormat on the driver's side
G
WARNING
Make sure that there is sufficient clearance
around the pedalsw henf loormats are used,
and that the floormats are properly secured.
The floormats must be correctly secured at all
times using the securing knob and retainers.
Before you drive off ,chec kthe floormats and
secure them if necessary. Afloormat which is
not properly secured can slip and thereby
interfere with the movemen tofthe pedals.
Do not place floormats on top of one another. X
Slide the seat backwards.
X To fit: lay the floormat in the footwell.
X Press studs :onto retainers ;.
X To remove: pull the floormat from retain-
ers ;.
X Remove the floormats. 292
FeaturesStowing and features
Page 296 of 373
Retrofitte
danti-glare film
Retrofitted anti-glare fil monthe inside of the
windows can interferew ith radio/mobile
telephone reception. This is particularly the
case for conductive or metallic-coated films.
You can obtain information about anti-glare
film from aqualified specialist workshop. Features
293Stowing and features Z
Page 304 of 373
Special service requirements
Arduous operating condition
sorincreased
loads on the vehicle will require some service
work to be performed more often than for a
vehicle in normal use. Such arduousc ondi-
tions include regular city driving with frequent
intermediate stops and use in mountainous
terrain or on poor road surfaces.
For example, if the vehicle is used under ardu-
ous operating conditions, have air filters,
engine oil and oil filters changed frequently
and check the wheels often.F urther informa-
tion can be obtaine dataqualified specialist
workshop, e.g. aMercedes-Ben zService
Centre.
Driving abroad
An extensive Mercedes-BenzS ervice network
is also available in other countries. The
Service Hotline's curren ttelephone numbers
for use when you are abroad are to be found
in the "Mercedes-Benz Service24h" section
of the Service Booklet. Care
General notes
H
Environmental note
Dispose of empty packagin gand cleaning
cloth sinane nvironmentally responsible man-
ner.
! For cleanin gyour vehicle, do not use any
of the following:
R dry, rough or hard cloths
R abrasive cleanin gagents
R solvents
R cleanin gagents containin gsolvents
Do not scrub.
Do not touch the surfaces or protective
films with hard objects, e.g. aring or ice
scraper. You could otherwise scratch or
damage the surfaces and protective film. !
Do not park up the vehicle for an extended
period straight after cleanin git, particularly
after having cleaned the wheels with wheel
cleaner. Wheel cleaners could cause
increased corrosion of the brake discs and
brake pads/linings. For this reason, you
should drive for afew minutes after clean-
ing. Braking heats the brake discs and the
brake pads/linings, thus drying them. The
vehicle can then be parked up.
Regular care of your vehicle is acondition for
retaining the quality in the long term.
Use care product sand cleanin gagents rec-
ommended and approved by Mercedes-Benz. Washing the vehicle and cleaning the
paintwork
Automatic car wash G
WARNING
Braking efficiency is reduced after washing
the vehicle. This could cause an accident. For
this reason, following acar wash, drive with
particular care until the brakes are dry. G
WARNING
The vehicle is braked when the HOLD function
or DISTRONIC PLUS is activated. Therefore,
deactivat ethe HOLD function and DISTRONIC
PLUS before the vehicle is washed in an auto-
matic car wash.
! Make sure that:
R the side windows and sliding sunroof are
closed completely.
R the blower for the ventilation/heating is
switched off (OFF button is depressed).
R the windscreen wiper switch is at posi-
tion 0.
The vehicle could otherwise be damaged.
! In car washes with atowing mechanism,
make sure that the automatic transmission
is in transmission position N,otherwise the
vehicle could be damaged. Care
301Maintenance and care Z