2012 MERCEDES-BENZ CLS COUPE fuel
[x] Cancel search: fuelPage 33 of 373
Instrumen
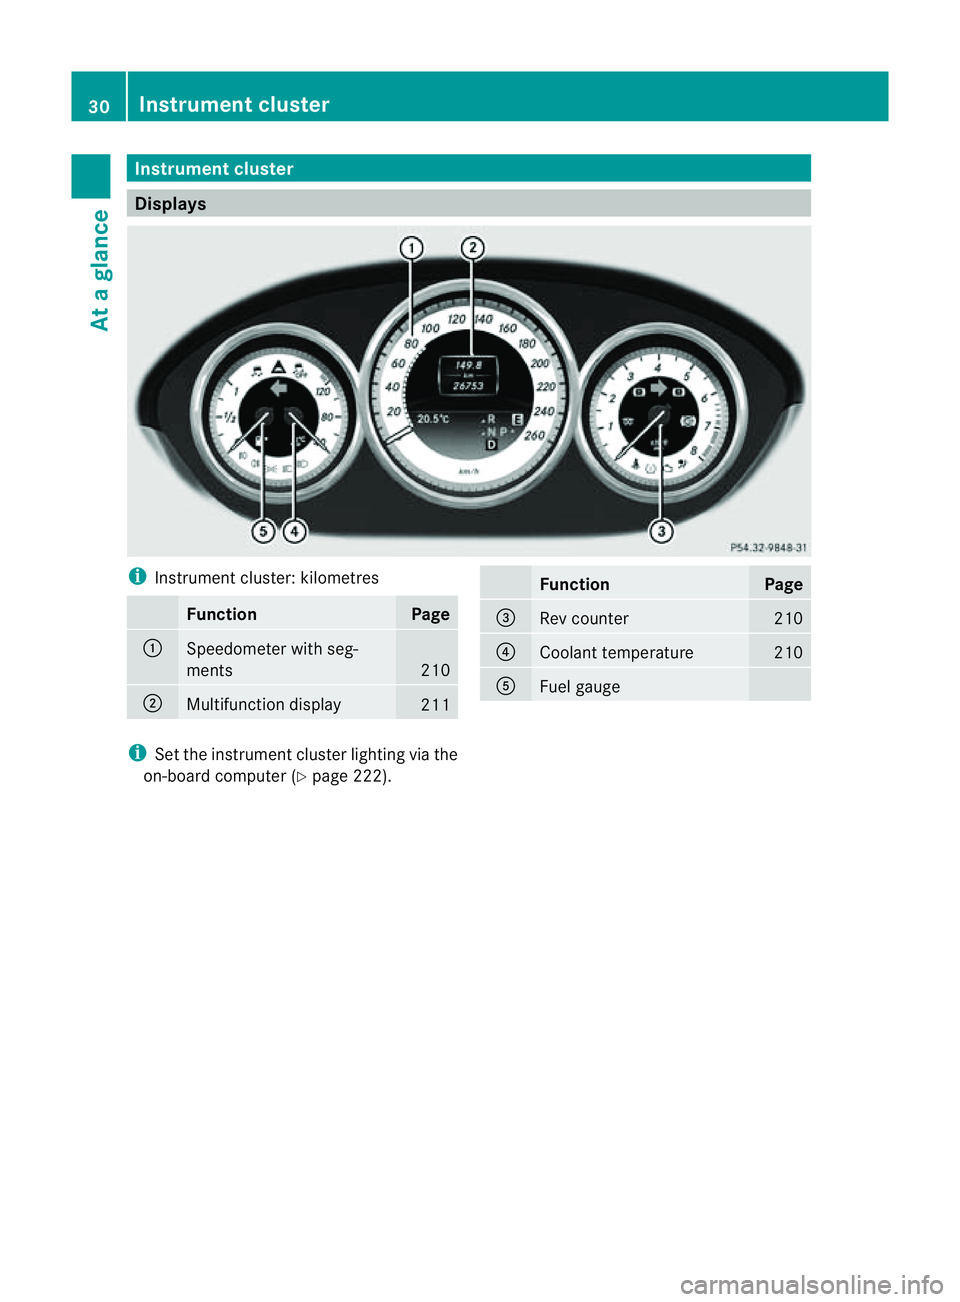
tcluster Displays
i
Instrument cluster: kilometres Function Page
:
Speedometer with seg-
ments
210
;
Multifunction display
211 Function Page
=
Rev counter 210
?
Coolant temperature 210
A
Fuel gauge
i
Set the instrumen tcluster lighting via the
on-board computer (Y page 222).30
Instrument clusterAt
ag lance
Page 34 of 373
i
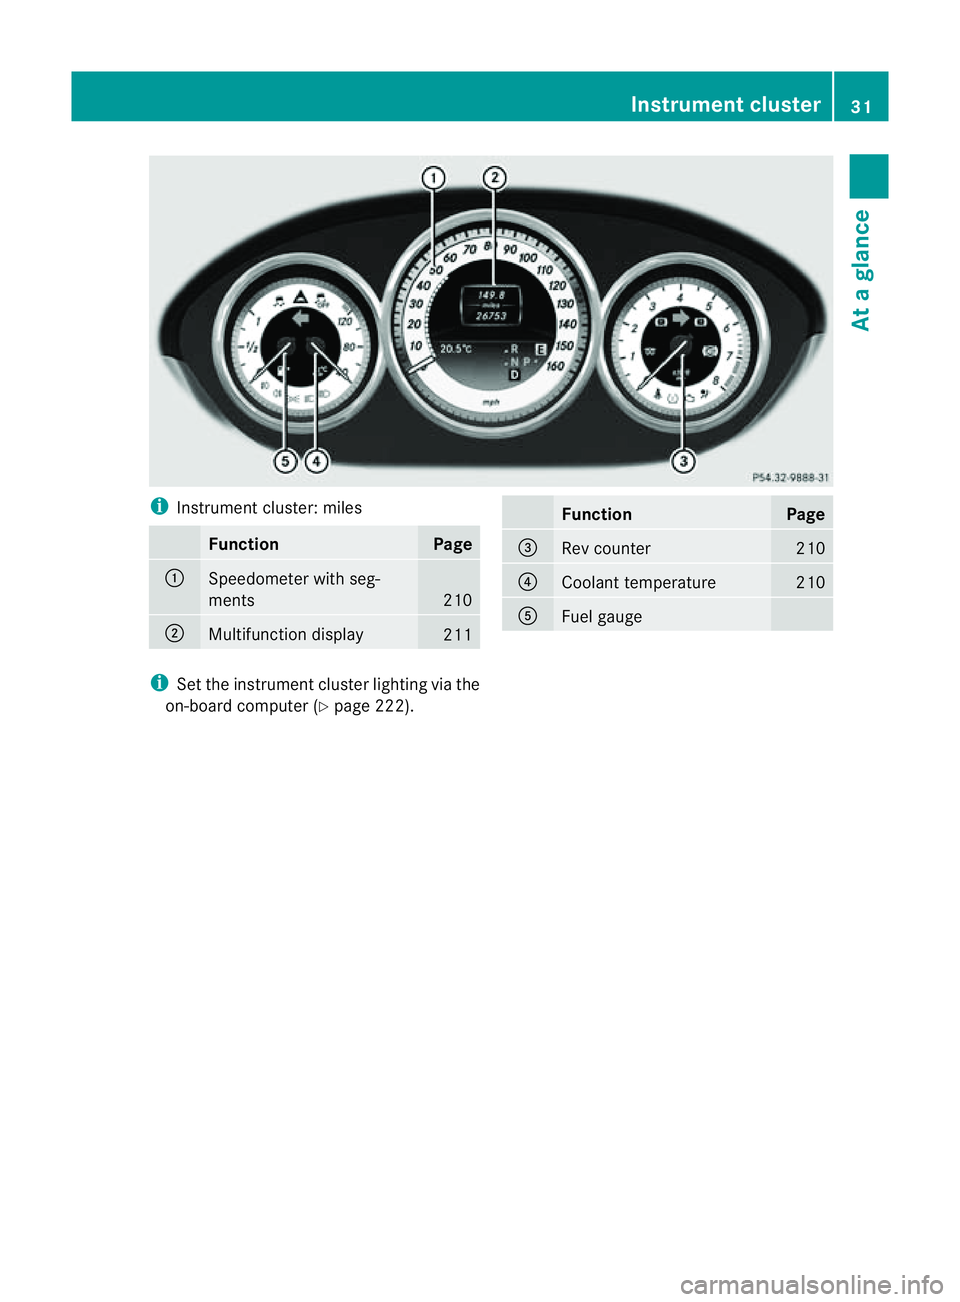
Instrument cluster: miles Function Page
:
Speedometer with seg-
ments
210
;
Multifunction display
211 Function Page
=
Rev counter 210
?
Coolant temperature 210
A
Fuel gauge
i
Set the instrument cluster lighting via the
on-board computer (Y page 222). Instrument cluster
31Atag lance
Page 35 of 373

Warning and indicator lamps
Function Page
:
÷
ESP® 263
M
SPORT handling
mode in AMG vehicles 264
;
·
Distance warning 269
=
å
ESP®
OFF 263
?
#!
Turn signals 113
A
J
Brakes (red) 260
B
J
Only for certain vehi-
cles: brakes (yellow) 260
C
!
ABS 261
D
6
SRS 266
E
;
Engine diagnostics 266
F
h
Tyre pressure monitor 270 Function Page
G
ü
Seat belt 259
H
%
Diesel engine: pre-
glow 143
÷
ESP®
in AMG vehicles 264
I
?
Coolant 267
J
K
Main-beam headlamp 113
K
L
Dipped-bea mhead-
lamps 111
L
T
Side lamps 112
M
R
Rear foglamp 112
N
N
This lamp has no func-
tion O
8
Reserve fuel 26732
Instrument clusterAt
ag lance
Page 80 of 373
Key functions
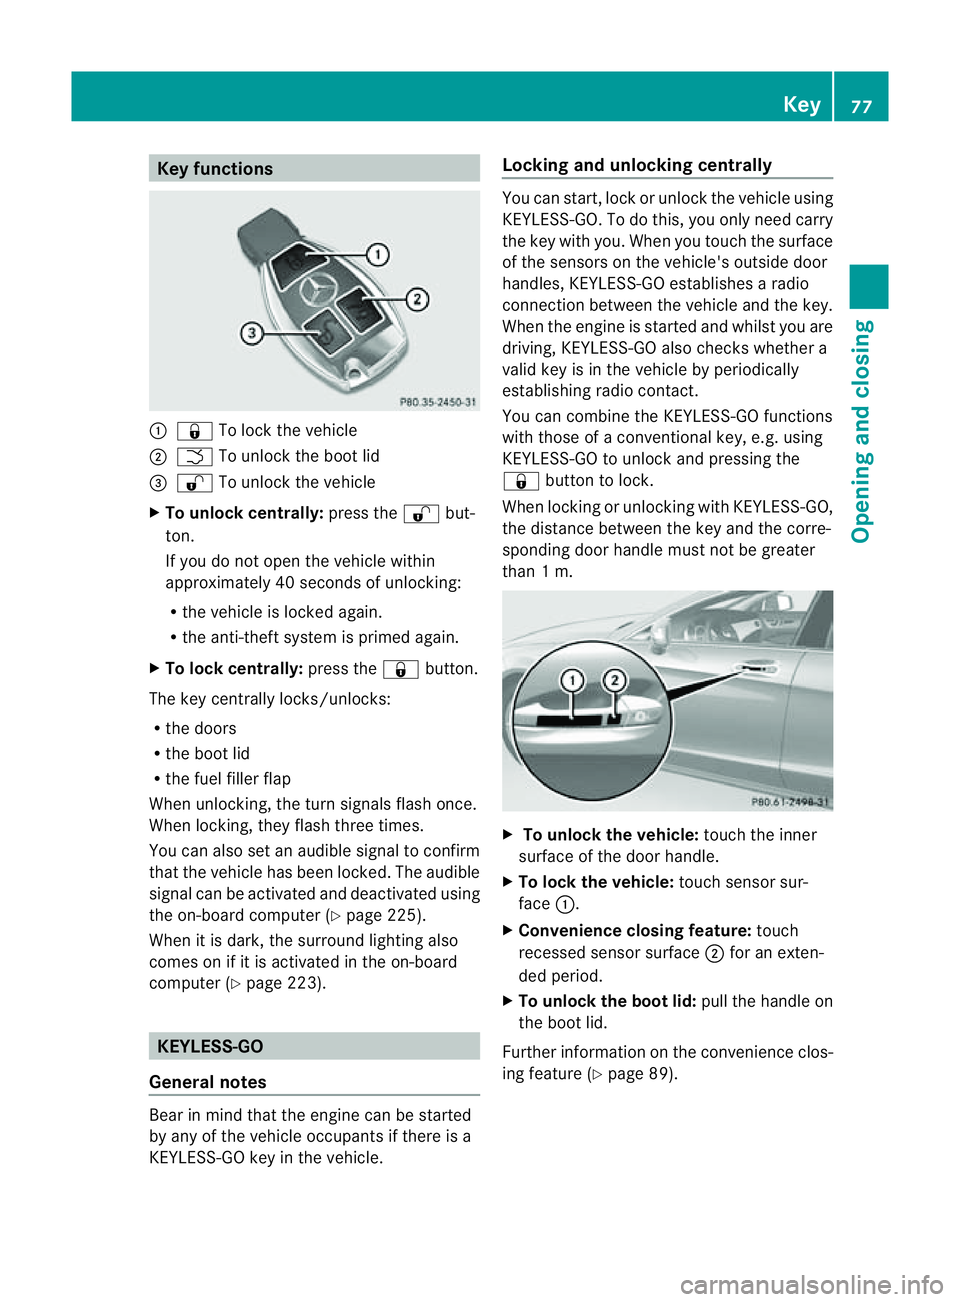
:
& To loc kthe vehicle
; F To unlock the boot lid
= % To unlock the vehicle
X To unlock centrally: press the%but-
ton.
If you do not open the vehicle within
approximately 40 seconds of unlocking:
R the vehicle is locked again.
R the anti-theft system is primed again.
X To lock centrally: press the&button.
The key centrally locks/unlocks:
R the doors
R the boot lid
R the fuel filler flap
When unlocking, the turn signals flash once.
When locking, they flash three times.
You can also set an audible signal to confirm
that the vehicle has been locked. The audible
signal can be activated and deactivated using
the on-board computer (Y page 225).
When it is dark, the surround lighting also
comes on if it is activated in the on-board
computer (Y page 223). KEYLESS-GO
General notes Bear in mind that the engine can be started
by any of the vehicle occupants if there is a
KEYLESS-GO key in the vehicle. Locking and unlocking centrally You can start, lock or unlock the vehicle using
KEYLESS-GO. To do this, you only need carry
the key with you. When you touch the surface
of the sensors on the vehicle's outside door
handles, KEYLESS-GO establishes
aradio
connection between the vehicle and the key.
When the engine is started and whilst you are
driving, KEYLESS-GO also checksw hether a
valid key is in the vehicle by periodically
establishing radio contact.
You can combine the KEYLESS-GO functions
with those of aconventional key, e.g. using
KEYLESS-GO to unlock and pressing the
& button to lock.
When locking or unlocking with KEYLESS-GO,
the distance between the key and the corre-
sponding door handle must not be greater
than 1m. X
To unlock the vehicle: touch the inner
surface of the door handle.
X To lock the vehicle: touch sensor sur-
face :.
X Convenience closing feature: touch
recessed sensor surface ;for an exten-
ded period.
X To unlock the boot lid: pull the handle on
the boot lid.
Further information on the convenience clos-
ing feature (Y page 89). Key
77Opening and closing Z
Page 81 of 373
Changing th
esettings of th elocking
system
You can chang ethe settings of th elocking
system. This mean stha tonlyt he driver' sdoor
and th efuel fille rflap are unlocked when the
vehicle is unlocked. This is useful if you fre-
quently travel on your own.
X To chang ethe setting: press and hold
down the %and& buttons on the
key simultaneously for approximately six
seconds until the battery chec klamp
flashes twice ( Ypage 79).
i If th esettin goft helockin gsystem is
changed within th esignal range of th evehi-
cle ,pressin gthe & or% button:
R locks or
R unlock sthe vehicle
The ke ynow function sasfollows:
X To unlock th edriver's door: pressthe
% buttononce.
X To unlock centrally: pressthe % but-
to nt wice.
X To lock centrally: pressthe & button.
The KEYLESS-GO function is changed as fol-
lows:
X To unlock th edriver's door: touch the
inner surface of th edoor handle on the
driver' sdoor.
X To unlock centrally: touch theinner sur-
fac eoft hedoor handle on th efront-
passenger door or th erear door.
X To lock centrally: touch theouter sensor
surface on on eofthedoor handles.
X To restor ethe factor ysettings: press
and hold down the %and& buttons
simultaneousl yfor approximately six sec-
onds until th ebattery check lamp flashes
twice (Y page 79). Emergency key element
General notes If th
evehicle can no longer be locke dor
unlocked wit hthe key, use th eemergency
ke ye lement.
If you use th eemergenc ykey element to
unlock and open the driver's door or the boot
lid, the anti-thef talarm system will be trig-
gered (Y page 71).
There are several ways to tur noff the alarm:
X To turn the alarm off with the key: press
the % or& button on the key.
or
X Insert the key into the ignition lock.
or
X To deactivate the alarm with KEYLESS-
GO: press the Start/Stop button in the igni-
tion lock. The key must be in the vehicle.
or
X Lock or unlock the vehicle using KEYLESS-
GO. The key must be outside the vehicle.
If you unlock the vehicle using the emergency
key element, the fuel filler fla pwilln ot be
unlocked automatically.
X To unlock the fuel filler flap: insert the
key into the ignition lock.
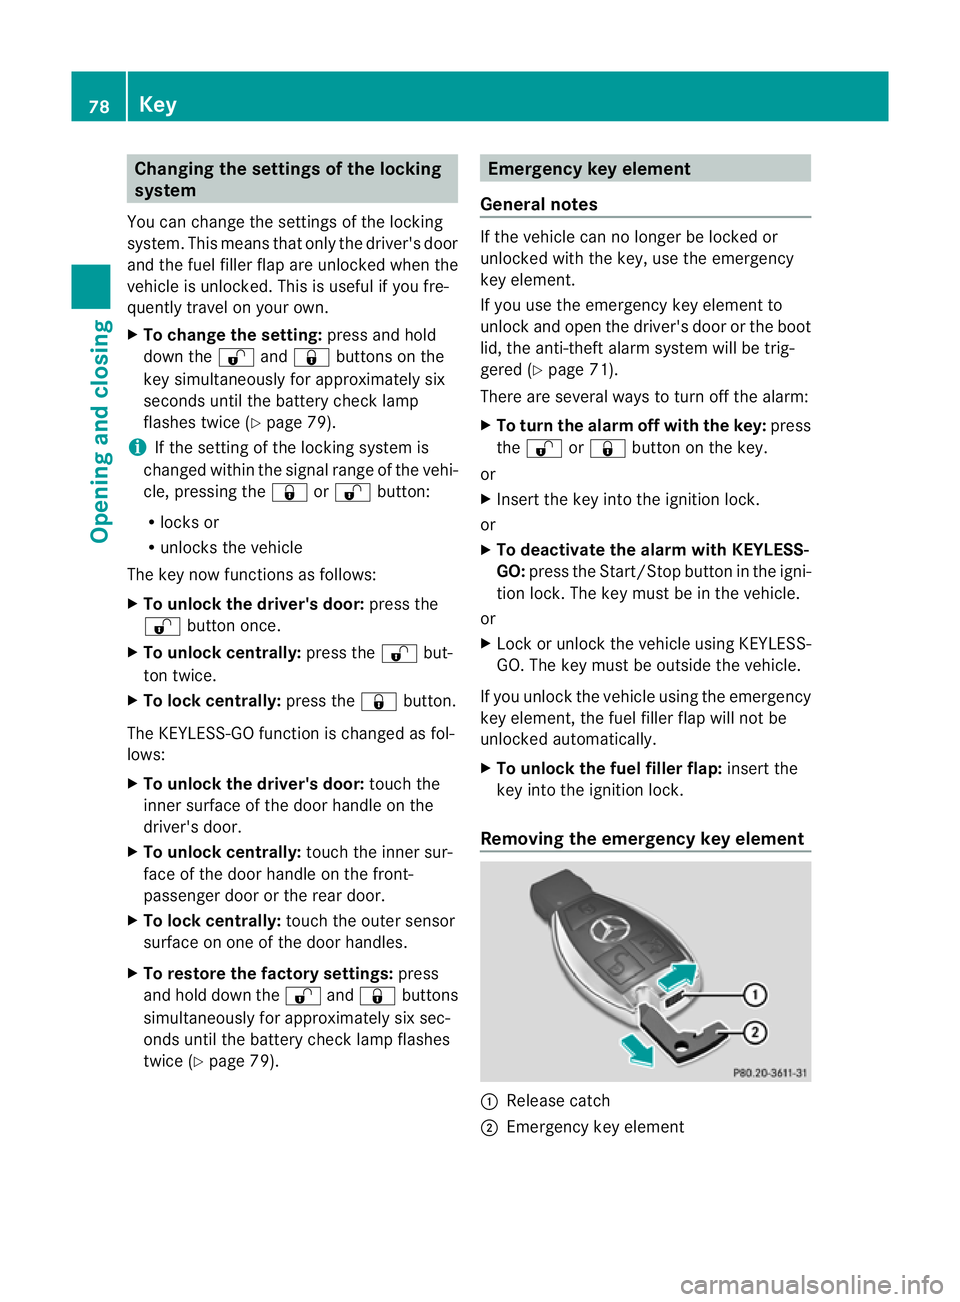
Removing the emergency key element :
Releas ecatch
; Emergency key element 78
KeyOpening and closing
Page 86 of 373
United Kingdom only:
if the vehicle has
been locked with the key or with KEYLESS-
GO, the double lock function is activated as
standard. It is then not possible to open the
doors from inside the vehicle. Deactivate the
interior motion senso r(Ypage 72) before you
lock the vehicle. The doors can then be
opened from the inside after the vehicle has
been locked from the outside. The anti-theft
alarm system is triggered if the door is
opened from the inside. Switc hoff the alarm
(Y page 71).
You can only open the rear doors from inside
the vehicle if they are not secured by the
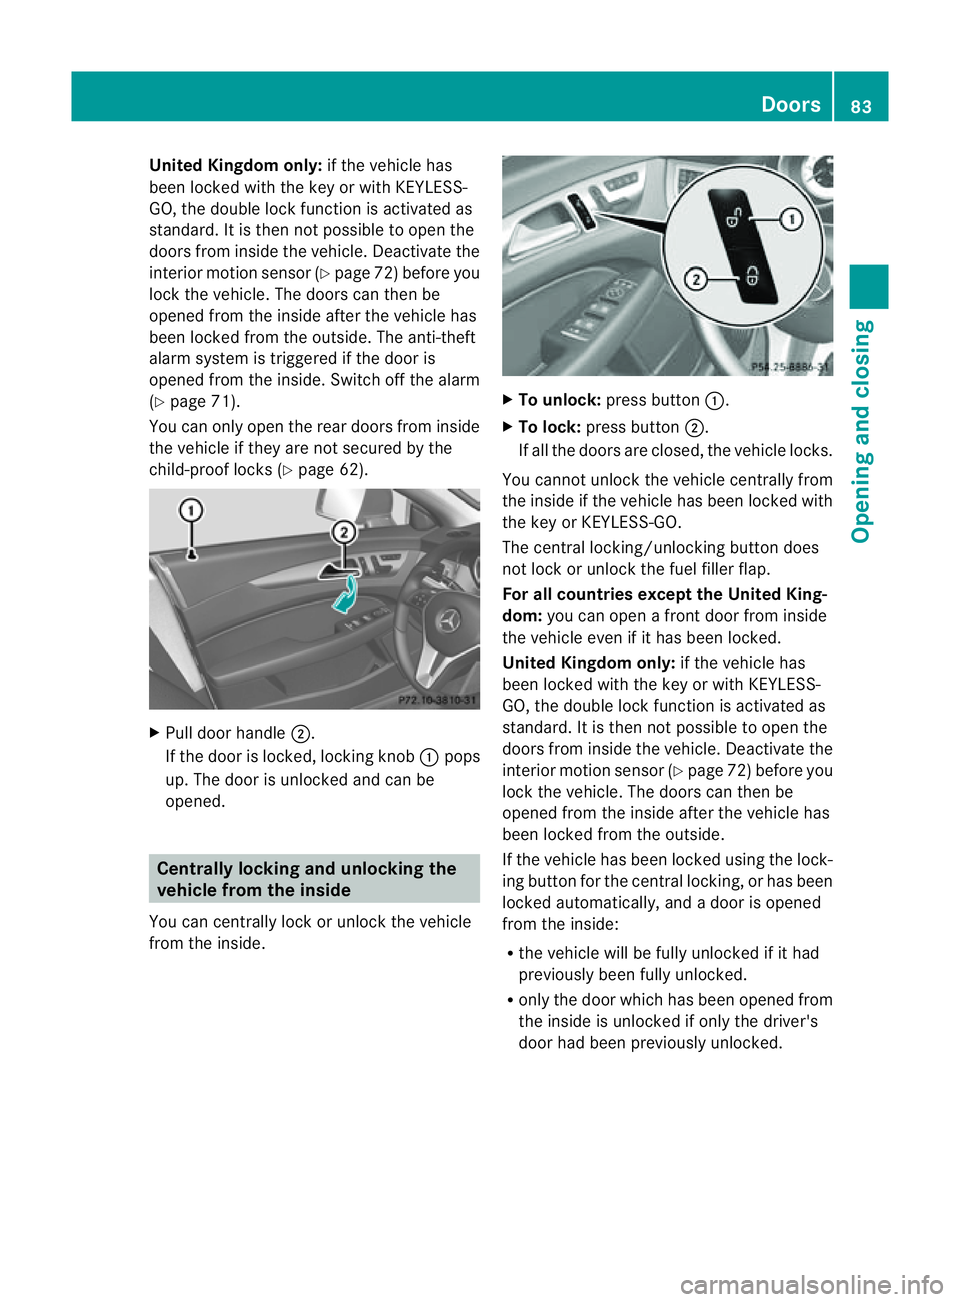
child-proof lock s(Ypage 62). X
Pull door handle ;.
If the door is locked, locking knob :pops
up. The door is unlocked and can be
opened. Centrally locking and unlocking the
vehicle from the inside
You can centrally lock or unlock the vehicle
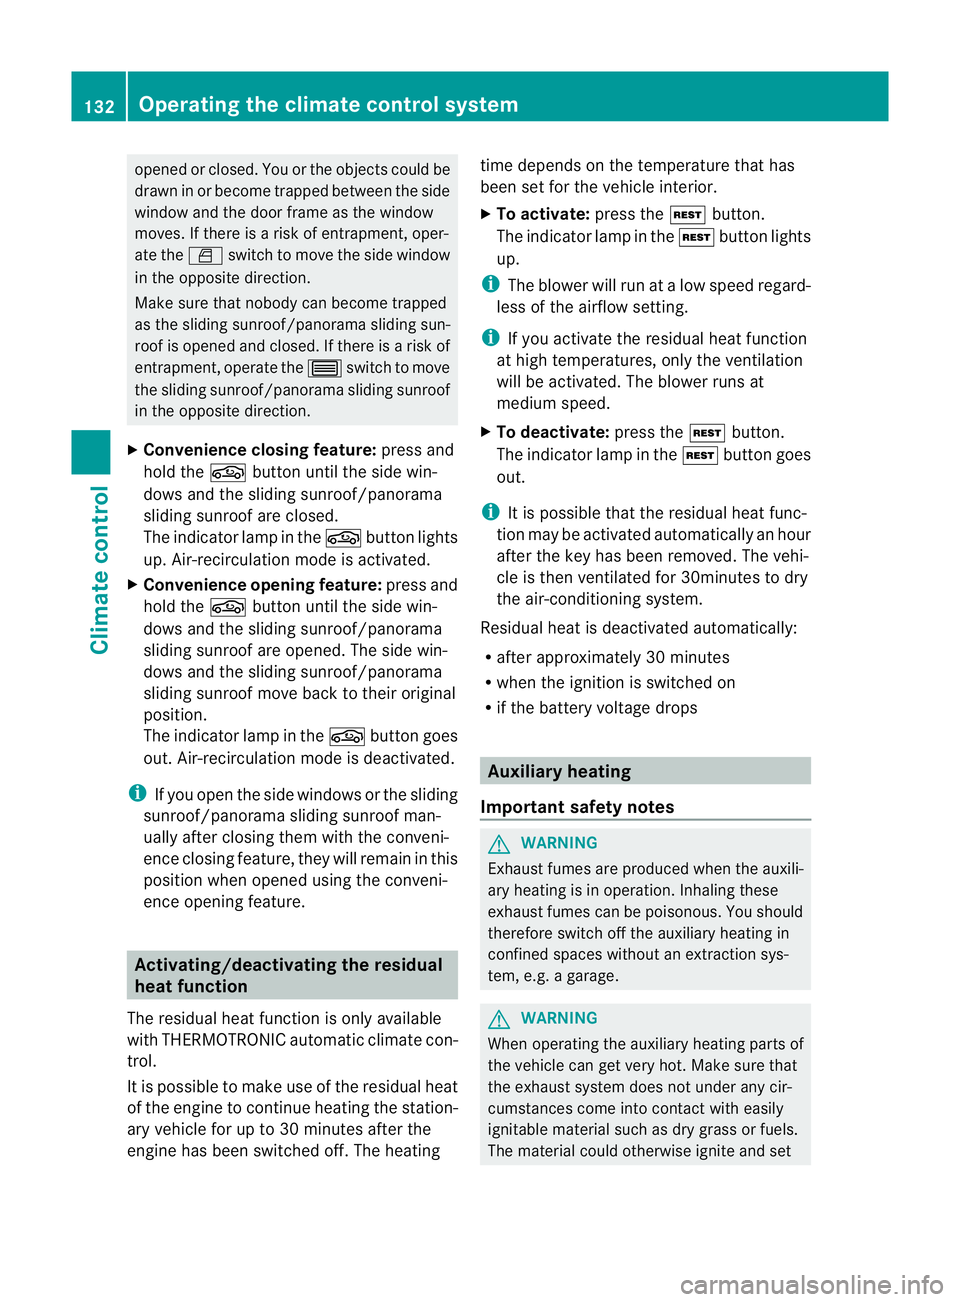
from the inside. X
To unlock: press button :.
X To lock: press button ;.
If all the doors are closed, the vehicle locks.
You cannot unlock the vehicle centrally from
the inside if the vehicle has been locked with
the key or KEYLESS-GO.
The central locking/unlocking button does
not lock or unlock the fuel filler flap.
For all countries except the United King-
dom: you can open afron tdoor from inside
the vehicle even if it has been locked.
United Kingdom only: if the vehicle has
been locked with the key or with KEYLESS-
GO, the double lock function is activated as
standard. It is then not possible to open the
doors from inside the vehicle. Deactivate the
interior motion senso r(Ypage 72) before you
lock the vehicle. The doors can then be
opened from the inside after the vehicle has
been locked from the outside.
If the vehicle has been locked using the lock-
ing button for the central locking, or has been
locked automatically, and adoor is opened
from the inside:
R the vehicle will be fully unlocked if it had
previously been fully unlocked.
R only the door which has been opened from
the inside is unlocked if only the driver's
door had been previously unlocked. Doors
83Opening and closing Z
Page 135 of 373
opened or closed. You or the object
scould be
drawn in or become trapped between the side
window and the door frame as the window
moves. If there is arisk of entrapment, oper-
ate the Wswitchtom ove the side window
in the opposit edirection.
Make sure that nobody can becom etrapped
as the slidin gsunroof/panorama slidin gsun-
roof is opened and closed. If there is arisk of
entrapment, operat ethe 3 switchtom ove
the slidin gsunroof/panorama slidin gsunroof
in the opposit edirection.
X Convenience closing feature: press and
hold the gbutton until the side win-
dows and the sliding sunroof/panorama
sliding sunroof are closed.
The indicator lamp in the gbutton lights
up. Air-recirculation mode is activated.
X Convenience opening feature: press and
hold the gbutton until the side win-
dows and the sliding sunroof/panorama
sliding sunroof are opened. The side win-
dows and the sliding sunroof/panorama
sliding sunroof move back to their original
position.
The indicator lamp in the gbutton goes
out. Air-recirculation mode is deactivated.
i If you open the side windows or the sliding
sunroof/panorama sliding sunroof man-
ually after closing the mwith the conveni-
enc eclosing feature, the ywill remain in this
position when opened using the conveni-
enc eopening feature. Activating/deactivating th
eresidual
heat function
The residual heat function is only available
with THERMOTRONI Cautomatic climate con-
trol.
It is possible to mak euse of the residual heat
of the engine to continue heatin gthe station-
ary vehicle for up to 30 minutes after the
engine has been switched off .The heating time depends on the temperature that has
been set for the vehicle interior.
X
To activate: press theÌbutton.
The indicator lamp in the Ìbutton lights
up.
i The blower will run at alow speed regard-
less of the airflow setting.
i If you activate the residual heat function
at high temperatures, only the ventilation
will be activated. The blower runs at
medium speed.
X To deactivate: press theÌbutton.
The indicator lamp in the Ìbutton goes
out.
i It is possible that the residual heat func-
tion may be activated automatically an hour
after the key has been removed. The vehi-
cle is then ventilated for 30minutes to dry
the air-conditioning system.
Residual heat is deactivated automatically:
R after approximately 30 minutes
R when the ignition is switched on
R if the battery voltage drops Auxiliary heating
Important safety notes G
WARNING
Exhaust fumes are produced when the auxili-
ary heating is in operation. Inhaling these
exhaust fumes can be poisonous. You should
therefore switch off the auxiliary heating in
confined spaces without an extraction sys-
tem, e.g. agarage. G
WARNING
When operating the auxiliary heating parts of
the vehicle can get very hot. Make sure that
the exhaust system does not under any cir-
cumstances come into contact with easily
ignitable material such as dry grass or fuels.
The material could otherwise ignite and set 132
Operating the climate control systemClimatec
ontrol
Page 136 of 373
the vehicl
ealigh t. Choose your parking spot
accordingly.
Operating the auxiliary heating is thu spro-
hibited at filling stations or when your vehicle
is being refuelled .You must therefor eswitch
off the auxiliary heating at filling stations.
! Operating the auxiliary heating/ventila-
tion draws on the vehicle battery. After you
have heated or ventilated the vehicle a
maximum of two times, drive for alonger
distance.
i Switch the auxiliary heating on regularly
once amonthf or about ten minutes.
The auxiliary heating heats the air in the
passenger compartment to the selected tem-
perature. It does not use the heat of the run-
ning engine to do this. The auxiliary heating
is operated directly using the vehicle's fuel.
For this reason, the tank content must be at
least at reserve fuel level to ensure that the
auxiliary heating functions.
The auxiliary heating/ventilation automati-
cally adjusts to changes in temperature and
weather conditions. For this reason, the aux-
iliary heating could switch from ventilation
mode to heating mode or from heating mode
to ventilation mode.
The auxiliary heating switches off automati-
cally after 50 minutes. This time limit can be
altered. To do this, visit aqualified specialist
workshop.
You cannot use the auxiliary ventilation to
cool the vehicle interior to atemperature
lower than the outside temperature.
Before switching on X
Turn the key to position 2in the ignition
lock.
X Set the temperature.
The auxiliary heating/ventilation can be acti-
vated even when climate control is set to
manual. Optimum comfor tcan be attained
when the system is set to automatic mode.
Set the temperature to 22 †. The auxiliary heating/ventilation can be acti-
vated or deactivated using the remote control
or the button on the centre console.
The on-board computer can be used to spec-
ify up to three departure times, one of which
may be preselected (Y page 225).
Switching the auxiliary heating/venti-
lation on/off using the centre console
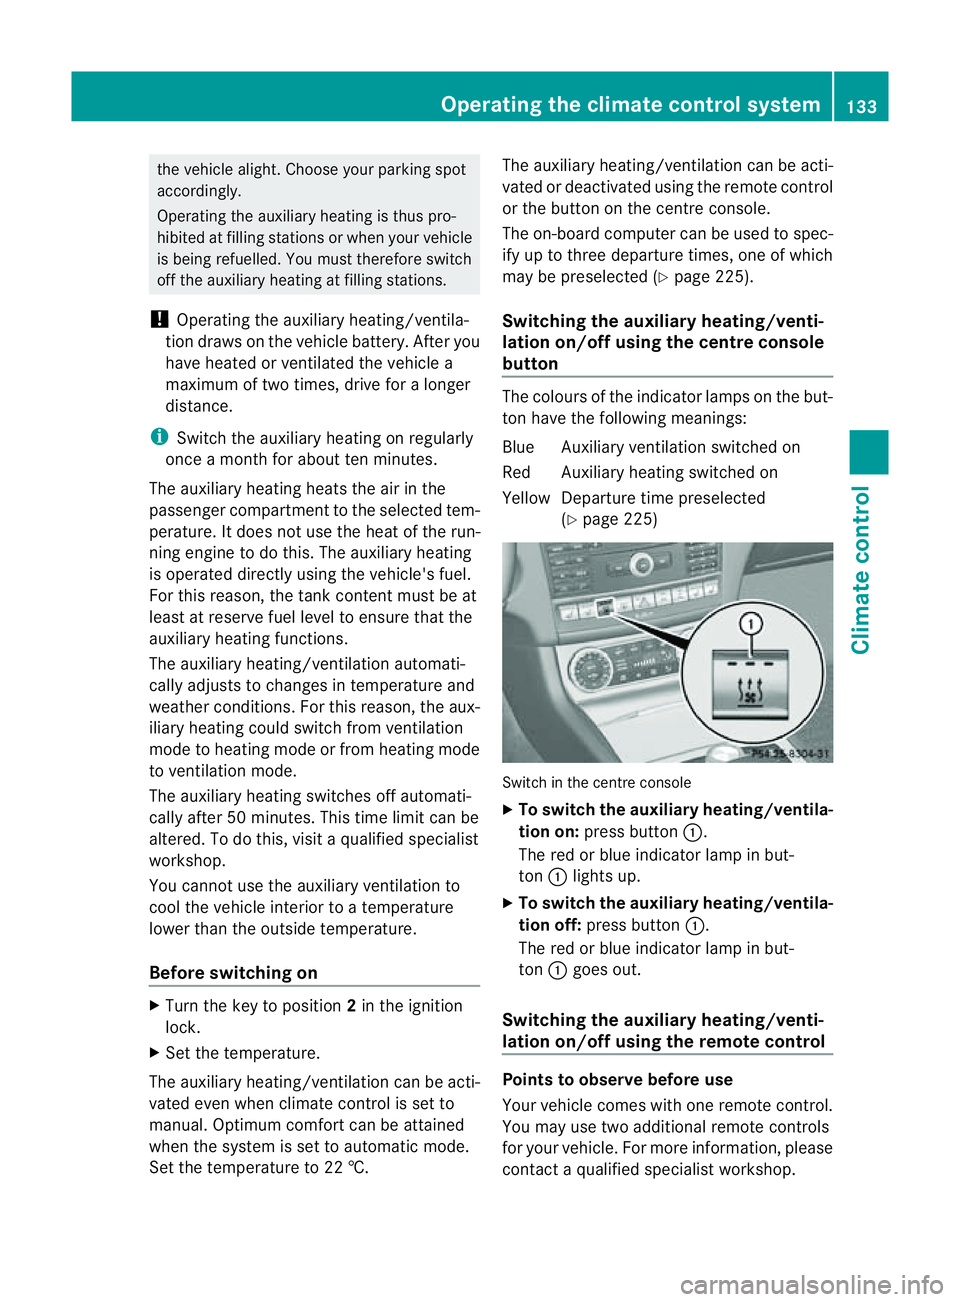
button The colours of the indicator lamps on the but-
ton have the following meanings:
Blue Auxiliary ventilation switched on
Red Auxiliary heating switched on
Yellow Departure time preselected
(Ypage 225) Switch in the centre console
X
To switch the auxiliary heating/ventila-
tion on: press button :.
The red or blue indicator lamp in but-
ton :lights up.
X To switch the auxiliary heating/ventila-
tion off: press button :.
The red or blue indicator lamp in but-
ton :goes out.
Switching the auxiliary heating/venti-
lation on/off using the remotec ontrol Points to observe before use
Your vehicle comes with one remote control.
You may use two additional remote controls
for your vehicle. For more information, please
contact
aqualified specialist workshop. Operating the climate control system
133Climate control Z