2012 MERCEDES-BENZ CLS COUPE light
[x] Cancel search: lightPage 155 of 373
E
Economy Comfortable, economical
driving S
Sport Sporty driving style
M
Manual Manua
lgears hifting i
For furthe rinformation on the automatic
drive program, se e(Ypage 152).
i Thea utomatic transmission switches to
automatic drive program Eeach tim ethe
engine is started.
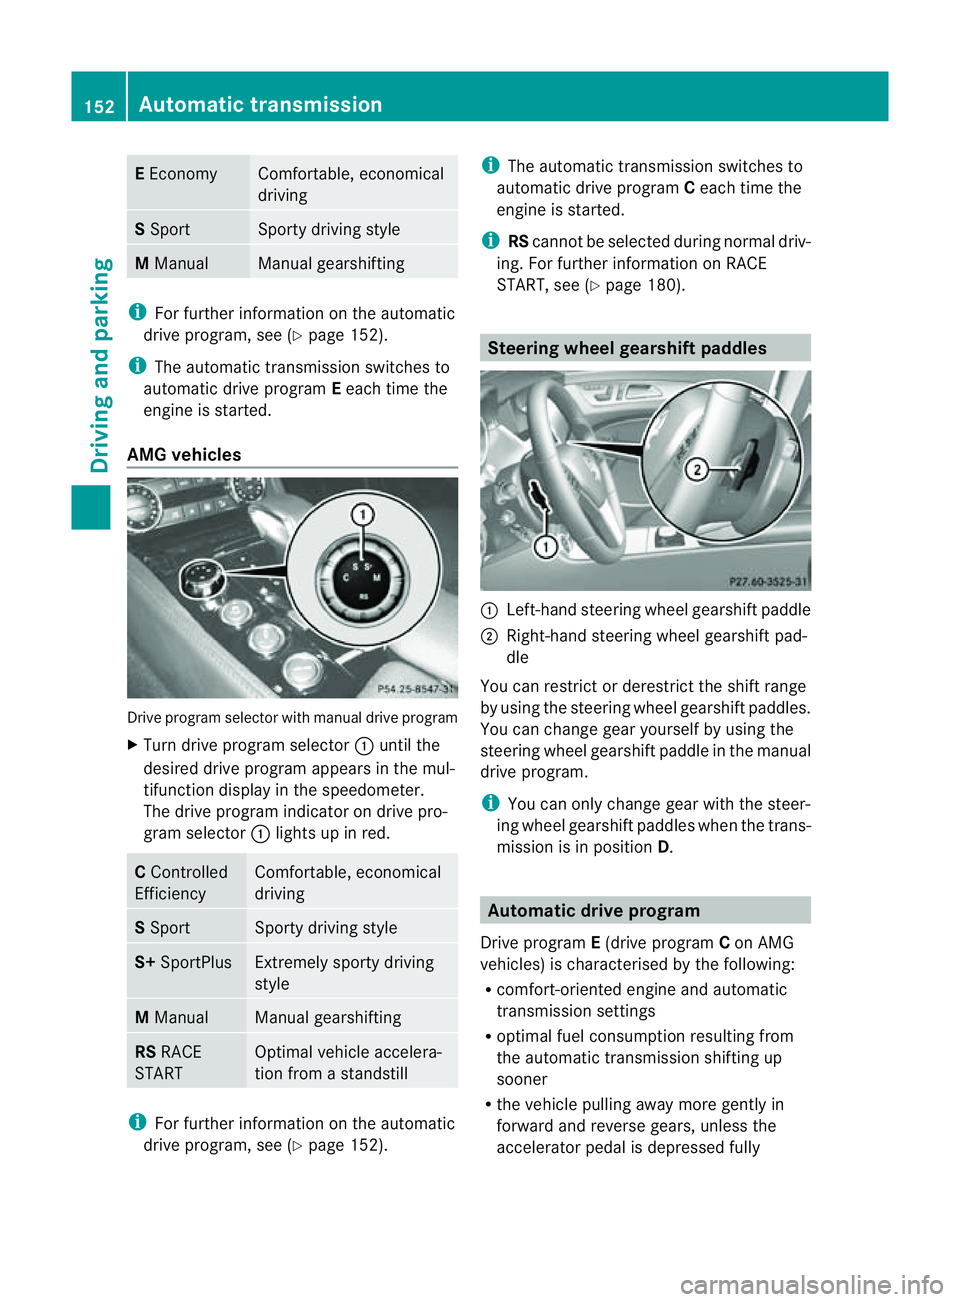
AM Gvehicles Drive program selecto
rwith manual drive program
X Turn drive program selector :until the
desired drive program appears in the mul-
tifunction display in the speedometer.
The drive program indicator on drive pro-
gram selector :light supinr ed. C
Controlled
Efficiency Comfortable, economical
driving
S
Sport Sporty drivin
gstyle S+
SportPlus Extremely sport
ydriving
style M
Manual Manual gearshifting
RS
RACE
START Optimal vehicle accelera-
tion from
astandstill i
For further information on the automatic
drive program, see (Y page 152). i
The automatic transmission switches to
automatic drive program Ceach tim ethe
engin eisstarted.
i RScannot be selected during normal driv-
ing. For further information on RACE
START, see (Y page 180). Steering wheel gearshift paddles
:
Left-han dsteerin gwheel gearshif tpaddle
; Right-hand steering wheel gearshif tpad-
dle
You can restrict or derestric tthe shif trange
by usin gthe steering wheel gearshif tpaddles.
You can chang egear yourself by usin gthe
steering wheel gearshif tpaddle in th emanual
driv eprogram.
i You can only chang egear wit hthe steer-
ing wheel gearshif tpaddles when th etrans-
mission is in position D. Automatic drive program
Drive program E(drive program Con AMG
vehicles) is characterised by th efollowing:
R comfort-oriente denginea nd automatic
transmission settings
R optimal fuel consumption resulting from
th ea utomatic transmission shiftin gup
sooner
R thev ehicle pullin gaway mor egently in
forward and revers egears, unless the
accelerator pedal is depressed fully 152
Automatic transmissionDriving and parking
Page 157 of 373
Clearing th
eshiftrange restriction X
Pul lthe right-hand steering wheel gearshift
paddle until the numbe rfor the gear disap-
pears from the multifunction display.
or
X Shift the transmission to position D.
The automatic transmission shifts from the
current shift range directly to D.
Selecting the ideal shift range X
Pull the left-hand steerin gwheel gearshift
paddle and hold it in position.
The automatic transmission shifts to the
gear which allowso ptimum acceleration
and deceleration. To do this, the automatic
transmission shifts down one or more
gears. Manual drive program
Activating the manuald rive programX
Press the program selector button
(Y page 151) repeatedly until Mappears in
the multifunction display.
X AMG vehicles: turn the drive program
selector (Y page 152) until Mappears in the
multifunction display.
The indicator Mon the drive program selec-
tor lights up in red.
AMG vehiclesa nd vehicleswithaDIRECT
SELECT lever: you can select manual drive
program Musin gthe program selector or the
driv eprogram selector button. In manual
driv eprogram M,you can chang egear using
th es teering wheel gearshif tpaddles if the
transmission is in position D.
Upshifting !
In manual gearshif tprogram M,the auto-
matic transmission does not shift up auto-
matically even when the engine limiting
spee dfor the current gearisr eached.
When the engine limiting speed is reached, the fuel supplyisc
ut to prevent the engine
from overrevving. You must make sure that
the engine speed does not reach the red
area of the rev counter. Otherwise, there is
ar isk of engine damage.
X Pull the right-hand steering wheel gearshift
paddle.
The automatic transmission shifts up to the
next gear.
AMG vehicles
X If the colour in the multifunction displayin
the speedometer changes to red and the
UP displaym
essage is shown, shift up a
gear.
Downshifting X
Pull the left-hand steering wheel gearshift
paddle.
The automatic transmission shifts down to
the next gear.
i If you slow down or stop without shifting
down, the automatic transmission auto-
matically shifts down.
i For maximum acceleration, pull the left-
hand steering wheel gearshift paddleu ntil
the transmission selects the optimum gear
for the current speed.
Kickdown You can also use kickdown for maximum
acceleration in manual drive program
M.
X Depress the accelerator pedal beyond the
pressure point.
The transmission shifts to alower gear
depending on the engine speed.
X Shift back up once the desired speed is
reached.
i AMG vehicles: it is not possible to use
kickdown in manual drive program M.154
Automatic transmissionDriving and parking
Page 160 of 373
Refuelling
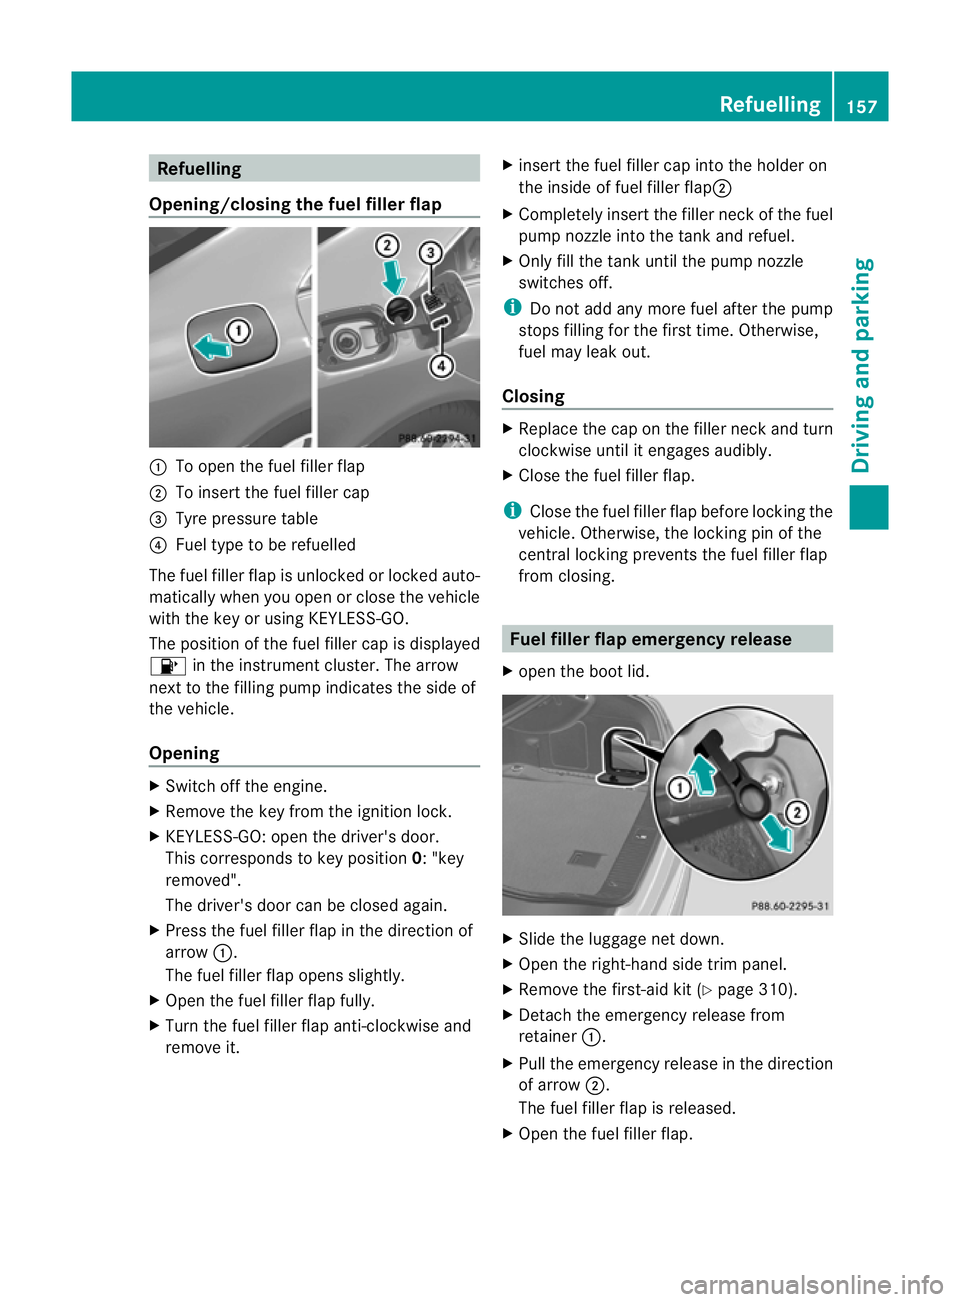
Opening/closing the fue lfille rflap :
To open the fuel filler flap
; To inser tthe fuel filler cap
= Tyre pressure table
? Fuel type to be refuelled
The fuel filler flap is unlocked or locked auto-
matically when you open or close the vehicle
with the key or using KEYLESS-GO.
The position of the fuel filler cap is displayed
8 in the instrumentc luster. The arrow
next to the filling pump indicates the side of
the vehicle.
Opening X
Switch off the engine.
X Remove the key from the ignition lock.
X KEYLESS-GO: open the driver's door.
This corresponds to key position 0:"key
removed".
The driver's door can be closed again.
X Press the fuel filler flap in the direction of
arrow :.
The fuel filler flap opens slightly.
X Open the fuel filler flap fully.
X Turn the fuel filler flap anti-clockwise and
remove it. X
insert the fuel filler cap into the holder on
the inside of fuel filler flap ;
X Completely insert the filler neck of the fuel
pump nozzle into the tank and refuel.
X Only fill the tank until the pump nozzle
switches off.
i Do not add any more fuel after the pump
stops filling for the first time. Otherwise,
fuel may leak out.
Closing X
Replace the cap on the filler neck and turn
clockwise until it engages audibly.
X Close the fuel filler flap.
i Close the fuel filler flap before locking the
vehicle. Otherwise, the locking pin of the
central locking prevents the fuel filler flap
from closing. Fuel filler flap emergency release
X open the boot lid. X
Slide the luggage net down.
X Open the right-hand side trim panel.
X Remove the first-aid kit (Y page 310).
X Detach the emergency release from
retainer :.
X Pull the emergency release in the direction
of arrow ;.
The fuel filler flap is released.
X Open the fuel filler flap. Refuelling
157Driving and parking Z
Page 164 of 373
When you apply the parking brake to brake
the vehicle, the brake lamps do not light up.
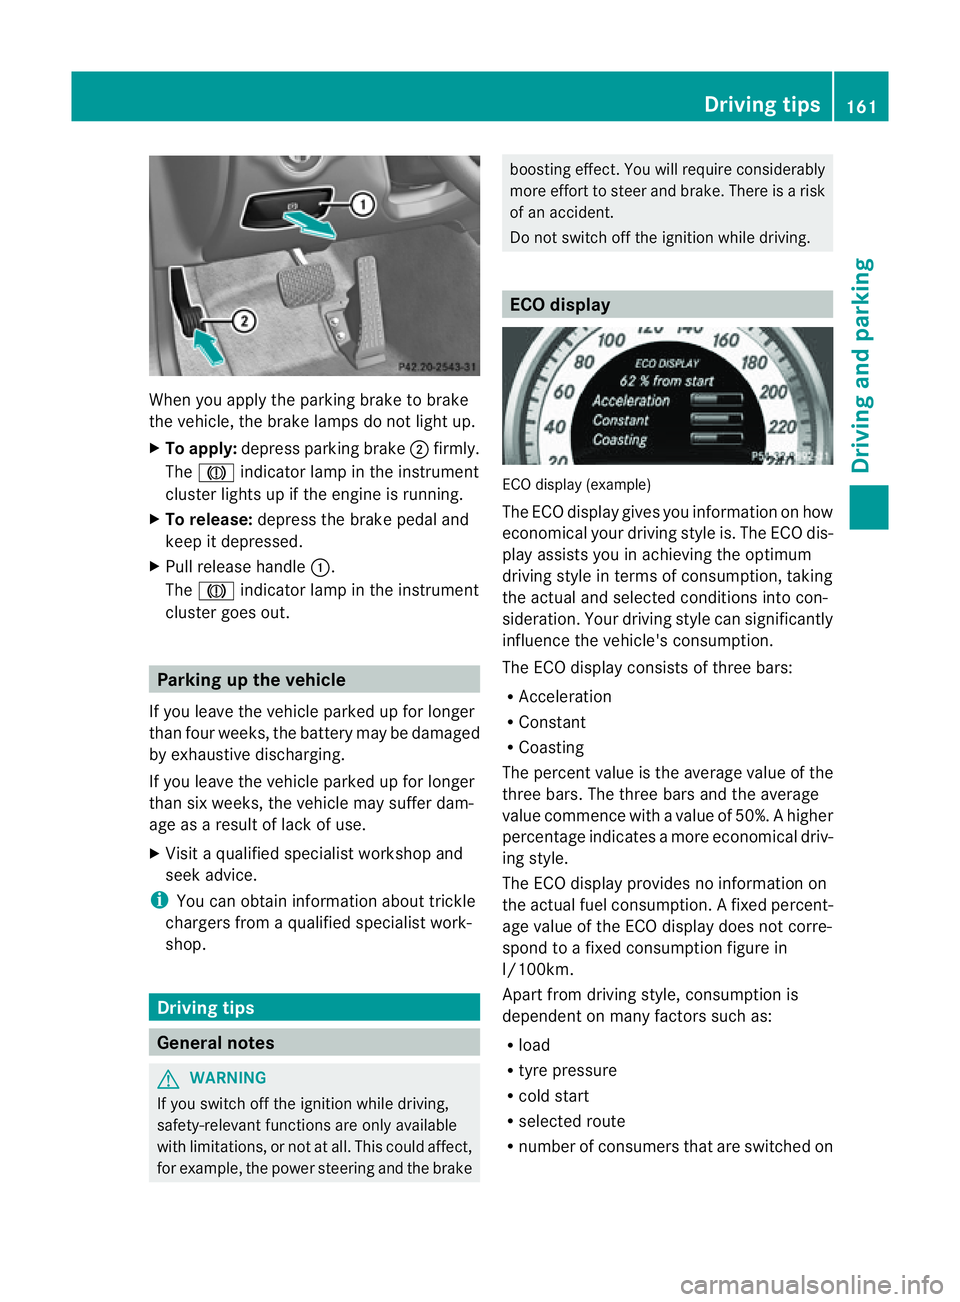
X To apply: depress parking brake ;firmly.
The J indicato rlamp in the instrument
cluster lights up if the engine is running.
X To release: depress the brake pedal and
keep it depressed.
X Pull release handle :.
The J indicato rlamp in the instrument
cluster goes out. Parking up the vehicle
If you leave the vehicle parked up for longer
than four weeks, the batter ymay be damaged
by exhaustive discharging.
If you leave the vehicle parked up for longer
than six weeks, the vehicle may suffer dam-
age as aresult of lack of use.
X Visit aqualified specialist workshop and
seek advice.
i You can obtain information about trickle
chargers from aqualified specialist work-
shop. Driving tips
General notes
G
WARNING
If you switch off the ignition while driving,
safety-relevant functions are only available
with limitations, or not at all. This could affect,
for example, the power steerin gand the brake boostin
geffect. You will require considerably
more effort to steer and brake. There is arisk
of an accident.
Do not switch off the ignition while driving. ECO display
ECO display (example)
The ECO display gives you information on how
economical your driving style is. The ECO dis-
play assists you in achieving the optimum
driving style in term
sofconsumption ,taking
the actual and selected conditions into con-
sideration. Your driving style can significantly
influenc ethe vehicle's consumption.
The ECO display consists of three bars:
R Acceleration
R Constant
R Coasting
The percen tvalue is th eaverage value of the
three bars .The three bars and the average
value commence with avalue of 50%. Ahigher
percentage indicates amoree conomical driv-
ing style.
The ECO display provides no information on
the actual fue lconsumption. Afixed percent-
age value of the ECO display does not corre-
spon dtoaf ixed consumption figure in
l/100km.
Apar tfromd rivin gstyle, consumption is
dependent on many factors such as:
R load
R tyre pressure
R cold start
R selected route
R number of consumer sthat are switched on Driving tips
161Driving and parking Z
Page 166 of 373
i
This also applies if you have activated
cruise control, SPEEDTRONIC or DIS-
TRONIC PLUS.
This will use the braking effect of the engine,
so less braking will be required to prevent the
vehicle from gaining speed. This relieves the
load on the brake system and prevent sthe
brakes from overheatin gand wearing too
quickly.
Heavy and light loads G
WARNING
The braking system can overheat if you leave
your foot on the brake pedal while driving.
This increases the braking distanc eand could
even cause the braking system to fail. There
is ar isk of an accident.
Never use the brake pedal as afootrest. Do
not simultaneously depress both the brake
pedal and the accelerator pedal while driving.
! Depressin gthe brake pedal constantly
results in excessiv eand premature wear to
the brake pads.
If the brakes have been subjected to aheavy
load, do not stop the vehicle immediately, but
drive on for ashort while. This allows the air-
flow to cool the brakes more quickly.
If the brakes have been used only moderately,
you should occasionally test their effective-
ness. To do this, brake more firmly from a
higher speed. This improves the grip of the
brakes.
Wet road surfaces If you have driven for
along time in heavy rain
without braking, there may be adelayedr eac-
tion from the brakes when braking for the first
time. This may also occur after the vehicle has
been washed or driven through deep water.
You have to depress the brake pedal more
firmly. Maintain agreater distanc efrom the
vehicle in front.
After driving on awet road or having the vehi-
cle washed, brake firmly while paying atten- tion to the traffic conditions. This will warm
up the brake discs, thereby drying them more
quickly and protecting them against corro-
sion.
Limited braking performance on salt-
treated roads
If you drive on salted roads,
alayer of salt
residue may form on the brake discs and
brake pads. This can result in asignificantly
longer braking distance.
R Brake occasionally to remove any possible
salt residue. Make sure that you do not
endanger other road users when doing so.
R Carefully depress the brake pedal and the
beginnin gand end of ajourney.
R Maintain agreater distance to the vehicle
ahead.
New brake pads/linings New and replaced brake pads and discs only
reach their optimum braking effect after sev-
eral hundred kilometres of driving. Compen-
sate for this by applying greater force to the
brake pedal.
For safety reasons, Mercedes-Benz recom-
mends that you only have brake pads/linings
fitted to your vehicle which have been
approved for Mercedes-Benz vehicles or
which correspon dtoanequivalent quality
standard. Brake pads/linings which have not
been approved for Mercedes-Benz vehicles or
which are not of an equivalent quality could
affect your vehicle's operating safety.
AMG high-performance and ceramic
brakes The AMG brake systems are designed for
heavy loads. This may lead to noise when
braking. This is dependent on:
R
speed
R braking force
R environmental conditions, such as temper-
ature and humidity Driving tips
163Driving and parking Z
Page 169 of 373
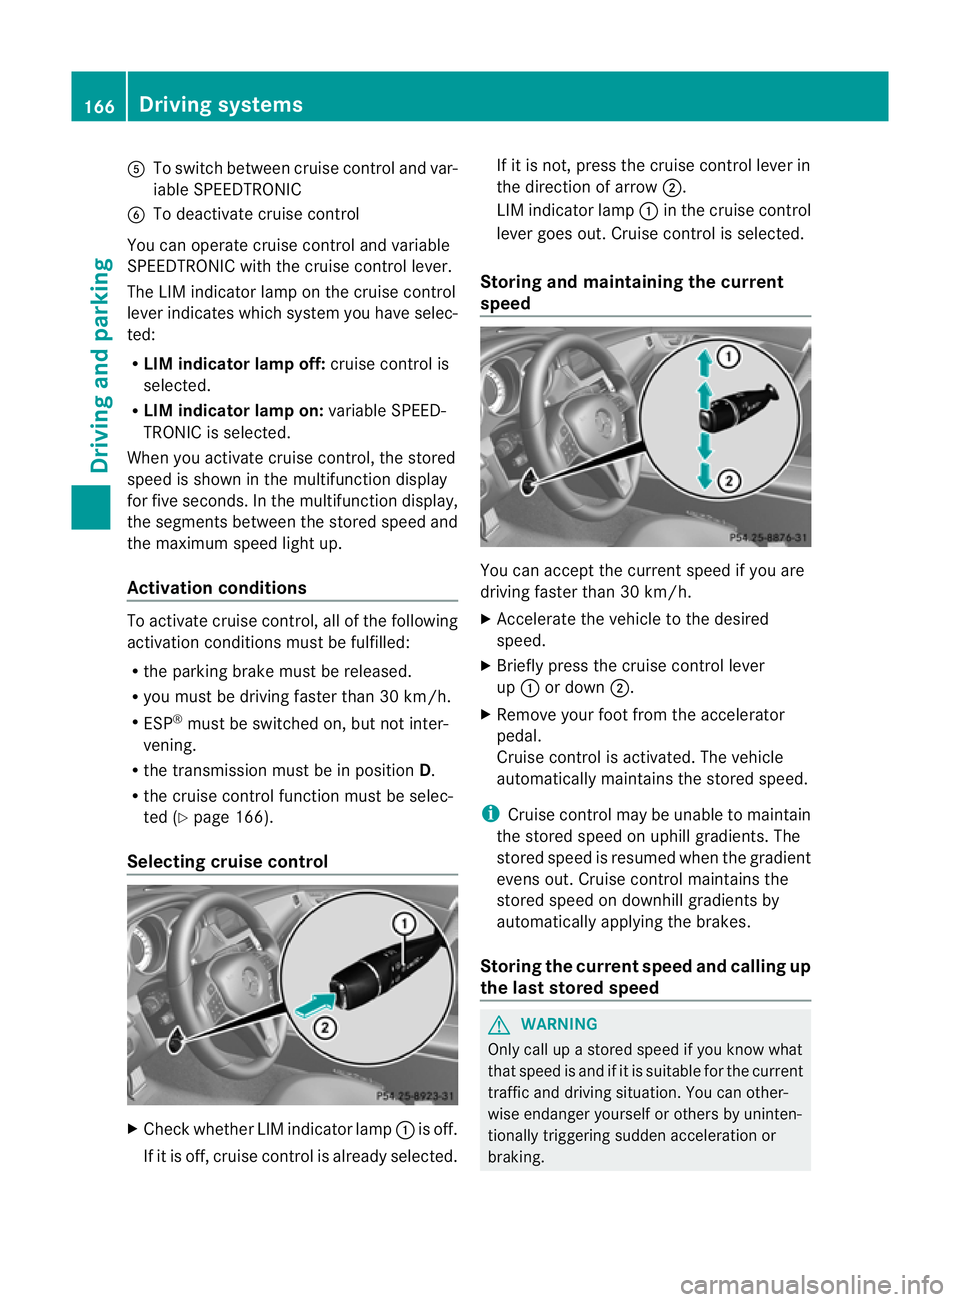
A
To switch between cruise control and var-
iable SPEEDTRONIC
B To deactivate cruise control
You can operate cruise control and variable
SPEEDTRONIC with the cruise control lever.
The LIM indicator lamp on the cruise control
lever indicates which system you have selec-
ted:
R LIM indicator lamp off: cruise control is
selected.
R LIM indicator lamp on: variable SPEED-
TRONIC is selected.
When you activat ecruise control, the stored
speed is shown in the multifunction display
for five seconds. In the multifunction display,
the segment sbetween the stored speed and
the maximum speed light up.
Activation conditions To activat
ecruise control, all of the following
activation conditions must be fulfilled:
R the parking brake must be released.
R you must be driving faster than 30 km/h.
R ESP ®
must be switched on, but not inter-
vening.
R the transmission must be in position D.
R the cruise control function must be selec-
ted (Y page 166).
Selecting cruise control X
Check whether LIM indicator lamp :is off.
If it is off, cruise control is already selected. If it is not,p
ress the cruise control lever in
the direction of arrow ;.
LIM indicator lamp :in the cruise control
lever goes out. Cruise control is selected.
Storing and maintaining the current
speed You can accept the curren
tspeed if you are
driving faster than 30 km/h.
X Accelerat ethe vehicle to the desired
speed.
X Briefly press the cruise contro llever
up : or down ;.
X Remove your foot from the accelerator
pedal.
Cruise contro lisactivated. The vehicle
automatically maintains the stored speed.
i Cruise contro lmay be unable to maintain
the stored speed on uphill gradients. The
stored speed is resumed when the gradient
evens out. Cruise contro lmaintains the
store dspee dond ownhill gradients by
automaticall yapplyin gthe brakes.
Storing th ecurren tspee dand calling up
the last stored speed G
WARNING
Only call up astored speed if you know what
that speed is and if it is suitable for the current
traffic and driving situation .You can other-
wise endanger yourself or other sbyuninten-
tionally triggering sudden acceleration or
braking. 166
Driving systemsDriving and parking
Page 170 of 373
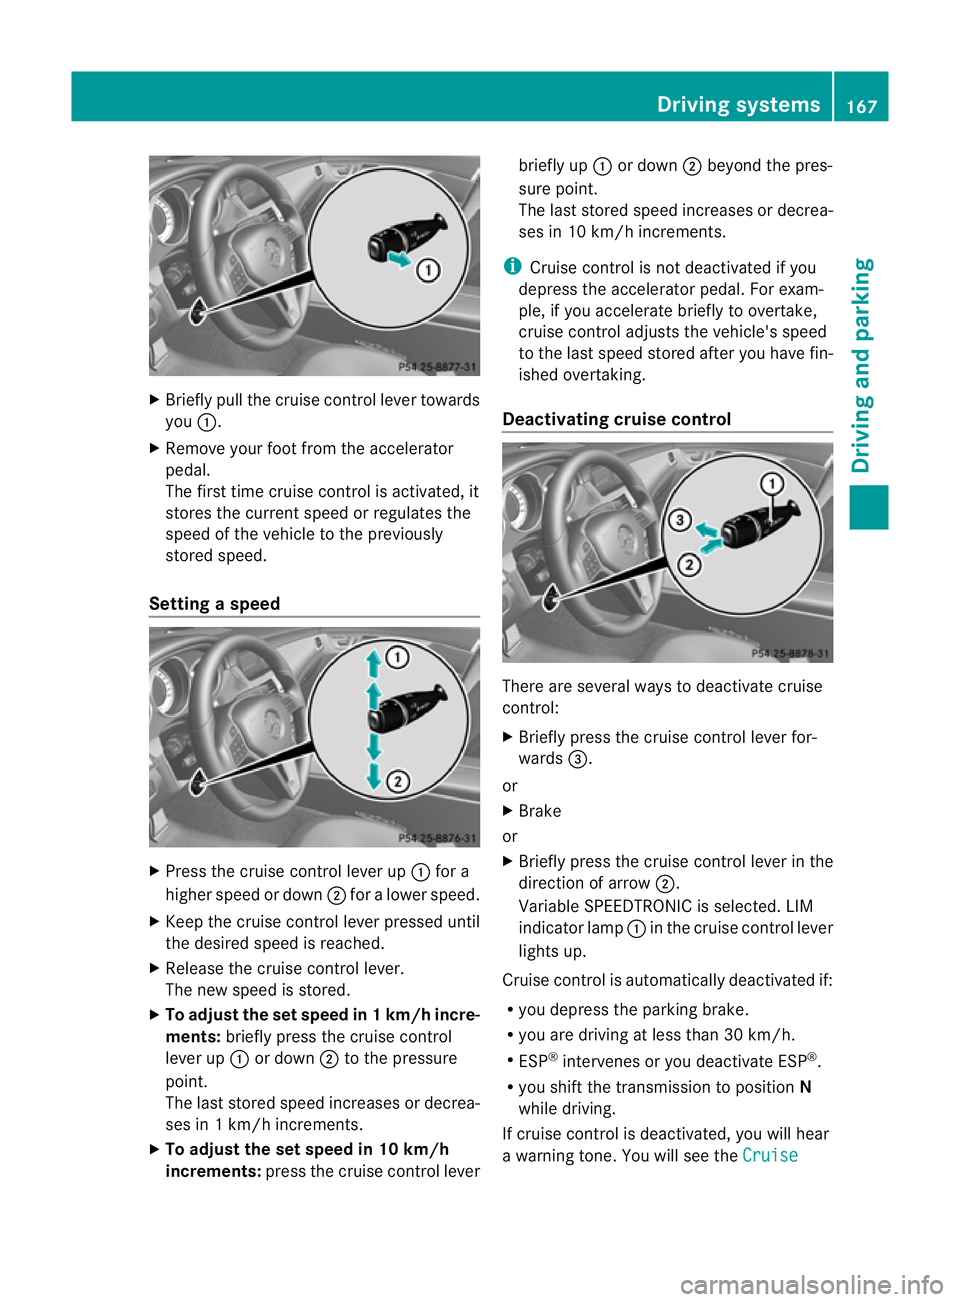
X
Briefly pull the cruise control lever towards
you :.
X Remove your foot from the accelerator
pedal.
The firs ttime cruise control is activated, it
stores the current speed or regulates the
speed of the vehicle to the previously
stored speed.
Setting aspeed X
Press the cruise control lever up :for a
highe rspeed or down ;for alower speed.
X Keep the cruise contro llever pressed until
the desired speed is reached.
X Release the cruise contro llever.
The new speed is stored.
X To adjust the set speed in 1km/h incre-
ments: briefly press the cruise control
lever up :or down ;to the pressure
point.
The last stored speed increases or decrea-
ses in 1km/ hincrements.
X To adjust the set speed in 10 km/h
increments: press the cruise contro llever briefly up
:or down ;beyond the pres-
sure point.
The last stored speed increases or decrea-
ses in 10 km/ hincrements.
i Cruise contro lisnot deactivated if you
depress the accelerator pedal. For exam-
ple, if you accelerate briefly to overtake,
cruise contro ladjusts the vehicle's speed
to the last speed stored after you have fin-
ished overtaking.
Deactivating cruise control There are several ways to deactivate cruise
control:
X
Briefly press the cruise contro llever for-
wards =.
or
X Brake
or
X Briefly press the cruise contro llever in the
direction of arrow ;.
Variable SPEEDTRONIC is selected. LIM
indicator lamp :in the cruise contro llever
lights up.
Cruise control is automatically deactivated if:
R you depress the parkin gbrake.
R you are driving at less than 30 km/h.
R ESP ®
intervenes or you deactivat eESP®
.
R you shift the transmission to position N
while driving.
If cruise control is deactivated, you will hear
aw arning tone. You will see the Cruise Driving systems
167Driving and parking Z
Page 171 of 373
control off message in the multifunction
displayf or approximately five seconds.
i The last speed stored is cleared when you
switch off the engine. SPEEDTRONIC
Important safety notes G
WARNING
Never depress the brake pedal continuously
while the vehicle is in motion, e.g. never cause
the brakes to rub by applying constant slight
pedal pressure. This causes the brake system
to overheat, increases the braking distance
and can lead to the brakes failing completely. G
WARNING
Do not change down for additional engine
braking on aslippery road surface. This could
cause the drive wheels to lose their grip and
the vehicle could skid. G
WARNING
SPEEDTRONIC is only an aid designed to
assist driving. You are responsible for the
vehicle's speed and for braking in good time.
SPEEDTRONIC brakes automaticallysot hat
you do not exceed the set speed. On long and
steep downhill gradients, especially if the
vehicle is laden, you must select shift range
1, 2or 3in good time. By doing so, you will
make use of the braking effect of the engine.
This relieves the load on the brake system and
prevents the brakes from overheating and
wearing too quickly. If you need additional
braking, depress the brake pedal repeatedly
rather than continuously.
You can set avariableorp ermanent limit
speed:
R variable for speed limits, e.g. in built-up
areas
R permanent for long-term speed restric-
tions, e.g. when driving with winter tyres
fitted (Y page 170) i
The speed indicated in the speedometer
may differ slightly from the limit speed
stored.
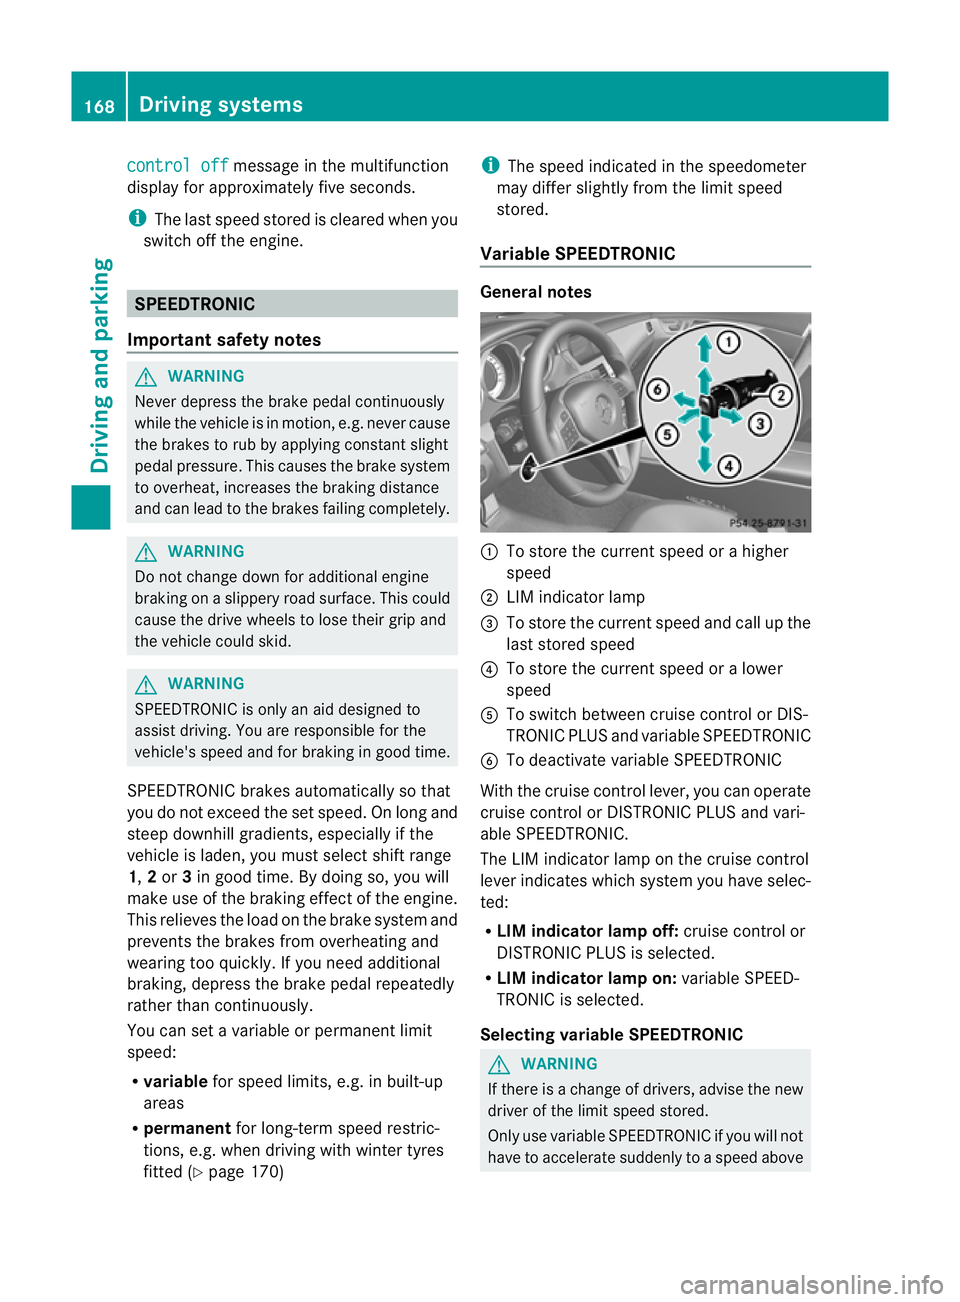
Variable SPEEDTRONIC General notes
:
To store the current speed or ahigher
speed
; LIM indicator lamp
= To store the current speed and call up the
last stored speed
? To store the current speed or alower
speed
A To switch between cruise control or DIS-
TRONIC PLUS and variableS PEEDTRONIC
B To deactivate variableS PEEDTRONIC
With the cruise control lever, you can operate
cruise control or DISTRONIC PLUS and vari-
able SPEEDTRONIC.
The LIM indicator lamp on the cruise control
lever indicates which system you have selec-
ted:
R LIM indicator lamp off: cruise control or
DISTRONIC PLUS is selected.
R LIM indicator lamp on: variableSPEED-
TRONIC is selected.
Selecting variable SPEEDTRONIC G
WARNING
If there is achange of drivers, advise the new
driver of the limit speed stored.
Only use variableS PEEDTRONIC if you will not
have to accelerate suddenly to aspeed above 168
Driving systemsDriving and parking