2012 MERCEDES-BENZ B-CLASS mirror
[x] Cancel search: mirrorPage 264 of 340

Notes on programming the remote
control
Canadian radio frequency laws require a
"break" (or interruption) of the transmission
signals after
broadcasting
for a few seconds.
Therefore, these signals may not last long
enough for the integrated garage door
opener. The signal is not recognized during
programming. Comparable with Canadian
law, some U.S. garage door openers also
feature a "break".
Proceed as follows:
R if you live in Canada
R if you have difficulties programming the
garage door opener (regardless of where
you live) when using the programming
steps
X Press and hold one of buttons ; to ? on
the integrated garage door opener.
After a short
time, indicator lamp : lights
up yellow.
X Release the button.
Indicator lamp : flashes yellow.
X Press button B of garage door remote
control A for two
seconds, then release it
for two seconds.
X Press button B again for two seconds.
X Repeat this sequence on button B of
remote control A until indicator lamp :
lights up green.
If indicator lamp : turns red, repeat the
process.
X Continue with the other programming
steps (see above).
Problems when programming
If you are experiencing problems
programming the integrated garage door
opener on the rear-view mirror, take note of
the following instructions:
R Check the
transmitter
frequency of garage
door drive remote control A. This can
usually be found on the back of the remote
control. The integrated garage door opener is
compatible with devices that have units
which operate in the frequency range of
280to 433
MHz.
R Replace the batteries in garage door
remote control A. This increases the
likelihood that garage door remote control
A
will transmit a strong and precise signal
to the integrated garage door opener in the
rear-view mirror.
R When programming, hold remote control
A at varying distances and angles from the
button that you are programming. Try
various angles at a distance between 2and
12 inches (5to 30 cm) or at the same angle
but at varying distances.
R If another remote control for the same
garage door drive is available, repeat the
same programming steps with this remote
control. Before performing these steps,
make sure that new batteries have been
installed in garage door drive remote
control A.
R Note that some remote controls only
transmit for a limited amount of time (the
indicator lamp on the remote control goes
out). Press button B on remote control
A again before transmission ends.
R Align the antenna cable of the garage door
opener unit. This can improve signal
reception/transmission.
Opening/closing the garage door After it has been programmed, the integrated
garage door opener performs the function of
the garage door system remote control.
Please also read the operating instructions
for the garage door system.
X
Turn the SmartKey to position 2 in the
ignition lock.
X Press button ;, = or ? which you have
programmed to operate the garage door.
Garage door system with a fixed code:
indicator lamp : lights up green.262
Features
Stowage and features
ProCarManuals.com
Page 265 of 340

Garage door system with a rolling code:
indicator lamp
: flashes green.
i The transmitter will transmit a signal as
long as the button is pressed. The
transmission is halted after a maximum of
ten seconds and indicator lamp : lights
up yellow. Press
button ;, = or ? again
if necessary.
Clearing the memory X
Turn the SmartKey to position 2 in the
ignition lock.
X Press buttons ; and ?.
The indicator lamp lights up yellow.
X Press and hold buttons ; and ?
until the
indicator lamp turns green.
i Make sure that you clear the memory of
the integrated garage door opener before
selling the vehicle. Compass
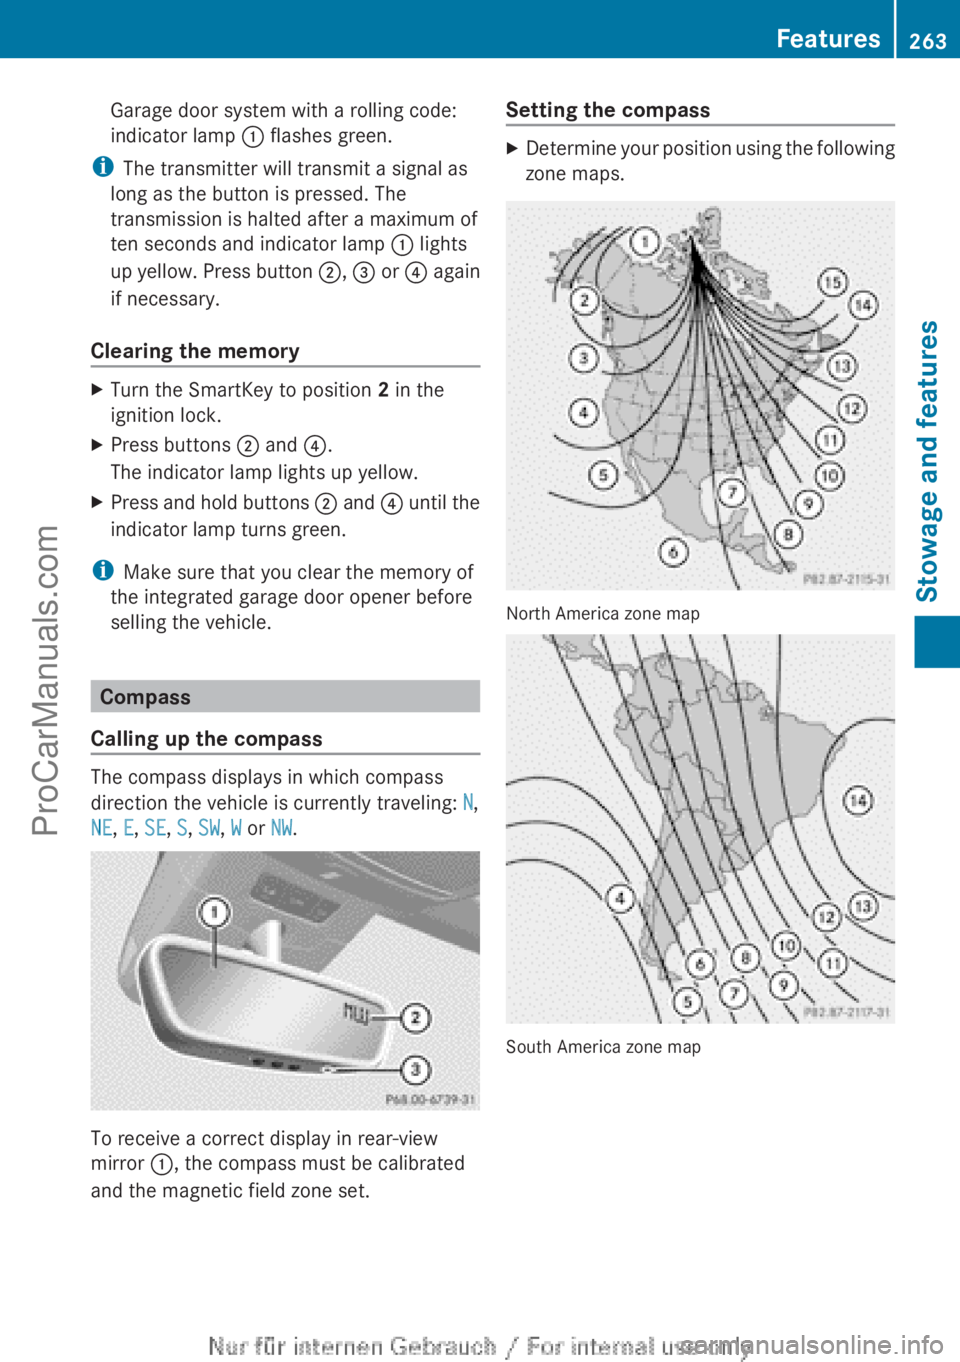
Calling up the compass The compass displays in which compass
direction the vehicle is currently traveling: N,
NE, E, SE, S, SW, W or NW.
To receive a correct display in rear-view
mirror :, the compass must be calibrated
and the magnetic field zone set. Setting the compass X
Determine your position using the following
zone maps. North America zone map
South America zone map Features
263
Stowage and features Z
ProCarManuals.com
Page 277 of 340

Cleaning the mirror turn signals
!
Only use cleaning agents or cleaning
cloths that are suitable for plastic lenses.
Unsuitable cleaning agents or cleaning
cloths could scratch
or damage the plastic
lenses of the mirror turn signals.
X Clean the plastic lenses of the mirror turn
signals in the
exterior mirror housing using
a wet sponge and a mild cleaning agent,
e.g. Mercedes-Benz car shampoo or
cleaning cloths.
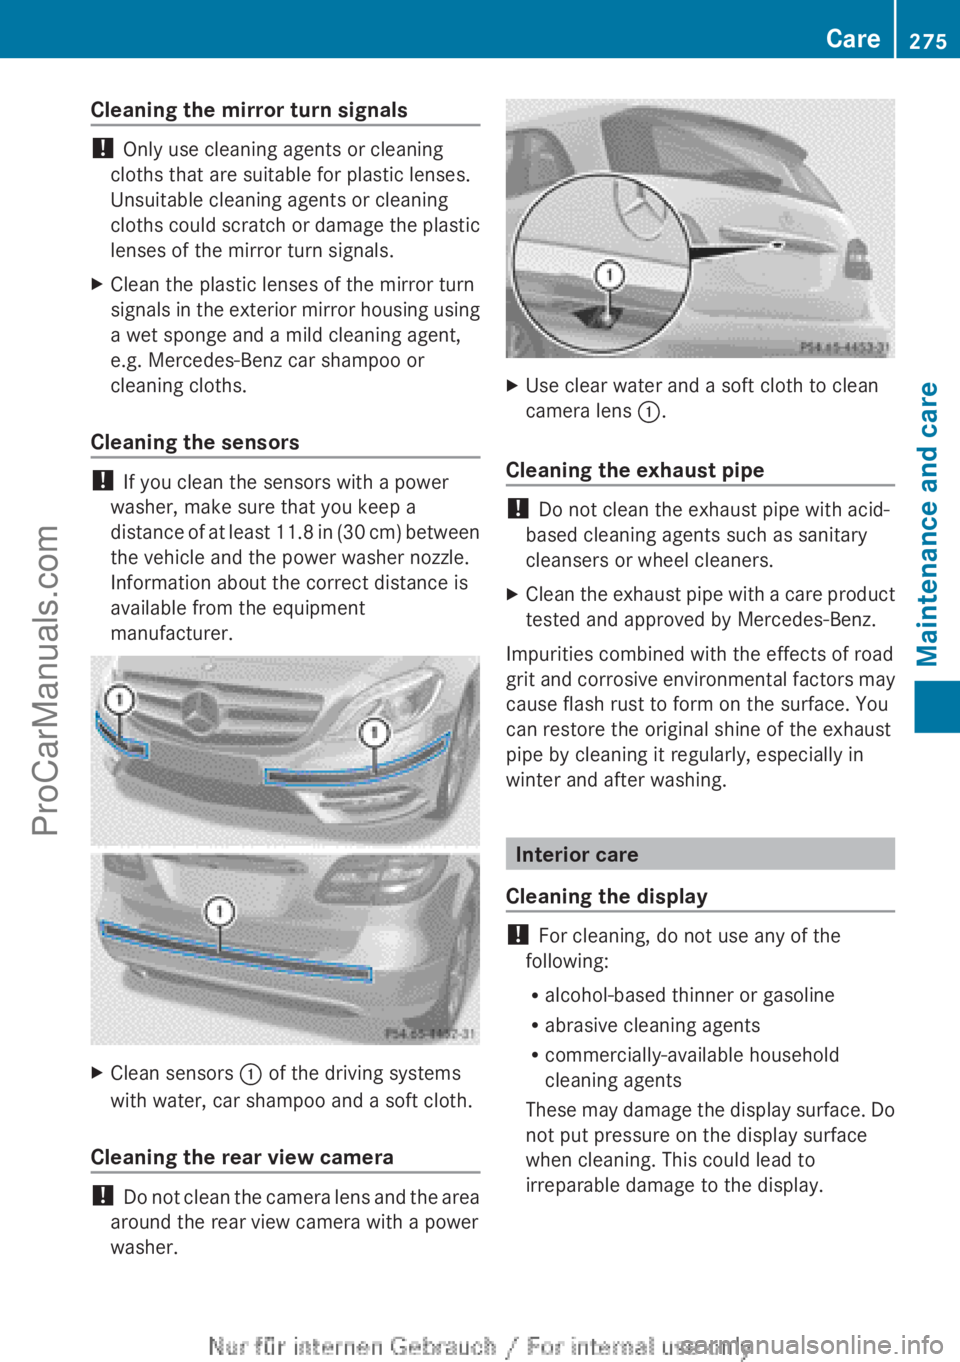
Cleaning the sensors !
If you clean the sensors with a power
washer, make sure that you keep a
distance of at
least 11.8 in (30 cm) between
the vehicle and the power washer nozzle.
Information about the correct distance is
available from the equipment
manufacturer. X
Clean sensors : of the driving systems
with water, car shampoo and a soft cloth.
Cleaning the rear view camera !
Do not
clean
the camera lens and the area
around the rear view camera with a power
washer. X
Use clear water and a soft cloth to clean
camera lens :.
Cleaning the exhaust pipe !
Do not clean the exhaust pipe with acid-
based cleaning agents such as sanitary
cleansers or wheel cleaners.
X Clean the exhaust pipe with a care product
tested and approved by Mercedes-Benz.
Impurities combined with the effects of road
grit and corrosive
environmental factors may
cause flash rust to form on the surface. You
can restore the original shine of the exhaust
pipe by cleaning it regularly, especially in
winter and after washing. Interior care
Cleaning the display !
For cleaning, do not use any of the
following:
R alcohol-based thinner or gasoline
R abrasive cleaning agents
R commercially-available household
cleaning agents
These may damage
the display surface. Do
not put pressure on the display surface
when cleaning. This could lead to
irreparable damage to the display. Care
275
Maintenance and care Z
ProCarManuals.com
Page 290 of 340

i
If the power supply has been interrupted,
e.g. if you reconnect the battery, you will
have to:
R set the clock (audio system/COMAND,
see the
separate operating instructions).
R reset the function for folding the exterior
mirrors in/out automatically, by folding
the mirrors out once ( Y page 93).Charging the battery
G
WARNING
During charging and jump-starting, explosive
gases can escape
from the battery. There is a
risk of an explosion.
Particularly avoid fire, open flames, creating
sparks and smoking. Ensure there is sufficient
ventilation while charging and jump-starting.
Do not lean over a battery. G
WARNING
Battery acid is caustic. There is a risk of injury.
Avoid contact with
the skin, eyes or clothing.
Do not inhale any battery gases. Do not lean
over the battery. Keep children away from
batteries. Wash battery acid immediately with
water and seek medical attention. G
WARNING
A discharged battery can freeze at
temperatures below freezing point. When
jump-starting the vehicle or charging the
battery, gases can escape from the battery.
There is a risk of an explosion.
Allow the frozen battery to thaw out before
charging it or jump-starting.
! Only use battery chargers with a
maximum charging voltage of 14.8 V.
! Only charge the battery using the jump-
starting connection point.
The jump-starting connection point is in the
engine compartment (Y
page 289). X
Open the hood (Y page 266).
X Connect the battery charger to the positive
terminal and ground point in the same
order as when connecting the donor
battery in the jump-starting procedure
(Y page 289).
If, at low temperatures, the indicator lamps/
warning lamps in the instrument cluster do
not light up, it is highly likely that the
discharged battery has frozen. In this case
you may neither jump-start the vehicle nor
charge the battery. The service life of a
thawed-out battery may be shorter. The
starting characteristics can be impaired,
particularly at low temperatures. Have the
thawed-out battery checked at a qualified
specialist workshop.
Only charge the installed battery with a
battery charger which has been tested and
approved by Mercedes-Benz. An accessory
battery charge unit specially adapted for
Mercedes-Benz vehicles and tested and
approved by Mercedes-Benz is available. It
permits the charging of the battery in its
installed position. Contact an authorized
Mercedes-Benz Center for further
information and availability.
Read the battery
charger's operating instructions before
charging the battery. 288
Battery (vehicle)
Breakdown assistance
ProCarManuals.com
Page 337 of 340

Refrigerant instruction label
Example: refrigerant instruction label
:
Warning symbol
; Refrigerant filling capacity
= Applicable SAE standards
? PAG oil part number
A Type of refrigerant
Warning symbols : indicate:
R possible dangers
R that it is necessary to have maintenance
work carried out at a qualified specialist
workshop
Filling capacities All models Capacity
Refrigerant
650 ± 10 g
(22.9 ± 0.4 oz) PAG oil
120 g
(4.2 oz) Vehicle data
General notes
Please note that for the specified vehicle
data:
R the heights specified may vary as a result
of:
-tires
- load
- condition of the suspension
- optional equipment
Dimensions and weights Model :
Maximum
headroom ;
Opening height B 250
BlueEFFICIEN
CY
73.8 in
(1874 mm) 78.0 in
(1981 mm) B 250 BlueEFFICIENCY
Vehicle length
171.6 in
(4359 mm) Vehicle width
including exterior
mirrors
79.1 in
(2010 mm) Vehicle height
61.3 in
(1558 mm) Wheelbase
106.3 in
(2699 mm) Vehicle data
335Technical data Z
ProCarManuals.com