2012 MERCEDES-BENZ B-CLASS mirror
[x] Cancel search: mirrorPage 94 of 340
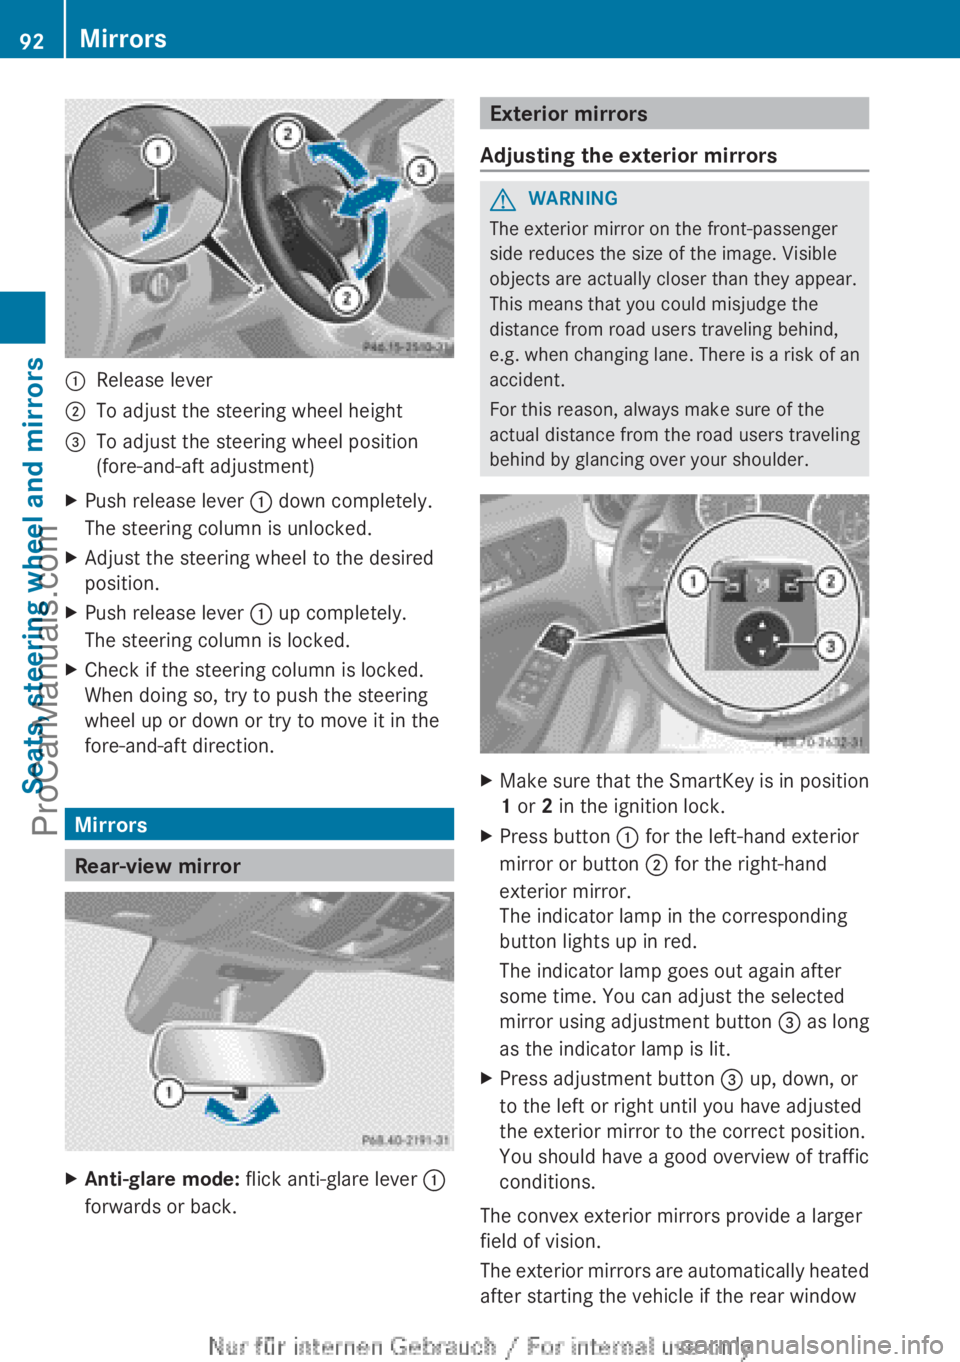
:
Release lever
; To adjust the steering wheel height
= To adjust the steering wheel position
(fore-and-aft adjustment)
X Push release lever : down completely.
The steering column is unlocked.
X Adjust the steering wheel to the desired
position.
X Push release lever : up completely.
The steering column is locked.
X Check if the steering column is locked.
When doing so, try to push the steering
wheel up or down or try to move it in the
fore-and-aft direction. Mirrors
Rear-view mirror
X
Anti-glare mode: flick anti-glare lever :
forwards or back. Exterior mirrors
Adjusting the exterior mirrors G
WARNING
The exterior mirror on the front-passenger
side reduces the size of the image. Visible
objects are actually closer than they appear.
This means that you could misjudge the
distance from road users traveling behind,
e.g. when changing
lane. There is a risk of an
accident.
For this reason, always make sure of the
actual distance from the road users traveling
behind by glancing over your shoulder. X
Make sure that the SmartKey is in position
1 or 2 in the ignition lock.
X Press button : for the left-hand exterior
mirror or button ; for the right-hand
exterior mirror.
The indicator lamp in the corresponding
button lights up in red.
The indicator lamp goes out again after
some time. You can adjust the selected
mirror using adjustment button = as long
as the indicator lamp is lit.
X Press adjustment button = up, down, or
to the left or right until you have adjusted
the exterior mirror to the correct position.
You should have a good overview of traffic
conditions.
The convex exterior mirrors provide a larger
field of vision.
The exterior
mirrors
are automatically heated
after starting the vehicle if the rear window 92
Mirrors
Seats, steering wheel and mirrors
ProCarManuals.com
Page 95 of 340

defroster is switched on and the outside
temperature is
low.
Mirror heating lasts up to
10 minutes.
i You can also heat up the exterior mirrors
manually by switching on the rear window
defroster.
Folding the exterior mirrors in or out
electrically X
Make sure that the SmartKey is in position
1 or 2 in the ignition lock.
X Briefly press button :.
Both exterior mirrors fold in or out.
i Make sure that the exterior mirrors are
always folded out fully while driving. They
could otherwise vibrate.
i If you are driving faster than
30 mph (47 km/h ), you can no longer fold
in the exterior mirrors.
Setting the exterior mirrors If the battery has been disconnected or
completely discharged, the exterior mirrors
must be reset. The exterior mirrors will
otherwise not fold in when you select the
"Fold in
mirrors
when locking" function in the
on-board computer (Y page 199).
X Make sure that the SmartKey is in
position 1 in the ignition lock.
X Briefly press button :. Folding the exterior mirrors in or out
automatically If the "Fold in mirrors when locking" function
is activated in the on-board computer
(Y page 199):
R
the exterior mirrors
fold in automatically as
soon as you lock the vehicle from the
outside.
R the exterior mirrors fold out again
automatically as soon as you unlock the
vehicle and then open the driver's or front-
passenger door.
i If the exterior mirrors have been folded in
manually, they do not fold out.
Exterior mirror pushed out of position If an exterior mirror has been pushed out of
position, proceed as follows:
X
Vehicles without electrically folding
exterior mirrors:
move
the exterior mirror
into the correct position manually.
X Vehicles with electrically folding
exterior mirrors: press and hold mirror-
folding button ( Y page
93) until you hear a
click and then the mirrors engage in
position.
The mirror housing is engaged again and
you can adjust the exterior mirrors as usual
(Y page 92). Automatic anti-glare mirrors
The "Automatic anti-glare
mirrors" function is
only available if the vehicle is equipped with
the "Mirrors package".
The rear-view mirror and the exterior mirror
on the driver's side automatically go into anti-
glare mode if:
R the ignition is switched on and
R incident light from headlamps strikes the
sensor in the rear-view mirror.
The mirrors do not go into anti-glare mode if
reverse gear is engaged or the interior lighting
is switched on. Mirrors
93
Seats, steering wheel and mirrors Z
ProCarManuals.com
Page 96 of 340
Parking position for the exterior
mirror on the front-passenger side
General notes The "Parking position of the exterior mirror on
the front-passenger side" function is only
available if the vehicle is equipped with the
"Mirrors package".
Setting and
storing
the parking positionUsing reverse gear
You can position the front-passenger side
exterior mirror
in
such a way that you can see
the rear wheel on that side as soon as you
engage reverse gear. You can store this
position. X
Make sure that the vehicle is stationary and
that the SmartKey is in position 2 in the
ignition lock.
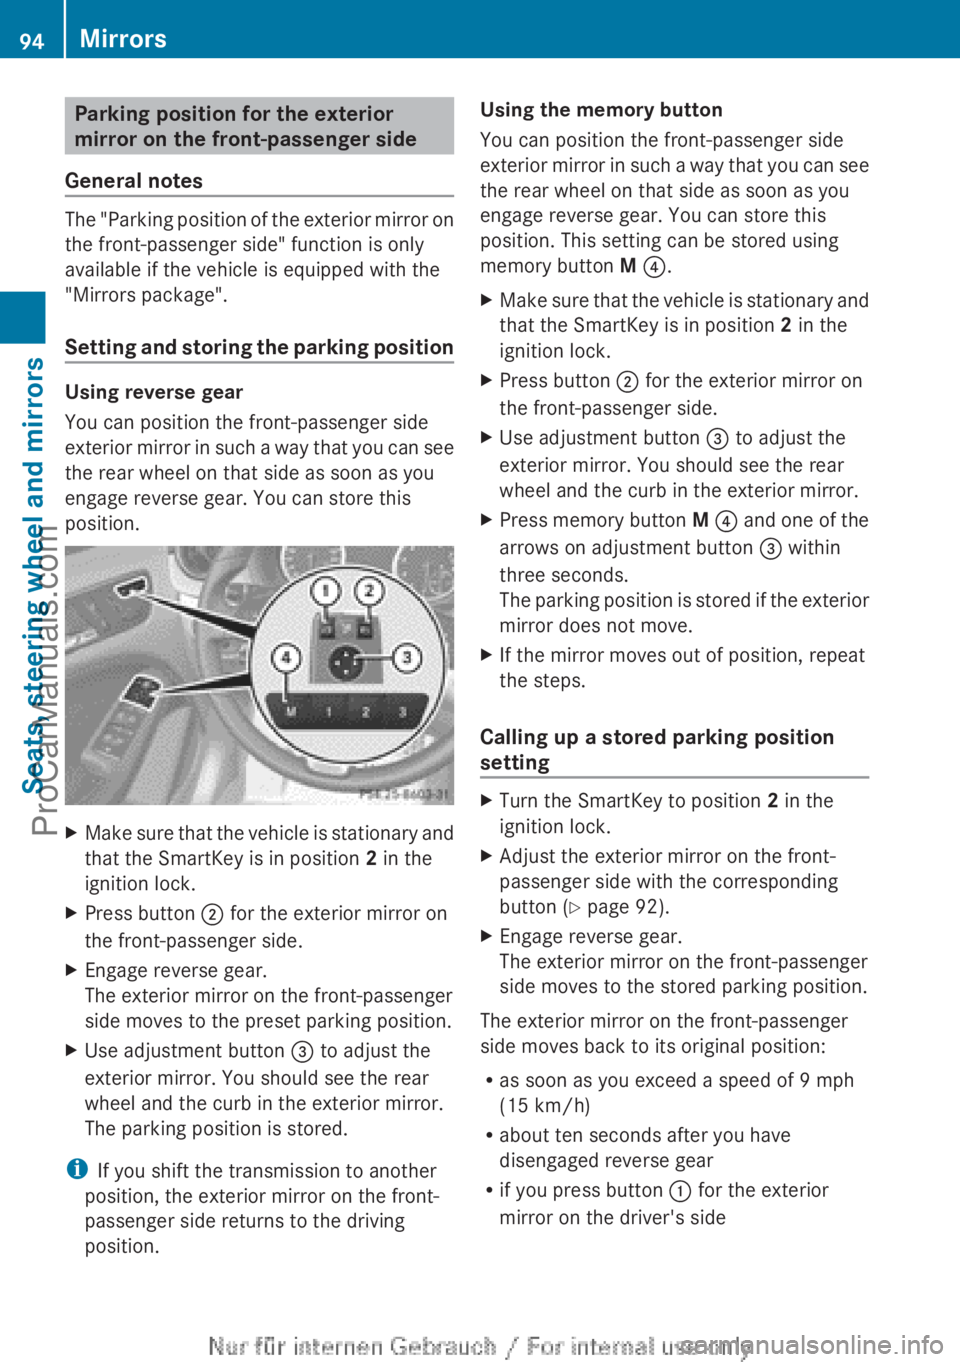
X Press button ; for the exterior mirror on
the front-passenger side.
X Engage reverse gear.
The exterior mirror on the front-passenger
side moves to the preset parking position.
X Use adjustment button = to adjust the
exterior mirror. You should see the rear
wheel and the curb in the exterior mirror.
The parking position is stored.
i If you shift the transmission to another
position, the exterior mirror on the front-
passenger side returns to the driving
position. Using the memory button
You can position the front-passenger side
exterior mirror
in
such a way that you can see
the rear wheel on that side as soon as you
engage reverse gear. You can store this
position. This setting can be stored using
memory button M ?.
X Make sure that the vehicle is stationary and
that the SmartKey is in position 2 in the
ignition lock.
X Press button ; for the exterior mirror on
the front-passenger side.
X Use adjustment button = to adjust the
exterior mirror. You should see the rear
wheel and the curb in the exterior mirror.
X Press memory button M ? and
one
of the
arrows on adjustment button = within
three seconds.
The parking position is stored if the exterior
mirror does not move.
X If the mirror moves out of position, repeat
the steps.
Calling up a stored parking position
setting X
Turn the SmartKey to position 2 in the
ignition lock.
X Adjust the exterior mirror on the front-
passenger side with the corresponding
button ( Y page 92).
X Engage reverse gear.
The exterior mirror on the front-passenger
side moves to the stored parking position.
The exterior mirror on the front-passenger
side moves back to its original position:
R as soon as you exceed a speed of 9 mph
(15 km/h)
R about ten seconds after you have
disengaged reverse gear
R if you press button : for the exterior
mirror on the driver's side 94
Mirrors
Seats, steering wheel and mirrors
ProCarManuals.com
Page 97 of 340
Memory functions
Storing settings
G
WARNING
If you use the memory function on the driver's
side while driving, you could lose control of
the vehicle as a result of the adjustments
being made. There is a risk of an accident.
Only use the
memory function on the driver's
side when the vehicle is stationary. G
WARNING
When the memory function adjusts the seat,
you and other
vehicle occupants – particularly
children – could become trapped. There is a
risk of injury.
While the memory function is making
adjustments, make sure that no one has any
body parts in the sweep of the seat. If
somebody becomes trapped, immediately
release the memory function position button.
The adjustment process is stopped. G
WARNING
Children could become trapped if they
activate the memory function, particularly
when unattended. There is a risk of injury.
When leaving the vehicle, always take the
SmartKey with you
and lock the vehicle. Never
leave children unsupervised in the vehicle.
With the memory function, you can store up
to three different settings, e.g. for three
different people.
The following settings are stored as a single
memory preset:
R position of the seat, backrest and head
restraint
R driver's side: position of the exterior
mirrors on the driver's and front-passenger
sides X
Adjust the seat ( Y page 88).
X Adjust the exterior mirror on the driver's
side ( Y page 92).
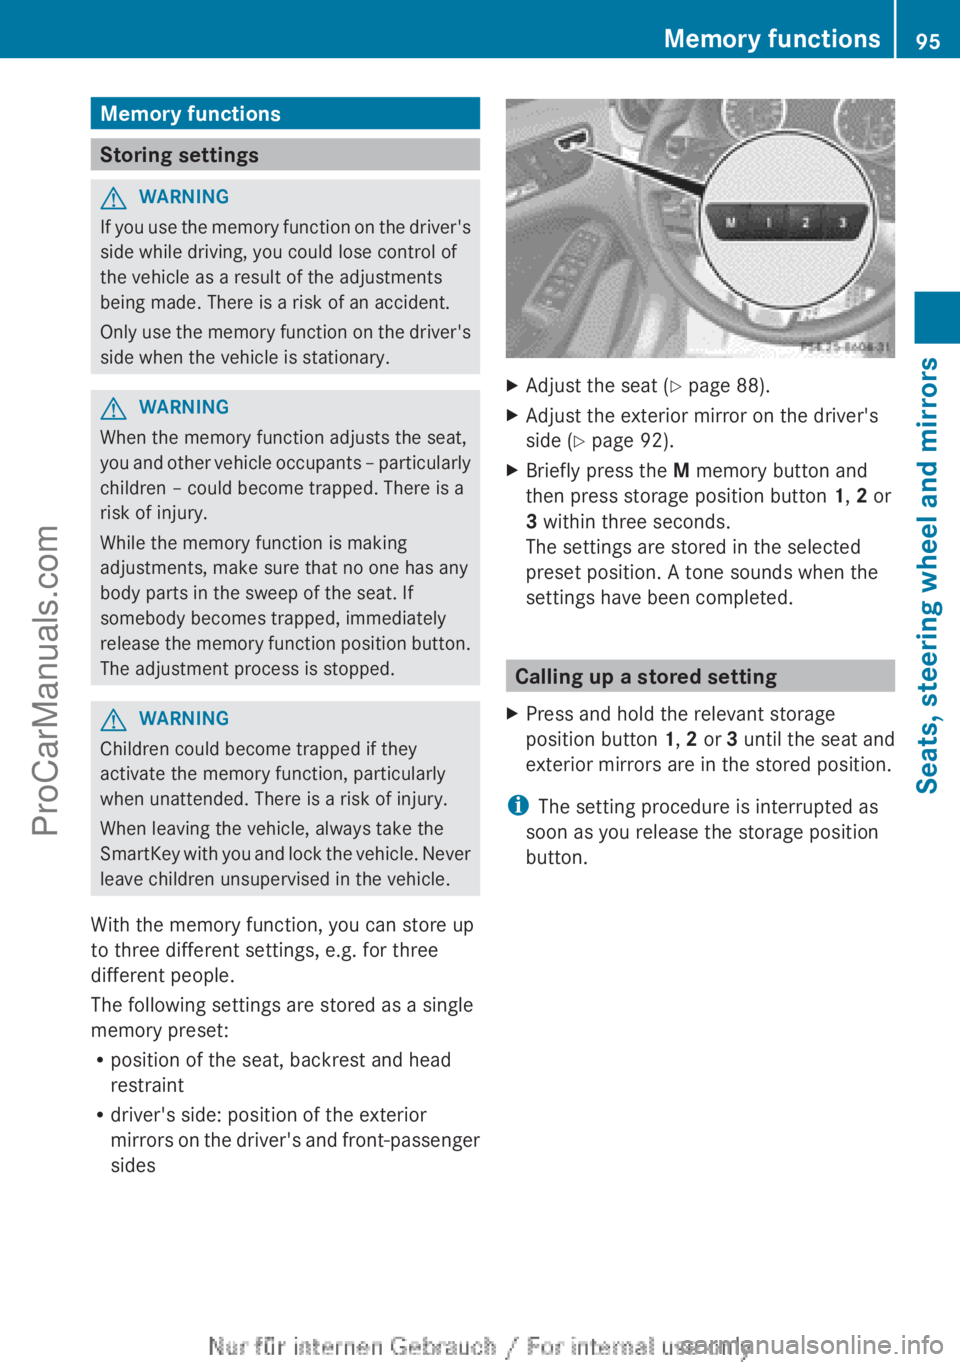
X Briefly press the M memory button and
then press storage position button 1, 2 or
3 within three seconds.
The settings are stored in the selected
preset position. A tone sounds when the
settings have been completed. Calling up a stored setting
X Press and hold the relevant storage
position button 1, 2 or 3
until the
seat and
exterior mirrors are in the stored position.
i The setting procedure is interrupted as
soon as you release the storage position
button. Memory functions
95
Seats, steering wheel and mirrors Z
ProCarManuals.com
Page 179 of 340

General notes
Rear view camera
: is in the trunk lid handle.
The rear view camera extends, when it is
activated.
The rear view camera is an optical parking and
maneuvering aid. It uses guide lines to show
the area behind your vehicle in the Audio/
COMAND display.
The area behind the vehicle is displayed as a
mirror image, as in the rear view mirror.
i The text of messages shown in the
COMAND display depends on the language
setting. The following are examples of rear
view camera messages in the COMAND
display.
Activating/deactivating the rear view
camera X
To activate: make sure
that the SmartKey
is in position 2 in the ignition lock.
X Make sure that in the audio system/
COMAND, the "Activation by R gear"
function is selected; see the separate
operating instructions for the audio
system/COMAND.
X Engage reverse gear.
Guide lines are used to show the area
behind the vehicle in the Audio/COMAND
display. To deactivate:
the rear view camera is
deactivated if you:
R select transmission position P (vehicles
with automatic transmission)
R drive forward ten meters
R shift the transmission from R to another
position (after 15 seconds)
R drive forwards at a speed of over 5 mph
(10km/h)
Displays in
the Audio/COMAND display The rear view camera may show a distorted
view of obstacles, show them incorrectly or
not at
all.
The rear view camera does not show
objects in the following positions:
R very close to the rear bumper
R under the rear bumper
R in the area immediately above the tailgate
handle
! Objects not at ground level may appear to
be further away than they actually are, e.g.:
R the bumper of a parked vehicle
R the drawbar of a trailer
R the ball coupling of a trailer tow hitch
R the rear section of an HGV
R a slanted post
Use the guidelines only for orientation.
Approach objects no further than the
bottom-most guideline. Driving systems
177
Driving and parking Z
ProCarManuals.com
Page 180 of 340

Lanes
:
White guide line without turning the
steering wheel, vehicle width including
the exterior mirrors (static)
; Yellow lane marking tires at current
steering wheel angle,
vehicle width to the
outer side of the wheels (dynamic)
= Red guide line for the vehicle width
including the exterior mirrors, for current
steering wheel angle (dynamic)
? Bumper Guide lines
?
Bumper
A Red guide line at a distance of
approximately 10 in (0.25 m
) from the
rear of the vehicle
B Yellow guide line at a distance of
approximately
13 ft (
4.0 m) from the rear
of the vehicle
C Vehicle center axle (marker assistance)
D Yellow guide line at a distance of
approximately 3 ft (1.0 m ) from the rear
of the vehicle The lanes and guide lines are only displayed
if you have engaged reverse gear.
The distance specifications only apply to
objects that are at ground level.
Additional displays on vehicles with PARKTRONIC
and COMAND
:
Front warning display
; Additional PARKTRONIC measurement
operational readiness indicator
= Rear warning display
Vehicles with PARKTRONIC and
COMAND: if PARKTRONIC is operational
(Y page 169), an additional operational
readiness indicator will appear in COMAND
display ;.If the PARKTRONIC warning
displays are active or light up, warning
displays : and
=
are also active or light up
correspondingly in the COMAND display.
Reverse parking function X
Make sure that the rear view camera is
activated and the "Reverse parking"
function is selected; see the separate
operating instructions for the audio
system/COMAND.
The lane and the guide lines are shown.178
Driving systems
Driving and parking
ProCarManuals.com
Page 183 of 340
Warning and display messages in the
multifunction display
X
Activate ATTENTION ASSIST using the on-
board computer ( Y page 195).
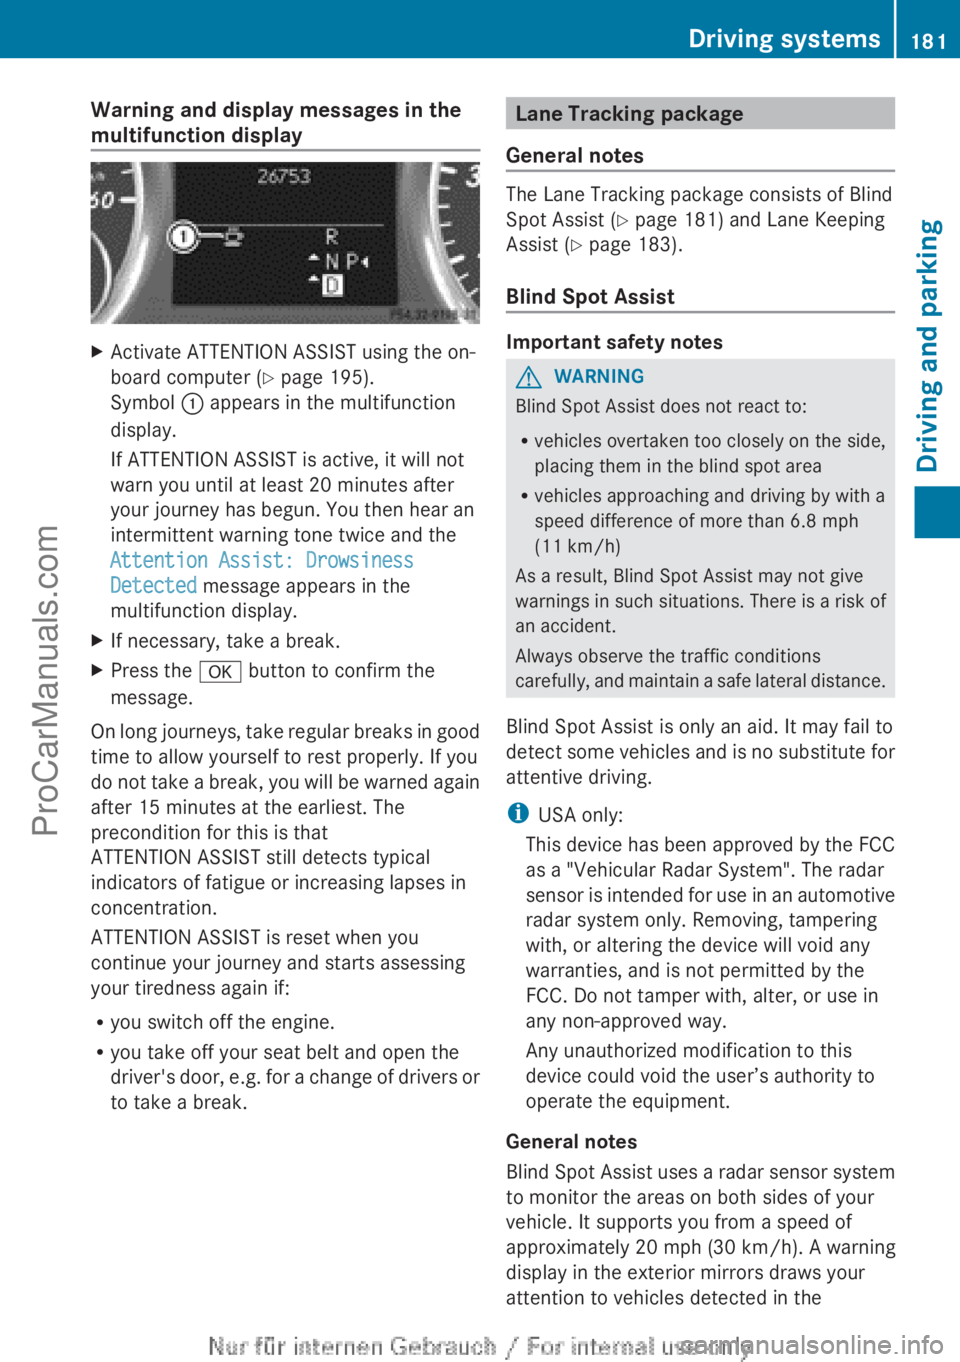
Symbol : appears in the multifunction
display.
If ATTENTION ASSIST is active, it will not
warn you until at least 20 minutes after
your journey has begun. You then hear an
intermittent warning tone twice and the
Attention Assist: Drowsiness
Detected message appears in the
multifunction display.
X If necessary, take a break.
X Press the
a button to confirm the
message.
On long journeys, take regular breaks in good
time to allow yourself to rest properly. If you
do not take
a break, you will be warned again
after 15 minutes at the earliest. The
precondition for this is that
ATTENTION ASSIST still detects typical
indicators of fatigue or increasing lapses in
concentration.
ATTENTION ASSIST is reset when you
continue your journey and starts assessing
your tiredness again if:
R you switch off the engine.
R you take off your seat belt and open the
driver's door, e.g. for a change of drivers or
to take a break. Lane Tracking package
General notes The Lane Tracking package consists of Blind
Spot Assist (
Y
page 181) and Lane Keeping
Assist (Y page 183).
Blind Spot Assist Important safety notes
G
WARNING
Blind Spot Assist does not react to:
R vehicles overtaken too closely on the side,
placing them in the blind spot area
R vehicles approaching and driving by with a
speed difference of more than 6.8 mph
(11 km/h )
As a result, Blind Spot Assist may not give
warnings in
such situations. There is a risk of
an accident.
Always observe the traffic conditions
carefully, and maintain a safe lateral distance.
Blind Spot Assist is only an aid. It may fail to
detect some vehicles and is no substitute for
attentive driving.
i USA only:
This device has been approved by the FCC
as a "Vehicular Radar System". The radar
sensor is intended for use in an automotive
radar system only. Removing, tampering
with, or altering the device will void any
warranties, and is not permitted by the
FCC. Do not tamper with, alter, or use in
any non-approved way.
Any unauthorized modification to this
device could void the user’s authority to
operate the equipment.
General notes
Blind Spot Assist uses a radar sensor system
to monitor the areas on both sides of your
vehicle. It supports you from a speed of
approximately 20 mph (30 km/h). A warning
display in the exterior mirrors draws your
attention to vehicles detected in the Driving systems
181
Driving and parking Z
ProCarManuals.com
Page 184 of 340
monitored area. If you then switch on the
corresponding turn signal to change lanes,
you will also receive a visual and audible
collision warning.
For
this purpose, Blind Spot
Assist uses sensors in the rear bumper.
For Blind Spot Assist to assist you when
driving, the radar sensor system must be:
R activated(Y page 199)
R operational
Monitoring range of the sensors
In particular, the detection of obstacles can
be impaired if:
R dirt on the sensors or anything else
covering the sensors
R there is poor visibility, e.g. due to fog, heavy
rain or snow
R a narrow vehicle traveling in front, e.g. a
motorbike or bicycle
R the road has very wide lanes
R the road has narrow lanes
R you are not driving in the middle of the lane
R there are barriers or similar lane borders
Vehicles in the monitoring range are then not
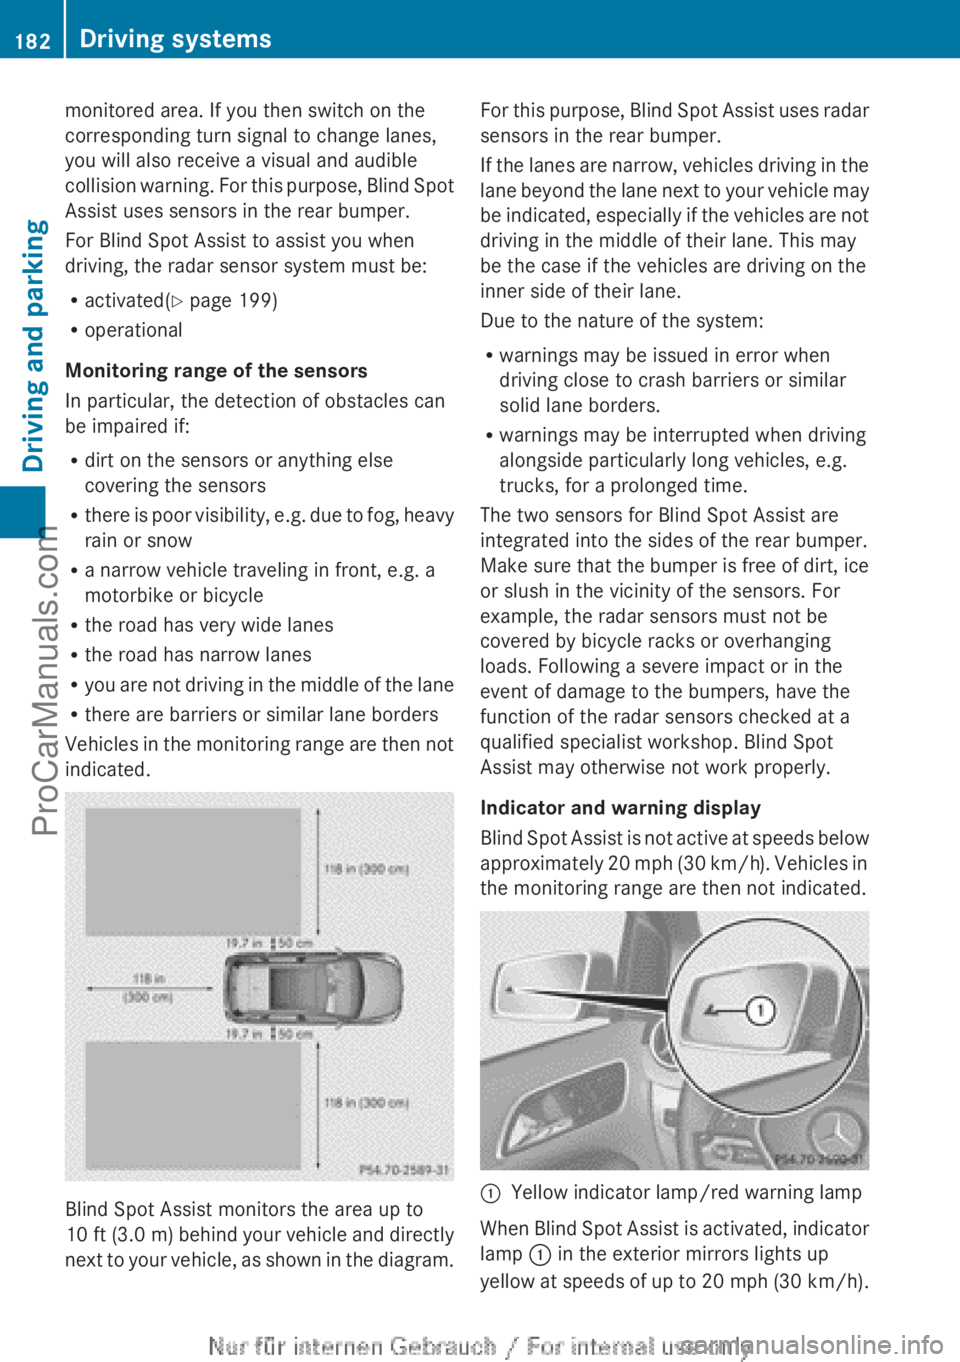
indicated. Blind Spot Assist monitors the area up to
10 ft (
3.0 m
) behind your vehicle and directly
next to your vehicle, as shown in the diagram. For this purpose, Blind Spot Assist uses radar
sensors in the rear bumper.
If the
lanes
are narrow, vehicles driving in the
lane beyond the lane next to your vehicle may
be indicated, especially if the vehicles are not
driving in the middle of their lane. This may
be the case if the vehicles are driving on the
inner side of their lane.
Due to the nature of the system:
R warnings may be issued in error when
driving close to crash barriers or similar
solid lane borders.
R warnings may be interrupted when driving
alongside particularly long vehicles, e.g.
trucks, for a prolonged time.
The two sensors for Blind Spot Assist are
integrated into the sides of the rear bumper.
Make sure that the bumper is free of dirt, ice
or slush in the vicinity of the sensors. For
example, the radar sensors must not be
covered by bicycle racks or overhanging
loads. Following a severe impact or in the
event of damage to the bumpers, have the
function of the radar sensors checked at a
qualified specialist workshop. Blind Spot
Assist may otherwise not work properly.
Indicator and warning display
Blind Spot Assist is not active at speeds below
approximately 20 mph (30 km/h). Vehicles in
the monitoring range are then not indicated. :
Yellow indicator lamp/red warning lamp
When Blind Spot Assist is activated, indicator
lamp : in the exterior mirrors lights up
yellow at speeds
of up to 20 mph (30 km/h).182
Driving systems
Driving and parking
ProCarManuals.com