2012 MERCEDES-BENZ B-CLASS warning lights
[x] Cancel search: warning lightsPage 106 of 340

?
| To switch the front interior lighting/
automatic interior lighting control off
A p To switch the right-hand front
reading lamp on/off
B To switch the automatic interior lighting
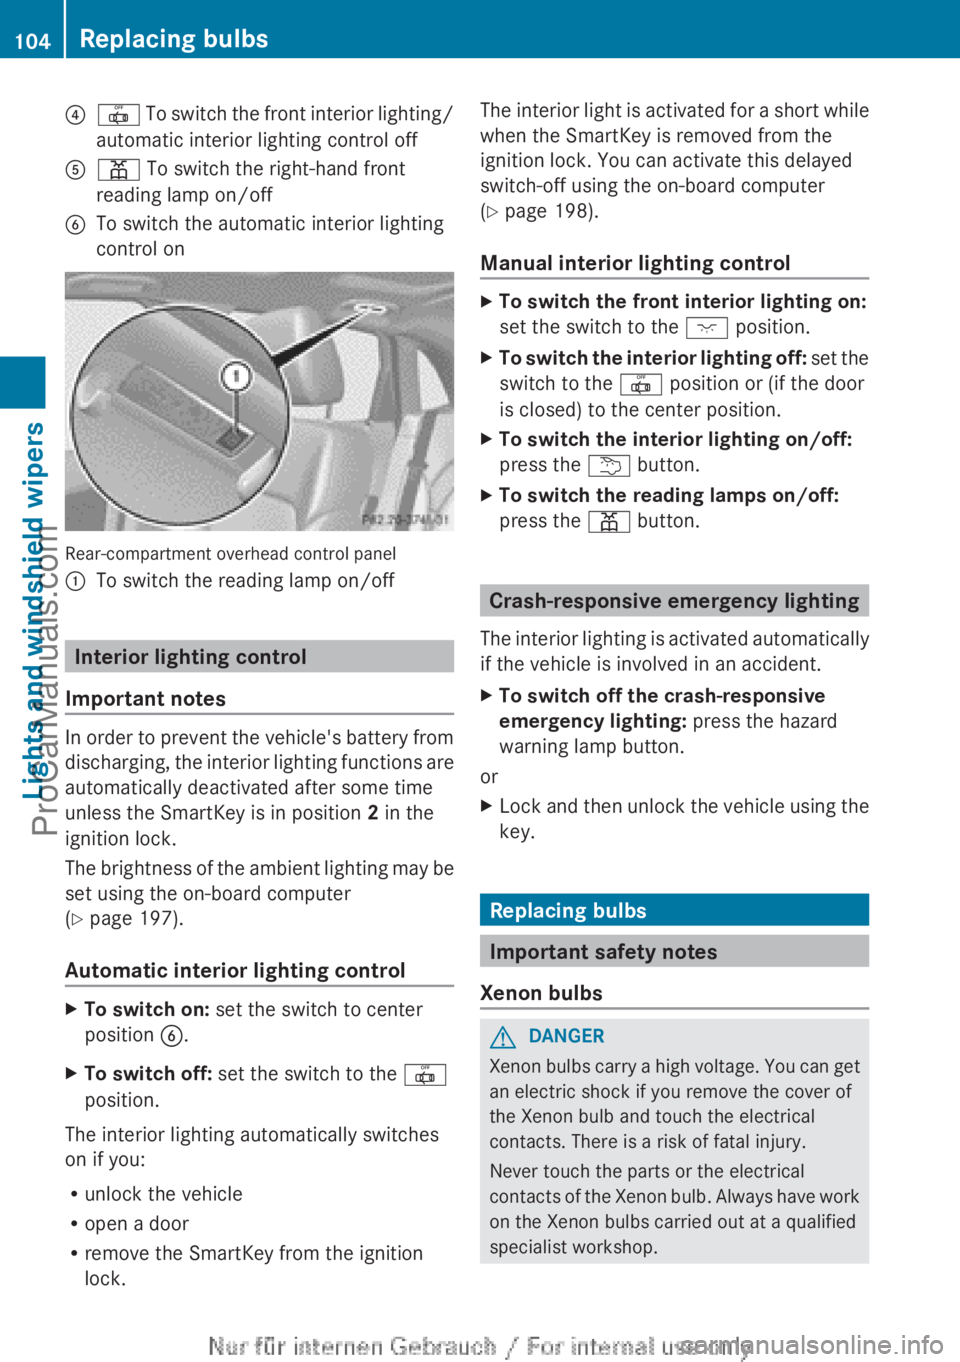
control on Rear-compartment overhead control panel
:
To switch the reading lamp on/off Interior lighting control
Important notes In order to prevent the vehicle's battery from
discharging, the
interior
lighting functions are
automatically deactivated after some time
unless the SmartKey is in position 2 in the
ignition lock.
The brightness of the ambient lighting may be
set using the on-board computer
(Y page 197).
Automatic interior lighting control X
To switch on: set the switch to center
position B.
X To switch off: set the switch to the |
position.
The interior lighting automatically switches
on if you:
R unlock the vehicle
R open a door
R remove the SmartKey from the ignition
lock. The interior light is activated for a short while
when the SmartKey is removed from the
ignition lock. You can activate this delayed
switch-off using the on-board computer
(Y page 198).
Manual interior lighting control
X
To switch the front interior lighting on:
set the switch to the c position.
X To switch the interior lighting off: set the
switch to the |
position or (if the door
is closed) to the center position.
X To switch the interior lighting on/off:
press the u button.
X To switch the reading lamps on/off:
press the p button. Crash-responsive emergency lighting
The interior lighting
is activated automatically
if the vehicle is involved in an accident.
X To switch off the crash-responsive
emergency lighting: press the hazard
warning lamp button.
or
X Lock and then unlock the vehicle using the
key. Replacing bulbs
Important safety notes
Xenon bulbs G
DANGER
Xenon bulbs carry a high voltage. You can get
an electric shock if you remove the cover of
the Xenon bulb and touch the electrical
contacts. There is a risk of fatal injury.
Never touch the parts or the electrical
contacts of the
Xenon bulb. Always have work
on the Xenon bulbs carried out at a qualified
specialist workshop. 104
Replacing bulbs
Lights and windshield wipers
ProCarManuals.com
Page 107 of 340

If your vehicle is equipped with Xenon bulbs,
you can recognize this by the following: the
cone of light from the Xenon bulbs moves
from the top to the bottom and back again
when you start the engine. For this to be
observed, the lights must be switched on
before starting the engine.
Bulbs and lamps are an important aspect of
vehicle safety.
You
must therefore make sure
that these function correctly at all times.
Have the headlamp setting checked regularly.
Other bulbs G
WARNING
Bulbs, lamps and connectors can get very hot
when operating. If you change a bulb, you
could burn yourself on these components.
There is a risk of injury.
Allow these components
to cool down before
changing a bulb.
There are bulbs other than the Xenon bulbs
that you cannot replace. Replace only the
bulbs listed (Y page 105). Have the bulbs that
you cannot replace yourself changed at a
qualified specialist workshop.
If you require assistance changing bulbs,
consult a qualified specialist workshop.
Do not touch the glass tube of new bulbs with
your bare hands. Even minor contamination
can burn into the glass surface and reduce
the service life of the bulbs. Always use a lint-
free cloth or only touch the base of the bulb
when installing.
Only use bulbs of the correct type.
If the new bulb still does not light up, consult
a qualified specialist workshop.
Bulbs and lamps are an important aspect of
vehicle safety. You must therefore make sure
that these function correctly at all times.
Have the headlamp setting checked regularly. Overview: changing bulbs/bulb types
You can change
the following bulbs. The bulb
type can be found in the legend. Halogen headlamps
:
Turn signal lamp:3457
; High-beam headlamp: H7 55 W
= Parking lamp/standing lamp: W 5 W LL
? Low-beam headlamp: H7 55 W Vehicles with Intelligent Light System
:
Cornering lamp: H7 55 W Replacing bulbs
105
Lights and windshield wipers Z
ProCarManuals.com
Page 109 of 340

Low-beam headlamps (halogen
headlamps)
G
WARNING
These bulbs are pressurized.
They can explode when being changed if:
R they are still hot
R they hit an object when being removed
R they are dropped
There is a risk of injury.
You should wear eye protection and clean
gloves when you are changing a bulb. If
necessary, have bulbs changed at a qualified
specialist workshop. X
Remove the cover in the front wheel
housing ( Y page 106).
X Turn housing cover : counter-clockwise
and pull it out.
X Turn bulb holder ; counter-clockwise
and
pull it out.
X Take the bulb out of bulb holder ;
.
X Insert the new bulb into bulb holder ;.
X Insert bulb holder ;
into the
lamp and turn
it clockwise.
X Align housing cover : and turn it
clockwise until it engages.
X Replace the cover in the front wheel
housing ( Y page 106). High-beam headlamps (halogen
headlamps) G
WARNING
These bulbs are pressurized.
They can explode when being changed if:
R they are still hot
R they hit an object when being removed
R they are dropped
There is a risk of injury.
You should wear eye protection and clean
gloves when you are changing a bulb. If
necessary, have bulbs changed at a qualified
specialist workshop. X
Switch off the lights.
X Open the hood.
X Turn housing cover : counter-clockwise
and pull it out.
X Turn bulb holder ; counter-clockwise
and
pull it out.
X Take the bulb out of bulb holder ;
.
X Insert the new bulb into bulb holder ;.
X Insert bulb holder ;
into the
lamp and turn
it clockwise.
X Align housing cover : and turn it
clockwise until it engages. Replacing bulbs
107
Lights and windshield wipers Z
ProCarManuals.com
Page 110 of 340

Parking lamps/standing lamps
(halogen headlamps)
X
Switch off the lights.
X Open the hood.
X Turn housing cover : counter-clockwise
and pull it out.
X Pull out bulb holder ;.
X Take the bulb out of bulb holder ;.
X Insert the new bulb into bulb holder ;.
X Insert bulb holder ;.
X Align housing cover : and turn it
clockwise until it engages.
Turn signals (halogen headlamps) X
Switch off the lights.
X Open the hood.
X Turn bulb holder : counter-clockwise and
pull it out.
X Take the bulb out of bulb holder :
.X
Insert the new bulb into bulb holder :.
X Insert bulb holder : and turn it clockwise
until it engages.
Cornering light function (Intelligent
Light System) G
WARNING
These bulbs are pressurized.
They can explode when being changed if:
R they are still hot
R they hit an object when being removed
R they are dropped
There is a risk of injury.
You should wear eye protection and clean
gloves when you are changing a bulb. If
necessary, have bulbs changed at a qualified
specialist workshop. X
Switch off the lights.
X Open the hood.
X Turn housing cover : counter-clockwise
and pull it out.
X Turn bulb holder ; counter-clockwise and
pull it out.
X Take the bulb out of bulb holder ;
.
X Insert the new bulb into bulb holder ;.
X Insert bulb holder ;
into the
lamp and turn
it clockwise.
X Align housing cover : and turn it
clockwise until it engages.108
Replacing bulbs
Lights and windshield wipers
ProCarManuals.com
Page 114 of 340

!
If the windshield wipers leave smears on
the windshield after the vehicle has been
washed in an automatic car wash, wax or
other residues may be the reason for this.
Clean the windshield using washer fluid
after washing the vehicle in an automatic
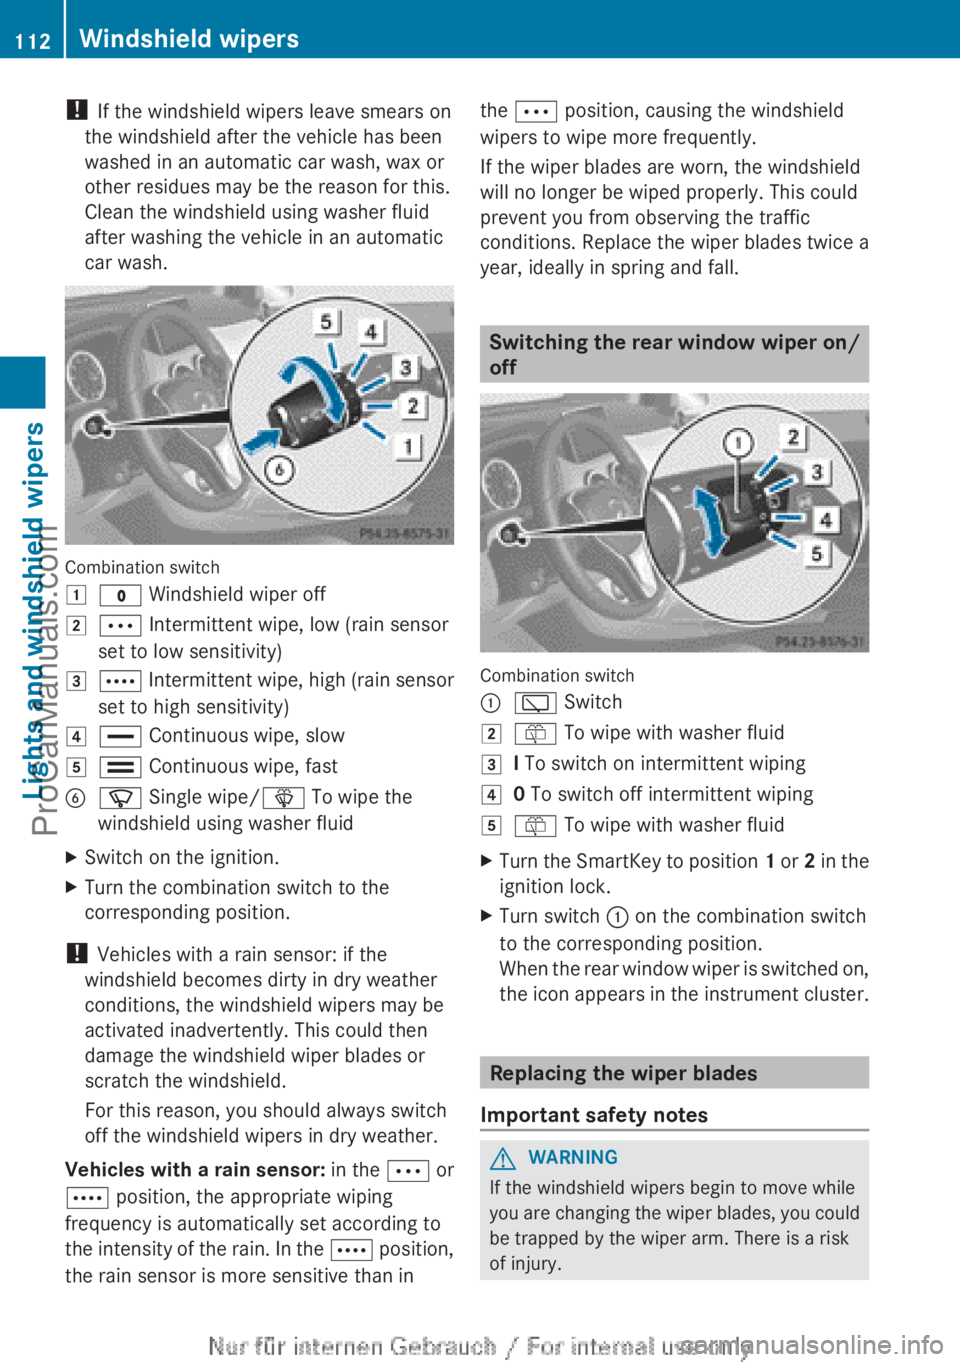
car wash. Combination switch
1
$ Windshield wiper off
2 Ä Intermittent wipe, low (rain sensor
set to low sensitivity)
3 Å Intermittent wipe, high (rain sensor
set to high sensitivity)
4 ° Continuous wipe, slow
5 ¯
Continuous wipe, fast
B í Single wipe/ î To wipe the
windshield using washer fluid
X Switch on the ignition.
X Turn the combination switch to the
corresponding position.
! Vehicles with a rain sensor: if the
windshield becomes dirty in dry weather
conditions, the windshield wipers may be
activated inadvertently. This could then
damage the windshield wiper blades or
scratch the windshield.
For this reason, you should always switch
off the windshield wipers in dry weather.
Vehicles with
a
rain sensor: in the Ä or
Å position, the appropriate wiping
frequency is automatically set according to
the intensity of the rain. In the Å position,
the rain sensor is more sensitive than in the Ä position, causing the windshield
wipers to wipe more frequently.
If the wiper blades are worn, the windshield
will no longer be wiped properly. This could
prevent you from observing the traffic
conditions. Replace the wiper blades twice a
year, ideally in spring and fall.
Switching the rear window wiper on/
off
Combination switch
:
è Switch
2 ô To wipe with washer fluid
3 I To switch on intermittent wiping
4 0 To switch off intermittent wiping
5 ô To wipe with washer fluid
X Turn the SmartKey to position 1 or
2
in the
ignition lock.
X Turn switch : on the combination switch
to the corresponding position.
When the rear
window wiper is switched on,
the icon appears in the instrument cluster. Replacing the wiper blades
Important safety notes G
WARNING
If the windshield wipers begin to move while
you are changing
the wiper blades, you could
be trapped by the wiper arm. There is a risk
of injury. 112
Windshield wipers
Lights and windshield wipers
ProCarManuals.com
Page 132 of 340

X
Turn the SmartKey to position 0 in the
ignition lock or remove it ( Y page 135).
X To activate: press the Ì button.
The indicator lamp
in the Ì button lights
up.
X To deactivate: press the Ì button.
The indicator lamp
in the Ì button goes
out.
i Residual heat is deactivated
automatically:
R after approximately 30 minutes
R when the ignition is switched on
R if the battery voltage drops
R when the auxiliary heating is activated Setting the air vents
Important safety notes
G
WARNING
Very hot or very cold air can flow from the air
vents. This could
result in burns or frostbite in
the immediate vicinity of the air vents. There
is a risk of injury.
Make sure that all vehicle occupants always
maintain a sufficient distance to the air
outlets. If necessary, redirect the airflow to
another area of the vehicle interior.
In order to ensure the direct flow of fresh air
through the air vents into the vehicle interior,
please observe the following notes:
R keep the air inlet between the windshield
and the hood free of blockages, such as ice,
snow or leaves.
R never cover the air vents or air intake grilles
in the vehicle interior.
i You can move the adjusters for the air
vents vertically or horizontally to set the
direction of the airflow.
i For optimal climate control in the vehicle,
open the air vents completely and set the
adjusters to the central position. Setting the center air vents
X
To open the center air vent: turn the
adjuster in one of center air vents :
counter-clockwise.
X To close the center air vent: turn the
adjuster in one of center air vents :
clockwise until it engages. Setting the side air vents
:
Side window defroster vent
; Side air vent
X To open a side air vent: turn the adjuster
in side air vent ; counter-clockwise.
X To close a side air vent: turn the
adjuster
in side air vent ; clockwise until it
engages. 130
Setting the air vents
Climate control
ProCarManuals.com
Page 153 of 340

engine is switched off. The sounds that can
be heard
while
this is occurring are normal.
Applying/releasing manually Applying
X
Push handle :.
When the electric parking brake is
engaged, the !
red indicator lamp lights
up in the instrument cluster.
i The electric parking brake can also be
applied when the SmartKey is removed.
Releasing
X Pull handle :.
The red ! indicator lamp in the
instrument cluster goes out.
i You can only release the electric parking
brake when the key is in position 1 or 2 in
the ignition lock.
Applying automatically The electric parking brake is applied
automatically:
R
if DISTRONIC PLUS brings the vehicle to a
standstill or
R if the HOLD
function is keeping the vehicle
stationary
In addition, at least one of the following
conditions must be fulfilled:
R the engine is switched off.
R the driver's door is open and the seat belt
is not fastened.
R there is a system malfunction.
R the power supply is insufficient.
R the vehicle is stationary for a lengthy
period.
The red ! indicator lamp in the instrument
cluster lights up.
i The electric parking brake is not
automatically engaged if the engine is
switched off by the ECO start/stop
function. Releasing automatically Your vehicle's electric parking brake is
automatically released if all of the following
conditions are met:
R
the engine is running.
R the transmission is in position D or R.
R the seat belt has been fastened.
R you depress the accelerator pedal.
If the transmission
is in position R, the tailgate
must be closed.
If your seat belt is not fastened, the following
conditions must be fulfilled to automatically
release the electric parking brake:
R the driver's door is closed.
R you have shifted out of transmission
position P or you have previously driven
faster than 2 mph (3 km/h).
Emergency braking The vehicle can also be braked during an
emergency by using the electric parking
brake.
X
While driving, push handle : of the
electric
parking brake ( Y page 150).
i The vehicle is braked for as long as
handle : of the electric parking brake is
pressed. The longer electric parking brake
handle : is depressed, the greater the
braking force.
During braking:
R a warning tone sounds
R the Release Park. Brake message
appears
R the red ! indicator lamp in the
instrument cluster flashes
When the vehicle has been braked to a
standstill, the electric parking brake is
engaged. Parking
151
Driving and parking Z
ProCarManuals.com
Page 157 of 340

brake pads. This can result in a significantly
longer braking distance.
R
Brake occasionally to
remove any possible
salt residue. Make sure that you do not
endanger other road users when doing so.
R Carefully depress the brake pedal and the
beginning and end of a journey.
R Maintain a greater distance to the vehicle
ahead.
Servicing the brakes !
If the red
brake warning lamp lights up in
the instrument cluster and you hear a
warning tone while the engine is running,
the brake fluid level may be too low.
Observe additional warning messages in
the multifunction display.
The brake fluid level may be too low due to
brake pad wear or leaking brake lines.
Have the brake system checked
immediately. This work should be carried
out at a qualified specialist workshop.
! A function or performance test should
only be carried out on a 2-axle
dynamometer. If you are planning to have
the vehicle tested on such a dynamometer,
contact an authorized Mercedes-Benz
Center to obtain further information first.
Otherwise, you could damage the drive
train or the brake system.
! As the ESP ®
system operates
automatically, the engine and the ignition
must be switched off (the SmartKey must
be in position 0 or 1 in the ignition lock) if:
R the electric parking brake is tested on a
brake dynamometer (for a maximum of
ten seconds)
R the vehicle is towed with the front axle
raised.
Braking triggered automatically by ESP ®
may seriously damage the brake system.
All checks and maintenance work on the
brake system must be carried out at a qualified specialist workshop. Consult a
qualified
specialist workshop
to arrange this.
Have brake pads installed and brake fluid
replaced at a qualified specialist workshop.
If the brake system has only been subject to
moderate loads, you should test the
functionality of your brakes at regular
intervals.
You can find a description of Brake Assist
(BAS) on ( Y page 59).
Mercedes-Benz recommends that you only
have brake pads/linings installed on your
vehicle which have been approved for
Mercedes-Benz vehicles or which correspond
to an equivalent quality standard. Brake
pads/linings which have not been approved
for Mercedes-Benz vehicles or which are not
of an equivalent quality could affect your
vehicle's operating safety.
Mercedes-Benz recommends that you only
use brake fluid that has been specially
approved for your vehicle by Mercedes-Benz,
or which corresponds to an equivalent quality
standard. Brake fluid which has not been
approved for Mercedes-Benz vehicles or
which is not of an equivalent quality could
affect your vehicle's operating safety.
Checking brake lining thickness You can measure the break pad/lining
thickness using a test gauge. Color-coding
(green or
red)
on the test gauge allows you to
determine whether the brake pad/lining
thickness is still sufficient. The test gauge is
in the vehicle document wallet in the glove
box. Driving tips
155
Driving and parking Z
ProCarManuals.com