2012 MERCEDES-BENZ B-CLASS warning light
[x] Cancel search: warning lightPage 75 of 340

Problem Possible causes/consequences and
M SolutionsThe engine cannot be
started using the
SmartKey. The on-board voltage is too low.
X
Switch off non-essential consumers, e.g. seat heating or interior
lighting, and try to start the engine again.
If this does not work:
X Check the starter battery and charge it if necessary
(Y page 285).
or
X Jump-start the vehicle (Y page 289).
or
X Consult a qualified specialist workshop. The engine cannot be
started using the
SmartKey. The steering lock is mechanically blocked.
X
Remove the SmartKey and reinsert it into the ignition lock. While
doing this, turn the steering wheel in both directions. Doors
Important safety notes
G
WARNING
If children are left unsupervised in the vehicle,
they could:
R open the doors, thus endangering other
people or road users.
R get out and disrupt traffic.
R operate the vehicle's equipment.
Additionally, children could set the vehicle in
motion if, for example, they:
R release the parking brake.
R shift the automatic transmission out of
parking position P.
R starting the engine.
There is a risk of an accident and injury.
When leaving the vehicle, always take the
SmartKey with you
and lock the vehicle. Never
leave children or animals unattended in the
vehicle. Always keep the SmartKey out of
reach of children. G
WARNING
If persons, particularly children are subjected
to prolonged exposure to extreme heat or
cold, there is a risk of injury, possibly even
fatal. Never leave children unattended in the
vehicle. Unlocking and opening doors from
the inside
X
To unlock a front door: pull door
handle ;.
Locking knob : pops up.
The door is unlocked and can be opened. Doors
73
Opening and closing Z
ProCarManuals.com
Page 79 of 340

You can reach the emergency release via the
cargo compartment. Fold the rear backrests
forward (
Y page 240).
X Take the mechanical key out of the
SmartKey (Y page 69). X
Insert mechanical key ; into the opening
in paneling :.
X Turn mechanical key ; 90° clockwise.
X Push mechanical key ; in the
direction of
the arrow and open the tailgate. Side windows
Important safety notes
G
WARNING
While opening the side windows, body parts
in the closing area could become trapped.
There is a risk of injury.
Make sure that no body parts are in close
proximity during the closing procedure. If
somebody becomes trapped, release the
switch or press the switch to open the side
window again. G
WARNING
If children operate the side windows they
could become trapped,
particularly if they are
left unsupervised. There is a risk of injury.
Activate the override feature for the rear side
windows. When leaving the vehicle, always
take the SmartKey with you and lock the
vehicle. Never leave children unsupervised in
the vehicle. Side window reversing feature
The side windows are equipped with an
automatic reversing feature. If a solid object
blocks or restricts a side window during the
closing process, the
side window opens again
automatically. However, the automatic
reversing feature is only an aid and does not
relieve you of the responsibility of paying
attention when closing a side window. G
WARNING
The reversing feature does not react:
R to soft, light and thin objects, e.g. small
fingers
R over the last
4 mm of the closing movement
R during resetting
R when closing the side window again
manually immediately after automatic
reversing
This means that the reversing feature cannot
prevent someone being trapped in these
situations. There is a risk of injury.
Make sure that no body parts are in close
proximity during the closing procedure. If
someone becomes trapped, press the switch
to open the side window again. Opening and closing the side
windows
The switches for
all side windows are located
on the driver's door. There is also a switch on
each door for the corresponding side window.
The switches on the driver's door take
precedence. Side windows
77
Opening and closing Z
ProCarManuals.com
Page 81 of 340
When you lock the vehicle, you can
simultaneously:
R
close the side windows
R close the panorama roof with power tilt/
sliding panel
On vehicles with
a panorama roof with power
tilt/sliding panel, you can then close the
roller sunblinds.
i The SmartKey must be close to the
driver's door handle.
X Point the tip of the SmartKey at the driver's
door handle.
X Press and hold the & button until the
side windows and the panorama roof with
power tilt/sliding panel are fully closed.
X Make sure that all the side windows and the
panorama roof with power tilt/sliding
panel are closed.
On vehicles with a panorama roof with power
tilt/sliding panel:
X Press and hold the & button again
until
the roller sunblinds of the panorama roof
with power tilt/sliding panel close.
X To interrupt convenience closing:
release the & button.Resetting the side windows
You must reset each side window if:
R the side window opens again slightly after
being closed fully.
R the side window can no longer be fully
opened or closed.
X Close all the doors.
X Turn the SmartKey to position 1
or 2
in the
ignition lock.
X Pull the corresponding switch on the door
control panel until the side window is
completely closed ( Y page 77).
X Hold the switch for an additional second. If the side window opens again slightly:
X
Immediately
pull the corresponding switch
on the door control panel until the side
window is completely closed ( Y page 77).
X Hold the switch for an additional second.
X If the corresponding side window remains
closed after the button has been released,
the side window has been reset correctly.
If this is not the case, repeat the steps
above again. Problems with the side windows
G
WARNING
If you close a side window again immediately
after it has been blocked or reset, the side
window closes with increased or maximum
force. The reversing
feature is then not active.
Parts of the body could be trapped in the
closing area in the process. This poses an
increased risk of injury or even fatal injury.
Make sure that no parts of the body are in the
closing area. To stop the closing process,
release the switch or push the switch again to
reopen the side window.
Problem: a side window cannot be closed
because it is blocked by objects, e.g.
leaves in the window guide.
X Remove the objects.
X Close the side window.
Problem: a side window cannot be closed
and you cannot see the cause. If a side
window is obstructed during closing and
reopens again slightly:
X Immediately after the window blocks, pull
the corresponding switch again until the
side window has closed.
The side window is closed with increased
force. Side windows
79
Opening and closing Z
ProCarManuals.com
Page 82 of 340
If a side window is obstructed again during
closing and reopens again slightly:
X
Immediately after the window blocks, pull
the corresponding switch again until the
side window has closed.
The side window
is closed without the anti-
entrapment feature. Panorama roof with power tilt/sliding
panel
Important safety notes
In the following section, the term "sliding
sunroof" refers to the panorama roof with
power tilt/sliding panel. G
WARNING
While opening and closing the sliding sunroof,
body parts in close proximity could become
trapped. There is a risk of injury.
Make sure that no body parts are in close
proximity during the opening and closing
procedures.
If somebody becomes trapped:
R release the switch immediately, or
R during automatic operation, push the
switch briefly in any direction
The opening or closing procedure will be
stopped. G
WARNING
If children operate the sliding sunroof they
could become trapped,
particularly if they are
left unsupervised. There is a risk of injury.
When leaving the vehicle, always take the
SmartKey with you and lock the vehicle. Never
leave children unsupervised in the vehicle.
! Only open the sliding sunroof if it is free
of snow and ice. Otherwise, malfunctions
may occur.
Do not allow anything to protrude from the
sliding sunroof. Otherwise, the seals could
be damaged. !
The weather can
change abruptly. It could
start to rain or snow. Make sure that the
sliding sunroof is closed when you leave the
vehicle. The vehicle electronics can be
damaged if water enters the vehicle
interior.
i Resonance noises can occur in addition
to the usual airflow noises when the sliding
sunroof is open. They are caused by minor
pressure fluctuations in the vehicle interior.
Change the position of the sliding sunroof
or open a side window slightly to reduce or
eliminate these noises. Sliding sunroof reversing feature
The sliding sunroof is equipped with an
automatic reversing feature. If a solid object
blocks or restricts the sliding sunroof during
the closing process,
the sliding sunroof opens
again automatically. However, the automatic
reversing feature is only an aid and does not
relieve you of the responsibility of paying
attention when closing the sliding sunroof. G
WARNING
The reversing feature does not react:
R to soft, light and thin objects, e.g. small
fingers
R over the last
4 mm of the closing movement
R during resetting
R when closing the sliding sunroof again
manually immediately after automatic
reversing
This means that the reversing feature cannot
prevent someone being trapped in these
situations. There is a risk of injury.
Make sure that no body parts are in close
proximity during the closing procedure.
If somebody becomes trapped:
R release the switch immediately, or
R during automatic operation, push the
switch briefly in any direction
The closing process is stopped. 80
Panorama roof with power tilt/sliding panel
Opening and closing
ProCarManuals.com
Page 83 of 340
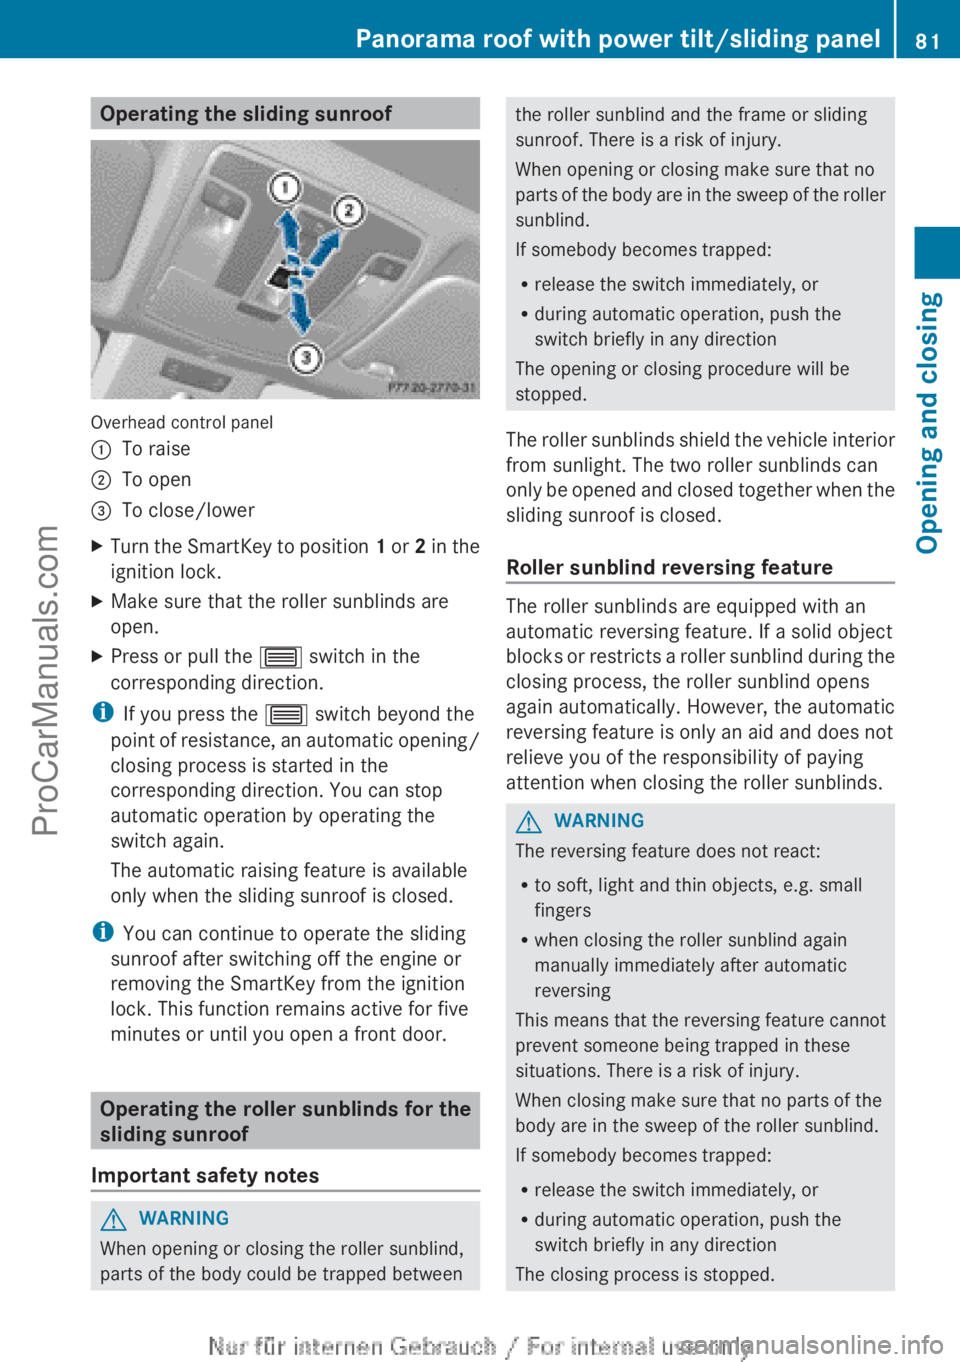
Operating the sliding sunroof
Overhead control panel
:
To raise
; To open
= To close/lower
X Turn the SmartKey to position 1 or
2 in the
ignition lock.
X Make sure that the roller sunblinds are
open.
X Press or pull the 3 switch in the
corresponding direction.
i If you press the 3 switch beyond the
point of resistance,
an automatic opening/
closing process is started in the
corresponding direction. You can stop
automatic operation by operating the
switch again.
The automatic raising feature is available
only when the sliding sunroof is closed.
i You can continue to operate the sliding
sunroof after switching off the engine or
removing the SmartKey from the ignition
lock. This function remains active for five
minutes or until you open a front door. Operating the roller sunblinds for the
sliding sunroof
Important safety notes G
WARNING
When opening or closing the roller sunblind,
parts of the body could be trapped between the roller sunblind and the frame or sliding
sunroof. There is a risk of injury.
When opening or closing make sure that no
parts of
the
body are in the sweep of the roller
sunblind.
If somebody becomes trapped:
R release the switch immediately, or
R during automatic operation, push the
switch briefly in any direction
The opening or closing procedure will be
stopped.
The roller sunblinds shield the vehicle interior
from sunlight. The two roller sunblinds can
only be opened and closed together when the
sliding sunroof is closed.
Roller sunblind reversing feature The roller sunblinds are equipped with an
automatic reversing feature. If a solid object
blocks or
restricts
a roller sunblind during the
closing process, the roller sunblind opens
again automatically. However, the automatic
reversing feature is only an aid and does not
relieve you of the responsibility of paying
attention when closing the roller sunblinds. G
WARNING
The reversing feature does not react:
R to soft, light and thin objects, e.g. small
fingers
R when closing the roller sunblind again
manually immediately after automatic
reversing
This means that the reversing feature cannot
prevent someone being trapped in these
situations. There is a risk of injury.
When closing make sure that no parts of the
body are in the sweep of the roller sunblind.
If somebody becomes trapped:
R release the switch immediately, or
R during automatic operation, push the
switch briefly in any direction
The closing process is stopped. Panorama roof with power tilt/sliding panel
81
Opening and closing Z
ProCarManuals.com
Page 84 of 340
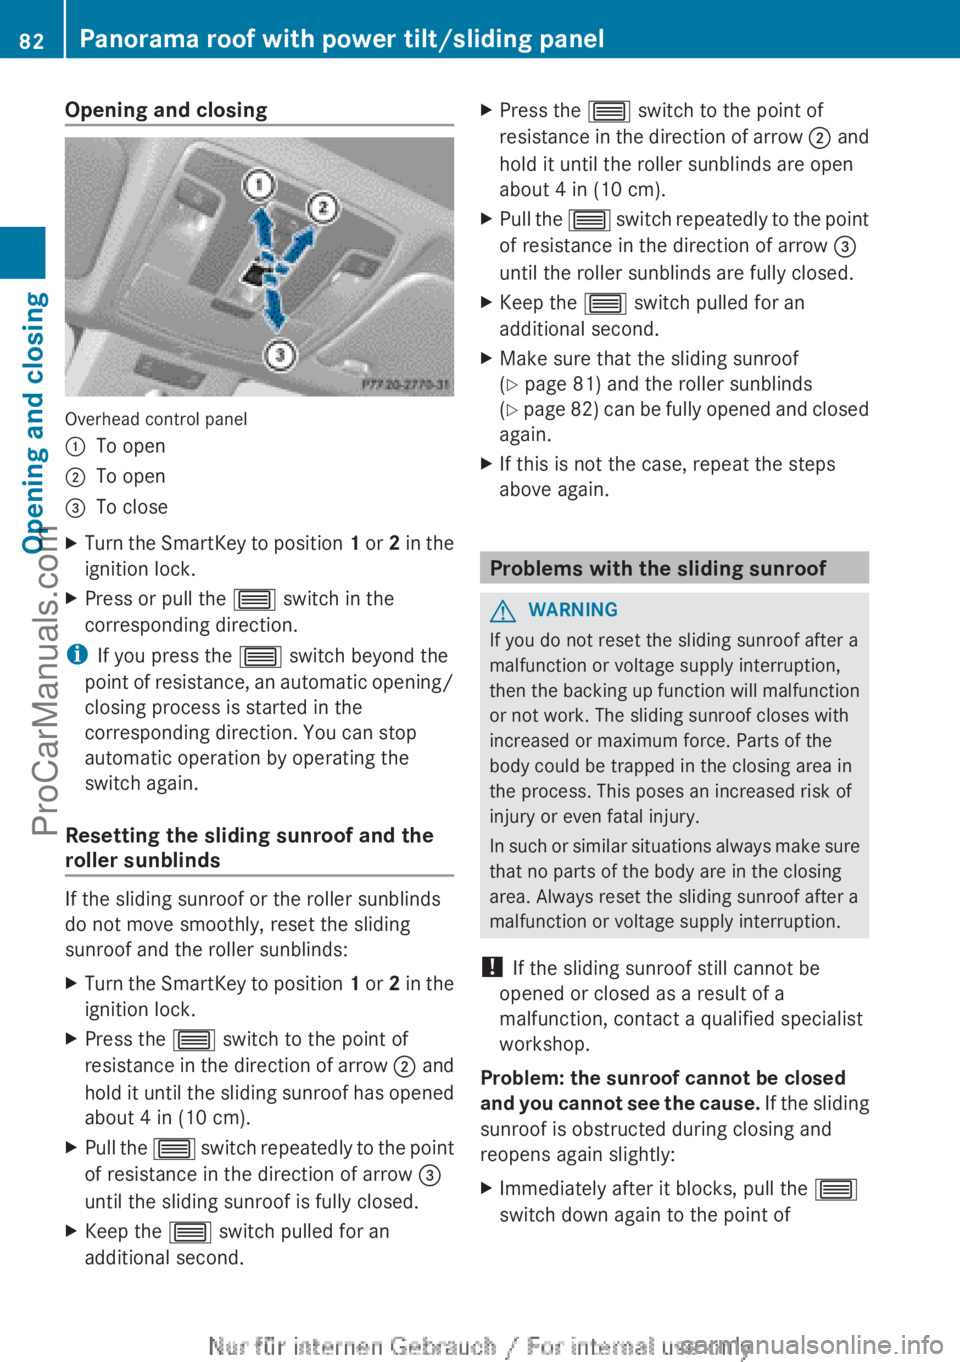
Opening and closing
Overhead control panel
:
To open
; To open
= To close
X Turn the SmartKey to position 1 or
2 in the
ignition lock.
X Press or pull the 3 switch in the
corresponding direction.
i If you press the 3 switch beyond the
point of resistance,
an automatic opening/
closing process is started in the
corresponding direction. You can stop
automatic operation by operating the
switch again.
Resetting the sliding sunroof and the
roller sunblinds If the sliding sunroof or the roller sunblinds
do not move smoothly, reset the sliding
sunroof and the roller sunblinds:
X
Turn the SmartKey to position 1 or 2
in the
ignition lock.
X Press the 3 switch to the point of
resistance in the
direction of arrow ; and
hold it until the sliding sunroof has opened
about 4 in (10 cm).
X Pull the 3 switch
repeatedly
to the point
of resistance in the direction of arrow =
until the sliding sunroof is fully closed.
X Keep the 3 switch pulled for an
additional second. X
Press the 3 switch to the point of
resistance in the
direction of arrow ; and
hold it until the roller sunblinds are open
about 4 in (10 cm).
X Pull the 3 switch
repeatedly
to the point
of resistance in the direction of arrow =
until the roller sunblinds are fully closed.
X Keep the 3 switch pulled for an
additional second.
X Make sure that the sliding sunroof
(Y page 81) and the roller sunblinds
(Y page
82)
can be fully opened and closed
again.
X If this is not the case, repeat the steps
above again. Problems with the sliding sunroof
G
WARNING
If you do not reset the sliding sunroof after a
malfunction or voltage supply interruption,
then the backing
up function will malfunction
or not work. The sliding sunroof closes with
increased or maximum force. Parts of the
body could be trapped in the closing area in
the process. This poses an increased risk of
injury or even fatal injury.
In such or similar situations always make sure
that no parts of the body are in the closing
area. Always reset the sliding sunroof after a
malfunction or voltage supply interruption.
! If the sliding sunroof still cannot be
opened or closed as a result of a
malfunction, contact a qualified specialist
workshop.
Problem: the sunroof cannot be closed
and you cannot see the cause. If the sliding
sunroof is obstructed during closing and
reopens again slightly:
X Immediately after it blocks, pull the 3
switch down again to the point of 82
Panorama roof with power tilt/sliding panel
Opening and closing
ProCarManuals.com
Page 92 of 340

Rear seat head restraints
Adjusting the rear seat head restraint
height
X
To raise: pull the head restraint up to the
desired position.
X To lower: press release catch : and push
the head restraint down until it is in the
desired position.
Removing and installing the rear seat
head restraints G
WARNING
If head restraints are not installed and
adjusted correctly, they cannot provide
protection as intended.
There is an increased
risk of injury in the head and neck area, e.g.
in the event of an accident or when braking.
Always drive with the head restraints
installed. Before driving off, make sure for
every vehicle occupant that the center of the
head restraint supports the back of the head
at about eye level.
The rear head restraints on the outer seats
can be removed and re-installed. X
Fold the seat backrest slightly forwards in
order to remove the head restraint
(Y page 240).
X To remove: pull the head restraint up to
the stop.
X Press release catch : and pull the head
restraint out of the guides.
X To re-install: insert the head restraint so
that the notches on the bar are on the left
when viewed in the direction of travel.
X Push the head restraint down until you hear
it engage in position. Adjusting the 4-way lumbar support
You can adjust the contour of the front seat
backrests individually to provide optimum
support for your back. :
To raise the backrest contour
; To soften the backrest contour
= To lower the backrest contour
? To harden the backrest contour90
Seats
Seats, steering wheel and mirrors
ProCarManuals.com
Page 93 of 340
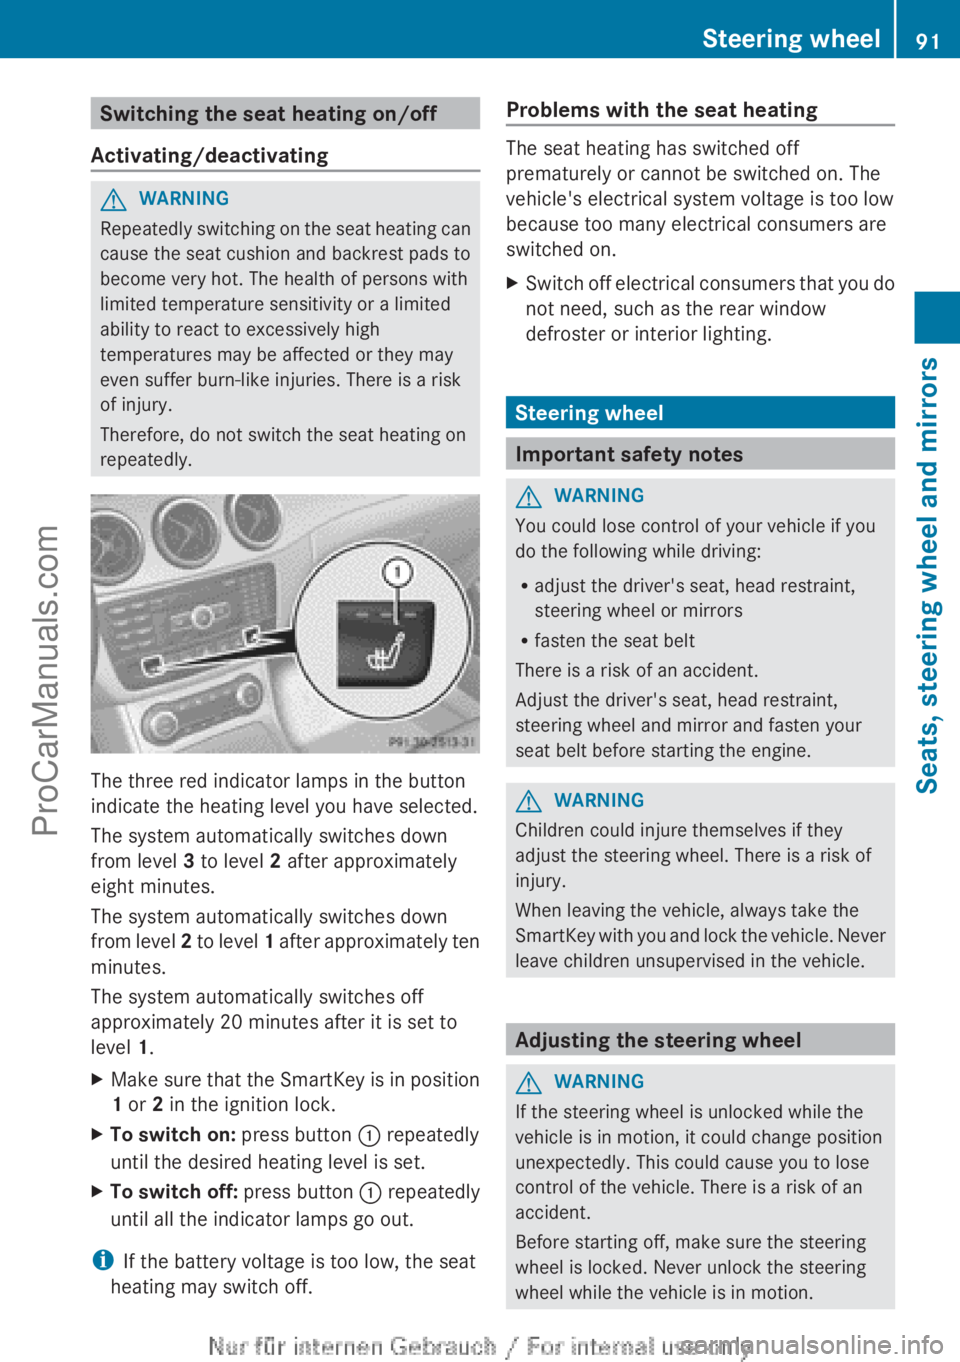
Switching the seat heating on/off
Activating/deactivating G
WARNING
Repeatedly switching on the seat heating can
cause the seat cushion and backrest pads to
become very hot. The health of persons with
limited temperature sensitivity or a limited
ability to react to excessively high
temperatures may be affected or they may
even suffer burn-like injuries. There is a risk
of injury.
Therefore, do not switch the seat heating on
repeatedly. The three red indicator lamps in the button
indicate the heating level you have selected.
The system automatically switches down
from level 3 to level 2 after approximately
eight minutes.
The system automatically switches down
from level
2
to level 1 after approximately ten
minutes.
The system automatically switches off
approximately 20 minutes after it is set to
level 1.
X Make sure that the SmartKey is in position
1 or 2 in the ignition lock.
X To switch on: press button : repeatedly
until the desired heating level is set.
X To switch off: press button : repeatedly
until all the indicator lamps go out.
i If the battery voltage is too low, the seat
heating may switch off. Problems with the seat heating The seat heating has switched off
prematurely or cannot be switched on. The
vehicle's electrical system voltage is too low
because too many electrical consumers are
switched on.
X
Switch off electrical consumers that you do
not need, such as the rear window
defroster or interior lighting. Steering wheel
Important safety notes
G
WARNING
You could lose control of your vehicle if you
do the following while driving:
R adjust the driver's seat, head restraint,
steering wheel or mirrors
R fasten the seat belt
There is a risk of an accident.
Adjust the driver's seat, head restraint,
steering wheel and mirror and fasten your
seat belt before starting the engine. G
WARNING
Children could injure themselves if they
adjust the steering wheel. There is a risk of
injury.
When leaving the vehicle, always take the
SmartKey with you
and lock the vehicle. Never
leave children unsupervised in the vehicle. Adjusting the steering wheel
G
WARNING
If the steering wheel is unlocked while the
vehicle is in motion, it could change position
unexpectedly. This could cause you to lose
control of the vehicle. There is a risk of an
accident.
Before starting off, make sure the steering
wheel is locked. Never unlock the steering
wheel while the vehicle is in motion. Steering wheel
91
Seats, steering wheel and mirrors Z
ProCarManuals.com