Page 273 of 356

Rear stowage compartments
Stowage compartment in the rear centre
console
X
To open: pull down the top of stowage
compartment :
by the edge of the handle.
i Depending on the vehicle's equipment,
there
may be an open stowage space above
the stowage compartment. Luggage nets
! The
maximum load that may be placed on
the luggage net under the rear shelf is
2.5 kg.
Luggage nets are located:
R in the front-passenger footwell
R on the back of the driver's and front-
passenger seat
R beneath the parcel shelf
R on the left and right-hand side in the lug-
gage compartment
Observe the loading guidelines ( Y page 268)
and the safety notes regarding stowage
spaces ( Y page 269). Through-loading facility in the rear
compartment
Observe
the loading guidelines (Y page 268). X
To open: fold down seat armrest :.
X Pull the cover, which can now be seen, for-
wards by the grip until it lies on arm-
rest :.
X Pull the centre head restraint on the rear
bench seat into the uppermost position
(Y page 94). X
Slide locking mechanism = in the direc-
tion of the arrow.
X Swing flap ; fully to the side.
Flap ; is held open by a magnet.
X To close:
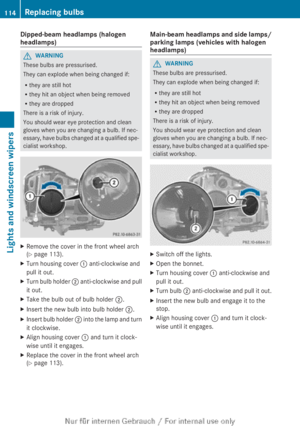
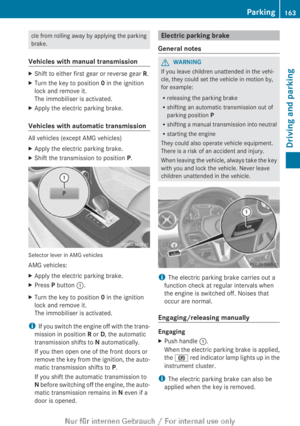
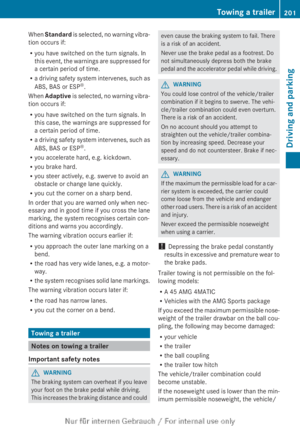
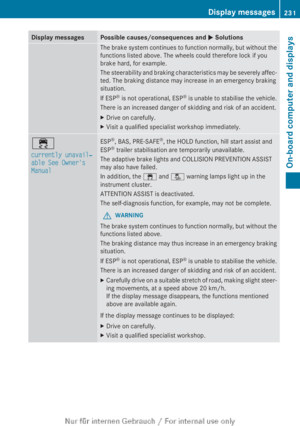
swing flap ; in the luggage com-
partment back until it engages.
X Fold the cover forwards until it engages into
armrest :.
X Fold armrest : up fully if necessary. Stowage areas
271
Stowing and features Z
Page 274 of 356

Enlarging the luggage compartment
Important safety notes G
WARNING
If the rear bench seat/rear seat and seat
backrest are not engaged they could fold for-
wards, e.g. when braking suddenly or in the
event of an accident.
R The vehicle occupant would thereby be
pushed into the seat belt by the rear bench
seat/rear seat or by the seat backrest. The
seat belt cannot protect as intended and
could result in additional injury.
R Objects or loads in the boot/luggage com-
partment cannot be restrained by the seat
backrest.
This poses an increased risk of injury.
Before every trip, make sure that the seat
backrests and the rear bench seat/rear seat
are engaged before every trip.
! Before folding the backrest in the rear
compartment forwards, make sure that the
rear compartment armrest and the
cupholder are folded in. They may other-
wise be damaged.
Observe the loading guidelines (Y page 268).
Folding the rear seat backrest forwards
and back Folding the rear seat backrest forward
The
left-hand and right-hand rear seat backr-
ests can be folded forwards separately to
increase the luggage compartment capacity. X
Fully insert the backrest head restraints
(Y page 96).
X Move the driver's or front-passenger seat
forward if necessary.
X Pull left-hand or right-hand release han-
dle ; of the seat backrest forwards.
The corresponding seat backrest : is
released.
X Fold backrest : forwards.
X Move the driver's or front-passenger seat
back if necessary. X
Insert the seat belt into seat-belt
extender :.
Folding the rear seat backrest back X
Move the driver's or front-passenger seat
forward if necessary.
! Make sure that the seat belt does not
become
trapped when folding the rear seat
backrest back. Otherwise, it could be dam-
aged. 272
Stowage areas
Stowing and features
Page 275 of 356

X
Fold seat backrest : back until it engages.
Red lock status indicator ; is no longer
visible.
X Adjust the head restraints if necessary
(Y page 96).
X Move the driver's or front-passenger seat
back if necessary. Parcel shelf
!
The maximum load which may be placed
on the rear shelf is 2.5 kg.
X To remove:
detach straps : from the tail-
gate.
X Swing the rear shelf down.
X Pull the rear shelf out to the rear ;.
X To fit:
place the rear shelf on the guide rails
on the left and right.
X Push the rear shelf evenly forwards using
both hands until it engages.
X Swing the rear shelf up.
X Attach straps : to the tailgate.Securing a load
Lashing eyelets Observe the following notes on securing
loads:
R
observe the loading guidelines
(Y page 268).
R secure the load using the lashing eyelets. R
distribute the load on the lashing eyelets
evenly.
R do not use elastic straps or nets to secure
a load, as these are only intended as an
anti-slip protection for light loads.
R do
not route lashing materials across sharp
edges or corners.
R pad sharp edges for protection.
There are four lashing eyelets in the luggage
compartment. :
Lashing eyelets
Bag hook G
WARNING
The bag hooks cannot restrain heavy objects
or items of luggage. Objects or items of lug-
gage could be flung around and thereby hit
vehicle occupants when braking or abruptly
changing directions. There is a risk of injury.
Only hang light objects on the bag hooks.
Never hang hard, sharp-edged or fragile
objects on the bag hooks.
! The bag hook can bear a maximum load
of 3 kg. Do not use it to secure a load.
There is one bag hook on either side of the
luggage compartment. Stowage areas
273
Stowing and features Z
Page 276 of 356

:
Bag hook Stowage well underneath the luggage
compartment floor
Important safety notes G
WARNING
If you drive when the luggage compartment
floor is open, objects could be flung around,
thus
striking vehicle occupants. There is a risk
of injury, especially when braking or abruptly
changing directions.
Always close the luggage compartment floor
before a journey.
! The maximum load capacity of the stow-
age well under the luggage compartment
floor is 25 kg.
Opening/closing the luggage compart-
ment floor A bracket for TIREFIT, the vehicle tool kit, etc.
is located underneath the luggage compart-
ment floor. X
To open: open the tailgate.
X Press down handle : on ribbing ;.
Handle : folds upwards.
X Swing the luggage compartment floor
upwards using handle : until it rests
against the luggage compartment cover.
X If the rear shelf is fitted:
hook the loop on
the luggage compartment floor into the
hook on the underside of the rear shelf. X
If the rear shelf is not fitted :
fold out hook
= on the underside of the luggage com-
partment floor. X
Attach hook = to the luggage compart-
ment's upper seal ?.
X To close (if the rear shelf is fitted):
unhook the loop from the hook on the
underside of the rear shelf.
X If the rear shelf is not fitted:
detach hook
= from upper seal ?.
X Fasten hook = to the bracket on the
underside of the luggage compartment
floor. 274
Stowage areas
Stowing and features
Page 277 of 356

X
Fold the luggage compartment floor down.
X Press the luggage compartment floor down
until it engages. Roof carrier
Important safety notes G
WARNING
An incorrectly secured roof carrier, ski rack or
load could become detached from the vehi-
cle. These objects might then be thrown
around, and could injure you or others or
cause
an accident. Follow the roof carrier/ski
rack manufacturer's installation instructions
and special instructions for use.
The roof load raises the vehicle's centre of
gravity, thereby affecting vehicle handling.
You must always observe the maximum roof
load of 75 kg. Always adapt your driving style
to the prevailing road, traffic and weather
conditions and drive with particular care if the
roof is laden.
! Mercedes-Benz recommends that you
only use roof carriers that have been tested
and approved for Mercedes-Benz vehicles.
This helps to prevent damage to the vehi-
cle.
Position the load on the roof carrier in such
a way that the vehicle will not sustain dam-
age even when it is in motion.
Ensure that, depending on the vehicle's
equipment, you can raise the panorama
sliding sunroof fully and open the tailgate
fully when the roof carrier is fitted.
i Vehicles with panorama sliding sun-
roof: if a roof carrier is fitted, the panorama
sliding sunroof cannot be opened. In order
to allow ventilation of the vehicle interior,
you can raise the panorama sliding sunroof.
If a roof carrier approved by Mercedes-
Benz makes contact with the panorama
sliding sunroof, the sunroof will lower
slightly but remain raised in the rear. Attaching the roof carrier
X
Open covers :
carefully in the direction of
the arrow.
X Fold covers : upwards.
X Only secure the roof carrier to the anchor-
age points under covers :.
X Observe the manufacturer's installation
instructions. Features
Cup holders
Important safety notes G
WARNING
The cup holder cannot secure a drinks con-
tainer in place during a journey. If you use a
cup holder during a journey, the drinks con-
tainer could be flung around and liquid could
be spilt. Vehicle occupants could come into
contact with the liquid and, in particular, be
scalded
by hot liquid. You could be distracted
from the traffic situation and lose control of
the vehicle. There is a risk of an accident and
injury.
Only use the cup holder when the vehicle is
stationary. Only place containers of a suitable
size in the cup holder. Seal the container, in
particular when it contains hot liquid. G
WARNING
If you do not correctly store objects in the
vehicle interior, they can slip or be flung
around, thus striking vehicle occupants. Features
275
Stowing and features
Z
Page 278 of 356

There is a risk of injury, especially when brak-
ing or abruptly changing directions.
R
Always
store objects so that they cannot be
flung around in these or in similar situa-
tions.
R Always make sure that objects do not pro-
trude from stowage compartments, lug-
gage nets or stowage nets.
R Close lockable stowage compartments
while driving.
R Stow and secure objects that are heavy,
hard, pointy, sharp-edged, fragile or too
large in the luggage compartment.
! Only use the cup holders for containers of
the right size and which have lids. The
drinks could otherwise spill.
The stowage compartments in the doors pro-
vide space for bottles:
R front: capacity up to 1.0 l
R rear: capacity up to 0.5 l
Cup holder in the front centre console All vehicles (except vehicles with Audio 5)
Two coin holders
=
and a card holder ; can
be found in the cup holder.
The cup holder and the rubber mat under-
neath can be removed for cleaning. Clean
them with clean, lukewarm water only.
X To remove: Lift the cup holder up and out
with a brief tug :. X
To fit: : insert the cup holder into lateral
curved sections ; in the stowage com-
partment. Simultaneously insert the cup
holder
in such a way that the wedge of the
upper section of the cup holder faces for-
wards.
X :
Press the cup holder downwards until it
engages on the right and left-hand sides.
Vehicles with Audio 5 X
Fold lift-up lid :
in stowage compartment
= up until it engages in the two lugs ;.
You can use front part ? as a cup holder.
Cup holder in the rear seat armrest !
Do
not sit on or support your body weight
on the rear seat armrest when it is folded
down, as you could otherwise damage it.
! Close the cup holder before folding the
rear seat armrest up. Otherwise, the cup
holder could be damaged. 276
Features
Stowing and features
Page 279 of 356

X
Fold down the rear seat armrest.
X To open: press the front of cup holder :
or ;.
Cup
holder : or ; extends automatically.
X To close: slide cup holder : or ; back
until it engages. Sun visors
Overview :
Mirror light
; Bracket
= Retaining clip, e.g. for a car park ticket
? Vanity mirror
A Mirror cover
Vanity mirror in the sun visor Mirror light : only functions if the sun visor
is clipped into bracket ; and mirror cover
A has been folded up. Glare from the side X
Fold down the sun visor.
X Pull the sun visor out of bracket ;.
X Swing the sun visor to the side.
X Vehicles with mirror lights:
slide the sun
visor horizontally as desired. Ashtray
Front ashtray !
The stowage space under the ashtray is
not heat resistant. Before placing lit ciga-
rettes in the ashtray, make sure that the
ashtray
is properly engaged. Otherwise, the
stowage space could be damaged. Example: vehicles with a stowage compartment
cover
X
To open: push the lower section of
cover :.
The stowage compartment opens.
X To remove the insert: lift insert =
up ; and out.
X To refit the insert:
press insert = into the
holder until it engages.
i If you remove the ashtray insert, you can
use the resulting compartment for stow-
age. Features
277
Stowing and features Z
Page 280 of 356

Rear-compartment ashtray
X
To open: pull cover = out by its top edge.
X To remove: pull insert ; by recess : in
the direction of arrow ? until it audibly
releases.
X Lift insert ; up and out.
X To fit the insert: fit insert ; from above
into the holder and press down into the
holder until it engages. Cigarette lighter
G
WARNING
You can burn yourself if you touch the hot
heating
element or the socket of the cigarette
lighter.
In addition, flammable materials can ignite if:
R the hot cigarette lighter falls
R a child holds the hot cigarette lighter to
objects, for example
There is a risk of fire and injury.
Always hold the cigarette lighter by the knob.
Always make sure that the cigarette lighter is
out of reach of children. Never leave children
unattended in the vehicle.
Your attention must always be focused on the
traffic conditions. Only use the cigarette
lighter when road and traffic conditions per-
mit. Example: vehicles with a stowage compartment
cover
X
Turn the key to position 2 in the ignition
lock (Y page 143).
X To open: push the lower section of
cover :.
The stowage compartment opens.
X Press in cigarette lighter ;.
Cigarette lighter ; will pop out automati-
cally when the heating element is red-hot. 12 V sockets
Points to observe before use X
Turn the key to position 1 in the ignition
lock (Y page 143).
The sockets can be used for accessories with
a maximum draw of
180 W (15 A). Accesso-
ries include such items as lamps or chargers
for mobile phones.
If you use the sockets for long periods when
the engine is switched off, the battery may
discharge.
i An emergency cut-off ensures that the on-
board voltage does not drop too low. If the
on-board voltage is too low, the power to
the sockets is automatically cut. This
ensures that there is sufficient power to
start the engine. 278
Features
Stowing and features