Page 4 of 140

4
Before Use
Navigation
Set Up
RDM-TMCIf
necessary
Rear View
Monitor
Contents
Preparation
nBefore Use
Accessories ........................................................................................ 2
Laser products ................................................................................... 2
Contents ............................................................................................. 4
Safety Information .............................................................................. 6
Introduction ........................................................................................ 8
(Use This Product Safety), (Navigation System),
(Beep sound and voice guidance restrictions while using Bluetooth
Hands-Free), (Screens), (LCD (Liquid crystal display))
Names and Functions ........................................................................ 9
Immediate use
nGetting startedlActivation....................................................................................... 11(Removing the Map Disc), (On-screen Buttons)
lMenu ............................................................................................. 14lSet Clock ....................................................................................... 15lNavigation Setup ........................................................................... 16(User Settings), (Quick POI Selection), (Language),
(Map Configuration), (Calibration), (Restore System Defaults)
l
Screen Names and Functions....................................................... 25(Screens Before Setting Route), (Screens During Route Guidance),
(Screen adjustments, beep alert and other settings)
l
Screen change .............................................................................. 28(Map orientation), (Map scale)
nRoutinglDestination Entry and Route Search............................................. 30(Change (Change Search Area)), (Address), (Point of interest),
(Emergency), (Memory Point), (Home), (Preset Destinations),
(Previous Destinations), (Freeway On/Off Ramp), (Coordinates),
(Select from map)
l
Quick POI ...................................................................................... 38(Displaying POI(s) on a Map), (Local Search),
(Deleting POI Markers), (Showing POI Data)
l
Character Entry ............................................................................. 39(Street name, city name, and other input),
(House phone number, and other input)
l
Direct Destination Input................................................................. 40(Direct Destination Input), (Selecting Route)
lPOI Icons on Maps / Cancel Guidance ......................................... 41(POI (Point of Interest) Icons), (Cancel Guidance)
lRoute Options ............................................................................... 42(Route Preferences), (Modification of Destination or Way Point Positions), (Deletion of Destination or Way Points), (Detour), (Turn List), (Display Route), (Route Preview), (Setting the conditions for simulation run)
Page 11 of 140
11
Getting started
Activation
Insert the map disc into the unit to start the Mobile Navigation System.
nData coverage area of map disc
Regarding the data coverage area, refer to the case of the navigation map disc.
The following function data are recorded in each area disc.
lPoint of Interest search
l Address search
l Intersection search
l Freeway On Ramp / Off Ramp search
l Phone Number search
Note
lThe map disc cannot be inserted or ejected while the ignition switch is in the OFF position.
l Remember that the battery can run down if the ignition switch is kept in the ACC or ON
position for a long time while the engine not running.
nMap Disc
l Refer to “Handling and Care of Map Discs” to know how to handle a map
disc ( page 71).
1
Switch the ignition to ACC or ON and press .
Disc AHAWAII PUERTO RICODisc B
HAWAII PUERTO RICO
Cautions
LOAD /
PUSHPOWER
VOL
LOAD��/
SOURCE
Page 14 of 140
14
RoutingAddress
Book
Getting started
Menu
Menu appears when pressing . MENU
Destination Entry and Route Search ( page 30)
Cancel Guidance ( page 41)
Route Options ( page 42)
Traffic Information ( page 60)
Set Clock ( page 15)
Bluetooth Phone ( page 118)
Volume ( page 58)
Address Book ( page 46)
Navigation Setup ( page 16)
Page 34 of 140
34
Before
UseGetting
started
Routing
Destination Entry and Route Search
Point of
interest
Open the
[DESTINATION
ENTRY] Menu SelectWhen entering
the destination
point directly
Select
When narrowing
down to city
name
Select :
Cancel the city
selection.
:
Displays list of 5
city names nearest
the current
position.Select thecity namefrom the
list
:
Displays the city
name input
screen. Enter th
ecity nameand selec
When narrowing
down to category
name
Select Select the
category
name from
the list
When narrowing
down to the
nearest facility
Select
: Searches for
facilities close to the nearest city hal
: Searches for
facilities near the current
position.
: Searches for
facilities near the previous map.
: Searches fofacilities near the preset destination.
When narrowing
down to a phone
number
Select Enter the phone number and
select
: Searches for facilities nearthe current destination.- : Searches for facilitiesnear the way point.
Page 35 of 140

35
Before
UseGetting
started
Routing
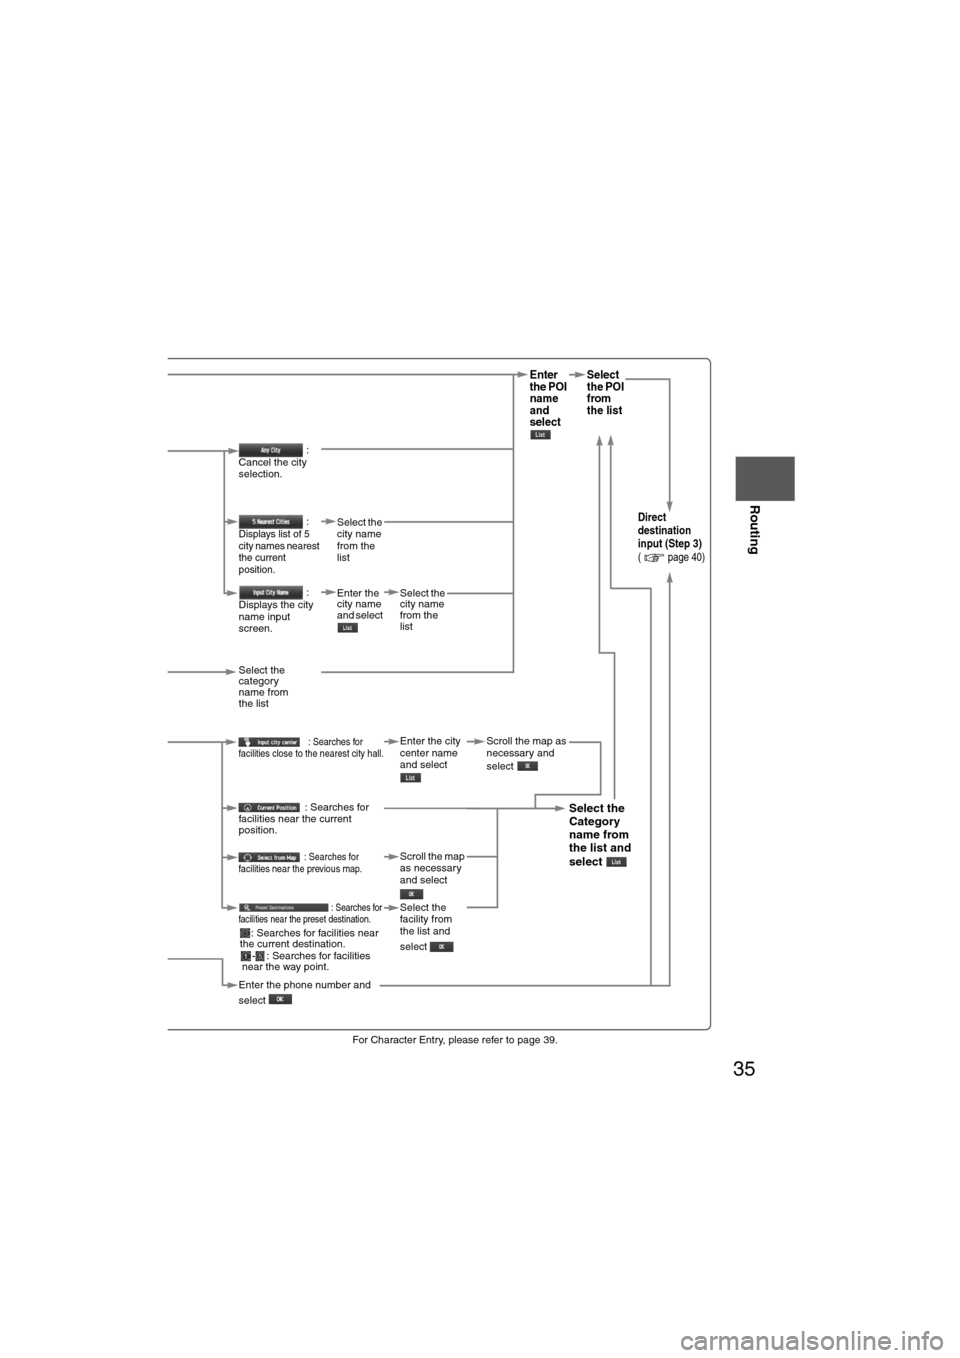
lFor Character Entry, please refer to page 39.
When entering
the destination
point directly
Select
Enter
the POI
name
and
select Select
the POI
from
the list
When narrowing
down to city
name
Select
:
Cancel the city
selection.
:
Displays list of 5
city names nearest
the current
position.Select the
city name
from the
listDirect
destination
input (Step 3)
( page 40)
:
Displays the city
name input
screen. Enter the
city name
and select
Select the
city name
from the
list
When narrowing
down to category
name
Select Select the
category
name from
the list
When narrowing
down to the
nearest facility
Select
: Searches for
facilities close to the nearest city hall.Enter the city
center name
and select Scroll the map as
necessary and
select
: Searches for
facilities near the current
position.
Select the
Category
name from
the list and
select
: Searches for
facilities near the previous map.Scroll the map
as necessary
and select
: Searches for
facilities near the preset destination.Select the
facility from
the list and
select
When narrowing
down to a phone
number
Select Enter the phone number and
select
: Searches for facilities near
the current destination.
- : Searches for facilitiesnear the way point.
Page 39 of 140
39
Before
UseGetting
started
Routing
Character Entry
Street
name, city
name, and
other input
House phone
number, and
other input
Select the first several
characters on the screen.
(Step 1) Select your target
in the list.
(Step 2)
lIf a desired name is not in
the list, go back to Step 1,
and try fewer characters.
: Display up to five previous
suggestions.
: Display the next suggestions.
: Text flow (Right)
: Text flow (Left) : Move the cursor to the previous position and delete a character.
: The list appears.
lExamples
Street: CANAL Street: 52nd Ave.
Enter by selecting characters: Enter by selecting characters:
Select Select
Names of which spelling starts
with the entered character appear.
Street: MAIN STREET
Enter by selecting characters:CA 52nd A
MA I N S
Select the characters on
the screen. Select
:Move the cursor to
the previous position
and delete a
character.
Page 47 of 140

47
Before
UseGetting
started
Routing
Address Book
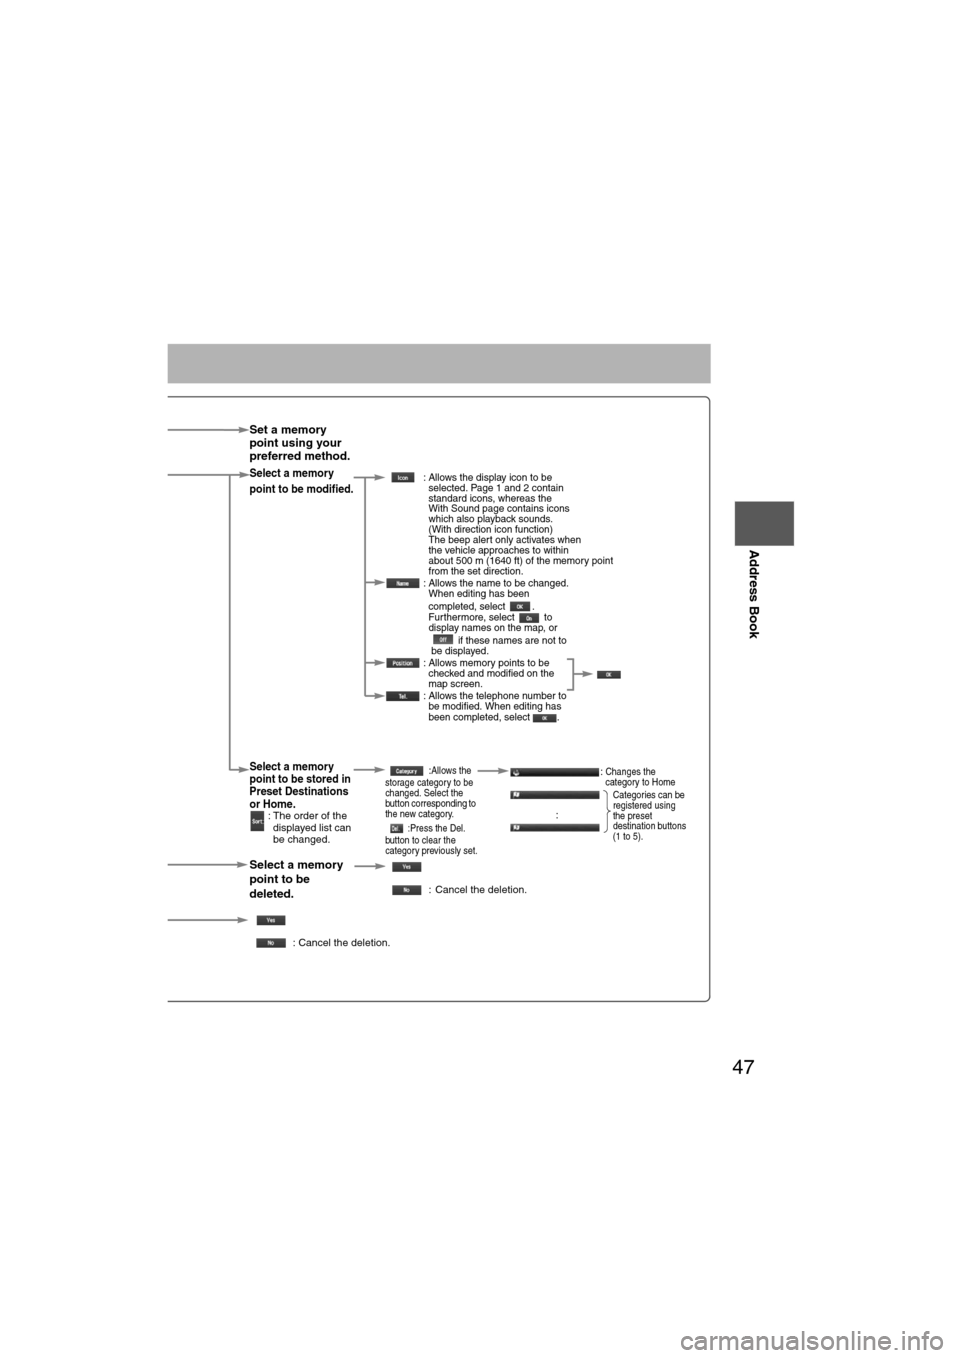
Set a memory
point using your
preferred method.
Select a memory
point to be modified. : Allows the display icon to be
selected. Page 1 and 2 contain
standard icons, whereas the
With Sound page contains icons
which also playback sounds.
(With direction icon function)
The beep alert only activates when
the vehicle approaches to within
about 500 m (1640 ft) of the memory point
from the set direction.
: Allows the name to be changed. When editing has been
completed, select .
Furthermore, select to
display names on the map, or
if these names are not to
be displayed.
: Allows memory points to be checked and modified on the
map screen.
: Allows the telephone number to be modified. When editing has
been completed, select .
Select a memory
point to be stored in
Preset Destinations
or Home.
: The order of the
displayed list can
be changed.
:Allows the
storage category to be
changed. Select the
button corresponding to
the new category.
:Press the Del.
button to clear the
category previously set.:Changes the
category to Home
:
Select a memory
point to be
deleted.
: Cancel the deletion.
: Cancel the deletion.
Show all icons or
Categories can be
registered using
the preset
destination buttons
(1 to 5).
Page 50 of 140

50
Before
UseGetting
started
Routing Address
Book
Voice Recognition
Voice Recognition
The voice recognition or the Bluetooth Hands-free system can be activated by pressing the
talk button on the steering wheel. The target operation in each mode (status) differs
depending on whether the switch is pressed with a short or long press. For details, refer to the
following switch operation list. ( page 52)
l
Bluetooth Hands-Free Outline
By connecting a Bluetooth equipped mobile telephone to the hands-free unit equipped on the
vehicle, making and receiving calls are possible.
For details, refer to the "Bluetooth Hands-Free" in the owner's manual.
l Voice Recognition Outline
Voice control can be carried out by simply pressing the talk button and using a voice
command ( page 55) spoken into the microphone.
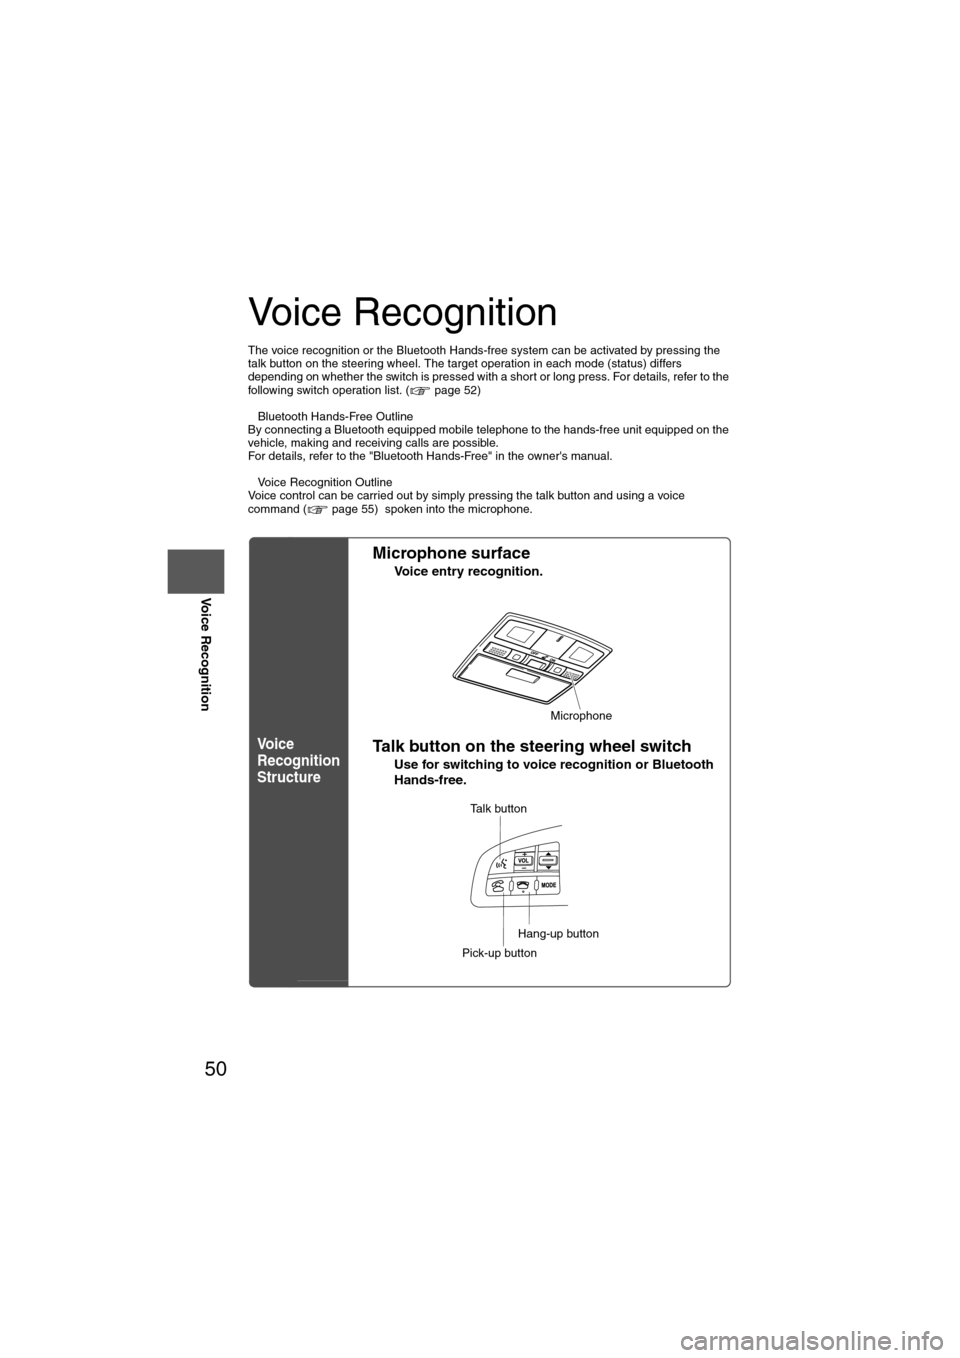
Vo i c e
Recognition
Structure
l Microphone surface
Voice entry recognition.
lTalk button on the steering wheel switch
Use for switching to voice recognition or Bluetooth
Hands-free.
Microphone
Talk button
Pick-up button
Hang-up button