Page 93 of 200
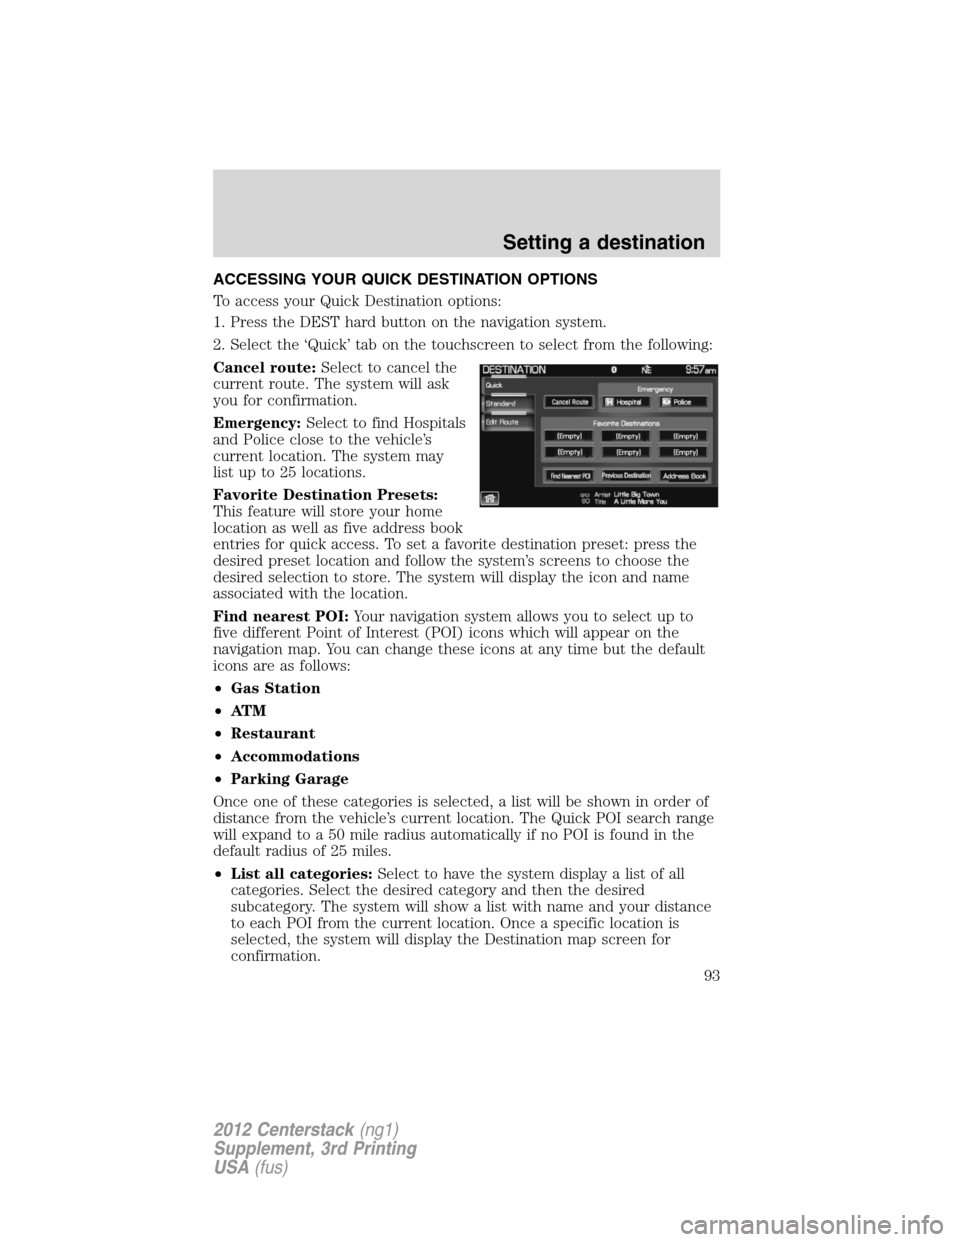
ACCESSING YOUR QUICK DESTINATION OPTIONS
To access your Quick Destination options:
1. Press the DEST hard button on the navigation system.
2. Select the ‘Quick’ tab on the touchscreen to select from the following:
Cancel route:Select to cancel the
current route. The system will ask
you for confirmation.
Emergency:Select to find Hospitals
and Police close to the vehicle’s
current location. The system may
list up to 25 locations.
Favorite Destination Presets:
This feature will store your home
location as well as five address book
entries for quick access. To set a favorite destination preset: press the
desired preset location and follow the system’s screens to choose the
desired selection to store. The system will display the icon and name
associated with the location.
Find nearest POI:Your navigation system allows you to select up to
five different Point of Interest (POI) icons which will appear on the
navigation map. You can change these icons at any time but the default
icons are as follows:
•Gas Station
•AT M
•Restaurant
•Accommodations
•Parking Garage
Once one of these categories is selected, a list will be shown in order of
distance from the vehicle’s current location. The Quick POI search range
will expand to a 50 mile radius automatically if no POI is found in the
default radius of 25 miles.
•List all categories:Select to have the system display a list of all
categories. Select the desired category and then the desired
subcategory. The system will show a list with name and your distance
to each POI from the current location. Once a specific location is
selected, the system will display the Destination map screen for
confirmation.
Setting a destination
93
2012 Centerstack(ng1)
Supplement, 3rd Printing
USA(fus)
Page 94 of 200
Previous Destination:Press to select a previous destination.
Address Book:Press to set an entry in your address book as your
destination.
ACCESSING YOUR STANDARD DESTINATION OPTIONS
1. Press the DEST hard button on the navigation system.
2. Select the ‘Standard’ tab on the
touchscreen to access the following
destination options:
•Address Book•Street Address
•Previous Destination•Point of Interest (POI)
•Phone Number•Freeway Entrance/Exit
•Map•Intersection
Address book
1. Press the DEST hard button on the navigation system.
2. Select the ‘Standard’ tab on the
touchscreen.
3. Select ‘Address Book’ to access
your ‘Address Book Entries List’.
Setting a destination
94
2012 Centerstack(ng1)
Supplement, 3rd Printing
USA(fus)
Page 95 of 200
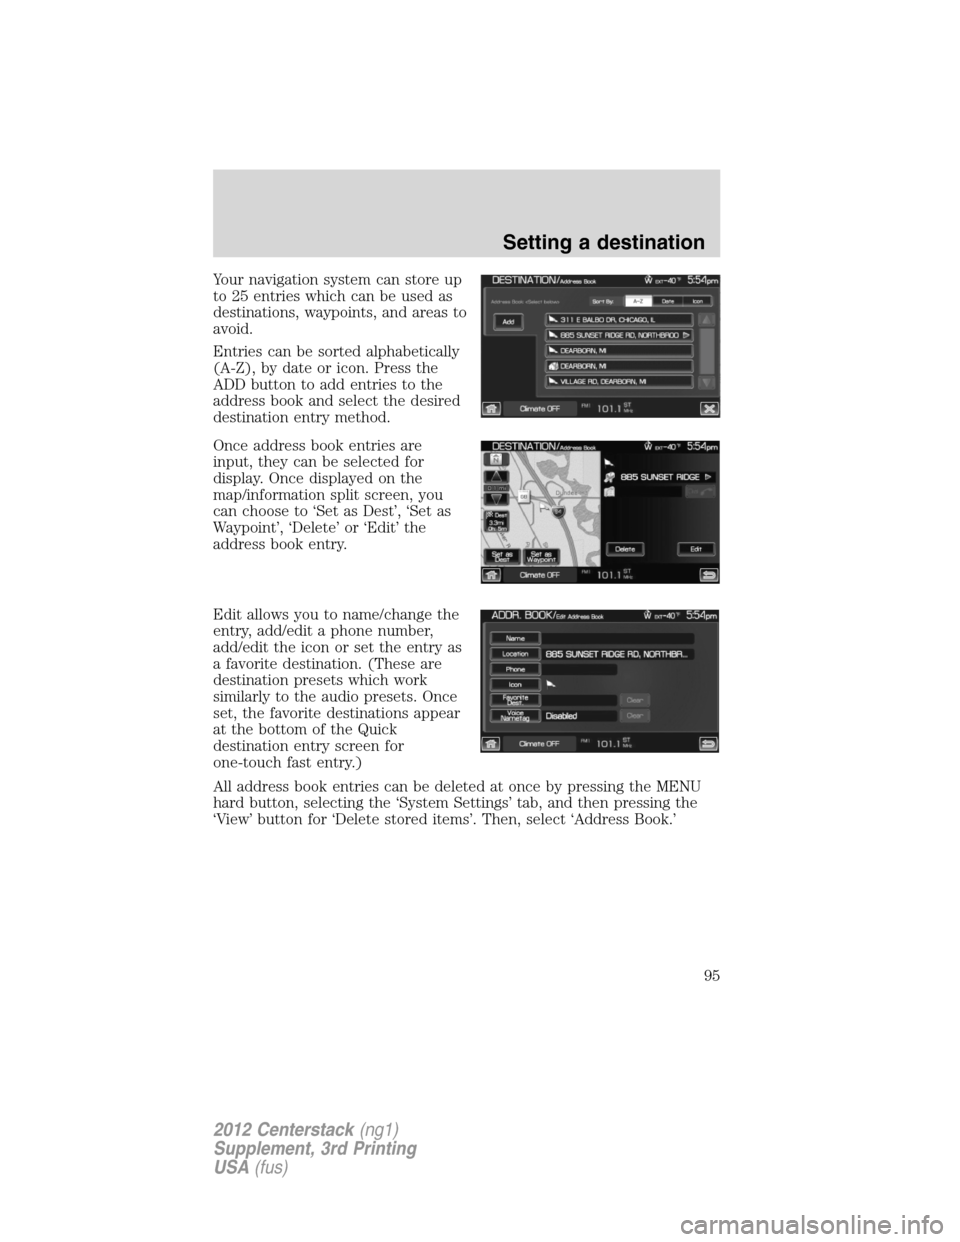
Your navigation system can store up
to 25 entries which can be used as
destinations, waypoints, and areas to
avoid.
Entries can be sorted alphabetically
(A-Z), by date or icon. Press the
ADD button to add entries to the
address book and select the desired
destination entry method.
Once address book entries are
input, they can be selected for
display. Once displayed on the
map/information split screen, you
can choose to ‘Set as Dest’, ‘Set as
Waypoint’, ‘Delete’ or ‘Edit’ the
address book entry.
Edit allows you to name/change the
entry, add/edit a phone number,
add/edit the icon or set the entry as
a favorite destination. (These are
destination presets which work
similarly to the audio presets. Once
set, the favorite destinations appear
at the bottom of the Quick
destination entry screen for
one-touch fast entry.)
All address book entries can be deleted at once by pressing the MENU
hard button, selecting the ‘System Settings’ tab, and then pressing the
‘View’ button for ‘Delete stored items’. Then, select ‘Address Book.’
Setting a destination
95
2012 Centerstack(ng1)
Supplement, 3rd Printing
USA(fus)
Page 96 of 200
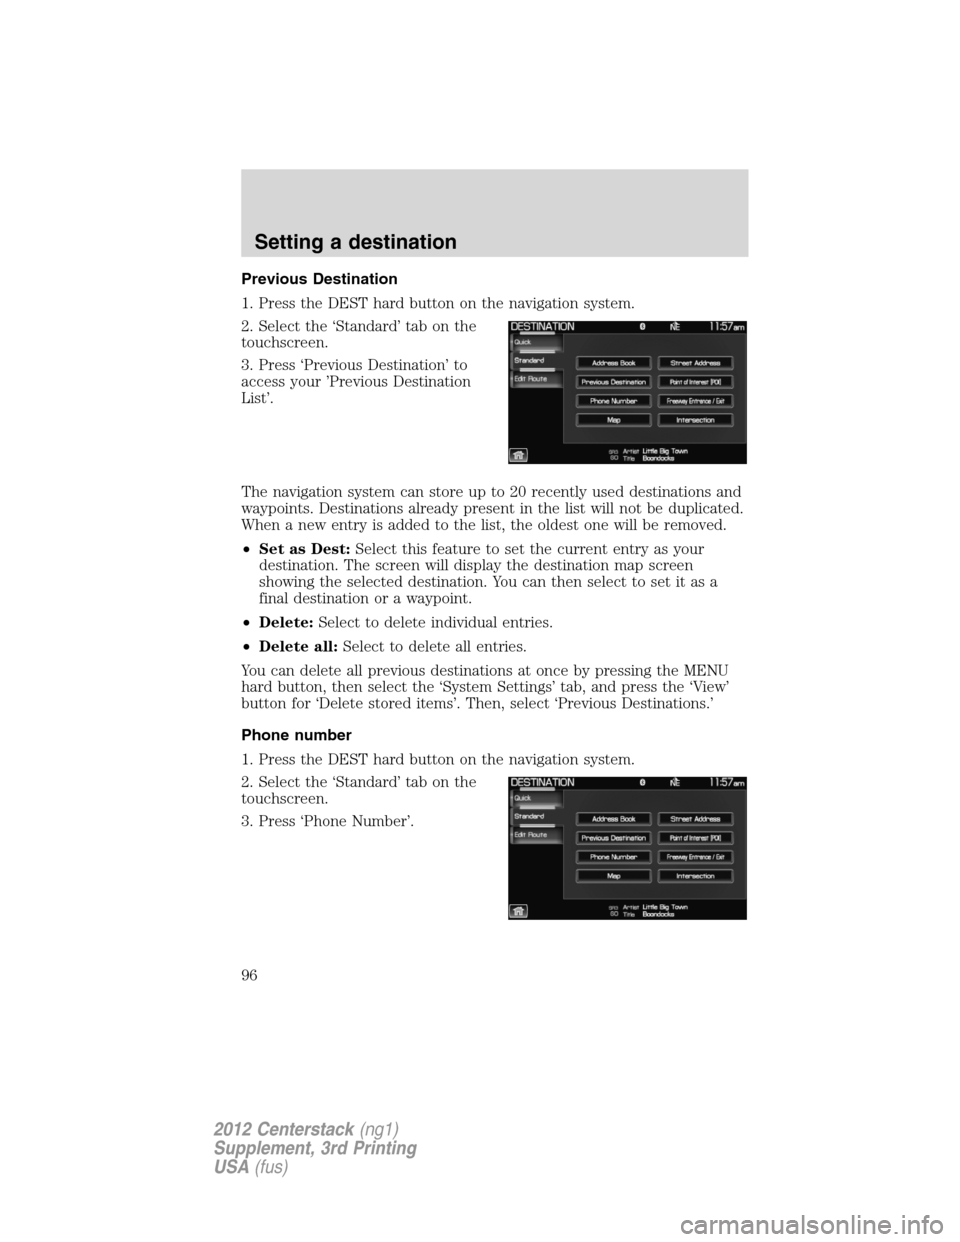
Previous Destination
1. Press the DEST hard button on the navigation system.
2. Select the ‘Standard’ tab on the
touchscreen.
3. Press ‘Previous Destination’ to
access your ’Previous Destination
List’.
The navigation system can store up to 20 recently used destinations and
waypoints. Destinations already present in the list will not be duplicated.
When a new entry is added to the list, the oldest one will be removed.
•Set as Dest:Select this feature to set the current entry as your
destination. The screen will display the destination map screen
showing the selected destination. You can then select to set it as a
final destination or a waypoint.
•Delete:Select to delete individual entries.
•Delete all:Select to delete all entries.
You can delete all previous destinations at once by pressing the MENU
hard button, then select the ‘System Settings’ tab, and press the ‘View’
button for ‘Delete stored items’. Then, select ‘Previous Destinations.’
Phone number
1. Press the DEST hard button on the navigation system.
2. Select the ‘Standard’ tab on the
touchscreen.
3. Press ‘Phone Number’.
Setting a destination
96
2012 Centerstack(ng1)
Supplement, 3rd Printing
USA(fus)
Page 97 of 200
This feature allows you to search for
a destination using the phone
number of a saved POI or Address
Book entry by entering the phone
number on the keypad on the
screen. After the number is entered,
the system will ask you to confirm
the name under which the phone
number is registered.
Map
1. Press the DEST hard button on the navigation system.
2. Select the ‘Standard’ tab on the
touchscreen.
3. Select ‘Map’.
You can now select any point on the
map to set as a destination or
waypoint by using the map cursor.
Setting a destination
97
2012 Centerstack(ng1)
Supplement, 3rd Printing
USA(fus)
Page 98 of 200
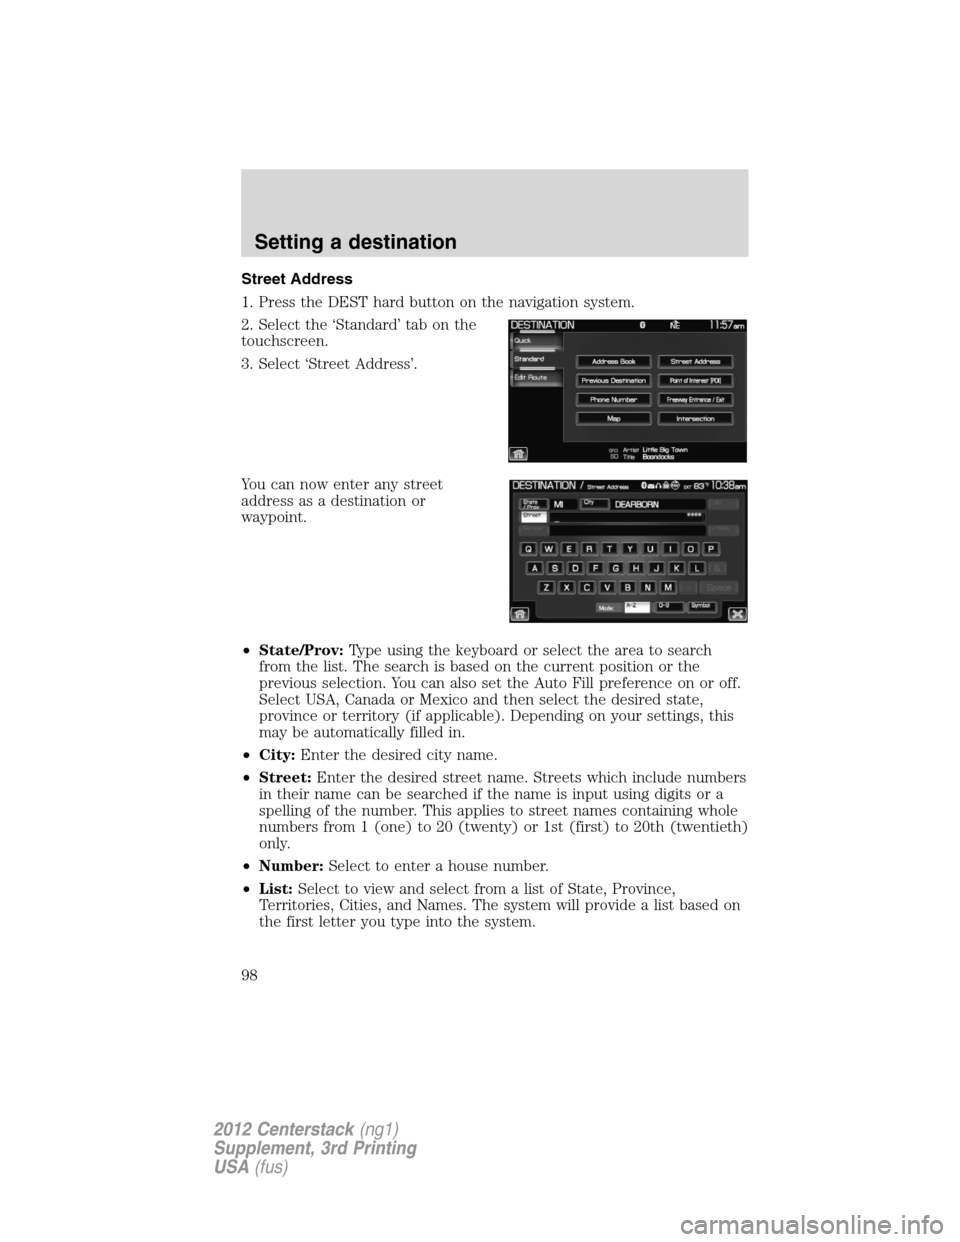
Street Address
1. Press the DEST hard button on the navigation system.
2. Select the ‘Standard’ tab on the
touchscreen.
3. Select ‘Street Address’.
You can now enter any street
address as a destination or
waypoint.
•State/Prov:Type using the keyboard or select the area to search
from the list. The search is based on the current position or the
previous selection. You can also set the Auto Fill preference on or off.
Select USA, Canada or Mexico and then select the desired state,
province or territory (if applicable). Depending on your settings, this
may be automatically filled in.
•City:Enter the desired city name.
•Street:Enter the desired street name. Streets which include numbers
in their name can be searched if the name is input using digits or a
spelling of the number. This applies to street names containing whole
numbers from 1 (one) to 20 (twenty) or 1st (first) to 20th (twentieth)
only.
•Number:Select to enter a house number.
•List:Select to view and select from a list of State, Province,
Territories, Cities, and Names. The system will provide a list based on
the first letter you type into the system.
Setting a destination
98
2012 Centerstack(ng1)
Supplement, 3rd Printing
USA(fus)
Page 99 of 200
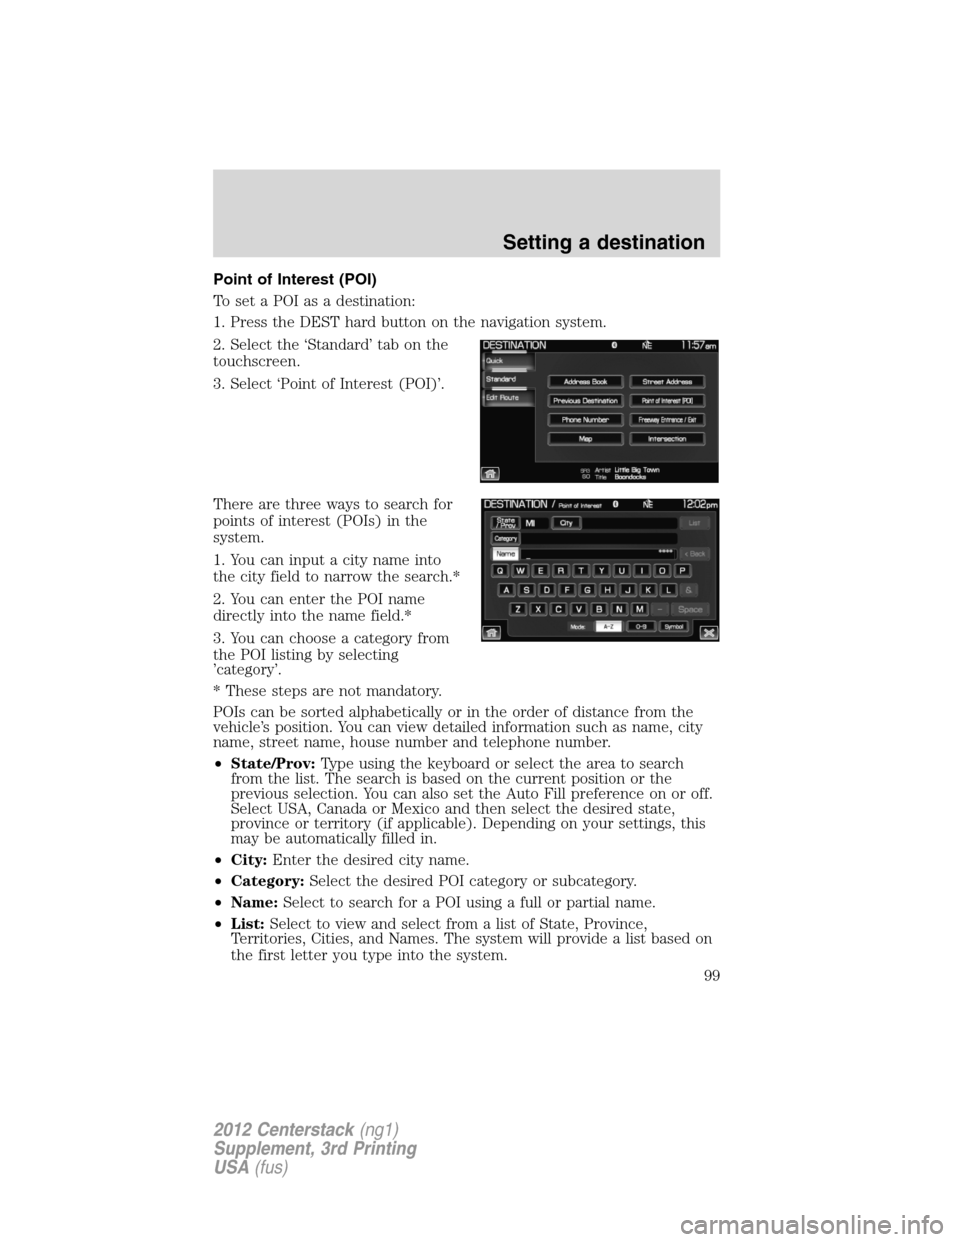
Point of Interest (POI)
To set a POI as a destination:
1. Press the DEST hard button on the navigation system.
2. Select the ‘Standard’ tab on the
touchscreen.
3. Select ‘Point of Interest (POI)’.
There are three ways to search for
points of interest (POIs) in the
system.
1. You can input a city name into
the city field to narrow the search.*
2. You can enter the POI name
directly into the name field.*
3. You can choose a category from
the POI listing by selecting
’category’.
* These steps are not mandatory.
POIs can be sorted alphabetically or in the order of distance from the
vehicle’s position. You can view detailed information such as name, city
name, street name, house number and telephone number.
•State/Prov:Type using the keyboard or select the area to search
from the list. The search is based on the current position or the
previous selection. You can also set the Auto Fill preference on or off.
Select USA, Canada or Mexico and then select the desired state,
province or territory (if applicable). Depending on your settings, this
may be automatically filled in.
•City:Enter the desired city name.
•Category:Select the desired POI category or subcategory.
•Name:Select to search for a POI using a full or partial name.
•List:Select to view and select from a list of State, Province,
Territories, Cities, and Names. The system will provide a list based on
the first letter you type into the system.
Setting a destination
99
2012 Centerstack(ng1)
Supplement, 3rd Printing
USA(fus)
Page 103 of 200
TheGovernmentcategory contains:
•City hall•Court house
•Embassy•Government office
•International border crossing•Post office
TheHealth & Medicinecategory contains:
•Hospital•Pharmacy
•Retirement / Nursing Home•Urgent care center
TheDomestic Servicescategory contains:
•Personal care services•Cleaners / Laundry
•Florist•Funeral home
•Storage•Tailor & Alteration
•Vet service
ThePersonal care servicessub-category contains:
•Barber shop•Beauty salon
•Cosmetics / Beauty•Nail salon
•Spa
Freeway Exit/Entrance
Your navigation system allows you to enter a freeway name and then you
can select an entrance or exit to that freeway.
1. Press the DEST hard button on the navigation system.
2. Select the ‘Standard’ tab on the
touchscreen.
3. Select ‘Freeway Exit/Entrance’.
Setting a destination
103
2012 Centerstack(ng1)
Supplement, 3rd Printing
USA(fus)