Page 87 of 200
CALENDAR
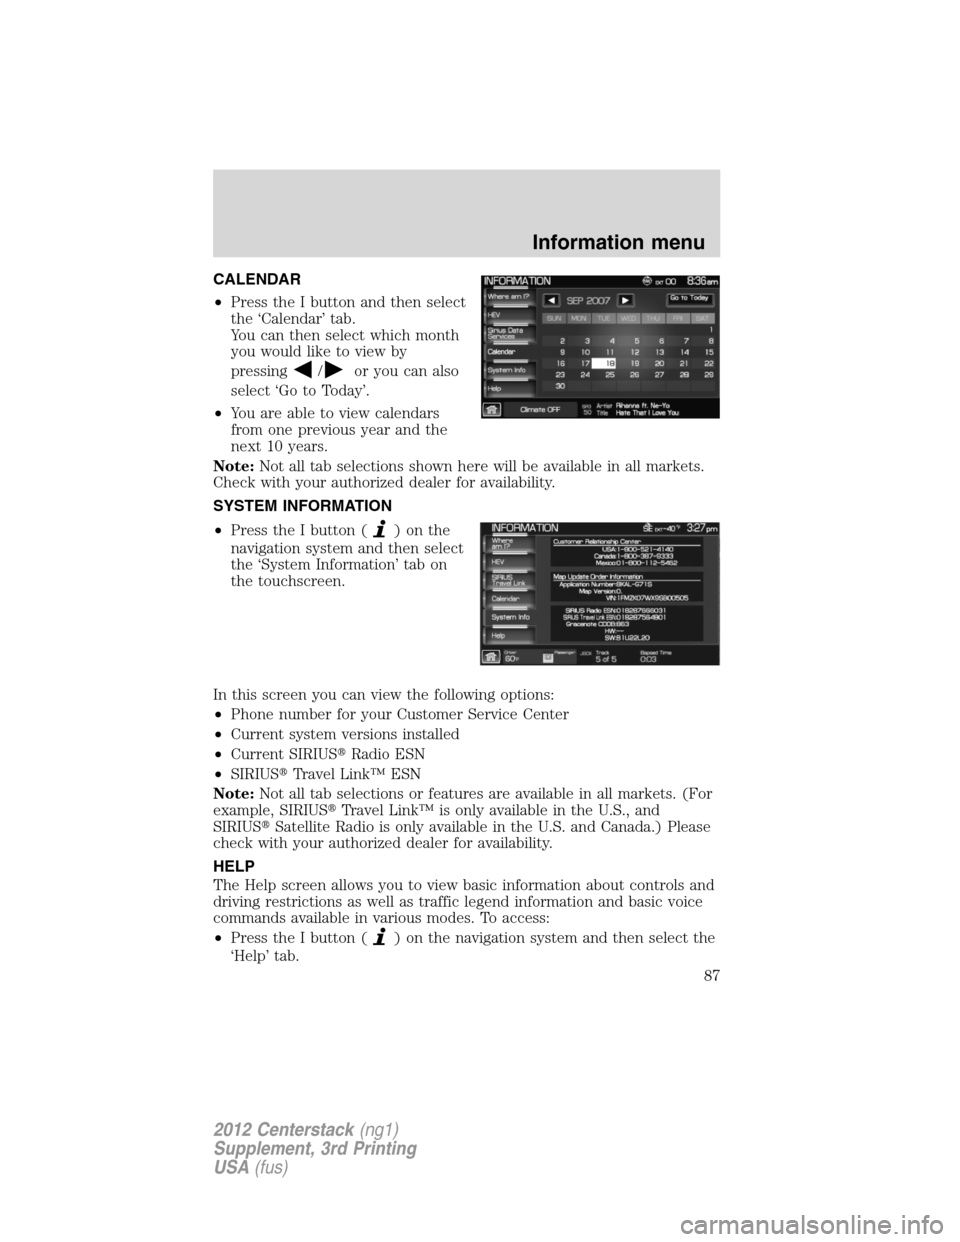
•Press the I button and then select
the ‘Calendar’ tab.
You can then select which month
you would like to view by
pressing
/or you can also
select ‘Go to Today’.
•You are able to view calendars
from one previous year and the
next 10 years.
Note:Not all tab selections shown here will be available in all markets.
Check with your authorized dealer for availability.
SYSTEM INFORMATION
•Press the I button (
)onthe
navigation system and then select
the ‘System Information’ tab on
the touchscreen.
In this screen you can view the following options:
•Phone number for your Customer Service Center
•Current system versions installed
•Current SIRIUS�Radio ESN
•SIRIUS�Travel Link™ ESN
Note:Not all tab selections or features are available in all markets. (For
example, SIRIUS�Travel Link™ is only available in the U.S., and
SIRIUS�Satellite Radio is only available in the U.S. and Canada.) Please
check with your authorized dealer for availability.
HELP
The Help screen allows you to view basic information about controls and
driving restrictions as well as traffic legend information and basic voice
commands available in various modes. To access:
•Press the I button (
) on the navigation system and then select the
‘Help’ tab.
Information menu
87
2012 Centerstack(ng1)
Supplement, 3rd Printing
USA(fus)
Page 91 of 200
PROGRAMMING A DESTINATION
The Destination screen gives you many options. You can choose to
access ‘Quick’ selections (available while the vehicle is moving) such as
your preset favorites or emergency points of interest, you can choose to
set a destination using ‘Standard’ resources (such as street address, or
points of interest, etc.) or you can choose the ‘Edit Route’ tab which will
allow you to set any preferences you may have for your current
navigation route.
Note:The navigation system contains map coverage for North America;
including the United States, Puerto Rico and U.S. Virgin Islands, Canada
and Mexico.
To access:
1. Press the DEST hard button on the navigation system.
2. Select from the following on the touchscreen:
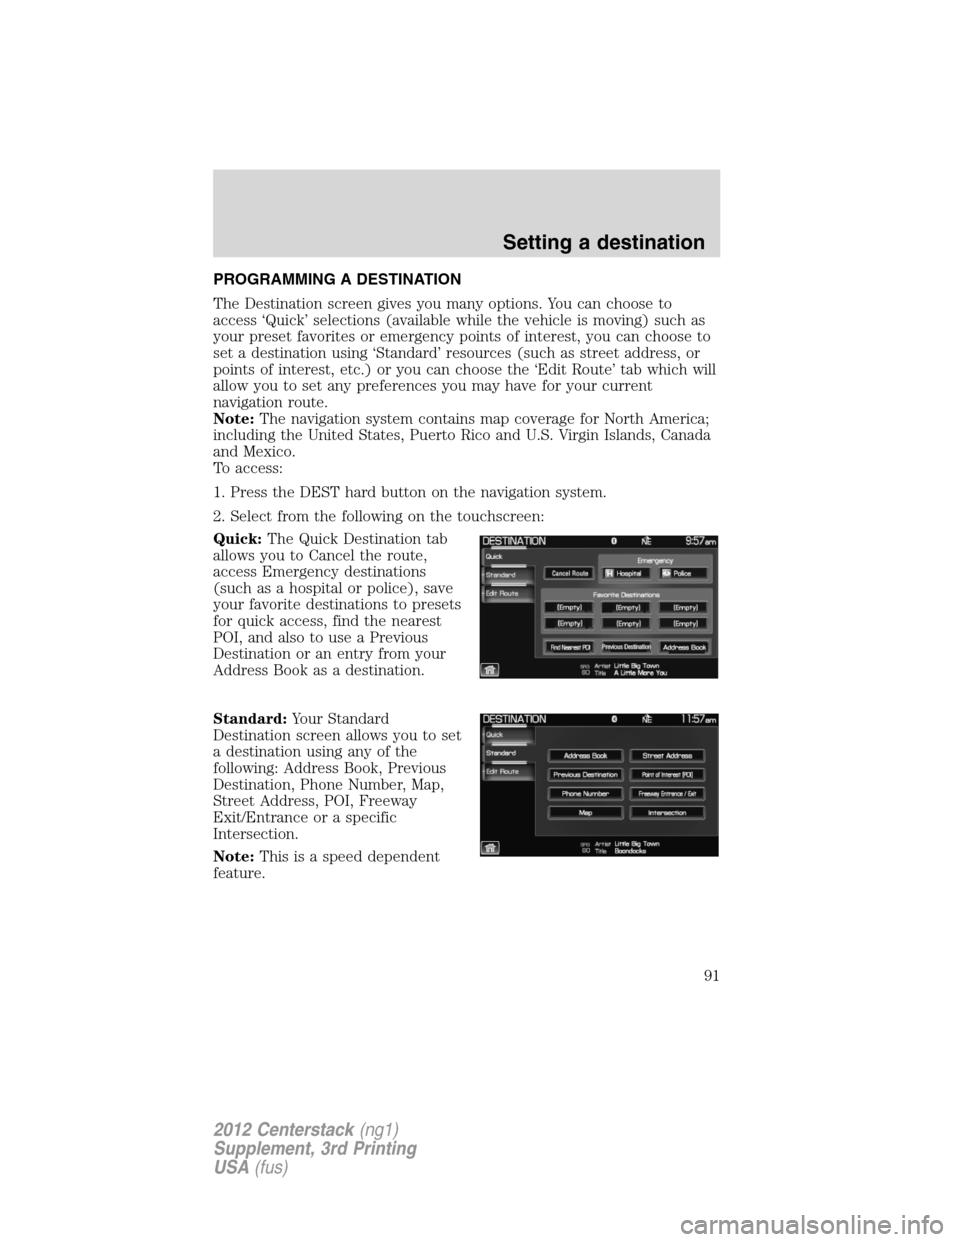
Quick:The Quick Destination tab
allows you to Cancel the route,
access Emergency destinations
(such as a hospital or police), save
your favorite destinations to presets
for quick access, find the nearest
POI, and also to use a Previous
Destination or an entry from your
Address Book as a destination.
Standard:Your Standard
Destination screen allows you to set
a destination using any of the
following: Address Book, Previous
Destination, Phone Number, Map,
Street Address, POI, Freeway
Exit/Entrance or a specific
Intersection.
Note:This is a speed dependent
feature.
Setting a destination
91
2012 Centerstack(ng1)
Supplement, 3rd Printing
USA(fus)
Page 94 of 200
Previous Destination:Press to select a previous destination.
Address Book:Press to set an entry in your address book as your
destination.
ACCESSING YOUR STANDARD DESTINATION OPTIONS
1. Press the DEST hard button on the navigation system.
2. Select the ‘Standard’ tab on the
touchscreen to access the following
destination options:
•Address Book•Street Address
•Previous Destination•Point of Interest (POI)
•Phone Number•Freeway Entrance/Exit
•Map•Intersection
Address book
1. Press the DEST hard button on the navigation system.
2. Select the ‘Standard’ tab on the
touchscreen.
3. Select ‘Address Book’ to access
your ‘Address Book Entries List’.
Setting a destination
94
2012 Centerstack(ng1)
Supplement, 3rd Printing
USA(fus)
Page 95 of 200
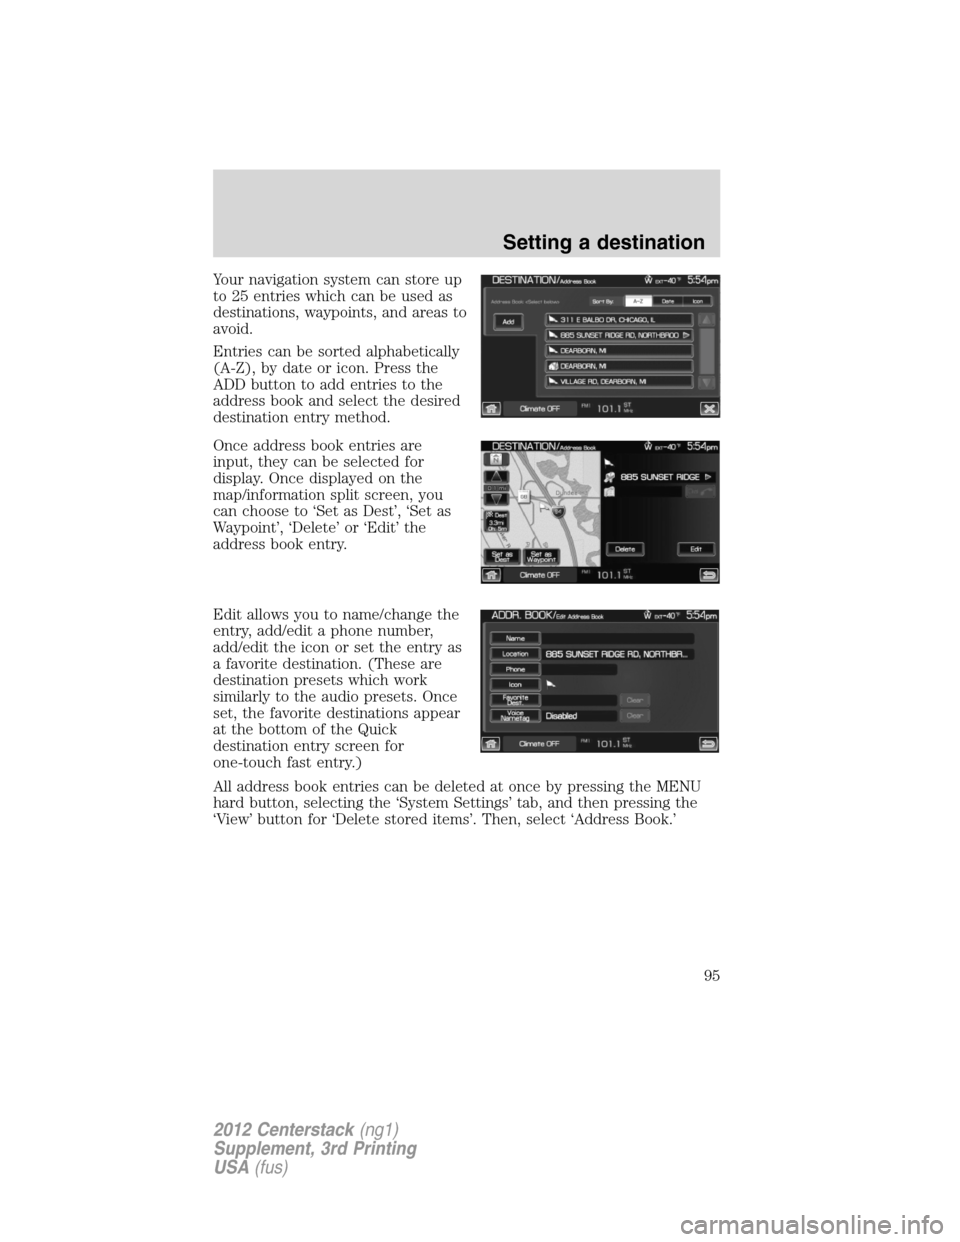
Your navigation system can store up
to 25 entries which can be used as
destinations, waypoints, and areas to
avoid.
Entries can be sorted alphabetically
(A-Z), by date or icon. Press the
ADD button to add entries to the
address book and select the desired
destination entry method.
Once address book entries are
input, they can be selected for
display. Once displayed on the
map/information split screen, you
can choose to ‘Set as Dest’, ‘Set as
Waypoint’, ‘Delete’ or ‘Edit’ the
address book entry.
Edit allows you to name/change the
entry, add/edit a phone number,
add/edit the icon or set the entry as
a favorite destination. (These are
destination presets which work
similarly to the audio presets. Once
set, the favorite destinations appear
at the bottom of the Quick
destination entry screen for
one-touch fast entry.)
All address book entries can be deleted at once by pressing the MENU
hard button, selecting the ‘System Settings’ tab, and then pressing the
‘View’ button for ‘Delete stored items’. Then, select ‘Address Book.’
Setting a destination
95
2012 Centerstack(ng1)
Supplement, 3rd Printing
USA(fus)
Page 96 of 200
Previous Destination
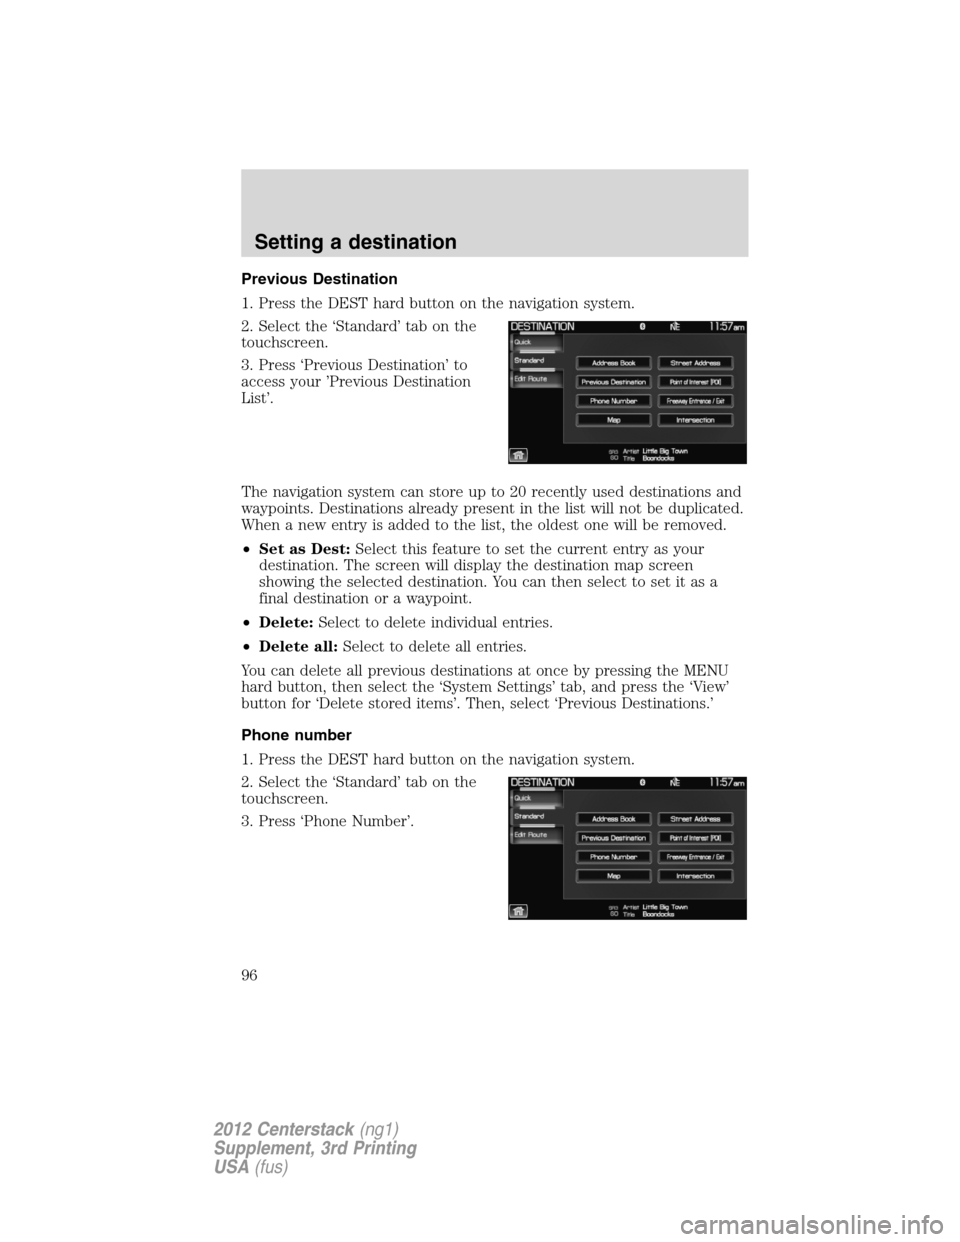
1. Press the DEST hard button on the navigation system.
2. Select the ‘Standard’ tab on the
touchscreen.
3. Press ‘Previous Destination’ to
access your ’Previous Destination
List’.
The navigation system can store up to 20 recently used destinations and
waypoints. Destinations already present in the list will not be duplicated.
When a new entry is added to the list, the oldest one will be removed.
•Set as Dest:Select this feature to set the current entry as your
destination. The screen will display the destination map screen
showing the selected destination. You can then select to set it as a
final destination or a waypoint.
•Delete:Select to delete individual entries.
•Delete all:Select to delete all entries.
You can delete all previous destinations at once by pressing the MENU
hard button, then select the ‘System Settings’ tab, and press the ‘View’
button for ‘Delete stored items’. Then, select ‘Previous Destinations.’
Phone number
1. Press the DEST hard button on the navigation system.
2. Select the ‘Standard’ tab on the
touchscreen.
3. Press ‘Phone Number’.
Setting a destination
96
2012 Centerstack(ng1)
Supplement, 3rd Printing
USA(fus)
Page 97 of 200
This feature allows you to search for
a destination using the phone
number of a saved POI or Address
Book entry by entering the phone
number on the keypad on the
screen. After the number is entered,
the system will ask you to confirm
the name under which the phone
number is registered.
Map
1. Press the DEST hard button on the navigation system.
2. Select the ‘Standard’ tab on the
touchscreen.
3. Select ‘Map’.
You can now select any point on the
map to set as a destination or
waypoint by using the map cursor.
Setting a destination
97
2012 Centerstack(ng1)
Supplement, 3rd Printing
USA(fus)
Page 99 of 200
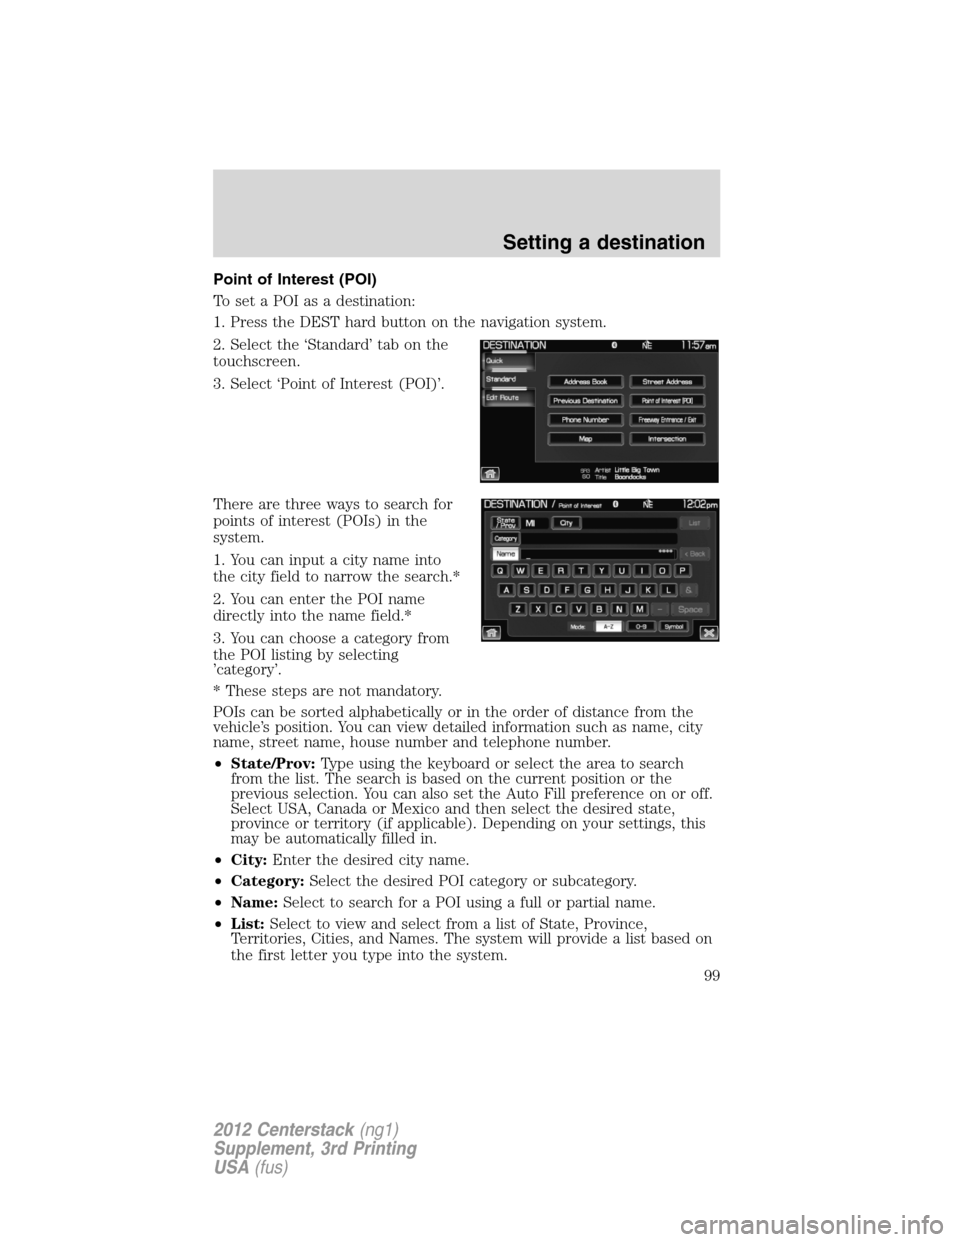
Point of Interest (POI)
To set a POI as a destination:
1. Press the DEST hard button on the navigation system.
2. Select the ‘Standard’ tab on the
touchscreen.
3. Select ‘Point of Interest (POI)’.
There are three ways to search for
points of interest (POIs) in the
system.
1. You can input a city name into
the city field to narrow the search.*
2. You can enter the POI name
directly into the name field.*
3. You can choose a category from
the POI listing by selecting
’category’.
* These steps are not mandatory.
POIs can be sorted alphabetically or in the order of distance from the
vehicle’s position. You can view detailed information such as name, city
name, street name, house number and telephone number.
•State/Prov:Type using the keyboard or select the area to search
from the list. The search is based on the current position or the
previous selection. You can also set the Auto Fill preference on or off.
Select USA, Canada or Mexico and then select the desired state,
province or territory (if applicable). Depending on your settings, this
may be automatically filled in.
•City:Enter the desired city name.
•Category:Select the desired POI category or subcategory.
•Name:Select to search for a POI using a full or partial name.
•List:Select to view and select from a list of State, Province,
Territories, Cities, and Names. The system will provide a list based on
the first letter you type into the system.
Setting a destination
99
2012 Centerstack(ng1)
Supplement, 3rd Printing
USA(fus)
Page 122 of 200
modify the Data in any way. You agree not to otherwise reproduce copy,
modify, decompile, disassemble or reverse engineer any portion of this
Data, and may not transfer or distribute it in any form, for any purpose,
except to the extent permitted by mandatory laws.
Restrictions:Except where you have been specifically licensed to do so
by (Licensee), and without limiting the preceding paragraph, you may
not (a) use this Data with any products, systems, or applications
installed or otherwise connected to or in communication with vehicles,
capable of vehicle navigation, positioning, dispatch, real time route
guidance, fleet management or similar applications; or (b) with or in
communication with any positioning devices or any mobile or
wireless-connected electronic or computer devices, including without
limitation cellular phones, palmtop and handheld computers, pagers, and
personal digital assistants or PDAs.
No warranty:This Data is provided to you “as is,” and you agree to use
it at your own risk. (Licensee) and its licensors (and their licensors and
suppliers) make no guarantees, representations or warranties of any
kind, express or implied, arising by law or otherwise, including but not
limited to, content, quality, accuracy, completeness, effectiveness,
reliability, fitness for a particular purpose, usefulness, use or results to be
obtained from this Data, or that the Data or server will be uninterrupted
or error-free.
Disclaimer of warranty:(Licensee) and its licensors (including their
licensors and suppliers) disclaim any warranties, express or implied, of
quality, performance, merchantability, fitness for a particular purpose or
non infringement. Some States, Territories and Countries do not allow
certain warranty exclusions, so to that extent the above exclusion may
not apply to you.
Disclaimer of liability:(Licensee) and its licensors (including their
licensors and suppliers) shall not be liable to you: in respect of any
claim, demand or action, irrespective of the nature of the cause of the
claim, demand or action alleging any loss, injury or damages, direct or
indirect, which may result from the use or possession of the information;
or for any loss of profit, revenue, contracts or savings, or any other
direct, indirect, incidental, special or consequential damages arising out
of your use of or inability to use this information, any defect in the
information, or the breach of these terms or conditions, whether in an
action in contract or tort or based on a warranty, even if (Licensee) or
its licensors have been advised of the possibility of such damages. Some
States, Territories and Countries do not allow certain liability exclusions
or damages limitations, so to that extent the above may not apply to you.
General Information
122
2012 Centerstack(ng1)
Supplement, 3rd Printing
USA(fus)