Page 268 of 420

266
4-3. Do-it-yourself maintenance
■Before recharging
When recharging, the battery produces hydrogen gas which is flammable and
explosive. Therefore, observe the following precautions before recharging:
●If recharging with the battery installed on the vehicle, be sure to disconnect the
ground cable.
●Make sure the power switch on the charger is off when connecting and discon-
necting the charger cables to the battery.
■If the vehicle is not used for an extended period of time
Removing the specified fuse helps to supp ress parasitic current (the draw on the
battery when the vehicle is shut off).
Turn the ignition switch to the “LOCK” position.
Open the fuse box lid in the engine compartment. ( P. 2 8 7 )
Before commencing driving again, make sure to return the fuse to its original posi-
tion.
STEP1
STEP2
While referring to “Fuse layout and amper-
age ratings” ( P. 290) or the back of the
fuse box lid for the location, use the pull-out
tool to remove the “D/C CUT” fuse
and put it into .
Make sure that the fuse is firmly inserted.STEP3
Page 269 of 420
267
4-3. Do-it-yourself maintenance
4
Maintenance and care
■Removing the negative (-) battery terminalTurn the ignition switch to the “LOC K” position and check that the gear
indicator is not displayed. ( P. 2 6 9 )
Open the rear hatch and remove the cover.
●When reconnecting the terminal, make sure that the lever is lowered into the
lock position.
●Do not disconnect the term inal while the power seats, power windows or other
electrical devices are being operated.
●When the battery terminal is disconnect ed, the “Lap Timer” data and clock in
the meter will be reset.
STEP1
STEP2
Lift the lever.
Disconnect the terminal.STEP3
Lock position
STEP4
Page 270 of 420

268
4-3. Do-it-yourself maintenance
CAUTION
■When connecting the battery terminal
Lower the lever into the locked position and ensure that the terminal is securely
fixed in place.
If the terminal is not securely fixed in place, it may come off while the vehicle is
being driven. This may cause the engine and electronic components to stop func-
tioning, resulting in an accident.
■Chemicals in the battery
A battery contains poisonous and corrosive sulfuric acid and may produce hydro-
gen gas which is flammable and explosive. To reduce the risk of death or serious
injury, take the following precautions while working on or near the battery:
●Do not cause sparks by touching the battery terminals with tools.
●Do not smoke or light a match near the battery.
●Avoid contact with eyes, skin and clothes.
●Never inhale or swallow electrolyte.
●Wear protective safety glasses when working near the battery.
●Keep children away from the battery.
■Where to safely charge the battery
Always charge the battery in an open area. Do not charge the battery in a garage or
closed room where there is insufficient ventilation.
■How to recharge the battery
Only perform a slow charge (5 A or less). The battery may explode if charged at a
quicker rate.
Page 271 of 420

269
4-3. Do-it-yourself maintenance
4
Maintenance and care
CAUTION
■Emergency measures regarding electrolyte
●If electrolyte gets in your eyes
Flush your eyes with clean water for at least 15 minutes and get immediate medi-
cal attention. If possible, continue to apply water with a sponge or cloth while
traveling to the nearest medical facility.
●If electrolyte gets on your skin
Wash the affected area thoroughly. If you feel pain or burning, get medical atten-
tion immediately.
●If electrolyte gets on your clothes
It can soak through clothing on to your skin. Immediately take off the clothing and
follow the procedure above if necessary.
●If you accidentally swallow electrolyte
Drink a large quantity of water or milk. Fo llow with milk of magnesia, beaten raw
egg or vegetable oil. Get emergency medical attention immediately.
■When replacing the battery
Use a battery designed for the LFA. Failure to do so may cause gas (hydrogen) to
enter the passenger compartment, causing a fire or explosion.
For replacement of the battery, contact your Lexus dealer.
NOTICE
■Before disconnecting the battery terminal
Turn the ignition switch to the “LOCK” position and check that the gear indicator
turns off before disconnecting the battery terminal.
If the terminal is disconnected while the gear indicator is still displayed, the ASG
(Automated Sequential Gearbox) computer may be negatively affected, possibly
causing the engine not to start. If the term inal is accidentally disconnected while the
indicator is on, contact your Lexus dealer.
■When recharging the battery
Never recharge the battery while the engine is running. Also, be sure all accesso-
ries are turned off.
Page 272 of 420
270
4-3. Do-it-yourself maintenance
Tires
Replace tires when the treadwear indicators show.
■Checking tires
New tread
Treadwear indicator
Worn tread
The location of treadwear indica-
tors is shown by the “TWI” or “”
marks, etc., molded on the sidewall
of each tire.
■ The tire pressure warning system
Your vehicle is equipped with a tire pressure warning system that uses
tire pressure warning valves and tr ansmitters to detect low tire inflation
pressure before serious problems arise. ( P. 315)
Installing tire pressure warning valves and transmitters
When replacing tires or wheels, tire pressure warning valves and trans-
mitters must also be installed.
When new tire pressure warning va lves and transmitters are installed,
new ID codes must be registered in the tire pressure warning computer
and tire pressure warning system must be initialized. Have tire pressure
warning valve and transmitter ID codes registered by your Lexus dealer.
( P. 272)
Page 273 of 420

271
4-3. Do-it-yourself maintenance
4
Maintenance and care
Initializing the tire pressure warning systemThe tire pressure warning system must be initialized when the tire infla-
tion pressure is changed (such as when changing traveling speed).
When the tire pressure warning system is initialized, the current tire infla-
tion pressure is set as the benchmark pressure.
■ How to initialize the tire pressure warning system
Park the vehicle in safe place and turn the ignition switch off.
Initialization cannot be performed while the vehicle is moving.
Adjust the tire inflation pressure to the specified cold tire inflation
pressure level. ( P. 366)
Make sure to adjust the tire pressure to the specified cold tire inflation
pressure level. The tire pressure warning system will operate based on
this pressure level.
Turn the ignition switch to the “ON” position.
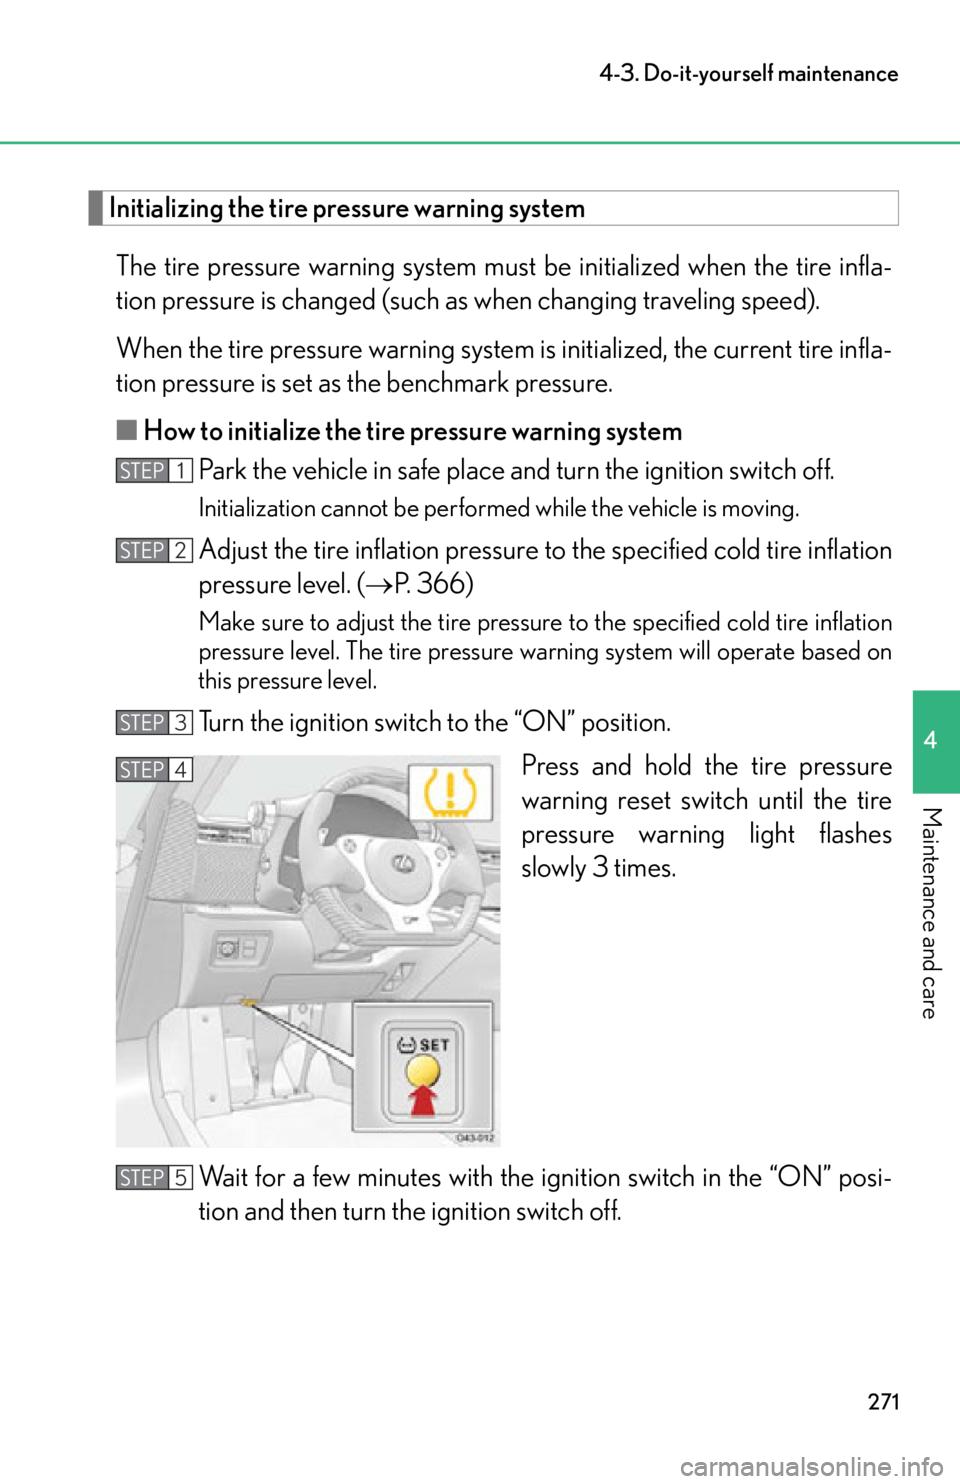
Press and hold the tire pressure
warning reset switch until the tire
pressure warning light flashes
slowly 3 times.
Wait for a few minutes with th e ignition switch in the “ON” posi-
tion and then turn the ignition switch off.
STEP1
STEP2
STEP3
STEP4
STEP5
Page 274 of 420

272
4-3. Do-it-yourself maintenance
Registering ID codesThe tire pressure warning valve and transmitter is equipped with a unique
ID code. When replacing a tire pressu re warning valve and transmitter, it
is necessary to register the ID code. Ha ve the ID code registered by your
Lexus dealer.
■When to replace your vehicle’s tires
Tires should be replaced if:
●You have tire damage such as cuts, splits, cracks deep enough to expose the
fabric or bulges indicating internal damage
●A tire goes flat repeatedly or cannot be properly repaired due to the size or
location of a cut or other damage
If you are not sure, consult with your Lexus dealer.
■Replacing tires and wheels
If the ID code of the tire pressure warning valve and transmitter is not registered,
the tire pressure warning system will not work properly. After driving for about 20
minutes, the tire pressure warning light fl ashes for 1 minute to indicate a system mal-
function.
■Tire life
Any tire over 6 years old must be checked by a qualified technician even if they
have seldom or never been used or damage is not obvious.
■Routine tire inflation pressure checks
The tire pressure warning system does not replace routine tire inflation pressure
checks. Make sure to check tire inflation pressure as part of your routine of daily
vehicle checks.
■Tire rotation
It is not possible to rotate the tires, as each tire is designed only for its original posi-
tion on the vehicle.
Page 275 of 420

273
4-3. Do-it-yourself maintenance
4
Maintenance and care
■Maximum load of tire
Check that the maximum load of the replacement tire is greater than 1 /2 of the
Gross Axle Weight Ratings (GAWR) of either the front axle or the rear axle, which-
ever is greater.
■Tire types
●Summer tires
Summer tires are high-speed performance tires best suited to highway driving
under dry conditions. Since summer tires do not have the same traction perfor-
mance as snow tires, summer tires are inadequate for driving on snow-covered
or icy roads. For driving on snow-covered roads or icy roads, the use of snow tires
is recommended. When installing snow tires, be sure to replace all four tires.
●All season tires
All season tires are designed to provide better traction in snow and to be ade-
quate for driving in most winter conditions as well as for use year-round. All sea-
son tires, however, do not have adequate traction performance compared with
snow tires in heavy or loose snow. Also, al l season tires fall short in acceleration
and handling performance compared with summer tires in highway driving.
●Snow tires
For driving on snow-covered roads or ic y roads, we recommend using snow tires.
If you need snow tires, select tires of the same size, construction and load capac-
ity as the originally installed tires. Since your vehicle has radial tires as original
equipment, make sure your snow tires also have radial construction. Do not install
studded tires without first checking local regulations for possible restrictions.
Snow tires should be installed on all wheels. ( P. 1 8 0 )
■Initializing the tire pressure warning system
Initialize the system with the tire inflatio n pressure adjusted to the specified level.
■If the tread on snow tires wears down below 0.16 in. (4 mm)
The effectiveness of the tires as snow tires is lost.
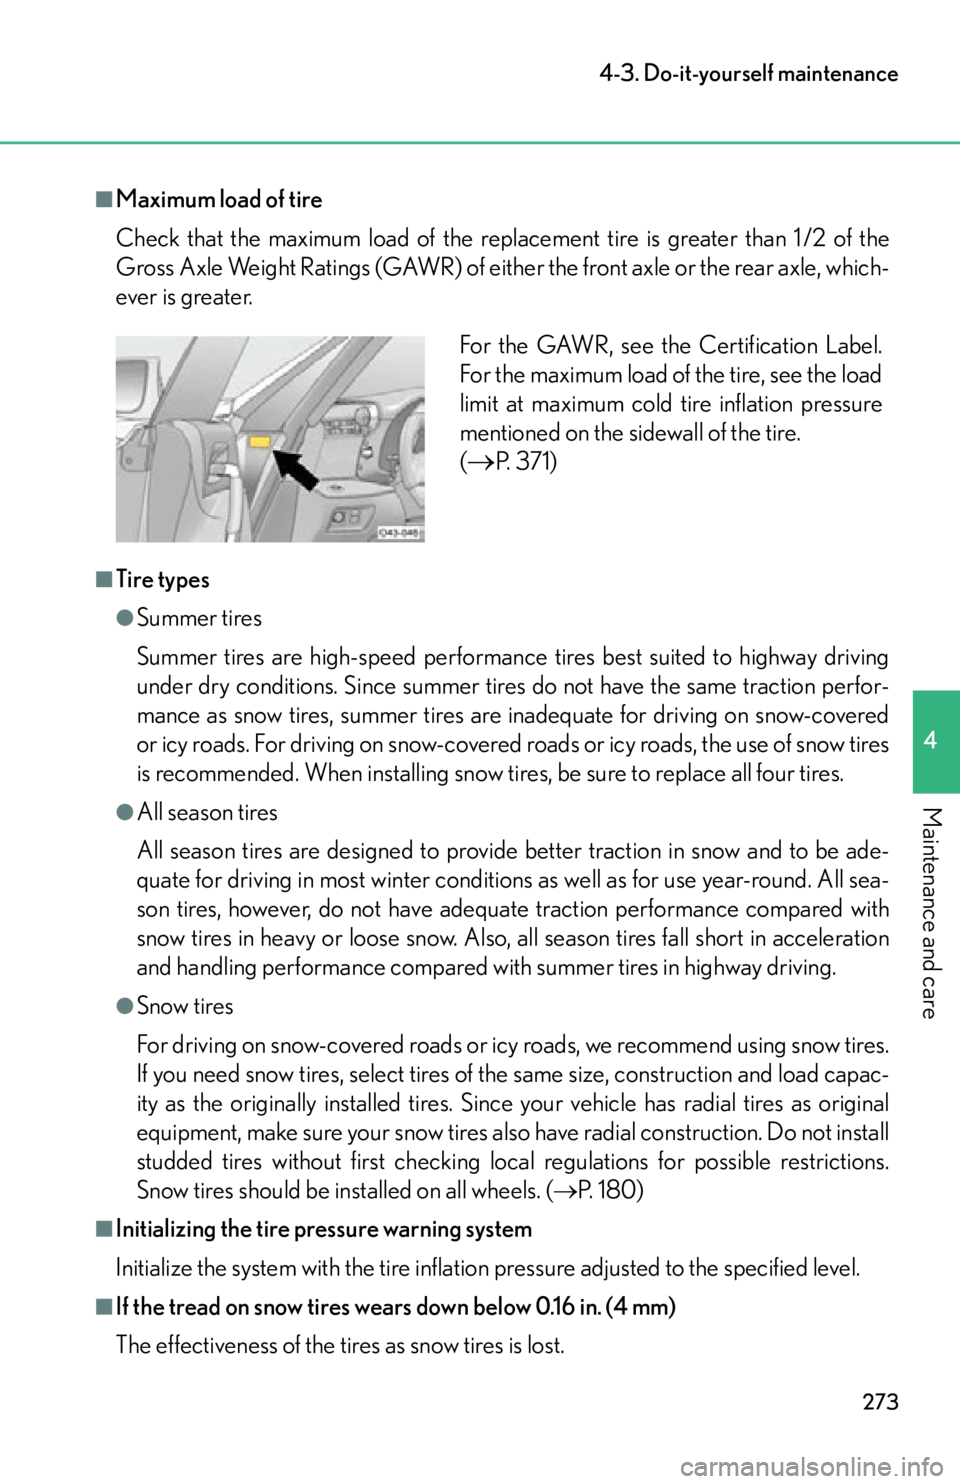
For the GAWR, see the Certification Label.
For the maximum load of the tire, see the load
limit at maximum cold tire inflation pressure
mentioned on the sidewall of the tire.
(
P. 3 7 1 )