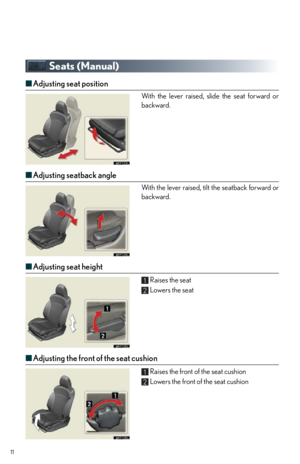
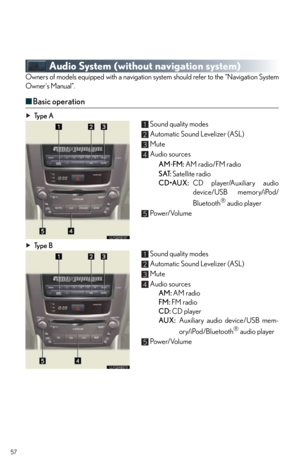
Page 49 of 82
49
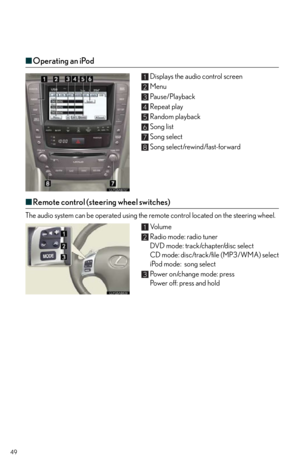
■Operating an iPod
Displays the audio control screen
Menu
Pa u s e / P l a y b a c k
Repeat play
Random playback
Song list
Song select
Song select/rewind/fast-forward
■Remote control (steering wheel switches)
The audio system can be operated using the remote control located on the steering wheel.
Vo l u m e
Radio mode: radio tuner
DVD mode: track/chapter/disc select
CD mode: disc/track/file (MP3/WMA) select
iPod mode: song select
Power on/change mode: press
Power off: press and hold
1
2
3
4
5
6
7
8
1
2
3
Page 50 of 82
50
Air Conditioning System
(with navigation system)
■Using the automatic mode
Press to turn on the airflow and to adjust the temperature.
■Adjusting the temperature
■To simultaneously adjust the driver's side and passenger's side temperature settings
Touch to turn the “DUAL” indicator off ( ) and then press .
■To individually adjust the driver's side and passenger's side temperature settings
Touch or press to turn the “DUAL” indicator on ( ) and then press or .
■To turn off the airflow
Press .
Dual mode button
Passenger side temperature display
Fan speed display
Outside air/recirculated air mode
button
Passenger side temperature control
Windshield defogger
Automatic mode button Driver side temperature control
“OFF” button
Cooling and dehumidification function
on/off button
Driver side temperature display
Air conditioning operation screen
display button
Air outlet display1
2
3
4
5
6
7
8
9
10
11
12
13
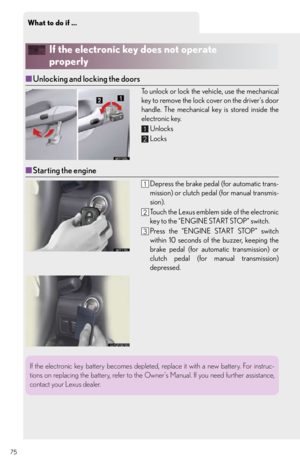
78
18
1585
9
Page 51 of 82
51
Hands-free System For Cellular Phone
(without navigation system)
■Bluetooth® phone pairing
Compatible Bluetooth®-equipped phones can be connected to the vehicle, enabling
hands-free operation. Please refer to the cell ular phone manufacturer's user guide for pair-
ing procedures, or go to“www.lexus.com/bluetooth” for more phone information.
To use a Bluetooth
® phone, it is necessary to first
register it in the system.
Press or .
Press and say “Pair phone”.
Press and say a name*.
*: This name will be used to identify yourphone in the case that more than one
phone has been registered to the system.
Press and say “Confirm” to display the
passkey.
Enter the passkey shown on the display into
the phone.
Refer to the cellular phone user's manual for
cellular phone operation.
Once the voice guidance for registration com-
pletion is finished, press .STEP1
: Pressing this switch turns the voice command system on. Say a command after the
beep.
Page 52 of 82
52
■Calling by number
Press and say “Dial by number”.
Press and say the phone number.
Dialing
a. Press .
b. Press and say “Dial”.
■Calling by name
You can call by saying a voice tag registered in the phonebook. For setting the voice recog-
nition, refer to the “Owner's Manual”.
Press and say “Dial by name”.
Press and say a contact name.
Dialing
a. Press .
b. Press and say “Dial”.
STEP1
STEP1
: Pressing this switch turns the voice command system on. Say a command after thebeep.
Page 53 of 82
53
■Calling by speed dial
Press .
Press the desired preset button (1-6).
Press .STEP1
STEP2
Page 54 of 82
54
■Phonebook transfer
Press .
Press and say “Phone book”.
Press and say “Add entry”.
Press and say “By phone”.
Press and say “Confirm”.
Transfer the phonebook data to the system
using the cellular phone.
Refer to the cellular phone user’s manual for
cellular phone operation.
Press and say “Previous” or “Next” until
the desired data is displayed.
Press and say “Confirm”.
Press and say the desired name.
Press and say “Confirm”.
Press and say “Confirm” again.STEP1
10
11
Phonebook transfer may not be po ssible depending on phone model.
: Pressing this switch turns the voice command system on. Say a command after the beep.
Page 55 of 82
55
■Changing the registered name
Press .
Press and say “Phone book”.
Press and say “Change name”.
Press and say the desired name.
Press and say “Confirm”.
Press and say the new name.
Press and say “Confirm”.STEP1
: Pressing this switch turns the voice command system on. Say a command after the
beep.
Page 56 of 82
56
■Registering a speed dial
Press .
Press and say “Phone book”.
Press and say “Set speed dial”.
Select the data to be registered.
Press and say the desired name.
Press and say “Confirm”.
Press the desired preset button (1-6).
Press and say “Confirm”.STEP1
STEP7
: Pressing this switch turns the voice command system on. Say a command after the
beep.


 49
■Operating an iPod
Displays the audio control screen
Menu
Pa u s e / P l a y b a c k
Repeat play
Random playback
Song list
Song select
Song select/rewind/fast-forward
■Remote control (steering")
 50
Air Conditioning System
(with navigation system)
■Using the automatic mode
Press to turn on the airflow and to adjust the temperature.
■Adjusting the temperature
■To simultaneously adju")
 51
Hands-free System For Cellular Phone
(without navigation system)
■Bluetooth® phone pairing
Compatible Bluetooth®-equipped phones can be connected to the vehicle, enabling
hands-free operation.")
 52
■Calling by number
Press and say “Dial by number”.
Press and say the phone number.
Dialing
a. Press .
b. Press and say “Dial”.
■Calling by name
You can call by saying a voice tag")
 53
■Calling by speed dial
Press .
Press the desired preset button (1-6).
Press .STEP1
STEP2")
 54
■Phonebook transfer
Press .
Press and say “Phone book”.
Press and say “Add entry”.
Press and say “By phone”.
Press and say “Confirm”.
Transfer the phonebook data to the sy")
 55
■Changing the registered name
Press .
Press and say “Phone book”.
Press and say “Change name”.
Press and say the desired name.
Press and say “Confirm”.
Press and say the new")
 56
■Registering a speed dial
Press .
Press and say “Phone book”.
Press and say “Set speed dial”.
Select the data to be registered.
Press and say the desired name.
Press and say “Co")