Page 9 of 413

8
9 Rear View Monitor System
Rear view monitor system290
.................................
10 Wide View Front Monitor System
Wide view front monitor system 296
............................
11 Intuitive Parking Assist
Intuitive parking assist 304
....................................
12 Setup
General settings 312
..........................................
Clock settings 318
............................................
Voice settings 321
............................................
Navigation settings 324
.......................................
Detailed navigation settings 325
................................
Telephone settings 334
......................................
Volume setting 335
........................................
Manage phone 336
........................................
Phonebook 344
...........................................
Setting the phonebook 345
.................................
Speed dials setting 353
....................................
Deleting call history 360
....................................
Setting the voice tag 361
...................................
Bluetooth r 365
............................................
Details 370
...............................................
Audio settings 373
..........................................
Select portable player 373
..................................
Settings Bluetooth raudio 375
...............................
Vehicle settings 380
.........................................
Maintenance 380
..........................................
Vehicle customization 385
..................................
Lexus parking assist setting 386
.............................
Other settings 388
............................................
13 Appendix
Limitations of the navigation system 392
.........................
Map database information and updates 394
......................
Index 405
.............................................
11 08.03HS250h_NAVI_U
75051U
Page 187 of 413
AUDIO/VIDEO SYSTEM
186
Operations such as selecting a preset station and adjusting the sound balance are car-
ried out on the screen. To display the audio screen, push the“MENU”button on the Re-
mote Touch, then select “Audio”.
" DVD changer
U6016AASLY
1Function menu tab
To control the radio, DVD changer,
Bluetooth raudio player, AUX, USB
memory or iPod, select the screen
tabs. For details, see page 191.
2Function menu display screen
To control the radio, DVD changer,
Bluetooth raudio player, AUX, USB
memory or iPod, select the screen
buttons. For details, see page 191.
3Disc slot
Insert discs into the slot after pushing
“LOAD” button. For details, see
page 223.
4“LOAD” button
Push this button to insert the discs.
For details, see page 223.
5“TUNE/FILE” knob
Turn this knob to move the station
band and files up or down. For de-
tails, see pages 203, 218 and 259.
11 08.03HS250h_NAVI_U
75051U
Quick reference
Page 188 of 413

AUDIO/VIDEO SYSTEM
187
6“CH/DISC” button
Push the“” or“” button to select
a preset station or a selected disc.
For details, see pages 225 and 228.
7“AUX” button
Push this button to turn the
Bluetooth raudio player, AUX, USB
memory or iPod on. For details, see
pages 191, 197, 247 and 255.
8“DISC” button
Push this button to play a DVD. For
details, see pages 191 and 227.
9“SAT” button
Push this button to choose a SAT sta-
tion. For details, see pages 191 and
202.
10“AM·FM” button
Push this button to choose a radio
station. (AM, FM1, FM2)
For details, see pages 191 and 197.
11“SEEK/TRACK” button
Push the “” or“” button to seek
up or down for a station, or to access
a desired track, file or chapter. For
details, see pages 199, 204, 214,
218, 234, 244, 253 and 259.
12“PWR/VOL” knob
Push this knob to turn the audio sys-
tem on and off, and turn it to adjust the
volume. For details, see page 191.
13“” button
Push this button to eject the discs.
For details, see page 225.
11 08.03HS250h_NAVI_U
75051U
7
Page 189 of 413

AUDIO/VIDEO SYSTEM
188
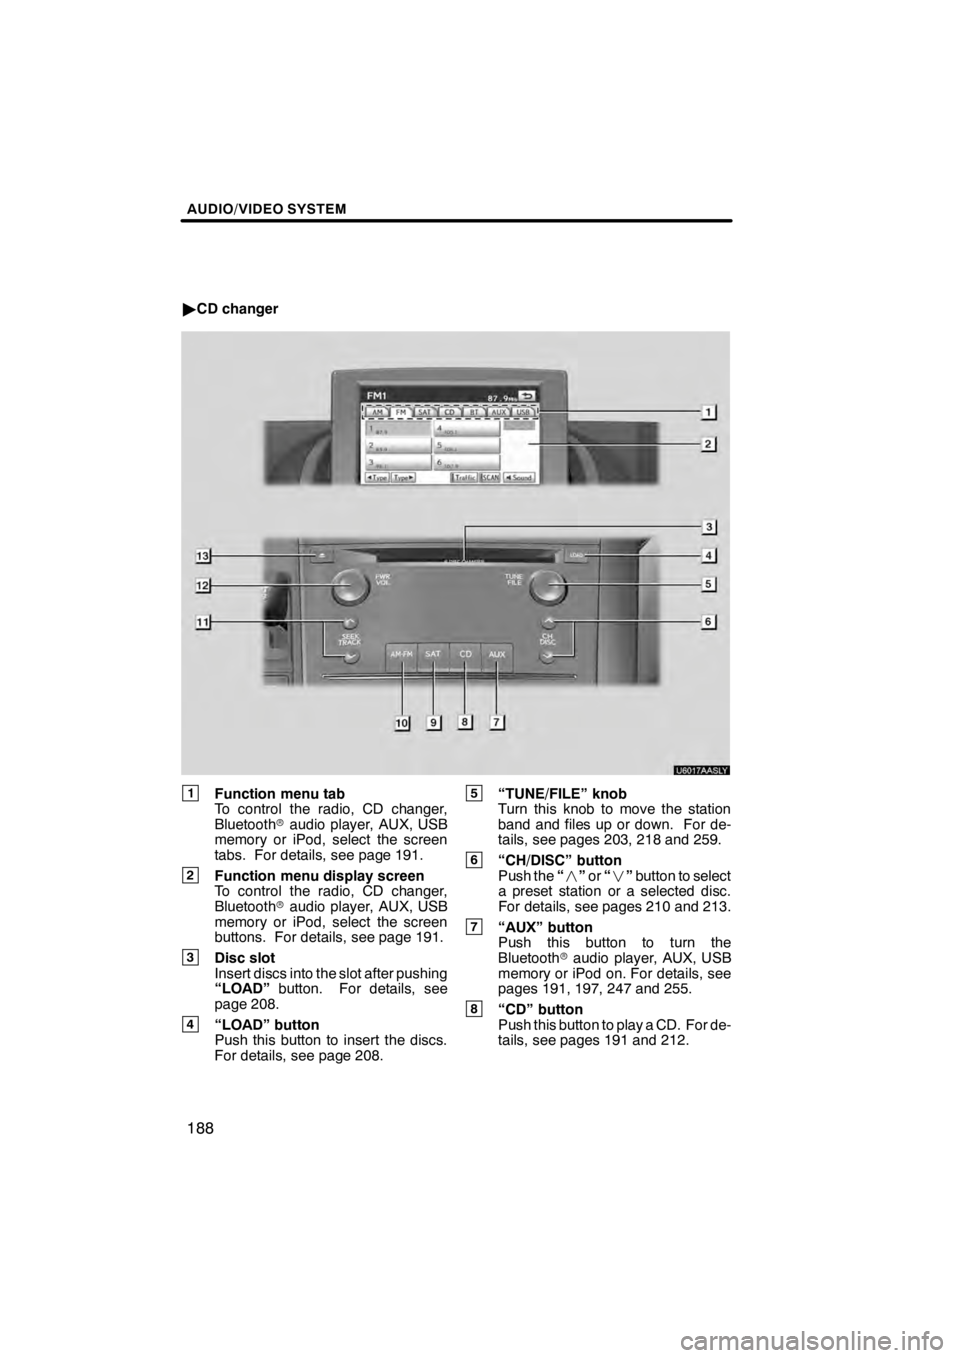
"CD changer
U6017AASLY
1Function menu tab
To control the radio, CD changer,
Bluetooth raudio player, AUX, USB
memory or iPod, select the screen
tabs. For details, see page 191.
2Function menu display screen
To control the radio, CD changer,
Bluetooth raudio player, AUX, USB
memory or iPod, select the screen
buttons. For details, see page 191.
3Disc slot
Insert discs into the slot after pushing
“LOAD” button. For details, see
page 208.
4“LOAD” button
Push this button to insert the discs.
For details, see page 208.
5“TUNE/FILE” knob
Turn this knob to move the station
band and files up or down. For de-
tails, see pages 203, 218 and 259.
6“CH/DISC” button
Push the “” or“” button to select
a preset station or a selected disc.
For details, see pages 210 and 213.
7“AUX” button
Push this button to turn the
Bluetooth raudio player, AUX, USB
memory or iPod on. For details, see
pages 191, 197, 247 and 255.
8“CD” button
Push this button to play a CD. For de-
tails, see pages 191 and 212.
11 08.03HS250h_NAVI_U
75051U
Page 191 of 413

AUDIO/VIDEO SYSTEM
190
Co−location: This transmitter must
not be co−located or operated in con-
junction with any other antenna or
transmitter.
DLaser products
D Do not take this unit apart or at-
tempt to make any changes
yourself. This is an intricate unit
that uses a laser pickup to re-
trieve information from the sur-
face of compact discs. The la-
ser is carefully shielded so that
its rays remain inside the cabi-
net. Therefore, never try to dis-
assemble the player or alter any
of its parts since you may be ex-
posed to laser rays and danger-
ous voltages.
D This product utilizes a laser.
Use of controls or adjustments
or performance of procedures
other than those specified here-
in may result in hazardous radi-
ation exposure.
NOTICE
To prevent the 12− volt battery from
being discharged, do not leave the
audio/video system on longer than
necessary when the hybrid system is
off.
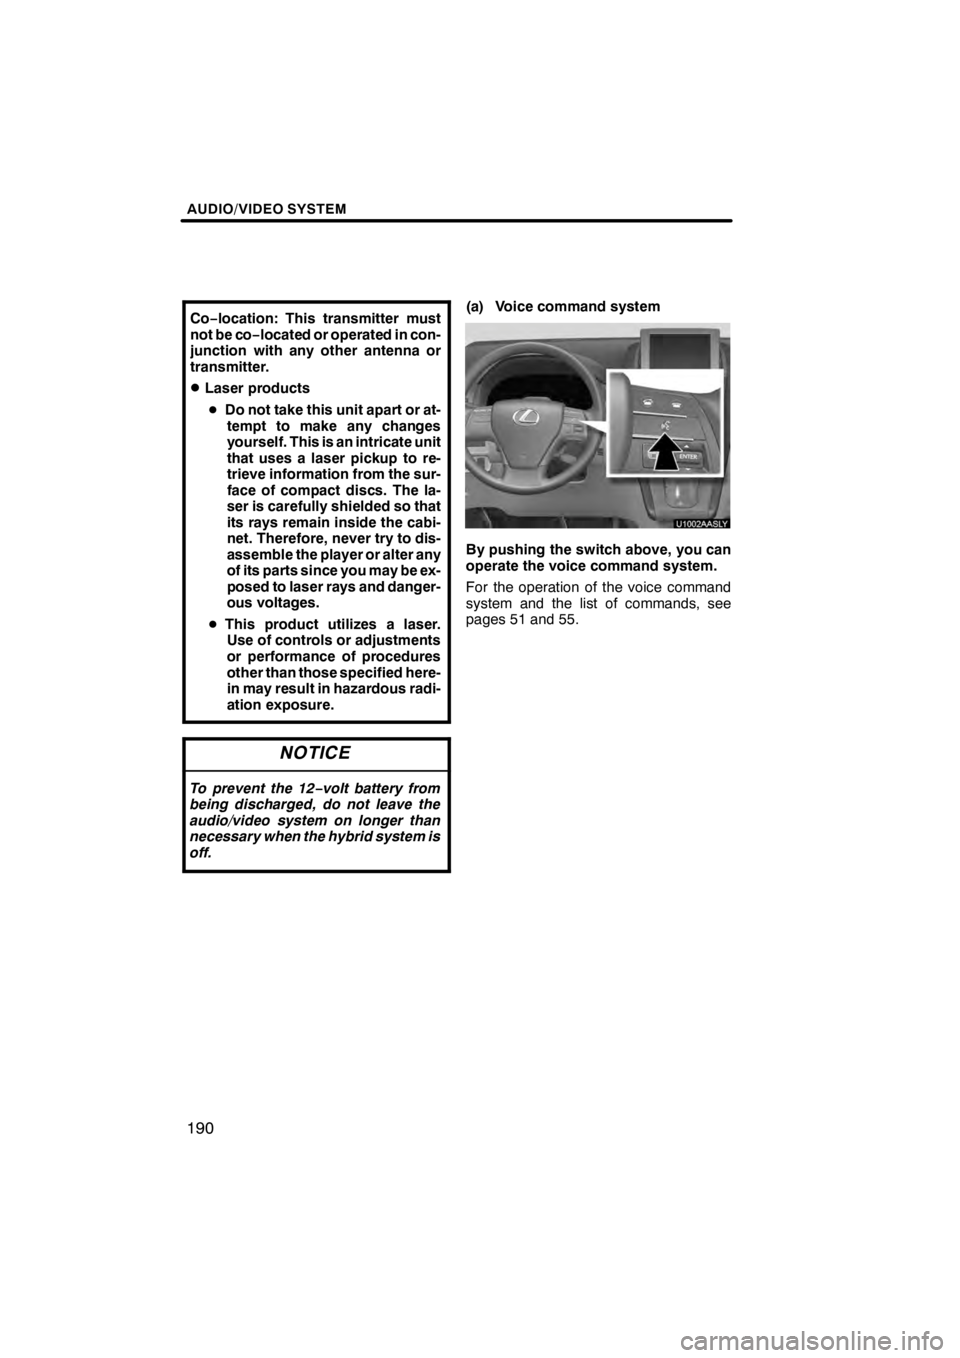
(a) Voice command system
By pushing the switch above, you can
operate the voice command system.
For the operation of the voice command
system and the list of commands, see
pages 51 and 55.
11 08.03HS250h_NAVI_U
75051U
Page 194 of 413
AUDIO/VIDEO SYSTEM
193
U6008LC
U6145LC
U6082LC
U600ALC
U6151LC
The screen buttons for radio, CD
changer, DVD changer, Bluetoothrau-
dio player, AUX, USB memory and iPod
operation are displayed on the screen
when the audio control mode is se-
lected.
Select the tab to select the desired mode
when the audio control mode is selected.
INFORMATION
You cannot operate dimmed screen
buttons.
11 08.03HS250h_NAVI_U
75051U
7
Page 198 of 413

AUDIO/VIDEO SYSTEM
197
(h) AUX port
The sound of portable audio players
connected to the AUX port can be enjoyed.
Push the“AUX”button to display audio
screen and select “AUX”tab to switch to
AUX mode. When the portable audio
player is not connected to the AUX port,
the tab will tone down. For details, refer to
the “Owner’s Manual”.
(i) USB port
It is available to connect a USB memory/
iPod device with the USB port. When the
USB memory/iPod is not connected to the
USB port, the tab will tone down. For de-
tails, see “(a) Connecting a USB memory
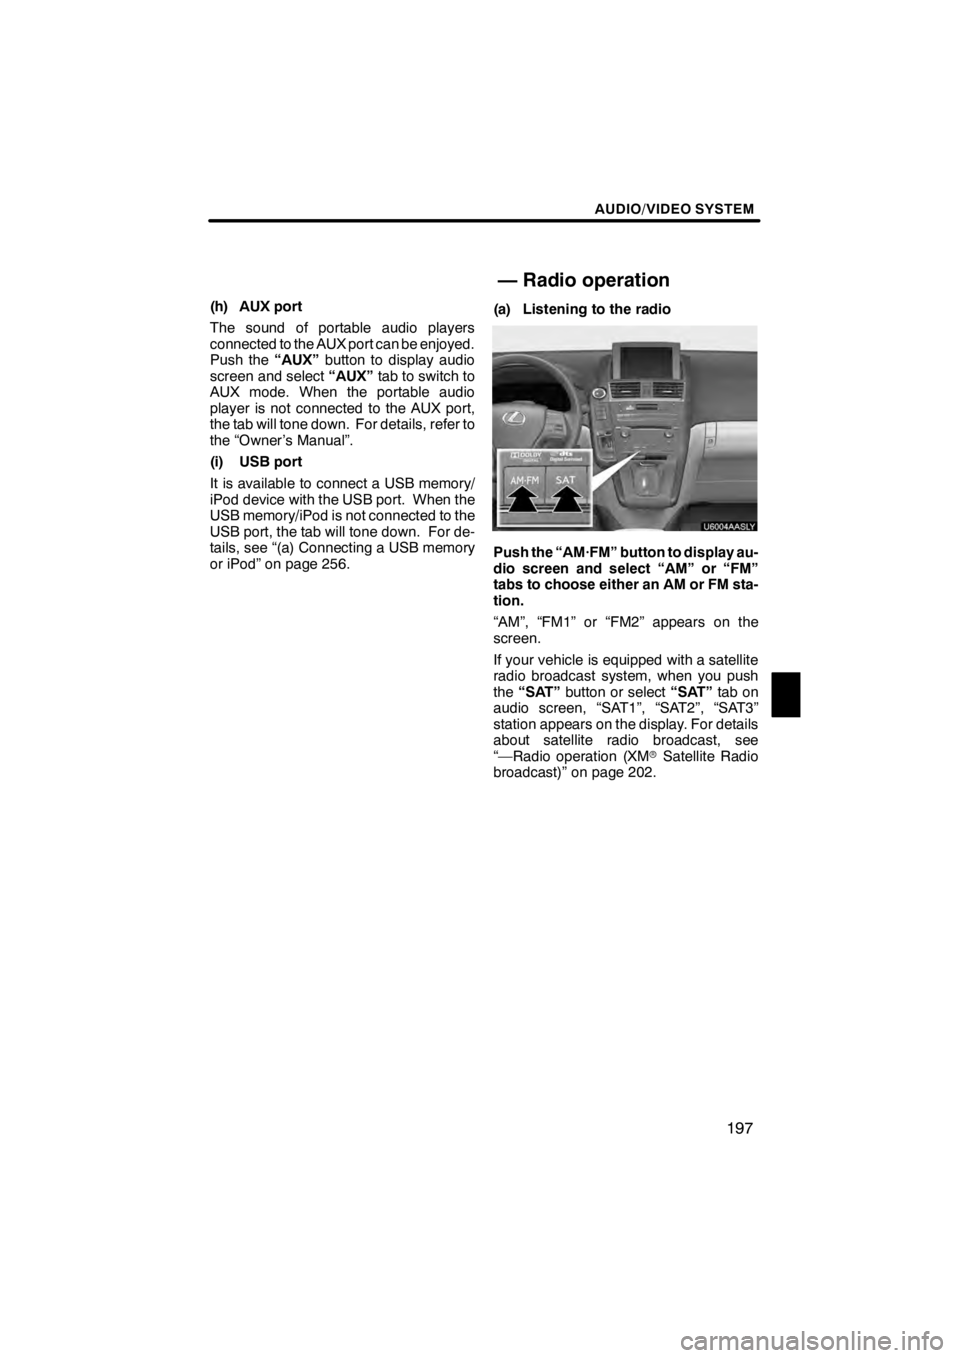
or iPod” on page 256. (a) Listening to the radio
U6004AASLY
Push the “AM·FM” button to display au-
dio screen and select “AM” or “FM”
tabs to choose either an AM or FM sta-
tion.
“AM”, “FM1” or “FM2” appears on the
screen.
If your vehicle is equipped with a satellite
radio broadcast system, when you push
the
“SAT” button or select “SAT”tab on
audio screen, “SAT1”, “SAT2”, “SAT3”
station appears on the display. For details
about satellite radio broadcast, see
“—Radio operation (XM rSatellite Radio
broadcast)” on page 202.
11 08.03HS250h_NAVI_U
75051U
— Radio operation
7
Page 229 of 413

AUDIO/VIDEO SYSTEM
228
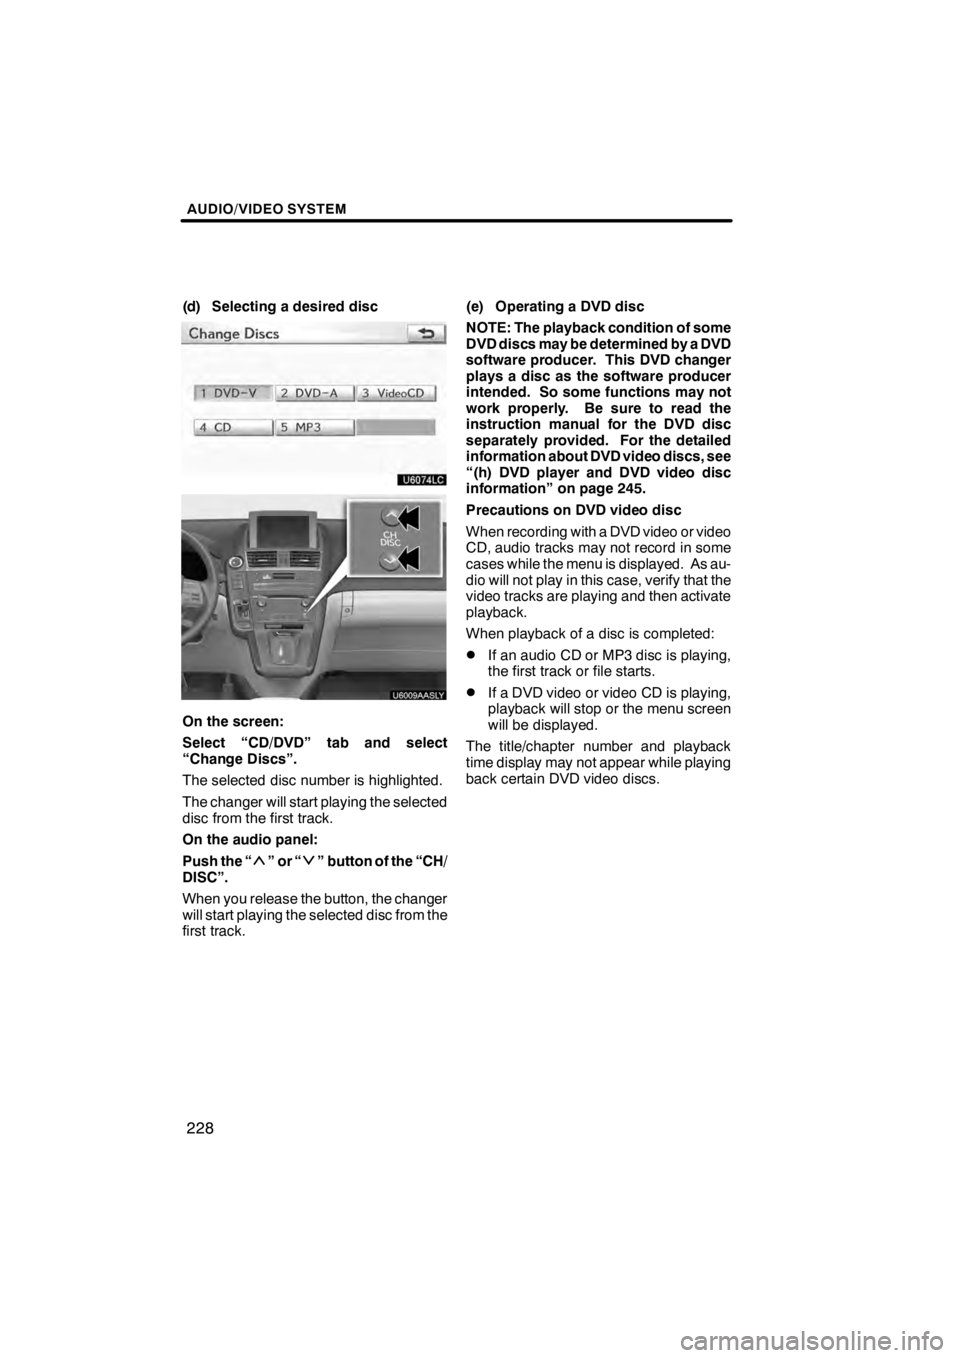
(d) Selecting a desired disc
U6074LC
U6009AASLY
On the screen:
Select “CD/DVD” tab and select
“Change Discs”.
The selected disc number is highlighted.
The changer will start playing the selected
disc from the first track.
On the audio panel:
Push the “
”or“” button of the “CH/
DISC”.
When you release the button, the changer
will start playing the selected disc from the
first track. (e) Operating a DVD disc
NOTE: The playback condition of some
DVD discs may be determined by a DVD
software producer. This DVD changer
plays a disc as the software producer
intended. So some functions may not
work properly. Be sure to read the
instruction manual for the DVD disc
separately provided. For the detailed
information about DVD video discs, see
“(h) DVD player and DVD video disc
information” on page 245.
Precautions on DVD video disc
When recording with a DVD video or video
CD, audio tracks may not record in some
cases while the menu is displayed. As au-
dio will not play in this case, verify that the
video tracks are playing and then activate
playback.
When playback of a disc is completed:
DIf an audio CD or MP3 disc is playing,
the first track or file starts.
DIf a DVD video or video CD is playing,
playback will stop or the menu screen
will be displayed.
The title/chapter number and playback
time display may not appear while playing
back certain DVD video discs.
11 08.03HS250h_NAVI_U
75051U