2012 Lancia Thema display
[x] Cancel search: displayPage 82 of 316

A maximum of 1000 entries perphone will be downloaded and up-
dated every time a phone is con-
nected to the Uconnect™ Phone.
Depending on the maximum num- ber of entries downloaded, there
may be a short delay before the
latest downloaded names can be
used. Until then, if available, the
previously downloaded phonebook
is available for use.
Only the phonebook of the cur- rently connected mobile phone is
accessible.
This downloaded phonebook can- not be edited or deleted on the
Uconnect™ Phone. These can only
be edited on the mobile phone. The
changes are transferred and up-
dated to Uconnect™ Phone on the
next phone connection.
Managing Your Favorite
Phonebook
There are three ways you can add an
entry to your Favorite Phonebook.
1. During an active call of a number
to make a favorite, touch and hold a favorite button on the top of the
phone main screen.
2. After loading the mobile phone-
book, select phonebook from the
Phone main screen, then select the
appropriate number. Touch the + next
to the selected number to display the
options pop-up. In the pop-up select
“Add to Favorites”.
NOTE:
If the Favorites list is full, you will
be asked to remove an existing fa-
vorite.
3. From the Phone main screen, se-
lect phonebook. From the phonebook
screen, select the “Favorites” soft-key
and then select the + soft-key located
to the right of the phonebook record.
Select an empty entry and touch the +
on that selected entry. When the Op-tions pop-up appears, touch “Add
from Mobile”. You will then be asked
which contact and number to choose
from your mobile phonebook. When
complete the new favorite will be
shown.
To Remove A Favorite
To remove a Favorite, select phone-
book from the Phone main screen.
Next select Favorites on the left side of the screen and then touch the +
Options soft-key.
Touch the + next to the Favorite you would like to remove.76
Page 83 of 316

The Options pop-up will display,touch “Remove from Favs”.
Emergency And Towing
Assistance
The Emergency and Towing Favorite
numbers can only be altered. These
cannot be deleted and the names can-
not be changed.
To change the Emergency or Towing
number follow these steps.
Touch the “Phonebook” soft-key from the Phone main screen.
Touch the “Favorites” soft-key. Next scroll to the bottom of the list
to locate the Emergency and Tow-
ing Favorites.
Touch the + Options soft-key.
Touch the + next to appropriate Favorite that is to be altered. The Options pop-up will appear
and you can choose between Edit-
ing the number or resetting the
number to default.
PHONE CALL FEATURES
The following features can be ac-
cessed through the Uconnect™ Phone
if the feature(s) are available and sup-
ported by Bluetooth® on your mobile
service plan. For example, if your mo-
bile service plan provides three-way
calling, this feature can be accessed
through the Uconnect™ Phone.
Check with your mobile service pro-
vider for the features that you have.
Ways To Initiate A Phone Call
Listed below are all the ways you can
initiate a phone call with Uconnect™
Phone.
Redial Dial by touching in the number
Voice Commands (Dial by Saying a
Name, Call by Saying a Phonebook
Name, Redial, or Call Back)
Favorite Phonebook
Mobile Phonebook
Recent Call Log
SMS Message Viewer
NOTE:
All of the above operations except
Redial can be done with 1 call or
less active.
Dial By Saying A Number
Press the
button to begin,
After the “Listening” prompt and the following beep, say “Dial 248-
555-1212”,
The Uconnect™ Phone will dial the number 248-555-1212.
Call By Saying A Phonebook
Name
Press thebutton to begin,
After the “Listening” prompt and the following beep, say “Call John
Doe Mobile”,
77
Page 84 of 316

The Uconnect™ Phone will dial thenumber associated with John Doe,
or if there are multiple numbers it
will ask which number you want to
call for John Doe.
Call Controls
The touch-screen allows you to con-
trol the following call features:
Answer
End
Ignore
Hold/unhold
Mute/unmute
Transfer the call to/from the phone
Swap 2 active calls
Join 2 active calls together
Touch-Tone Number Entry
Touch the “Phone” soft-key,
Touch the “Dial” soft-key,
The Touch-Tone screen will be dis- played,
Use the numbered soft-keys to en- ter the number and touch “Call”. To send a touch tone using Voice Rec-
ognition (VR), press the
button
while in a call and say “Send 1234#”
or you can say “Send Voicemail Pass-
word” if Voicemail password is stored
in your mobile phonebook.
Recent Calls
You may browse up to 34 of the most
recent of each of the following call
types:
Incoming Calls
Outgoing Calls
Missed Calls
All Calls
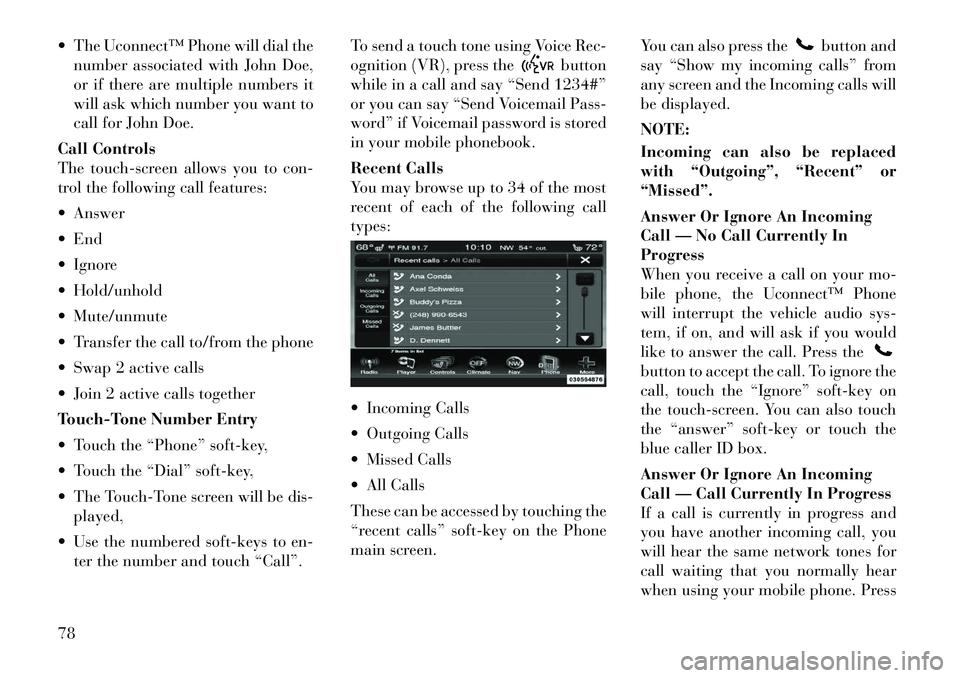
These can be accessed by touching the
“recent calls” soft-key on the Phone
main screen. You can also press the
button and
say “Show my incoming calls” from
any screen and the Incoming calls will
be displayed.
NOTE:
Incoming can also be replaced
with “Outgoing”, “Recent” or
“Missed”.
Answer Or Ignore An Incoming
Call — No Call Currently In
Progress
When you receive a call on your mo-
bile phone, the Uconnect™ Phone
will interrupt the vehicle audio sys-
tem, if on, and will ask if you would
like to answer the call. Press the
button to accept the call. To ignore the
call, touch the “Ignore” soft-key on
the touch-screen. You can also touch
the “answer” soft-key or touch the
blue caller ID box.
Answer Or Ignore An Incoming
Call — Call Currently In Progress
If a call is currently in progress and
you have another incoming call, you
will hear the same network tones for
call waiting that you normally hear
when using your mobile phone. Press
78
Page 87 of 316

When calling a number with your
Uconnect™ Phone that normally re-
quires you to enter in a touch-tone
sequence on your mobile phone key-
pad, you can utilize the touch-screen
or press the
button and say the
word “Send” then the sequence you
wish to enter. For example, if required
to enter your PIN followed with a
pound, (3 7 4 6 #), you can press the
button and say, “Send 3 7 4 6
#”. Saying “Send” followed by a
number, or sequence of numbers, is
also to be used for navigating through
an automated customer service center
menu structure, and to leave a num-
ber on a pager.
You can also send stored mobile
phonebook entries as tones for fast
and easy access to voice mail and
pager entries. For example, if you pre-
viously created a Phonebook entry
with First and/or Last Name as
“Voicemail Password”, then if you
press the
button and say “Send
Voicemail Password” the Uconnect™
Phone will then send the correspond- ing phone number associated with the
phonebook entry, as tones over the
phone.
NOTE:
The first number encountered
for that contact will be sent. All
other numbers entered for that
contact will be ignored.
You may not hear all of the tones due to mobile phone network
configurations. This is normal.
Some paging and voice mail sys- tems have system time out set-
tings that are too short and may
not allow the use of this feature.
Pauses, wait or other characters that are supported by some
phones are not supported over
Bluetooth®. These additional
symbols will be ignored in the
dialing a numbered sequence.
Barge In — Overriding Prompts
The
button can be used when
you wish to skip part of a prompt and
issue your voice command immedi-
ately. For example, if a prompt is ask-
ing “There are 2 numbers with the
name John. Say the full name” you could press the
button and say,
“John Smith” to select that option
without having to listen to the rest of
the voice prompt.
Voice Response Length
It is possible for you to choose be-
tween Brief and Detailed Voice Re-
sponse Length.
Touch the “More” soft-key, then touch the “Settings” soft-key,
Touch the “Display” soft-key, then scroll down to Voice Response
Length,
Select either “Brief” or “Detailed” by touching the box next to the
selection. A check-mark will ap-
pear to show your selection.
Phone And Network Status
Indicators
Uconnect™ Phone will provide noti-
fication to inform you of your phone
and network status when you are at-
tempting to make a phone call using
Uconnect™ Phone. The status is
given for network signal strength and
phone battery strength.
81
Page 95 of 316

At any point, if the system does not
recognize one of your commands, you
will be prompted to repeat it.
To hear available commands, press
the Uconnect™ Voice Command
button and say “Help”. You will
hear available commands for the
screen displayed.
Natural Speech
Natural speech allows the user to
speak commands in phrases or com-
plete sentences. The system filters out
certain non-word utterances and
sounds such as “ah” and “eh”. The
system handles fill-in words such as “I
would like to”.
The system handles multiple inputs in
the same phrase or sentence such as
“make a phone call” and “to Kelly
Smith”. For multiple inputs in the
same phrase or sentence, the system
identifies the topic or context and pro-
vides the associated follow-up prompt
such as “Who do you want to call?” in the case where a phone call was re-
quested but the specific name was not
recognized.
The system utilizes continuous dialog;
when the system requires more infor-
mation from the user it will ask a
question to which the user can re-
spond without pressing the
Uconnect™ Voice Command
button.
Uconnect™ Voice
Commands
The Uconnect™ Voice Command sys-
tem understands two types of com-
mands. Universal commands are
available at all times. Local com-
mands are available if the supported
radio mode is active.
Start a dialogue by pressing the
Uconnect™ Voice Commandbutton.
Changing the Volume
1. Start a dialogue by pressing the
Voice Command
button.2. Say a command (e.g., “Help”).
3. Use the ON/OFF VOLUME rotary
knob to adjust the volume to a com-
fortable level while the Voice Com-
mand system is speaking. Please note
the volume setting for Voice Com-
mand is different than the audio sys-
tem.
Starting Voice Recognition (VR)
Session in Radio/Player Modes
In this mode, you can say the follow-
ing commands:
NOTE:
The commands can be said on any
screen when a call is not active
after pushing the Uconnect™
Voice Command
button.
Disc
To switch to the disc mode, say
“Change source to Disc”. This com-
mand can be given in any mode or
screen:
“Track” (#) (to change the track)
89
Page 104 of 316

Front Heated Seat Operations —
Uconnect Touch™ 8.4 and 8.4
Nav:
Press the “Controls” soft-key located
on the bottom of the Uconnect
Touch™ display.Press the “Driver” or “Pas-
senger” seat soft-key once
to select HI-level heating.
Press the soft-key a second
time to select LO-level heating. Press
the soft-key a third time to shut the
heating elements OFF. NOTE:
Once a heat setting is selected, heat
will be felt within two to five min-
utes.
When the HI-level setting is selected,
the heater will provide a boosted heat
level during the first four minutes of
operation. Then, the heat output will
drop to the normal HI-level. If the
HI-level setting is selected, the system
will automatically switch to LO-level
after a maximum of 60 minutes of
continuous operation. At that time,
the display will change from HI to LO,
indicating the change. The LO-level
setting will turn OFF automatically
after a maximum of 45 minutes.Rear Heated Seats
On some models, the two outboard
seats are equipped with heated seats.
The heated seat switches for these
seats are located on the rear of the
center console. There are two heated
seat switches that allow the rear pas-
sengers to operate the seats indepen-
dently.
You can choose from HI, LO or OFF
heat settings. Amber indicator lights
in each switch indicate the level of
heat in use. Two indicator lights will
illuminate for HI, one for LO and
none for OFF.
Press the switch once to se-
lect HI-level heating. Press
the switch a second time to
select LO-level heating.
Press the switch a third time to shut
the heating elements OFF.
NOTE:
Once a heat setting is selected, heat will be felt within two to
five minutes.
The engine must be running for the heated seats to operate.
Controls Soft-Key
Heated Seats Soft-Keys
98
Page 105 of 316

When the HI-level setting is selected,
the heater will provide a boosted heat
level during the first four minutes of
operation. Then, the heat output will
drop to the normal HI-level. If the
HI-level setting is selected, the system
will automatically switch to LO-level
after a maximum of 60 minutes of
continuous operation. At that time,
the number of illuminated LEDs
changes from two to one, indicating
the change. The LO-level setting will
turn OFF automatically after a maxi-
mum of 45 minutes.
VENTILATED SEATS (for
versions/markets, where
provided)
On some models, both the driver and
passenger seats are ventilated. Lo-
cated in the seat cushion and seatback
are small fans that draw air from the
seat surface through fine perforations
in the seat cover to help keep the
driver and front passenger cooler in
higher ambient temperatures.
The ventilated seats can be operated
using the Uconnect Touch™ System.Front Ventilated Seat Operation
— Uconnect Touch™ 8.4/8.4 Nav:
Press the “Controls” soft-key located
on the bottom of the Uconnect
Touch™ display.
Press the “Driver” or “Passenger”
seat soft-key once to select HI-level
ventilation. Press the soft-key a sec-
ond time to select LO-level ventila-
tion. Press the soft-key a third time to
shut off the seat ventilation.
Press the “Driver” or “Passenger”
seat soft-key once to select HI-level
ventilation. Press the soft-key a sec-
ond time to select LO-level ventila-
tion. Press the soft-key a third time to
shut off the seat ventilation.
NOTE:
The engine must be running for the
ventilated seats to operate.
HEAD RESTRAINTS
Head restraints are designed to reduce
the risk of injury by restricting head
movement in the event of a rear im-
pact. Head restraints should be ad-
justed so that the top of the head
restraint is located above the top of
your ear.
Controls Soft-Key
Ventilated Seats Soft-Keys
99
Page 108 of 316

the memory save function and the (1)
and (2) buttons which are used to
recall either of two pre-programmed
memory profiles.
PROGRAMMING THE
MEMORY FEATURE
NOTE:
Saving a new memory profile will
erase an existing profile from
memory.
To create a new memory profile, per-
form the following:
1. Cycle the ignition to the RUN po-
sition.
2. Adjust all memory profile settings
to desired preferences (i.e., seat, side
mirror, adjustable pedals [for
versions/markets, where provided],power tilt and telescopic steering col-
umn [for versions/markets, where
provided], and radio station presets).
3. Press and release the SET (S) but-
ton on the memory switch.
4. Within five seconds, press and re-
lease the MEMORY button 1 or 2. The
Electronic Vehicle Information Center
(EVIC) (for versions/markets, where
provided) will display which memory
position has been set.
NOTE:
Memory profiles can be set with-
out the vehicle in PARK, but the
vehicle must be in PARK to re-
call a memory profile.
The Recall Memory with Remote Key Unlock feature can be
turned on and off using the
Uconnect Touch™ System, refer
to “Uconnect Touch™ Settings”
in “Understanding Your Instru-
ment Panel” for further infor-
mation. LINKING AND UNLINKING
THE REMOTE KEYLESS
ENTRY TRANSMITTER TO
MEMORY
Your RKE transmitters can be pro-
grammed to recall one of two pre-
programmed memory profiles by
pressing the UNLOCK button on the
RKE transmitter.
To program your RKE transmitters,
perform the following:
1. Cycle the ignition to the OFF posi-
tion.
2. Select desired memory profile (1)
or (2).
3. Once the profile has been recalled,
press and release the SET (S) button
on the memory switch, then press and
release button (1) or (2) accordingly.
“Memory Profile Set” (1 or 2) will
display in the instrument cluster on
vehicles equipped with the EVIC.
4. Press and release the LOCK button
on the RKE transmitter within 10 sec-
onds.
Memory Seat Switch
102