2012 Lancia Thema audio
[x] Cancel search: audioPage 88 of 316

Dialing Using The Mobile Phone
Keypad
You can dial a phone number with
your mobile phone keypad and still
use the Uconnect™ Phone (while di-
aling via the mobile phone keypad,
the user must exercise caution and
take precautionary safety measures).
By dialing a number with your paired
Bluetooth® mobile phone, the audio
will be played through your vehicle's
audio system. The Uconnect™ Phone
will work the same as if you dial the
number using voice command.
NOTE:
Certain brands of mobile phones
do not send the dial ring to the
Uconnect™ Phone to play it on the
vehicle audio system, so you will
not hear it. Under this situation,
after successfully dialing a num-
ber the user may feel that the call
did not go through even though the
call is in progress. Once your call is
answered, you will hear the audio.Mute/Un-Mute (Mute OFF)
When you mute the Uconnect™
Phone, you will still be able to hear
the conversation coming from the
other party, but the other party will
not be able to hear you. In order to
mute the Uconnect™ Phone simply
touch the Mute button on the Phone
main screen.
ADVANCED PHONE
CONNECTIVITY
Transfer Call To And From
Mobile Phone
The Uconnect™ Phone allows ongo-
ing calls to be transferred from your
mobile phone to the Uconnect™
Phone without terminating the call.
To transfer an ongoing call from your
Uconnect™ Phone paired mobile
phone to the Uconnect™ Phone or
vice versa, press the Transfer button
on the Phone main screen.
Connect Or Disconnect Link
Between The Uconnect™ Phone
And Mobile Phone
If you would like to connect or discon-
nect the Bluetooth® connection be-
tween a Uconnect™ Phone paired
mobile phone and the Uconnect™
Phone, follow the instructions de-
scribed in your mobile phone User's
Manual.
THINGS YOU SHOULD
KNOW ABOUT YOUR
UCONNECT™ PHONE
Voice Command
For best performance, adjust the
rearview mirror to provide at least
1 cm gap between the overhead
console (for versions/markets,
where provided) and the mirror.
Always wait for the beep before speaking.
82
Page 89 of 316
Speak normally, without pausing,just as you would speak to a person
sitting a few meters away from you.
Make sure that no one other than you is speaking during a voice com-
mand period.
Performance is maximized under: low-to-medium blower setting,
low-to-medium vehicle speed,
low road noise,
smooth road surface,
fully closed windows,
dry weather condition.
Even though the system is designed for users speaking in North Ameri-
can English, French, and Spanish
accents, the system may not always
work for some. When navigating through an auto-
mated system such as voice mail, or
when sending a page, before speak-
ing the digit string, make sure to
say “Send”.
Storing names in your favorites phonebook when the vehicle is not
in motion is recommended.
Phonebook (Mobile and Favorites) name recognition rate is optimized
when the entries are not similar.
You can say “O” (letter “O”) for “0” (zero).
Even though international dialing for most number combinations is
supported, some shortcut dialing
number combinations may not be
supported.
In a convertible vehicle, system per- formance may be compromised
with the convertible top down. Far End Audio Performance
Audio quality is maximized under:
low-to-medium blower setting,
low-to-medium vehicle speed,
low road noise,
smooth road surface,
fully closed windows,
dry weather conditions, and
operation from the driver's seat.
Performance, such as audio clarity, echo, and loudness to a large degree
rely on the phone and network, and
not the Uconnect™ Phone.
Echo at the far end can sometimes be reduced by lowering the in-
vehicle audio volume.
In a convertible vehicle, system per- formance may be compromised
with the convertible top down.
83
Page 95 of 316
At any point, if the system does not
recognize one of your commands, you
will be prompted to repeat it.
To hear available commands, press
the Uconnect™ Voice Command
button and say “Help”. You will
hear available commands for the
screen displayed.
Natural Speech
Natural speech allows the user to
speak commands in phrases or com-
plete sentences. The system filters out
certain non-word utterances and
sounds such as “ah” and “eh”. The
system handles fill-in words such as “I
would like to”.
The system handles multiple inputs in
the same phrase or sentence such as
“make a phone call” and “to Kelly
Smith”. For multiple inputs in the
same phrase or sentence, the system
identifies the topic or context and pro-
vides the associated follow-up prompt
such as “Who do you want to call?” in the case where a phone call was re-
quested but the specific name was not
recognized.
The system utilizes continuous dialog;
when the system requires more infor-
mation from the user it will ask a
question to which the user can re-
spond without pressing the
Uconnect™ Voice Command
button.
Uconnect™ Voice
Commands
The Uconnect™ Voice Command sys-
tem understands two types of com-
mands. Universal commands are
available at all times. Local com-
mands are available if the supported
radio mode is active.
Start a dialogue by pressing the
Uconnect™ Voice Commandbutton.
Changing the Volume
1. Start a dialogue by pressing the
Voice Command
button.2. Say a command (e.g., “Help”).
3. Use the ON/OFF VOLUME rotary
knob to adjust the volume to a com-
fortable level while the Voice Com-
mand system is speaking. Please note
the volume setting for Voice Com-
mand is different than the audio sys-
tem.
Starting Voice Recognition (VR)
Session in Radio/Player Modes
In this mode, you can say the follow-
ing commands:
NOTE:
The commands can be said on any
screen when a call is not active
after pushing the Uconnect™
Voice Command
button.
Disc
To switch to the disc mode, say
“Change source to Disc”. This com-
mand can be given in any mode or
screen:
“Track” (#) (to change the track)
89
Page 98 of 316
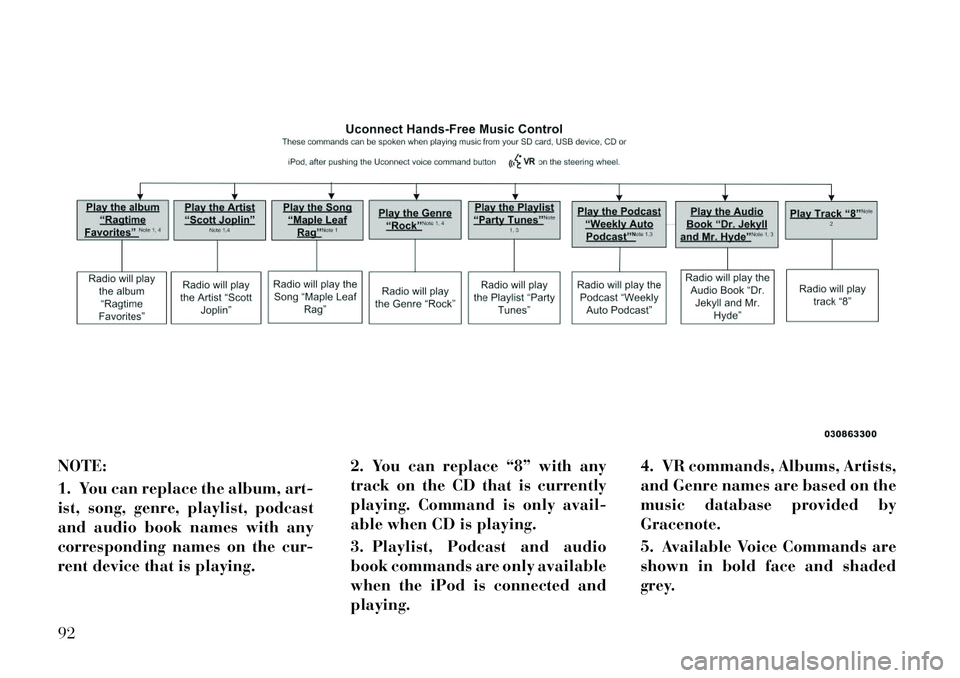
NOTE:
1. You can replace the album, art-
ist, song, genre, playlist, podcast
and audio book names with any
corresponding names on the cur-
rent device that is playing.2. You can replace “8” with any
track on the CD that is currently
playing. Command is only avail-
able when CD is playing.
3. Playlist, Podcast and audio
book commands are only available
when the iPod is connected and
playing.4. VR commands, Albums, Artists,
and Genre names are based on the
music database provided by
Gracenote.
5. Available Voice Commands are
shown in bold face and shaded
grey.92
Page 140 of 316

PARKVIEW® REAR
BACK UP CAMERA (for
versions/markets, where
provided)
Your vehicle may be equipped with
the ParkView® Rear Back Up Cam-
era that allows you to see an on-screen
image of the rear surroundings of
your vehicle whenever the shift lever
is put into REVERSE. The image will
be displayed on the radio touchscreendisplay along with a caution note to
“check entire surroundings” across
the top of the screen. After five sec-
onds this note will disappear. The
ParkView® camera is located on the
rear of the vehicle above the rear Li-
cense plate.
When the vehicle is shifted out of RE-
VERSE, the rear camera mode is ex-
ited and the navigation or audio
screen appears again.
When displayed, static grid lines will
illustrate the width of the vehicle
while a dashed center-line will indi-
cate the center of the vehicle to assist
with parking or aligning to a hitch/
receiver. The static grid lines will
show separate zones that will help
indicate the distance to the rear of the
vehicle. The following table shows the
approximate distances for each zone:
Zone
Distance to the rear of the vehicle
Red 0 - 30 cm
Yellow 30 cm - 1 m
Green 1 m or greater
WARNING!
Drivers must be careful when back-
ing up even when using the
ParkView® Rear Back Up Camera.
Always check carefully behind your
vehicle, and be sure to check for
pedestrians, animals, other vehicles,
obstructions, or blind spots before
backing up. You are responsible for
the safety of your surroundings and
must continue to pay attention while
backing up. Failure to do so can
result in serious injury or death.
CAUTION!
To avoid vehicle damage,
ParkView® should only be used as a
parking aid. The ParkView® cam-
era is unable to view every obstacle
or object in your drive path.
(Continued)
CAUTION!(Continued)
To avoid vehicle damage, the ve-
hicle must be driven slowly when
using ParkView® to be able to stop
in time when an obstacle is seen. It
is recommended that the driver look
frequently over his/her shoulder
when using ParkView®.
134
Page 156 of 316

MESSAGES # . . . . . . . . . . . . . . . . . . . . . . . . . 167
TURN MENU OFF . . . . . . . . . . . . . . . . . . . . . 167
Uconnect Touch™ SETTINGS . . . . . . . . . . . . . . 167 HARD-KEYS . . . . . . . . . . . . . . . . . . . . . . . . . 167
SOFT-KEYS . . . . . . . . . . . . . . . . . . . . . . . . . . 167
CUSTOMER PROGRAMMABLE FEATURES— Uconnect Touch™ SYSTEM 8.4
SETTINGS . . . . . . . . . . . . . . . . . . . . . . . . . . . 168
SOUND SYSTEMS . . . . . . . . . . . . . . . . . . . . . . . 177
NAVIGATION SYSTEM (for versions/markets, where provided) . . . . . . . . . . . . . . . . . . . . . . . . . 177
SETTING THE ANALOG CLOCK . . . . . . . . . . . . 178
iPod®/USB/MP3 CONTROL (for vehicles/ markets, where provided) . . . . . . . . . . . . . . . . . 178
HARMAN KARDON® Logic7® HIGH PERFORMANCE MULTICHANNEL
SURROUND SOUND SYSTEM WITH
DRIVER-SELECTABLE SURROUND (DSS) (for
versions/markets, where required) . . . . . . . . . . . 178
STEERING WHEEL AUDIO CONTROLS . . . . . . 179 Radio Operation . . . . . . . . . . . . . . . . . . . . . . 179
CD Player . . . . . . . . . . . . . . . . . . . . . . . . . . . 179
CD/DVD DISC MAINTENANCE . . . . . . . . . . . . . 179
RADIO OPERATION AND MOBILE PHONES . . . 180
CLIMATE CONTROLS . . . . . . . . . . . . . . . . . . . . 180 GENERAL OVERVIEW . . . . . . . . . . . . . . . . . 180
150
Page 174 of 316
CUSTOMER
PROGRAMMABLE
FEATURES — Uconnect
Touch™ SYSTEM 8.4
SETTINGS
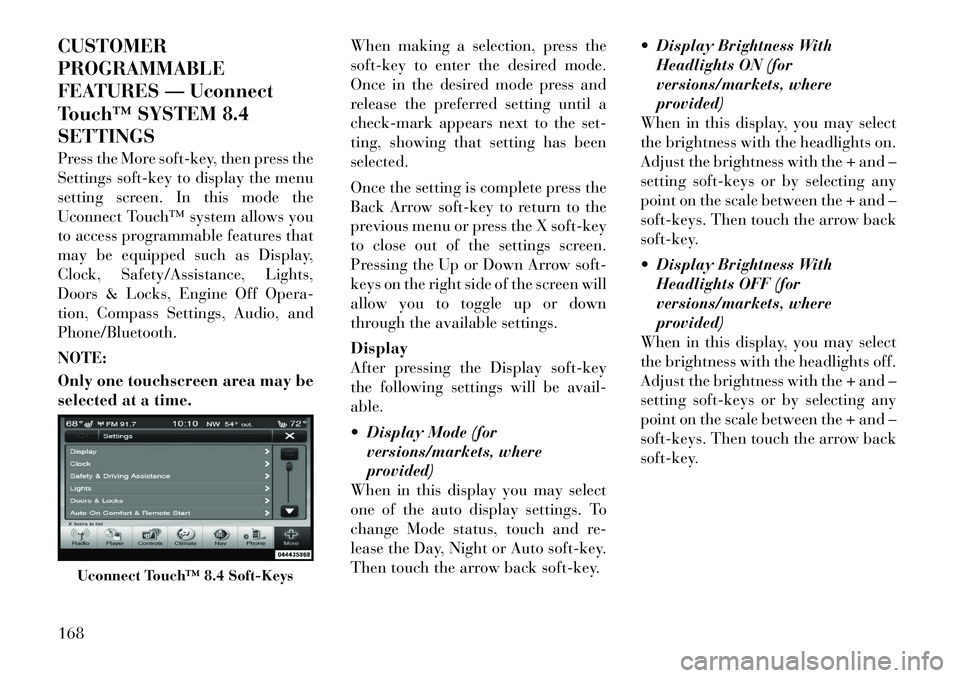
Press the More soft-key, then press the
Settings soft-key to display the menu
setting screen. In this mode the
Uconnect Touch™ system allows you
to access programmable features that
may be equipped such as Display,
Clock, Safety/Assistance, Lights,
Doors & Locks, Engine Off Opera-
tion, Compass Settings, Audio, and
Phone/Bluetooth.
NOTE:
Only one touchscreen area may be
selected at a time.When making a selection, press the
soft-key to enter the desired mode.
Once in the desired mode press and
release the preferred setting until a
check-mark appears next to the set-
ting, showing that setting has been
selected.
Once the setting is complete press the
Back Arrow soft-key to return to the
previous menu or press the X soft-key
to close out of the settings screen.
Pressing the Up or Down Arrow soft-
keys on the right side of the screen will
allow you to toggle up or down
through the available settings.
Display
After pressing the Display soft-key
the following settings will be avail-
able.
Display Mode (for
versions/markets, where
provided)
When in this display you may select
one of the auto display settings. To
change Mode status, touch and re-
lease the Day, Night or Auto soft-key.
Then touch the arrow back soft-key. Display Brightness With
Headlights ON (for
versions/markets, where
provided)
When in this display, you may select
the brightness with the headlights on.
Adjust the brightness with the + and –
setting soft-keys or by selecting any
point on the scale between the + and –
soft-keys. Then touch the arrow back
soft-key.
Display Brightness With Headlights OFF (for
versions/markets, where
provided)
When in this display, you may select
the brightness with the headlights off.
Adjust the brightness with the + and –
setting soft-keys or by selecting any
point on the scale between the + and –
soft-keys. Then touch the arrow back
soft-key.
Uconnect Touch™ 8.4 Soft-Keys
168
Page 183 of 316
Audio
After pressing the Audio soft-key the
following settings will be available.
Balance/Fade (forversions/markets, where
provided)
When in this display you may adjust
the Balance and Fade settings.
Equalizer (for versions/markets, where provided)
When in this display you may adjust
the Bass, Mid and Treble settings. Ad-
just the settings with the + and –
setting soft-keys or by selecting any
point on the scale between the + and –
soft-keys. Then touch the arrow back
soft-key.
NOTE:
Bass/Mid/Treble allow you to sim-
ply slide your finger up or down to
change the setting as well as touch
directly on the desired setting. Speed Adjusted Volume (for
versions/markets, where
provided)
This feature increases or decreases
volume relative to vehicle speed. To
change the Speed Adjusted Volume
touch the Off, 1, 2 or 3 soft-key. Then
touch the arrow back soft-key.
Music Info Cleanup (for versions/markets, where
provided)
This feature helps organize music files
for optimized music navigation. To
make your selection, touch the Music
Info Cleanup soft-key, select On or Off
followed by pressing the arrow back
soft-key.
Surround Sound (for versions/markets, where
provided)
This feature provides simulated sur-
round sound mode. To make your se-
lection, touch the Surround Sound soft-key, select On or Off followed by
pressing the arrow back soft-key.
Phone/Bluetooth
After pressing the Phone/Bluetooth
soft-key the following settings will be
available.
Paired Devices (for
versions/markets, where
provided)
This feature shows which phones are
paired to the Phone/Bluetooth sys-
tem. For further information, refer to
the Uconnect Touch™ Supplement.
SOUND SYSTEMS
Refer to your Sound Systems Booklet.
NAVIGATION SYSTEM
(for versions/markets,
where provided)
Refer to your Uconnect Touch™ User
Manual.
177