Page 144 of 393

465
Features of your vehicle
Headlamp escort (if equipped)
If you turn the ignition switch to the
ACC or OFF position with the head-
lights ON, the headlights remain on
for about 20 minutes. However, if the
driver’s door is opened and closed,
the headlights are turned off after 30
seconds.
The headlights can be turned off by
pressing the lock button on the trans-
mitter (or smart key) twice or turning
the light switch to the OFF or Auto
position. However, if you turn the light
switch to the Auto position when it is
dark outside, the headlights will not
be turned off immediately.
Battery saver function
The purpose of this feature is toprevent the battery from being dis-
charged. The system automatically
turns off the parking lights when
the driver removes the ignition key
and opens the driver-side door (in
that order).
With this feature, the parking lights will turn off automatically if the driv-
er parks on the side of the road at
night.
If necessary, to keep the lights on
when the ignition key is removed,
perform the following:
1) Open the driver-side door.
2) Turn the parking lights OFF and ON again using the light switch
on the steering column.
Daytime running light
Daytime Running Lights (DRL) can
make it easier for others to see the
front of your vehicle during the day.
DRL can be helpful in many different
driving conditions, and it is especial-
ly helpful after dawn and before sun-
set.
The DRL system turns OFF when:
1. The headlight are ON.
2. The parking brake is applied.
3. Engine stops.
4. The turn signal light is ON.
LIGHTING
Page 151 of 393

Features of your vehicle
72
4
Do not use the interior lights for
extended periods when the engine is
not running.
It may cause battery discharge.
Map lamp
Push the lens (1) to turn the map
lamp on or off. This light produces a
spot beam for convenient use as a
map lamp at night or as a personal
lamp for the driver and the front pas-
senger.
(2) DOOR
The light will turn on as below if the
button is pressed.
The light will turn off if the button is
pressed again. The light comes on
when any door (or tailgate) is opened
regardless of the ignition switch posi-
tion. When doors are unlocked by the
transmitter or the key is removed
from the ignition switch, the light
comes on for approximately 30 sec-
onds as long as any door is not
opened. The light goes out gradually
after approximately 30 seconds if the
door is closed.
However, if the ignition switch is ON
or all doors are locked, the light will
turn off immediately. If a door is
opened with the ignition switch in the
ACC or LOCK position, the light
stays on for about 20 minutes.
However, if a door is opened with the
ignition switch in the ON position, the
light stays on continuously.
INTERIOR LIGHT
OAM042052
■Type A
WARNING - Interior light
Do not use the interior lights
when driving in the dark. The
glare from the interior lights
may obstruct your view and
cause an accident.
Page 152 of 393

473
Features of your vehicle
Room lamp
The light will turn on and off accord-
ing to the switch position.
(1) OFF
The light stays off at all times.
(2) DOOR
The light comes on when any door
(or tailgate) is opened regardless of
the ignition switch position. When
doors are unlocked by the transmitter
or the key is removed from the igni-
tion switch, the light comes on for
approximately 30 seconds as long as
any door is not opened. The light
goes out gradually after approxi-
mately 30 seconds if the door is
closed.
However, if the ignition switch is ON
or all doors are locked, the light will
turn off immediately. If a door is
opened with the ignition switch in the
ACC or LOCK position, the light
stays on for about 20 minutes.
However, if a door is opened with the
ignition switch in the ON position, the
light stays on continuously.
(3) ON
The light stays on at all times.
Do not leave the lamp switches on
for an extended period of time when
the vehicle is not running.
Luggage room lamp
The luggage room lamp comes on
when the tailgate is opened.
The lamp comes on as long as the
tailgate is open. To prevent unneces-
sary charging system drain, close
the tailgate securely after using the
luggage room.
OAM049053
■Type B
OAM042348N
Page 161 of 393

Features of your vehicle
82
4
System operation
Ventilation
1. Set the mode to the position.
2. Set the air intake control to the
outside (fresh) air position.
3. Set the temperature control to the desired position.
4. Set the fan speed control to the desired speed.
Heating
1. Set the mode to the position.
2. Set the air intake control to theoutside (fresh) air position.
3. Set the temperature control to the desired position.
4. Set the fan speed control to the desired speed.
5. If dehumidified heating is desired, turn the air conditioning system (if
equipped) on.
If the windshield fogs up, set the mode to the
orposition. Operation Tips
To keep dust or unpleasant fumes
from entering the vehicle through
the ventilation system, temporarily
set the air intake control to the
recirculated air position. Be sure to
return the control to the fresh air
position when the irritation has
passed to keep fresh air in the
vehicle. This will help keep the driv-
er alert and comfortable.
Air for the heating/cooling system is drawn in through the grilles just
ahead of the windshield. Care
should be taken that these are not
blocked by leaves, snow, ice or
other obstructions.
To prevent interior fog on the wind- shield, set the air intake control to
the fresh air position and fan speed
to the desired position, turn on the
air conditioning system, and adjust
the temperature control to desired
temperature.
Air conditioning (if equipped)
All Kia Air Conditioning Systems are
filled with environmentally friendly
R-134a refrigerant which does not
damage the ozone layer.
1. Start the engine. Press the air con- ditioning button.
2. Set the mode to the position.
3. Set the air intake control to the outside air or recirculated air posi-
tion.
4. Adjust the fan speed control and temperature control to maintain
maximum comfort.
When maximum cooling is desired, set the temperature control to the
extreme left position, set the mode
control to the MAX A/C position,
then set the fan speed control to
the highest speed.
Page 188 of 393
4109
Features of your vehicle
If you install an aftermarket HID
head lamps, your vehicle’s audio and
electronic devices may malfunction.
Antenna (if equipped)
Your vehicle uses a roof antenna to
receive AM or/and FM broadcast sig-
nals.
This antenna is removable. To
remove the roof antenna, turn it
counterclockwise. To install the roof
antenna, turn it clockwise. When reinstalling your roof anten-
na, it is important that it is fully
tightened and adjusted to the
upright position to ensure proper
reception. But it could be removed
when parking the vehicle or when
loading cargo on the roof rack.
When cargo is loaded on the roof rack, do not place the cargo near
the antenna pole to ensure proper
reception.
OHM048154N
AUDIO SYSTEM
CAUTION - Antenna
Before entering a place with alow height clearance or a carwash, remove the antenna byrotating it counterclockwise. Ifnot, the antenna may be dam-aged.
Page 193 of 393

Features of your vehicle
114
4
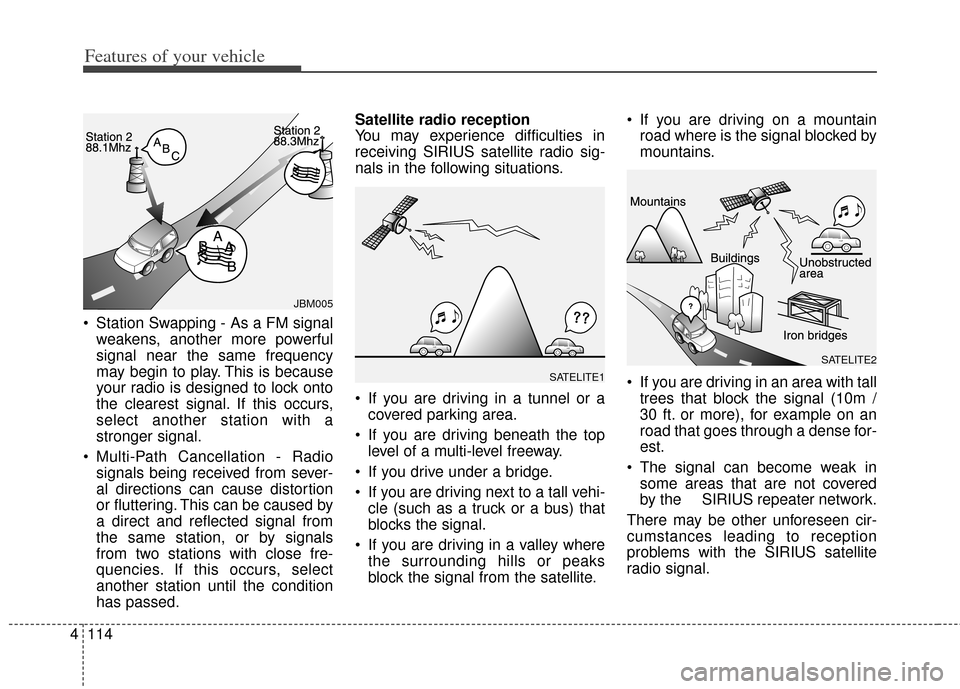
Station Swapping - As a FM signal
weakens, another more powerful
signal near the same frequency
may begin to play. This is because
your radio is designed to lock onto
the clearest signal. If this occurs,
select another station with a
stronger signal.
Multi-Path Cancellation - Radio signals being received from sever-
al directions can cause distortion
or fluttering. This can be caused by
a direct and reflected signal from
the same station, or by signals
from two stations with close fre-
quencies. If this occurs, select
another station until the condition
has passed. Satellite radio reception
You may experience difficulties in
receiving SIRIUS satellite radio sig-
nals in the following situations.
If you are driving in a tunnel or a
covered parking area.
If you are driving beneath the top level of a multi-level freeway.
If you drive under a bridge.
If you are driving next to a tall vehi- cle (such as a truck or a bus) that
blocks the signal.
If you are driving in a valley where the surrounding hills or peaks
block the signal from the satellite. If you are driving on a mountain
road where is the signal blocked by
mountains.
If you are driving in an area with tall trees that block the signal (10m /
30 ft. or more), for example on an
road that goes through a dense for-
est.
The signal can become weak in some areas that are not covered
by the SIRIUS repeater network.
There may be other unforeseen cir-
cumstances leading to reception
problems with the SIRIUS satellite
radio signal.
SATELITE2
SATELITE1
JBM005
Page 196 of 393

4117
Features of your vehicle
Using RADIO, SETUP, VOLUME
and AUDIO CONTROL
1. Button
The FM/AM button toggles between
FM and AM. Listed below are the
paths as the system switches from
FM to AM and back to FM.
FM/AM : FM1
➟FM2➟AM➟FM1...
Button
Turns to FM mode and toggles
FM1and FM2 when the button is
pressed each time.
Button
Pressing the button selects
the AM band. AM Mode is displayed
on the LCD.
2. Button & Knob
Turns the audio system on/offwhen the ignition switch is on ACC
or ON.
If the knob is turned clockwise/counterclockwise, the
volume will increase /decrease.
3. Button
When the is pressed, it will automatically tune to the next
lower station.
When the is pressed, it will automatically tune to the next
higher station.
4. Button
When the button is pressed, itautomatically scans the radio sta-
tions upwards.
The SCAN feature steps through each station, starting from the ini-
tial station, for 5 seconds.
Press the button again to stop the scan feature and to listen
to the currently selected channel.
5. Button
When the button is pressed, stops
sound and “Audio Mute” is displayed
on LCD.
MUTE
SCAN
SCAN
SEEK
SEEK
SEEK
VOLPOWER
AM
AM
FM
FM/AM
Page 198 of 393
4119
Features of your vehicle
Select default display of MP3 play
information. “Folder/File” or
“Artist/Title” can be selected.
Select default display of SIRIUS
mode. “Cat./Ch.” or “Artist/Title” can
be selected.
Select this item to enter Clock setup
mode. Adjust the hour and press thebutton to set. Adjust the
minute and press the button
to complete and exit from clock
adjustment mode.
Pressing the button while in
power off, screen will allow the user
to make immediately adjustments to
the clock.
Select this item to enter Bluetooth®
wireless technology setup mode.
Refer to “BLUETOOTH PHONE
OPERATION” section for detailed
information.
(PowerBass)
This function creates virtual sound
effects and allows adjustments to the
Bass level.
Off ➟Low ➟Mid ➟High ➟ Off...
❈ AM Mode is not supported.
SETUP
ENTER
ENTER